


库函数
make
经典的Hello World

"hello.c" 6L, 63C 已写入     hello.c就不写了,很简单的
[root@localhost ~]# gcc hello.c
[root@localhost ~]# ll hello.c a.out
-rwxr-xr-x. 1 root root 8440 9月   2 16:51 a.out
-rw-r--r--. 1 root root   63 9月   2 16:51 hello.c
[root@localhost ~]# ./a.out
Hello world[root@localhost ~]# gcc -c hello.c
[root@localhost ~]# ll hello*
-rw-r--r--. 1 root root   63 9月   2 16:51 hello.c
-rw-r--r--. 1 root root 1496 9月   2 16:52 hello.o
[root@localhost ~]# gcc -o hello hello.o
[root@localhost ~]# ll hello*
-rwxr-xr-x. 1 root root 8440 9月   2 16:53 hello
-rw-r--r--. 1 root root   63 9月   2 16:51 hello.c
-rw-r--r--. 1 root root 1496 9月   2 16:52 hello.o
[root@localhost ~]# ./hello
Hello world[root@localhost ~]#
c语言的程序完成了。我们继续我们的Linux学习,学习总是枯燥的不是么?
gcc是编译单个c程序,如果要将c的程序编译成一个可执行文件,该如何操作呢?
make诞生了。看书中的例子
gcc -c会首先将c文件预编译位.o文件,然后用gcc -o进行链接,形成执行档
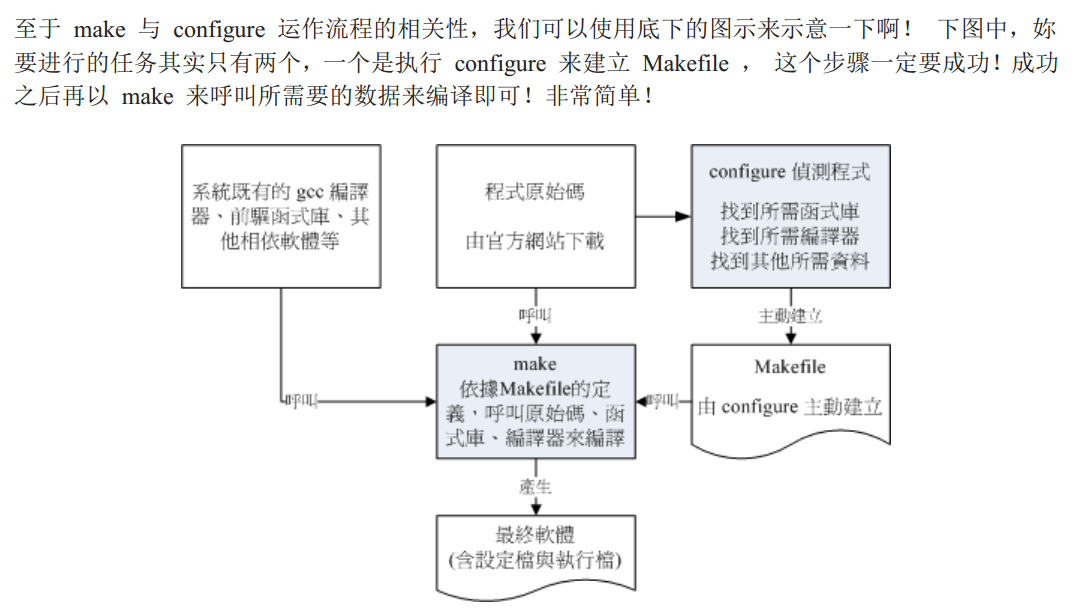
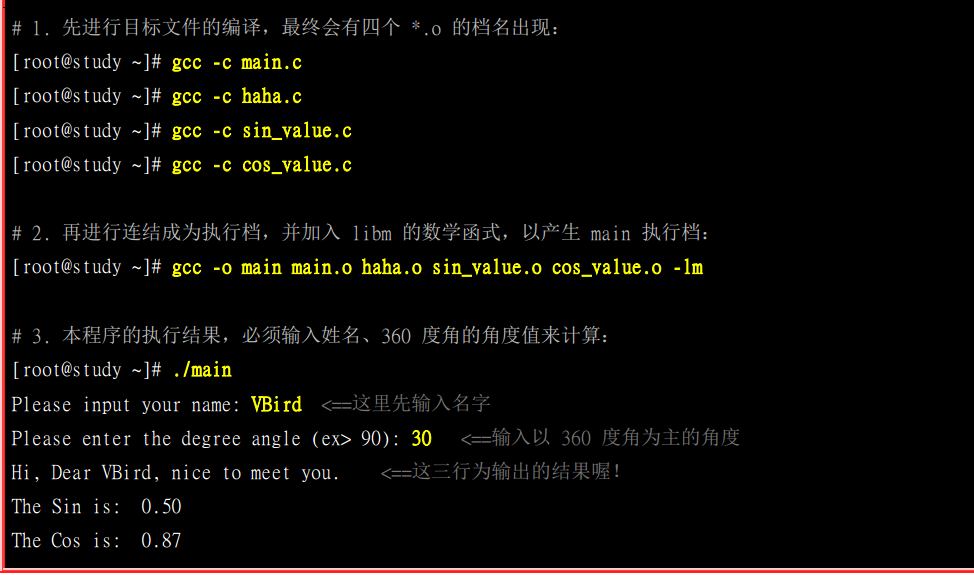
make的使用

~
[root@localhost ~]# vim cos_value.c
#include <stdio.h>
#include <math.h>
#define pi 3.14159
float angle;

void cos_value(void)
{
        float value;
        value = cos ( angle / 180. * pi );
        printf ("The Cos is: %5.2f\n",value);
}

~

-- 插入 --                                                                                                                                                                                                                1,2          全部
#include <stdio.h>
#include <math.h>
#define pi 3.14159
float angle;

void cos_value(void)
{
        float value;
        value = cos ( angle / 180. * pi );
        printf ("The Cos is: %5.2f\n",value);
}
~
~
~
-- 插入 --                                                    1,2          全部
#include <stdio.h>
#include <math.h>
#define pi 3.14159
float angle;

void cos_value(void)
{
        float value;
        value = cos ( angle / 180. * pi );
        printf ("The Cos is: %5.2f\n",value);
}
~
~
~
~
~
-- 插入 --                                                                                                                                                                                                                1,2          全部
#include <stdio.h>
#include <math.h>
  efine pi 3.14159
▽loat angle;

void cos_value(void)
{
        float value;
        value = cos ( angle / 180. * pi );
        printf ("The Cos is: %5.2f\n",value);
}

~
"cos_value.c" [新] 12L, 185C 已写入
[root@localhost ~]# vim haha.c
#include <stdio.h>
int haha(char name[15])

▽       printf ("\n\nHi, Dear %s, nice to meet you.", name);
}

~
~
~

"haha.c" [新] 6L, 102C 已写入
[root@localhost ~]# vim main.c
#include <stdio.h>
#define pi 3.14159
  ar name[15];
▽loat angle;

int main(void)
{
        printf ("\n\nPlease input your name: ");
        scanf  ("%s", &name );
        printf ("\nPlease enter the degree angle (ex> 90): " );
        scanf  ("%f", &angle );
        haha( name );
        sin_value( angle );
        cos_value( angle );
}

~
~
~
~
~
~
~
"main.c" [新] 16L, 292C 已写入
[root@localhost ~]# vim sin_value.c
#include <stdio.h>
#include <math.h>
  efine pi 3.14159
▽loat angle;

void sin_value(void)
{
        float value;
        value = sin ( angle / 180. * pi );
        printf ("\nThe Sin is: %5.2f\n",value);
}

~
~
~
~
~
~
~
~
~
~
~
"sin_value.c" [新] 12L, 187C 已写入
[root@localhost ~]# vim makefile
main:main.o haha.o sin_value.o cos_value.o
        gcc -o main main.o haha.o sin_value.o cos_value.o -lm
~
~

"makefile" [新] 2L, 98C 已写入
[root@localhost ~]# make
cc    -c -o main.o main.c
cc    -c -o haha.o haha.c
cc    -c -o sin_value.o sin_value.c
cc    -c -o cos_value.o cos_value.c
gcc -o main main.o haha.o sin_value.o cos_value.o -lm
[root@localhost ~]# make
make: “main”是最新的。
[root@localhost ~]# ./main


Please input your name: lsq

Please enter the degree angle (ex> 90): 12


Hi, Dear lsq, nice to meet you.
The Sin is:  0.21
The Cos is:  0.98
[root@localhost ~]#
使用make的好处在于,编译某一个程序的时候,你不需要在每次都敲打冗长的 gcc -c gcc -o等操作。只需要编辑一下makefile。然后调用make,就会自动将所有的c程序进行编译。而且你如果更改里边的内容的话,你也不需要再已更改就gcc,只需要调用make他就会自动的编译,方便了很多,尤其是如果你的工程文件很庞大的话。
而且最主要的是,make会自动的去识别你更新过哪个c源码,然后编译时只编译更新过的源码,很人性
总结

makefile 的基本语法与变量

给你我们前面的代码对照一下
编译的目标  .o都是目标文件
main:main.o haha.o sin_value.o cos_value.o
        gcc -o main main.o haha.o sin_value.o cos_value.o -lm    记得tab键。这个是个注意点
makefile规则:

同样,makefile中,可以运行多指令。方式也跟前面的main一样。如下
[root@localhost ~]# vim makefile
main:main.o haha.o sin_value.o cos_value.o
        gcc -o main main.o haha.o sin_value.o cos_value.o -lm
clean:
        rm -f main main.o haha.o sin_value.o cos_value.o   第二条指令
~
~
"makefile" 4L, 156C 已写入
[root@localhost ~]# make  clean   调用第二条指令
rm -f main main.o haha.o sin_value.o cos_value.o
他还支持多命令运行
[root@localhost ~]# make clean main
先清楚编译文件,再进行编译。。。。爽歪歪不是么
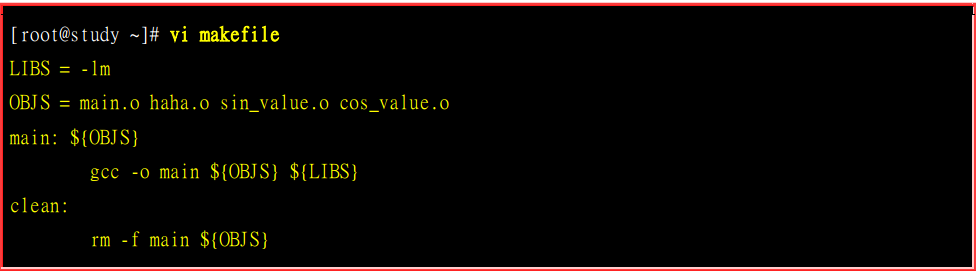
我们还可以运用以前学过的shell的编程,用变量去取代所有重复的内容
如下图
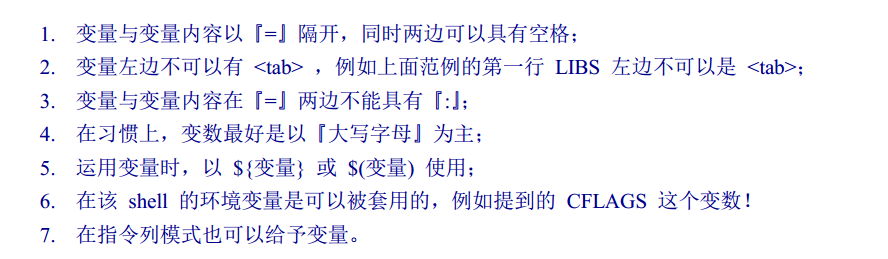
变量的语法要求
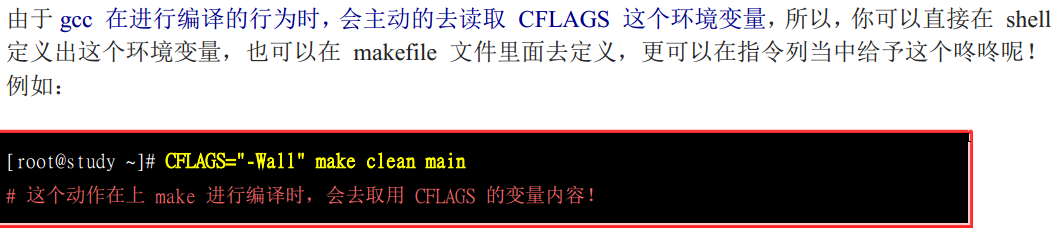
注意第7条,在指令列也可以给予变量。这样就可以设定变量的内容了,不是么,是不是很cool,如下图
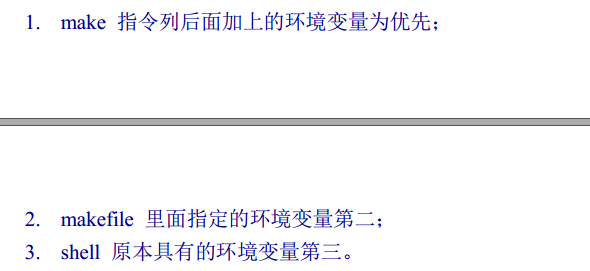
当然,你也可以将该变量放到makefile中,这样就存在一个问题,如果指令列和makefile中的变量都进行了指定,那指令会使用哪个呢?我觉得是使用指令列变量,看看书,答案跟我预想的一样
特殊变量

所以上面的makefile也可以这样写

Tarball 管理
Tarball建立软件
使用源代码管理软件所需要的基础软件
一 编译软件 gcc /cc等
二 打包编译软件 make等
三 相关包文件
基础软件包

即开发者模式中的软件包
命令安装软件包

tarball的安装步骤
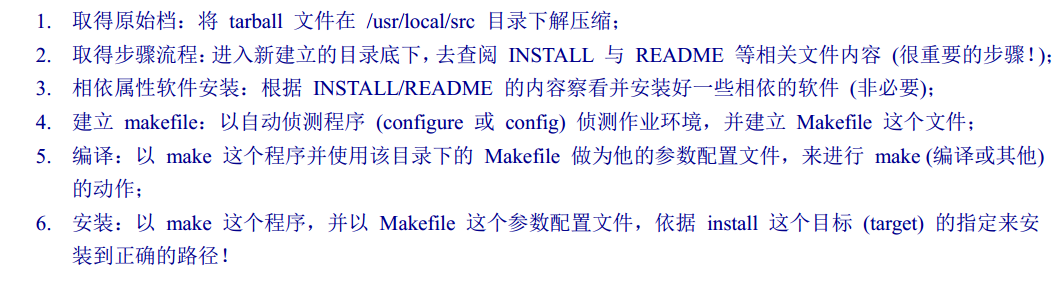
tarball指令的下达方式

以上步骤都是按步骤进行,一步失败,其他步骤都无法成功,这点一定要注意一下

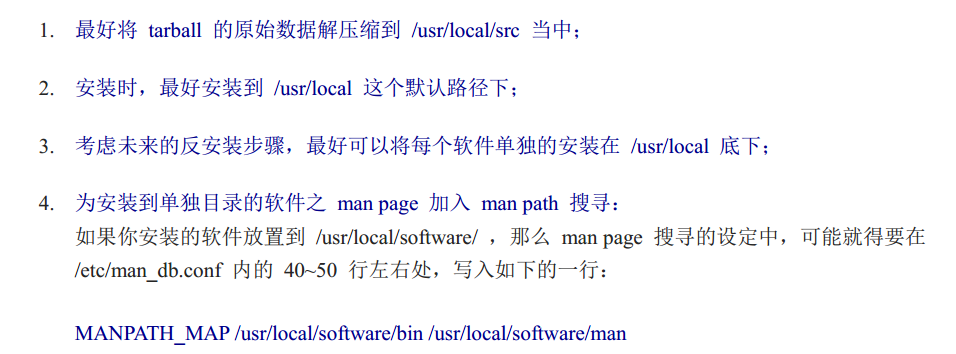
这一步没理解。。。(理解了,man_db.conf是方便man命令查询时使用)
tarball的安装步骤建议:
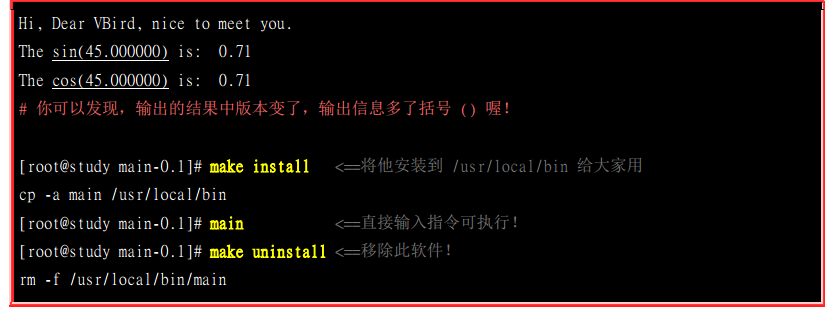
按照书中的例子安装完毕了。
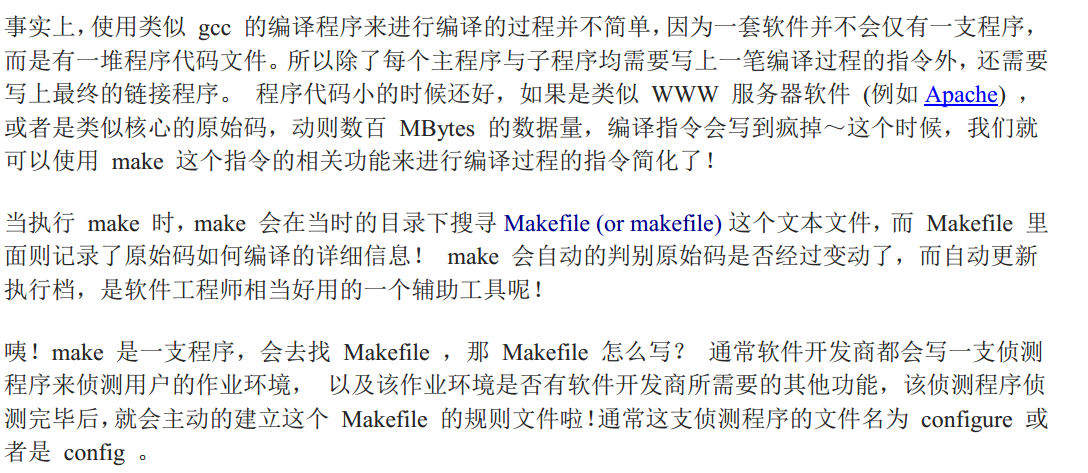
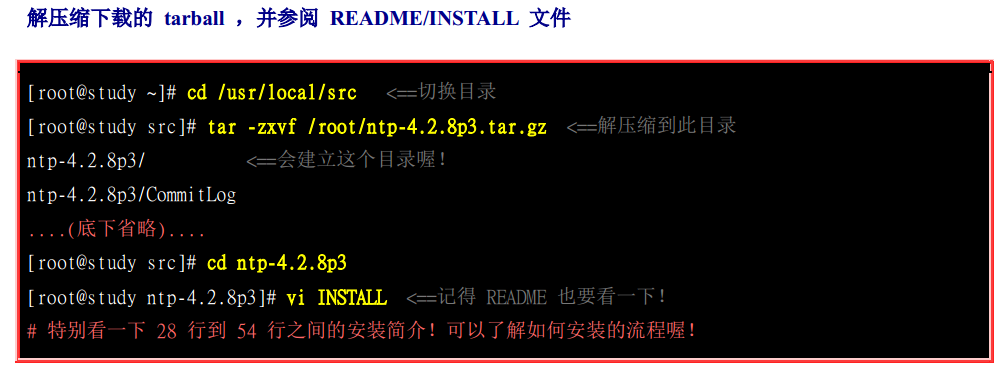
首先利用wget 通过网址将tar包下载下来
然后tar- zxvf解压缩
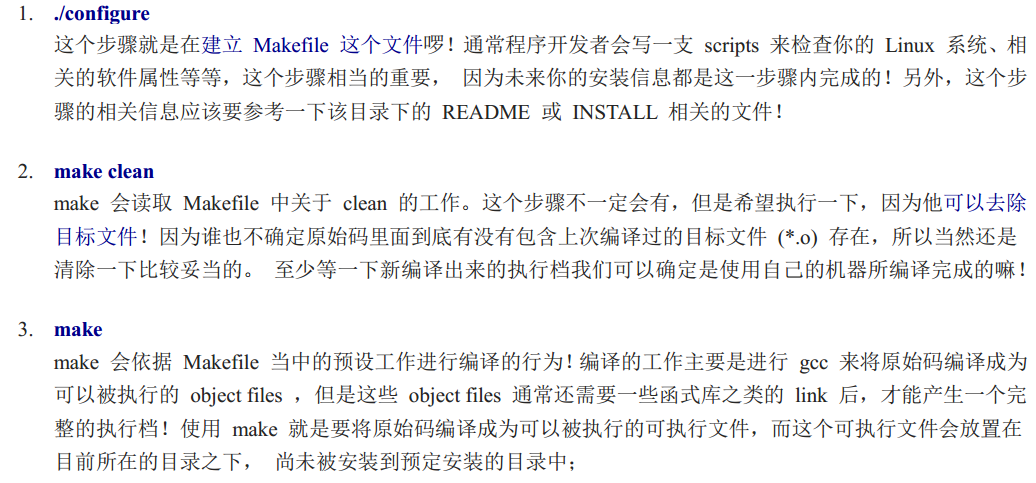
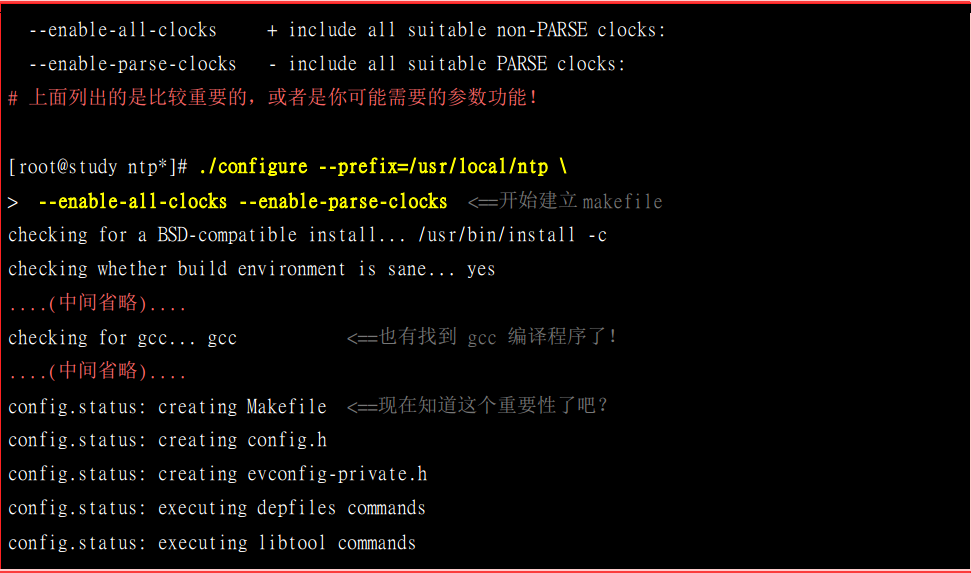
然后就是通过配置文件生成makefile,然后make进行安装。
这个通过configure命令就是配置生成makefile的命令
config.status: creating libevent.pc
config.status: creating libevent_openssl.pc
config.status: creating libevent_pthreads.pc
config.status: creating Makefile                    #这就是通过配置文件生成的makefile文件
config.status: creating config.h
config.status: config.h is unchanged
config.status: creating evconfig-private.h
config.status: evconfig-private.h is unchanged
config.status: executing depfiles commands
config.status: executing libtool commands
[root@localhost local]# cd ntp
[root@localhost ntp]# ls    #可以看到,安装完毕
bin  libexec  sbin  share
安全步骤会产生大量的说明文件,贴不了图,就贴一张书中的图吧


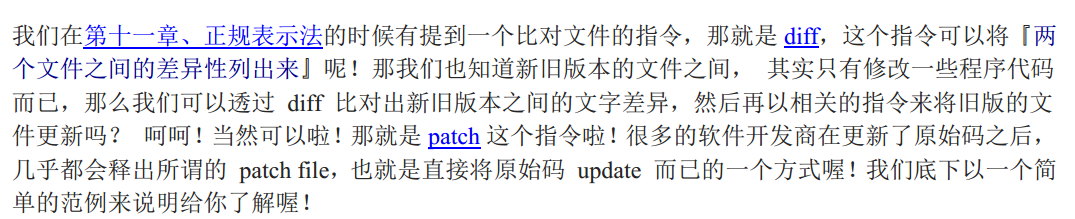
软件更新
patch命令
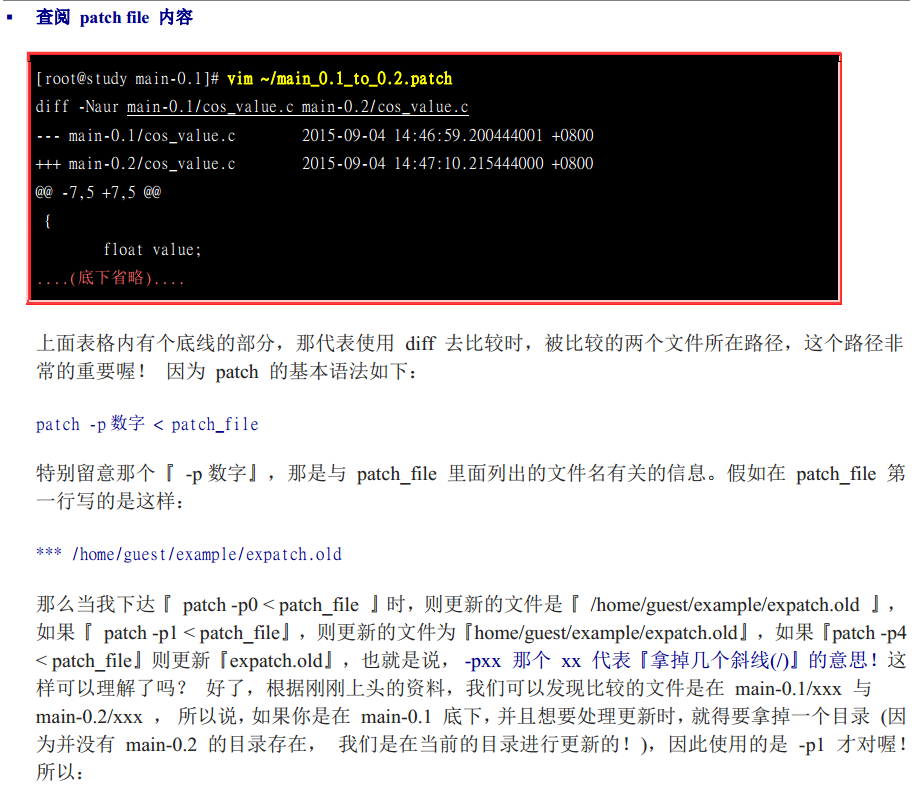

注意一下这个问题:
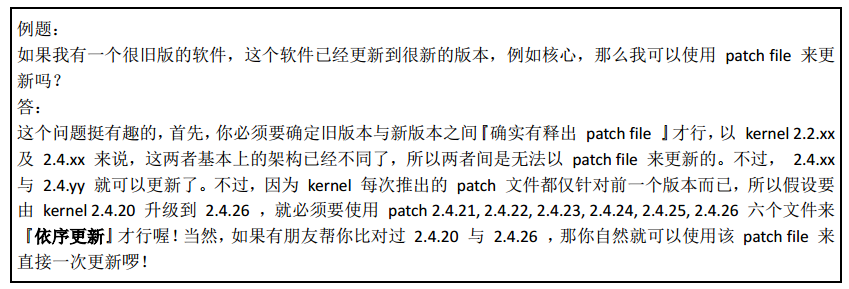
也就是说,如果版本跨度太大,那还不如卸载重新下载新版本安装了。。。对吧
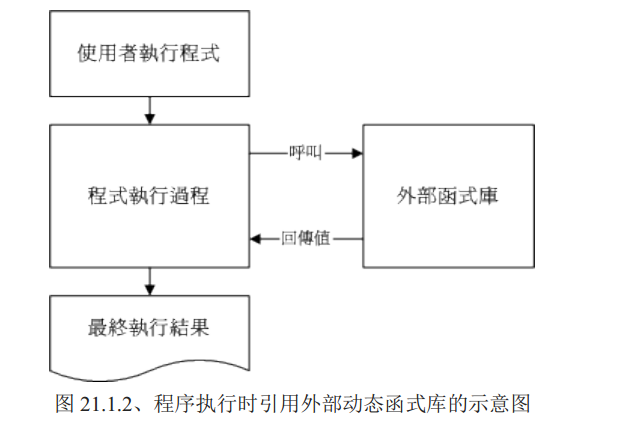
函数库 (库文件)
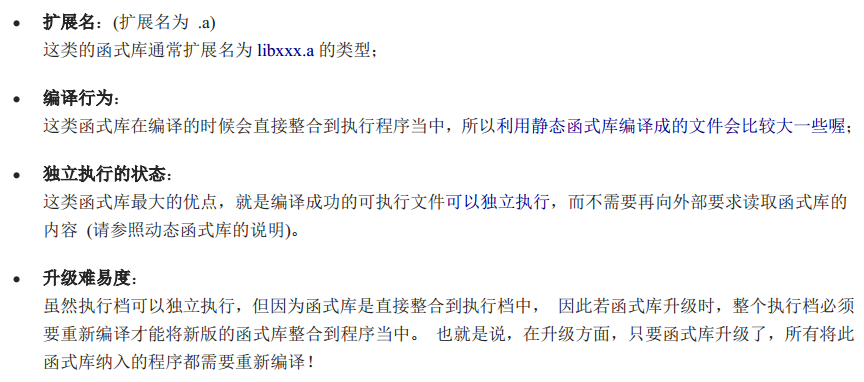
静态函数库
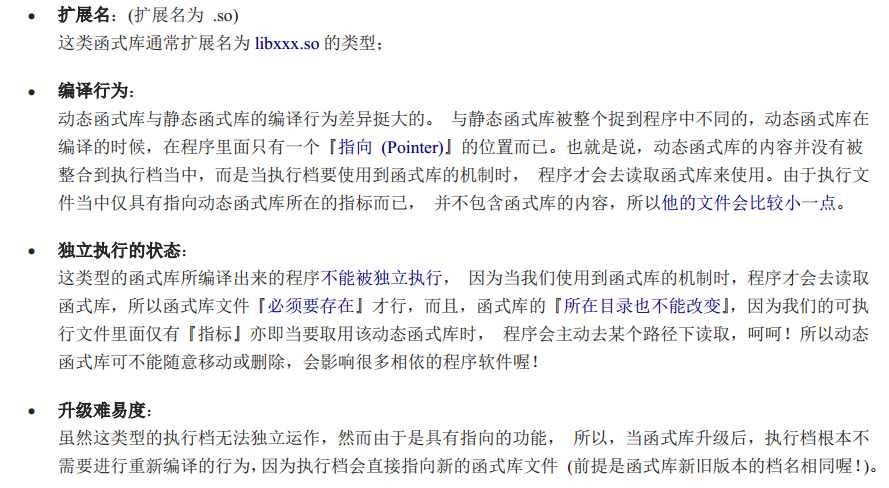
动态函数库
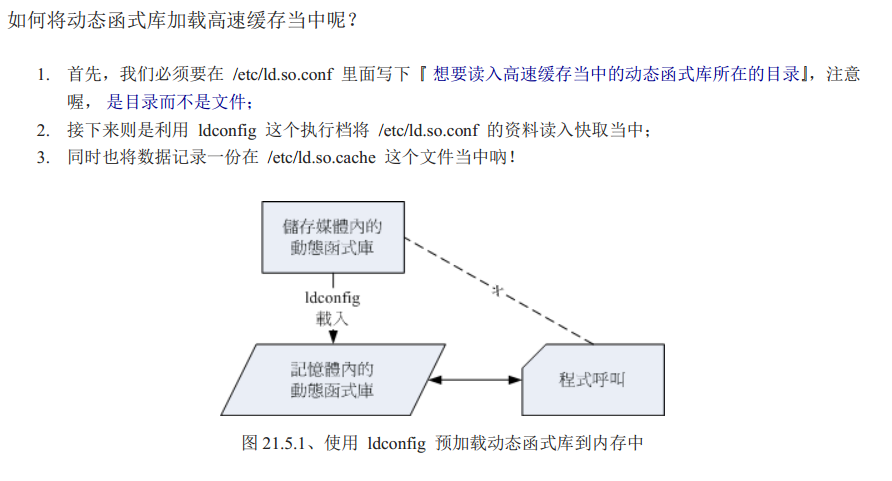
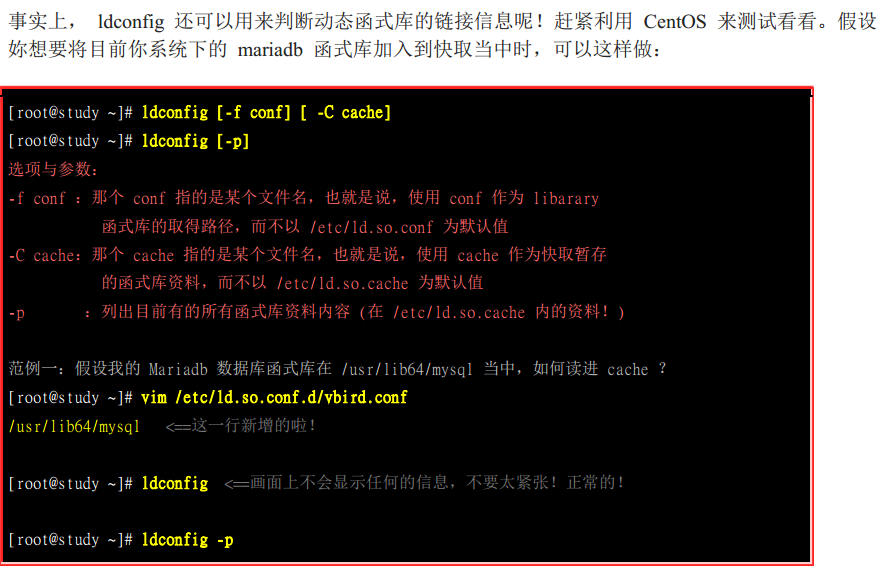
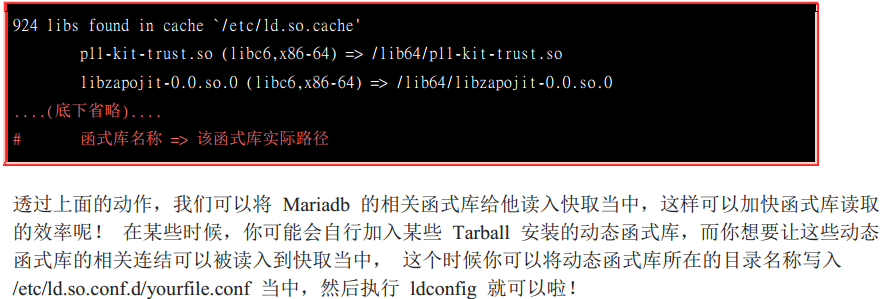
上面的操作时将动态函数库加载到内存当中,方便快速的读取与编译
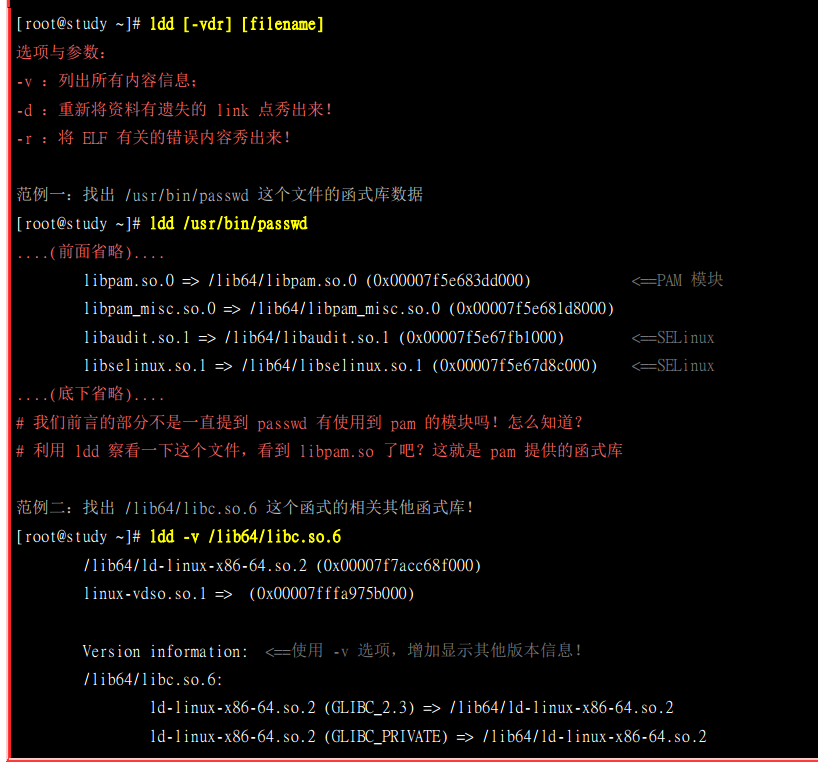
利用ldd来解析某个待编译程序包含哪些库文件
课后作业
[root@localhost etc]# ls /etc/{passwd,shadow,group > important.file
ls: 无法访问/etc/{passwd,shadow,group: 没有那个文件或目录
[root@localhost etc]# ls /etc/{passwd,shadow,group} > important.file
[root@localhost etc]# find /user/bin /usr/bin -perm /6000 >> important.file
find: ‘/user/bin’: 没有那个文件或目录
[root@localhost etc]# find /usr/sbin /usr/bin -perm /6000 >> important.file
[root@localhost etc]# vim md5.checkfile.sh
#!/bin/bash
for filename in ${cat important.file)
do

        md5sum $filename >> fingerl.file

done
"md5.checkfile.sh" [新] 7L, 97C 已写入
[root@localhost etc]# sh md5.checkfile.sh
md5.checkfile.sh:行2: 寻找匹配的 `}' 是遇到了未预期的文件结束符
md5.checkfile.sh:行8: 语法错误: 未预期的文件结尾
[root@localhost etc]# vim md5.checkfile.sh
#!/bin/bash
for filename in $(cat important.file)
do
md5sum $filename >> fingerl.file
done
[root@localhost etc]# sh md5.checkfile.sh
[root@localhost etc]# cat fingerl.file
[root@localhost etc]# chattr +i fingerl.file 设置权限,将原始档设置成无法修改的值,这样再以后的比对过程中,才能发现修改的位置哪里有不对,后面的对md5.checkfile.sh的修改就是利用了这个来做对比
[root@localhost etc]# cat fingerl.file
重写 md5.checkfile.sh
[root@localhost etc]# vim md5.checkfile.sh
[ -f finger.file ] && rm finger_new.file
#!/bin/bash
if [ "$1" == "new" ]; then
for filename in $(cat important.file)
do
md5sum $filename >> fingerl.file
done
echo "New file finger1.file is created"
exit 0
fi
if [ ! -f finger1.file ]; then
echo "file : finger1.file NOT exits."
exit 1
fi
[ -f finger_new.file ] && rm finger_new.file
for filename in $(cat important.file)
do
md5sum $filename >> finger_new.file
done
testing=$(diff finger1.file finger_new.file)
if [ $"testing" !="" ] then
diff finger1.file finger_new.file | mail -s 'finger trouble..' root
fi
~
~
然后设置每天执行该sh命令
[root@localhost etc]# vim crontab
SHELL=/bin/bash
PATH=/sbin:/bin:/usr/sbin:/usr/bin
MAILTO=root
# For details see man 4 crontabs
# Example of job definition:
# .---------------- minute (0 - 59)
# | .------------- hour (0 - 23)
# | | .---------- day of month (1 - 31)
# | | | .------- month (1 - 12) OR jan,feb,mar,apr ...
# | | | | .---- day of week (0 - 6) (Sunday=0 or 7) OR sun,mon,tue,wed,thu,fri,sat
# | | | | |
# * * * * * user-name command to be executed
30 2 * * * root cd /root; sh md5.checkfile.sh #添加这一行文字 。对照着上面的解释,就能明白这个玩意的意思
~
~
~


【推荐】国内首个AI IDE,深度理解中文开发场景,立即下载体验Trae
【推荐】编程新体验,更懂你的AI,立即体验豆包MarsCode编程助手
【推荐】抖音旗下AI助手豆包,你的智能百科全书,全免费不限次数
【推荐】轻量又高性能的 SSH 工具 IShell:AI 加持,快人一步
· 开发者必知的日志记录最佳实践
· SQL Server 2025 AI相关能力初探
· Linux系列:如何用 C#调用 C方法造成内存泄露
· AI与.NET技术实操系列(二):开始使用ML.NET
· 记一次.NET内存居高不下排查解决与启示
· Manus重磅发布:全球首款通用AI代理技术深度解析与实战指南
· 被坑几百块钱后,我竟然真的恢复了删除的微信聊天记录!
· 没有Manus邀请码?试试免邀请码的MGX或者开源的OpenManus吧
· 园子的第一款AI主题卫衣上架——"HELLO! HOW CAN I ASSIST YOU TODAY
· 【自荐】一款简洁、开源的在线白板工具 Drawnix