iOS 推送通知、Pushkit
推送注册
=======================================
https://www.jianshu.com/p/d8254c41de11
https://www.jianshu.com/p/a3be60e0bd61
https://www.jianshu.com/p/b63b8bfb8d83
https://developer.apple.com/documentation/usernotifications/setting_up_a_remote_notification_server?language=objc
https://blog.csdn.net/csdn100861/article/details/87937434
https://www.jianshu.com/p/b0fc35206630
http://events.jianshu.io/p/ced8c9c5fbdf
https://www.jianshu.com/p/b8d5f74fd7a1
https://www.jianshu.com/p/0f0dd782fdd5
本地通知
https://www.jianshu.com/p/6f7212fb8e18
通知扩展 UNNotificationContent和UNNotificationService
https://www.jianshu.com/p/45933f5450a4
https://www.jianshu.com/p/5c565eeca567
https://www.jianshu.com/p/d719d496ddeb
https://www.jianshu.com/p/cfacfb7ce0ea
如何创建推送证书 https://www.jianshu.com/p/f5765676f9f2
=======================================
摘自:https://www.jianshu.com/p/9d2f0d423504
iOS 8 以下推送注册
UIRemoteNotificationType types = (UIRemoteNotificationType) (UIRemoteNotificationTypeAlert |UIRemoteNotificationTypeSound | UIRemoteNotificationTypeBadge);
[[UIApplication sharedApplication] registerForRemoteNotificationTypes:types];
iOS 8 、9 推送注册
UIUserNotificationType types = (UIUserNotificationTypeAlert | UIUserNotificationTypeSound | UIUserNotificationTypeBadge);
UIUserNotificationSettings *settings = [UIUserNotificationSettings settingsForTypes:types categories:nil];
[[UIApplication sharedApplication] registerUserNotificationSettings:settings];
[[UIApplication sharedApplication] registerForRemoteNotifications];
iOS 10 以及以上推送注册
UNUserNotificationCenter *center = [UNUserNotificationCenter currentNotificationCenter];
center.delegate = self;
[center requestAuthorizationWithOptions:(UNAuthorizationOptionBadge | UNAuthorizationOptionSound | UNAuthorizationOptionAlert | UNAuthorizationOptionCarPlay) completionHandler:^(BOOL granted, NSError *_Nullable error) {
    if (!error)
    {
        NSLog(@"request authorization succeeded!");
    }
}];

[[UIApplication sharedApplication] registerForRemoteNotifications];
注意:需要导入 <UserNotifications/UserNotifications.h> 头文件,遵循 UNUserNotificationCenterDelegate 协议
Device Token 获取
// 远程通知注册成功
- (void)application:(UIApplication *)application didRegisterForRemoteNotificationsWithDeviceToken:(NSData *)deviceToken
{
    NSLog(@"%@", deviceToken);
}

// 远程通知注册失败
- (void)application:(UIApplication *)application didFailToRegisterForRemoteNotificationsWithError:(NSError *)error
{
    NSLog(@"did Fail To Register For Remote Notifications With Error: %@", error);
}
device token :
APNs uses device tokens to identify each unique app and device combination. It also uses them to authenticate the routing of remote notifications sent to a device.
device token 是 APNs 用于区分识别每个 iOS 设备和设备上不同 app 的一个标识符,还可以用于 APNs 通过它将推送消息路由到指定设备上。
大意就是:device token 是唯一的,我们可以通过 device token,推送到指定设备指定 App 上。
接收通知
iOS 7 之前台接收远程通知,后台点击通知
- (void)application:(UIApplication *)application didReceiveRemoteNotification:(NSDictionary *)userInfo
{

}
iOS 7,8,9 前台接收远程通知,后台点击通知。这个回调比上面的多了一个参数completionHandler,上面的回调也可以接收 iOS 7,8,9 的通知,但是当这两个回调一起写的时候,只执行下面这个。
- (void)application:(UIApplication *)application didReceiveRemoteNotification:(NSDictionary *)userInfo fetchCompletionHandler:(void (^)(UIBackgroundFetchResult result))completionHandler
{
    completionHandler(UIBackgroundFetchResultNewData);
}
iOS 10 推送回调
//  iOS 10: App在前台获取到通知
- (void)userNotificationCenter:(UNUserNotificationCenter *)center willPresentNotification:(UNNotification *)notification withCompletionHandler:(void (^)(UNNotificationPresentationOptions))completionHandler
{
    if([notification.request.trigger isKindOfClass:[UNPushNotificationTrigger class]])
    {
        NSLog(@"iOS10 前台收到远程通知:%@", notification.request.content.userInfo);
    }
    else
    {
        // 判断为本地通知
        NSLog(@"iOS10 前台收到本地通知:%@", notification.request.content.userInfo);
    }

    completionHandler(UNNotificationPresentationOptionBadge | UNNotificationPresentationOptionSound | UNNotificationPresentationOptionAlert);
}

//  iOS 10: 点击通知进入App时触发
- (void)userNotificationCenter:(UNUserNotificationCenter *)center didReceiveNotificationResponse:(UNNotificationResponse *)response withCompletionHandler:(nonnull void (^)(void))completionHandler
{
    if([response.notification.request.trigger isKindOfClass:[UNPushNotificationTrigger class]])
    {
        NSLog(@"iOS10 点击远程通知:%@", response.notification.request.content.userInfo);
    }
    else
    {
        // 判断为本地通知
        NSLog(@"iOS10 点击本地通知:%@", response.notification.request.content.userInfo);
    }

    completionHandler();
}
静默推送
Silent Notification
The aps dictionary can also contain the content-available property. The content-available property with a value of 1 lets the remote notification act as a silent notification. When a silent notification arrives, iOS wakes up your app in the background so that you can get new data from your server or do background information processing. Users aren’t told about the new or changed information that results from a silent notification, but they can find out about it the next time they open your app.
For a silent notification, take care to ensure there is no alert, sound, or badge payload in the aps dictionary. If you don’t follow this guidance, the incorrectly-configured notification might be throttled and not delivered to the app in the background, and instead of being silent is displayed to the user.
静默推送:顾名思义,就是安静的推送,用户安全感知不到。
{
    "aps": {
        "content-available": 1
        }
}
静默推送的 content-available 一定要为 1,不然苹果感知不到这是一条静默的推送,苹果的建议是take care to ensure there is no alert, sound, or badge payload in the aps dictionary.,不要将 alert 、sound、badge 放在 payload 中。
举个例子:
{
    "aps": {
        "content-available": 1,
        "alert": "推送",
        "badge": 1,
        "sound": "default",
    }
}
如果你这样设置静默推送的 payload,也没有错,但是这个就跟普通的通知没有区别了,还是会打扰到用户,就违背了苹果设计静默推送的的初衷。
静默推送可以唤醒应用在后台被系统杀死的情况,但是不能唤醒用户手动杀死的情况。
静默推送是在 iOS 7 之后推出的一种推送方式。它与其他推送的区别在于允许应用收到通知后在后台(background)状态下运行一段代码,可用于从服务器获取内容更新。功能使用场景:(多媒体)聊天,Email更新,基于通知的订阅内容同步等功能,提升了终端用户的体验。
静默通知在前台和后台都是调用 application: didReceiveRemoteNotification: fetchCompletionHandler 回调。
Voip 推送
Voip推送要有对应的使用场景才能使用,不然会有被拒风险,一般有RTC应用场景都没有问题,审核时需要提示对应场景使用的操作视频
https://www.jianshu.com/p/2eb0d2fbf26b
https://www.cnblogs.com/windsSunShine/p/9399515.html
https://www.jianshu.com/p/f692f16eff28?tdsourcetag=s_pctim_aiomsg
https://www.jianshu.com/p/7214092e2d24
其他参考: https://blog.csdn.net/weixin_34209851/article/details/91467374
一年一度的iOS大版本更新又开始了,对于不明真相吃瓜群众来说真是太好啦!对于我们程序员却意味着disaster...这次的推送架构完全推翻以往,所以得从新适配,话不多说,开始吧。 1.在targets的Capabiliies内Push Notifications选项开关打开

然后Background Modes打开如下几个选项

友情提示上图几个选项,如果你应用内没有需要在后台音频播放或者位置更新,第一和第二项还是别勾上了,免得被App Store审核bb...我的刚提交两天就给我干下来返工了,555
General内导入UserNotifications.framework

2.进入Appdelegate.m文件
2.1) #import <UserNotifications/UserNotifications.h>
遵循UNUserNotificationCenterDelegate协议
@interface AppDelegate()<UNUserNotificationCenterDelegate>
2.2)
在- (BOOL)application:(UIApplication *)application didFinishLaunchingWithOptions:(NSDictionary *)launchOptions
方法内调用registRemoteNotifications方法
//20160930 注册通知APNS
[self registRemoteNotifications];
该方法具体如下
1.- (void)registRemoteNotifications {

    if ([[[UIDevice currentDevice] systemVersion]floatValue]>=10.0) {
        //申请用户同意
        UNUserNotificationCenter *center = [UNUserNotificationCenter currentNotificationCenter];
        center.delegate = self;
        [center requestAuthorizationWithOptions:(UNAuthorizationOptionBadge | UNAuthorizationOptionSound | UNAuthorizationOptionAlert) completionHandler:^(BOOL granted, NSError * _Nullable error) {
            if (!error) {
                NSLog(@"succeeded!");
            }
            if (granted) {

                [center getNotificationSettingsWithCompletionHandler:^(UNNotificationSettings * _Nonnull settings) {

                    NSLog(@"remoteNotificationSetting: %@", settings);

                }];
            }
        }];

    }
    float ios_version = [[[UIDevice currentDevice] systemVersion] floatValue];

    if (ios_version >= 8.0){//iOS8-iOS10
        [[UIApplication sharedApplication] registerUserNotificationSettings:[UIUserNotificationSettings settingsForTypes:(UIUserNotificationTypeSound | UIUserNotificationTypeAlert | UIUserNotificationTypeBadge) categories:nil]];
        [[UIApplication sharedApplication] registerForRemoteNotifications];
    }
    else {
        [[UIApplication sharedApplication] registerForRemoteNotificationTypes:UIRemoteNotificationTypeBadge|UIRemoteNotificationTypeSound|UIRemoteNotificationTypeAlert];
    }

}
2.3) 再实现如下两个代理方法 #pragma mark --ios10推送回调 //前台回调
1)- (void)userNotificationCenter:(UNUserNotificationCenter*)center willPresentNotification:(UNNotification
*)notification withCompletionHandler:(void(^)(UNNotificationPresentationOptions))completionHandler

{

    [self application:[UIApplication sharedApplication] didReceiveRemoteNotification:notification.request.content.userInfo];

}

//后台回调

2)   - (void)userNotificationCenter:(UNUserNotificationCenter*)center didReceiveNotificationResponse:(UNNotificationResponse
*)response withCompletionHandler:(void(^)())completionHandler

{

    [self application:[UIApplication sharedApplication] didReceiveRemoteNotification:response.notification.request.content.userInfo];

}
================= =================
https://www.jianshu.com/p/61dd9dd431a9
判断用户是否打开了推送开关 UNNotificationSettings
iOS10及以上:
用户是否打开推送开关的判断很简单,就是UNNotificationSettings的authorizationStatus,notDetermined就是用户还没有点,denied就是用户点了不同意,authorized就是用户点了同意。
注意,如果是notDetermined,那设置里面都不会有通知设置这个选项
iOS8及iOS9:
就是UIApplication.shared.isRegisteredForRemoteNotifications,true就是同意,false就是没同意或者未确定;
所以统一的判断方法如下:
func isNotificationEnabled(handle: @escaping (Bool) -> Void) {
        if #available(iOS 10.0, *) {
            UNUserNotificationCenter.current().getNotificationSettings(completionHandler: { (setting) in
                //如果授权状态是notDetermined,那其他所有的setting都是0(notSupported)
                //如果授权状态是deny,那所有其他的setting都是1(disabled)
                //如果授权状态是authorized,其他设置的值才有意义
                DispatchQueue.main.async(execute: {
                    if setting.authorizationStatus == .authorized {
                        handle(true)
                    } else {
                        handle(false)
                    }
                })
            })
        } else {
            //YES if the app is registered for remote notifications and received its device token or NO if registration has not occurred, has failed, or has been denied by the user.
            let result = UIApplication.shared.isRegisteredForRemoteNotifications
            handle(result)
        }
    }
都是认为用户明确点了同意返回true,其他情况返回false
iOS7及之前:
貌似只能用[[UIApplication sharedApplication] enabledRemoteNotificationTypes] == UIUserNotificationTypeNone来判断,但我已经没有iOS7的设备或模拟器测试了,所以这个不确定。。。
详细解释:
iOS10苹果重构了整个通知框架,推出了UserNotifications这个框架,详见喵神博客(https://onevcat.com/2016/08/notification/)
开发者可以拿到更详细的app通知设置,即UNNotificationSettings,其属性与设置里的对应关系如图
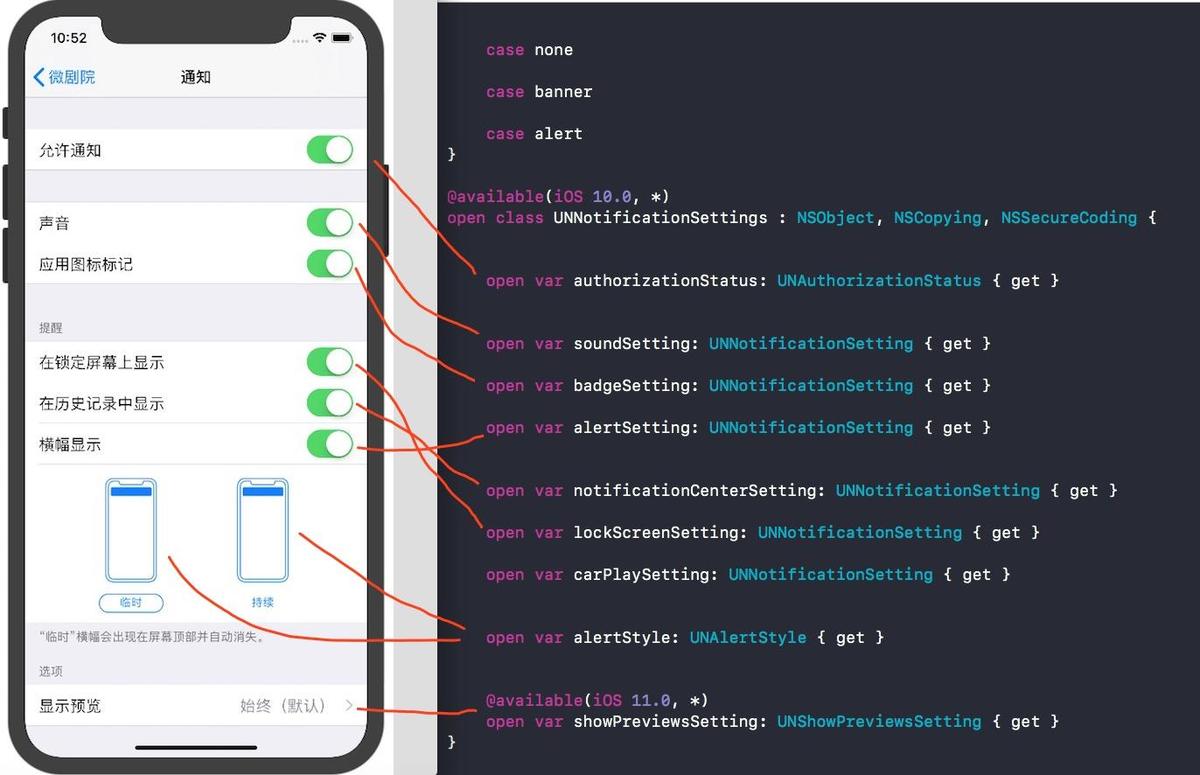

明确的一一对应:authorizationStatus是总开关,
当authorizationStatus是0(notDetermined)时,其他的setting都是0(none或者notSupported)
当authorizationStatus是1(denied)时,其他的setting都是1(disabled)
当authorizationStatus是2(authorized)时,其他的setting的值就是UI上开关设置的值
就这么简单!
(天真的我原来居然想当然的以为notificationCenterSetting才是开关是否打开的属性,authorizationStatus只是是否授权的状态。。。真是很傻很天真)
iOS8和iOS9更简单,就是UIApplication.shared.isRegisteredForRemoteNotifications,苹果官方文档上写了:
YES if the app is registered for remote notifications and received its device token or NO if registration has not occurred, has failed, or has been denied by the user.
之前用UIApplication.shared.currentUserNotificationSettings == []来判断是否开了通知是不准确的,因为用户其实是可以打开推送开关,然后把所有的设置类型都设置为关。。。当然你说这种跟关了总开关一样,这就看怎么定义了,用户已经聪明到通过这种方式来避免被推送提醒烦了(会这么做的应该也是程序猿吧?),app还提示没打开推送,那就只能卸载才能不被烦了吧!
================= =================
https://blog.csdn.net/weixin_34209851/article/details/91467374
https://www.jianshu.com/p/5c565eeca567
https://ios.zhizuobiao.com/ios-18112100308/
https://www.jianshu.com/p/1d37efd7d65c
NSFoundationVersionNumber_iOS_9_x_Max 表示什么
推送设置从ios6到ios15的变化
static void extracted()
https://developer.apple.com/documentation/usernotifications/setting_up_a_remote_notification_server/handling_notification_responses_from_apns
======== 延伸 ========
https://blog.51cto.com/u_8392210/3735519
p12证书导出, http://blog.itpub.net/31483669/viewspace-2690116/
.cer是苹果的默认证书,在xcode开发打包可以使用,如果在lbuilder、phonegap、HBuilder、AppCan、APICloud这些跨平台开发工具打包,就需要用到p12文件。
.cer证书仅包含公钥,.p12证书可能既包含公钥也包含私钥,这就是他们的区别,除开xcode开发工具,其他都需要用p12才能打包。
关于IOS制作p12证书的方法
p12是 的格式之一,下面为大家介绍IOS push对应的p12证书制作方法
1.用钥匙串生成一个CertificateSigningRequest.certSigningRequest文件
2.新建appid 然后下载对应证书
3.双击ssl对应的证书 如:aps_development.cer
4.再钥匙串中展开aps_development.cer安装后的证书,导出其中的专用密钥(导出格式为p12)
5.将下载下来的ssl证书aps_development.cer转成pem格式,命令:
openssl x509 -in aps_production.cer -inform DER -out aps_production.pem -outform PEM
6.将导出的p12格式密钥转成pem,命令
openssl pkcs12 -nocerts -out o2o_key_dev.pem -in o2o_key_dev.p12
7.将5中生成的pem和6中生成的pem两个文件和1中导出的文件,一共三个文件,共同打包成最终的p12文件,命令
openssl pkcs12 -export -in aps_production.pem -inkey o2o_key_dev.pem -certfile CertificateSigningRequest.certSigningRequest -name aps_o2o_dis -out aps_o2o_dis.p12
注释:如果需要给第三方导出相应的证书,只需要将安装在电脑上面的证书导出P12文件和授权文件给第三方即可,不是导出专用秘钥,和上面的4有区别,记得注意一下,同时如果需要让第三方通过发布证书导出ipa,他需要输入开发者账号和密码。
使用Appuploader 生成p12, Appuploade可以跨平台使用,Windows、Linux或Mac系统都可以使用
======= 关于deviceToken ======
https://www.jianshu.com/p/9ac37c964f2d
友盟论坛里面的回答:
ios9以前的系统里面:一个设备的token是唯一的。除了升级系统等少量情况,基本不变。 而且在token变了以后,老的token,就被认为是无效了。 苹果不会对这部分无效的token推送。
ios9的系统:一个app每一次重新安装多会产生新的token。 而且老的token不会无效,还可以正常推送。 这个问题,我们在ios9刚发布的时候,我们就向苹果反馈过这个问题,也得到过他们反馈,应该是个bug。但是他们一直也没有修复。 所以这个重担就落在我们头上。
处理办法:
我们目前是根据OpenUDID(实时过滤)和IDFA(按天过滤)双重过滤(部分app没有采集IDFA,就只按按照OpenUDID),对于同一个OpenUDID或者IDFA只采用最新的devietoken做为设备的有效devicetoken,老的我们这边认为是非法的。 由于某些原因OpenUDID也可能会变,所以就会有极少量的设备可能会存在发送两次以上的情况(尤其是测试设备)。
https://www.jianshu.com/p/edd7011ce5f8
http://www.javashuo.com/article/p-cyngsvay-ba.html
后台挂起的一些坑 http://t.zoukankan.com/ghosgt-p-8745969.html
本地定时的推送,覆盖之前的
iOS远程推送之(二):角标applicationIconNumber设置 https://www.jianshu.com/p/59878fd8053c
applicationIconBadgeNumber不显示, 原因在ios8及之后,需要用户授权才能显示:
UIUserNotificationSettings *settings = [UIUserNotificationSettings settingsForTypes:UIUserNotificationTypeBadge categories:nil];
[[UIApplication sharedApplication] registerUserNotificationSettings:settings];
https://blog.csdn.net/east5683/article/details/51004574:
在iOS应用中经常使用UIApplication的applicationIconBadgeNumber属性来显示徽章数字(即app右上角红色数字),但有时候红色徽章数字却不显示,在此对需注意的问题加以小结。
在iOS8及以上版本,app使用本地通知和远程通知前都必须注册支持用户交互的类型
typedef NS_OPTIONS(NSUInteger, UIUserNotificationType) {
UIUserNotificationTypeNone = 0, // the application may not present any UI upon a notification being received
UIUserNotificationTypeBadge = 1 <<0,// the application may badge its icon upon a notification being received,徽章
UIUserNotificationTypeSound = 1 <<1,// the application may play a sound upon a notification being received,声音
UIUserNotificationTypeAlert = 1 <<2,// the application may display an alert upon a notification being received,弹出框
} NS_ENUM_AVAILABLE_IOS(8_0)__TVOS_PROHIBITED;
对于未注册的类型,系统将会忽略该种类型的响应。
常用注册代码块为:
UIUserNotificationType types =UIUserNotificationTypeBadge |UIUserNotificationTypeSound | UIUserNotificationTypeAlert;
UIUserNotificationSettings *mySettings = [UIUserNotificationSettings settingsForTypes:types categories:nil];[[UIApplication sharedApplication] registerUserNotificationSettings:mySettings];
// 如果是远程通知的话,则还需注册消息推送
[[UIApplication sharedApplication] registerForRemoteNotifications];
对于远程通知来说还必须执行注册的第二步(本地通知不需要)以获取APNs服务器用于分发通知的应用程序特定的设备令牌。
所以在使用之前先对系统加以判断,如果系统时8.0及以上则加上上述注册代码块。
float version = [[[UIDevice currentDevice] systemVersion] floatValue];
if (version >= 8.0) {
// 注册代码块
}
https://www.it1352.com/2138364.html
问题描述
我已经阅读了几篇文章(例如这篇 https://forums.developer. apple.com/thread/7598 )设置
application.applicationIconBadgeNumber = -1
applicationDidBecomeActive或applicationWillEnterForeground上的
允许我清除徽章编号,而无需从通知中心删除通知.当我将application.applicationIconBadgeNumber设置为负数(如-1)时,它将清除Notification Center中的所有通知.是否有另一种清除徽章编号而不删除notifications的方法?
推荐答案
UIApplication.sharedApplication.applicationIconBadgeNumber = -1;
我已经在iOS 12.2中对其进行了测试,并且可以通过远程通知正常运行.
通过将接收到的远程通知保存在通知中心中来清除徽章计数.
代码段供参考:
- (void)applicationDidBecomeActive:(UIApplication *)application {
    UIApplication.sharedApplication.applicationIconBadgeNumber = -1;
}
这篇关于清除applicationIconBadgeNumber而不删除通知不起作用的文章就介绍到这了,希望我们推荐的答案对大家有所帮助,也希望大家多多支持IT屋!
JAVA后台对接苹果APNS(VOIP)实现推送 https://blog.csdn.net/m0_37954663/article/details/106797376

 浙公网安备 33010602011771号