kubernetes 基础
官网 kubernetes.io 有中文
中文网站 http://docs.kubernetes.org.cn
kubectl 详细情况 https://kubernetes.io/docs/reference/kubectl/overview/
学习资料来自于:https://kubernetes.io/cn/docs/tutorials/kubernetes-basics/ 目前 1-6 全部完成
目录
Kubernetes 集群由两种类型的资源组成
Kubernetes Pods
Kubernetes 部署
Using a Service to Expose Your App
Running Multiple Instances of Your App
Performing a Rolling Update
Kubernetes 集群由两种类型的资源组成
一个 Master 是集群的调度节点
Nodes 是应用程序实际运行的工作节点

Master 负责管理集群。 master 协调集群中的所有活动,例如调度应用程序、维护应用程序的所需状态、扩展应用程序和滚动更新。
节点 是 Kubernetes 集群中的工作机器,可以是物理机或虚拟机。 每个工作节点都有一个 Kubelet,它是管理 节点 并与
Kubernetes Master 节点进行通信的代理。节点 上还应具有处理容器操作的工作,例如 Docker 或 rkt。一个
Kubernetes 工作集群至少有三个节点
Kubernetes 集群可以部署在物理机或虚拟机上。要开始使用 Kubernetes 开发,您可以使用
Minikube(https://github.com/kubernetes/minikube)。Minikube 是一个轻量级的 Kubernetes 实现,
会在本机创建一台虚拟机,并部署一个只包含一个节点的简单集群。
kubectl is configured and we can see both the version of the client and as well as the server.
The client version is the kubectl version; the server version is the Kubernetes version installed on
the master. You can also see details about the build
kubectl 详细情况 https://kubernetes.io/docs/reference/kubectl/overview/
kubectl controls the Kubernetes cluster manager
Kubectl 使用 Kubernetes API 与集群进行交互。
几个命令
kubectl cluster-info Display endpoint information about the master and services in the cluster
Kubernetes master is running at https://172.17.0.35:8443
To further debug and diagnose cluster problems, use 'kubectl cluster-info dump'.
kubectl get nodes To view the nodes in the cluster,This command shows all nodes that can be
used to host our applications. Now we have only one node, and we can see
that it’s status is ready (it is ready to accept applications for deployment).
NAME STATUS ROLES AGE VERSION
minikube Ready <none> 25m v1.10.0
Kubernetes Pods
当您创建部署时,Kubernetes 创建了一个 Pod 来托管您的应用程序实例。Pod 是一个 Kubernetes 的资源抽象,表示一
个或多个应用容器 (例如 Docker 或 rkt) 组,以及一些用于这些容器的共享资源。这些资源包括:
共享存储,如卷
网络,作为唯一的集群 IP 地址
每个容器如何运行的信息,例如容器镜像版本或要使用的特定端口
Pod 模型可以理解为应用程序特定的 "逻辑主机",并且可以包含相对紧密耦合的不同应用程序容器。例如,Pod 可能包
含带有 Node.js 应用程序的容器以及另一个要吸收 Node.js Web 服务器提供的数据的不同容器。Pod 中的容器共
享 IP 地址和端口空间,始终位于同一位置并且统一调度,并在相同的节点上运行,共享上下文环境。each Pod in
a Kubernetes cluster has a unique IP address, even Pods on the same Node
Pods 是 Kubernetes 平台上原子级别的单元。当我们在 Kubernetes 上创建一个部署时,该部署将在其中创建包含容器
的 Pod (而不是直接创建容器)。每个 Pod 都绑定到它被调度的节点,并且始终在那里,直到终止 (根据重启
策略) 或删除。在节点故障的情况下,在集群中的其他可用节点上调度相同的 Pod。
Pods概要: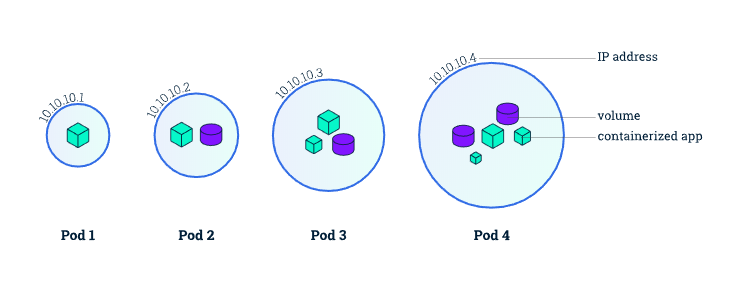
Pod 总是运行在 Node上。Node 是 Kubernetes 的工作机器,可以是虚拟机或物理机,这取决于在集群的安装情况。
每个节点由 Master 管理。一个节点上可以有多个 Pod, Kubernetes master 会自动处理调度集群各个节点上的
Pod。 Master 在自动调度时,会考虑每个 Node 上的可用资源。
每个 Kubernetes 节点至少运行以下组件:
Kubelet 是负责 Kubernetes Master 和 所有节点之间通信的进程,它管理机器上运行的 Pod 和容器。
容器运行时(例如 Docker, rkt) 负责从镜像仓库中拉取容器镜像,解包容器并运行应用程序。
使用 kubectl 进行故障排除
最常见的操作可以通过以下 kubectl 命令完成:
kubectl get - 列出可用资源
kubectl describe - 显示有关资源的详细信息
kubectl logs - 从 Pod 中的容器打印日志
kubectl exec - 在 Pod 中的容器执行命令
您可以使用这些命令来查看应用程序部署的时间,它们当前的状态,运行的位置及其配置。
Let’s verify that the application we deployed in the previous scenario is running. We’ll use the kubectl get command and look for existing Pods:
$ kubectl get pods
NAME                                   READY     STATUS    RESTARTS   AGE
kubernetes-bootcamp-5c69669756-hh9jq   1/1       Running   0          1m
$
Next, to view what containers are inside that Pod and what images are used to build those containers we run thedescribe podscommand:
$ kubectl describe pods Name: kubernetes-bootcamp-5c69669756-hh9jq Namespace: default Node: minikube/172.17.0.25 Start Time: Sat, 12 May 2018 10:17:12 +0000 Labels: pod-template-hash=1725225312 run=kubernetes-bootcamp Annotations: <none> Status: Running IP: 172.18.0.2 Controlled By: ReplicaSet/kubernetes-bootcamp-5c69669756 Containers: kubernetes-bootcamp: Container ID: docker://007724f3ed6caf2f417464bc83526a0f14d96eb581cc8c2b27c593e1feb8aa3d Image: gcr.io/google-samples/kubernetes-bootcamp:v1 Image ID: docker-pullable://gcr.io/google-samples/kubernetes-bootcamp@sha256:0d6b8ee63bb57c5f5b6156f446b3bc3b3c143d233037f3a2f00e279c8fcc64af Port: 8080/TCP Host Port: 0/TCP State: Running Started: Sat, 12 May 2018 10:17:12 +0000 Ready: True Restart Count: 0 Environment: <none> Mounts: /var/run/secrets/kubernetes.io/serviceaccount from default-token-fm5dg (ro) Conditions: Type Status Initialized True Ready True PodScheduled True Volumes: default-token-fm5dg: Type: Secret (a volume populated by a Secret) SecretName: default-token-fm5dg Optional: false QoS Class: BestEffort Node-Selectors: <none> Tolerations: node.kubernetes.io/not-ready:NoExecute for 300s node.kubernetes.io/unreachable:NoExecute for 300s Events: Type Reason Age From Message ---- ------ ---- ---- ------- Warning FailedScheduling 7m (x4 over 7m) default-scheduler 0/1 nodes are available: 1 node(s) were notready. Normal Scheduled 7m default-scheduler Successfully assigned kubernetes-bootcamp-5c69669756-hh9jq to minikube Normal SuccessfulMountVolume 7m kubelet, minikube MountVolume.SetUp succeeded for volume "default-token-fm5dg" Normal Pulled 7m kubelet, minikube Container image "gcr.io/google-samples/kubernetes-bootcamp:v1" already present on machine Normal Created 7m kubelet, minikube Created container Normal Started 7m kubelet, minikube Started container $
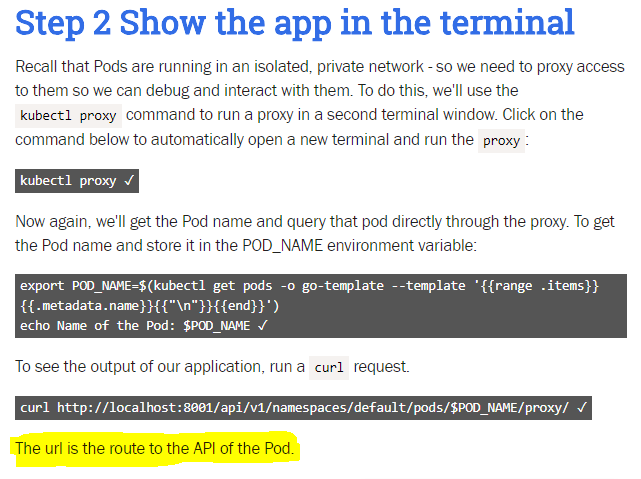
命令下面 Kubernetes 部署 有类似的 这图主要看 涂亮 的部分
懒得打字了...

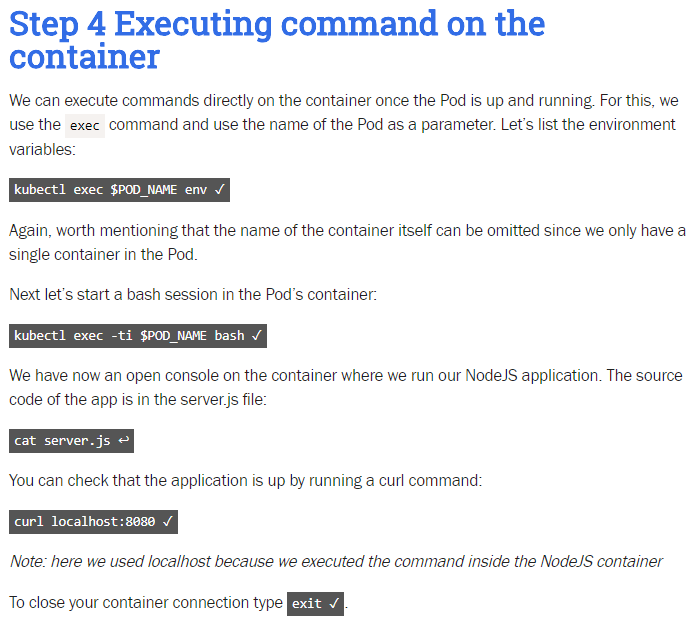
Step 4 对应输出:
$ kubectl exec $POD_NAME env
PATH=/usr/local/sbin:/usr/local/bin:/usr/sbin:/usr/bin:/sbin:/binHOSTNAME=kubernetes-bootcamp-5c69669756-hh9jq
KUBERNETES_PORT=tcp://10.96.0.1:443
KUBERNETES_PORT_443_TCP=tcp://10.96.0.1:443
KUBERNETES_PORT_443_TCP_PROTO=tcp
KUBERNETES_PORT_443_TCP_PORT=443
KUBERNETES_PORT_443_TCP_ADDR=10.96.0.1
KUBERNETES_SERVICE_HOST=10.96.0.1
KUBERNETES_SERVICE_PORT=443
KUBERNETES_SERVICE_PORT_HTTPS=443
NPM_CONFIG_LOGLEVEL=info
NODE_VERSION=6.3.1
HOME=/root
$ kubectl exec -ti $POD_NAME bash  (-it 挺熟悉的吧)
root@kubernetes-bootcamp-5c69669756-hh9jq:/# echo "hello docker"
hello docker
root@kubernetes-bootcamp-5c69669756-hh9jq:/# cat server.js
var http = require('http');
var requests=0;
var podname= process.env.HOSTNAME;
var startTime;
var host;
var handleRequest = function(request, response) {
  response.setHeader('Content-Type', 'text/plain');
  response.writeHead(200);
  response.write("Hello Kubernetes bootcamp! | Running on: ");
  response.write(host);
  response.end(" | v=1\n");
  console.log("Running On:" ,host, "| Total Requests:", ++requests,"| App Uptime:", (new Date() - startTime)/1000, "seconds", "| Log Time:",new Date());
}
var www = http.createServer(handleRequest);
www.listen(8080,function () {
    startTime = new Date();;
    host = process.env.HOSTNAME;
    console.log ("Kubernetes Bootcamp App Started At:",startTime, "| Running On: " ,host, "\n" );
});
root@kubernetes-bootcamp-5c69669756-hh9jq:/# curl localhost:8080
Hello Kubernetes bootcamp! | Running on: kubernetes-bootcamp-5c69669756-hh9jq | v=1
root@kubernetes-bootcamp-5c69669756-hh9jq:/# exit
exit
$
Kubernetes 部署
一旦运行了 Kubernetes 集群,您可以在其上部署容器化应用程序。为此,您可以创建一个 Kubernetes Deployment。
Deployment 负责创建和更新应用程序实例。创建 Deployment 后, Kubernetes master 会将 Deployment 创建
的应用程序实例调度到集群中的各个节点。创建应用程序实例后,Kubernetes 部署控制器会持续监视这些实例。
如果托管它的节点不可用或删除,则部署控制器将替换实例。 这提供了一种解决机器故障或维护的自愈机制。
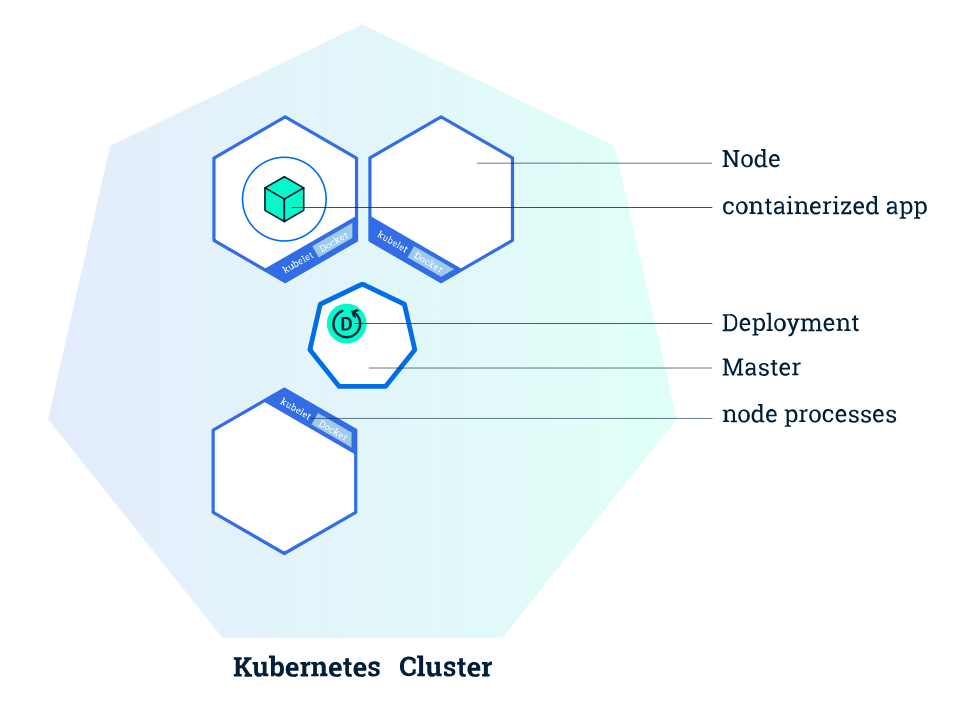
您可以使用 Kubernetes 命令行工具 Kubectl创建和管理部署。Kubectl 使用 Kubernetes API 与集群进行交互。
创建部署时,您需要为应用程序指定容器镜像以及要运行的副本数。您可以稍后通过更新部署来更改该信
息;基础训练模块 5 和 6 讨论如何扩展和更新您的部署。应用程序需要打包成支持的容器格式之一,以
便部署在 Kubernetes 上。对于我们的第一个部署,我们将使用 Node.js 应用程序打包到 Docker 容器。
源代码和 Dockerfile 可在 Kubernetes Bootcamp 的 GitHub 存储库 中找到。
https://kubernetes.io/cn/docs/tutorials/kubernetes-basics/deploy-intro/
Kubernetes will choose where to deploy our application based on Node available resources.
Let’s run our first app on Kubernetes with the kubectl run command. The run command creates a new
deployment. We need to provide the deployment name and app image location (include the full
repository url for images hosted outside Docker hub). We want to run the app on a specific port
so we add the --port parameter:
kubectl run kubernetes-bootcamp --image=gcr.io/google-samples/kubernetes-bootcamp:v1 --port=8080
Great! You just deployed your first application by creating a deployment. This performed a few things
for you:
searched for a suitable node where an instance of the application could be run (we have only
1 available node)
scheduled the application to run on that Node
configured the cluster to reschedule the instance on a new Node when needed
To list your deployments use the get deployments command:kubectl get deployments
We see that there is 1 deployment running a single instance of your app. The instance is running
inside a Docker container on your node.
$ kubectl run kubernetes-bootcamp --image=gcr.io/google-samples/kubernetes-bootcamp:v1 --port=8080
deployment.apps "kubernetes-bootcamp" created
$ kubectl get deployments
NAME                  DESIRED   CURRENT   UP-TO-DATE   AVAILABLE   AGE
kubernetes-bootcamp   1         1         1            1           33s
View our app
Pods that are running inside Kubernetes are running on a private, isolated network. By default they are visible
from other pods and services within the same kubernetes cluster, but not outside that network. When we
use kubectl, we're interacting through an API endpoint to communicate with our application.
We will cover other options on how to expose your application outside the kubernetes cluster in Module 4.
The kubectl command can create a proxy that will forward communications into the cluster-wide,
private network.
The proxy can be terminated by pressing control-C and won't show any output while its running.
We will open a second terminal window to run the proxy.
kubectl proxy
We now have a connection between our host (the online terminal) and the Kubernetes cluster. The proxy
enables direct access to the API from these terminals.
You can see all those APIs hosted through the proxy endpoint, now available at through http://localhost:8001.
For example, we can query the version directly through the API using the curl command:
curl http://localhost:8001/version
The API server will automatically create an endpoint for each pod, based on the pod name, that is also
accessible through the proxy.
First we need to get the Pod name, and we'll store in the environment variable POD_NAME:
export POD_NAME=$(kubectl get pods -o go-template --template '{{range .items}}{{.metadata.name}}{{"\n"}}{{end}}')
echo Name of the Pod: $POD_NAME
Now we can make an HTTP request to the application running in that pod:
curl http://localhost:8001/api/v1/namespaces/default/pods/$POD_NAME/proxy/
The url is the route to the API of the Pod.
Using a Service to Expose Your App
Kubernetes Pods are mortal. Pods in fact have a lifecycle. When a worker node dies, the Pods running on
the Node are also lost. A ReplicationController might then dynamically drive the cluster back to
desired state via creation of new Pods to keep your application running. As another example, consider
an image-processing backend with 3 replicas. Those replicas are fungible; the front-end system should
not care about backend replicas or even if a Pod is lost and recreated. That said, each Pod in a
Kubernetes cluster has a unique IP address, even Pods on the same Node, so there needs to be a way
of automatically reconciling changes among Pods so that your applications continue to function.
A Service in Kubernetes is an abstraction which defines a logical set of Pods and a policy by which to access
them. Services enable a loose coupling between dependent Pods. A Service is defined using YAML
(preferred) or JSON, like all Kubernetes objects. The set of Pods targeted by a Service is usually
determined by a LabelSelector (see below for why you might want a Service without including selector
in the spec).Although each Pod has a unique IP address, those IPs are not exposed outside the cluster
without a Service.
Services allow your applications to receive traffic. Services can be exposed in different ways by specifying
a type in the ServiceSpec:
ClusterIP (default) - Exposes the Service on an internal IP in the cluster. This type makes the Service
only reachable from within the cluster.
NodePort - Exposes the Service on the same port of each selected Node in the cluster using NAT.
Makes a Service accessible from outside the cluster using <NodeIP>:<NodePort>. Superset
of ClusterIP.
LoadBalancer - Creates an external load balancer in the current cloud (if supported) and assigns a
fixed, external IP to the Service. Superset of NodePort.
ExternalName - Exposes the Service using an arbitrary name (specified by externalName in the spec)
by returning a CNAME record with the name. No proxy is used. This type requires v1.7 or higher
of kube-dns.
More information about the different types of Services can be found in the Using Source IP tutorial. Also see
Connecting Applications with Services.
Additionally, note that there are some use cases with Services that involve not defining selector in the spec. A
Service created without selector will also not create the corresponding Endpoints object. This allows users
to manually map a Service to specific endpoints. Another possibility why there may be no selector is you
are strictly using type: ExternalName.
Services and Labels
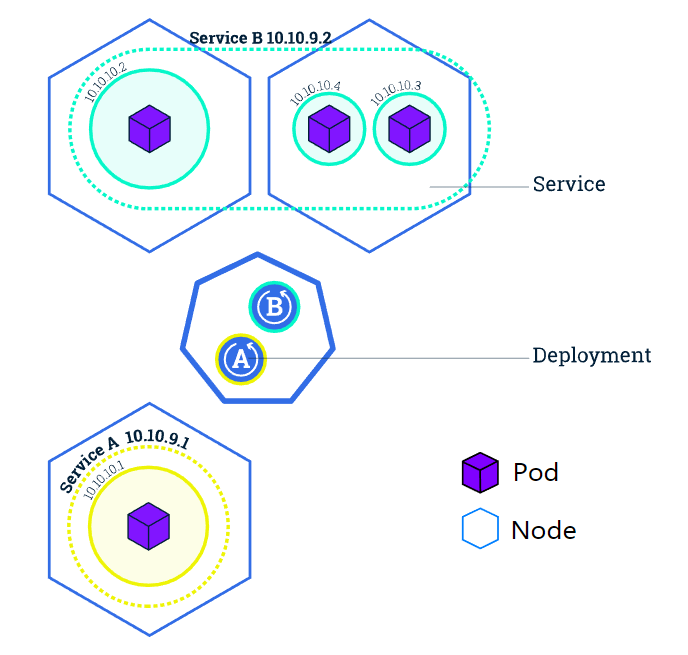

A Service routes traffic across a set of Pods. Services are the abstraction that allow pods to die and
replicate in Kubernetes without impacting your application. Discovery and routing among dependent
Pods (such as the frontend and backend components in an application) is handled by Kubernetes
Services.
Services match a set of Pods using labels and selectors, a grouping primitive that allows logical operation
on objects in Kubernetes. Labels are key/value pairs attached to objects and can be used in any
number of ways:
Designate objects for development, test, and production
Embed version tags
Classify an object using tags
实际操作
In this scenario you will learn how to expose Kubernetes applications outside the cluster using the kubectl
expose command. You will also learn how to view and apply labels to objects with the kubectl label
command.
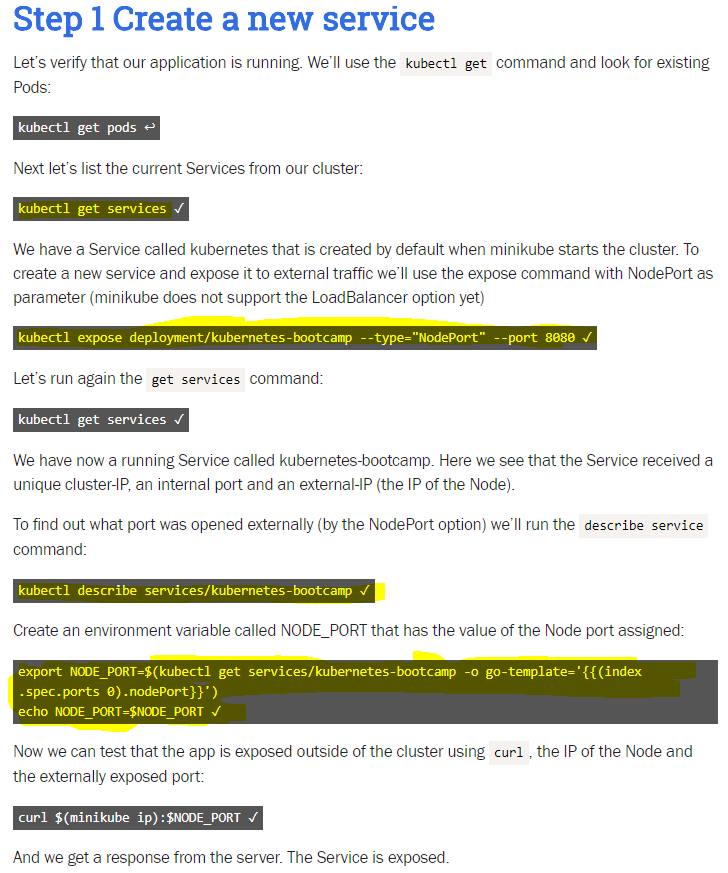
相应输出:
$ kubectl get pods
NAME                                   READY     STATUS    RESTARTS   AGE
kubernetes-bootcamp-5c69669756-7xcwr   1/1       Running   0          2m
$ kubectl get services
NAME         TYPE        CLUSTER-IP   EXTERNAL-IP   PORT(S)   AGE
kubernetes   ClusterIP   10.96.0.1    <none>        443/TCP   3m
$ kubectl expose deployment/kubernetes-bootcamp --type="NodePort" --port 8080
service "kubernetes-bootcamp" exposed
$ kubectl get services
NAME                  TYPE        CLUSTER-IP      EXTERNAL-IP   PORT(S)          AGE
kubernetes            ClusterIP   10.96.0.1       <none>        443/TCP          4m
kubernetes-bootcamp   NodePort    10.100.29.214   <none>        8080:32516/TCP   6s
$ kubectl describe services/kubernetes-bootcamp
Name:                     kubernetes-bootcamp
Namespace:                default
Labels:                   run=kubernetes-bootcamp
Annotations:              <none>
Selector:                 run=kubernetes-bootcamp
Type:                     NodePort
IP:                       10.100.29.214
Port:                     <unset>  8080/TCP
TargetPort:               8080/TCP
NodePort:                 <unset>  32516/TCP
Endpoints:                172.18.0.2:8080
Session Affinity:         None
External Traffic Policy:  Cluster
Events:                   <none>
$ export NODE_PORT=$(kubectl get services/kubernetes-bootcamp -o go-template='{{(index .spec.ports 0).nodePort}}')
$ echo NODE_PORT=$NODE_PORT
NODE_PORT=32516
$ curl $(minikube ip):$NODE_PORT
Hello Kubernetes bootcamp! | Running on: kubernetes-bootcamp-5c69669756-7xcwr | v=1
$
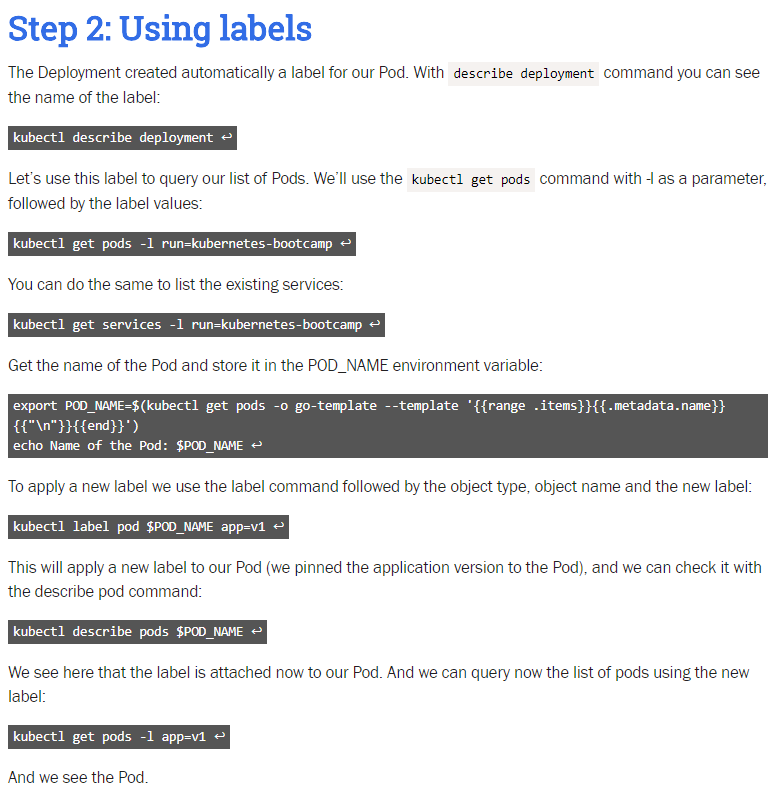
相应输出:
$ kubectl describe deployment
Name:                   kubernetes-bootcamp
Namespace:              default
CreationTimestamp:      Mon, 14 May 2018 03:34:22 +0000
Labels:                 run=kubernetes-bootcamp
Annotations:            deployment.kubernetes.io/revision=1
Selector:               run=kubernetes-bootcamp
Replicas:               1 desired | 1 updated | 1 total | 1 available | 0 unavailable
StrategyType:           RollingUpdate
MinReadySeconds:        0
RollingUpdateStrategy:  1 max unavailable, 1 max surge
Pod Template:
  Labels:  run=kubernetes-bootcamp
  Containers:
   kubernetes-bootcamp:
    Image:        gcr.io/google-samples/kubernetes-bootcamp:v1
    Port:         8080/TCP
    Host Port:    0/TCP
    Environment:  <none>
    Mounts:       <none>
  Volumes:        <none>
Conditions:
  Type           Status  Reason
  ----           ------  ------
  Available      True    MinimumReplicasAvailable
  Progressing    True    NewReplicaSetAvailable
OldReplicaSets:  <none>
NewReplicaSet:   kubernetes-bootcamp-5c69669756 (1/1 replicas created)
Events:
  Type    Reason             Age   From                   Message
  ----    ------             ----  ----                   -------
  Normal  ScalingReplicaSet  35m   deployment-controller  Scaled up replica set kubernetes-bootcamp-5c69669756 to1
$ kubectl get pods -l run=kubernetes-bootcamp
NAME                                   READY     STATUS    RESTARTS   AGE
kubernetes-bootcamp-5c69669756-7xcwr   1/1       Running   0          36m
$ kubectl get services -l run=kubernetes-bootcamp
NAME                  TYPE       CLUSTER-IP      EXTERNAL-IP   PORT(S)          AGE
kubernetes-bootcamp   NodePort   10.100.29.214   <none>        8080:32516/TCP   34m
$ export POD_NAME=$(kubectl get pods -o go-template --template '{{range .items}}{{.metadata.name}}{{"\n"}}{{end}}')
$ echo Name of the Pod: $POD_NAME
Name of the Pod: kubernetes-bootcamp-5c69669756-7xcwr
$ kubectl label pod $POD_NAME app=v1
pod "kubernetes-bootcamp-5c69669756-7xcwr" labeled
$ kubectl describe pods $POD_NAME
Name:           kubernetes-bootcamp-5c69669756-7xcwr
Namespace:      default
Node:           minikube/172.17.0.38
Start Time:     Mon, 14 May 2018 03:34:29 +0000
Labels:         app=v1
                pod-template-hash=1725225312    (labels 有多个了  可能是交互学习的环境问题)
                run=kubernetes-bootcamp
Annotations:    <none>
Status:         Running
IP:             172.18.0.2
Controlled By:  ReplicaSet/kubernetes-bootcamp-5c69669756
Containers:
  kubernetes-bootcamp:
    Container ID:   docker://a564790aa87e267f5b66e7d0865f177a53efd60720184a4768d09090bba32a52
    Image:          gcr.io/google-samples/kubernetes-bootcamp:v1
    Image ID:       docker-pullable://gcr.io/google-samples/kubernetes-bootcamp@sha256:0d6b8ee63bb57c5f5b6156f446b3bc3b3c143d233037f3a2f00e279c8fcc64af
    Port:           8080/TCP
    Host Port:      0/TCP
    State:          Running
      Started:      Mon, 14 May 2018 03:34:30 +0000
    Ready:          True
    Restart Count:  0
    Environment:    <none>
    Mounts:
      /var/run/secrets/kubernetes.io/serviceaccount from default-token-g8x49 (ro)
Conditions:
  Type           Status
  Initialized    True
  Ready          True
  PodScheduled   True
Volumes:
  default-token-g8x49:
    Type:        Secret (a volume populated by a Secret)
    SecretName:  default-token-g8x49
    Optional:    false
QoS Class:       BestEffort
Node-Selectors:  <none>
Tolerations:     node.kubernetes.io/not-ready:NoExecute for 300s
                 node.kubernetes.io/unreachable:NoExecute for 300s
Events:
  Type     Reason                 Age                From               Message
  ----     ------                 ----               ----               -------
  Warning  FailedScheduling       39m (x4 over 39m)  default-scheduler  0/1 nodes are available: 1 node(s) were not ready.
  Normal   Scheduled              39m                default-scheduler  Successfully assigned kubernetes-bootcamp-5c69669756-7xcwr to minikube
  Normal   SuccessfulMountVolume  39m                kubelet, minikube  MountVolume.SetUp succeeded for volume "default-token-g8x49"
  Normal   Pulled                 39m                kubelet, minikube  Container image "gcr.io/google-samples/kubernetes-bootcamp:v1" already present on machine
  Normal   Created                39m                kubelet, minikube  Created container
  Normal   Started                39m                kubelet, minikube  Started container
$ kubectl get pods -l app=v1
NAME                                   READY     STATUS    RESTARTS   AGE
kubernetes-bootcamp-5c69669756-7xcwr   1/1       Running   0          41m
$ kubectl get pods -l run=kubernetes-bootcamp (也还能用)
NAME READY STATUS RESTARTS AGE
kubernetes-bootcamp-5c69669756-7xcwr 1/1 Running 0 41m
$
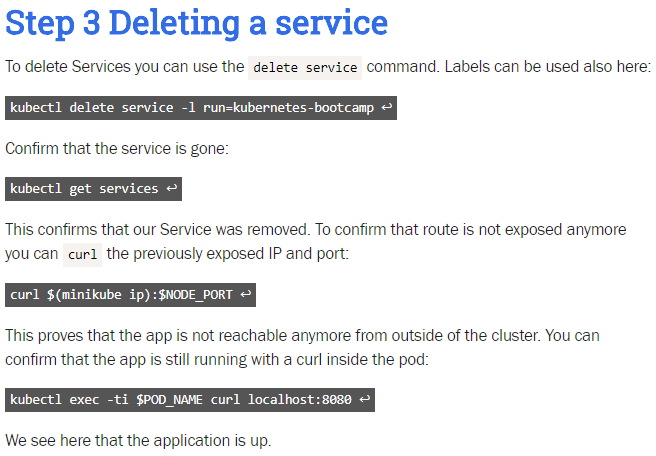
相应输出:
$ kubectl get services
NAME                  TYPE        CLUSTER-IP      EXTERNAL-IP   PORT(S)          AGE
kubernetes            ClusterIP   10.96.0.1       <none>        443/TCP          7m
kubernetes-bootcamp   NodePort    10.101.43.103   <none>        8080:32575/TCP   7m
$ kubectl delete service -l run=kubernetes-bootcamp
service "kubernetes-bootcamp" deleted
$ kubectl get services
NAME         TYPE        CLUSTER-IP   EXTERNAL-IP   PORT(S)   AGE
kubernetes   ClusterIP   10.96.0.1    <none>        443/TCP   8m
$ curl $(minikube ip):$NODE_PORT
curl: (7) Failed to connect to 172.17.0.62 port 32575: Connection refused
$ kubectl exec -ti $POD_NAME curl localhost:8080
Hello Kubernetes bootcamp! | Running on: kubernetes-bootcamp-5c69669756-l9wml | v=1
$
Running Multiple Instances of Your App
Scaling an application
In the previous modules we created a Deployment, and then exposed it publicly via a
Service. The Deployment created only one Pod for running our application. When
traffic increases, we will need to scale the application to keep up with user demand.
Scaling is accomplished by changing the number of replicas in a Deployment
Scaling overview
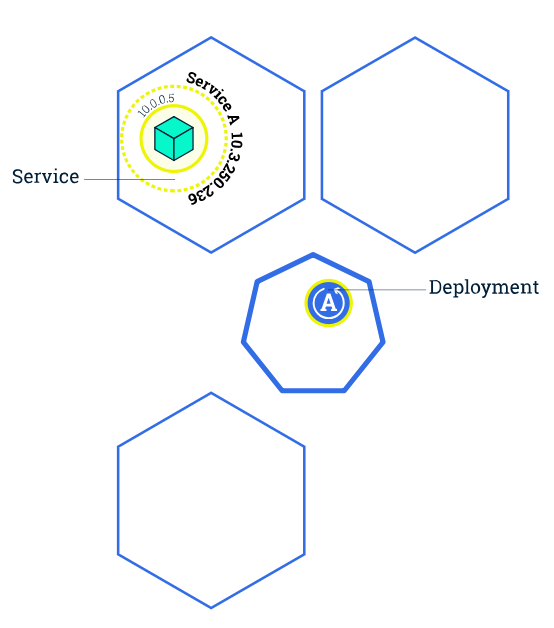
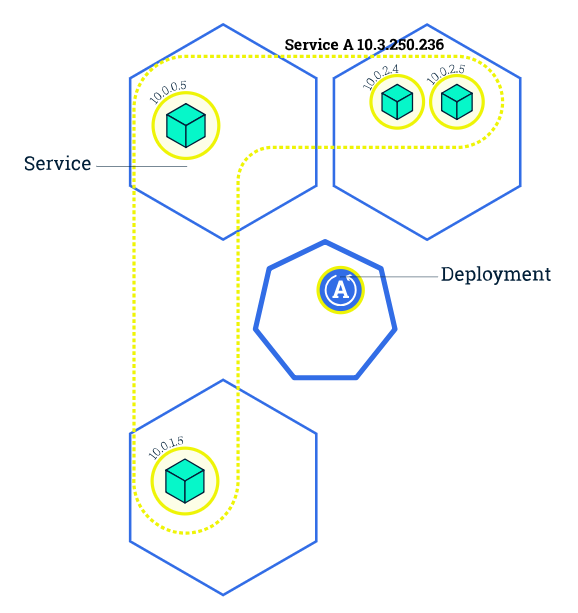
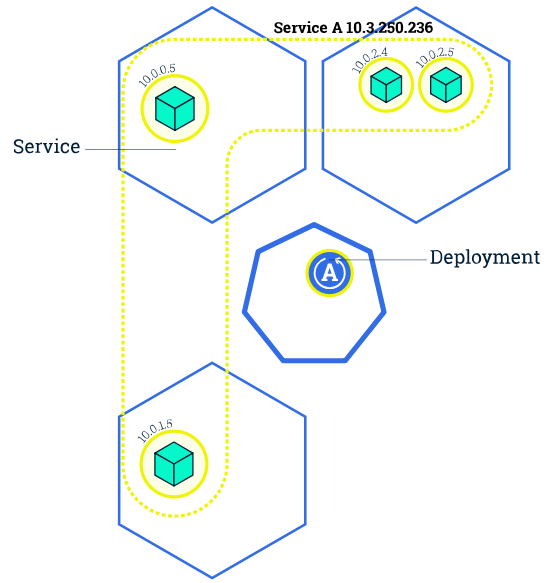
Scaling out a Deployment will ensure new Pods are created and scheduled to Nodes with
available resources. Scaling in will reduce the number of Pods to the new desired state.
Kubernetes also supports autoscaling of Pods, but it is outside of the scope of this
tutorial. Scaling to zero is also possible, and it will terminate all Pods of the specified
Deployment.
Running multiple instances of an application will require a way to distribute the traffic to all of
them. Services have an integrated load-balancer that will distribute network traffic to all
Pods of an exposed Deployment. Services will monitor continuously the running Pods
using endpoints, to ensure the traffic is sent only to available Pods.
Scaling is accomplished by changing the number of replicas in a Deployment.
Once you have multiple instances of an Application running, you would be able to do Rolling
updates without downtime. We'll cover that in the next module. Now, let's go to the
online terminal and scale our application.
实操:
The goal of this interactive scenario is to scale a deployment with kubectl scale and to
see the load balancing in action

相应代码:
$ kubectl get deployments
NAME                  DESIRED   CURRENT   UP-TO-DATE   AVAILABLE   AGE
kubernetes-bootcamp   1         1         1            1           1m
$ kubectl scale deployments/kubernetes-bootcamp --replicas=4
deployment.extensions "kubernetes-bootcamp" scaled
$ kubectl get deployments
NAME                  DESIRED   CURRENT   UP-TO-DATE   AVAILABLE   AGE
kubernetes-bootcamp   4         4         4            3           2m
$ kubectl get deployments
NAME                  DESIRED   CURRENT   UP-TO-DATE   AVAILABLE   AGE
kubernetes-bootcamp   4         4         4            4           3m
$ kubectl get pods -o wide
NAME                                   READY     STATUS    RESTARTS   AGE       IP           NODE
kubernetes-bootcamp-5c69669756-2jmvb   1/1       Running   0          51s       172.18.0.5   minikube
kubernetes-bootcamp-5c69669756-52249   1/1       Running   0          51s       172.18.0.7   minikube
kubernetes-bootcamp-5c69669756-dcqq9   1/1       Running   0          3m        172.18.0.4   minikube
kubernetes-bootcamp-5c69669756-gr5z5   1/1       Running   0          51s       172.18.0.6   minikube
$ kubectl describe deployments/kubernetes-bootcamp
Name:                   kubernetes-bootcamp
Namespace:              default
CreationTimestamp:      Mon, 14 May 2018 09:35:16 +0000
Labels:                 run=kubernetes-bootcamp
Annotations:            deployment.kubernetes.io/revision=1
Selector:               run=kubernetes-bootcamp
Replicas:               4 desired | 4 updated | 4 total | 4 available | 0 unavailable
StrategyType:           RollingUpdate
MinReadySeconds:        0
RollingUpdateStrategy:  1 max unavailable, 1 max surge
Pod Template:
  Labels:  run=kubernetes-bootcamp
  Containers:
   kubernetes-bootcamp:
    Image:        gcr.io/google-samples/kubernetes-bootcamp:v1
    Port:         8080/TCP
    Host Port:    0/TCP
    Environment:  <none>
    Mounts:       <none>
  Volumes:        <none>
Conditions:
  Type           Status  Reason
  ----           ------  ------
  Progressing    True    NewReplicaSetAvailable
  Available      True    MinimumReplicasAvailable
OldReplicaSets:  <none>
NewReplicaSet:   kubernetes-bootcamp-5c69669756 (4/4 replicas created)
Events:
  Type    Reason             Age   From                   Message
  ----    ------             ----  ----                   -------
  Normal  ScalingReplicaSet  4m    deployment-controller  Scaled up replica set kubernetes-bootcamp-5c69669756 to 1
  Normal  ScalingReplicaSet  1m    deployment-controller  Scaled up replica set kubernetes-bootcamp-5c69669756 to 4
$

响应结果:
(提供的交互环境 minikube does not support the LoadBalancer option yet 所以下面的结果可能与真实的不同 那个Type就感觉不对劲...)
$ kubectl describe services/kubernetes-bootcamp
Name:                     kubernetes-bootcamp
Namespace:                default
Labels:                   run=kubernetes-bootcamp
Annotations:              <none>
Selector:                 run=kubernetes-bootcamp
Type:                     NodePort
IP:                       10.99.149.94
Port:                     <unset>  8080/TCP
TargetPort:               8080/TCP
NodePort:                 <unset>  31236/TCP
Endpoints:                172.18.0.4:8080,172.18.0.5:8080,172.18.0.6:8080 + 1 more...
Session Affinity:         None
External Traffic Policy:  Cluster
Events:                   <none>
$ export NODE_PORT=$(kubectl get services/kubernetes-bootcamp -o go-template='{{(index .spec.ports 0).nodePort}}')
$ echo NODE_PORT=$NODE_PORT
NODE_PORT=31236
$ curl $(minikube ip):$NODE_PORT
Hello Kubernetes bootcamp! | Running on: kubernetes-bootcamp-5c69669756-52249 | v=1
$ curl $(minikube ip):$NODE_PORT
Hello Kubernetes bootcamp! | Running on: kubernetes-bootcamp-5c69669756-52249 | v=1
$ curl $(minikube ip):$NODE_PORT
Hello Kubernetes bootcamp! | Running on: kubernetes-bootcamp-5c69669756-52249 | v=1
$ curl $(minikube ip):$NODE_PORT
Hello Kubernetes bootcamp! | Running on: kubernetes-bootcamp-5c69669756-2jmvb | v=1
$ curl $(minikube ip):$NODE_PORT
Hello Kubernetes bootcamp! | Running on: kubernetes-bootcamp-5c69669756-52249 | v=1
$ curl $(minikube ip):$NODE_PORT
Hello Kubernetes bootcamp! | Running on: kubernetes-bootcamp-5c69669756-52249 | v=1
$ curl $(minikube ip):$NODE_PORT
Hello Kubernetes bootcamp! | Running on: kubernetes-bootcamp-5c69669756-2jmvb | v=1
$ curl $(minikube ip):$NODE_PORT
Hello Kubernetes bootcamp! | Running on: kubernetes-bootcamp-5c69669756-2jmvb | v=1
$ curl $(minikube ip):$NODE_PORT
Hello Kubernetes bootcamp! | Running on: kubernetes-bootcamp-5c69669756-dcqq9 | v=1
$
Performing a Rolling Update
Updating an application
Users expect applications to be available all the time and developers are expected to deploy
new versions of them several times a day. In Kubernetes this is done with rolling updates.
Rolling updates allow Deployments' update to take place with zero downtime by incrementally updating
Pods instances with new ones. The new Pods will be scheduled on Nodes with available resources.
In the previous module we scaled our application to run multiple instances. This is a requirement for
performing updates without affecting application availability. By default, the maximum number of Pods
that can be unavailable during the update and the maximum number of new Pods that can be created,
is one. Both options can be configured to either numbers or percentages (of Pods). In Kubernetes,
updates are versioned and any Deployment update can be reverted to previous (stable) version.
if a Deployment is exposed publicly, the Service will load-balance the traffic only to available Pods during
the update. An available Pod is an instance that is available to the users of the application.
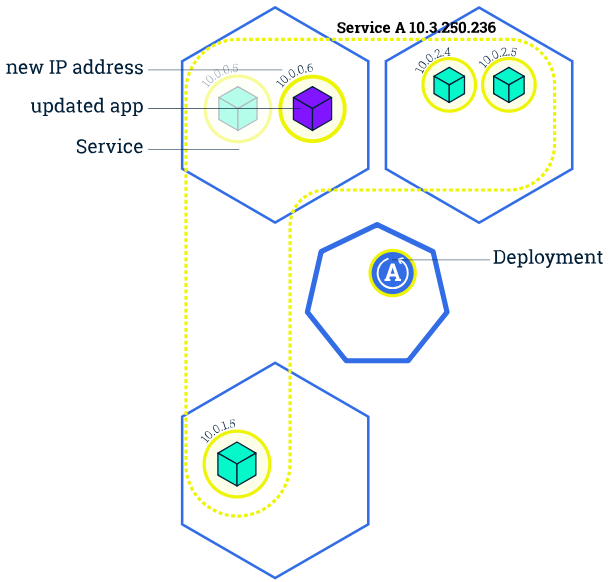
Rolling updates overview
01
02

03

04
Similar to application Scaling, if a Deployment is exposed publicly, the Service will load-balance the traffic only
to available Pods during the update. An available Pod is an instance that is available to the users of the
application.
Rolling updates allow the following actions:
Promote an application from one environment to another (via container image updates)
Rollback to previous versions
Continuous Integration and Continuous Delivery of applications with zero downtime
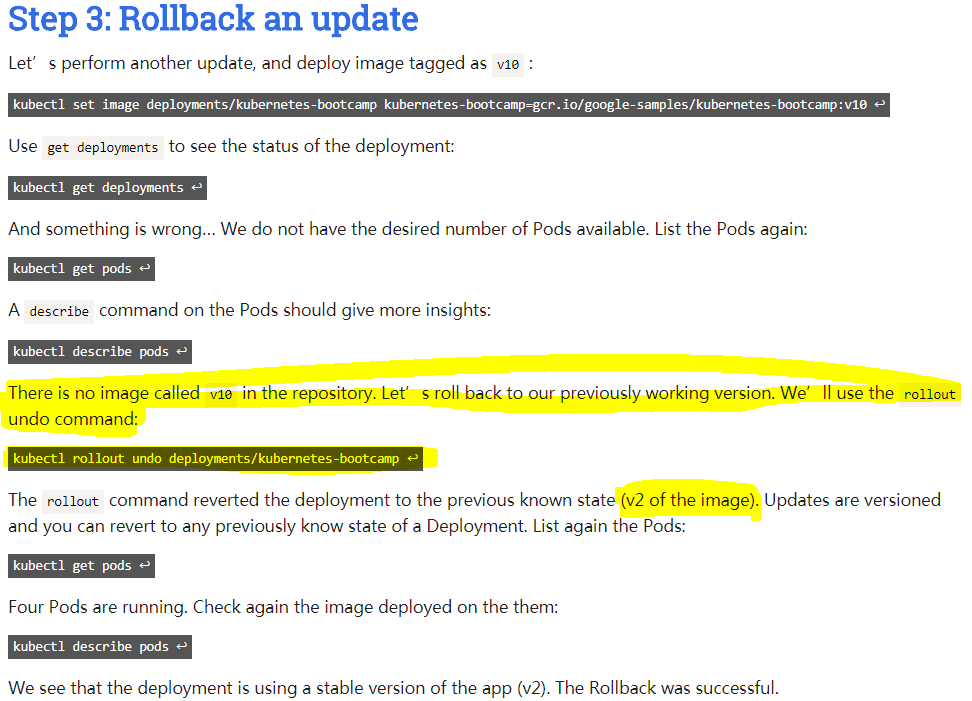
In the following interactive tutorial, we'll update our application to a new version, and also perform a rollback.
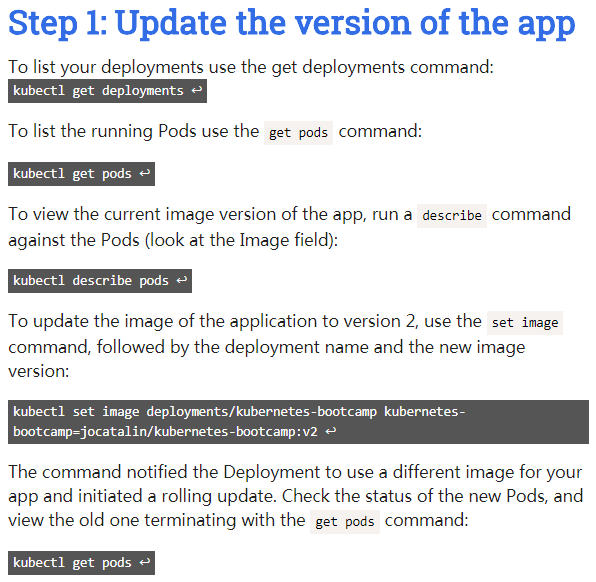
The goal of this scenario is to update a deployed application with kubectl set image and to rollback with the
rollout undo command.
响应输出:
$ kubectl get deployments
NAME                  DESIRED   CURRENT   UP-TO-DATE   AVAILABLE   AGE
kubernetes-bootcamp   4         4         4            4           3m
$ kubectl get pods
NAME                                   READY     STATUS    RESTARTS   AGE
kubernetes-bootcamp-5c69669756-7q4mq   1/1       Running   0          3m
kubernetes-bootcamp-5c69669756-lpzmw   1/1       Running   0          3m
kubernetes-bootcamp-5c69669756-tm49p   1/1       Running   0          3m
kubernetes-bootcamp-5c69669756-zzbb6   1/1       Running   0          3m
$ kubectl describe pods
Name:           kubernetes-bootcamp-5c69669756-7q4mq
Namespace:      default
Node:           minikube/172.17.0.56
Start Time:     Tue, 15 May 2018 02:11:25 +0000
Labels:         pod-template-hash=1725225312
                run=kubernetes-bootcamp
Annotations:    <none>
Status:         Running
IP:             172.18.0.4
Controlled By:  ReplicaSet/kubernetes-bootcamp-5c69669756
Containers:
  kubernetes-bootcamp:
    Container ID:   docker://e0a0132077aba0132c8ef72b480b803c73745a2e7b99af0c1cb325d452376c40
    Image:          gcr.io/google-samples/kubernetes-bootcamp:v1
    Image ID:       docker-pullable://gcr.io/google-samples/kubernetes-bootcamp@sha256:0d6b8ee63bb57c5f5b6156f446b3bc3b3c143d233037f3a2f00e279c8fcc64af
    Port:           8080/TCP
    Host Port:      0/TCP
    State:          Running
      Started:      Tue, 15 May 2018 02:11:26 +0000
    Ready:          True
    Restart Count:  0
    Environment:    <none>
    Mounts:
      /var/run/secrets/kubernetes.io/serviceaccount from default-token-qbqsv (ro)
Conditions:
  Type           Status
  Initialized    True
  Ready          True
  PodScheduled   True
Volumes:
  default-token-qbqsv:
    Type:        Secret (a volume populated by a Secret)
    SecretName:  default-token-qbqsv
    Optional:    false
QoS Class:       BestEffort
Node-Selectors:  <none>
Tolerations:     node.kubernetes.io/not-ready:NoExecute for 300s
                 node.kubernetes.io/unreachable:NoExecute for 300s
Events:
  Type     Reason                 Age              From               Message
  ----     ------                 ----             ----               -------
  Warning  FailedScheduling       3m (x4 over 3m)  default-scheduler  0/1 nodes are available: 1 node(s) were not ready.
  Normal   Scheduled              3m               default-scheduler  Successfully assigned kubernetes-bootcamp-5c69669756-7q4mq to minikube
  Normal   SuccessfulMountVolume  3m               kubelet, minikube  MountVolume.SetUp succeeded for volume "default-token-qbqsv"
  Normal   Pulled                 3m               kubelet, minikube  Container image "gcr.io/google-samples/kubernetes-bootcamp:v1"already present on machine
  Normal   Created                3m               kubelet, minikube  Created container
  Normal   Started                3m               kubelet, minikube  Started container

... 其他三个

$ kubectl set image deployments/kubernetes-bootcamp kubernetes-bootcamp=jocatalin/kubernetes-bootcamp:v2
deployment.apps "kubernetes-bootcamp" image updated
$ kubectl get pods
NAME                                   READY     STATUS        RESTARTS   AGE
kubernetes-bootcamp-5c69669756-7q4mq   1/1       Terminating   0          5m
kubernetes-bootcamp-5c69669756-lpzmw   1/1       Terminating   0          5m
kubernetes-bootcamp-5c69669756-tm49p   1/1       Terminating   0          5m
kubernetes-bootcamp-5c69669756-zzbb6   1/1       Terminating   0          5m
kubernetes-bootcamp-7799cbcb86-98sb5   1/1       Running       0          6s
kubernetes-bootcamp-7799cbcb86-fcrhx   1/1       Running       0          8s
kubernetes-bootcamp-7799cbcb86-ffxj8   1/1       Running       0          8s
kubernetes-bootcamp-7799cbcb86-pfddb   1/1       Running       0          6s
$ kubectl get deployments
NAME DESIRED CURRENT UP-TO-DATE AVAILABLE AGE
kubernetes-bootcamp 4 4 4 4 13m
$ kubectl describe pods
Name: kubernetes-bootcamp-7799cbcb86-98sb5
Namespace: default
Node: minikube/172.17.0.56
Start Time: Tue, 15 May 2018 02:17:03 +0000
Labels: pod-template-hash=3355767642
run=kubernetes-bootcamp
Annotations: <none>
Status: Running
IP: 172.18.0.11
Controlled By: ReplicaSet/kubernetes-bootcamp-7799cbcb86
Containers:
kubernetes-bootcamp:
Container ID: docker://3f0ecbb1e9085a3f55729e8e1fd33f417f0d87ab9908e80bfcd572d452d7a05e
Image: jocatalin/kubernetes-bootcamp:v2
Image ID: docker-pullable://jocatalin/kubernetes-bootcamp@sha256:fb1a3ced00cecfc1f83f18ab5cd14199e30adc1b49aa4244f5d65ad3f5feb2a5
Port: 8080/TCP
Host Port: 0/TCP
State: Running
Started: Tue, 15 May 2018 02:17:04 +0000
Ready: True
Restart Count: 0
Environment: <none>
Mounts:
/var/run/secrets/kubernetes.io/serviceaccount from default-token-qbqsv (ro)
Conditions:
Type Status
Initialized True
Ready True
PodScheduled True
Volumes:
default-token-qbqsv:
Type: Secret (a volume populated by a Secret)
SecretName: default-token-qbqsv
Optional: false
QoS Class: BestEffort
Node-Selectors: <none>
Tolerations: node.kubernetes.io/not-ready:NoExecute for 300s
node.kubernetes.io/unreachable:NoExecute for 300s
Events:
Type Reason Age From Message
---- ------ ---- ---- -------
Normal Scheduled 7m default-scheduler Successfully assigned kubernetes-bootcamp-7799cbcb86-98sb5 to minikube
Normal SuccessfulMountVolume 7m kubelet, minikube MountVolume.SetUp succeeded for volume "default-token-qbqsv"
Normal Pulled 7m kubelet, minikube Container image "jocatalin/kubernetes-bootcamp:v2" already present on machine
Normal Created 7m kubelet, minikube Created container
Normal Started 7m kubelet, minikube Started container
...其他三个
$
响应输出:
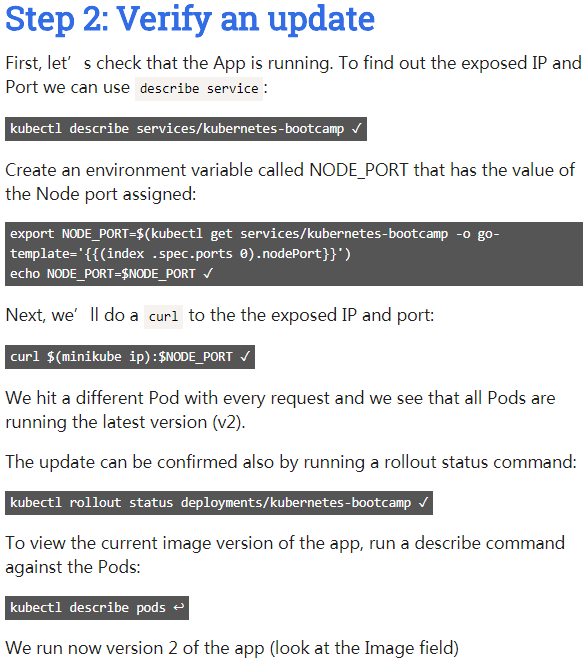
$ kubectl describe services/kubernetes-bootcamp
Name:                     kubernetes-bootcamp
Namespace:                default
Labels:                   run=kubernetes-bootcamp
Annotations:              <none>
Selector:                 run=kubernetes-bootcamp
Type:                     NodePort
IP:                       10.102.226.243
Port:                     <unset>  8080/TCP
TargetPort:               8080/TCP
NodePort:                 <unset>  31803/TCP
Endpoints:                172.18.0.10:8080,172.18.0.11:8080,172.18.0.8:8080 + 1 more...
Session Affinity:         None
External Traffic Policy:  Cluster
Events:                   <none>
$ export NODE_PORT=$(kubectl get services/kubernetes-bootcamp -o go-template='{{(index .spec.ports 0).nodePort}}')
$ echo NODE_PORT=$NODE_PORT
NODE_PORT=31803
$ curl $(minikube ip):$NODE_PORT
Hello Kubernetes bootcamp! | Running on: kubernetes-bootcamp-7799cbcb86-fcrhx | v=2
$ curl $(minikube ip):$NODE_PORT
Hello Kubernetes bootcamp! | Running on: kubernetes-bootcamp-7799cbcb86-98sb5 | v=2
$ curl $(minikube ip):$NODE_PORT
Hello Kubernetes bootcamp! | Running on: kubernetes-bootcamp-7799cbcb86-pfddb | v=2
$ curl $(minikube ip):$NODE_PORT
Hello Kubernetes bootcamp! | Running on: kubernetes-bootcamp-7799cbcb86-ffxj8 | v=2
$ curl $(minikube ip):$NODE_PORT
Hello Kubernetes bootcamp! | Running on: kubernetes-bootcamp-7799cbcb86-98sb5 | v=2
$ kubectl rollout status deployments/kubernetes-bootcamp
deployment "kubernetes-bootcamp" successfully rolled out
$


 浙公网安备 33010602011771号