
flutter 写原生平台代码(直接复制2020/03/07 只做参考用)
Writing custom platform-specific code
This guide describes how to write custom platform-specific code. Some platform-specific functionality is available through existing packages; see using packages.
Flutter uses a flexible system that allows you to call platform-specific APIs whether available in Java or Kotlin code on Android, or in Objective-C or Swift code on iOS.
Flutter’s platform-specific API support does not rely on code generation, but rather on a flexible message passing style:
-
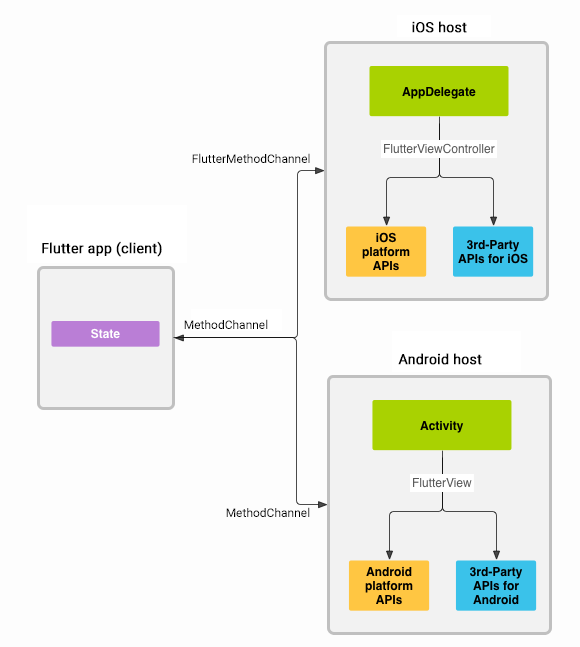
The Flutter portion of the app sends messages to its host, the iOS or Android portion of the app, over a platform channel.
-
The host listens on the platform channel, and receives the message. It then calls into any number of platform-specific APIs—using the native programming language—and sends a response back to the client, the Flutter portion of the app.
Note: This guide addresses using the platform channel mechanism if you need to use the platform’s APIs or libraries in Java/Kotlin/Objective-C or Swift. But you can also write platform-specific Dart code in your Flutter app by inspecting the defaultTargetPlatform property. Platform adaptations lists some platform-specific adaptations that Flutter automatically does for you in the framework.
Architectural overview: platform channels
Messages are passed between the client (UI) and host (platform) using platform channels as illustrated in this diagram:
Messages and responses are passed asynchronously, to ensure the user interface remains responsive.
Note: Even though Flutter sends messages to and from Dart asynchronously, whenever you invoke a channel method, you must invoke that method on the platform’s main thread. See the section on threading for more information.
On the client side, MethodChannel (API) enables sending messages that correspond to method calls. On the platform side, MethodChannel on Android (API) and FlutterMethodChannel on iOS (API) enable receiving method calls and sending back a result. These classes allow you to develop a platform plugin with very little ‘boilerplate’ code.
Note: If desired, method calls can also be sent in the reverse direction, with the platform acting as client to methods implemented in Dart. A concrete example of this is the quick_actions plugin.
Platform channel data types support and codecs
The standard platform channels use a standard message codec that supports efficient binary serialization of simple JSON-like values, such as booleans, numbers, Strings, byte buffers, and List and Maps of these (see StandardMessageCodec) for details). The serialization and deserialization of these values to and from messages happens automatically when you send and receive values.
The following table shows how Dart values are received on the platform side and vice versa:
| Dart | Java | Kotlin | OC | Swift |
|---|---|---|---|---|
| null | null | null | nil (NSNull when nested) | nil |
| bool | java.lang.Boolean | Boolean | NSNumber numberWithBool: | NSNumber(value: Bool) |
| int | java.lang.Integer | Int | NSNumber numberWithInt: | NSNumber(value: Int32) |
| int, if 32 bits not enough | java.lang.Long | Long | NSNumber numberWithLong: | NSNumber(value: Int) |
| double | java.lang.Double | Double | NSNumber numberWithDouble: | NSNumber(value: Double) |
| String | java.lang.String | String | NSString | String |
| Uint8List | byte[] | ByteArray | FlutterStandardTypedData typedDataWithBytes: | FlutterStandardTypedData(bytes: Data) |
| Int32List | int[] | IntArray | FlutterStandardTypedData typedDataWithInt32: | FlutterStandardTypedData(int32: Data) |
| Int64List | long[] | LongArray | FlutterStandardTypedData typedDataWithInt64: | FlutterStandardTypedData(int64: Data) |
| Float64List | double[] | DoubleArray | FlutterStandardTypedData typedDataWithFloat64: | FlutterStandardTypedData(float64: Data) |
| List | java.util.ArrayList | List | NSArray | Array |
| Map | java.util.HashMap | HashMap | NSDictionary | Dictionary |
Example: Calling platform-specific iOS and Android code using platform channels
The following code demonstrates how to call a platform-specific API to retrieve and display the current battery level. It uses the Android BatteryManager API, and the iOS device.batteryLevel API, via a single platform message, getBatteryLevel().
The example adds the platform-specific code inside the main app itself. If you want to reuse the platform-specific code for multiple apps, the project creation step is slightly different (see developing packages), but the platform channel code is still written in the same way.
Note: The full, runnable source-code for this example is available in /examples/platform_channel/ for Android with Java and iOS with Objective-C. For iOS with Swift, see /examples/platform_channel_swift/.
Step 1: Create a new app project
Start by creating a new app:
- In a terminal run:
flutter create batterylevel
By default our template supports writing Android code using Kotlin, or iOS code using Swift. To use Java or Objective-C, use the -i and/or -a flags:
- In a terminal run:
flutter create -i objc -a java batterylevel
Step 2: Create the Flutter platform client
The app’s State class holds the current app state. Extend that to hold the current battery state.
First, construct the channel. Use a MethodChannel with a single platform method that returns the battery level.
The client and host sides of a channel are connected through a channel name passed in the channel constructor. All channel names used in a single app must be unique; prefix the channel name with a unique ‘domain prefix’, for example: samples.flutter.dev/battery.
import 'dart:async';

import 'package:flutter/material.dart';
import 'package:flutter/services.dart';
...
class _MyHomePageState extends State<MyHomePage> {
  static const platform = const MethodChannel('samples.flutter.dev/battery');

  // Get battery level.
}
Next, invoke a method on the method channel, specifying the concrete method to call via the String identifier getBatteryLevel. The call might fail—for example if the platform does not support the platform API (such as when running in a simulator), so wrap the invokeMethod call in a try-catch statement.
Use the returned result to update the user interface state in _batteryLevel inside setState.
// Get battery level.
String _batteryLevel = 'Unknown battery level.';

Future<void> _getBatteryLevel() async {
  String batteryLevel;
  try {
    final int result = await platform.invokeMethod('getBatteryLevel');
    batteryLevel = 'Battery level at $result % .';
  } on PlatformException catch (e) {
    batteryLevel = "Failed to get battery level: '${e.message}'.";
  }

  setState(() {
    _batteryLevel = batteryLevel;
  });
}
Finally, replace the build method from the template to contain a small user interface that displays the battery state in a string, and a button for refreshing the value.
@override
Widget build(BuildContext context) {
  return Material(
    child: Center(
      child: Column(
        mainAxisAlignment: MainAxisAlignment.spaceEvenly,
        children: [
          RaisedButton(
            child: Text('Get Battery Level'),
            onPressed: _getBatteryLevel,
          ),
          Text(_batteryLevel),
        ],
      ),
    ),
  );
}
Step 3: Add an Android platform-specific implementation
Start by opening the Android host portion of your Flutter app in Android Studio:
-
Start Android Studio
-
Select the menu item File > Open…
-
Navigate to the directory holding your Flutter app, and select the android folder inside it. Click OK.
-
Open the
MainActivity.javafile located in the java folder in the Project view.
Next, create a MethodChannel and set a MethodCallHandler inside the configureFlutterEngine() method. Make sure to use the same channel name as was used on the Flutter client side.
import androidx.annotation.NonNull;
import io.flutter.embedding.android.FlutterActivity;
import io.flutter.embedding.engine.FlutterEngine;
import io.flutter.plugin.common.MethodChannel;
import io.flutter.plugins.GeneratedPluginRegistrant;

public class MainActivity extends FlutterActivity {
  private static final String CHANNEL = "samples.flutter.dev/battery";

  @Override
  public void configureFlutterEngine(@NonNull FlutterEngine flutterEngine) {
    GeneratedPluginRegistrant.registerWith(flutterEngine);
    new MethodChannel(flutterEngine.getDartExecutor().getBinaryMessenger(), CHANNEL)
        .setMethodCallHandler(
          (call, result) -> {
            // Note: this method is invoked on the main thread.
            // TODO
          }
        );
  }
}
Add the Android Java code that uses the Android battery APIs to retrieve the battery level. This code is exactly the same as you would write in a native Android app.
First, add the needed imports at the top of the file:
import android.content.ContextWrapper;
import android.content.Intent;
import android.content.IntentFilter;
import android.os.BatteryManager;
import android.os.Build.VERSION;
import android.os.Build.VERSION_CODES;
import android.os.Bundle;
Then add the following as a new method in the activity class, below the configureFlutterEngine() method:
private int getBatteryLevel() {
  int batteryLevel = -1;
  if (VERSION.SDK_INT >= VERSION_CODES.LOLLIPOP) {
    BatteryManager batteryManager = (BatteryManager) getSystemService(BATTERY_SERVICE);
    batteryLevel = batteryManager.getIntProperty(BatteryManager.BATTERY_PROPERTY_CAPACITY);
  } else {
    Intent intent = new ContextWrapper(getApplicationContext()).
        registerReceiver(null, new IntentFilter(Intent.ACTION_BATTERY_CHANGED));
    batteryLevel = (intent.getIntExtra(BatteryManager.EXTRA_LEVEL, -1) * 100) /
        intent.getIntExtra(BatteryManager.EXTRA_SCALE, -1);
  }

  return batteryLevel;
}
Finally, complete the setMethodCallHandler() method added earlier. You need to handle a single platform method, getBatteryLevel(), so test for that in the call argument. The implementation of this platform method calls the Android code written in the previous step, and returns a response for both the success and error cases using the result argument. If an unknown method is called, report that instead.
Remove the following code:
(call, result) -> {
  // Note: this method is invoked on the main thread.
  // TODO
}
And replace with the following:
(call, result) -> {
  // Note: this method is invoked on the main thread.
  if (call.method.equals("getBatteryLevel")) {
    int batteryLevel = getBatteryLevel();

    if (batteryLevel != -1) {
      result.success(batteryLevel);
    } else {
      result.error("UNAVAILABLE", "Battery level not available.", null);
    }
  } else {
    result.notImplemented();
  }
}
You should now be able to run the app on Android. If using the Android Emulator, set the battery level in the Extended Controls panel accessible from the … button in the toolbar.
Step 4: Add an iOS platform-specific implementation
Start by opening the iOS host portion of the Flutter app in Xcode:
-
Start Xcode
-
Select the menu item File > Open…
-
Navigate to the directory holding your Flutter app, and select the ios folder inside it. Click OK.
-
Make sure the Xcode projects builds without errors.
-
Open the file
AppDelegate.m, located under Runner > Runner in the Project navigator.
Create a FlutterMethodChannel and add a handler inside the application didFinishLaunchingWithOptions: method. Make sure to use the same channel name as was used on the Flutter client side.
#import <Flutter/Flutter.h>
#import "GeneratedPluginRegistrant.h"

@implementation AppDelegate
- (BOOL)application:(UIApplication*)application didFinishLaunchingWithOptions:(NSDictionary*)launchOptions {
  FlutterViewController* controller = (FlutterViewController*)self.window.rootViewController;

  FlutterMethodChannel* batteryChannel = [FlutterMethodChannel
                                          methodChannelWithName:@"samples.flutter.dev/battery"
                                          binaryMessenger:controller];

  [batteryChannel setMethodCallHandler:^(FlutterMethodCall* call, FlutterResult result) {
    // Note: this method is invoked on the UI thread.
    // TODO
  }];

  [GeneratedPluginRegistrant registerWithRegistry:self];
  return [super application:application didFinishLaunchingWithOptions:launchOptions];
}
Next, add the iOS ObjectiveC code that uses the iOS battery APIs to retrieve the battery level. This code is exactly the same as you would write in a native iOS app.
Add the following method in the AppDelegate class, just before @end:
- (int)getBatteryLevel {
  UIDevice* device = UIDevice.currentDevice;
  device.batteryMonitoringEnabled = YES;
  if (device.batteryState == UIDeviceBatteryStateUnknown) {
    return -1;
  } else {
    return (int)(device.batteryLevel * 100);
  }
}
Finally, complete the setMethodCallHandler() method added earlier. You need to handle a single platform method, getBatteryLevel(), so test for that in the call argument. The implementation of this platform method calls the iOS code written in the previous step, and returns a response for both the success and error cases using the result argument. If an unknown method is called, report that instead.
__weak typeof(self) weakSelf = self;
[batteryChannel setMethodCallHandler:^(FlutterMethodCall* call, FlutterResult result) {
  // Note: this method is invoked on the UI thread.
  if ([@"getBatteryLevel" isEqualToString:call.method]) {
    int batteryLevel = [weakSelf getBatteryLevel];

    if (batteryLevel == -1) {
      result([FlutterError errorWithCode:@"UNAVAILABLE"
                                 message:@"Battery info unavailable"
                                 details:nil]);
    } else {
      result(@(batteryLevel));
    }
  } else {
    result(FlutterMethodNotImplemented);
  }
}];
You should now be able to run the app on iOS. If using the iOS Simulator, note that it does not support battery APIs, and the app displays ‘battery info unavailable’.
Separate platform-specific code from UI code
If you expect to use your platform-specific code in multiple Flutter apps, it can be useful to separate the code into a platform plugin located in a directory outside your main application. See developing packages for details.
Publish platform-specific code as a package
To share your platform-specific code with other developers in the Flutter ecosystem, see publishing packages.
Custom channels and codecs
Besides the above mentioned MethodChannel, you can also use the more basic BasicMessageChannel, which supports basic, asynchronous message passing using a custom message codec. You can also use the specialized BinaryCodec, StringCodec, and JSONMessageCodec classes, or create your own codec.
Channels and Platform Threading
Invoke all channel methods on the platform’s main thread when writing code on the platform side. On Android, this thread is sometimes called the “main thread”, but it is technically defined as the UI thread. Annotate methods that need to be run on the UI thread with @UiThread. On iOS, this thread is officially referred to as the main thread.
Jumping to the UI thread in Android
To comply with channels’ UI thread requirement, you may need to jump from a background thread to Android’s UI thread to execute a channel method. In Android this is accomplished by post()ing a Runnable to Android’s UI thread Looper, which will cause the Runnable to execute on the main thread at the next opportunity.
In Java:
new Handler(Looper.getMainLooper()).post(new Runnable() {
  @Override
  public void run() {
    // Call the desired channel message here.
  }
});
In Kotlin:
Handler(Looper.getMainLooper()).post {
  // Call the desired channel message here.
}
Jumping to the main thread in iOS
To comply with channel’s main thread requirement, you may need to jump from a background thread to iOS’s main thread to execute a channel method. In iOS this is accomplished by executing a block on the main dispatch queue:
In Objective-C:
dispatch_async(dispatch_get_main_queue(), ^{
  // Call the desired channel message here.
});
In Swift:
DispatchQueue.main.async {
  // Call the desired channel message here.
}
 浙公网安备 33010602011771号