git使用的常见命令
Git的使用
1.下载git:https://www.cnblogs.com/ximiaomiao/p/7140456.html
Git常用命令及使用方法
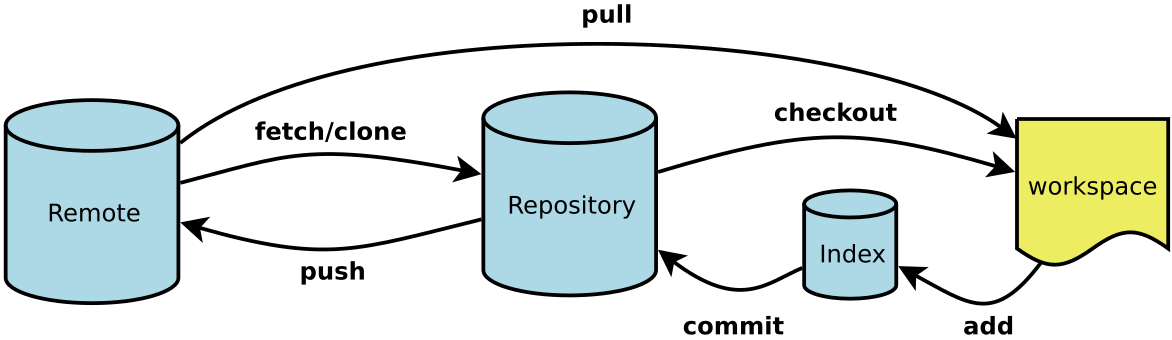
- Workspace:工作区
- Index / Stage:暂存区
- Repository:仓库区(或本地仓库)
- Remote:远程仓库
项目常见命令
# 在当前目录新建一个Git代码库
$ git init

# 设置提交代码时的用户信息
$ git config [--global] user.name "[name]"
$ git config [--global] user.email "[email address]"

# 下载一个项目和它的整个代码历史
$ git clone [url]

# 增加一个新的远程仓库,并命名
$ git remote add [shortname] [url]

# 指把两段不相干的 分支进行强行合并
 git pull origin master --allow-unrelated-histories


# 新建一个分支,但依然停留在当前分支
$ git branch [branch-name]

# 列出所有本地分支和远程分支
$ git branch -a

# 切换到指定分支,并更新工作区
$ git checkout [branch-name]

#添加当前目录的所有文件到暂存区
$ git add .

# 提交暂存区到仓库区
$ git commit -m [message]

# 合并指定分支到当前分支
$ git merge [branch]

# 上传本地指定分支到远程仓库
$ git push [remote] [branch]
项目常见命令:版本回退
Git配置
1 # 显示当前的Git配置
2 $ git config --list
3
4 # 编辑Git配置文件
5 $ git config -e [--global]
6
7 # 设置提交代码时的用户信息
8 $ git config [--global] user.name "[name]"
9 $ git config [--global] user.email "[email address]"
添加文件到暂存区
 1 # 添加指定文件到暂存区
 2 $ git add [file1] [file2] ...
 3
 4 # 添加指定目录到暂存区,包括子目录
 5 $ git add [dir]
 6
 7 # 添加当前目录的所有文件到暂存区
 8 $ git add .
 9
10 # 添加每个变化前,都会要求确认
11 # 对于同一个文件的多处变化,可以实现分次提交
12 $ git add -p
13
14 # 删除工作区文件,并且将这次删除放入暂存区
15 $ git rm [file1] [file2] ...
16
17 # 停止追踪指定文件,但该文件会保留在工作区
18 $ git rm --cached [file]
19
20 # 改名文件,并且将这个改名放入暂存区
21 $ git mv [file-original] [file-renamed]
添加文件到仓库区
 1 # 提交暂存区到仓库区
 2 $ git commit -m [message]
 3
 4 # 提交暂存区的指定文件到仓库区
 5 $ git commit [file1] [file2] ... -m [message]
 6
 7 # 提交工作区自上次commit之后的变化,直接到仓库区
 8 $ git commit -a
 9
10 # 提交时显示所有diff信息
11 $ git commit -v
12
13 # 使用一次新的commit,替代上一次提交
14 # 如果代码没有任何新变化,则用来改写上一次commit的提交信息
15 $ git commit --amend -m [message]
16
17 # 重做上一次commit,并包括指定文件的新变化
18 $ git commit --amend [file1] [file2] ...
分支
# 列出所有本地分支
$ git branch

# 列出所有远程分支
$ git branch -r

# 列出所有本地分支和远程分支
$ git branch -a

# 新建一个分支,但依然停留在当前分支
$ git branch [branch-name]

# 以远程分支为基础新建一个分支,并切换到该分支
$ git checkout -b [branch] origin/[remote-branch]

# 新建一个分支,指向指定commit
$ git branch [branch] [commit]

# 新建一个分支,与指定的远程分支建立追踪关系
$ git branch --track [branch] [remote-branch]

# 切换到指定分支,并更新工作区
$ git checkout [branch-name]

# 切换到上一个分支
$ git checkout -

# 建立追踪关系,在现有分支与指定的远程分支之间
$ git branch --set-upstream [branch] [remote-branch]

# 合并指定分支到当前分支
$ git merge [branch]

# 选择一个commit,合并进当前分支
$ git cherry-pick [commit]

# 删除分支
$ git branch -d [branch-name]

# 删除远程分支
$ git push origin --delete [branch-name]
$ git branch -dr [remote/branch]
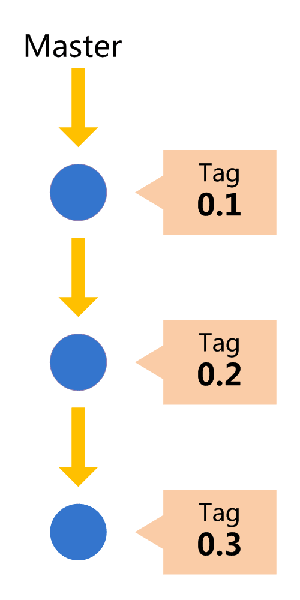
标签
 1 # 列出所有tag
 2 $ git tag
 3
 4 # 新建一个tag在当前commit
 5 $ git tag [tag]
 6
 7 # 新建一个tag在指定commit
 8 $ git tag [tag] [commit]
 9
10 # 删除本地tag
11 $ git tag -d [tag]
12
13 # 删除远程tag
14 $ git push origin :refs/tags/[tagName]
15
16 # 查看tag信息
17 $ git show [tag]
18
19 # 提交指定tag
20 $ git push [remote] [tag]
21
22 # 提交所有tag
23 $ git push [remote] --tags
24
25 # 新建一个分支,指向某个tag
26 $ git checkout -b [branch] [tag]
远程同步
 1 # 下载远程仓库的所有变动
 2 $ git fetch [remote]
 3
 4 # 显示所有远程仓库
 5 $ git remote -v
 6
 7 # 显示某个远程仓库的信息
 8 $ git remote show [remote]
 9
10 # 增加一个新的远程仓库,并命名
11 $ git remote add [shortname] [url]
12
13 # 取回远程仓库的变化,并与本地分支合并
14 $ git pull [remote] [branch]
15
16 # 上传本地指定分支到远程仓库
17 $ git push [remote] [branch]
18
19 # 强行推送当前分支到远程仓库,即使有冲突
20 $ git push [remote] --force
21
22 # 推送所有分支到远程仓库
23 $ git push [remote] --all
PS: git pull origin master --allow-unrelated-histories 指把两段不相干的 分支进行强行合并
撤销
 1 # 恢复暂存区的指定文件到工作区
 2 $ git checkout [file]
 3
 4 # 恢复某个commit的指定文件到暂存区和工作区
 5 $ git checkout [commit] [file]
 6
 7 # 恢复暂存区的所有文件到工作区
 8 $ git checkout .
 9
10 # 重置暂存区的指定文件,与上一次commit保持一致,但工作区不变
11 $ git reset [file]
12
13 # 重置暂存区与工作区,与上一次commit保持一致
14 $ git reset --hard
15
16 # 重置当前分支的指针为指定commit,同时重置暂存区,但工作区不变
17 $ git reset [commit]
18
19 # 重置当前分支的HEAD为指定commit,同时重置暂存区和工作区,与指定commit一致
20 $ git reset --hard [commit]
21
22 # 重置当前HEAD为指定commit,但保持暂存区和工作区不变
23 $ git reset --keep [commit]
24
25 # 新建一个commit,用来撤销指定commit
26 # 后者的所有变化都将被前者抵消,并且应用到当前分支
27 $ git revert [commit]
28
29 # 暂时将未提交的变化移除,稍后再移入
30 $ git stash
31 $ git stash pop
.gitignore
1.Django项目中常用的不需要提交的清单设置
.idea/
__pycache__/
*.pyc
*.log
*.pot
db.sqlite3
media
2.使用Git管理代码的过程中,可以修改.gitignore文件中的标示的方法来忽略开发者想忽略掉的文件或目录,如果没有.gitignore文件,可以自己手工创建。在.gitignore文件中的每一行保存一个匹配的规则例如:
1 # 此为注释 – 将被 Git 忽略
2
3 *.a       # 忽略所有 .a 结尾的文件
4 !lib.a    # 但 lib.a 除外
5 /TODO     # 仅仅忽略项目根目录下的 TODO 文件,不包括 subdir/TODO
6 build/    # 忽略 build/ 目录下的所有文件
7 doc/*.txt # 会忽略 doc/notes.txt 但不包括 doc/server/arch.txt
3.Git使用时.gitignore设置的文件无法生效的的问题,执行以下命令。
1 git rm -r --cached .
2 git add .
3 git commit -m 'update .gitignore'
Git分支管理策略
主分支Master
首先,代码库应该有一个、且仅有一个主分支。所有提供给用户使用的正式版本,都在这个主分支上发布。
Git主分支的名字,默认叫做Master。它是自动建立的,版本库初始化以后,默认就是在主分支在进行开发。
开发分支Develop
主分支只用来分布重大版本,日常开发应该在另一条分支上完成。我们把开发用的分支,叫做Develop。
这个分支可以用来生成代码的最新隔夜版本(nightly)。如果想正式对外发布,就在Master分支上,对Develop分支进行"合并"(merge)。
Git创建Develop分支的命令
1 git checkout -b develop master
将Develop分支发布到Master分支的命令
1 # 切换到Master分支
2 git checkout master
3
4 # 对Develop分支进行合并
5 git merge --no-ff develop
这里稍微解释一下,上一条命令的--no-ff参数是什么意思。默认情况下,Git执行"快进式合并"(fast-farward merge),会直接将Master分支指向Develop分支。
使用--no-ff参数后,会执行正常合并,在Master分支上生成一个新节点。为了保证版本演进的清晰,我们希望采用这种做法。关于合并的更多解释,请参考Benjamin Sandofsky的《Understanding the Git Workflow》。
原文地址:https://blog.csdn.net/web_csdn_share/article/details/79243308
