WPF之各种数据
在Silverlight和WPF中数据绑定都是使用Binding表达式来进行数据的绑定,当然这种方法的优点不仅仅是使用简单,和其强大的功能也存在直接的联系。
先看个Sample吧:
<Grid>
        <Grid.Resources>
            <local:User x:Key="currentUser"></local:User>
        </Grid.Resources>
        <Grid.RowDefinitions>
            <RowDefinition Height="35"></RowDefinition>
            <RowDefinition Height="35"></RowDefinition>
        </Grid.RowDefinitions>
        <Grid.ColumnDefinitions>
            <ColumnDefinition></ColumnDefinition>
            <ColumnDefinition></ColumnDefinition>
        </Grid.ColumnDefinitions>
        <TextBlock Grid.Column="0" Margin="5">Name:</TextBlock>
        <TextBox Grid.Column="1" Margin="5" Text="{Binding Name,Source={StaticResource currentUser}}"></TextBox>
        <TextBlock Grid.Column="0" Margin="5" Grid.Row="1">Age:</TextBlock>
        <TextBox Grid.Column="1" Margin="5" Grid.Row="1" Text="{Binding Age,Source={StaticResource currentUser}}"></TextBox>
    </Grid>
此段代码中在在Grid中定义了一个资源,为一个实体类的对象(User为自定义实体),在TextBox中使用Binding的方式进行绑定数据,Source指定数据源为静态资源中的定义的对象(通过key来指定)。
上边代码仅仅指定了Binding表达式,并没有指定何时进行数据源的更新,所以上述的TextBox可以进行以下修改:
<TextBox Grid.Column="1" Margin="5" Text="{Binding Name,Source={StaticResource currentUser}, UpdateSourceTrigger=PropertyChanged}"></TextBox>
在Binding中增加了UpdateSourceTrigger的属性设置,设置的值的为当值改变时候通知数据源。
Mode:
上述例子中并没有使用到Mode属性,那是因为TextBox的Text属性默认为TwoWay(吼吼,和Silverlight有不同哦),所以是不需要的,但是还是要进行解释。
Mode一共有好几个值可选,但是呢常用的有以下几个:
OneWay:表示仅从数据源更新到控件,比如当数据源有了修改,则界面会立即更新;
TwoWay:表示既从数据源更新到控件,也从数据源更新到服务端,比如当界面中的控件(Combobox控件,此处真的不能举例TextBox)发生了值的改变,那么对应的DataContext中控件的绑定的属性也会发生改变;
OneWatToSource:此属性在Silverlight中是没有的哦,作用是从控件更新到数据源对象。
WPF中的数据源绑定方式:
1.Source,一般来说值ItemsSource或者拥有此类似的属性,一般会绑定自己的对象。
2.ElementName,一般用于元素之间的绑定,比如将TextBlock的值绑定为某一个Silder的值。
3.RelativeSource 用于指定数据源的相对位置,例如我们都知道在DataGrid的模板中的Button无法触发Command,那么怎么办呢?哈哈,有了RelativeSource一切都变的那么简单。
<DataGrid>
            <DataGrid.Columns>
                <DataGridTemplateColumn>
                    <DataGridTemplateColumn.CellTemplate>
                        <DataTemplate>
                            <Button Command="{Binding Path=EditCommand, RelativeSource={RelativeSource FindAncestor,AncestorType={x:Type Window}}}"></Button>
                        </DataTemplate>
                    </DataGridTemplateColumn.CellTemplate>
                </DataGridTemplateColumn>
            </DataGrid.Columns>
        </DataGrid>
是不是很简单呢,FindAncestor表示将从目标对象沿着元素树向上查找,AncestorType表示需要查找的对象类型。即将从目标对象为起点,沿着元素树往上查找,直至找到第一个类型为Window的对象作为数据源。 RelativeResourceMode,除了FindAncestor之外还有三个值: Self,数据源即为当前的元素本身,用于元素的几个属性之间的绑定
<Style x:Key="textBoxInError" TargetType="{x:Type TextBox}">
  <Style.Triggers>
    <Trigger Property="Validation.HasError" Value="true">
      <Setter Property="ToolTip"
        Value="{Binding RelativeSource={x:Static RelativeSource.Self},
                        Path=(Validation.Errors)[0].ErrorContent}"/>
    </Trigger>
  </Style.Triggers>
</Style>
PreviousData:多用在列表中,允许您绑定所显示数据项列表中以前的数据项(不是包含数据项的控件)。
TemplateParent:表示拥有该模板的父类,引用应用了模板(其中有数据绑定元素)的元素。 这类似于设置 TemplateBindingExtension,并仅当 Binding 在模板中时适用。
INotifyPropertyChanged接口:
在工作中有时候会发现明明Binding正确,也指定了正确的Mode,数据源还是无法通知到界面,那么恭喜你很有可能是你的实体类没有实现INotifyPropertyChanged接口。INotifyPropertyChanged接口用我自己的解释就是用于通知界面属性改变了,是不是很通俗的解释,它的功能也的确是这样的,只不过你需要自己写实现的代码哦:
 private string _name;
        public string Name
        {
            get { return _name; }
            set
            {
                if (_name != value)
                {
                    _name = value;
                    OnPropertyChanged("Name");
                }
            }
        }

        public event PropertyChangedEventHandler PropertyChanged;
        private void OnPropertyChanged(string propertyName)
        {
            if (PropertyChanged != null)
            {
                PropertyChanged(this, new PropertyChangedEventArgs(propertyName));
            }
        }
实现INotifyPropertyChanged的目的是要进行对PropertyChanged 事件进行调用,当然前提是要自己写一个OnPropertyChanged这样的方法,参数就是属性的名字,在方法中判断当有属性改变事件不为空(即有属性值发生了改变),则对属性进行通知,这样Binding了此属性的控件就会得到更新。
UpdateSourceTrigger:
从字面意思就可以理解,是更新数据源的触发器,即何时从目标对象(往往指的是绑定属性的控件)更新到数据源(UpdateSourceTrigger也是一个枚举)。
1.LostFocus:目标对象失去焦点(控件失去焦点);
2.PropertyChanged:表示目标对象值发生改变(控件的值进行了改变);
3.Explicit:显式的通知,一般来说为在后置代码中手动调用UpdateSource方法;
4.Default:Binding的UpdateSourceTrigger属性大部分都为PropertyChanged。而Text属性考虑到了效率的问题,则是LostFocus。
IValueConverter:
值转换 IValueConverter 值转换比较实用的,比如数据库中保存的男女为1和0,而希望显示在界面上的为男和女,另外也希望在编辑界面上选择男女之后可以转换为1和0便于保存到数据库。 有了IValueConverter此需求变的非常简单,值转换类实现IValueConverter接口,需要实现Convert和ConvertBack方法,通过Convert方法转换为要显示的数据,通过ConvertBack将值更新到数据源去。
Sample:
 public class SexConverter : IValueConverter
    {
        public object Convert(object value, Type targetType, object parameter, System.Globalization.CultureInfo culture)
        {
            if (value != null)
            {
                if ((int)value == 0)
                {
                    return "男";
                }
                else if ((int)value == 1)
                {
                    return "女";
                }
            }
            return null;
        }

        public object ConvertBack(object value, Type targetType, object parameter, System.Globalization.CultureInfo culture)
        {
            if (value != null)
            {
                if (value == "男")
                {
                    return 0;
                }
                else if (value == "女")
                {
                    return 1;
                }
            }
            return 0;
        }
    }
此例子为转换性别的,假设数据库中存放的为数字,而希望在界面上显示的为字符串,这时候我们就可以通过IValueConverter的转换。此接口有两个方法Convert和ConvertBack,前者为将元素(控件)绑定的值(即方法中的第一个参数Value)转换为你想要的任何格式(或者是任何逻辑的值)的值;后者为将元素中的值转换为数据源对应格式的值。例子中为在界面上显示为字符串"男女",而数据库为数字“0,1”,所以就需要在Convert方法中转换为字符串,而在ConvterBack方法中转成数据库一致的数字。
使用场景:一般来说IValueConverter使用在希望将Binding的值进行处理,不管是进行格式的格式化或者是进行逻辑的判断得到具体的值,甚至说可以根据值来返回一个颜色影响到文本的状态。
既然说到了ValueConverter我就多说几句,除了上述的IValueConverter之外还有一个很厉害的类型转换,它就是TypeConverter.
自定义数据验证
Binding的ValidationRules属性是数据验证规则的集合,要实现自定义的数据验证,则要继承自一个抽象类ValidationRule,其中必须实现Validate方法,如下的一个验证是否为数字的自定义验证类:
  class NumberRule : ValidationRule
    {
        public override ValidationResult Validate(object value, System.Globalization.CultureInfo cultureInfo)
        {
            int number;
            if (int.TryParse(value.ToString(), out number) == false)
            {
                return new ValidationResult(false, "输入了非法的数字!");
            }
            return ValidationResult.ValidResult;
        }
    }
使用方法如下: 其中Binding.ValidationRules为验证规则集合,可以放多个要验证的(继承自ValidationRul)类,另外要设置ValidatesOnDataErrors为true,这样才可以进行显示错误,最重要的一点是ToolTip,此处我们绑定了ToolTip为错误的文本。在这里使用的时RelativeSource相对资源的方式,Self表示TextBox的本身,Validation.Errors为附加属性,是ValidationError的集合,当数据出现非法的时候,就会创建ValidationError对象到集合中。由于每次验证时候都会清空集合,所以使用的时第一个ValidationError对象。ErrorContent是ValidationError的属性,此属性就是我们自定义ValidationRule中Validate方法中返回的ValidationResult的第二个参数值。
 <TextBox Grid.Row="0" Height="30" Width="200" Background="LightBlue"  ToolTip="{Binding RelativeSource={RelativeSource  Self},Path=(Validation.Errors)[0].ErrorContent}">
            <TextBox.Text>
                <Binding Path="Age" ValidatesOnDataErrors="True" UpdateSourceTrigger="PropertyChanged">
                    <Binding.ValidationRules>
                        <local:NumberRule></local:NumberRule>
                    </Binding.ValidationRules>
                </Binding>
            </TextBox.Text>
        </TextBox>
当输入非数字的字符时候,则会使边框显示为红色,同时这里使用ToolTip来显示错误信息,显示效果如下: 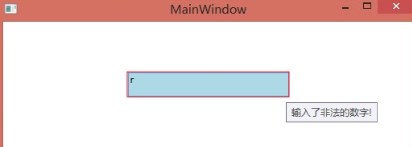
ErrorTemplate(错误消息模版): 默认的错误消息是以红色边框来显示的,上例子中我们还使用了ToolTip来显示错误文本。
<ControlTemplate x:Key="validationTemplate">
  <DockPanel>
    <TextBlock Foreground="Red" FontSize="20">!</TextBlock>
    <AdornedElementPlaceholder/>
  </DockPanel>
</ControlTemplate>
上述代码为一个自定义验证模板的代码,此时出现错误则会在控件的左侧显示红色叹号,如下效果:

代码中比较疑惑的地方就是,AdornedElementPlaceholder标签(表示用于 ControlTemplate 的元素指定了装饰的控件位置放置相对于其他元素在 ControlTemplate。),此处相对的控件就是TextBox控件。
开始使用验证模板:
<TextBox Name="StartDateEntryForm" Grid.Row="3" Grid.Column="1"
    Validation.ErrorTemplate="{StaticResource validationTemplate}"
    Style="{StaticResource textStyleTextBox}" Margin="8,5,0,5">
    <TextBox.Text>
        <Binding Path="StartDate" UpdateSourceTrigger="PropertyChanged"
            Converter="{StaticResource dateConverter}" >
            <Binding.ValidationRules>
                <src:FutureDateRule />
            </Binding.ValidationRules>
        </Binding>
    </TextBox.Text>
</TextBox>
通过指定Validation.ErrorTemplate为静态的资源key即可。
数据的验证过程:(摘抄自WPF葵花宝典)
数据验证和值转换不同,数据验证只发生在从目标到数据源转换的过程中,即数据验证只能在模式为TowWay或者OneWayToSource的两种绑定。ValidationRule的ValidationStep属性用来标识ValidationRule的Validate函数的调用顺序,它有4种不同的枚举值,即RawProposedValue,ConvertedProposedValue,UpdateValue,CommitedValue.
(1)如果有自定义的ValidationRule,WPF则会首先调用值为RawProposedValue(ValidationStep)的Validate函数。如果验证不合法,该过程结束;否则继续。
(2)如果有值转换类,WPF会调用值转换类的ConvertBack函数。如果转换不成功,该过程结束;否则继续。
(3)WPF会继续检查值为ConvertedProposed的自定义ValidationRule,调用其Validate函数。如果验证不合法,该过程结束;否则继续。
(4)WPF设置数据源的属性值。
(5)WPF继续检查值为UpdateValue的自定义ValidationRule,调用其Validate函数。如果验证不合法,该过程结束;否则继续。
(6)WPF检查值为CommitedValue的自定义ValidationRule,调用其Validate函数,整个验证过程结束。
数据模板:
数据模板和控件模板类似,但是前者是用来定义数据的可视化外观,后者是用来定义整个控件的可视化外观。
<ListBox.ItemTemplate>
                <DataTemplate>
                    <Border BorderThickness="1" BorderBrush="Black">
                        <Grid>
                            <Grid.RowDefinitions>
                                <RowDefinition></RowDefinition>
                                <RowDefinition></RowDefinition>
                            </Grid.RowDefinitions>
                            <Grid.ColumnDefinitions>
                                <ColumnDefinition Width="40"></ColumnDefinition>
                                <ColumnDefinition></ColumnDefinition>
                            </Grid.ColumnDefinitions>
                            <TextBlock Grid.Row="0" Grid.Column="0" Text="姓名:"></TextBlock>
                            <TextBlock Grid.Row="1" Grid.Column="0" Text="年龄:"></TextBlock>
                            <TextBlock Grid.Row="0" Grid.Column="1" Text="{Binding Path=Name}"></TextBlock>
                            <TextBlock Grid.Row="1" Grid.Column="1" Text="{Binding Path=Age}"></TextBlock>
                        </Grid>
                    </Border>
                </DataTemplate>
            </ListBox.ItemTemplate>
上述代码就是一个简单的DataTemplate例子,使ListBox的ItemTemplate模板作为一个两行两列的Grid,放置了四个TextBlock用于显示信息。
当然,DataTemplate也可以控件模板一样做成资源,供多个地方使用:
 <DataTemplate x:Key="listboxItemDataTemplate">
                <Border BorderThickness="1" BorderBrush="Black">
                    <Grid>
                        <Grid.RowDefinitions>
                            <RowDefinition></RowDefinition>
                            <RowDefinition></RowDefinition>
                        </Grid.RowDefinitions>
                        <Grid.ColumnDefinitions>
                            <ColumnDefinition Width="40"></ColumnDefinition>
                            <ColumnDefinition></ColumnDefinition>
                        </Grid.ColumnDefinitions>
                        <TextBlock Grid.Row="0" Grid.Column="0" Text="姓名:"></TextBlock>
                        <TextBlock Grid.Row="1" Grid.Column="0" Text="年龄:"></TextBlock>
                        <TextBlock Grid.Row="0" Grid.Column="1" Text="{Binding Path=Name}"></TextBlock>
                        <TextBlock Grid.Row="1" Grid.Column="1" Text="{Binding Path=Age}"></TextBlock>
                    </Grid>
                </Border>
            </DataTemplate>
这就是一个资源形式的DataTemplate,在ListBox中设置属性ListTemplate="{StaticResourcelistboxItemDataTemplate}"即可。
更甚至,可以设置同一类元素的DataTemplae,此时就需要设置DataTemplate的DataType即可:
      <DataTemplate DataType="{x:Type local:Person}">
                <Border BorderThickness="1" BorderBrush="Black">
                    <Grid>
                        <Grid.RowDefinitions>
                            <RowDefinition></RowDefinition>
                            <RowDefinition></RowDefinition>
                        </Grid.RowDefinitions>
                        <Grid.ColumnDefinitions>
                            <ColumnDefinition Width="40"></ColumnDefinition>
                            <ColumnDefinition></ColumnDefinition>
                        </Grid.ColumnDefinitions>
                        <TextBlock Grid.Row="0" Grid.Column="0" Text="姓名:"></TextBlock>
                        <TextBlock Grid.Row="1" Grid.Column="0" Text="年龄:"></TextBlock>
                        <TextBlock Grid.Row="0" Grid.Column="1" Text="{Binding Path=Name}"></TextBlock>
                        <TextBlock Grid.Row="1" Grid.Column="1" Text="{Binding Path=Age}"></TextBlock>
                    </Grid>
                </Border>
            </DataTemplate>
和之前代码的唯一区别就是将key替换了DataType,DataType类似于样式的TargetType属性,可以自动应用到所有类型为Person的对象,当然也无需在ListBox中指定ListItemTemplate。
集合视图:
集合视图可以进行过滤,排序和分组。集合视图实现自ICollectionView接口,可以在不改变数据集的情况下过滤,分组和排序数据。数据集合数据视图是一对多的关系,并且当目标直接绑定数据源时,WPF也会为数据源创建一个默认的数据视图。
Demo:
<Window.Resources>
        <local:People x:Key="personSource"></local:People>
        <CollectionViewSource Source="{Binding Source={StaticResource personSource}}" x:Key="listingDataView"></CollectionViewSource>
        <DataTemplate DataType="{x:Type local:User}">
            <Border BorderThickness="1" BorderBrush="Black" MinWidth="300">
                <Grid>
                    <Grid.RowDefinitions>
                        <RowDefinition></RowDefinition>
                        <RowDefinition></RowDefinition>
                    </Grid.RowDefinitions>
                    <Grid.ColumnDefinitions>
                        <ColumnDefinition Width="40"></ColumnDefinition>
                        <ColumnDefinition Width="*"></ColumnDefinition>
                    </Grid.ColumnDefinitions>
                    <TextBlock Grid.Row="0" Grid.Column="0" Text="姓名:"></TextBlock>
                    <TextBlock Grid.Row="1" Grid.Column="0" Text="年龄:"></TextBlock>
                    <TextBlock Grid.Row="0" Grid.Column="1" Text="{Binding Path=Name}"></TextBlock>
                    <TextBlock Grid.Row="1" Grid.Column="1" Text="{Binding Path=Age}"></TextBlock>
                </Grid>
            </Border>
        </DataTemplate>
        <DataTemplate x:Key="groupingHeaderTemplate">
            <TextBlock  Text="{Binding Path=Name}" Foreground="Navy" FontWeight="Bold" FontSize="12"></TextBlock>
        </DataTemplate>
    </Window.Resources>
 public class User : INotifyPropertyChanged
    {
        private string _name;
        public string Name
        {
            get { return _name; }
            set
            {
                if (_name != value)
                {
                    _name = value;
                    OnPropertyChanged("Name");
                }
            }
        }

        public event PropertyChangedEventHandler PropertyChanged;
        private void OnPropertyChanged(string propertyName)
        {
            if (PropertyChanged != null)
            {
                PropertyChanged(this, new PropertyChangedEventArgs(propertyName));
            }
        }

        private int _age;

        public int Age
        {
            get { return _age; }
            set { _age = value; }
        }

    }

    public class People:ObservableCollection<User>
    {
        public People()
            : base()
        {
            Add(new User { Name = "Listen", Age = 21 });
            Add(new User { Name = "Fly", Age = 26 });
            Add(new User { Name = "Colors", Age = 28 });
            Add(new User { Name = "Blue", Age = 40});
            Add(new User { Name = "Colors.Blue", Age =77 });
        }
    }
在资源中有一个People集合的一个对象,同时还有一个CollectionViewSource 集合视图对象,另外还有两个DataTemplate,一个就是之前说到的针对一个类型的模板,另一个是新添加的针对ListBox的GroupStyle的HeaderTemplate的模板。
    <Grid>
        <Grid.RowDefinitions>
            <RowDefinition Height="30"></RowDefinition>
            <RowDefinition Height="*"></RowDefinition>
        </Grid.RowDefinitions>
        <StackPanel Orientation="Horizontal">
            <CheckBox Margin="5" x:Name="chkGroup" Checked="chkGroup_Checked_1" Unchecked="chkGroup_Unchecked_1">按年龄分组</CheckBox>
            <CheckBox Margin="5" x:Name="chkFilter" Checked="chkFilter_Checked_1" Unchecked="chkFilter_Unchecked_1">过滤</CheckBox>
            <CheckBox Margin="5" x:Name="chkSort" Checked="chkSort_Checked_1" Unchecked="chkSort_Unchecked_1">排序</CheckBox>
        </StackPanel>
        <ListBox x:Name="listBox" ItemsSource="{Binding Source={StaticResource listingDataView}}" Grid.Row="2">
            <ListBox.GroupStyle>
                <GroupStyle HeaderTemplate="{StaticResource groupingHeaderTemplate}"></GroupStyle>
            </ListBox.GroupStyle>
        </ListBox>
    </Grid>
ListBox部分代码如上,其中有三个复选框用于对数据进行分组,过滤和排序,同时也在ListBox的GroupStyle中指定了HeaderTemplate,表示分组标题的模板。
 CollectionViewSource listingDataView;
        public Window2()
        {
            InitializeComponent();
            listingDataView = (CollectionViewSource)this.Resources["listingDataView"];
        }

        private void chkGroup_Checked_1(object sender, RoutedEventArgs e)
        {
            PropertyGroupDescription groupDescription = new PropertyGroupDescription();
            groupDescription.PropertyName = "Age";
            listingDataView.GroupDescriptions.Add(groupDescription);
        }

        private void chkGroup_Unchecked_1(object sender, RoutedEventArgs e)
        {
            listingDataView.GroupDescriptions.Clear();
        }

        private void chkFilter_Checked_1(object sender, RoutedEventArgs e)
        {
            listingDataView.Filter += listingDataView_Filter;
        }

        void listingDataView_Filter(object sender, FilterEventArgs e)
        {
            User user = e.Item as User;
            if (user!=null)
            {
                if (user.Age > 30)
                {
                    e.Accepted = true;
                }
                else
                {
                    e.Accepted = false;
                }
            }
        }
        private void chkFilter_Unchecked_1(object sender, RoutedEventArgs e)
        {
            listingDataView.Filter -= listingDataView_Filter;
        }

        private void chkSort_Checked_1(object sender, RoutedEventArgs e)
        {
            listingDataView.SortDescriptions.Add(new System.ComponentModel.SortDescription("Age",System.ComponentModel.ListSortDirection.Descending));
        }

        private void chkSort_Unchecked_1(object sender, RoutedEventArgs e)
        {
            listingDataView.SortDescriptions.Clear();
        }
在后置代码中先是定义了一个CollectionViewSource的对象,用于接收Resource中的对象,同时也便于之后的操作。在三个复选框的Checked和UnChecked事件中对集合进行操作。(其中过滤是对Age大于30的数据进行过滤,对Name进行分组,对Age进行倒序)
效果图如下: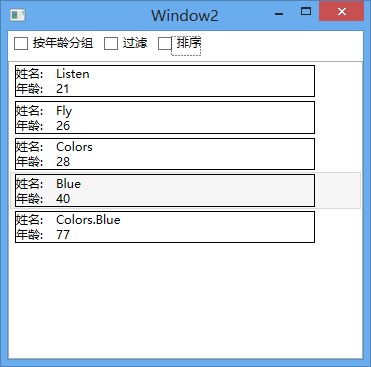
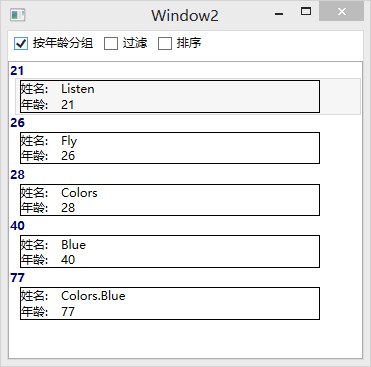
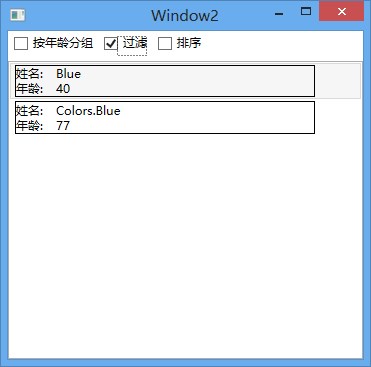
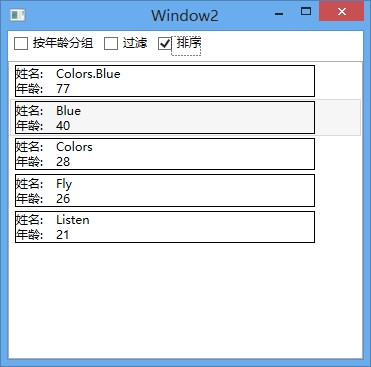
以上四幅图依次为默认状态,按年龄分组,过滤,和排序效果。
好了,这次的数据部分就说到这里,欢迎大家进行讨论和指正。


