
day 15
知识补充
1.关于压缩题,理解tar和gz

http://yuchaoit.cn/all_nginx.tgz

[root@yuanlai-0224 test_tar]# # 看到此tgz,就得记住,它是2个打包+压缩步骤,tar + gz
[root@yuanlai-0224 test_tar]#
[root@yuanlai-0224 test_tar]#
[root@yuanlai-0224 test_tar]# # 万能解压命令 tar -zxvf
[root@yuanlai-0224 test_tar]#
[root@yuanlai-0224 test_tar]# tar -zxvf all_nginx.tgz

# 第二条命令,分别进行先解压缩gz后缀,再拆包tar归档操作,最终得到,原本的零散文件
gzip -d all_nginx.tgz
tar -xvf all_nginx.tar


http://yuchaoit.cn/all_nginx.tar
tar -xf all_nginx.tar

http://yuchaoit.cn/all_nginx.tar.gz
tar -zxvf all_nginx.tar.gz


http://yuchaoit.cn/nginx-logo.png.gz

[root@yuanlai-0224 test_tar]# gzip -d nginx-logo.png.gz
[root@yuanlai-0224 test_tar]# ll
总用量 4
-rw-r--r--. 1 root root 368 10月 19 07:55 nginx-logo.png
[root@yuanlai-0224 test_tar]#
[root@yuanlai-0224 test_tar]#
[root@yuanlai-0224 test_tar]# file nginx-logo.png
nginx-logo.png: PNG image data, 121 x 32, 1-bit colormap, non-interlaced


文件操作,测试数据
[root@yuanlai-0224 test_tar]# cat  t1.txt
20
26
13
18
28
7
14
30
8
15
3
18
10
25
25
7
30
28
28
23
0
4
30
14
32
3
9
20
31
5


生成20个随机数
for i in {1..30};do echo $(expr $RANDOM / 1000 ) ;done> t1.txt


2.读取文件内容且倒叙排序,从小到大,从大到小,
# sort是对文本排序的,默认是以第一位字符进行大小比较
[root@yuanlai-0224 test_tar]# cat t1.txt  | sort -n -r


3.读取文件内容,排序,再统计重复行的次数
[root@yuanlai-0224 test_tar]# cat t1.txt  | sort -n | uniq -c
      1 0
      2 3
      1 4
      1 5
      2 7
      1 8
      1 9
      1 10
      1 13
      2 14
      1 15
      2 18
      2 20
      1 23
      2 25
      1 26
      3 28
      3 30
      1 31
      1 32


4.统计文件一共有多少行
cat t1.txt |wc -l
统计文件字符数
cat t1.txt |wc -m
统计文件字节数
cat t1.txt |wc -c


5.如何查看文件的详细信息。

file t1.txt


6.给启动django的命令做一个简单的别名(alias)

alias stdj='python3 manage.py runserver 0.0.0.0:8000'

取消别名
unalias stdj

永久好使,并且别影响到被人,怎么永久添加
写入到自己的用户环境变量文件中
~/.bash_profile


7.进程查找、进程杀死
linux 可以进程找出所有进程信息的组合命令
1. ps -ef  |  grep '你要找的进程名'   # 找到的结果,去看它的pid进程号,然后kill干掉即可
2.   kill 进程pid


8.linux解析dns的命令,解析,就是将域名,解析到ip的一个操作

1. linux能正确进行互联网dns解析的文件是什么
/etc/resolov.conf ,在这里头写入域名服务器地址
(114.114.114.114   223.5.5.5  115.115.115.115 223.6.6.6 119.29.29.29)


192.168.0.170   yjy.top    # 只想在自己本地,测一测这个域名,(/etc/hosts)


如果yjy想让全班同学,咱们这个局域网内(比如在公司的集团,局域网内,也能够实现某域名的解析)

2. 如何查看域名,对应的ip是多少?
ping 会自动帮你去做域名查找
ping baidu.com
(ping 在你本机,去测一测,你和对方的机器,是否通信,ping命令会不断的发送数据包,给对方服务器,对方如果存活,会给你响应)

3. linux也提供了更专业化的,域名查找,解析的命令

- dig

dig @223.5.5.5   你的域名


- nslookup (name server look up 名称服务器查找,简称,域名查找 )
如何用,提供了交互式(等待你输入,然后等待给结果),非交互式(命令下去,直接出结果)的2个操作

# 交互式,直接输入该命令
[root@yuanlai-0224 test_tar]# nslookup
> www.yuchaoit.cn


Server:		114.114.114.114
Address:	114.114.114.114#53

Non-authoritative answer:
Name:	www.yuchaoit.cn
Address: 123.206.16.61


# 非交互式
[root@yuanlai-0224 test_tar]# nslookup apecome.com
Server:		114.114.114.114
Address:	114.114.114.114#53

Non-authoritative answer:
Name:	apecome.com
Address: 123.57.242.10


9.scp远程传输

windows 和linux如何传递呀
lrzsz一个
xftp一个

你的windows,你的虚机,(互相传文件,有什么限制吗?,比如穿不过去,网络不通等限制)
有,如何理解

        lrzsz,不支持直接传输零散文件,需要打包为单个文件,即可传输

        linux打开了防火墙,禁止文件传输


正常情况下
	win,linux之间互传,没什么影响


你的linux虚拟机,和你同桌的linux虚拟机,传文件,有什么影响吗?
有
	1. 同桌不给你密码
	2. 你和同桌不在一个网段 (每个人都是NAT网段,都是自己的私有局域网)(改为桥接,在同一个网段下即可)


你的linux虚拟机(自己本地的局域网),和你的阿里云(互联网中的公网),有什么限制吗?


1.虚拟机,能找到 阿里云
	你的虚拟机(192.168.0.xx)
	↓
	宿主机windows
	↓
	交换机,路由器(有绑定的中国移动的公网宽带ip)
	↓
	阿里云(购买阿里云时候,人家绑定了一个固定的公网ip,全世界都可以访问到的)


2. 阿里云找不到你的虚拟机

	阿里云(购买阿里云时候,人家绑定了一个固定的公网ip,全世界都可以访问到的)
	×
	你们家,你的学校的路由器的公网ip(这里就没有)
	×
	你的虚拟机


先玩简单的,两个linux机器之间,传递文件
systemctl restart network # 重启network,读取网卡配置文件再生效吧!
准备虚拟机1 192.168.0.240

虚拟机2     192.168.0.158


# scp的语法(安装的,远程传输,基于ssh协议认证的传输,机器1,要传文件给机器2,需要进行ssh的账户密码认证
# 好比ssh去登录其他人的机器

# scp的语法
1. 我登录了192.168.0.240 这个机器A,把机器A的/etc/passwd文件,发给机器B  192.168.0.158,放到/opt下

语法
scp  源数据的机器   远程机器

# 把当前登录的机器的 /etc/passwd文件发给别人
scp /etc/passwd    root@192.168.0.158:/opt

# 把自己的 /var/log/整个目录,全发过去到 /tmp/
scp -r   /var/log/     root@192.168.0.158:/tmp/


# 以登录的机器是 192.168.0.240这台
# 需求是, 把远程的数据 拿过来

把192.168.0.158上的/etc/passwd 拿到自己的 /opt目录下


scp 你想要的数据机器   放到那

scp   root@192.168.0.158:/etc/passwd      /opt/


# 递归的远程 拿别人的文件夹数据

scp  -r  root@192.168.0.158:/var/log      /opt/


# 课件,准备好2个linux机器(安装2个虚机,和同桌互传,改为 桥接模式)


10.粉碎文件
# rm命令,删除文件,其实还是可以恢复的,现在的文件系统,都是日志型系统(你的操作,其实被系统监控,录制,做了个备份)
# rm删除数据后,磁盘其实还未立即彻底删除,根据磁盘恢复数据手段,还是可以把数据拿回来的

shred 文件名
这个命令之所以叫粉碎文件,是随机写入一堆二进制数据,导致原文件无法使用

随机写入二进制数据到文件中,比较危险,不推荐使用
[root@yuanlai-0224 test_tar]# shred gushi.txt
服务管理
回顾systemctl
你的机器机器会有默认的软件(服务),比如 network 管理网络的软件, sshd提供远程连接的服务。

如何管理这些服务

启动	(start)

停止	(stop)

重启	(restart)

重新加载	(reload)

开机自启(持久化)	(enable)

禁止开机自启	(disable)

查询是否持久化(是否开机自启)	(is-enabled)

centos 7 用这个命令,同时对服务进行启停管理,以及开机自启
systemctl  start/stop/restart/reload/enable/disable/is-enabaled   服务名

这个命令属于是对centos 6提供的两个命令,做了一个整合
1.service
	Linux的命令,大多数都是去机器上找到某个文件,然后读取文件配置,加载功能
	service 旧的命令,是默认去 /etc/init.d/	目录下寻找(服务管理脚本文件)
	然后根据你的指令  service start /stop  network  (/etc/init.d/network)

	service 服务名 启停服务
		然后会去读取 /etc/init.d 目录下的脚本
	我们在用 centos 6 的时候,自己按爪那个了某软件,比如nginx 网站,但是某又不方便的启停管理脚本
	自己去写nginx启停脚本,放到 /etc/init.d/nginx
	然后使用		service   nginx  start

2.chkconfig

在centos 7 中 systemctl 就是把上面的两个命令整合到一起。
关于systemctl命令其实是找到脚本

无论敲的是  service  还是  systemctl   start  stop  restart
其实都是去找到这个脚本文件(/etc/init.d/),然后去传入你的参数,再去start  stop
service 启动网络服务
service network start
命令启动网络服务

/etc/init.d/network start
用脚本文件启动网络服务

用 service 或者 用脚本管理服务,其实就等于 systemctl start network
通过上面可以看到  service  其实是去读取脚本  /etc/init.d/  目录下的脚本文件

而在 centos7 中的脚本目录就不一样了
系统默认的所有服务,管理脚本的存放目录,以及你自己安装了某软件,也可以放入到这个目录下,就可以通过systemctl
start/stop  来实现管理

比如,安装了  nginx  软件,查看启动命令以及脚本在哪
yum  install  nginx  -y				#安装  nginx


yum安装的程序,会自动生成nginx管理脚本,自动的在systemctl 管理脚本目录下
	nginx这个服务名其实是一个缩写,完整的服务名叫  nginx.service

[root@yuanlai0224 ~]# systemctl  status  nginx
● nginx.service - The nginx HTTP and reverse proxy server
   Loaded: loaded (/usr/lib/systemd/system/nginx.service; disabled; vendor preset: disabled)
   Active: inactive (dead)
[root@yuanlai0224 ~]#

查看 nginx 的运行状态,他会给出一个 nginx 的存放目录就是
/usr/lib/systemd/system/		也就是systemctl  统一管理脚本的目录
比如  sshd  这个服务它的脚本就可以在这个目录中搜到
[root@yuanlai0224 ~]# ll  /usr/lib/systemd/system/sshd*
-rw-r--r--. 1 root root 313 Apr 11  2018 /usr/lib/systemd/system/sshd-keygen.service
-rw-r--r--. 1 root root 373 Apr 11  2018 /usr/lib/systemd/system/sshd.service
-rw-r--r--. 1 root root 260 Apr 11  2018 /usr/lib/systemd/system/sshd@.service
-rw-r--r--. 1 root root 181 Apr 11  2018 /usr/lib/systemd/system/sshd.socket
[root@yuanlai0224 ~]#
理解systemctl 管理脚本的流程
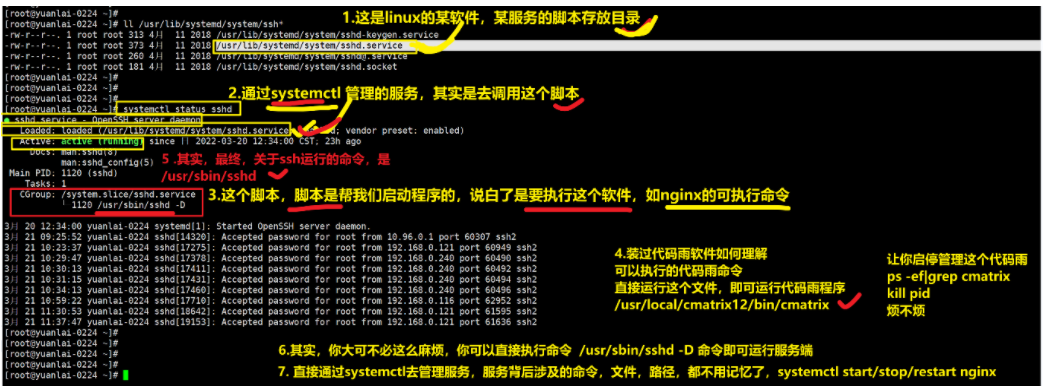
实践操作来演示上面所说:
直接运行指令
[root@yuanlai0224 ~]# /usr/sbin/nginx
[root@yuanlai0224 ~]#

执行上述命令可以看到页面的

要关闭nginx这个进程,要先找到这个服务的进程给他杀掉
[root@yuanlai0224 ~]# ps -ef | grep nginx
root      51512      1  0 17:15 ?        00:00:00 nginx: master process /usr/sbin/nginx
nginx     51513  51512  0 17:15 ?        00:00:00 nginx: worker process
root      51640  49953  0 17:17 pts/1    00:00:00 grep --color=auto nginx
[root@yuanlai0224 ~]#
[root@yuanlai0224 ~]# kill 51512			#结束nginx 的进程号

但是下次要运行 nginx 还要把这个流程走一遍,而且还要重新去查看进程 id 这个过程很麻烦

#我们再次执行 nginx  查看它的进程号,这个进程号是不断发生变化的,因此应证了上边所说的来回操作会很麻烦
[root@yuanlai0224 ~]# /usr/sbin/nginx
[root@yuanlai0224 ~]# ps -ef | grep nginx
root      51764      1  0 17:20 ?        00:00:00 nginx: master process /usr/sbin/nginx
nginx     51765  51764  0 17:20 ?        00:00:00 nginx: worker process
root      51770  49953  0 17:20 pts/1    00:00:00 grep --color=auto nginx
[root@yuanlai0224 ~]#
以服务器管理模式运行 systemctl
简单的两条命令就完事

[root@yuanlai0224 ~]# systemctl  start  nginx		#开启 nginx 服务
[root@yuanlai0224 ~]#
[root@yuanlai0224 ~]# systemctl  stop  nginx		#关闭 nginx 服务
[root@yuanlai0224 ~]#
[root@yuanlai0224 ~]# systemctl  restart  nginx		#重新启动  nginx 服务
ntp时间服务部署
全世界的服务器,时间统一标准,可以以这个为准 cn.ntp.org.cn
timedatectl
可以修改Linux的日期,时间
timedatectl  整合了下边的两个命令
		date 改时间日期(软件时间,你的系统运行了,程序计算的时间)
		hwclock  改硬件时间(计算的主板上,有一个BISO系统,以及纽扣电池,提供电量)

在 centos 6 时代修改系统的时间,时区,需要用到的
date  修改时间,日期
修改时区	修改时区,cp /usr/share/zoneinfo/Asia/Shanghai /etc/localtime	#亚洲上海的时区

#查看系统中有哪些失去文件
ls   /usr/share/zoneinfo
ll   /usr/share/zoneinfo/Asia/Shanghai

修改硬件时间 ---  hwclock 命令
查看当前时间
下边的两条命令都可查看当前时间

[root@yuanlai0224 ~]# timedatectl
      Local time: Mon 2022-03-21 17:32:09 CST
  Universal time: Mon 2022-03-21 09:32:09 UTC
        RTC time: Mon 2022-03-21 09:32:09
       Time zone: Asia/Shanghai (CST, +0800)
     NTP enabled: no
NTP synchronized: yes
 RTC in local TZ: no
      DST active: n/a
[root@yuanlai0224 ~]#

[root@yuanlai0224 ~]# timedatectl  status
      Local time: Mon 2022-03-21 17:32:39 CST
  Universal time: Mon 2022-03-21 09:32:39 UTC
        RTC time: Mon 2022-03-21 09:32:39
       Time zone: Asia/Shanghai (CST, +0800)
     NTP enabled: no
NTP synchronized: yes
 RTC in local TZ: no
      DST active: n/a
[root@yuanlai0224 ~]#
修改时间,时区
#查看下 timedatectl  的参数以及用法

[root@yuanlai0224 ~]# timedatectl  --help
timedatectl [OPTIONS...] COMMAND ...

Query or change system time and date settings.

  -h --help                Show this help message
     --version             Show package version
     --no-pager            Do not pipe output into a pager
     --no-ask-password     Do not prompt for password
  -H --host=[USER@]HOST    Operate on remote host
  -M --machine=CONTAINER   Operate on local container
     --adjust-system-clock Adjust system clock when changing local RTC mode

Commands:
  status                   Show current time settings				#查看当前状态
  set-time TIME            Set system time							#设置当前的时间
  set-timezone ZONE        Set system time zone						#设置当前的时区
  list-timezones           Show known time zones					#查看系统支持哪些时区
  set-local-rtc BOOL       Control whether RTC is in local time
  set-ntp BOOL             Control whether NTP is enabled
[root@yuanlai0224 ~]#

#修改时间
[root@yuanlai0224 ~]# timedatectl  set-time '2018-9-1 12:00'
[root@yuanlai0224 ~]# timedatectl
      Local time: Sat 2018-09-01 12:00:04 CST
  Universal time: Sat 2018-09-01 04:00:04 UTC
        RTC time: Sat 2018-09-01 04:00:04
       Time zone: Asia/Shanghai (CST, +0800)
     NTP enabled: no
NTP synchronized: no
 RTC in local TZ: no
      DST active: n/a
[root@yuanlai0224 ~]#

#查看系统中有多少个时区
[root@yuanlai0224 ~]# timedatectl  list-timezones | wc -l
425
[root@yuanlai0224 ~]#

#找出关于上海的时区

[root@yuanlai0224 ~]# timedatectl  list-timezones | grep  -i  'shanghai'
Asia/Shanghai
[root@yuanlai0224 ~]#


#先把他的时区修改为其他
[root@yuanlai0224 ~]# timedatectl  set-timezone  Africa/Tunis
[root@yuanlai0224 ~]# timedatectl
      Local time: Sat 2018-09-01 05:07:13 CET
  Universal time: Sat 2018-09-01 04:07:13 UTC
        RTC time: Sat 2018-09-01 04:07:13
       Time zone: Africa/Tunis (CET, +0100)
     NTP enabled: no
NTP synchronized: no
 RTC in local TZ: no
      DST active: n/a
[root@yuanlai0224 ~]#

#修改时间为上海的时间
[root@yuanlai0224 ~]# timedatectl  set-timezone  Asia/Shanghai
[root@yuanlai0224 ~]# timedatectl
      Local time: Sat 2018-09-01 12:08:20 CST
  Universal time: Sat 2018-09-01 04:08:20 UTC
        RTC time: Sat 2018-09-01 04:08:20
       Time zone: Asia/Shanghai (CST, +0800)
     NTP enabled: no
NTP synchronized: no
 RTC in local TZ: no
      DST active: n/a
[root@yuanlai0224 ~]#
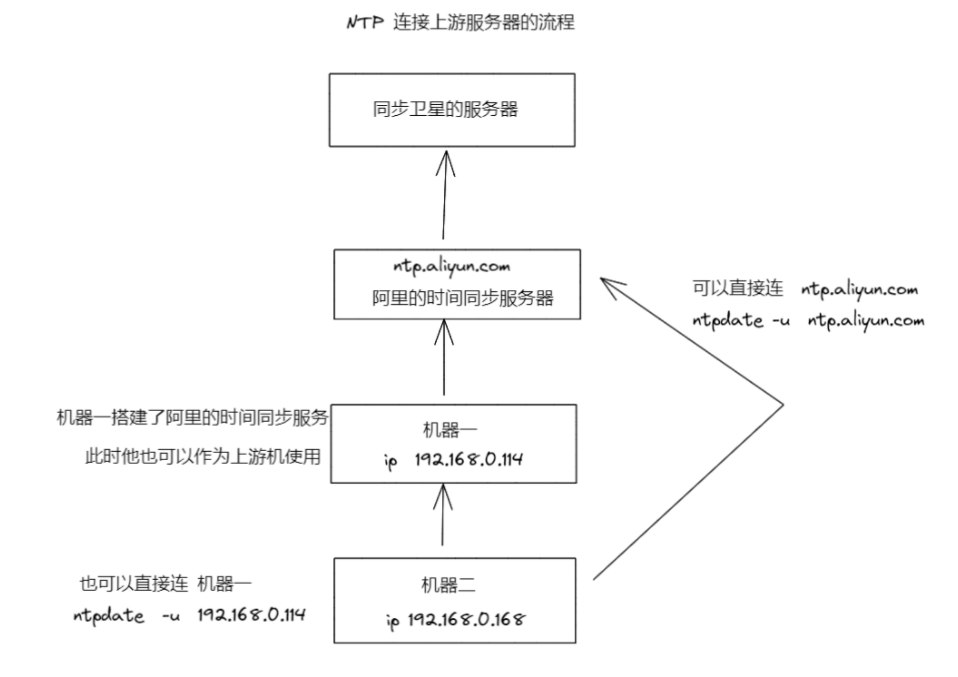
ntp时间同步
强制性更新整个系统的时间 ntpdate 它是不友好的强制同步时间
搭建ntp服务,自动的,有好的更新,校准系统时间
强制性的ntpdate 命令
1.找到时间服务器地址,强制更新即可

[root@yuanlai0224 ~]# ntpdate -u  ntp.aliyun.com
21 Mar 17:48:16 ntpdate[53257]: step time server 203.107.6.88 offset 112080992.401459 sec
[root@yuanlai0224 ~]#

#来确认一下时间是否更新
[root@yuanlai0224 ~]# timedatectl
      Local time: Mon 2022-03-21 17:48:38 CST
  Universal time: Mon 2022-03-21 09:48:38 UTC
        RTC time: Sat 2018-09-01 04:12:06
       Time zone: Asia/Shanghai (CST, +0800)
     NTP enabled: no
NTP synchronized: no
 RTC in local TZ: no
      DST active: n/a
[root@yuanlai0224 ~]#
搭建ntpd服务
所有的Linux软件用法都一样
安装
改配置
启动
使用
以后就是继续该配置,重新加载,重启
继续使用
1.安装 ntp 软件
yum install ntp -y

2.查看ntp软件信息
[root@yuanlai0224 ~]# ls  /usr/lib/systemd/system/ | grep  ntp
ntpdate.service
ntpd.service
[root@yuanlai0224 ~]#

3.找到ntp软件的配置文件
[root@yuanlai0224 ~]# rpm -ql ntp |grep conf
/etc/ntp.conf
/etc/sysconfig/ntpd
/usr/share/man/man5/ntp.conf.5.gz
[root@yuanlai0224 ~]#

4.修改ntp配置文件
[root@yuanlai0224 ~]# vim  /etc/ntp.conf


 11 # 添加ntp的运行日志
 12  logfile /var/log/my_ntp.log
 13
 14 # 记录程序的运行进程号的,可以用于写脚本,读取这个文件,就找到了程序的进程id
 15  pidfile /var/run/ntpd.pid


 36 server  ntp.aliyun.com  prefer
 37 server  cn.pool.ntp.org  iburst


5.修改机器的时间为错误的
[root@yuanlai0224 ~]# timedatectl set-time  '2012-12-12  12:12'
[root@yuanlai0224 ~]# timedatectl
      Local time: Wed 2012-12-12 12:12:06 CST
  Universal time: Wed 2012-12-12 04:12:06 UTC
        RTC time: Wed 2012-12-12 04:12:06
       Time zone: Asia/Shanghai (CST, +0800)
     NTP enabled: no
NTP synchronized: no
 RTC in local TZ: no
      DST active: n/a
[root@yuanlai0224 ~]#

6.启动ntpd服务,等待时间是否同步
关于ntpd的服务脚本文件/usr/lib/systemd/system/ntpd.service

[root@yuanlai0224 ~]# systemctl   start  ntpd
[root@yuanlai0224 ~]# systemctl  status  ntpd
● ntpd.service - Network Time Service
   Loaded: loaded (/usr/lib/systemd/system/ntpd.service; disabled; vendor preset: disabled)
   Active: active (running) since Sun 2022-03-20 14:25:54 CST; 9 years 3 months left
  Process: 11370 ExecStart=/usr/sbin/ntpd -u ntp:ntp $OPTIONS (code=exited, status=0/SUCCESS)
 Main PID: 11371 (ntpd)
   CGroup: /system.slice/ntpd.service
           └─11371 /usr/sbin/ntpd -u ntp:ntp -g

Mar 21 16:39:53 yuanlai0224 ntpd[11371]: new interface(s) found: waking up resolver
Mar 21 16:39:54 yuanlai0224 ntpd[11371]: 0.0.0.0 0638 08 no_sys_peer
Mar 21 17:56:27 yuanlai0224 ntpd[11371]: Deleting interface #15 ens33, 192.168.0.162#123, in...ecs
Mar 21 17:56:27 yuanlai0224 ntpd[11371]: 202.118.1.130 interface 192.168.0.162 -> (none)
Mar 21 17:56:27 yuanlai0224 ntpd[11371]: 185.209.85.222 interface 192.168.0.162 -> (none)
Mar 21 17:56:27 yuanlai0224 ntpd[11371]: 162.159.200.123 interface 192.168.0.162 -> (none)
Mar 21 17:56:27 yuanlai0224 ntpd[11371]: 193.182.111.12 interface 192.168.0.162 -> (none)
Mar 21 17:56:29 yuanlai0224 ntpd[11371]: Listen normally on 17 ens33 192.168.0.162 UDP 123
Mar 21 17:56:29 yuanlai0224 ntpd[11371]: new interface(s) found: waking up resolver
Mar 21 17:56:30 yuanlai0224 ntpd[11371]: 0.0.0.0 0648 08 no_sys_peer
Hint: Some lines were ellipsized, use -l to show in full.
[root@yuanlai0224 ~]#

7.查看 ntp 是否和上游服务器同步
[root@yuanlai0224 ~]# ntpstat
synchronised to NTP server (202.118.1.130) at stratum 2
   time correct to within 482 ms
   polling server every 1024 s

8.查看时间同步的状态
[root@yuanlai0224 ~]# ntpq  -p
     remote           refid      st t when poll reach   delay   offset  jitter
==============================================================================
+time.cloudflare 10.28.12.207     3 u  123 1024    7  281.850  -24.579 1105815
+stratum2-1.ntp. 62.231.6.98      2 u  124 1024    7  136.137  -14.645 1105815
 ntp1.flashdance 192.36.143.151   2 u   59 1024    5  287.856   19.093 1308418
*202.118.1.130   .PTP.            1 u 4632 1024    3   15.125    1.451  15.223
[root@yuanlai0224 ~]#

9.这台机器就是一个时间服务器了可以作为上游机使用了
date命令和hwclock命令
hwclock		可以将硬件和软件时间做同步

-s     hctosys		从硬件时钟设置系统时间
-w     systohc		从当前系统时间设置硬件时间

 浙公网安备 33010602011771号