drf 认证组件
目录
drf三大认证(认证,权限,频率)与过滤排序,分页
drf 认证组件
登录接口
views
from rest_framework.viewsets import ViewSet
from rest_framework.decorators import action
from .models import User,UserToken
from rest_framework.response import Response
import uuid
class UserView(ViewSet):
    @action(methods=['POST'],detail=False)
    def login(self,request):
        username = request.data.get('username')
        password = request.data.get('password')
        user = User.objects.filter(username=username).first()
        if user:
            # 如果存在生成一个人随机字符串
            token = uuid.uuid4()
            UserToken.objects.update_or_create(user=user,defaults={'token':token})
            return Response({'code': '100', 'msg': '登陆成功','token':token})
        else:
            return Response({'code':'101','msg':'用户名或密码错误'})
models
from django.db import models

# Create your models here.
class User(models.Model):
    username = models.CharField(max_length=32)
    password = models.CharField(max_length=32)

    user_token = models.OneToOneField(to='UserToken',on_delete=models.CASCADE,null=True)
class UserToken(models.Model):
    token = models.CharField(max_length=32)
urls
from django.contrib import admin
from django.urls import path,include
from rest_framework.routers import SimpleRouter
from app01 import views

router = SimpleRouter()
router.register('user',views.UserView,'user')

from app01 import views
urlpatterns = [
    path('admin/', admin.site.urls),
    path('api/v1/',include(router.urls))
]
认证组件
登录认证
需求: 个别接口需要登录认证才能访问
认证组件使用步骤
1.编写一个认证类 继承BaseAuthontication
	-新建一个py文件 authonticate
    重写authenticate方法,在内部拿到token进行认证,认证成功返回两个值(登录用户与token值)或None, 否则抛异常。
    异常模块AuthenticationFailed
from rest_framework.authentication import BaseAuthentication
from .models import UserToken
from rest_framework.exceptions import AuthenticationFailed

class LoginAuth(BaseAuthentication):
    # 重写authenticate方法
    def authenticate(self, request):
        # 判断请求中是否携带token
        "请求头可以从request.META中取"
        # 从地址栏中取,取不到就None
        token = request.query_params.get('token', None)
        if token:
            # 去表中查询,能查到就登陆了 返回两个值(登录用户与token值),当前登录用户返回给request.user
            user_token = UserToken.objects.filter(token=token).first()
            if user_token:
                return user_token.user,token
            else:
                # 没有则抛异常导入模块
                raise AuthenticationFailed('token认证失败')
        else:
            raise AuthenticationFailed('您没有token')
2. 局部使用
  视图类中添加参数
 # 查询单个 需要登录才能查
"""
authentication_classes = []  认证参数 编写一个认证类放入列表内,可以写多个,从左往右一次验证
"""
from .authonticate import LoginAuth
class BookDetailView(ViewSetMixin,RetrieveAPIView):
    queryset = Book.objects.all()
    serializer_class = BookSerializer
    authentication_classes = [LoginAuth]  # 认证参数,不填则禁用
3.全局使用
 settings配置文件中添加
 REST_FRAMEWORK = {
    'DEFAULT_AUTHENTICATION_CLASSES': ['app01.authonticate.LoginAuth'], # 使用这种方式而不是from app01.authonticate import LoginAuth
}
"不能在settings里乱导入模块,会报错,因为你导入的文件可能还没加载settings先加载了"
这样使用全部的接口都需要登录认证,我们可以在视图类不需要登录认证的接口中添加参数 禁用登录认证
class BookDetailView(ViewSetMixin, RetrieveAPIView):
	authentication_classes = []  # 不填写就行了
总结
# 1 写一个认证类,继承BaseAuthentication
# 2 重写authenticate方法,在该方法在中实现登录认证
# 3 如果认证成功,返回两个值【返回None或两个值】登录用户与token值
# 4 认证不通过,抛异常AuthenticationFailed
# 5 局部使用和全局使用
	-局部:只在某个视图类中使用【当前视图类管理的所有接口】
        class BookDetailView(ViewSetMixin, RetrieveAPIView):
            authentication_classes = [LoginAuth]
    -全局:全局所有接口都生效(登录接口不要)
    REST_FRAMEWORK = {
    	'DEFAULT_AUTHENTICATION_CLASSES':['app01.authenticate.LoginAuth']
	}

    -局部禁用:
    	 class BookDetailView(ViewSetMixin, RetrieveAPIView):
            authentication_classes = []
drf 权限组件
eg:优酷会员 登录后没有会员也不能观看会员视频。
我们要实现登陆成功了有些接口没有权限访问。有的接口有权限访问
  查询单个需要超级管理员才能访问。
  查询所有所有登录用户都能访问
 "需要有个字段在表中来代表用户权限"
class User(models.Model):
    username = models.CharField(max_length=32)
    password = models.CharField(max_length=32)
  *  user_type = models.IntegerField(choices=((1, '超级管理员'), (2, '普通用户')), default=2)
需要注意的是这里我们添加的字段使用到了一个属性
eg:
    user_type = models.IntegerField(choices=((1, '超级管理员'), (2, '普通用户')), default=2)

 "ORM操作"
    user_obj = User.objects.filter(pk=1).first()
    user_obj.get_user_type_display() # 可以获取数字对应的性别。
权限组件
1.编写一个权限类
新建一个py文件 Permissions.py
# 写权限类
from rest_framework.permissions import BasePermission
class CommonPermissions(BasePermission):
    # 重写has_permission方法
    def has_permission(self, request, view):
        # 实现权限控制 -获取当前登录用户request.user
        "之前登录认证类return返回的第一个参数就是给到request.user"
        # 判断是否为超级管理员 是则返回True 否则 False
        if request.user.user_type == 1:
            return True
        else:
            # 控制报错信息,往对象中放一个属性固定写法 message
            # choices使用get_user_type_display()能拿到数字对应的中文
            self.message = '%s 您没有权限' % request.user.get_user_type_display()
            return False
视图
# 查询所有
class BookView(ViewSetMixin, ListAPIView):
    queryset = Book.objects.all()
    serializer_class = BookSerializer
    authentication_classes = [] # 局部取消登录认证
    permission_classes = [] # 局部禁用权限认证

# 查询单个
from .authonticate import LoginAuth
from .permissions import CommonPermissions
class BookDetailView(ViewSetMixin,RetrieveAPIView):
    queryset = Book.objects.all()
    serializer_class = BookSerializer
    # authentication_classes = [LoginAuth]
    permission_classes = [CommonPermissions] # 添加权限类进行权限校验
总结
# 1 写一个权限类,继承BasePermission
# 2 重写has_permission方法,在该方法在中实现权限认证,在这方法中,request.user就是当前登录用户
# 3 如果有权限,返回True
# 4 没有权限,返回False,定制返回的中文: self.message='中文'
# 5 局部使用和全局使用
	-局部:只在某个视图类中使用【当前视图类管理的所有接口】
        class BookDetailView(ViewSetMixin, RetrieveAPIView):
    		permission_classes = [CommonPermission] # 权限类
    -全局:全局所有接口都生效
    settings添加
          REST_FRAMEWORK = {
            'DEFAULT_PERMISSION_CLASSES': [
                'app01.permissions.CommonPermission',
            ],

        }

    -局部禁用:
    	 class BookDetailView(ViewSetMixin, RetrieveAPIView):
            permission_classes = []
drf频率组件
控制接口的被访问的频率即次数
频率组件使用
1.编写频率类
from rest_framework.throttling import BaseThrottle,SimpleRateThrottle
# 不继承BaseThrottle的原因是因为继承SimpleRateThrottle 代码更简单
class CommonThrottle(SimpleRateThrottle):
    # 定义一个类属性
    scope = 'pl'
    """这里写的就得在配置文件中配置
    'DEFAULT_THROTTLE_RATES': {
        'pl': '5/m', 每分钟5次
                3/h  每小时3次
                5/s  每秒5次
},"""
    def get_cache_key(self,request,view):
        # 按返回什么就用什么 做频率限制(id或ip)
        "id从  request.user.pk拿 返回id就按id来做频率次数限制"
        return request.META.get('REMOTE_ADDR')
| http请求头获取数据的方法request.META | |
|---|---|
| REMOTE_ADDR | 客户端的ip地址 |
| HTTP_TOKEN | 请求头携带的token |
2.局部使用
from .throttling import CommonThrottle
class BookDetailView(ViewSetMixin,RetrieveAPIView):
    queryset = Book.objects.all()
    serializer_class = BookSerializer
    throttle_classes = [CommonThrottle]   # 添加频率认证
    # 局部禁用
    throttle_classes = [] # 注掉上面的
3.全局生效
REST_FRAMEWORK = {
'DEFAULT_THROTTLE_RATES': {
        'pl': '2/s',
},
'DEFAULT_THROTTLE_CLASSES': ['app01.throttling.CommonThrottle'],
}
总结
# 1 写一个频率类,继承SimpleRateThrottle
# 2 重写get_cache_key方法,返回什么,就以什么做限制----》ip或用户id做限制
# 3 配置一个类属性:scope = 'book_5_m'
# 4 在配置文件中配置
  'DEFAULT_THROTTLE_RATES': {
        'book_5_m': '5/m',
    },
# 5 局部使用和全局使用
	-局部:只在某个视图类中使用【当前视图类管理的所有接口】
        class BookDetailView(ViewSetMixin, RetrieveAPIView):
    		throttle_classes = [CommonThrottle]
    -全局:全局所有接口都生效
          REST_FRAMEWORK = {
             'DEFAULT_THROTTLE_CLASSES': ['app01.throttling.CommonThrottle'],

        }

    -局部禁用:
    	 class BookDetailView(ViewSetMixin, RetrieveAPIView):
            throttle_classes = []
drf过滤排序
在学习restful规范中有一条规定了请求地址中带过滤条件,我们常用的五个接口只有一个接口需要过滤条件·
查询所有图书接口
1.内置过滤类的使用
继承GenericAPIView类来编写
# 导入过滤类
from rest_framework.filters import SearchFilter,OrderingFilter
"""
SearchFilter  内置的固定用法模糊匹配。
    filter_backends = [SearchFilter]
    search_fields=['name'] # 模糊匹配,指定字段
OrderingFilter 排序
	filter_backends = [OrderingFilter]
	ordering_fields = ['price'] 按价格排序

"""
# ListAPIView内继承了GenericAPIView
class BookView(ViewSetMixin,ListAPIView):
    queryset = Book.objects.all()
    serializer_class = BookSerializer
    permission_classes = []
    authentication_classes = []
    throttle_classes = []
    filter_backends = [SearchFilter]
    # 模糊匹配,指定字段 只要名字中含有路由携带的字(http://127.0.0.1:8001/api/v1/books/?search=诛)就能展示
    # search_fields=['name']
    # 也可以填写多个字段 http://127.0.0.1:8001/api/v1/books/?search__lt=20 不能多个条件组合查询
    search_fields = ['name','price']
2.使用第三方django-filter 模块实现
需要提前下载
pip3.8 install django-filter -i http://mirrors.aliyun.com/pypi/simple/
# 第三方过滤类
from django_filters.rest_framework import DjangoFilterBackend
class BookView(ViewSetMixin,ListAPIView):
    queryset = Book.objects.all()
    serializer_class = BookSerializer
    permission_classes = []
    authentication_classes = []
    throttle_classes = []
    filter_backends = [DjangoFilterBackend]
    filterset_fields = ['name','price'] # 精确匹配,不支持模糊匹配,可以多个字段组合查询
查询方式:
	http://127.0.0.1:8001/api/v1/books/?name=诛仙
   http://127.0.0.1:8001/api/v1/books/?name=诛仙&price=10
3.自己定制过滤类
新建py文件 filter.py
from rest_framework.filters import BaseFilterBackend

class CommonFilter(BaseFilterBackend):
    # 重写filter_queryset方法
    def filter_queryset(self, request, queryset, view):
        "queryset数据都在queryset内"
        # 返回queryset对象= 过滤后的数据 ,price_gt自己定制的规则

        price_gt = request.query_params.get('price_gt',None)
        if price_gt:
            return queryset.filter(price__gt=price_gt)
        else:
            return queryset
# 自定义类
from .filter import CommonFilter
class BookView(ViewSetMixin,ListAPIView):
    queryset = Book.objects.all()
    serializer_class = BookSerializer
    permission_classes = []
    authentication_classes = []
    throttle_classes = []
    filter_backends = [CommonFilter]
查询方法:
http://127.0.0.1:8001/api/v1/books/?price_gt=30
扩展
自定义过滤,用反射写校验
"但是目前只能实现单个筛选条件,不能使用_gt 之类的"
class CommonFilter(BaseFilterBackend):
    # 重写filter_queryset方法
    def filter_queryset(self, request, queryset, view):
        filter_data = getattr(view,'filte_data')
        for i in filter_data:
            print(i)
            res = request.query_params.get(i,None)
            print(res)
            if res:
                return queryset.filter(Q(i=res))
            else:
                return queryset

完善多个条件但是还是不能_gt _lt
class CommonFilter(BaseFilterBackend):
    # 重写filter_queryset方法

    def filter_queryset(self, request, queryset, view):
        q_obj = Q()
        filter_data = getattr(view,'filte_data')
        for i in filter_data:
            print(i)
            res = request.query_params.get(i,None)
            q_obj.children.append((i,res))
            print(res)
        print(q_obj)
        if q_obj:
            return queryset.filter(q_obj)
        else:
            return queryset
  发现问题 没有筛选条件晒不到数据
排序
# 内置的就够了
from rest_framework.filters import OrderingFilter
class BookView(ViewSetMixin, ListAPIView):
    queryset = Book.objects.all()
    serializer_class = BookSerializer
    filter_backends = [OrderingFilter,也可以放过滤类]
    ordering_fields = ['price']

 # 支持的查询方法:
    http://127.0.0.1:8000/api/v1/books/?ordering=price
    http://127.0.0.1:8000/api/v1/books/?ordering=-price 倒序价格
   http://127.0.0.1:8000/api/v1/books/?ordering=-id,price 倒序id后按价格排
drf分页器
drf内置了三个分页器对应三种分页方式
需要自己编写page分页类
from rest_framework.pagination import LimitOffsetPagination,CursorPagination,PageNumberPagination
三个分页类代表三种不同方式

1.PageNumberPagination 网页用
class CommonPageNumberPagination(PageNumberPagination):
    page_size = 2  # 每页显示2条
    page_query_param = 'page'  # page=10  查询第10页的数据
    page_size_query_param = 'size'  # page=10&size=5    查询第10页,每页显示5条
    max_page_size = 5  # 每页最大显示5条

views
from .page import CommonPageNumberPagination
class BookView(ViewSetMixin,ListAPIView):
    queryset = Book.objects.all()
    serializer_class = BookSerializer
    pagination_class = CommonPageNumberPagination # 导入分页类

 http://127.0.0.1:8001/api/v1/books/?page=3&size=1  page第三页显示1条
"可以通过给size传值来改变显示数据条数,不传默认以分页类page_size为准"
2.LimitOffsetPagination
class CommonLimitOffsetPagination(LimitOffsetPagination):
    default_limit = 3  # 每页显示3条
    limit_query_param = 'limit'  # 传limit=3   取3条
    offset_query_param = 'offset'  # 传offset=1  从第一个位置开始,取limit条
    max_limit = 5

from .page import CommonLimitOffsetPagination
class BookView(ViewSetMixin,ListAPIView):
    queryset = Book.objects.all()
    serializer_class = BookSerializer
    pagination_class = CommonLimitOffsetPagination

http://127.0.0.1:8001/api/v1/books/?limit=3&offset=1 每页显示3条从第一条数据开始取
# app 用下面

class CommonCursorPagination(CursorPagination):
    cursor_query_param = 'cursor'  # 查询参数
    page_size = 2  # 每页多少条
    ordering = 'id'  # 排序字段

# 配置在视图类上即可
class BookView(ViewSetMixin, ListAPIView):
    queryset = Book.objects.all()
    serializer_class = BookSerializer
    pagination_class = CommonCursorPagination
    # 游标分页,只能下一页,上一页,不能跳到中间,但它的效率最高,大数据量分页,使用这种较好
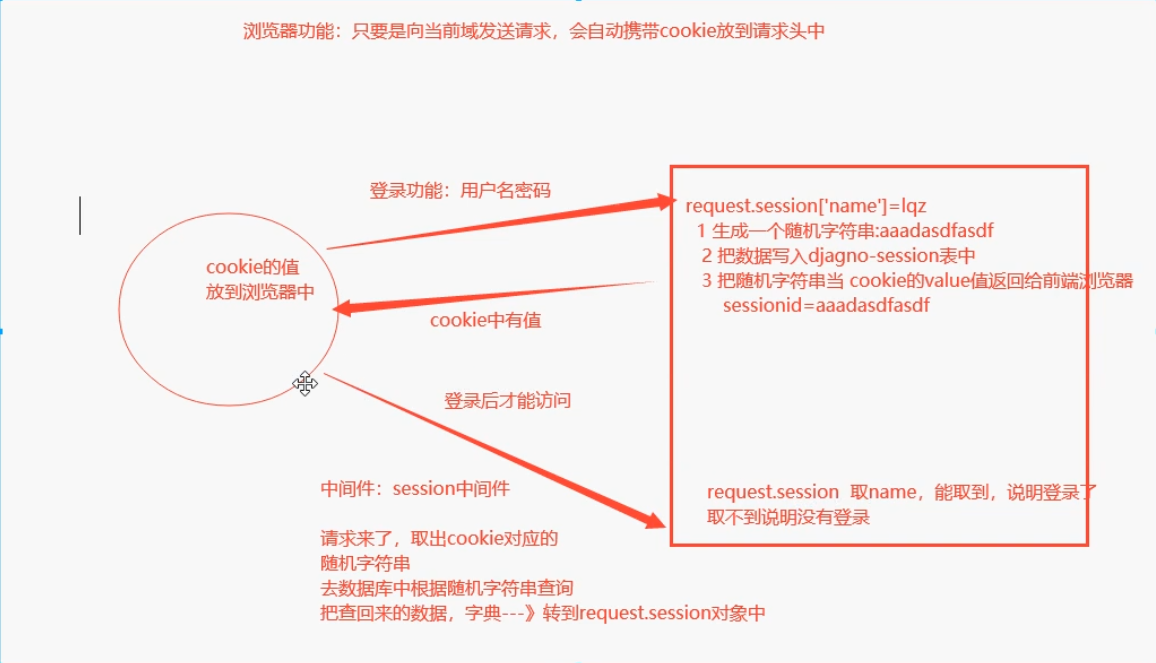
django的cookie+session认证底层原理

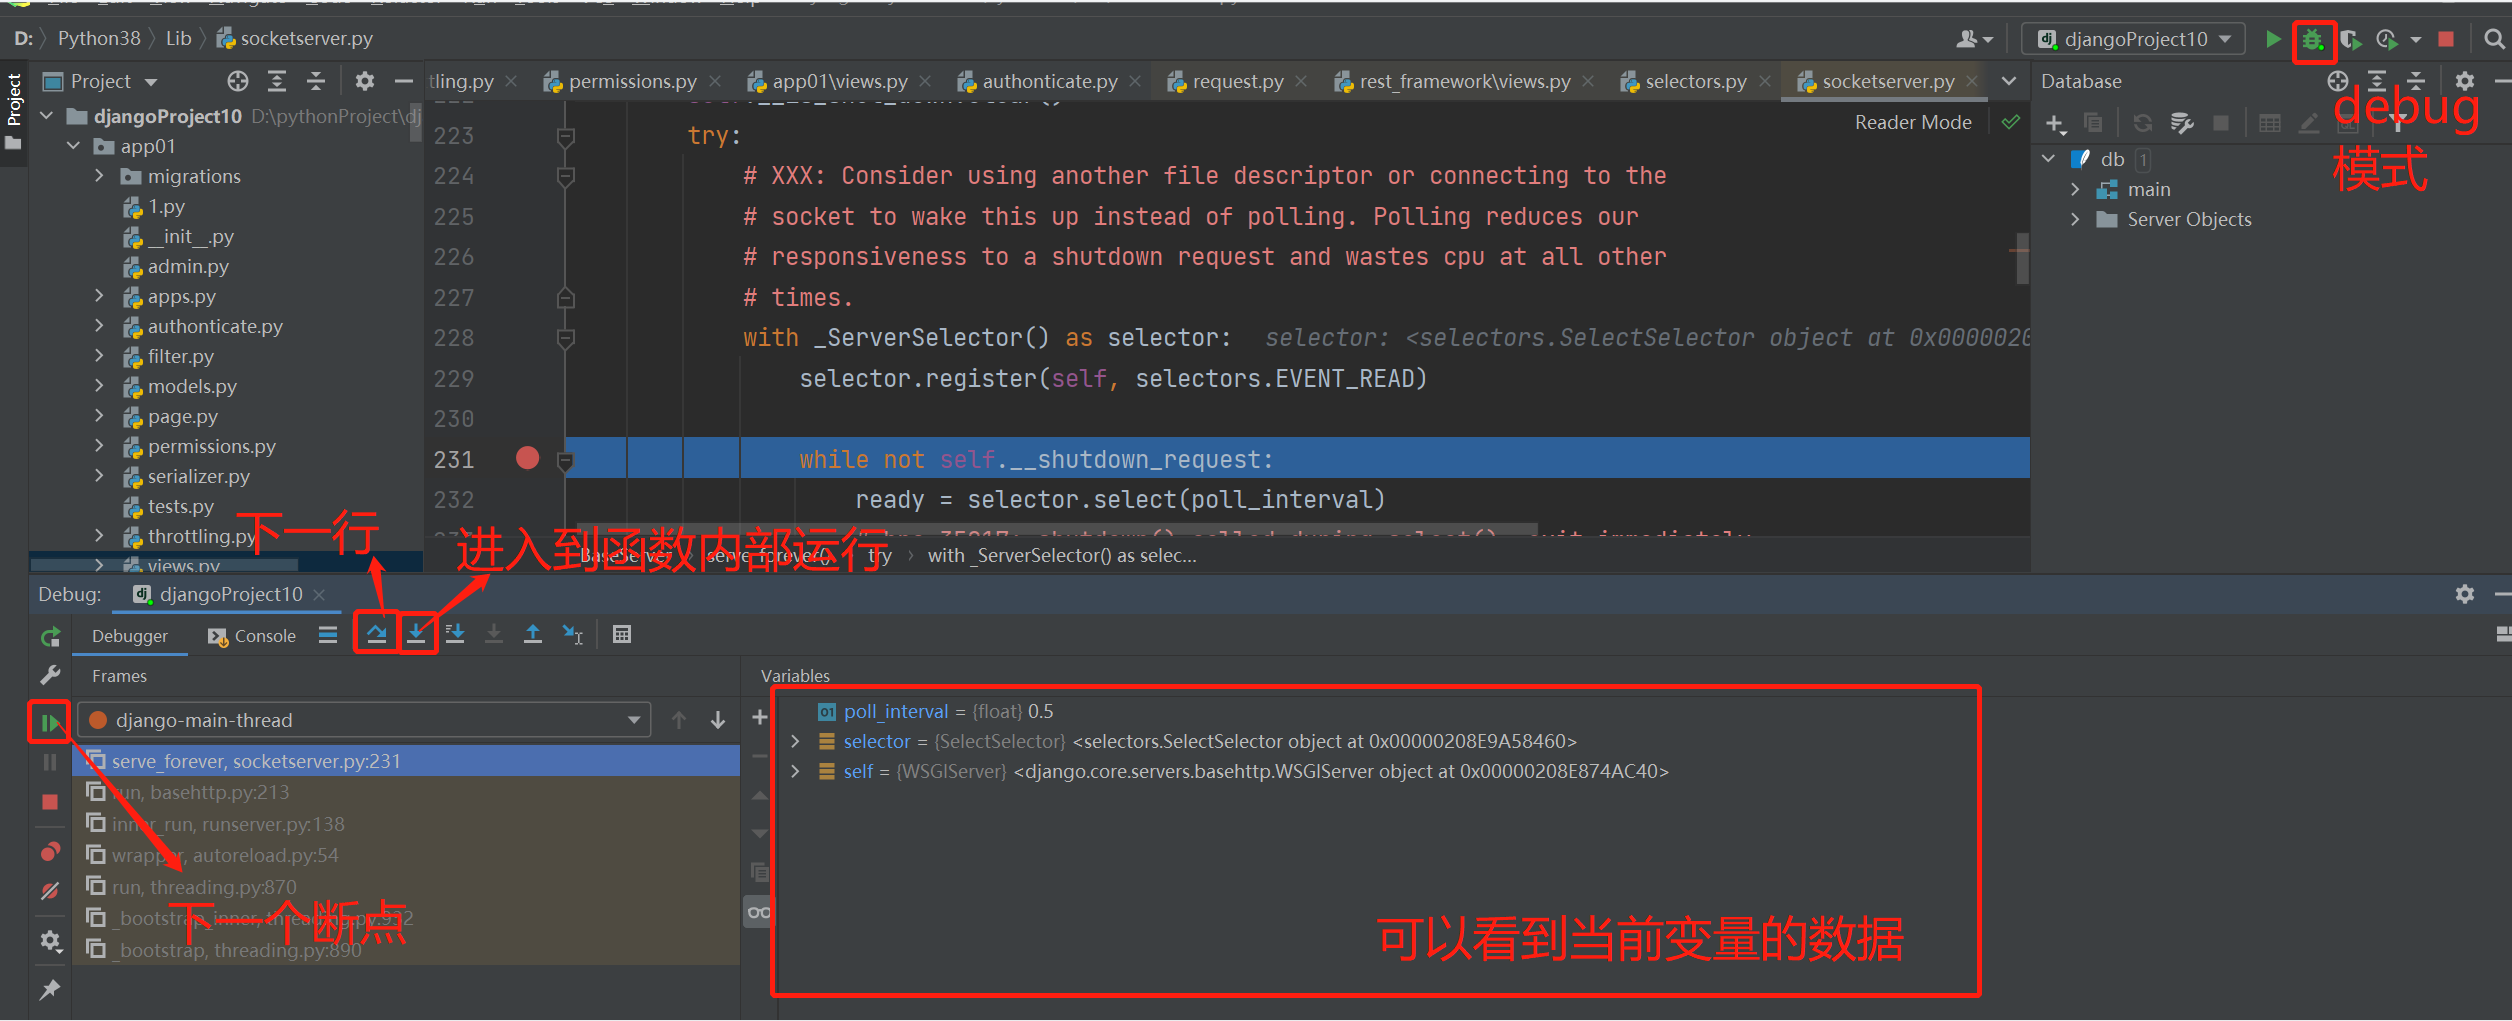
pycharm DEBUG模式断点使用方法
pycharm debug模式运行下我们可以再任意位置停下,只需要在需要的位置上加上断点,查看当前情况下数据的变化情况
"使用断点应当了解代码的底层运行顺序,便于我们添加断点进行查验"

认证,权限,频率源码分析
权限类源码分析
1.在视图类中配置权限类就会去执行权限类的has_permission方法,完成权限校验

2.drf 的APIView 在执行视图视图类的方法之前执行了三大认证, APIView中的dispatch方法中的
# 执行三大认证
self.initial(request, *args, **kwargs) # APIView中497行左右
 - 进入initial查看 APIView中399行左右
    def initial(self, request, *args, **kwargs):
        # 能够解析的编码,版本控制
        self.format_kwarg = self.get_format_suffix(**kwargs)
        neg = self.perform_content_negotiation(request)
        request.accepted_renderer, request.accepted_media_type = neg
        version, scheme = self.determine_version(request, *args, **kwargs)
        request.version, request.versioning_scheme = version, scheme

     	 # 三大认证的执行顺序
        # 认证组件
        self.perform_authentication(request)
        # 权限组件  [读它]
        self.check_permissions(request)
        # 频率组件
        self.check_throttles(request)
# APIView的326 左右
    def check_permissions(self, request):
        "进入self.get_permissions()查看"
        # 经过self.get_permissions()源代码处理后变成了[CommonPermission(),] for循环后permission就等于调用了CommonPermission()
            for permission in self.get_permissions():
            #CommonPermission()权限类对象的调用,执行has_permission,这就是为什么我们写的权限类要重写has_permission方法
            # self 是视图类的对象,就是咱们自己的的权限类的has_permission的view参数,
            if not permission.has_permission(request, self):
                # 如果权限类中has_permission方法return 的是False,就会走这里下面的返回没有权限的信息。
                # 如果配了多个权限类,第一个没过,直接不会再执行下一个权限类了
                self.permission_denied(
                    request,
                    # 可以定制返回信息,就是权限类中self.message = '您没有权限' 也可以添加code
                    message=getattr(permission, 'message', None),
                    code=getattr(permission, 'code', None)
                )
# APIView的274行左右  get_permissions
    def get_permissions(self):
        # 按照从下往上的顺序查找 self.permission_classes  是咱们配置在视图类上的列表,permission_classes=[权限类1,权限类2]里面是一个个的权限类,没加括号
        # 列表生成式从我们配置的权限类列表中拿到权限类对象,放到列表中
        """
        permission_classes = [CommonPermission]
        经过列表生成式拿到权限类对象
        permission()变成了CommonPermission()
        """
        return [permission() for permission in self.permission_classes]
总结
	通过上述流程得知是APIView中的dispatch方法内部的initial执行了三大认证,我们通过读intial的源码看到了self.check_permissions(request)权限类组件。
	在check_permissions方法中 取出了配置在视图类中的权限类,并添加括号实例化得到对象,然后执行对象的has_permission方法,返回false就会直接结束,没有权限,后续的权限类也不会执行。
    如果不在视图类上配置permission_classes=[]
    就会使用配置文件的api_settings.DEFAULT_PERMISSION_CLASSES
    优先使用项目配置文件,其次使用drf内置配置文件
认证类源码分析
继续从initial中的认证组件代码读源码
    def initial(self, request, *args, **kwargs):
        # 能够解析的编码,版本控制。。。。
        self.format_kwarg = self.get_format_suffix(**kwargs)
        neg = self.perform_content_negotiation(request)
        request.accepted_renderer, request.accepted_media_type = neg
        version, scheme = self.determine_version(request, *args, **kwargs)
        request.version, request.versioning_scheme = version, scheme

     	# 认证组件的执行位置【读它】
        self.perform_authentication(request)
        # 权限组件
        self.check_permissions(request)
        # 频率组件
        self.check_throttles(request)
 # APIView的316行左右
    def perform_authentication(self, request):
        request.user #咱们觉得它是个属性,其实它是个方法,包装成了数据属性,去研究request的user

  这里的request是新的Request哦
from rest_framework.request import Request
 # Request类的user方法   219行左右
    @property
    def user(self):
        # 判断对象中是否有_user属性,有直接返回去,没有执行下面的_authenticate方法
        if not hasattr(self, '_user'):
            with wrap_attributeerrors():
                self._authenticate()
        return self._user
# self 是Request的对象,找Request类的self._authenticate()   373 行
    def _authenticate(self):
        # 研究self.authenticators(下面第一个窗口)发现Request类初始化的时候,传入的,那么Request是什么时候初始化的呢研究(下面第二个窗口)得知    self.authenticators 我们配置在视图类上认证类的一个个对象,放到列表中

        for authenticator in self.authenticators:
            try:
                # 这里的authenticator.authenticate(self(这个self是Request对象))其实就是认证类对象点他的authenticate(self(这个self是Request对象))方法返回了两个值,第一个是当前登录用户,第二个的token,只走这一个认证类,后面的不再走了
                # 可以返回None,会继续执行下一个认证类
                user_auth_tuple = authenticator.authenticate(self)
            # 这里捕获的是我们认证类中抛的异常
            except exceptions.APIException:
                self._not_authenticated()
                raise

            if user_auth_tuple is not None:
                self._authenticator = authenticator
                # 解压赋值:
                #self.user=当前登录用户,self是当次请求的新的Request的对象
                #self.auth=token
                "所以需要我们在认证类中返回两个参数"
                self.user, self.auth = user_auth_tuple
                return

        self._not_authenticated()
 # self.authenticators  去Request类的init中找     152行左右
    def __init__(self, request, parsers=None, authenticators=None,
                 negotiator=None, parser_context=None):

        self.authenticators = authenticators or ()
 # 什么时候调用Reqeust的__init__?---》APIVIew的dispatch上面的492行的:
    request = self.initialize_request(request, *args, **kwargs)
    查看self.initialize_request方法,385行
    def initialize_request(self, request, *args, **kwargs):
        return Request(
            request,
            parsers=self.get_parsers(),
            #  那么查看get_authenticators()方法
            authenticators=self.get_authenticators(),
            negotiator=self.get_content_negotiator(),
            parser_context=parser_context
        )
      def get_authenticators(self):
		# 和权限类一样从我们视图类中配置的authentication_classes拿到认证类对象
        return [auth() for auth in self.authentication_classes]
总结
	1 配置在视图类上的认证类,会在执行视图类方法之前执行,在权限认证之前执行
    2 自己写的认证类,可以返回两个值或None
    3 后续可以从request.user 取出当前登录用户(前提是你要在认证类中返回)
频率类源码分析
# 之前读过:drf的apiview,在执行视图类的方法之前,执行了3大认证----》dispatch方法中的
    -497行左右, self.initial(request, *args, **kwargs)---》执行3大认证

# APIView类的399行左右:
    def initial(self, request, *args, **kwargs):
        # 能够解析的编码,版本控制。。。。
        self.format_kwarg = self.get_format_suffix(**kwargs)
        neg = self.perform_content_negotiation(request)
        request.accepted_renderer, request.accepted_media_type = neg
        version, scheme = self.determine_version(request, *args, **kwargs)
        request.version, request.versioning_scheme = version, scheme

     	# 认证组件的执行位置
        self.perform_authentication(request)
        # 权限组件
        self.check_permissions(request)
        # 频率组件【读它】
        self.check_throttles(request)
# APIView 的352行
    def check_throttles(self, request):
        throttle_durations = []
        #self.get_throttles() 配置在视图类上的频率类的对象,放到列表中
        # 每次取出一个频率类的对象,执行allow_request方法,如果是False,频率超了,不能再走了
        # 如果是True,没有超频率,可以直接往后
        """我们的频率类继承的是SimpleRateThrottle,它继承了BaseThrottle帮助我们重写了allow_request在内部调用了我们写的get_cache_key方法返回什么就用什么做频率认证"""
        for throttle in self.get_throttles():
            if not throttle.allow_request(request, self):
                throttle_durations.append(throttle.wait())

        if throttle_durations:
            # Filter out `None` values which may happen in case of config / rate
            # changes, see #1438
            durations = [
                duration for duration in throttle_durations
                if duration is not None
            ]

            duration = max(durations, default=None)
            self.throttled(request, duration)
总结
        """我们的频率类继承的是SimpleRateThrottle,它继承了BaseThrottle帮助我们重写了allow_request在内部调用了我们写的get_cache_key方法返回什么就用什么做频率认证"""

----------------------------------------------------------------------

    class SuperThrottle(BaseThrottle):
    def allow_request(self,request,view):
        return False
如果我们自己写的频率类:继承BaseThrottle,重写allow_request,在内部判断,如果超频了,就返回False,如果没超频率,就返回True
自定义频率类
class SuperThrottle(BaseThrottle):
    # (1)取出访问者ip
    # (2)判断当前ip不在访问字典里,添加进去,并且直接返回True,表示第一次访问,在字典里,继续往下走 {ip地址:[时间1,时间2,时间3,时间4]}
    # (3)循环判断当前ip的列表,有值,并且当前时间减去列表的最后一个时间大于60s,把这种数据pop掉,这样列表中只有60s以内的访问时间,
    # (4)判断,当列表小于3,说明一分钟以内访问不足三次,把当前时间插入到列表第一个位置,返回True,顺利通过
    # (5)当大于等于3,说明一分钟内访问超过三次,返回False验证失败
    # 定义一个访问字典
    VISIT_RECORD = {}

    def __init__(self):
        self.history = None
    def allow_request(self, request, view):
        # 1.取出ip
        ip = request.META.get('REMOTE_ADDR')
        import time
        ctime = time.time()
        # 2.判断当前ip在不在访问字典里,不在添加进去
        if ip not in self.VISIT_RECORD:
            # {ip:[时间]}
            self.VISIT_RECORD[ip] = [ctime,]
            # 返回True表示第一次访问
            return True
        # 添加到ip到的history属性中
        self.history = self.VISIT_RECORD.get(ip,[])
        # 3 循环判断当前history属性里,有值,并且当前时间减去列表的最后一个时间大于60s,把这种数据pop掉,这样列表中只有60s以内的访问时间
        # 判断self.history 有值 则 使用当前时间减去获取的最后一个时间,大于60秒,就POP掉,默认尾部
        while self.history and ctime - self.history[-1] > 60:
            self.history.pop()
        # 判断当前列表小于3(存放的访问时间,其实就是访问次数),就说明一分钟内访问次数不足三次,把当前时间插到列表第一个位置
        if len(self.history) < 3:
            # 索引0的位置插入时间 如果这里插入到尾部的话那么上面对比的时候就是用最新的访问时间做比对了,应该用这个ip的第一次访问时间做比对			 # {ip:[时间2,时间1,]}
            self.history.insert(0,ctime)
            return True
        else:
            return False

    # 这样前端会显示超出限制不显示剩余多少时间,需要写wait方法
    def wait(self):
        import time
        ctime = time.time()
        # 用60秒减去 第一次访问时间的秒数就是剩余时间。
        return 60 - (ctime - self.history[-1])
我们自定义了一个频率类继承了BaseThrottle类,并重写了allow_request方法,我们通过前面的研究知道SimpleRateThrottle类继承了BaseThrottle类并帮我们重写了allow_request方法,不需要我们重写allow_request方法。
研究SimpleRateThrottle的allow_request方法怎么写的
    def allow_request(self, request, view):
			# 经过查看rate源码发现通过get_rate方法返回了'2/s'
        if self.rate is None:
            return True

        # 重写get_cache_key方法返回谁就以谁做限制(ip地址)
        self.key = self.get_cache_key(request, view)
        if self.key is None:
            return True
		# 下面的逻辑,跟咱们写的一样 不过时间从cache缓存中取出来了
        self.history = self.cache.get(self.key, [])
        # self.timer = time.time那么self.timer()就是time.time()
        self.now = self.timer()
        # 假设60秒访问5次
        # 拿第一次访问的时间与 当前时间减去我们设定的时间做比对,如果大于我们第一次访问的时间就说明超过60秒了,反过来就是第一次访问时间小于我们减去得到的时间 就是超过60秒了 所以要剔除大于60秒的时间

        while self.history and self.history[-1] <= self.now - self.duration:
            self.history.pop()
        if len(self.history) >= self.num_requests:
            # throttle_failure()返回的False
            return self.throttle_failure()
        # throttle_success() 返回的是True
        return self.throttle_success()


# SimpleRateThrottle的init方法
    def __init__(self):
        if not getattr(self, 'rate', None):
            # 经get_rate()方法研究这里的self.rate 得到的就是 '2/s'
            self.rate = self.get_rate()
        # 研究这个parse_rate(self.rate) 内部反回了切分字符串2/s得到的 对应的整型和时间。并解压赋值self.num_requests=  2  , self.duration 1(秒为单位)
        self.num_requests, self.duration = self.parse_rate(self.rate)
# SimpleRateThrottle的get_rate() 方法
    def get_rate(self):
		  #反射有没有scope没有抛异常,scope就是我们在频率类中·写的scope
        if not getattr(self, 'scope', None):
            msg = ("You must set either `.scope` or `.rate` for '%s' throttle" %
                   self.__class__.__name__)
            raise ImproperlyConfigured(msg)

        try:

            # 可以看到self.scope拿到的就是我们在类中填写的scope的值  研究THROTTLE_RATES方法发现是个属性
            """
           THROTTLE_RATES = api_settings.DEFAULT_THROTTLE_RATES

          'DEFAULT_THROTTLE_RATES': {
        				'pl': '2/s',},
        		就是我们在配置文件中的这个配置"""
            # 所以这里return的就是'2/s'
            return self.THROTTLE_RATES[self.scope]
        except KeyError:
            msg = "No default throttle rate set for '%s' scope" % self.scope
            raise ImproperlyConfigured(msg)
#     SimpleRateThrottle的parse_rate 方法
	def parse_rate(self, rate):
        # rate是'2/s',如果是None就返回 (None, None)
        if rate is None:
            return (None, None)
		  # 按/切分 ‘2/s’ 那么num=‘2’ period=‘second’
        num, period = rate.split('/')
        # num_requests=转整型的2
        num_requests = int(num)
        duration = {'s': 1, 'm': 60, 'h': 3600, 'd': 86400}[period[0]]
        # 经过上面的步骤num_requests=2,duration=1
        return (num_requests, duration)
基于APIView写分页功能
# 分页功能,只有查询所有才有


class BookView(ViewSetMixin, APIView):
    def list(self, request):
        books = Book.objects.all()
        # 使用步骤
        # 1 实例化得到一个分页类的对象
        paginator = CommonLimitOffsetPagination() # 更换分页类来换分页方式
        # 2 调用分页类对象的paginate_queryset方法来完成分页,返回的page是 分页好的要序列化的数据,
        page = paginator.paginate_queryset(books, request, self)
        if page is not None:
            serializer = BookSerializer(instance=page, many=True)
            # 3 返回数据,调用paginator的get_paginated_response方法
            # return paginator.get_paginated_response(serializer.data)
            # 也可以写成这样
            return Response({
                'total': paginator.count,
                'next': paginator.get_next_link(),
                'previous': paginator.get_previous_link(),
                'results': serializer.data
            })
异常处理
# APIView--->dispatch--->三大认证,视图类的方法,如果出了一场,会被一场捕获,捕获后统一处理
# drf 内置了一个函数,只要上面过程出了异常,就会执行这个函数,这个函数只处理的drf的异常
	-视图内中主动抛的非drf异常(没有继承APIException的),程序出错了 都不会被处理
    我们的目标,无论主动抛还是程序运行出错,都统一返回规定格式--》能记录日志
    公司里一般返回   {code:999,'msg':'系统错误,请联系系统管理员'}


# 写一个函数,内部处理异常,在配置文件中配置一下即可

from rest_framework.response import Response
from rest_framework.views import exception_handler
# 在公司中,只要走了这个函数就说明错了,就要记录日志,尽量详细。
def common_exceptions_handler(exc, context):
    # exc  # 错误对象
    # context # 上下文里有view:当前视图类的对象,  args与kwargs是视图类方法分组出来的参数,request:当次请求的request对象
    res = exception_handler(exc, context)
    if res: # 有值说明返回了Response对象,没有则是None
        # 如果是Response则是drf异常,已经处理了 res.data.get('detail'),以后drf的异常也会被这里处理成固定格式
        res= Response(data={'code':100,'msg':res.data.get('detail','请联系管理员')})
    else:
        # 如果None说明没有处理,就是非drf异常自己定制 str(exc)里有抛异常的信息
        # res = Response(data={'code': 100, 'msg': str(exc)})
        res = Response(data={'code': 101, 'msg': '系统错误,请联系管理员'})
    return res

# 在配置文件中配置
REST_FRAMEWORK = {
	'EXCEPTION_HANDLER': 'app01.exceptions.common_exception_handler',
}


