Java NIO
Java NIO 基本介绍
- Java NIO(New IO)也有人称之为 java non-blocking IO是从Java 1.4版本开始引入的一个新的IO API,可以替代标准的Java IO API。NIO与原来的IO有同样的作用和目的,但是使用的方式完全不同,NIO支持面向缓冲区的、基于通道的IO操作。NIO将以更加高效的方式进行文件的读写操作。NIO可以理解为非阻塞IO,传统的IO的read和write只能阻塞执行,线程在读写IO期间不能干其他事情,比如调用socket.read()时,如果服务器一直没有数据传输过来,线程就一直阻塞,而NIO中可以配置socket为非阻塞模式。
- NIO 相关类都被放在 java.nio 包及子包下,并且对原 java.io 包中的很多类进行改写。
- NIO 有三大核心部分:Channel( 通道) ,Buffer( 缓冲区), Selector( 选择器)
- Java NIO 的非阻塞模式,使一个线程从某通道发送请求或者读取数据,但是它仅能得到目前可用的数据,如果目前没有数据可用时,就什么都不会获取,而不是保持线程阻塞,所以直至数据变的可以读取之前,该线程可以继续做其他的事情。 非阻塞写也是如此,一个线程请求写入一些数据到某通道,但不需要等待它完全写入,这个线程同时可以去做别的事情。
- 通俗理解:NIO 是可以做到用一个线程来处理多个操作的。假设有 1000 个请求过来,根据实际情况,可以分配20 或者 80个线程来处理。不像之前的阻塞 IO 那样,非得分配 1000 个。
NIO 和 BIO 的比较
- BIO 以流的方式处理数据,而 NIO 以块的方式处理数据,块 I/O 的效率比流 I/O 高很多
- BIO 是阻塞的,NIO 则是非阻塞的
- BIO 基于字节流和字符流进行操作,而 NIO 基于 Channel(通道)和 Buffer(缓冲区)进行操作,数据总是从通道
读取到缓冲区中,或者从缓冲区写入到通道中。Selector(选择器)用于监听多个通道的事件(比如:连接请求,数据到达等),因此使用单个线程就可以监听多个客户端通道
| NIO | BIO |
|---|---|
| 面向缓冲区(Buffer) | 面向流(Stream) |
| 非阻塞(Non Blocking IO) | 阻塞IO(Blocking IO) |
| 选择器(Selectors) |
NIO 三大核心原理示意图
NIO 有三大核心部分:Channel( 通道) ,Buffer( 缓冲区), Selector( 选择器)
Buffer缓冲区
缓冲区本质上是一块可以写入数据,然后可以从中读取数据的内存。这块内存被包装成NIO Buffer对象,并提供了一组方法,用来方便的访问该块内存。相比较直接对数组的操作,Buffer API更加容易操作和管理。
Channel(通道)
Java NIO的通道类似流,但又有些不同:既可以从通道中读取数据,又可以写数据到通道。但流的(input或output)读写通常是单向的。 通道可以非阻塞读取和写入通道,通道可以支持读取或写入缓冲区,也支持异步地读写。
Selector选择器
Selector是 一个Java NIO组件,可以能够检查一个或多个 NIO 通道,并确定哪些通道已经准备好进行读取或写入。这样,一个单独的线程可以管理多个channel,从而管理多个网络连接,提高效率

- 每个 channel 都会对应一个 Buffer
- 一个线程对应Selector , 一个Selector对应多个 channel(连接)
- 程序切换到哪个 channel 是由事件决定的
- Selector 会根据不同的事件,在各个通道上切换
- Buffer 就是一个内存块 , 底层是一个数组
- 数据的读取写入是通过 Buffer完成的 , BIO 中要么是输入流,或者是输出流, 不能双向,但是 NIO 的 Buffer 是可以读也可以写。
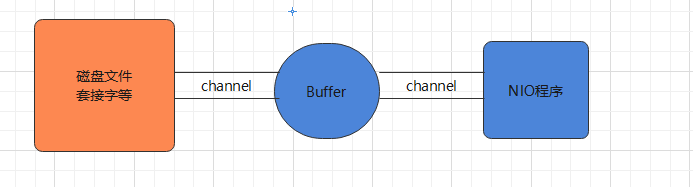
- Java NIO系统的核心在于:通道(Channel)和缓冲区 (Buffer)。通道表示打开到 IO 设备(例如:文件、 套接字)的连接。若需要使用 NIO 系统,需要获取 用于连接 IO 设备的通道以及用于容纳数据的缓冲 区。然后操作缓冲区,对数据进行处理。简而言之,Channel 负责传输, Buffer 负责存取数据
NIO核心一:缓冲区(Buffer)
缓冲区(Buffer)
一个用于特定基本数据类 型的容器。由 java.nio 包定义的,所有缓冲区 都是 Buffer 抽象类的子类.。Java NIO 中的 Buffer 主要用于与 NIO 通道进行 交互,数据是从通道读入缓冲区,从缓冲区写入通道中的
Buffer 类及其子类
Buffer 就像一个数组,可以保存多个相同类型的数据。根 据数据类型不同 ,有以下 Buffer 常用子类:
- ByteBuffer
- CharBuffer
- ShortBuffer
- IntBuffer
- LongBuffer
- FloatBuffer
- DoubleBuffer
上述 Buffer 类 他们都采用相似的方法进行管理数据,只是各自 管理的数据类型不同而已。都是通过如下方法获取一个 Buffer 对象:
缓冲区的基本属性
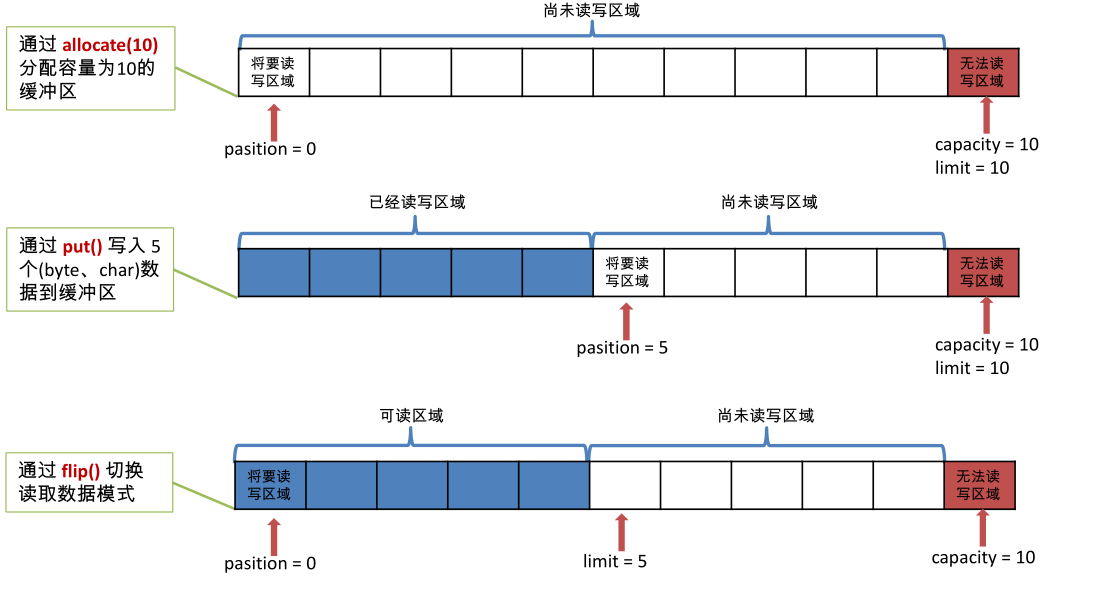
Buffer 中的重要概念:
- 容量 (capacity) :作为一个内存块,Buffer具有一定的固定大小,也称为"容量",缓冲区容量不能为负,并且创建后不能更改。
- 限制 (limit):表示缓冲区中可以操作数据的大小(limit 后数据不能进行读写)。缓冲区的限制不能为负,并且不能大于其容量。 写入模式,限制等于buffer的容量。读取模式下,limit等于写入的数据量。
- 位置 (position):下一个要读取或写入的数据的索引。缓冲区的位置不能为 负,并且不能大于其限制
- 标记 (mark)与重置 (reset):标记是一个索引,通过 Buffer 中的 mark() 方法 指定 Buffer 中一个特定的 position,之后可以通过调用 reset() 方法恢复到这 个 position.
标记、位置、限制、容量遵守以下不变式: 0 <= mark <= position <= limit <= capacity - 图示:
Buffer常见方法
缓冲区的数据操作
使用Buffer读写数据一般遵循以下四个步骤:
- 1.写入数据到Buffer
- 2.调用flip()方法,转换为读取模式
- 3.从Buffer中读取数据
- 4.调用buffer.clear()方法或者buffer.compact()方法清除缓冲区
案例演示
直接与非直接缓冲区
什么是直接内存与非直接内存
根据官方文档的描述:
byte byffer可以是两种类型,一种是基于直接内存(也就是非堆内存);另一种是非直接内存(也就是堆内存)。对于直接内存来说,JVM将会在IO操作上具有更高的性能,因为它直接作用于本地系统的IO操作。而非直接内存,也就是堆内存中的数据,如果要作IO操作,会先从本进程内存复制到直接内存,再利用本地IO处理。
从数据流的角度,非直接内存是下面这样的作用链:
而直接内存是:
很明显,在做IO处理时,比如网络发送大量数据时,直接内存会具有更高的效率。直接内存使用allocateDirect创建,但是它比申请普通的堆内存需要耗费更高的性能。不过,这部分的数据是在JVM之外的,因此它不会占用应用的内存。所以呢,当你有很大的数据要缓存,并且它的生命周期又很长,那么就比较适合使用直接内存。只是一般来说,如果不是能带来很明显的性能提升,还是推荐直接使用堆内存。字节缓冲区是直接缓冲区还是非直接缓冲区可通过调用其 isDirect() 方法来确定。
使用场景
- 1 有很大的数据需要存储,它的生命周期又很长
- 2 适合频繁的IO操作,比如网络并发场景
NIO核心二:通道(Channel)
通道Channe概述
通道(Channel):由 java.nio.channels 包定义 的。Channel 表示 IO 源与目标打开的连接。 Channel 类似于传统的“流”。只不过 Channel 本身不能直接访问数据,Channel 只能与 Buffer 进行交互。
1、 NIO 的通道类似于流,但有些区别如下:
-
通道可以同时进行读写,而流只能读或者只能写
-
通道可以实现异步读写数据
-
通道可以从缓冲读数据,也可以写数据到缓冲:
2、BIO 中的 stream 是单向的,例如 FileInputStream 对象只能进行读取数据的操作,而 NIO 中的通道(Channel)
是双向的,可以读操作,也可以写操作。
3、Channel 在 NIO 中是一个接口
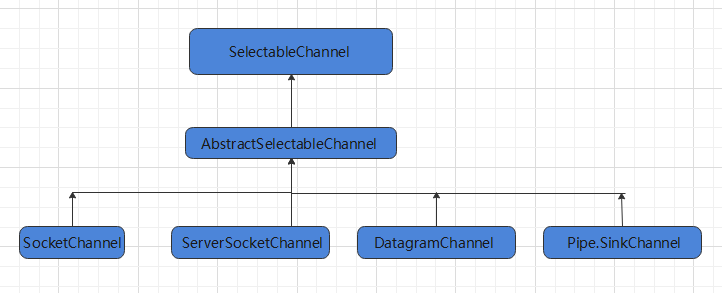
常用的Channel实现类
- FileChannel:用于读取、写入、映射和操作文件的通道。
- DatagramChannel:通过 UDP 读写网络中的数据通道。
- SocketChannel:通过 TCP 读写网络中的数据。
- ServerSocketChannel:可以监听新进来的 TCP 连接,对每一个新进来的连接都会创建一个 SocketChannel。 【ServerSocketChanne 类似 ServerSocket , SocketChannel 类似 Socket】
FileChannel 类
获取通道的一种方式是对支持通道的对象调用getChannel() 方法。支持通道的类如下:
- FileInputStream
- FileOutputStream
- RandomAccessFile
- DatagramSocket
- Socket
- ServerSocket
获取通道的其他方式是使用 Files 类的静态方法 newByteChannel() 获取字节通道。或者通过通道的静态方法 open() 打开并返回指定通道
FileChannel的常用方法
案例1-本地文件写数据
需求:使用前面学习后的 ByteBuffer(缓冲) 和 FileChannel(通道), 将 "hello,黑马Java程序员!" 写入到 data.txt 中.
案例2-本地文件读数据
需求:使用前面学习后的 ByteBuffer(缓冲) 和 FileChannel(通道), 将 data01.txt 中的数据读入到程序,并显示在控制台屏幕
案例3-使用Buffer完成文件复制
使用 FileChannel(通道) ,完成文件的拷贝。
案例4-分散 (Scatter) 和聚集 (Gather)
分散读取(Scatter ):是指把Channel通道的数据读入到多个缓冲区中去
聚集写入(Gathering )是指将多个 Buffer 中的数据“聚集”到 Channel。
案例5-transferFrom()
从目标通道中去复制原通道数据
案例6-transferTo()
把原通道数据复制到目标通道
NIO核心三:选择器(Selector)
选择器(Selector)概述
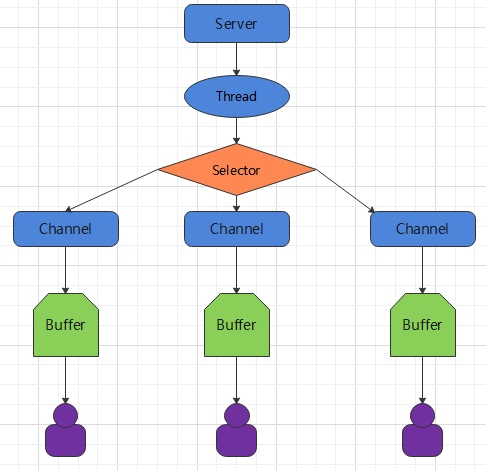
选择器(Selector) 是 SelectableChannle 对象的多路复用器,Selector 可以同时监控多个 SelectableChannel 的 IO 状况,也就是说,利用 Selector可使一个单独的线程管理多个 Channel。Selector 是非阻塞 IO 的核心
- Java 的 NIO,用非阻塞的 IO 方式。可以用一个线程,处理多个的客户端连接,就会使用到 Selector(选择器)
- Selector 能够检测多个注册的通道上是否有事件发生(注意:多个 Channel 以事件的方式可以注册到同一个
Selector),如果有事件发生,便获取事件然后针对每个事件进行相应的处理。这样就可以只用一个单线程去管
理多个通道,也就是管理多个连接和请求。 - 只有在 连接/通道 真正有读写事件发生时,才会进行读写,就大大地减少了系统开销,并且不必为每个连接都
创建一个线程,不用去维护多个线程 - 避免了多线程之间的上下文切换导致的开销
选择 器(Selector)的应用
创建 Selector :通过调用 Selector.open() 方法创建一个 Selector。
向选择器注册通道:SelectableChannel.register(Selector sel, int ops)
当调用 register(Selector sel, int ops) 将通道注册选择器时,选择器对通道的监听事件,需要通过第二个参数 ops 指定。可以监听的事件类型(用 可使用 SelectionKey 的四个常量 表示):
- 读 : SelectionKey.OP_READ (1)
- 写 : SelectionKey.OP_WRITE (4)
- 连接 : SelectionKey.OP_CONNECT (8)
- 接收 : SelectionKey.OP_ACCEPT (16)
- 若注册时不止监听一个事件,则可以使用“位或”操作符连接。
NIO非阻塞式网络通信原理分析
Selector 示意图和特点说明
Selector可以实现: 一个 I/O 线程可以并发处理 N 个客户端连接和读写操作,这从根本上解决了传统同步阻塞 I/O 一连接一线程模型,架构的性能、弹性伸缩能力和可靠性都得到了极大的提升。
服务端流程
-
1、当客户端连接服务端时,服务端会通过 ServerSocketChannel 得到 SocketChannel:1. 获取通道
-
2、切换非阻塞模式
-
3、绑定连接
-
4、 获取选择器
-
5、 将通道注册到选择器上, 并且指定“监听接收事件”
-
- 轮询式的获取选择器上已经“准备就绪”的事件
-
客户端流程
-
-
获取通道
-
-
-
切换非阻塞模式
-
-
- 分配指定大小的缓冲区
-
-
发送数据给服务端
Scanner scan = new Scanner(System.in);
while(scan.hasNext()){
String str = scan.nextLine();
buf.put((new SimpleDateFormat("yyyy/MM/dd HH:mm:ss").format(System.currentTimeMillis())
+ "\n" + str).getBytes());
buf.flip();
sChannel.write(buf);
buf.clear();
}
//关闭通道
sChannel.close();
-
NIO非阻塞式网络通信入门案例
需求:服务端接收客户端的连接请求,并接收多个客户端发送过来的事件。
代码案例
NIO 网络编程应用实例-群聊系统
目标
需求:进一步理解 NIO 非阻塞网络编程机制,实现多人群聊
- 编写一个 NIO 群聊系统,实现客户端与客户端的通信需求(非阻塞)
- 服务器端:可以监测用户上线,离线,并实现消息转发功能
- 客户端:通过 channel 可以无阻塞发送消息给其它所有客户端用户,同时可以接受其它客户端用户通过服务端转发来的消息
服务端代码实现
客户端代码实现
__EOF__

本文链接:https://www.cnblogs.com/LiPengFeiii/p/15263666.html
关于博主:评论和私信会在第一时间回复。或者直接私信我。
版权声明:本博客所有文章除特别声明外,均采用 BY-NC-SA 许可协议。转载请注明出处!
声援博主:如果您觉得文章对您有帮助,可以点击文章右下角【推荐】一下。您的鼓励是博主的最大动力!


【推荐】国内首个AI IDE,深度理解中文开发场景,立即下载体验Trae
【推荐】编程新体验,更懂你的AI,立即体验豆包MarsCode编程助手
【推荐】抖音旗下AI助手豆包,你的智能百科全书,全免费不限次数
【推荐】轻量又高性能的 SSH 工具 IShell:AI 加持,快人一步
· 从 HTTP 原因短语缺失研究 HTTP/2 和 HTTP/3 的设计差异
· AI与.NET技术实操系列:向量存储与相似性搜索在 .NET 中的实现
· 基于Microsoft.Extensions.AI核心库实现RAG应用
· Linux系列:如何用heaptrack跟踪.NET程序的非托管内存泄露
· 开发者必知的日志记录最佳实践
· TypeScript + Deepseek 打造卜卦网站:技术与玄学的结合
· Manus的开源复刻OpenManus初探
· AI 智能体引爆开源社区「GitHub 热点速览」
· 从HTTP原因短语缺失研究HTTP/2和HTTP/3的设计差异
· 三行代码完成国际化适配,妙~啊~