MyBatis(SSM框架)接入redis作为二级缓存(含源码)
1.配置jar包:
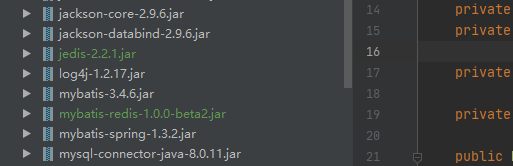
可在(https://mvnrepository.com/)中下载
2.添加redis ip 和port配置

#redis配置 start
# redis地址
redis.ip=127.0.0.1
# redis端口
redis.port=6379
#  最大连接数
jedis.pool.maxActive=3000
#  空闲时最大连接数
jedis.pool.maxIdle=1000
#  最大等待时间
jedis.pool.maxWait=1500
jedis.pool.testOnBorrow=true
jedis.pool.testOnReturn=true
# 开关
redis.switch = true
#  redis的KEY,以这个开头,区分系统
redis.key = SOA
#redis配置 end
3.配置对应工具类

RedisCache.Java
package com.lll.utils;

import org.apache.ibatis.cache.Cache;
import org.apache.ibatis.cache.CacheException;
import org.apache.log4j.Logger;
import redis.clients.jedis.Jedis;

import java.io.Serializable;
import java.util.Properties;
import java.util.concurrent.locks.ReadWriteLock;

public class RedisCache implements Cache {

    private final String redisIp = PropertiesUtils.getProperty("redis.ip");
    private final int redisPort = Integer.valueOf(PropertiesUtils.getProperty("redis.port")).intValue();

    private final String id;

    private Jedis cache = new Jedis(redisIp, redisPort);

    public RedisCache(String id) {
        this.id = id;
    }

    @Override
    public String getId() {
        return id;
    }

    @Override
    //返回缓存所有键值对的数量
    public int getSize() {
        Long dbSize = cache.dbSize();
        return dbSize.intValue();
    }

    @Override
    //向缓存中存入数据
    public void putObject(Object key, Object value) {
        System.out.println("key:" + key);
        //将对象序列化成字节数组  引入commens-lang3工具包
        byte[] keyBs = SerializeUtils.serialize((Serializable) key);
        byte[] valueBs = SerializeUtils.serialize((Serializable) value);

        cache.set(keyBs, valueBs);
    }

    @Override
    //从缓存中获取数据
    public Object getObject(Object key) {
        byte[] keyBs = SerializeUtils.serialize((Serializable) key);
        byte[] valueBs = cache.get(keyBs);
        if (valueBs != null) { // 第一次到缓存找数据的时候 , 返回的是null
            return SerializeUtils.unserialize(valueBs);
        }
        return null;
    }

    @Override
    //清除缓存
    public Object removeObject(Object key) {
        // 先获取一下删除的对象
        byte[] keyBs = SerializeUtils.serialize((Serializable) key);
        byte[] valueBs = cache.get(keyBs);
        Object obj = SerializeUtils.unserialize(valueBs);
        cache.del(keyBs);// 执行删除操作
        return obj;
    }

    @Override
    //清空缓存
    public void clear() {
        cache.flushDB();
    }

    @Override
    public ReadWriteLock getReadWriteLock() {
        return null;
    }

    @Override
    public boolean equals(Object o) {
        if (getId() == null) {
            throw new CacheException("Cache instances require an ID.");
        }
        if (this == o) {
            return true;
        }
        if (!(o instanceof Cache)) {
            return false;
        }

        Cache otherCache = (Cache) o;
        return getId().equals(otherCache.getId());
    }

    @Override
    public int hashCode() {
        if (getId() == null) {
            throw new CacheException("Cache instances require an ID.");
        }
        return getId().hashCode();
    }

}
SerializeUtils.java
package com.lll.utils;

import java.io.ByteArrayInputStream;
import java.io.ByteArrayOutputStream;
import java.io.ObjectInputStream;
import java.io.ObjectOutputStream;

public class SerializeUtils {

    //private static final Logger logger = Logger.getLogger(SerializeUtils.class);

    private static void close(ObjectOutputStream objectOutputStream, ByteArrayOutputStream byteArrayOutputStream) {
        try {
            if (byteArrayOutputStream != null) {
                byteArrayOutputStream.close();
            }
            if (objectOutputStream != null) {
                objectOutputStream.close();
            }
        } catch (Exception e) {
            e.printStackTrace();
            //logger.error("关闭IO资源异常[" + e.getMessage() + "]", e);
        }
    }

    private static void close(ObjectInputStream objectInputStream, ByteArrayInputStream byteArrayInputStream) {
        try {
            if (objectInputStream != null) {
                objectInputStream.close();
            }
            if (byteArrayInputStream != null) {
                byteArrayInputStream.close();
            }
        } catch (Exception e) {
            e.printStackTrace();
            //logger.error("关闭IO资源异常[" + e.getMessage() + "]", e);
        }
    }

    public static byte[] serialize(Object object) {
        ObjectOutputStream objectOutputStream = null;
        ByteArrayOutputStream byteArrayOutputStream = null;
        try {
            byteArrayOutputStream = new ByteArrayOutputStream();
            objectOutputStream = new ObjectOutputStream(byteArrayOutputStream);
            objectOutputStream.writeObject(object);
            byte[] bytes = byteArrayOutputStream.toByteArray();
            return bytes;
        } catch (Exception e) {
            e.printStackTrace();
            //logger.error("序列化对象异常[" + e.getMessage() + "]", e);
        } finally {
            close(objectOutputStream, byteArrayOutputStream);
        }
        return null;
    }

    @SuppressWarnings("unchecked")
    public static <T> T unserialize(byte[] bytes) {
        if (bytes == null)
            return null;
        ByteArrayInputStream byteArrayInputStream = null;
        ObjectInputStream objectInputStream = null;
        try {
            byteArrayInputStream = new ByteArrayInputStream(bytes);
            objectInputStream = new ObjectInputStream(byteArrayInputStream);
            return (T) objectInputStream.readObject();
        } catch (Exception e) {
            e.printStackTrace();
        } finally {
            close(objectInputStream, byteArrayInputStream);
        }
        return null;
    }

}
4.在mybatis-config.xml和spring-mybatis.xml开启配置
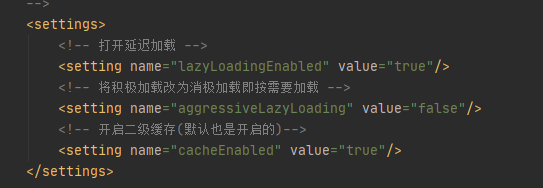
<?xml version="1.0" encoding="UTF-8" ?>
<!DOCTYPE configuration
        PUBLIC "-//mybatis.org//DTD Config 3.0//EN"
        "http://mybatis.org/dtd/mybatis-3-config.dtd">

<configuration>

    <!-- 使用mybatis方式全局变量设置在核心配置文件sqlMapConfig.xml的settings中
         spring和mybatis整合的情况下,mybatis下的全局参数<settings>在spring的配置文件中设置,
            在spring的sqlSessionFactory对象中,将配置粘入bean的property中

        settings用于配置全局变量,有顺序要求,要放在environment前面,配置全局参数
        lazyLoadingEnabled 配置懒加载,全局允许或静止懒加载,所有的任务都懒加载
        具体实现懒加载:通过在resultMap中设置fetchType实现懒加载

        <setting name="cacheEnabled" value="true"/> cacheEnabled允许二级缓存
    -->
    <settings>
        <!-- 打开延迟加载 -->
        <setting name="lazyLoadingEnabled" value="true"/>
        <!-- 将积极加载改为消极加载即按需要加载 -->
        <setting name="aggressiveLazyLoading" value="false"/>
        <!-- 开启二级缓存(默认也是开启的)-->
        <setting name="cacheEnabled" value="true"/>
    </settings>

</configuration>

<beans xmlns="http://www.springframework.org/schema/beans"
       xmlns:xsi="http://www.w3.org/2001/XMLSchema-instance"
       xmlns:context="http://www.springframework.org/schema/context"
       xsi:schemaLocation="http://www.springframework.org/schema/beans
        http://www.springframework.org/schema/beans/spring-beans.xsd
        http://www.springframework.org/schema/context
        http://www.springframework.org/schema/context/spring-context.xsd">


    <!-- 配置组件扫描器,使用注解方式开发,不用配置dao和service -->
    <!-- 在springmvc.xml文件中也可以配置这个属性 -->
    <context:component-scan base-package="com.lll"/>

    <!-- 数据源 -->
<!--    <bean id="dataSource"-->
<!--          class="org.springframework.jdbc.datasource.DriverManagerDataSource">-->
<!--        <property name="driverClassName" value="com.mysql.jdbc.Driver"/>-->
<!--        <property name="url" value="jdbc:mysql://localhost:3306/test"/>-->
<!--        <property name="username" value="root"/>-->
<!--        <property name="password" value=""/>-->
<!--    </bean>-->

    <!-- 配置session工厂 -->
    <bean id="sqlSessionFactory" class="org.mybatis.spring.SqlSessionFactoryBean">
<!--        <property name="dataSource" ref="dataSource"/>-->
        <property name="configLocation" value="classpath:resource/mybatis-config.xml"/>
    </bean>

    <!-- 事务管理器 -->
    <!--     <bean id="transactionManager" class="org.springframework.jdbc.datasource.DataSourceTransactionManager">
            <property name="dataSource" ref="dataSource"/>
        </bean> -->

    <!-- 配置AOP通知 -->
    <!--     <tx:advice id="txAdvice" transaction-manager="transactionManager">
             配置事务属性
             <tx:attributes>
                 添加事务管理的方法
                 <tx:method name="save*" propagation="REQUIRED"/>
                 <tx:method name="delete*" propagation="REQUIRED"/>
                 <tx:method name="update*" propagation="REQUIRED"/>
                 <tx:method name="select*" read-only="true"/>
             </tx:attributes>
         </tx:advice> -->

    <!-- 配置AOP,为添加事务管理的操作配置AOP -->
    <!--     <aop:config>
            引入的Spring定义的事务通知,需要使用aop:advisor
            下面难
            <aop:advisor advice-ref="txAdvice"
                pointcut="execution(* com.edu.test.service.*.*(..))"
            />
        </aop:config> -->
</beans>
5.在dao.xml中开启缓存
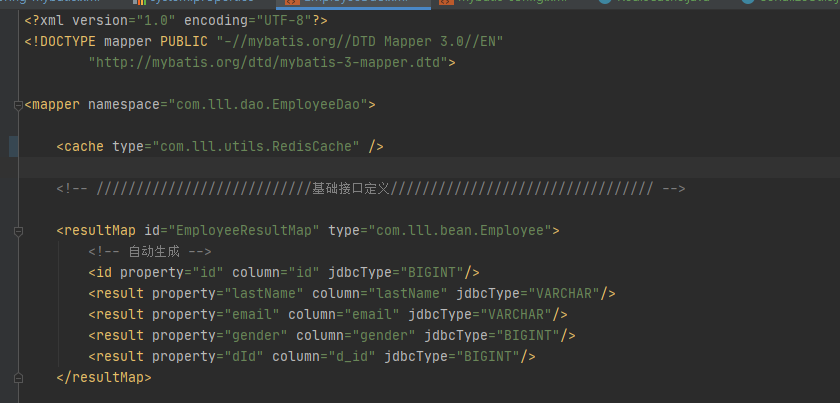
<cache type="com.lll.utils.RedisCache" />
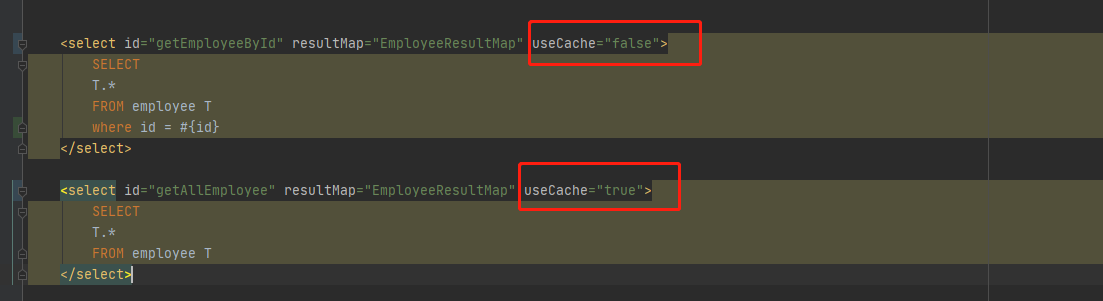
6.在sql方法中设置是都使用缓存
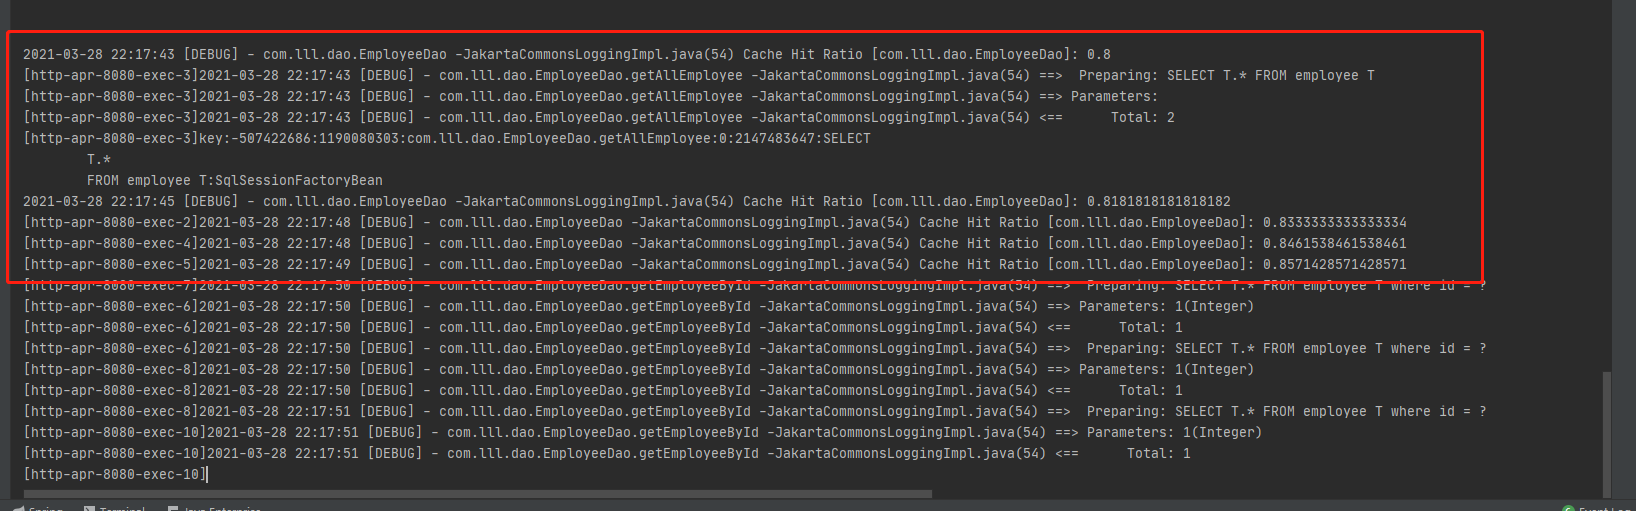
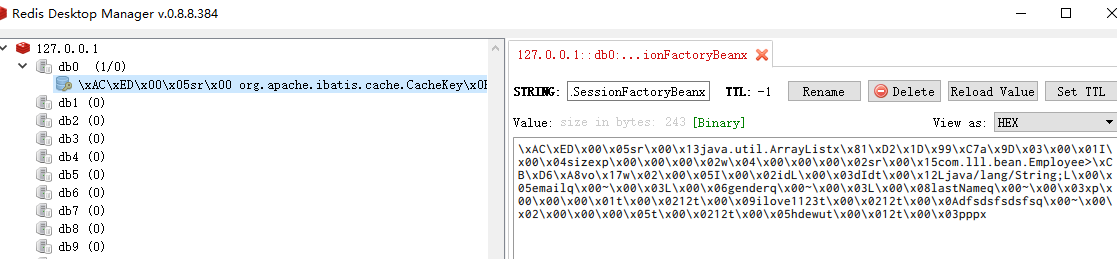
7.实际效果:
8.注意:bean对象必须实现Serializable,否则缓存会报错
9.资源
源码地址:https://github.com/CodingPandaLLL/springlll.git
资源包:https://codeload.github.com/CodingPandaLLL/springlll/zip/refs/tags/1.0.1

 浙公网安备 33010602011771号