
STM32 I2C通信实现SHT20温湿度采样并在OLED显示屏显示
一、开发板实例:STM32L431RCT6
开发板采用意法半导体(ST)公司的低功耗 Arm® Cortex®-M4 处理器STM32L431RCT6,其工作主频高达80MHz,并提供256KB Flash, 64KB SRAM存储空间。
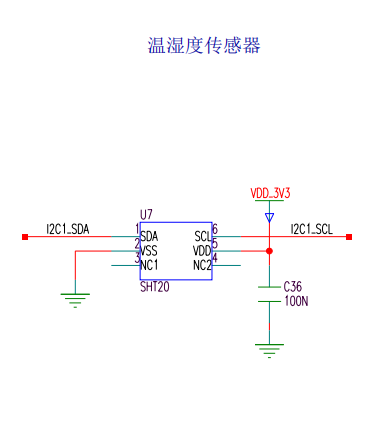
二、SHT20原理
技术参数:
- 工作电压:2.1~3.6VDC(请勿使用5V供电!)
- 信号输出:I2C数字输出
- 温度测量范围:-40~125°C 温度测量精度±0.3 °C
- 湿度测量范围:0~100%RH 湿度测量精度±3%
- 能耗:3.2uW(8位测量,1次/秒)
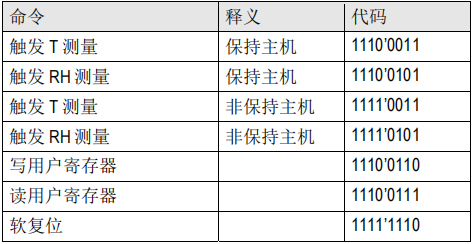
SHT20在采样时有两种工作模式:hold master模式和no hold master模式,具体采用哪种模式由命令决定。
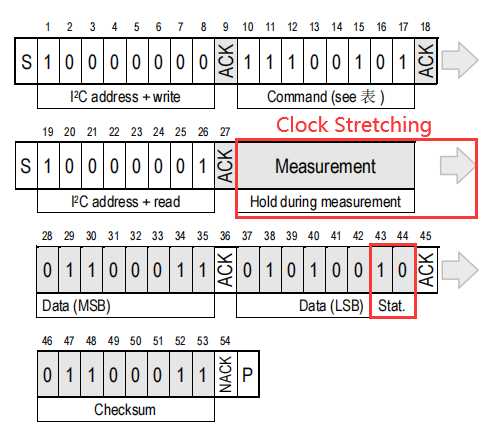
其中,hold master模式(温度命令为0xE3,湿度命令为0xE5)将会使用Clock Stretching机制来与MCU通信,工作时序如下:
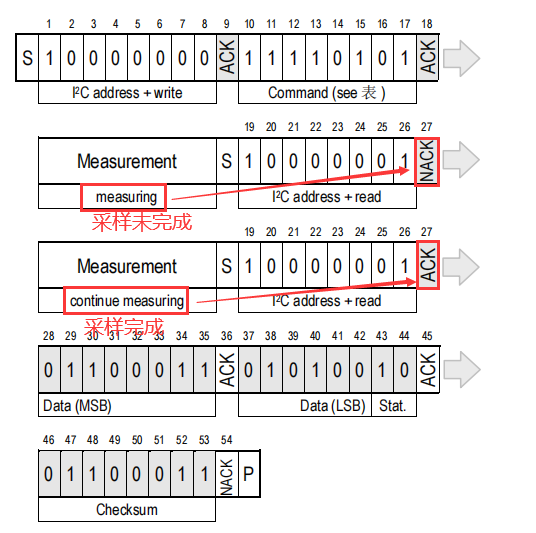
而no hold master模式(温度命令为0xF3,湿度命令为0xF5),工作时序如下:
三、采样
1、基于HAL库实现I2C采样
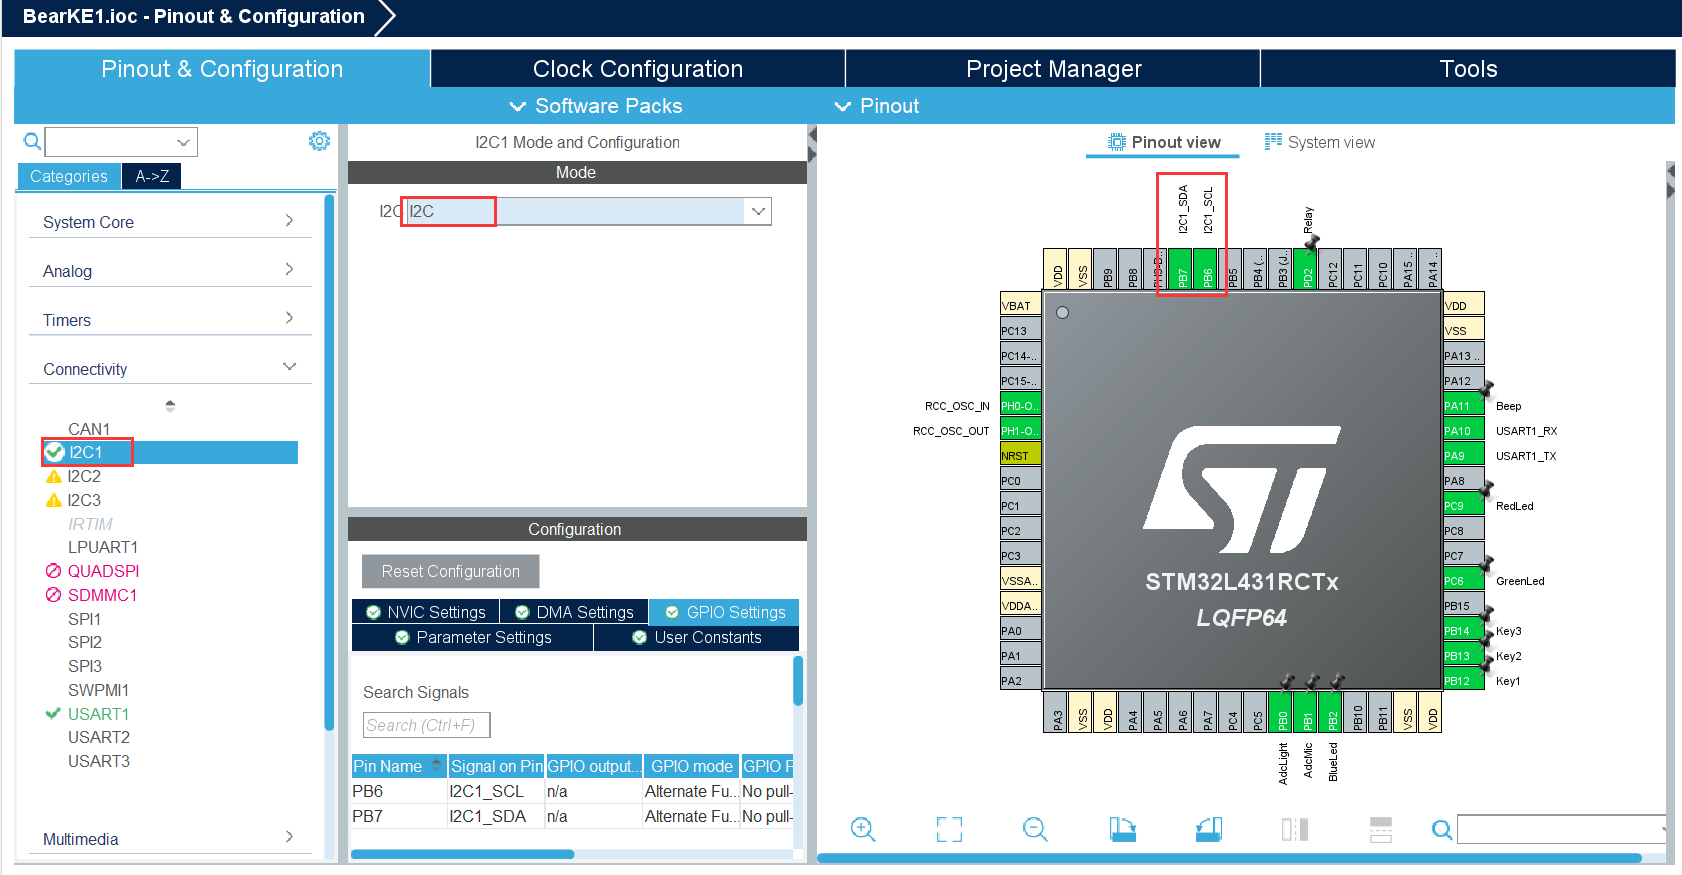
首先配置SHT20连接的PB6和PB7为I2C模式,Ctrl+S保存代码,会自动生成I2C总线初始化代码。
2、GPIO模拟I2C实现采样
一般CPU上的I2C总线个数有限制,很多引脚容易冲突导致没有I2C接口使用,此时我们可以直接拿两个GPIO口来模拟I2C总线。
3、代码实现
GPIO模拟I2C头文件gpio_i2c_sht20.h
/*
 * gpio_i2c_sht20.h
 *
 *  Created on: Aug 18, 2023
 *      Author: asus
 */

#ifndef INC_GPIO_I2C_SHT20_H_
#define INC_GPIO_I2C_SHT20_H_

enum{
	NO_ERROR = 0x00, // no error
	PARM_ERROR = 0x01, // parameter out of range error
	ACK_ERROR = 0x02, // no acknowledgment error
	CHECKSUM_ERROR = 0x04, // checksum mismatch error
	TIMEOUT_ERROR = 0x08, // timeout error
	BUS_ERROR = 0x10, // bus busy
};

enum{
	ACK_NONE,
	ACK,
	NAK,
};

extern int I2C_Master_Receive(uint8_t addr, uint8_t *buf, int len);
extern int I2C_Master_Transmit(uint8_t addr, uint8_t *data, int bytes);

#endif /* INC_GPIO_I2C_SHT20_H_ */
GPIO模拟I2C源文件gpio_i2c_sht20.c
/*
 * gpio_i2c_sht20.c
 *
 *  Created on: Aug 18, 2023
 *      Author: asus
 */
#include <stdio.h>
#include "stm32l4xx_hal.h"
#include "tim.h"
#include "gpio.h"
#include "gpio_i2c_sht20.h"

#define I2C_CLK_STRETCH_TIMEOUT 50

#define CONFIG_GPIO_I2C_DEBUG
#ifdef CONFIG_GPIO_I2C_DEBUG
#define i2c_print(format,args...)printf(format,##args)
#else
#define i2c_print(format,args...)do{}while(0)
#endif


typedef struct i2c_gpio_s
{
	GPIO_TypeDef *group;
	uint16_t scl;
	uint16_t sda;
}i2c_gpio_t;

static i2c_gpio_t i2c_pins = {GPIOB,GPIO_PIN_6,GPIO_PIN_7};

#define SDA_IN() do{GPIO_InitTypeDef GPIO_InitStruct = {0};\
					GPIO_InitStruct.Pin = i2c_pins.sda;\
					GPIO_InitStruct.Mode = GPIO_MODE_INPUT;\
					GPIO_InitStruct.Pull = GPIO_PULLUP;\
					GPIO_InitStruct.Speed = GPIO_SPEED_FREQ_HIGH;\
					HAL_GPIO_Init(i2c_pins.group,&GPIO_InitStruct);\
					}while(0)

#define SDA_OUT() do{GPIO_InitTypeDef GPIO_InitStruct = {0};\
					 GPIO_InitStruct.Pin = i2c_pins.sda;\
					 GPIO_InitStruct.Mode = GPIO_MODE_OUTPUT_PP;\
					 GPIO_InitStruct.Pull = GPIO_PULLUP;\
					 GPIO_InitStruct.Speed = GPIO_SPEED_FREQ_HIGH;\
					 HAL_GPIO_Init(i2c_pins.group,&GPIO_InitStruct);\
					 }while(0)

#define SCL_OUT() do{GPIO_InitTypeDef GPIO_InitStruct = {0};\
					 GPIO_InitStruct.Pin = i2c_pins.scl;\
					 GPIO_InitStruct.Mode = GPIO_MODE_OUTPUT_PP;\
					 GPIO_InitStruct.Pull = GPIO_PULLUP;\
					 GPIO_InitStruct.Speed = GPIO_SPEED_FREQ_HIGH;\
					 HAL_GPIO_Init(i2c_pins.group,&GPIO_InitStruct);\
					 }while(0)

#define SCL_H() HAL_GPIO_WritePin(i2c_pins.group,i2c_pins.scl,GPIO_PIN_SET)
#define SCL_L() HAL_GPIO_WritePin(i2c_pins.group,i2c_pins.scl,GPIO_PIN_RESET)
#define SDA_H() HAL_GPIO_WritePin(i2c_pins.group,i2c_pins.sda,GPIO_PIN_SET)
#define SDA_L() HAL_GPIO_WritePin(i2c_pins.group,i2c_pins.sda,GPIO_PIN_RESET)

#define READ_SDA() HAL_GPIO_ReadPin(i2c_pins.group,i2c_pins.sda)
#define READ_SCL() HAL_GPIO_ReadPin(i2c_pins.group,i2c_pins.scl)

//使用时钟延伸
static inline uint8_t I2c_WaitWhileClockStretching(uint16_t timeout)
{
	while(timeout-- > 0)
	{
		if(READ_SCL())
			break;
		delay_us(1);
	}
	return timeout ? NO_ERROR :BUS_ERROR;
}

//起始信号
uint8_t I2c_StartCondition()
{
	uint8_t rv = NO_ERROR;
	SDA_OUT();
	SCL_OUT();

	SDA_H();
	delay_us(1);
	SCL_H();
	delay_us(1);

#ifdef I2C_CLK_STRETCH_TIMEOUT
	rv = I2c_WaitWhileClockStretching(I2C_CLK_STRETCH_TIMEOUT);
	if(rv)
	{
		i2c_print("ERROR:%s() I2C bus busy\n",__func__);
		return rv;
	}
#endif

	SDA_L();//先于SCL先拉低
	delay_us(2);
	SCL_L();//拉低SCL便于之后的操作
	delay_us(2);
	return rv;
}

//终止信号
uint8_t I2c_StopCondition(void)
{
	uint8_t rv = NO_ERROR;
	SDA_OUT();

	SCL_L();
	SDA_L();
	delay_us(2);
	SCL_H();
	delay_us(2);

#ifdef I2C_CLK_STRETCH_TIMEOUT
	rv = I2c_WaitWhileClockStretching(I2C_CLK_STRETCH_TIMEOUT);
	if(rv)
	{
		i2c_print("ERROR:%s() I2C bus busy\n",__func__);
	}
#endif

	SDA_H();
	delay_us(2);
	return rv;
}

//写一个字节
uint8_t I2c_WriteByte(uint8_t byte)
{
	uint8_t rv = NO_ERROR;
	uint8_t mask;
	SDA_OUT();
	SCL_L();
	for(mask=0x80;mask>0;mask>>=1)
	{
		if((mask & byte) == 0)
		{
			SDA_L();
		}
		else
		{
			SDA_H();
		}
		delay_us(5);
		SCL_H();
		delay_us(5);

#ifdef I2C_CLK_STRETCH_TIMEOUT
		rv = I2c_WaitWhileClockStretching(I2C_CLK_STRETCH_TIMEOUT);
		if(rv)
		{
			i2c_print("ERROR:%s() I2C bus busy\n",__func__);
			goto OUT;
		}
#endif

		SCL_L();
		delay_us(5);
	}
	SDA_IN();
	SCL_H();
	delay_us(5);

#ifdef I2C_CLK_STRETCH_TIMEOUT
	rv = I2c_WaitWhileClockStretching(I2C_CLK_STRETCH_TIMEOUT);
	if(rv)
	{
		i2c_print("ERROR:%s() I2C bus busy\n",__func__);
		goto OUT;
	}
#endif

	if(READ_SDA())
		rv = ACK_ERROR;

OUT:
	SCL_L();
	delay_us(20);
	return rv;
}

//读一个字节
uint8_t I2c_ReadByte(uint8_t *byte,uint8_t ack)
{
	uint8_t rv = NO_ERROR;
	uint8_t mask;
	*byte = 0x00;
	SDA_IN();
	for(mask = 0x80;mask > 0;mask >>= 1)
	{
		SCL_H();
		delay_us(1);

#ifdef I2C_CLK_STRETCH_TIMEOUT
		rv = I2c_WaitWhileClockStretching(I2C_CLK_STRETCH_TIMEOUT);
		if(rv)
		{
			i2c_print("ERROR:%s() I2C bus busy\n",__func__);
			goto OUT;
		}
#endif

		if(READ_SDA())
			*byte |= mask;
		SCL_L();
		delay_us(2);
	}

	if(ack == ACK)
	{
		SDA_OUT();
		SDA_L();
	}
	else if(ack ==NAK)
	{
		SDA_OUT();
		SDA_H();
	}
	delay_us(1);
	SCL_H();
	delay_us(2);

#ifdef I2C_CLK_STRETCH_TIMEOUT
	rv = I2c_WaitWhileClockStretching(I2C_CLK_STRETCH_TIMEOUT);
	if(rv)
	{
		i2c_print("ERROR:%s() I2C bus busy\n",__func__);
	}
#endif

OUT:
	SCL_L();
	delay_us(2);
	return rv;
}


uint8_t I2c_SendAddress(uint8_t addr)
{
	return I2c_WriteByte(addr);
}

//接收从机发来的信号
int I2C_Master_Receive(uint8_t addr,uint8_t *buf,int len)
{
	int i;
	int rv = NO_ERROR;
	uint8_t byte;

	I2c_StartCondition();
	rv = I2c_WriteByte(addr);
	if(rv)
	{
		i2c_print("Send I2C read address failure,rv=%d\n",rv);
		goto OUT;
	}
#ifdef I2C_CLK_STRETCH_TIMEOUT
	rv = I2c_WaitWhileClockStretching(I2C_CLK_STRETCH_TIMEOUT);
	if(rv)
	{
		i2c_print("ERROR:%s() I2C wait clock stretching failure,rv=%d\n",__func__,rv);
		return rv;
	}
#endif

	for(i=0;i<len;i++)
	{
		if(!I2c_ReadByte(&byte,ACK))
			buf[i] = byte;
		else
			goto OUT;
	}

OUT:
	I2c_StopCondition();
	return rv;
}

//发送命令
int I2C_Master_Transmit(uint8_t addr, uint8_t *data, int bytes)
{
	int i;
	int rv = NO_ERROR;

	if(!data)
	{
		return PARM_ERROR;
	}

	i2c_print("I2C Mastr start transimit [%d] bytes data to addr [0x%02x]\n", bytes, addr);
	I2c_StartCondition();

	rv = I2c_SendAddress(addr);
	if(rv)
	{
		goto OUT;
	}

	for(i=0;i<bytes;i++)
	{
		if(NO_ERROR != (rv=I2c_WriteByte(data[i])))
			break;
	}

OUT:
	I2c_StopCondition();
	return rv;
}
SHT20的驱动源文件sht20.c
/*
 * sht20.c
 *
 *  Created on: Jul 21, 2023
 *      Author: asus
 */


#include <stdio.h>
#include "stm32l4xx_hal.h"
#include "sht20.h"
#include "tim.h"


/*通过该宏控制是使用HAL库里的I2C接口还是CPIO模拟串口的接口*/
#define CONFIG_GPIO_I2C

#ifdef CONFIG_GPIO_I2C
#include "gpio_i2c_sht20.h"
#else
#include "i2c.h"
#endif

//#define CONFIG_SHT20_DEBUG //用于调试,打开时由printf,发布产品时注释掉,printf语句会被替换成do{}while(0)

#ifdef CONFIG_SHT20_DEBUG
#define sht20_print(format,args...)printf(format,##args)
#else
#define sht20_print(format,args...)do{}while(0)
#endif

int SHT20_SampleData(uint8_t cmd,float *data)
{
	uint8_t buf[2];
	float sht20_data = 0.0;
	int rv;

#ifdef CONFIG_GPIO_I2C
	rv = I2C_Master_Transmit(0x80,&cmd,1); //GPIO模拟I2C采样
#else
	rv = HAL_I2C_Master_Transmit(&hi2c1,SHT20_ADDR_WR,&cmd,1,0xFFFF);//基于HAL库实现I2C采样
#endif

	if(0 != rv)
	{
		return -1;
	}
	if(cmd == 0xF3)
	{
		HAL_Delay(85);
	}
	else if(cmd == 0xF5)
	{
		HAL_Delay(29);
	}

#ifdef CONFIG_GPIO_I2C
	rv = I2C_Master_Receive(0x81,buf,2);
#else
	rv = HAL_I2C_Master_Receive(&hi2c1,SHT20_ADDR_RD,buf,2,0xFFFF);
#endif

	if(0 != rv)
	{
		return -1;
	}
	sht20_data = buf[0];
	sht20_data=ldexp(sht20_data,8);
	sht20_data += buf[1]&0xFC;
	if(cmd == 0xF3)
	{
		*data = (-46.85+175.72*sht20_data/65536);
	}
	else if(cmd == 0xF5)
	{
		*data = (-6+125*sht20_data/65536);
	}
	return *data;
}
SHT20的驱动头文件sht20.h
/*
 * sht20.h
 *
 *  Created on: Jul 21, 2023
 *      Author: asus
 */

#ifndef INC_SHT20_H_
#define INC_SHT20_H_

#include "stm32l4xx_hal.h"

#define SHT20_ADDR 0x40

#define SHT20_ADDR_WR (SHT20_ADDR<<1)	//写地址
#define SHT20_ADDR_RD ((SHT20_ADDR<<1) | 0x01)	//读地址

#define SOFT_RESET_CMD 0xFE	//复位

#define TEMP_CMD 0xE3
#define RH_CMD 0xE5


extern int SHT20_SampleData(uint8_t cmd,float *data);

#endif /* INC_SHT20_H_ */
修改main.c文件
int report_tempRH_json(void)
{
	char buf[128],temp[20],humd[20];
	float temperature,humidity;

	SHT20_SampleData(0xF3,&temperature);//温度
	SHT20_SampleData(0xF5,&humidity);//湿度

	memset(buf,0,sizeof(buf));
	snprintf(buf,sizeof(buf),"{\"Temperature\":\"%.2f\",\"Humidity\":\"%.2f\"}",temperature,humidity);
//转换为字符串形式打印出来


	HAL_UART_Transmit(&huart1,(uint8_t *)buf,strlen(buf),0xFFFF);

	return 0;
}
四、OLED显示
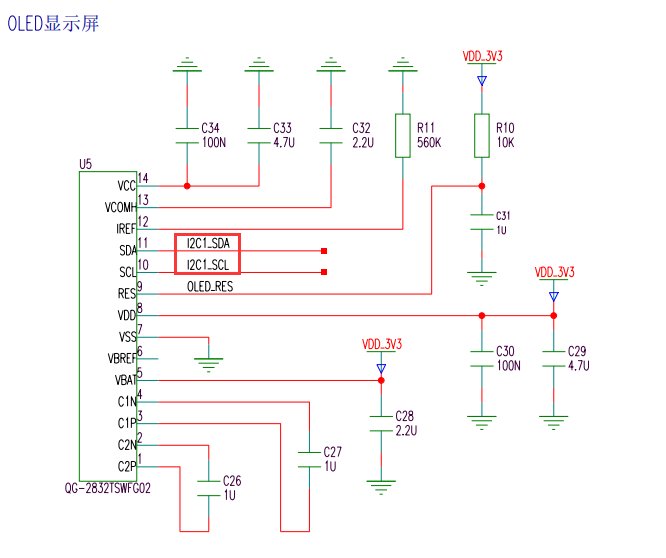
1、OLED显示屏介绍
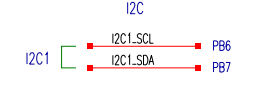
开发板上配备的OLED显示屏通过I2C接口连接到单片机的PB6,PB7管脚上。
2、添加OLED驱动文件
修改main.c文件
OLED_Init();//初始化


int report_tempRH_json(void)
{
	char buf[128],temp[20],humd[20];
	float temperature,humidity;


	SHT20_SampleData(0xF3,&temperature);
	SHT20_SampleData(0xF5,&humidity);

	memset(buf,0,sizeof(buf));
	snprintf(buf,sizeof(buf),"{\"Temperature\":\"%.2f\",\"Humidity\":\"%.2f\"}",temperature,humidity);

    /*将温度和湿度转为字符串形式*/
	memset(temp,0,sizeof(temp));
	snprintf(temp,sizeof(temp),"%.2f",temperature);
	memset(humd,0,sizeof(humd));
	snprintf(humd,sizeof(humd),"%.2f",humidity);

    /*调用函数在OLED显示屏上显示*/
//	OLED_ShowString(0,0,"Temperature:",16);//显示英文字符

	OLED_ShowChinese(&Hzk_Temp,0,0,0);//显示汉语
	OLED_ShowChinese(&Hzk_Temp,32,0,1);
	OLED_ShowString(48,0,":",16);

	OLED_ShowString(72,0,temp,16);//显示温度


//	OLED_ShowString(0,2,"Humidity:",16);

	OLED_ShowChinese(&Hzk_Humd,0,2,0);
	OLED_ShowChinese(&Hzk_Humd,32,2,1);
	OLED_ShowString(48,2,":",16);

	OLED_ShowString(72,2,humd,16);


	HAL_UART_Transmit(&huart1,(uint8_t *)buf,strlen(buf),0xFFFF);

	return 0;
}

 浙公网安备 33010602011771号