SpringMVC拦截器详解
目录
前言
SpringMVC是目前主流的Web MVC框架之一。
如果有同学对它不熟悉,那么请参考它的入门blog:http://www.cnblogs.com/fangjian0423/p/springMVC-introduction.html
拦截器是每个Web框架必备的功能,也是个老生常谈的主题了。
本文将分析SpringMVC的拦截器功能是如何设计的,让读者了解该功能设计的原理。
重要接口及类介绍
1. HandlerExecutionChain类
由HandlerMethod和Interceptor集合组成的类,会被HandlerMapping接口的getHandler方法获取。

2. HandlerInterceptor接口

SpringMVC拦截器基础接口。
3. AbstractHandlerMapping
HandlerMapping的基础抽象类。

4. AsyncHandlerInterceptor
继承HandlerInterceptor的接口,额外提供了afterConcurrentHandlingStarted方法,该方法是用来处理异步请求。当Controller中有异步请求方法的时候会触发该方法。 楼主做过测试,异步请求先支持preHandle、然后执行afterConcurrentHandlingStarted。异步线程完成之后执行preHandle、postHandle、afterCompletion。 有兴趣的读者可自行研究。
5. HandlerInterceptorAdapter
实现AsyncHandlerInterceptor接口的抽象类,一般我们使用拦截器的话都会继承这个类。然后复写相应的方法。
6. WebRequestInterceptor
与HandlerInterceptor接口类似,区别是WebRequestInterceptor的preHandle没有返回值。还有WebRequestInterceptor是针对请求的,接口方法参数中没有response。
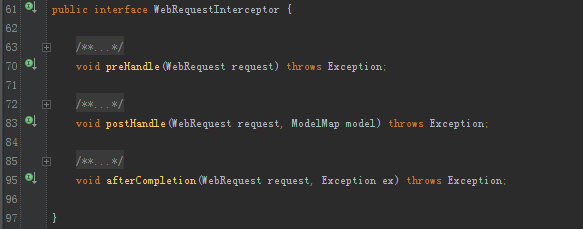
AbstractHandlerMapping内部的interceptors是个Object类型集合。处理的时候判断为MappedInterceptor[加入到mappedInterceptors集合中];HandlerInterceptor、WebRequestInterceptor(适配成WebRequestHandlerInterceptorAdapter)[加入到adaptedInterceptors中]
7. MappedInterceptor
一个包括includePatterns和excludePatterns字符串集合并带有HandlerInterceptor的类。 很明显,就是对于某些地址做特殊包括和排除的拦截器。

8. ConversionServiceExposingInterceptor
默认的<annotation-driven/>标签初始化的时候会初始化ConversionServiceExposingInterceptor这个拦截器,并被当做构造方法的参数来构造MappedInterceptor。之后会被加入到AbstractHandlerMapping的mappedInterceptors集合中。该拦截器会在每个请求之前往request中丢入ConversionService。主要用于spring:eval标签的使用。
源码分析
首先我们看下拦截器的如何被调用的。
Web请求被DispatcherServlet截获后,会调用DispatcherServlet的doDispatcher方法。

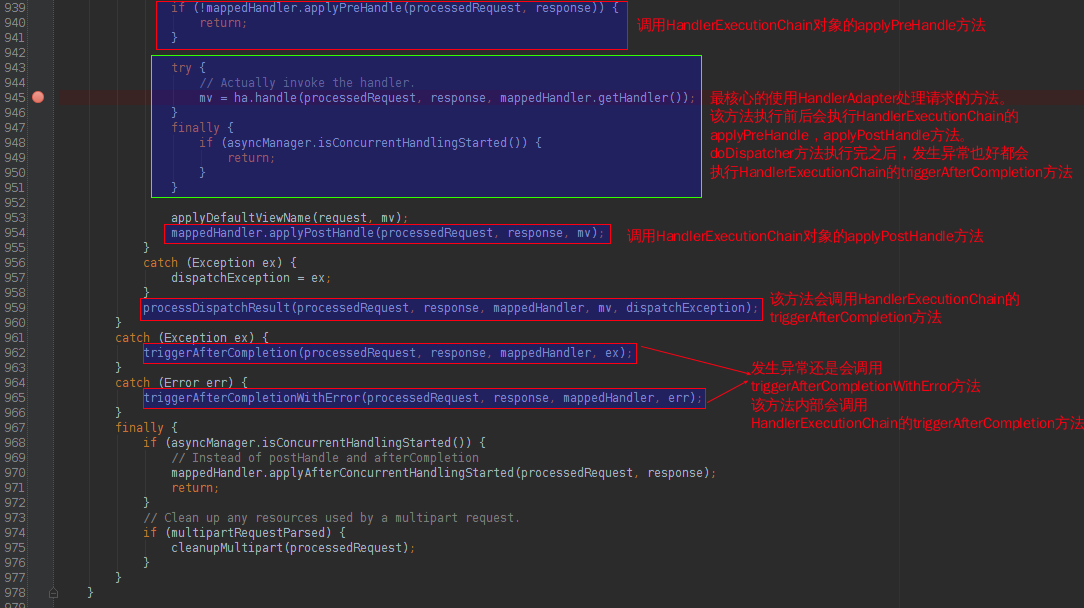
很明显地看到,在HandlerAdapter处理之后,以及处理完成之后会调用HandlerExecutionChain的方法。
HandlerExecutionChain的applyPreHandle、applyPostHandle、triggerAfterCompletion方法如下:


很明显,就是调用内部实现HandlerInterceptor该接口集合的各个对应方法。
下面我们看下HandlerExecutionChain的构造过程。
HandlerExecutionChain是从HandlerMapping接口的getHandler方法获取的。
HandlerMapping的基础抽象类AbstractHandlerMapping中:
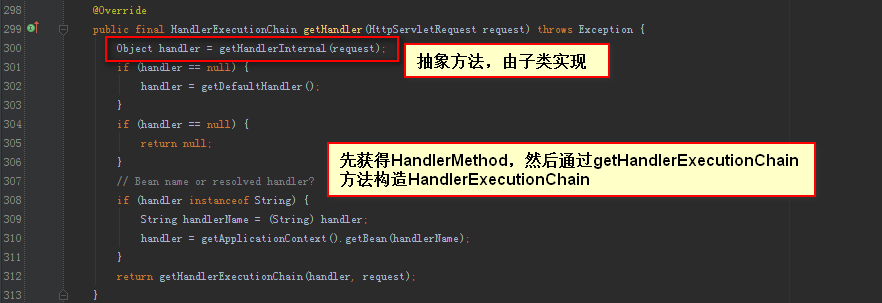
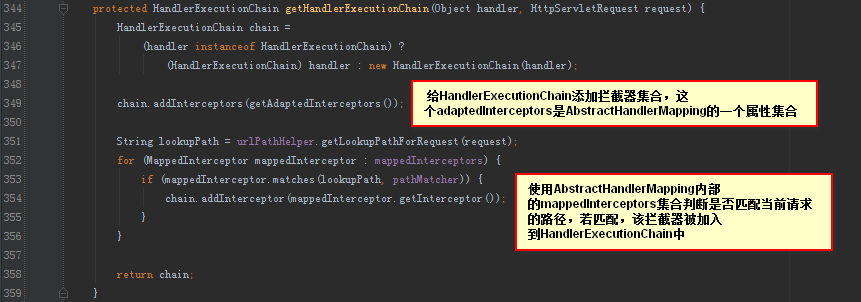
我们看到,HandlerExecutionChain的拦截器是从AbstractHandlerMapping中的adaptedInterceptors和mappedInterceptors属性中获取的。
拦截器的配置
清楚了HandlerExecutionChain的拦截器属性如何构造之后,下面来看下SpringMVC是如何配置拦截器的。
1. *-dispatcher.xml配置文件中添加 <mvc:interceptors>配置
<mvc:interceptors>
  <mvc:interceptor>
    <mvc:mapping path="/**"/>
    <mvc:exclude-mapping path="/login"/>
    <mvc:exclude-mapping path="/index"/>
    <bean class="package.interceptor.XXInterceptor"/>
  </mvc:interceptor>
</mvc:interceptors>
这里配置的每个<mvc:interceptor>都会被解析成MappedInterceptor。
其中子标签<mvc:mapping path="/**"/>会被解析成MappedInterceptor的includePatterns属性;<mvc:exclude-mapping path="/**"/>会被解析成MappedInterceptor的excludePatterns属性;<bean/>会被解析成MappedInterceptor的interceptor属性。
<mvc:interceptors>这个标签是被InterceptorsBeanDefinitionParser类解析。
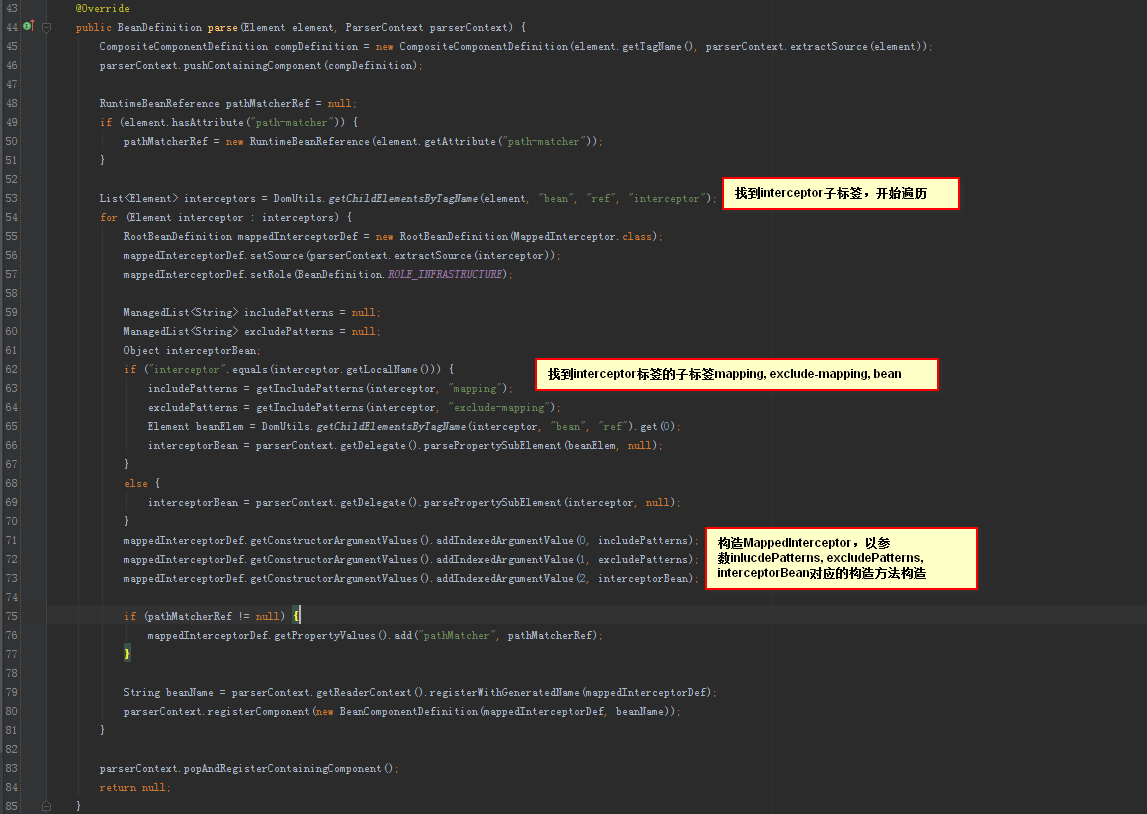
2. 配置RequestMappingHandlerMapping,并配置该bean对应的interceptors集合属性。 这里的interceptors集合是个Object类型的泛型集合。
AbstractHandlerMapping抽象类只暴露了1个拦截器的set方法 -> interceptors。
adaptedInterceptors和mappedInterceptors均没有暴露set方法,因此我们只能为RequestMappingHandlerMapping配置interceptors属性。
其实AbstractHandlerMapping内部的initInterceptors方法中,会遍历interceptors集合,然后判断各个项是否是MappedInterceptor、HandlerInterceptor、WebRequestInterceptor。
其中MappedInterceptor类型的拦截器会被加到mappedInterceptors集合中,HandlerInterceptor类型的会被加到adaptedInterceptors集合中,WebRequestInterceptor类型的会被适配成WebRequestHandlerInterceptorAdapter加到adaptedInterceptors集合中。


配置如下:
<bean class="org.springframework.web.servlet.mvc.method.annotation.RequestMappingHandlerMapping">
  <property name="interceptors">
    <bean class="package.interceptor.XXInterceptor"/>
  </property>
  <property name="order" value="-1"/>
</bean>
这里有个属性order,配成了-1。 为什么呢?
其实是个小知识,与读者分享一下。
Spring提供了一个Order接口,主要是排序用的。

我们这里使用的AbstractHandlerMapping抽象类也实现了这个接口。
DispatcherServlet初始化HandlerMapping集合的代码:

因此,如果读者又配置了:
<mvc:annotation-driven/>

那么就会有2只HandlerMapping,所以我们配置RequestMappingHandlerMapping的时候设置order为-1,就是为了让这个HandlerMapping的优先级高于<mvc:annotation-driven/>配置的RequestMappingHandlerMapping级别。
如果读者只配置了RequestMappingHandlerMapping,没配置<mvc:annotation-driven/>。 那么可以忽略这个小知识~~~~~~~~
一般建议使用第一种方法。
编写自定义的拦截器
public class LoginInterceptor extends HandlerInterceptorAdapter {

  @Override
  public boolean preHandle(HttpServletRequest request, HttpServletResponse response,
                             Object handler) throws Exception {
        // 获得请求路径的uri
        String uri = request.getRequestURI();

        // 判断路径是登出还是登录验证,是这两者之一的话执行Controller中定义的方法
        if(uri.endsWith("/login/auth") || uri.endsWith("/login/out")) {
            return true;
        }

        // 进入登录页面,判断session中是否有key,有的话重定向到首页,否则进入登录界面
        if(uri.endsWith("/login/") || uri.endsWith("/login")) {
            if(request.getSession() != null && request.getSession().getAttribute("loginUser") != null) {
                response.sendRedirect(request.getContextPath() + "/index");
            } else {
                return true;
            }
        }

        // 其他情况判断session中是否有key,有的话继续用户的操作
        if(request.getSession() != null && request.getSession().getAttribute("loginUser") != null) {
            return true;
        }

        // 最后的情况就是进入登录页面
        response.sendRedirect(request.getContextPath() + "/login");
        return false;
  }

}
登录Controller:
@Controller
@RequestMapping(value = "/login")
public class LoginController {

    @RequestMapping(value = {"/", ""})
    public String index() {
        return "login";
    }

    @RequestMapping("/auth")
    public String auth(@RequestParam String username, HttpServletRequest req) {
        req.getSession().setAttribute("loginUser", username);
        return "redirect:/index";
    }

    @RequestMapping("/out")
    public String out(HttpServletRequest req) {
        req.getSession().removeAttribute("loginUser");
        return "redirect:/login";
    }

}
*-diapatcher.xml配置:
<mvc:interceptors>
  <mvc:interceptor>
    <mvc:mapping path="/**"/>
    <bean class="org.format.demo.interceptor.LoginInterceptor"/>
  </mvc:interceptor>
</mvc:interceptors>
PS:我们看到LoginInterceptor里的preHandle方法对于地址“/login/auth”和"/login/out"不处理。
因此,可以写点配置,少写带java代码。在拦截器配置中添加2个exclude-mapping,并且去掉LoginInterceptor里的
if(uri.endsWith("/login/auth") || uri.endsWith("/login/out")) {
  return true;
}
配置新增:
<mvc:exclude-mapping path="/login/out"/>
<mvc:exclude-mapping path="/login/auth"/>
总结
总结了SpringMVC拦截器的原理以及各种配置,像网上很多人会问为什么拦截器执行preHandle方法返回false之后还是会执行afterCompletion方法,其实我们看下源码就知道了。
关于异步请求方面的拦截器以及第二种配置方法(interceptors集合属性可加入继承自HandlerInterceptorAdapter抽象类的类以及实现WebRequestInterceptor接口的类),读者可自行研究。
文中难免有错误,希望读者能够指出来。


