

In this article, we will learn about what are feature flags their use along with benefits and how to use these feature flags in the ASP.NET Core application. We will also explore how we can make use of available feature filters to enable or disable features in the ASP.NET Core application.
We will be implementing Microsoft Feature Management i.e. feature flags in ASP.NET Core C# application but all this is applicable to other types of .NET C# based applications as well.
在本文中,我们将了解什么是功能标志以及它们的优点,以及如何在 ASP.NET Core 应用程序中使用这些功能标志。我们还将探讨如何利用可用的功能过滤器来启用或禁用 ASP.NET Core 应用程序中的功能。
我们将在核心C#应用程序中实现Microsoft功能管理 ASP.NET 即功能标志,但所有这些都适用于其他类型的基于.NET C#的应用程序。
Feature flags in ASP.NET Core allow us to change application behaviour i.e. enable or disable a specific functionality in the application at runtime without the need to make code changes or deploy a new version of the application. Feature flags are like a feature toggler that allows us to enable or disable a feature in an application in production.
ASP.NET Core 中的功能标志允许我们更改应用程序行为,即在运行时启用或禁用应用程序中的特定功能,而无需进行代码更改或部署应用程序的新版本。功能标志就像一个功能切换器,允许我们在生产中的应用程序中启用或禁用功能。
Consider that you have just released a new feature on production for allowing users to generate an invoice for their order. But you found out that this new feature is not working correctly as it is not printing the customer name correctly in the invoice. So quickly with help of the feature flag, you can disable this feature without changing code or deploying a new version of the application. This feature can be disabled on production till the time you work out a fix & deploy that on production.
假设您刚刚发布了一项新功能,允许用户为其订单生成发票。但是您发现此新功能无法正常工作,因为它无法在发票中正确打印客户名称。借助功能标志,您可以快速禁用此功能,而无需更改代码或部署新版本的应用程序。此功能可以在生产环境中禁用,直到您制定修复程序并将其部署到生产环境之前。
So you can enable or disable a feature in the production at runtime without code changes and deployment & also quickly rollback a feature that has gone wrong on production without the need to roll back the deployment
因此,您可以在运行时启用或禁用生产中的功能,而无需更改代码和部署,还可以快速回滚在生产中出错的功能,而无需回滚部署
Feature flags also allow you to gradually release a feature to the users i.e. first you can enable a new feature for just a few users of the application to check how it performs and once you are assured that it works as expected then you can enable this feature for remaining users either all at once or again gradually.
功能标志还允许您逐步向用户发布功能,即首先您可以为应用程序的少数用户启用新功能以检查其性能,一旦您确定它按预期工作,您就可以为其余用户启用此功能一次或再次逐渐。
You can also selectively enable or disable a feature in the application based on browser type, users, etc. If you have a feature that uses javascript supported only in chrome then you can make that feature enabled for chrome and disabled for all other browsers except chrome browser. You can even enable a feature for a specific user(s) or for a group of users.
您还可以根据浏览器类型、用户等有选择地启用或禁用应用程序中的功能。如果您有一个使用仅在 chrome 中支持的 javascript 的功能,则可以为 chrome 启用该功能,并为除 chrome 浏览器之外的所有其他浏览器禁用该功能。您甚至可以为特定用户或一组用户启用功能。
You can also use feature flags to support the Beta programs of your application. As part of the Beta program, you can enable new features only for users who have opted for the Beta version of the application. Once new features are tested thoroughly then you can enable features in the Beta program for all the users.
您还可以使用功能标志来支持应用程序的 Beta 程序。作为 Beta 计划的一部分,您只能为已选择应用程序 Beta 版本的用户启用新功能。彻底测试新功能后,您可以为所有用户启用 Beta 程序中的功能。
Many a time when you start working on new features in your application then you create a new feature branch for your source code so that it doesn’t impact your version of the application running on production. You build & test this feature separately and when it’s ready you merge it into your main branch. Feature flags can reduce the overhead of branching and merge for the development of features. You can develop a feature as part of your main branch and keep it disabled till it’s fully developed and tested.
很多时候,当您开始处理应用程序中的新功能时,您会为源代码创建一个新的功能分支,以便它不会影响在生产环境中运行的应用程序版本。你单独构建和测试这个功能,当它准备好时,你把它合并到你的主分支中。功能标志可以减少分支和合并的开销,以便开发功能。您可以将功能开发为主分支的一部分,并在完全开发和测试之前将其禁用。
Introduction to Microsoft Feature Management
微软特性管理简介
The Microsoft feature management is a library provided by Microsoft for feature flags implementation in .NET and .NET Core based applications. This library allows you to add feature flags declaratively so that there is no need for you to manually write code to enable or disable features with if statement.
Microsoft 功能管理是 Microsoft 提供的库,用于在基于 .NET 和 .NET Core 的应用程序中实现功能标志。此库允许您以声明方式添加功能标志,这样就无需手动编写代码来启用或禁用带有 if 语句的功能。
The Microsoft feature management library also helps to manage feature flags life cycle i.e. library refresh flag status and also caches them in memory or also can guarantees that a flag state remains constant during a request or session.
Microsoft 功能管理库还有助于管理功能标志生命周期,即库刷新标志状态,并将它们缓存在内存中,或者还可以保证标志状态在请求或会话期间保持不变。
Microsoft feature management library makes it possible to decouple the feature launches with the deployment of the code i.e. you can deploy all the new features together on production in a disabled state and you can enable those features as when and when required without further deployments.
Microsoft 功能管理库可以将功能启动与代码部署分离,即您可以在禁用状态下在生产环境中一起部署所有新功能,并且可以在需要时启用这些功能,而无需进一步部署。
Microsoft feature management library for ASP.NET Core also provides support for MVC controllers, views, actions, routes, and middleware.
适用于 ASP.NET Core 的 Microsoft 功能管理库还提供对 MVC 控制器、视图、操作、路由和中间件的支持。
Microsoft Feature Management provides the following features
- Allows to enable or disable a feature at runtime on the production
- Feature flag configuration management either locally or remotely on Azure
- Provides support for ASP.NET Core Filters so that logic for enabling & disabling can be extended beyond flag state.
- Flag state management to ensure that even if the feature flag is toggled at runtime it does not change for the request that is running or the user sessions which are active i.e. feature state should toggle only for new requests or new user sessions.
微软功能管理提供以下功能
允许在生产运行时启用或禁用功能
在 Azure 上本地或远程进行功能标志配置管理
提供对 ASP.NET 核心筛选器的支持,以便启用和禁用的逻辑可以扩展到标志状态之外。
标志状态管理,以确保即使在运行时切换功能标志,它也不会改变正在运行的请求或处于活动状态的用户会话,即功能状态应仅针对新请求或新用户会话切换。
Implementation of Feature Flags in ASP.NET Core Applications
在 ASP.NET 核心应用程序中实现功能标志
For demonstrations in this article, we will be using Visual Studio Community 2022 17.0.5 with .NET 6
对于本文中的演示,我们将使用Visual Studio Community 2022 17.0.5和.NET 6
Overall Approach for demonstration
- We will first create an ASP.NET Core Web App and name it as ProCodeGuide.Samples.FeatureFlagsDemo
- We will then add Mobile Review Functionality/Feature to the MVC Application i.e. Page to view a list of mobiles with a rating for each mobile and for each mobile there will also be a link to check details of that mobile.
- Next, we will enable a feature flag for this Mobile Review Functionality so that we are able to learn how to configure feature flags in ASP.NET Core for the features being added.
- Finally, we will explore and understand the different options available in Microsoft Feature Management Library for feature flags in ASP.NET Core
Here is a quick and short video on how to implement feature flags in ASP.NET Core
总体演示方法
我们将首先创建一个 ASP.NET 核心 Web 应用程序,并将其命名为 ProCodeGuide.Samples.FeatureFlagsDemo
然后,我们将向MVC应用程序添加移动评论功能/特性,即页面以查看具有每个手机评级的手机列表,对于每个手机,还将有一个链接来检查该手机的详细信息。
接下来,我们将为此移动查看功能启用功能标志,以便我们能够了解如何在 ASP.NET Core 中为要添加的功能配置功能标志。
最后,我们将探索和了解 Microsoft 功能管理库中可用于 ASP.NET Core 中功能标志的不同选项
以下是有关如何在 Core 中实现功能标志 ASP.NET 快速简短的视频
Create ASP.NET Core Web App Project
Create a new project of type ASP.NET Core Web App (MVC) as per the screenshots shown below with the name as ProCodeGuide.Samples.FeatureFlagsDemo
创建 ASP.NET 核心 Web 应用项目
按照下面显示的屏幕截图创建一个类型为 ASP.NET Core Web App (MVC) 的新项目,名称为 ProCodeGuide.Samples.FeatureFlagsDemo

Please note that on the Additional Information screen I have selected authentication type as ‘Individual Accounts’ this will add Identity support to the applications for creating users and login functionality to create sessions.
请注意,在“附加信息”屏幕上,我选择了身份验证类型作为“个人帐户”,这将为用于创建用户的应用程序添加身份支持和用于创建会话的登录功能。
Add a new Feature to the Application
Now that we have created the project for demonstration let’s add some functionality i.e. features so that we are able to see how to configure feature flags in ASP.NET Core.
向应用程序添加新功能
现在我们已经创建了用于演示的项目,让我们添加一些功能,即功能,以便我们能够看到如何在 Core 中配置功能标志 ASP.NET。
For demonstration purposes, we will add a mobile review feature to this application. We will add a high-level menu ‘Mobile Reviews’ clicking on which it will display a list of mobiles with the rating for each mobile and also for each mobile there will be a link to check the details of that mobile.
So let’s get started to build our feature first and then we will add a feature flag to it.
Add Models
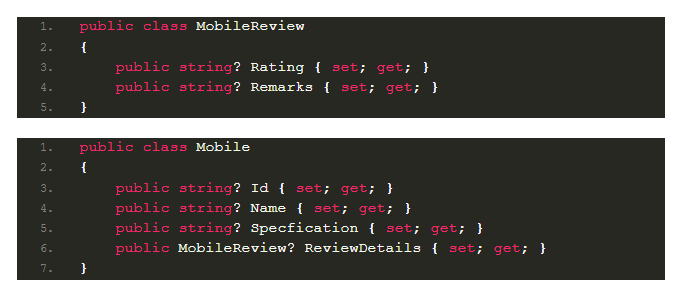
We will first add models that will hold the data for the list of mobiles and another model for the detailed review of the mobile. We will add models under Models\MobileReview.cs & Models\Mobile.cs as shown in the code below
出于演示目的,我们将向此应用程序添加移动审阅功能。我们将添加一个高级菜单“移动评论”单击该菜单,单击该菜单将显示每个手机的评级的手机列表,并且对于每个手机,还将有一个链接来检查该手机的详细信息。
因此,让我们先开始构建我们的功能,然后我们将向其添加一个功能标志。
添加模型
我们将首先添加将保存手机列表数据的模型和另一个用于详细审查手机的模型。我们将在 ModelsMobileReview.cs & ModelsMobile.cs 下添加模型,如下面的代码所示
添加数据服务
现在我们已经创建了模型来保存数据,我们需要将数据填充到这些模块中,这些模块将显示在我们的演示应用程序中。由于这是一个演示应用程序,我们将在代码本身中对虚拟数据进行硬编码,这样我们就不会浪费太多时间在连接数据上。
为了生成数据,我们将创建一个返回硬编码数据的虚拟数据服务。实际上,此服务应从数据库中获取数据并返回该数据,但我们将在此演示中保持简单。我们将按照下面显示的代码添加 InterfacesIMobileDataService.cs & ServicesDummyMobileDataService.cs
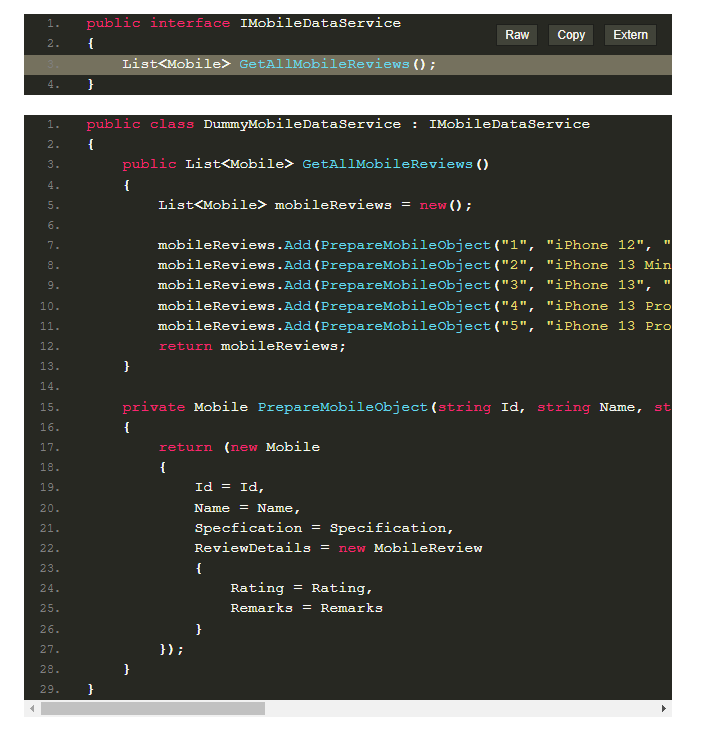
In the above dummy service, we are returning the list of Mobiles and each Mobile instance is populated with the hardcoded data required for the demo.
Now that we have added a dummy data service we will register this service in the dependency container so that it can be injected into the controller using the constructor. To register the service add the below line of code in the Program.cs file.
builder.Services.AddTransient<IMobileDataService, DummyMobileDataService>();
在上面的虚拟服务中,我们返回 Mobile 列表,并且每个 Mobile 实例都填充了演示所需的硬编码数据。
现在我们已经添加了一个虚拟数据服务,我们将在依赖项容器中注册此服务,以便可以使用构造函数将其注入控制器。要注册服务,请在 Program.cs 文件中添加以下代码行。
Add Controller
Next, we will add the MVC controller for the Mobile to handle actions for our view pages i.e. a mobile list with a rating & detailed mobile review page. We will add a controller under Controllers\MobileController.cs as per the code shown below
添加控制器
接下来,我们将为移动设备添加MVC控制器来处理视图页面的操作,即带有评级和详细移动评论页面的移动列表。我们将在控制器移动控制器下添加一个控制器.cs如下所示的代码
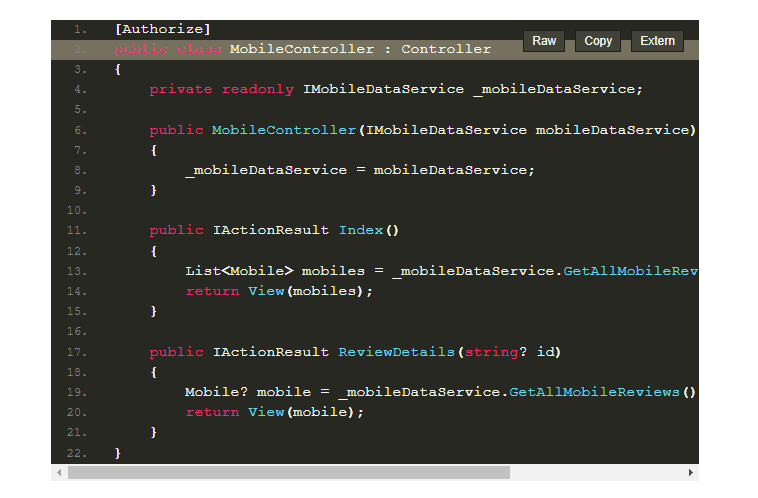
In the above controller, we have added two actions Index to handle the main mobile review page that will display the list of mobile with review and ReviewDetails that to handle detailed mobile review page that will display details of one mobile at a time.
The above Controller is with Authorize attribute so you will have to create a user and login with that user to be able to get access to execute actions on the controller.
Add Views
So far we have added models, data service & controller so now it’s time to add the required views and wire them all together so that we get a working prototype for demonstration of feature flags in ASP.NET Core.
1st View – We will add the main view display the list of mobiles with the rating of each mobile under Views\Mobile\Index.cshtml as per the code shown below
在上面的控制器中,我们添加了两个操作索引来处理移动评论主页,该页面将显示带有评论的移动列表,以及处理详细移动评论页面的 ReviewDetails,该页面一次将显示一个手机的详细信息。
上述控制器具有授权属性,因此您必须创建一个用户并使用该用户登录,才能获得在控制器上执行操作的访问权限。
添加视图
到目前为止,我们已经添加了模型,数据服务和控制器,所以现在是时候添加所需的视图并将它们连接在一起,以便我们得到一个工作原型,用于演示 ASP.NET Core中的功能标志。
第一视图 - 我们将根据下面显示的代码在ViewsMobileIndex.cshtml下添加主视图显示每个手机的评级列表

The above view will display the list of mobiles and for each mobile, there will be a link to view the detailed review of that mobile.
2nd View – We will add the 2nd view to display the detailed review of each mobile under Views\Mobile\ReviewDetails.cshtml as per the code shown below
上面的视图将显示手机列表,对于每个手机,将有一个链接来查看该手机的详细评论。
第二个视图 - 我们将添加第二个视图,以按照下面显示的代码在视图移动审查详细信息.cshtml下显示每个手机的详细评论

Next, we will add the menu item in the application for Mobile Review and clicking on this menu item will take us to the Index page of Mobile Controller i.e. Main page for Mobile Review. For menu item below code has been added in Views/Shared/_Layout.cshtml with <ul> element.
接下来,我们将在移动应用程序中添加菜单项以进行移动评论,单击此菜单项将带我们进入移动控制器的索引页面,即移动评论的主页。对于下面的菜单项,代码已添加到带有元素的Views/Shared/_Layout.cshtml 中。
<li class="nav-item">
    <a class="nav-link text-dark" asp-area="" asp-controller="Mobile" asp-action="Index">Mobile Reviews</a>
</li>
Add Migrations
Since we have selected Identity as part of the application we need to automate migrations and also create a database so we need to run the “add-migration” command and to create a database from the migrations we need to run the command “update-database” in the package manager console.
Run the below-mentioned commands in the package manager console
添加迁移
由于我们选择了 Identity 作为应用程序的一部分,因此我们需要自动迁移并创建一个数据库,因此我们需要运行“add-migration”命令并从迁移中创建数据库,我们需要在包管理器控制台中运行命令“update-database”。
在包管理器控制台中运行以下命令
add-migration FirstMigration
update-database
Now after running the code we should be able to see the below screen
现在运行代码后,我们应该能够看到下面的屏幕
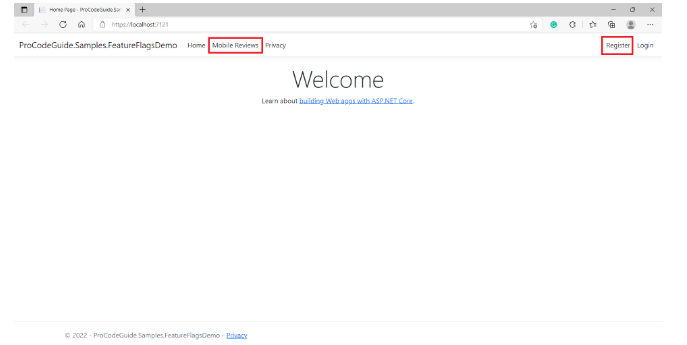
In the above screen, you can see the mobile reviews menu that we added in _Layout,cshtml. If you try to click on this menu then you will be taken to the login screen. So you need to register a new user first and then login with that user to navigate to the mobile review screen that is shown below
在上面的屏幕中,您可以看到我们在_Layout,cshtml中添加的移动评论菜单。如果您尝试单击此菜单,那么您将被带到登录屏幕。因此,您需要先注册一个新用户,然后使用该用户登录以导航到如下所示的移动评论屏幕
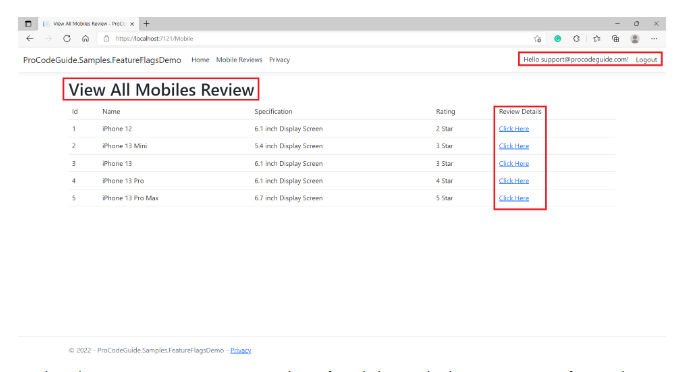
In the above screen, we can see a list of mobiles with dummy ratings for each mobile. There is also a link against each mobile to view the detailed review and after clicking on this link you will be taken to the below screen
在上面的屏幕中,我们可以看到每个手机的虚拟评级手机列表。每个手机都有一个链接,用于查看详细评论,单击此链接后,您将被带到以下屏幕
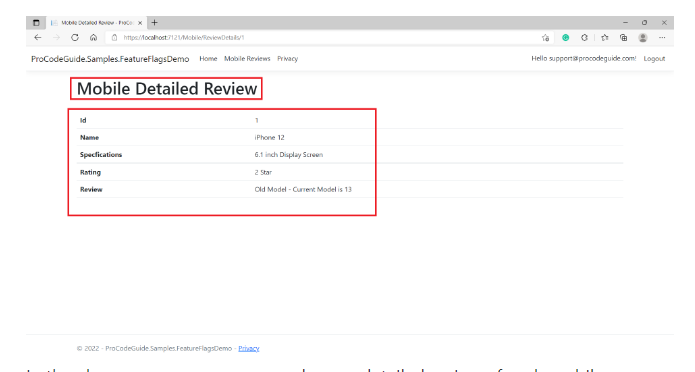
In the above screen, we can see a dummy detailed review of each mobile.
Now that we have coded for the new feature and our code is ready with the required functionality for release. But Management has decided to launch this feature at a later date. So instead of reverting the feature, we decided that we will introduce a feature flag for this feature and release our code with the flag set to false so that this feature i.e. new menu option won’t be visible to the users.
Actually, we should have added a feature flag along with the feature development itself but for demonstration purposes so that we clearly understand how to configure feature flags in ASP.NET Core I didn’t introduce a feature flag while coding for the feature. So let’s now understand how to configure feature flags in ASP.NET Core for the application for this new feature.
在上面的屏幕中,我们可以看到每个手机的虚拟详细评论。
现在我们已经为新功能编写了代码,并且我们的代码已准备好发布所需的功能。但管理层已决定稍后推出此功能。因此,我们决定为此功能引入一个功能标志,并在将标志设置为 false 的情况下发布我们的代码,以便此功能(即新菜单选项)对用户不可见。
实际上,我们应该在功能开发本身中添加一个功能标志,但出于演示目的,以便我们清楚地了解如何在 Core 中配置功能标志 ASP.NET 我在为功能编码时没有引入功能标志。因此,现在让我们了解如何在 ASP.NET Core 中为应用程序配置此功能标志。
Configure Feature Flags for the new Feature
To configure feature flags in ASP.NET Core you need first add the reference for package Microsoft.FeatureManagement.AspNetCore in the Application.
Install required packages
You can add the Microsoft Feature Management package by running the below-mentioned command in the Package Manager Console window
为新功能配置功能标志
要在 ASP.NET Core中配置功能标志,首先需要在应用程序中添加包Microsoft.FeatureManagement.AspNetCore的引用。
安装所需的软件包
可以通过在“包管理器控制台”窗口中运行以下命令来添加 Microsoft 功能管理包
Install-Package Microsoft.FeatureManagement.AspNetCore -Version 2.4.0
As we can see from the above screen Microsoft.FeatureManagment.AspNetCore has a dependency on Microsoft.FeatureManagement package so it will install this package as well.
Configure Feature Management in Application
Now that we have the package installed in the ASP.NET Core application we need to configure it in our application. For configuration, we added the below line of code in Program.cs
正如我们从上面的屏幕中看到的,Microsoft.FeatureManagment.AspNetCore依赖于Microsoft.FeatureManagement软件包,因此它也将安装此软件包。
在应用程序中配置功能管理
现在我们已经在 ASP.NET Core 应用程序中安装了软件包,我们需要在我们的应用程序中对其进行配置。对于配置,我们在程序中添加了以下代码行.cs
The above line of code will add the required services for feature management in the ASP.NET Core application. By default feature management service will look for feature flags in ASP.NET Core in the appsettings.json file so we need to add the feature management section in the appsettings.json file as shown below.
上面的代码行将在 ASP.NET Core 应用程序中添加功能管理所需的服务。默认情况下,功能管理服务将在 appsettings.json 文件中查找 ASP.NET Core 中的功能标志,因此我们需要在 appsettings.json 文件中添加功能管理部分,如下所示。
"FeatureManagement": {
    "MobileReview": false,
    "MobileDetailedReview": false
  }
Under the Feature Management section in the appsettings.json file, we have added a couple of feature flags i.e. MobileReview & MobileDetailedReview for the 2 views which we added in our application for Mobile Reviews. Please note that we have added both the feature flags as disabled i.e. value is set to false.
Also, we will add the constants for the feature flags added above in the form of enum in our application so that we don’t need to hardcode feature flag names in our application. The name of the feature flag in appsettings.json should match the name of the constant in the enum.
Below enum has been added in under Models\FeatureFlags.cs
在appsettings.json文件中的功能管理部分下,我们为我们在移动评论应用程序中添加的2个视图添加了几个功能标志,即MobileReview和MobileDetailedReview。请注意,我们已将两个功能标志都添加为禁用,即值设置为 false。
此外,我们将在应用程序中以枚举的形式为上面添加的功能标志添加常量,这样我们就不需要在应用程序中对功能标志名称进行硬编码。appsettings.json 中的功能标志名称应与枚举中常量的名称匹配。
下面的枚举已添加到模型功能标志下.cs
public enum FeatureFlags
{
    MobileReview,
    MobileDetailedReview
}
Now that we have done the required configuration of Feature Management in our applications let’s see how we can make use of feature management services in the controller.
Make use of Feature Flags in Controller
To enable feature flags in ASP.NET Core in the controller we can make use of the Feature Management attribute FeatureGate. We can use this attribute either for a particular action or at the controller level i.e. for all the actions controller.
The FeatureGate attribute takes the name of the feature flag set in the appsettings.json file as an input string parameter. Applying the FeatureGate attribute will enable or disable an action(s) based on the feature flag value set to true or false in the appsettings.json file.
We have applied the FeatureGate attribute to the Mobile Controller (flag name MobileReview) and to action ReviewDetails (flag name MobileDetailedReview) as shown in the code below.
在appsettings.json文件中的功能管理部分下,我们为我们在移动评论应用程序中添加的2个视图添加了几个功能标志,即MobileReview和MobileDetailedReview。请注意,我们已将两个功能标志都添加为禁用,即值设置为 false。
此外,我们将在应用程序中以枚举的形式为上面添加的功能标志添加常量,这样我们就不需要在应用程序中对功能标志名称进行硬编码。appsettings.json 中的功能标志名称应与枚举中常量的名称匹配。
下面的枚举已添加到模型功能标志下.cs
public enum FeatureFlags
{
    MobileReview,
    MobileDetailedReview
}


Now that we have done the required configuration of Feature Management in our applications let’s see how we can make use of feature management services in the controller.
Make use of Feature Flags in Controller
To enable feature flags in ASP.NET Core in the controller we can make use of the Feature Management attribute FeatureGate. We can use this attribute either for a particular action or at the controller level i.e. for all the actions controller.
The FeatureGate attribute takes the name of the feature flag set in the appsettings.json file as an input string parameter. Applying the FeatureGate attribute will enable or disable an action(s) based on the feature flag value set to true or false in the appsettings.json file.
We have applied the FeatureGate attribute to the Mobile Controller (flag name MobileReview) and to action ReviewDetails (flag name MobileDetailedReview) as shown in the code below.
现在我们已经在应用程序中完成了功能管理所需的配置,让我们看看如何在控制器中使用功能管理服务。
在控制器中使用功能标志
要在控制器 ASP.NET 核心中启用功能标志,我们可以使用功能管理属性 FeatureGate。我们可以将此属性用于特定操作或在控制器级别,即用于所有操作控制器。
属性将 appsettings.json 文件中设置的功能标志的名称作为输入字符串参数。应用 FeatureGate 属性将根据 appsettings.json 文件中设置为 true 或 false 的功能标志值启用或禁用操作。
我们已将 FeatureGate 属性应用于移动控制器(标志名称 MobileReview)和操作 ReviewDetails(标志名称 MobileDetailedReview),如下面的代码所示。
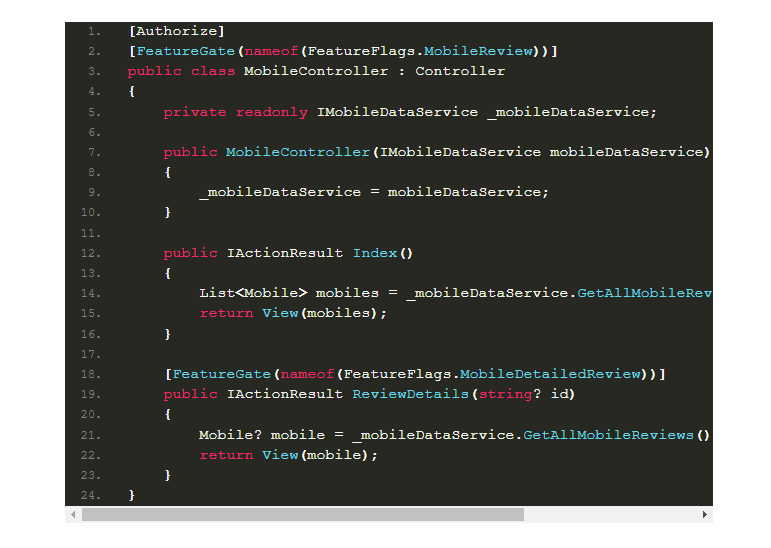
As per the above code, the controller will be disabled (including all actions) if the feature flag MobileReview in the appsettings.json file is set to false and if the feature flag MobileReview is true then all actions will be available except action ReviewDetails as that is again dependent on feature flag MobileDetailedReview i.e. action ReviewDetails will not be available if the feature flag MobileDetailedReview is set to false.
In the appsettings.json file both the feature flags are set to false so now let’s run the code and check the results. After running the code and navigating to menu mobile review (after login) we will get below screen
根据上面的代码,如果 appsettings.json 文件中的功能标志 MobileReview 设置为 false,则控制器将被禁用(包括所有操作),如果功能标志 MobileReview 为 true,则除操作 ReviewDetails 之外的所有操作都将可用,因为这再次依赖于功能标志 MobileDetailedReview,即如果功能标志 MobileDetailedReview 设置为 false,则操作 ReviewDetails 将不可用。
在 appsettings.json 文件中,两个功能标志都设置为 false,所以现在让我们运行代码并检查结果。运行代码并导航到菜单移动评论(登录后)后,我们将得到以下屏幕

We got the above error as we tried to view the mobile review screen but the mobile controller is not available as the feature flag MobileReview is set to false.
You can try enabling the features by setting the feature flag to true in the appsettings.json file and you can see that your code works fine i.e. new features are available and everything is working as expected. But do remember to again set the feature flags to false for the continuity of this demonstration.
The default behaviour of Microsoft Feature Management services is to display this error when any disabled action has been accessed by the user. Let’s see how we can override this default behaviour i.e. instead of displaying an error we display a friendly message to the user.
Implement Disabled Feature Handler
To override the behaviour that happens when action is called but action is disabled by the feature flag then in that case you need to create a new class that implements the IDisabledFeaturesHandler interface and then register that new class in the Program.cs file with feature management services.
We have added the below class under Handlers\CustomDisabledFeatureHandler.cs that implements the IDisabledFeaturesHandler interface and implements the function HandleDisabledFeatures from the interface
我们得到了上述错误,因为我们试图查看移动审查屏幕,但移动控制器不可用,因为功能标志MobileReview被设置为假。
你可以尝试在appsettings.json文件中设置功能标志为 "true "来启用这些功能,你可以看到你的代码工作正常,即新的功能是可用的,一切都在按预期工作。但请记住,为了保证本演示的连续性,请再次将功能标志设置为假。
微软功能管理服务的默认行为是,当用户访问任何禁用的操作时,显示这个错误。让我们看看如何覆盖这个默认行为,即不显示错误,而是向用户显示一个友好的信息。
实现禁用功能处理程序
要覆盖当动作被调用但动作被功能标志禁用时发生的行为,在这种情况下,你需要创建一个新的类,实现IDisabledFeaturesHandler接口,然后在Program.cs文件中向功能管理服务注册这个新类。
我们在Handlers\CustomDisabledFeatureHandler.cs中添加了以下类,该类实现了IDisabledFeaturesHandler接口,并实现了该接口的HandleDisabledFeatures函数
As you can see in the above code in the function to override disabled feature behaviour we are returning the response as plain text with a message and have also appended the message with the disabled feature flag name that has been invoked
Now that we have added the class we need to register this in the program.cs file. You can register this class as a feature management service by adding the below code in the program.cs file.
正如您在上面的代码中看到的那样,在覆盖禁用功能行为的函数中,我们将响应作为纯文本形式返回消息,并且还附加了已调用的禁用功能标志名称的消息
现在我们已经添加了类,我们需要在程序.cs文件中注册它。您可以通过在程序.cs文件中添加以下代码来将此类注册为功能管理服务。
builder.Services.AddFeatureManagement()
                .UseDisabledFeaturesHandler(new CustomDisabledFeatureHandler());
The above code will register class CustomDisabledFeatureHandler as a handler for disabled feature i.e. this class method will be invoked when a user tries to access action that is disabled by feature flag set to false.
Now after running the code and navigating to menu mobile review (after login) we will get below screen
上面的代码会将类 CustomDisabledFeatureHandler 注册为禁用功能的处理程序,即当用户尝试访问由设置为 false 的功能标志禁用的操作时,将调用此类方法。
现在,在运行代码并导航到菜单移动评论(登录后)后,我们将得到以下屏幕

As seen in the above screen still feature is disabled but instead of getting an error what is received as the response is the message that we code in the disabled feature handler along with the feature name i.e. MobileReview.
This overriding of the behaviour so that the user does not receive an error instead get a friendly message is fine. But in the first place, if features flags are set to false then the user should not be allowed to click on the mobile review menu or detailed mobile review link i.e. either this menu & link should not be visible and if they are visible then they should not be clickable.
Now let’s see how we can make use of the feature flags in ASP.NET Core in views so that menu and link is not visible to the user when features are disabled i.e. features flags for MobileReview and MobileDetailedReview are set to false.
Make use of Feature Flags in Views
The package Microsoft.FeatureManagement.AspNetCore also provides support for custom TagHelpers that can be used in the application to implement feature flags in ASP.NET Core by conditionally rendering the HTML content.
To start using Tag Helpers first you need to add the feature management tag helpers. We have added the below line of code in the Views/_ViewImports.cshtml file to add the feature management tag helpers in our application.
如上图所示,该功能仍然被禁用,但收到的响应是我们在禁用功能处理程序中编码的信息,以及功能名称,即MobileReview,而不是得到一个错误。
这种覆盖行为使用户没有收到一个错误,而是收到一个友好的消息,这很好。但首先,如果功能标志被设置为false,那么用户就不应该被允许点击移动评论菜单或详细的移动评论链接,也就是说,这个菜单和链接不应该是可见的,如果它们是可见的,那么它们不应该被点击。
现在让我们看看如何在视图中利用ASP.NET Core的功能标志,以便在功能被禁用时,即MobileReview和MobileDetailedReview的功能标志被设置为false时,菜单和链接对用户不可见。
@addTagHelper *, Microsoft.FeatureManagement.AspNetCore
Now we can make use of feature management tag helpers to conditional render HTML content.
The first change we have to make is for the menu item mobile reviews i.e. display or render that menu only if the feature flag is set to true i.e. feature is enabled. For this, we will make use of <feature></feature> tag helper and surround the menu item around the feature tag helper. In the feature tag helper, we will have to specify the name of the feature to which it is linked.
We have made below code changes in Views/Shared/_Layout.cshtml to wrap the menu item within the feature tag helper and also specified the name of the feature flag in the tag helper
现在我们可以利用功能管理标签助手来有条件地呈现HTML内容。
我们要做的第一个改变是对菜单项的移动审查,即只有当功能标志被设置为真,即功能被启用时才显示或渲染该菜单。为此,我们将使用<feature></feature>标签助手,并将菜单项环绕在功能标签助手周围。在特征标签助手中,我们必须指定它所链接的特征的名称。
我们在Views/Shared/_Layout.cshtml中做了以下代码修改,将菜单项包裹在特征标签助手中,并在标签助手中指定了特征标志的名称
<feature name="@nameof(FeatureFlags.MobileReview)">
    <li class="nav-item">
        <a class="nav-link text-dark" asp-area="" asp-controller="Mobile" asp-action="Index">Mobile Reviews</a>
    </li>
</feature>
The second change we have to make is for the link for detailed mobile review i.e. display or render that link only if the feature flag is set to true i.e. feature is enabled.
We have made below code changes in Views/Mobile/Index.cshtml to wrap the link within the feature tag helper and also specified the name of the feature flag in the tag helper
我们必须做的第二个改变是针对详细的移动评论的链接,即只有当功能标志被设置为 "真",即功能被启用时才显示或呈现该链接。
我们在Views/Mobile/Index.cshtml中做了以下代码修改,将链接包裹在功能标签帮助器中,并在标签帮助器中指定了功能标志的名称。
The above changes will not display the menu item for the mobile review page and link for the detailed mobile review page if the corresponding feature flags are set to false in the appsettings.json file.
You can compile & run the code to verify that the above changes in views using feature management tag helpers is providing the desired results.
Feature Flag as a Progam Parameter in Controller & View
So far we saw how to use attributes and tag helpers provided in the feature management package to disable controller/actions and control the rendering of HTML content based on feature flags value. But what happens if you don’t have an option to disable action as that action already exists on production and you are just making some logical change in the existing action that you want to control based on the feature flags.
For example, you have an action in which some calculations are being done but now you need to change the existing calculation logic but you want to do that based on the feature flag i.e. if a newlogic feature is enabled new logic for calculation will be used else old calculation logic will be used instead.
For this, we will have to programmatically query feature flags in ASP.NET Core in the controller so that we can access the feature flag value in the controller and then from the controller if required pass it to other components like services, views, etc. The feature management has provided the FeatureManager service which can be accessed using interface IFeatureManager using dependency injection in ASP.NET Core.
如果在 appsettings.json 文件中将相应的功能标志设置为 false,则上述更改将不会显示移动评论页面的菜单项和详细移动评论页面的链接。
您可以编译并运行代码,以验证使用功能管理标记帮助程序在视图中进行的上述更改是否提供了所需的结果。
功能标志作为控制器和视图中的 Progam 参数
到目前为止,我们了解了如何使用功能管理包中提供的属性和标记帮助程序来禁用控制器/操作,并根据功能标志值控制 HTML 内容的呈现。但是,如果您没有禁用操作的选项,因为该操作已存在于生产环境中,并且您只是在要根据功能标志控制的现有操作中进行一些逻辑更改,会发生什么情况。
例如,你有一个动作,其中正在进行一些计算,但现在你需要改变现有的计算逻辑,但你想根据功能标志来做,即如果启用newlogic功能,将使用新的计算逻辑,否则将使用旧的计算逻辑。
为此,我们必须在控制器中以编程方式查询ASP.NET Core中的功能标志,这样我们就可以在控制器中访问功能标志值,然后在需要时从控制器中把它传递给其他组件,如服务、视图等。功能管理提供了FeatureManager服务,可以使用接口IFeatureManager在ASP.NET Core中使用依赖注入来访问。
It is possible to change the value of the feature flag in the appsettings.json file without the need to restart the application and the new changed value will start reflecting in the application. But this can result in inconsistent behaviour within your application. For example, if in an action you are checking feature flag value at multiple places then it is quite possible that if you change the value of the feature flag on the fly then the value might change within a request itself so to avoid this issue you can make use of IFeatureManagerSnapshot interface instead of IFeatureManager. As the name suggests IFeatureManagerSnapshot will provide a snapshot that will be consistent during a single request
To access the feature flag value in the controller we will make the following code changes to the Controllers/HomeController.cs file
public class HomeController : Controller
{
    private readonly ILogger<HomeController> _logger;
    private readonly IFeatureManager _featureManager;

    public HomeController(ILogger<HomeController> logger, IFeatureManager featureManager)
    {
        _logger = logger;
        _featureManager = featureManager;
    }

    public async Task<IActionResult> Index()
    {
        if (await _featureManager.IsEnabledAsync(nameof(FeatureFlags.MobileReview)))
        {
            ViewData["WelcomeMessage"] = "Welcome - Mobile Review Application";
        }
        else
        {
            ViewData["WelcomeMessage"] = "Welcome";
        }
        return View();
    }

    //Remaining Code has been removed for readability
}
可以在appsettings.json文件中改变功能标志的值,而不需要重新启动应用程序,新改变的值将开始反映在应用程序中。但这可能会导致你的应用程序中出现不一致的行为。例如,如果在一个动作中,你在多个地方检查功能标志的值,那么很有可能,如果你在运行中改变功能标志的值,那么该值可能会在请求本身中改变,所以为了避免这个问题,你可以使用IFeatureManagerSnapshot接口而不是IFeatureManager。顾名思义,IFeatureManagerSnapshot将提供一个快照,该快照在一次请求中是一致的。
To access the feature flag value in the controller we will make the following code changes to the Controllers/HomeController.cs file
为了访问控制器中的功能标志值,我们将对Controllers/HomeController.cs文件做如下代码修改
public class HomeController : Controller
{
    private readonly ILogger<HomeController> _logger;
    private readonly IFeatureManager _featureManager;

    public HomeController(ILogger<HomeController> logger, IFeatureManager featureManager)
    {
        _logger = logger;
        _featureManager = featureManager;
    }

    public async Task<IActionResult> Index()
    {
        if (await _featureManager.IsEnabledAsync(nameof(FeatureFlags.MobileReview)))
        {
            ViewData["WelcomeMessage"] = "Welcome - Mobile Review Application";
        }
        else
        {
            ViewData["WelcomeMessage"] = "Welcome";
        }
        return View();
    }

    //Remaining Code has been removed for readability
}
In the above code, we are querying the value for feature flag MobileReview using the FeatureManager service provided by the Feature management package to query feature flags in ASP.NET Core. Based on the value of the feature flag we are altering the welcome message that is being displayed to the users.
To display the welcome message provided by the controller we have made the following code changes in the Views/Home/Index.cshtml file.
在上面的代码中,我们正在使用功能管理包提供的FeatureManager服务来查询ASP.NET Core中的功能标志MobileReview的值。根据功能标志的值,我们正在改变显示给用户的欢迎信息。
为了显示控制器提供的欢迎信息,我们在Views/Home/Index.cshtml文件中做了以下代码修改。
@{
    ViewData["Title"] = "Home Page";
}

<div class="text-center">
    <h1 class="display-4">@ViewData["WelcomeMessage"]</h1>
    <p>Learn about <a href="https://docs.microsoft.com/aspnet/core">building Web apps with ASP.NET Core</a>.</p>
</div>
As we have passed the welcome message to the view you can even pass the feature flag directly to view to conditionally render HTML based on the feature flag value.
You can compile & run the code to verify that the above changes are providing the desired results.
由于我们已经将欢迎信息传递给了视图,你甚至可以直接将特征标志传递给视图,以便根据特征标志的值有条件地渲染HTML。
你可以编译并运行代码,以验证上述变化是否提供了所需的结果。
Combining Multiple Feature Flags
You can also configure multiple feature flags in ASP.NET Core for the FeatureGate attribute in the controller and feature tag in the view. The feature names should be comma-separated and you can also specify the condition for multiple feature flags in ASP.NET Core i.e. All (and) or Any (or).
Below are examples about how to specify multiple feature flags in ASP.NET Core for the FeatureGate attribute in the controller and feature tag in the view
结合多个特征标志
你也可以在ASP.NET Core中为控制器中的FeatureGate属性和视图中的特征标签配置多个特征标志。特征名称应以逗号分隔,你也可以在ASP.NET Core中指定多个特征标志的条件,即全部(和)或任何(或)。
以下是如何在ASP.NET Core中为控制器中的FeatureGate属性和视图中的特征标签指定多个特征标志的例子
[FeatureGate(Microsoft.FeatureManagement.RequirementType.Any, nameof(FeatureFlags.MobileReview), nameof(FeatureFlags.MobileDetailedReview))]
public IActionResult ReviewDetails(string? id)
{
    Mobile? mobile = _mobileDataService.GetAllMobileReviews().Find(p => p.Id.Equals(id));
    return View(mobile);
}
<feature name="@nameof(FeatureFlags.MobileDetailedReview),@nameof(FeatureFlags.MobileReview)" requirement=All>
    <td>@Html.ActionLink("Click Here", "ReviewDetails", new { id = mobile.Id })</td>
</feature>
Feature Filters for Feature Flags in ASP.NET Core
Until now we just used the value (true or false) of the feature flag to determine whether the feature should be enabled or disabled. Now if you want to go beyond the value of the feature flag and implement some extra logic (based on users, groups, percentage of requests, etc) for feature enabling and disabling then this is where Feature Filters come into the picture.
You can specify the optional feature filter for any feature flag. When a feature flag value is accessed then Microsoft Feature Management will access its configuration in the appsettings.json file and if it finds the configuration for feature filter for that feature then it will instantiate the instance of the feature filter. Once the instance of the feature filter is instantiated then it will look for the configuration values for the feature filter and based on the logic of that feature filter the value for the feature flag either true or false is determined.
Before you can use feature filter in the configuration it should be registered in the application in Program.cs file. There are inbuilt feature filters provided by the Microsoft Feature Management package for ASP.NET Core but you can even write your own custom feature filters.
ASP.NET Core中功能标志的特征过滤器
到目前为止,我们只是使用功能标志的值(真或假)来确定该功能是否应该被启用或禁用。现在,如果你想超越功能标志的值,并为功能的启用和禁用实现一些额外的逻辑(基于用户、组、请求的百分比等),那么这就是功能过滤器出现的地方。
你可以为任何功能标志指定可选的功能过滤器。当一个功能标志值被访问时,微软功能管理将访问其在appsettings.json文件中的配置,如果它发现该功能的功能过滤器的配置,它将实例化该功能过滤器的实例。一旦特征过滤器实例被实例化,它将寻找特征过滤器的配置值,并根据该特征过滤器的逻辑决定特征标志的值是真还是假。
在配置中使用特征过滤器之前,应在Program.cs文件中注册应用程序。Microsoft Feature Management package for ASP.NET Core提供了一些内置的特征过滤器,但你甚至可以自己编写自定义的特征过滤器。
Using Percentage Filter
This percentage filter will enable a feature for the specified percentage of requests. i.e. a value of 50 will enable the feature for 50% of the requests and for the other 50% it will be disabled.
This filter can be used when you are releasing a new feature but don’t want to enable it all at once ie. you want to release a feature gradually. Initially, you keep the percentage small like 1-5% and after checking the results and response you can increase the percentage slowly. You can even use this percentage filter for randomised A/B testing.
As explained you need to first register the feature filter in the application before you can use that in the configuration. Below is the code to register Percentage Filter in the application in the Program.cs file.
使用百分比过滤器
这个百分比过滤器将对指定百分比的请求启用一个功能,即一个50的值将对50%的请求启用该功能,对另外50%的请求则禁用。
这个过滤器可以在你发布一个新的功能,但不想一下子启用它时使用,即你想逐步发布一个功能。最初,你保持小的百分比,如1-5%,在检查结果和反应后,你可以慢慢增加百分比。你甚至可以使用这个百分比过滤器进行随机的A/B测试。
正如所解释的,你需要首先在应用程序中注册功能过滤器,然后才能在配置中使用它。下面是在应用程序中Program.cs文件中注册百分比过滤器的代码。
builder.Services.AddFeatureManagement()
                .UseDisabledFeaturesHandler(new CustomDisabledFeatureHandler())
                .AddFeatureFilter<PercentageFilter>();


Once the feature filter is registered you can use that filter in the configuration in the appsettings.json file. Below is the configuration for percentage filter with a value of 50%
一旦特征过滤器被注册,你可以在appsettings.json文件的配置中使用该过滤器。下面是百分比过滤器的配置,其值为50%。
"FeatureManagement": {
  "MobileReview": {
    "EnabledFor": [
      {
        "Name": "Microsoft.Percentage",
        "Parameters": {
          "Value": 50
        }
      }
    ]
  },
  "MobileDetailedReview": true
}
The above configuration will enable the MobileReview feature for 50% of the requests that are handled by the application.
You can compile & run the code to verify that the above changes are providing the desired results or not. After running if you perform a frequent refresh on the home page then you can observe that the menu Mobile Review is not available always instead it’s visible for some requests and for others it is not visible.
上述配置将为应用程序所处理的50%的请求启用MobileReview功能。
你可以编译和运行代码来验证上述变化是否提供了所需的结果。运行后,如果你经常刷新主页,那么你可以观察到菜单MobileReview并不总是可用的,相反,它在某些请求中是可见的,而在其他请求中是不可见的。
Using Time Window Feature
This time window filter will enable a feature from the start date-time specified to the end date time specified i.e. it will enable for the datetime range specified. If you specify only start date-time but no end date time then this feature will be enabled at start date-time and will never get disabled.
使用时间窗口功能
此时间窗口筛选器将启用从指定的开始日期时间到指定的结束日期时间的功能,即它将为指定的日期时间范围启用。如果仅指定开始日期时间而不指定结束日期时间,则此功能将在开始日期时间启用,并且永远不会被禁用。
This time window feature filter is useful for time-bound features i.e. features that should get enabled at a specific date time and be disabled at a specific date-time like a weekend sale, festival sale, etc.
As explained you need to first register the feature filter in the application before you can use that in the configuration. Below is the code to register Time Window Filter in the application in the Program.cs file.
这个时间窗口功能过滤器对有时间限制的功能很有用,即在一个特定的日期时间启用,在一个特定的日期时间禁用的功能,如周末销售,节日销售等。
正如所解释的,你需要首先在应用程序中注册功能过滤器,然后才能在配置中使用它。下面是在应用程序中Program.cs文件中注册时间窗口过滤器的代码。
builder.Services.AddFeatureManagement()
                .UseDisabledFeaturesHandler(new CustomDisabledFeatureHandler())
                .AddFeatureFilter<PercentageFilter>()
                .AddFeatureFilter<TimeWindowFilter>();

Once the feature filter is registered you can use that filter in the configuration in the appsettings.json file. Below is the configuration for Time Window filter with Start as 26th Jan 2022 06:00 AM and End as 26th Jan 2022 06:00 PM
"FeatureManagement": {
  "MobileReview": {
    "EnabledFor": [
      {
        "Name": "Microsoft.Percentage",
        "Parameters": {
          "Value": 50
        }
      }
    ]
  },
  "MobileDetailedReview": {
    "EnabledFor": [
      {
        "Name": "Microsoft.TimeWindow",
        "Parameters": {
          "Start": "2022-01-26T06:00:00+00:00",
          "End": "2022-01-26T18:00:00+00:00"
        }
      }
    ]
  }
}
The above configuration will enable the MobilDeatiledeReview feature on 26th January 2022 at 6 AM and disable it at 6 PM on 26th January 2022.
You can compile & run the code to verify that the above changes are providing the desired results or not. You specify the start as the current machine time when you are running the code and the end time as 1-2 minutes apart from the start time.
There are other built-in feature filters as well that you can explore and use as per your requirements and needs to implement Feature Flags in ASP.NET Core
上述配置将在 2022 年 1 月 26 日上午 6 点启用 MobilDeatiledeReview 功能,并在 2022 年 1 月 26 日下午 6 点禁用该功能。
您可以编译并运行代码以验证上述更改是否提供了所需的结果。在运行代码时,将开始时间指定为当前计算机时间,将结束时间指定为与开始时间相隔 1-2 分钟的时间。
还有其他内置功能筛选器,您可以根据需要探索和使用,并在 Core 中实现功能标志 ASP.NET
Feature Flag Drawbacks
The feature flags in ASP.NET Core does add some dependency & complexity to the application as feature flags need to be managed and will also require maintenance.
In the long run, once a new feature is enabled for all the users and very well established on production such that it will never be reverted then in that case you need to consider removing that feature flag code and its configuration as well.
When you develop a feature with a feature flag option then there are additional testing needs for the application as you need to also test that feature is working as per the feature flag logic added to the application
功能标志缺点
ASP.NET Core中的功能标志确实增加了应用程序的一些依赖性和复杂性,因为功能标志需要管理并且还需要维护。
从长远来看,一旦为所有用户启用了新功能,并且在生产环境中建立了良好的功能,使其永远不会被还原,那么在这种情况下,您还需要考虑删除该功能标志代码及其配置。
当您开发具有功能标志选项的功能时,应用程序还有其他测试需求,因为您还需要根据添加到应用程序的功能标志逻辑测试该功能是否正常工作
Summary
We learned about how we can implement feature flags in ASP.NET Core to control the way features are released or enabled on production. The feature flags in ASP.NET Core gives you much better control over the features you are releasing to the production and thus provide you with a way to avoid errors by releasing the features to all users at the same time.
You can enable features for limited users and once you are satisfied with the results then you can enable it for all users. You can even launch the feature at the desired date-time by specifying the Time Window filter.
Using feature flags in ASP.NET Core makes rollback of the feature easy as it does not require the deployment of any binaries.
Please provide your suggestions & questions in the comments section below
You can check my other trending articles – Build Resilient Microservices (Web API) using Polly in ASP.NET Core & Microservices with ASP.NET Core 3.1 – Ultimate Detailed Guide
References – Feature Flags in ASP.NET Core Application
总结
我们了解了如何在 ASP.NET Core 中实现功能标志,以控制在生产环境中发布或启用功能的方式。ASP.NET Core 中的功能标志使您可以更好地控制要发布到生产中的功能,从而通过同时向所有用户发布功能来避免错误。
您可以为受限用户启用功能,一旦对结果感到满意,就可以为所有用户启用该功能。您甚至可以通过指定时间窗口筛选器在所需的日期时间启动该功能。
在 ASP.NET Core 中使用功能标志可以轻松回滚功能,因为它不需要部署任何二进制文件。
请在下面的评论部分提供您的建议和问题
您可以查看我的其他趋势文章 – 在 ASP.NET Core 中使用 Polly 构建弹性微服务 (Web API) 和带有 ASP.NET Core 3.1 的微服务 – 终极详细指南
参考 – 核心应用程序中 ASP.NET 功能标志
Download Source Code
Here you can download the complete source code for this article demonstrating how to implement Feature Flags in ASP.NET Core
下载源代码
在这里,您可以下载本文的完整源代码,演示如何在 Core 中实现功能标志 ASP.NET
Hope you found this article useful. Please support the Author
希望这篇文章对您有所帮助。请支持作者
Microsoft Feature Management - Feature Flags in ASP.NET Core C# - Detailed Guide | Pro Code Guide
