Prism是由微软Patterns & Practices团队开发的项目,目的在于帮助开发人员构建松散耦合的、更灵活、更易于维护并且更易于测试的WPF应用或是Silverlight应用以及Windows Phone 7应用。使用Prism可以使程序开发更趋于模块化,整个项目将由多个离散的、松耦合的模块组成,而各个模块又可以又不同的开发者或团队进行开发、测试和部署。目前Prism的最新版本是Prism 4,于2010年11月12日发布。Prism有很完整的文档以及丰富的示例程序。在这里我们仅针对于Silverlight程序的开发。
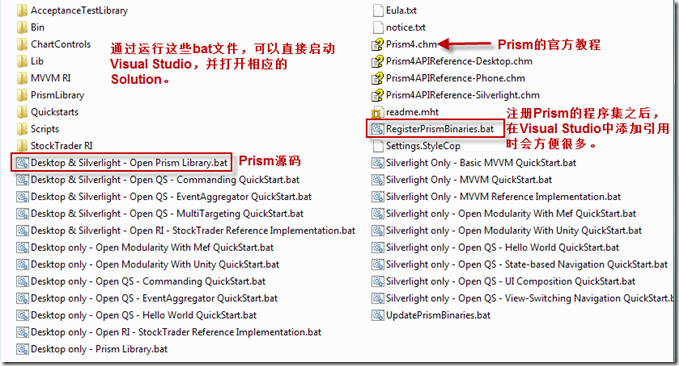
在下载Prism安装包并安装完成后,会在目标文件夹中发现很多文件。
推荐首先运行RegisterPrismBinaries.bat文件,这样在开发基于Prism的程序时可以更方便地添加引用程序集。
使用Prism之前,需要了解一些概念,下面通过一个非常简单的小程序来了解一下Prism。
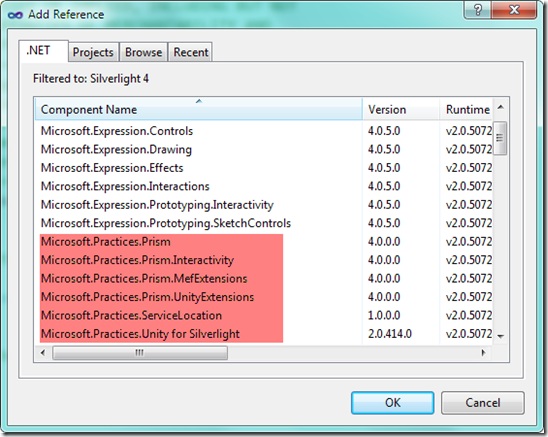
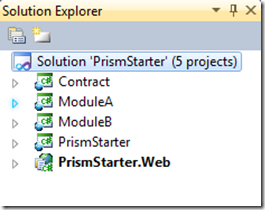
1.打开Visual Studio 2010,新建一个Silverlight Application项目,并添加对Prism的引用。再创建三个Silverlight类库工程。
2.在Contract工程下新建一个接口,叫做ITextProvider。
|
1
2
3
4
|
public interface ITextProvider{ string GetText();} |
3.在其它的三个项目中都引用Contract项目。
4.在PrismStarter工程下新建一个TextProvider类并实现ITextProvider接口。
|
1
2
3
4
5
6
7
8
9
10
|
public class TextProvider : ITextProvider{ private int i = 0; public string GetText() { i++; return string.Format("From TextProvider [{0}]", i); }} |
5.删除PrismStarter项目中自动生成的MainPage.xaml,创建一个新的UserControl,叫做Shell。页面代码如下:
|
1
2
3
4
5
6
7
8
9
10
11
12
13
14
15
16
17
18
19
20
21
22
23
|
<UserControl x:Class="PrismStarter.Shell" mc:Ignorable="d" d:DesignHeight="300" d:DesignWidth="400"> <Grid x:Name="LayoutRoot" Background="White"> <Grid.RowDefinitions> <RowDefinition Height="100" /> <RowDefinition Height="100" /> <RowDefinition Height="100" /> </Grid.RowDefinitions> <TextBlock FontSize="30" VerticalAlignment="Center" HorizontalAlignment="Center" Text="Prism Starter" /> <ContentControl Grid.Row="1" HorizontalContentAlignment="Stretch" prism:RegionManager.RegionName="RegionA" /> <ContentControl Grid.Row="2" HorizontalContentAlignment="Stretch" prism:RegionManager.RegionName="RegionB" /> </Grid></UserControl> |
6.在ModuleA工程中添加对Prism程序集的引用。并添加一个UserControl叫做ViewA,页面代码为:
|
1
2
3
|
<Grid x:Name="LayoutRoot" Background="White"> <TextBlock x:Name="textModuleA" FontSize="30" VerticalAlignment="Center" HorizontalAlignment="Center" /></Grid> |
CodeBehind中的代码为:
|
1
2
3
4
5
6
7
8
9
10
11
12
|
public partial class ViewA : UserControl{ public ViewA(ITextProvider textProvider) { InitializeComponent(); this.Loaded += (s, e) => { textModuleA.Text = string.Format("Module A {0}", textProvider.GetText()); }; }} |
7.在ModuleA工程中添加一个类叫做ModuleA,并实现接口IModule。
|
1
2
3
4
5
6
7
8
9
10
11
12
13
14
|
public class ModuleA : IModule{ private IRegionManager _regionManager; public ModuleA(IRegionManager regionManager) { _regionManager = regionManager; } public void Initialize() { _regionManager.RegisterViewWithRegion("RegionA", typeof(ViewA)); }} |
注意这里的RegionA对应于Shell页面中的RegionName。
8.在ModuleB工程中重复6、7过程,只是将A替换为B。
9.在PrismStarter工程中添加对ModuleA和ModuleB的引用。
10.在PrismStarter工程中添加一个PrismStarterBootstrapper类,并继承UnityBootstrapper。
|
1
2
3
4
5
6
7
8
9
10
11
12
13
14
15
16
17
18
19
20
21
22
23
24
25
26
27
28
29
30
31
32
33
34
35
36
37
38
39
|
public class PrismStarterBootstrapper : UnityBootstrapper{ protected override DependencyObject CreateShell() { return this.Container.TryResolve<Shell>(); } protected override void InitializeShell() { // 控制页面在初始化时显示Shell页面 App.Current.RootVisual = (UIElement)this.Shell; } protected override void ConfigureModuleCatalog() { // 注册Module。在实际开发中可以使用xaml做配置文件, // 这样就可以将PrismStarter与ModuleA和ModuleB完全解耦,也就不再需要引用这两个项目 Type moduleAType = typeof(ModuleA.ModuleA); ModuleInfo moduleA = new ModuleInfo { ModuleName = moduleAType.Name, ModuleType = moduleAType.AssemblyQualifiedName, }; Type moduleBType = typeof(ModuleB.ModuleB); ModuleInfo moduleB = new ModuleInfo { ModuleName = moduleBType.Name, ModuleType = moduleBType.AssemblyQualifiedName, }; this.ModuleCatalog.AddModule(moduleA); this.ModuleCatalog.AddModule(moduleB); } protected override void ConfigureContainer() { // 注册一下TextProvider,这样在通过容器请求ITextProvider时会返回TextProvider实例 base.ConfigureContainer(); this.Container.RegisterInstance<ITextProvider>(new TextProvider()); }} |
11.最后一步,打开App.xaml.cs,修改Application_Startup方法
|
1
2
3
4
5
|
private void Application_Startup(object sender, StartupEventArgs e){ PrismStarterBootstrapper bootstrapper = new PrismStarterBootstrapper(); bootstrapper.Run();} |
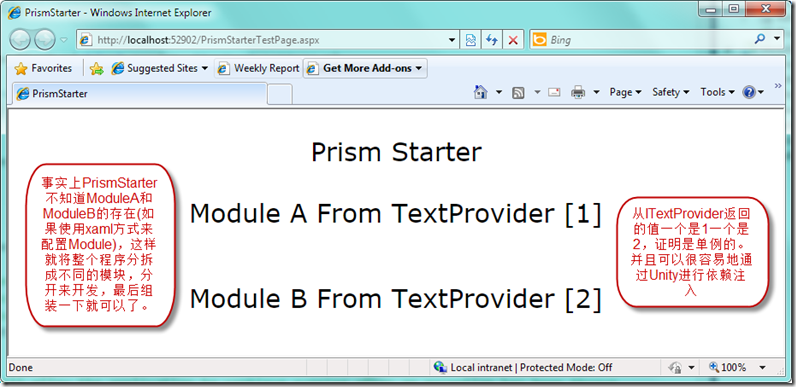
运行程序,结果如下:
下面简单介绍一下这个小例子中涉及到的一些概念。
Bootstrapper: 在程序中使用框架需要找到一个切入点,将框架植入进去,将一部分功能委托给框架来实现。在Silverlight中使用Prism的切入点就是App.xaml.cs中的Application_Startup方法。一般来说,这个方法中只是指定页面最先加载的页面,但是我们把默认的逻辑去掉,取而代之的是Bootstrapper(在本例中就是PrismStarterBootstrapper)。当调用Bootstrapper.Run方法时,它会完成一些准备工作,如一些配置等。因此你会发现,使用Prism后,启动程序时会比正常启动要慢一些,就是因为Bootstrapper做了许多工作。
Container: 依赖注入容器。在程序中使用依赖注入的好处到处都可以找的到。在Silverlight中使用容器来管理各个组件的一个很明显的好处就是使用单例来降低内存使用。否则每次加载一个页面都需要重新创建一个也很耗费资源的。当然好处不只这些,通过容器来注入一些服务(如本例中的IRegionManager和ITextProvider)显得相当方便。
Module: Prism帮助我们把程序分解成一个个功能模块,这些功能模块就叫做Module,通常一个工程就是一个Module。由于Module彼此是独立的,但是在运行时需要将它们整合到一起,因此Prism需要知道Module的存在,这里就涉及到了ModuleCatalog, ModuleCatalog就是Module的容器,里面包含了所有Module的信息,以ModuleInfo的形式存在。ModuleInfo就是对Module的抽象,包含Module的名字,类型,依赖等一些信息。
Shell: 相当于程序的入口,初始界面,还能够提供类似ASP.Net中的母版页的功能。Shell必须由Bootstrapper创建,因为Shell需要使用的一些service,比如RegionManager等,需要在Shell显示前注册。
Region: 相当于ASP.Net中的ContentPlaceHolder(是这么叫的吧?),起到占位符的作用,如本例中Shell中有两个Region——RegionA和RegionB,定义了两块区域。在Module的初始化过程中,通过IRegionManager将Module中的页面放进了定义好的Region中。IRegionManager负责管理Region,可以通过它向Region中注册View,进行导航等。
Prism的功能当然远不止这么简单,它还提供对MVVM模式的支持,对导航的支持等,在后续文章中会逐步介绍。希望能够通过本文让大家对Prism有一定的了解。


