idea快速搭建SpringCloud项目
1.搭建准备
基于Maven+idea搭建。 另外SpringCloud需要基于springboot搭建。
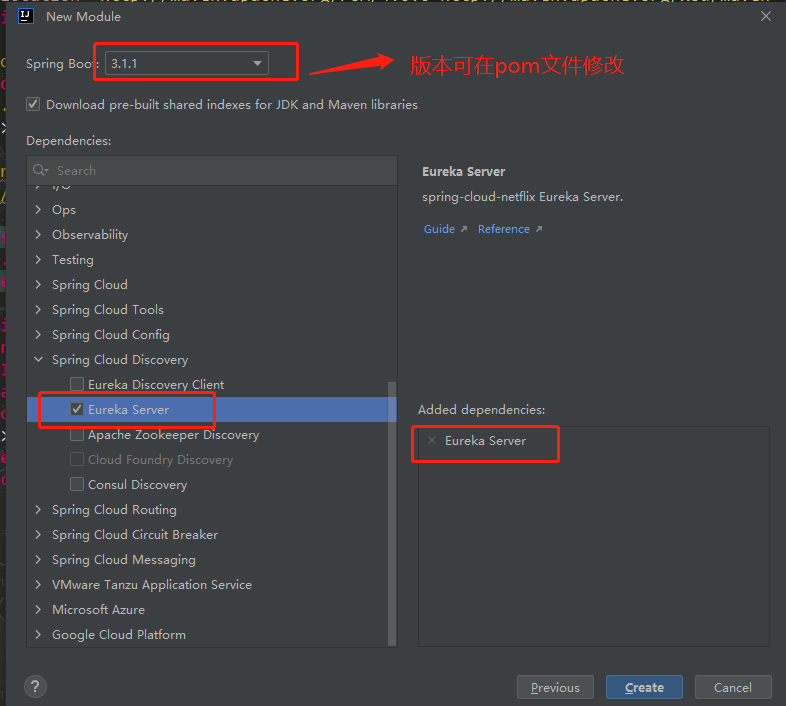
idea2023.1.4版本,引入Spring Boot相关依赖 这里的springboot用的是2.0.3.RELEASE版本,引入Spring Cloud相关依赖 这里为 Finchley.SR4,jdk1.8
2.工程初始化配置
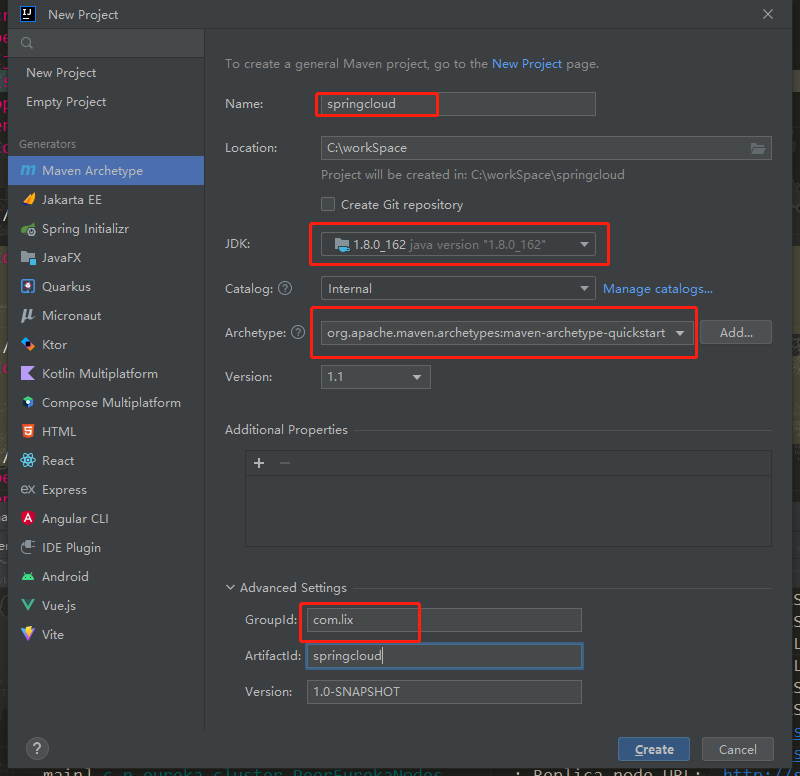
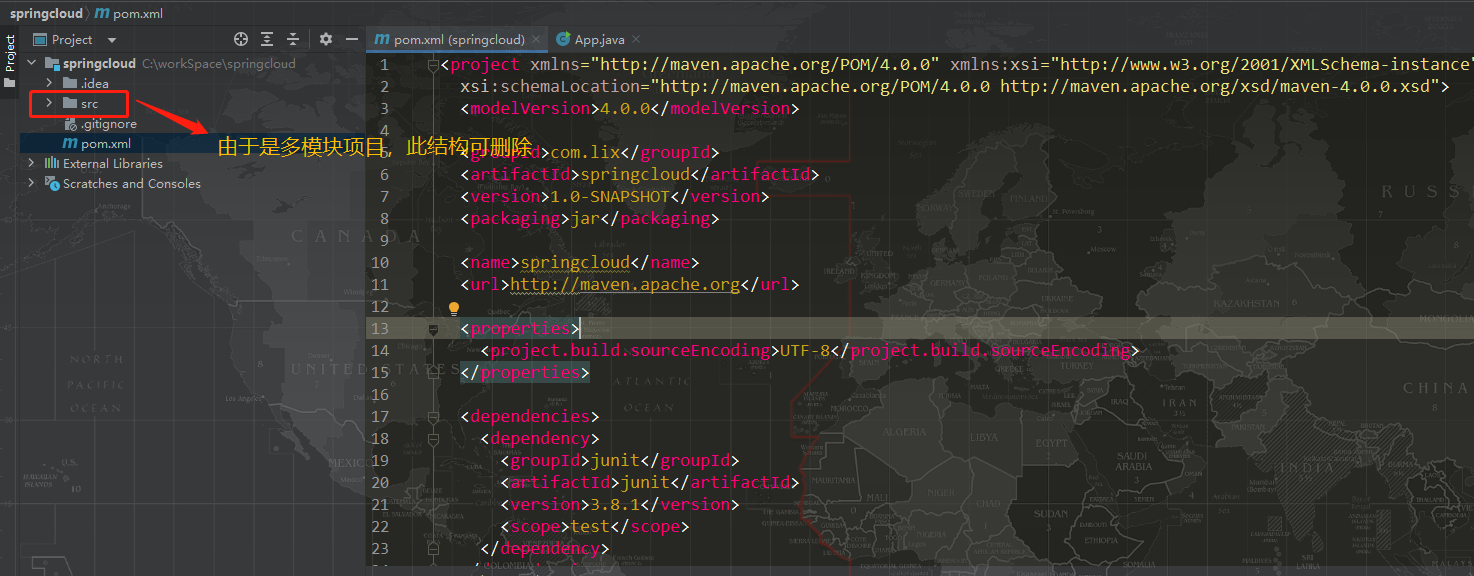
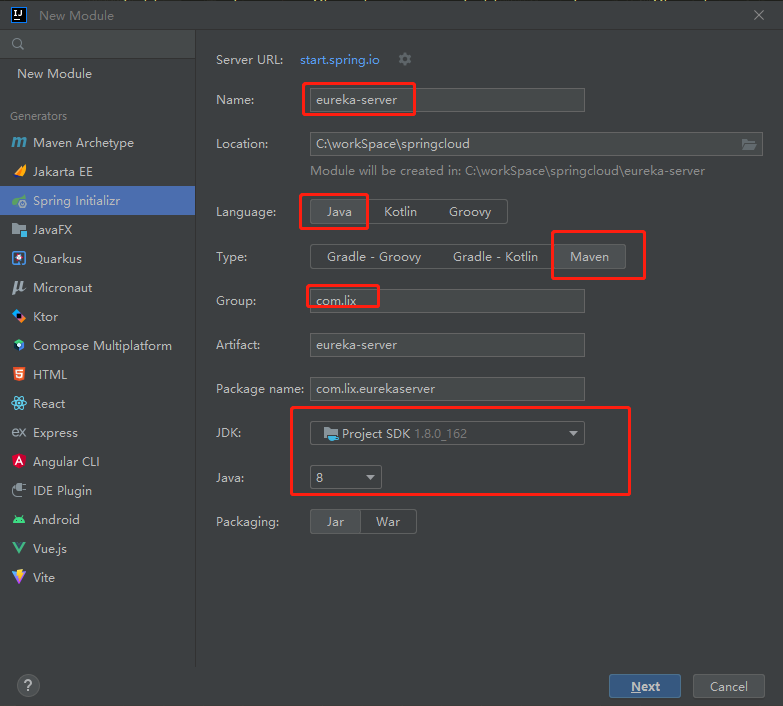
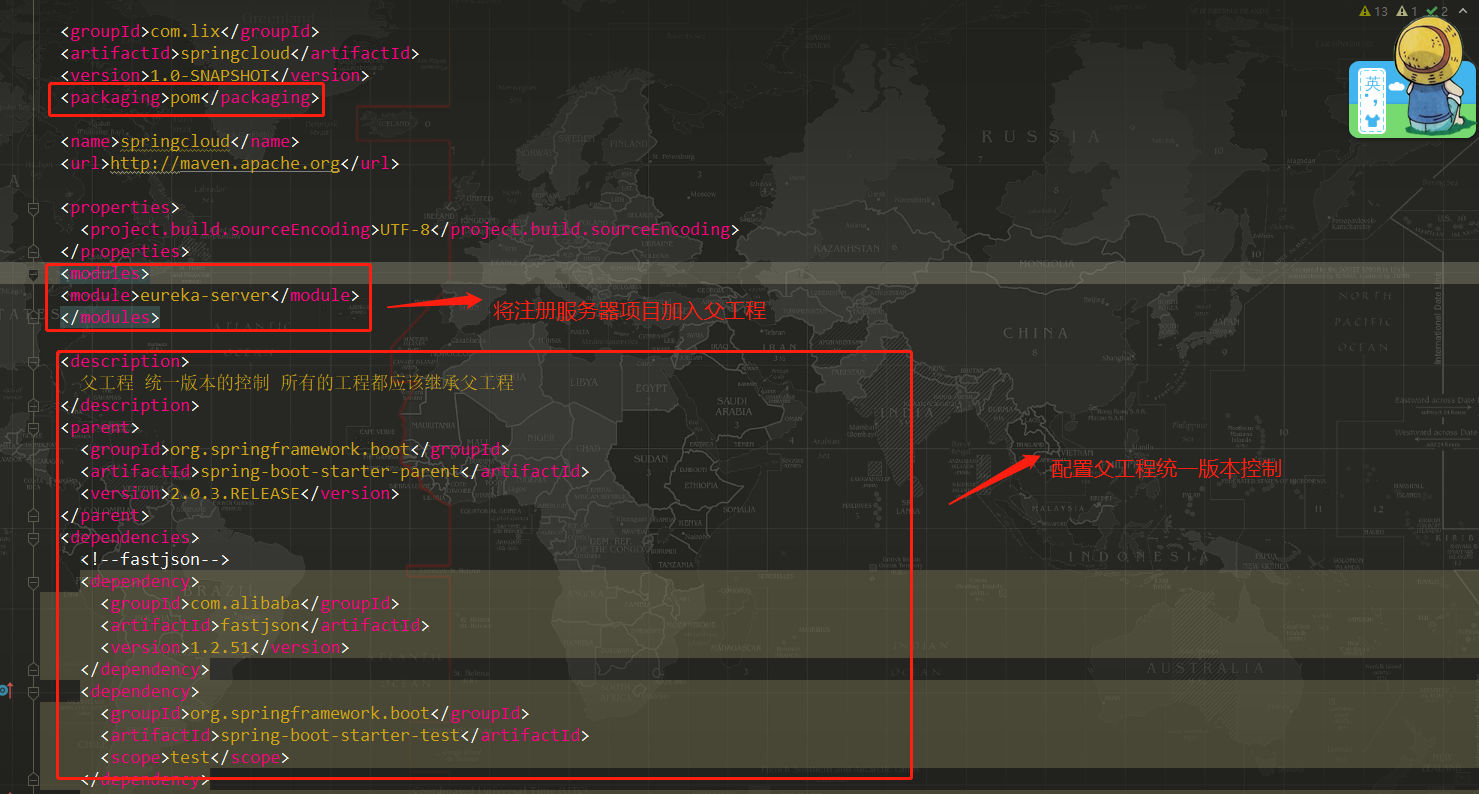
2.1创建一个父项目
新建一个maven项目
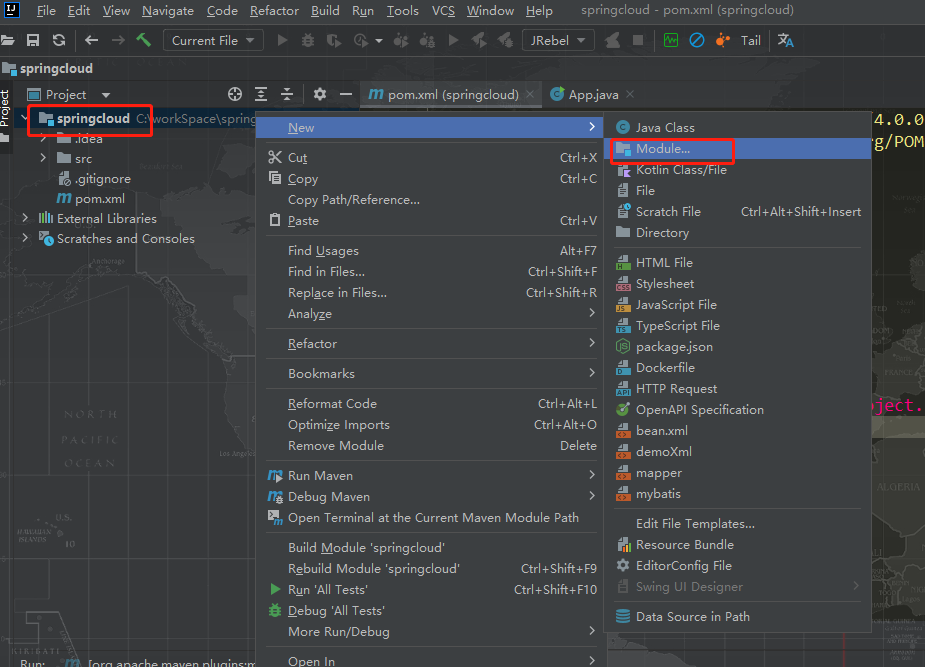
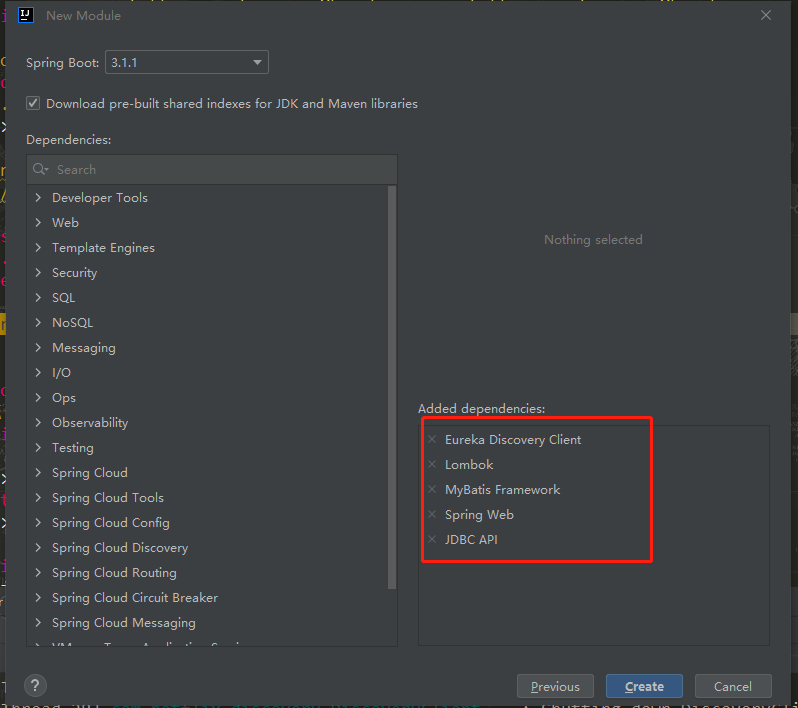
2.2创建一个注册中心模块 eureka-server
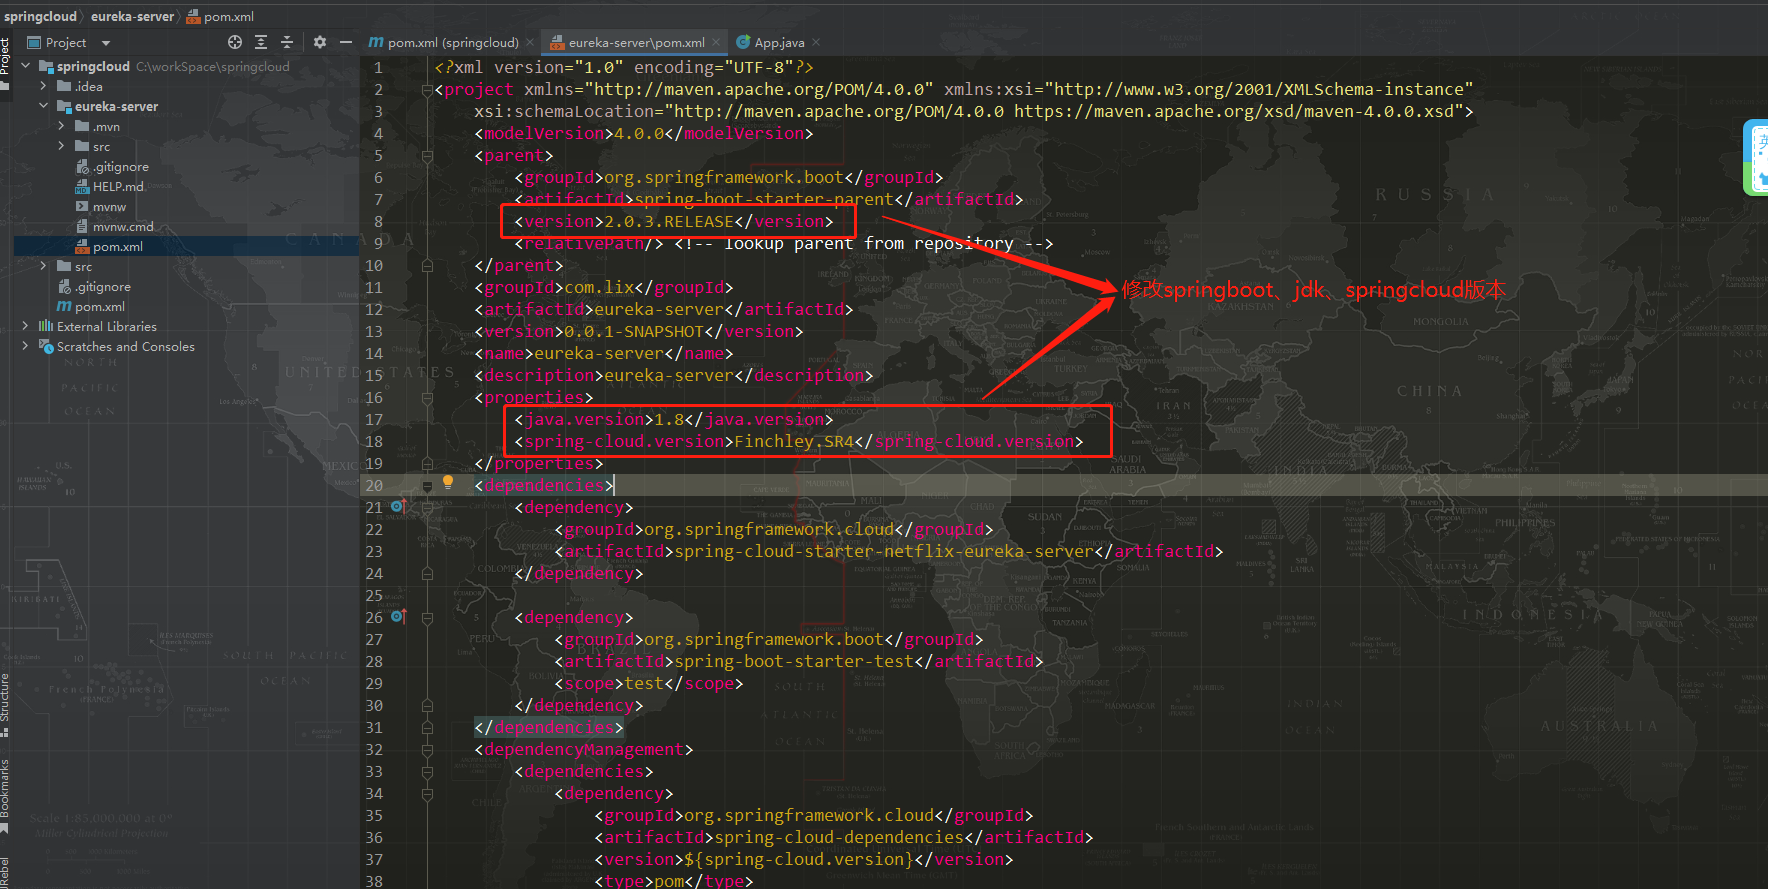
2.2.1配置注册中心

 1 package com.lix.eurekaserver;
 2
 3 import org.springframework.boot.SpringApplication;
 4 import org.springframework.boot.autoconfigure.SpringBootApplication;
 5 import org.springframework.cloud.netflix.eureka.server.EnableEurekaServer;
 6
 7 @SpringBootApplication
 8 //声明为注册中心
 9 @EnableEurekaServer
10 public class EurekaServerApplication {
11
12     public static void main(String[] args) {
13         SpringApplication.run(EurekaServerApplication.class, args);
14     }
15
16 }
配置文件改用yml,配置如下:
 1 server:
 2   #注册地址
 3   port: 8888
 4 eureka:
 5   instance:
 6     #注册ip
 7     hostname: localhost
 8   client:
 9     #自身不再向eureka注册
10     register-with-eureka: false
11     #启动时禁用client的注册
12     fetch-registry: false
13     #url服务
14     serviceUrl:
15       defaultZone: http://${eureka.instance.hostname}:${server.port}/eureka/
16 spring:
17   application:
18     name: eureka-server
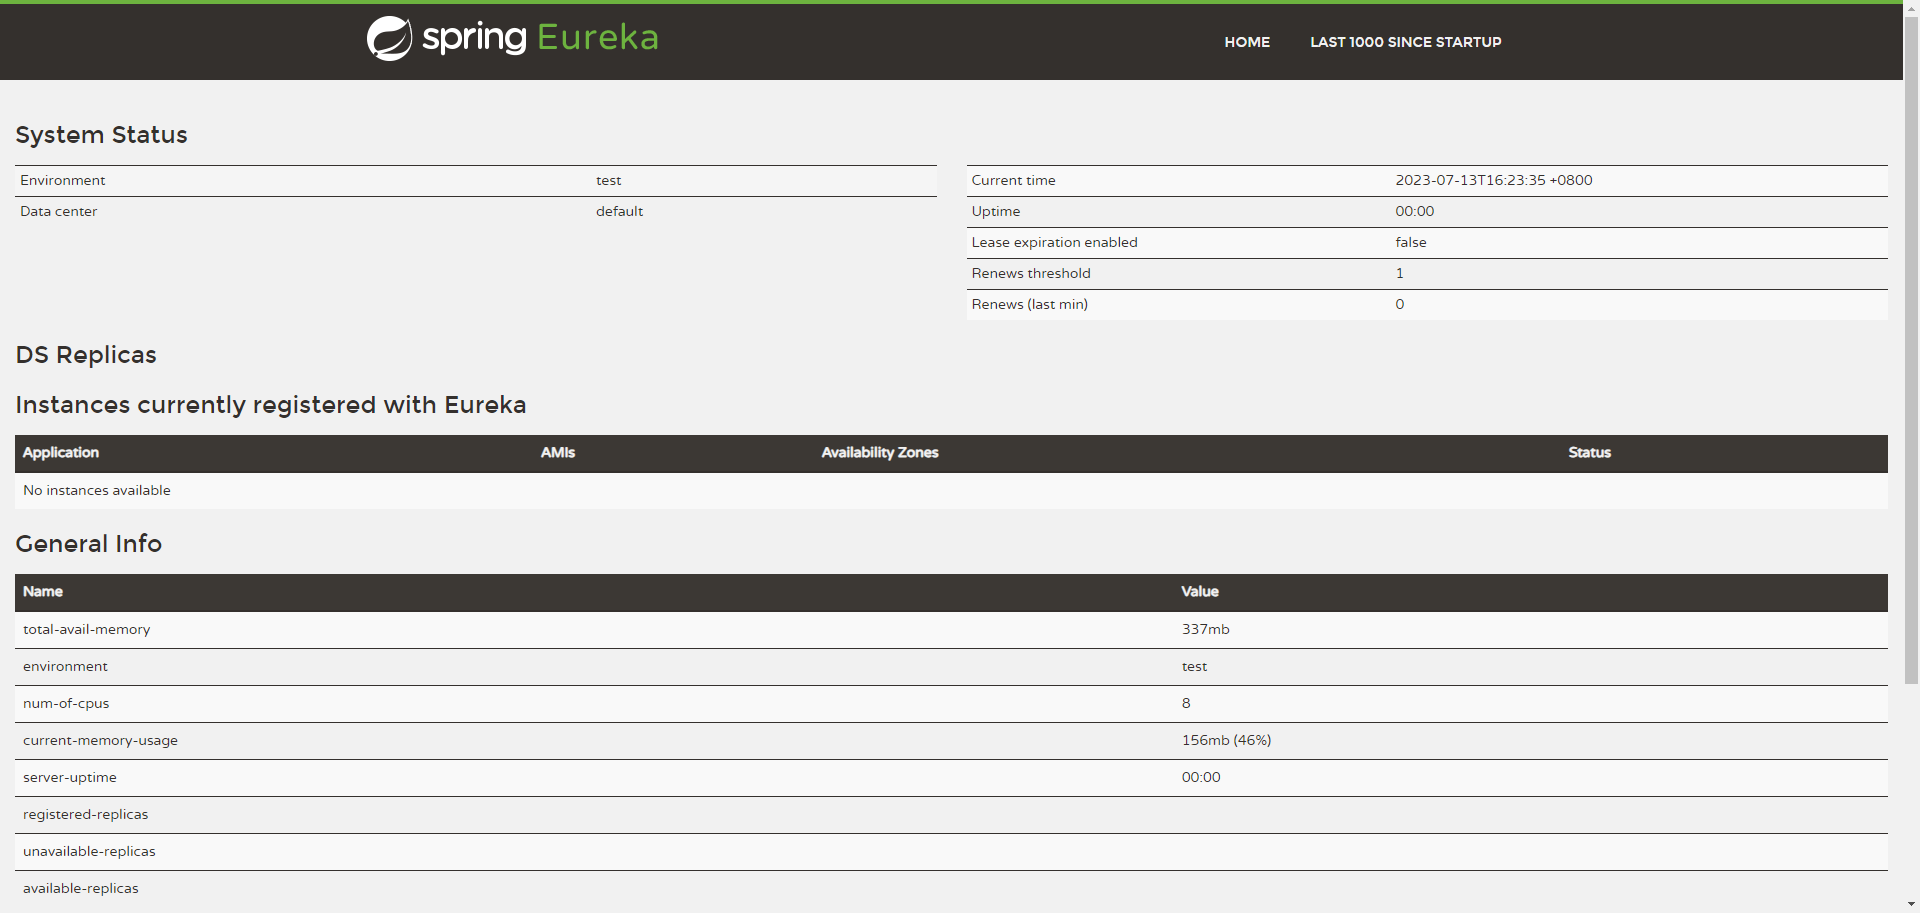
启动服务,可看到注册中心页面
2.3创建一个服务提供者(就是常写的spring-boot)eureka-provider
 1 package com.lix.eurekaprovider;
 2
 3 import org.springframework.boot.SpringApplication;
 4 import org.springframework.boot.autoconfigure.SpringBootApplication;
 5 import org.springframework.boot.autoconfigure.jdbc.DataSourceAutoConfiguration;
 6 import org.springframework.cloud.netflix.eureka.EnableEurekaClient;
 7 /**测试屏蔽掉未使用的数据库相关服务**/
 8 @SpringBootApplication(exclude = DataSourceAutoConfiguration.class)
 9 /**声明为注册服务**/
10 @EnableEurekaClient
11 public class EurekaProviderApplication {
12
13     public static void main(String[] args) {
14         SpringApplication.run(EurekaProviderApplication.class, args);
15     }
16
17 }
 1 eureka:
 2   client:
 3     serviceUrl:
 4       #服务注册地址
 5       defaultZone: http://${eureka.instance.hostname}:8888/eureka/server:
 6   #运行端口
 7   port: 8001
 8 spring:
 9   application:
10     #服务注册名称
11     name: service-provider
 1 package com.lix.eurekaprovider;
 2
 3 import org.springframework.web.bind.annotation.RequestMapping;
 4 import org.springframework.web.bind.annotation.RestController;
 5
 6 /**
 7  * @author lix
 8  * @date 2023/7/12 16:30
 9  * @description
10  * @currentMinute example
11  */
12 @RestController
13 @RequestMapping("/ceshi")
14 public class Controller {
15     @RequestMapping("/1")
16     public String  ceshi(String args) {
17         System.out.println("传入的值"+args);
18         return "传入的值为:"+args;
19     }
20 }
启动注册中心和服务提供者provider服务
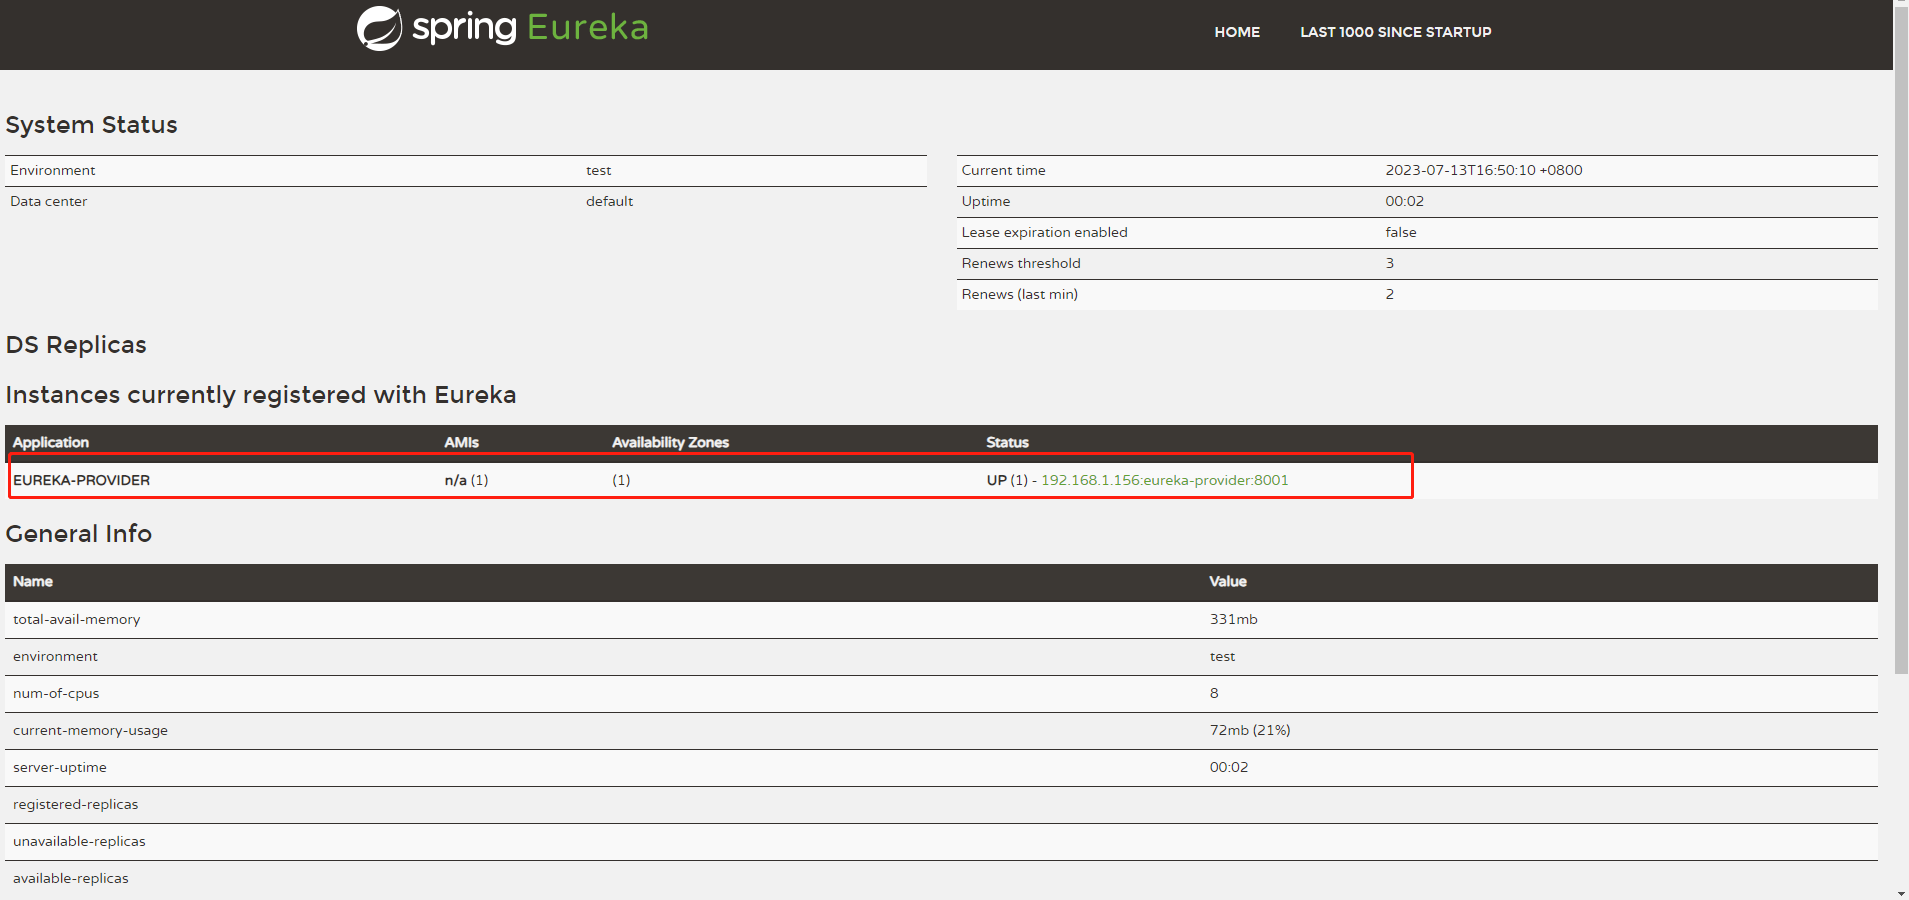
在直接访问一下服务提供者的 网络位置http://localhost:8001/ceshi/1?args=测试,我们已经看见 可以访问了,证明此微服务可用。
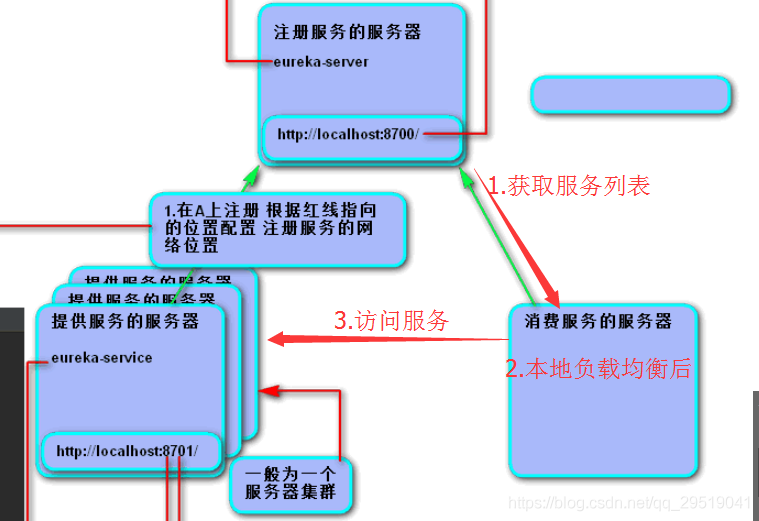
注意:但是我们一般不直接调用所需的微服务,而是经过提供注册服务的服务器server,获取所需的服务提供者列表(为一个列表,此列表包含了能提供相应服务的服务器),他们也许是个集群,因此server会返回一个 ip+端口号的表,服务消费者通过相应算法访问这表上的不同服务器,这些服务器提供的是相同的服务,这种在服务消费者一方挑选服务器为自己服务的方式是一种客户端的负载均衡。目前所知的有 轮询和随机两种方式 访问这些服务器,轮询就是循环的意思,假如有3台服务器,访问方式就是1,2,3,1,2,3,1,2,3····,随机就是随机,回想一下random方法,一种无规律的方式。这两种方式都是为了,访问每个服务器的可能性尽量的相同。还有权重负载这种算法,意思就是 根据服务器负载能力的分配相应的服务。能力大的干得多。能力小的干得少。
2.4创建一个消费者服务 eureka-consumer
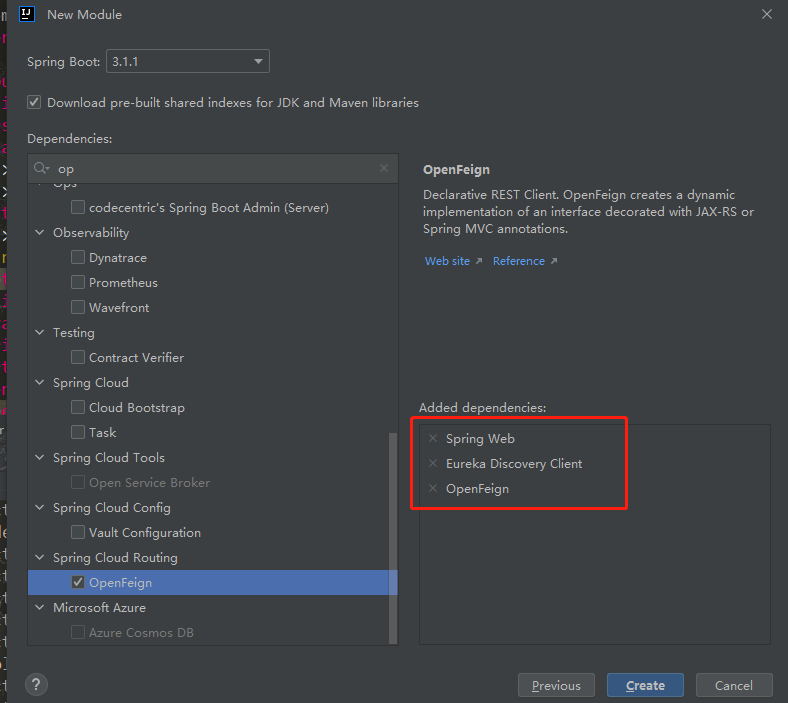
 1 package com.lix.eurekaconsumer;
 2
 3 import org.springframework.boot.SpringApplication;
 4 import org.springframework.boot.autoconfigure.SpringBootApplication;
 5 import org.springframework.cloud.netflix.eureka.EnableEurekaClient;
 6 import org.springframework.cloud.openfeign.EnableFeignClients;
 7
 8 @SpringBootApplication
 9 /**声明为注册中心**/
10 @EnableEurekaClient
11 /**把调用注册子模块接口引入到Spring容器中(不加此注解会出现找不到@FeignClient修饰的接口)**/
12 @EnableFeignClients
13 public class EurekaConsumerApplication {
14
15     public static void main(String[] args) {
16         SpringApplication.run(EurekaConsumerApplication.class, args);
17     }
18
19 }
 1 package com.lix.eurekaconsumer;
 2
 3 import org.springframework.cloud.client.loadbalancer.LoadBalanced;
 4 import org.springframework.context.annotation.Bean;
 5 import org.springframework.context.annotation.Configuration;
 6 import org.springframework.http.client.ClientHttpRequestFactory;
 7 import org.springframework.http.client.SimpleClientHttpRequestFactory;
 8 import org.springframework.web.client.RestTemplate;
 9
10 /**
11  * @author lix
12  * @date 2023/7/13 09:30
13  * @description
14  * @currentMinute example
15  *
16  * RestTemplate配置
17  * 这是一种JavaConfig的容器配置,用于spring容器的bean收集与注册,并通过参数传递的方式实现依赖注入。
18  * "@Configuration"注解标注的配置类,都是spring容器配置类,springboot通过"@EnableAutoConfiguration"
19  * 注解将所有标注了"@Configuration"注解的配置类,"一股脑儿"全部注入spring容器中。
20  *
21  *
22  */
23 @Configuration
24 public class RestTemplateConfig {
25
26   /*  @Bean
27     public RestTemplate restTemplate(ClientHttpRequestFactory factory) {
28         return new RestTemplate(factory);
29     }*/
30 //需要先将RestTemplate以Bean的形式注入到Spring容器中
31     @Bean
32     @LoadBalanced
33     RestTemplate getRestTemplate(){
34         return new RestTemplate();
35     }
36
37     @Bean
38     public ClientHttpRequestFactory simpleClientHttpRequestFactory() {
39         SimpleClientHttpRequestFactory factory = new SimpleClientHttpRequestFactory();
40         factory.setReadTimeout(5000);//ms
41         factory.setConnectTimeout(15000);//ms
42         return factory;
43     }
44 }
 1 package com.lix.eurekaconsumer;
 2
 3 import org.springframework.beans.factory.annotation.Autowired;
 4 import org.springframework.cloud.client.loadbalancer.LoadBalancerClient;
 5 import org.springframework.web.bind.annotation.RequestMapping;
 6 import org.springframework.web.bind.annotation.RestController;
 7 import org.springframework.web.client.RestTemplate;
 8
 9 /**
10  * @author lix
11  * @date 2023/7/12 16:30
12  * @description
13  * @currentMinute example
14  */
15 @RestController
16 @RequestMapping("/ceshi")
17 public class ConsumerController {
18     @Autowired
19     private LoadBalancerClient loadBalancerClient;
20     @Autowired
21     private RestTemplate restTemplate;
22     @RequestMapping("/2")
23     public String  ceshi(String args) {
24         System.out.println("传入的值为:"+args);
25         //第一种调用方式
26         //String forObject = new RestTemplate().getForObject("http://localhost:8071/Hello/World?s=" + s, String.class);
27
28         //第二种调用方式
29         //根据服务名 获取服务列表 根据算法选取某个服务 并访问某个服务的网络位置。
30         //ServiceInstance serviceInstance = loadBalancerClient.choose("EUREKA-SERVICE");
31         //String forObject = new RestTemplate().getForObject("http://"+serviceInstance.getHost()+":"+serviceInstance.getPort()+"/Hello/World?s="+s,String.class);
32         //第三种调用方式 需要restTemplate注入的方式
33         String forObject = restTemplate.getForObject("http://EUREKA-PROVIDER/ceshi/1?args=" + args, String.class);
34         return forObject;
35     }
36 }
启动消费者服务 在直接访问一下服务提供者的 网络位置http://localhost:8002/ceshi/2?args=测试,我们已经看见 可以访问了,证明此微服务可用。
注意:我们常用第三种调用方式。第一种是直接调用:不经过注册中心那服务列表,直接访问的servicesupport第二种:是根据服务名选择调用,如上图需要做如下注入
@Autowired
private LoadBalancerClient loadBalancerClient;
如上图代码中第二种调用方法的代码所示。用服务名去注册中心获取服务列表,当前客户端底层会做随机算法的选取获得服务并访问。第三种需要一个@Bean的注解自动注入并直接调用restTemplate对象调用服务。底层调用模式与第二种调用方式一样。如下:
@Configuration
public class Beans {
    //管理简单对象
    @Bean
    @LoadBalanced
    public RestTemplate getRestTemplate(){
        return new RestTemplate();
    }
}
@Bean注解告诉工厂,这个方法需要自动注入。@LoadBalanced,表示需要做负载匀衡。然后如controller中一样注入一下restTemplate,并且使用他,区别是可以直接使用服务名访问了
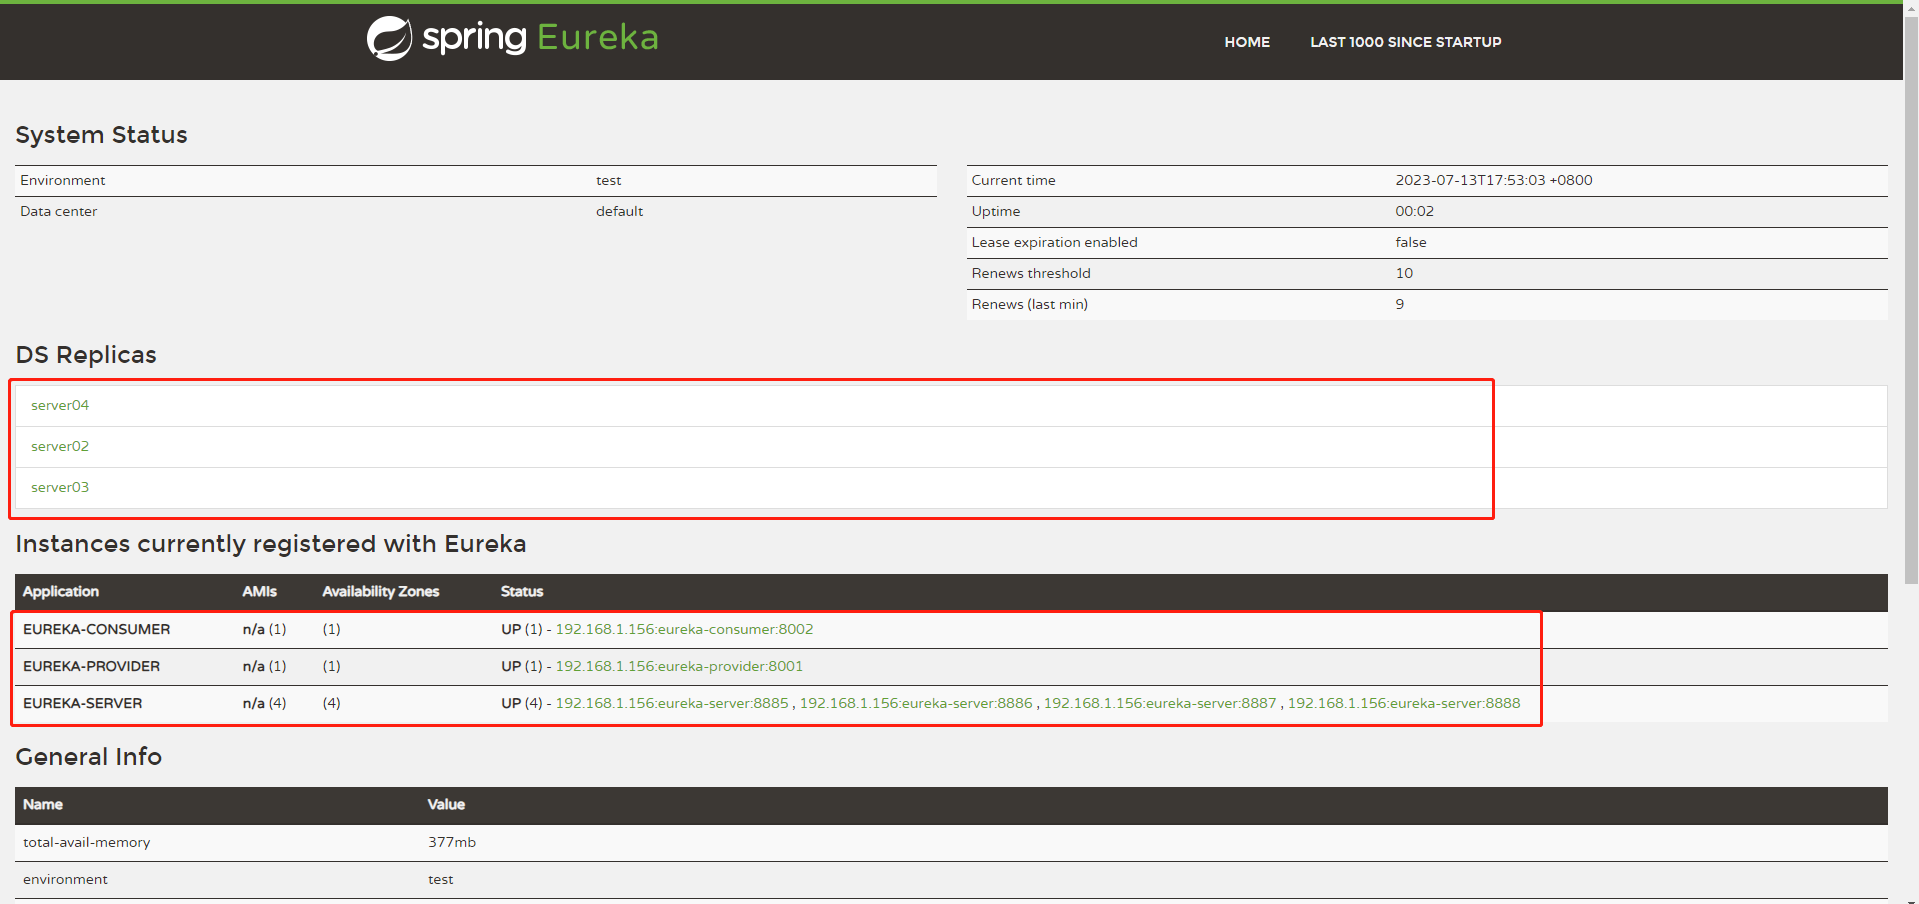
2.5 Eureka server的高可用配置
为服务消费方的端口 访问方法解析:
- 访问服务消费方@RequestMapping指定的路径及消费方的端口来访问消费方的controller
- controller根据服务名去server方获取获取服务列表,获取服务列表后根据随机的模式负载匀衡后去选择服务地址去访问servicesupport:如下图
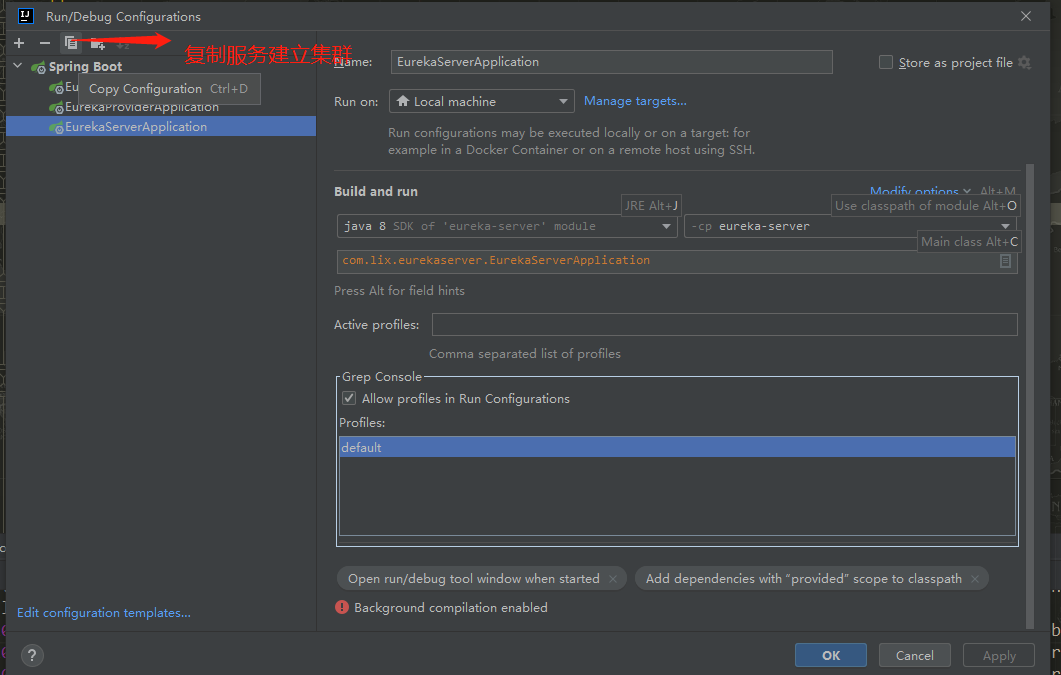
在idea中搭建Eureka集群,不需要搭建多个项目,我们可以在一个项目中创建多个application-xxx.yml配置文件,在启动项目时,指定一个application-xxx.yml文件,就启动一个服务,从而实现集群。
效果相当于我们将项目达成jar包后,在命令中指定application-xxx.yml文件一样。
我们在创建多个application.yml文件时,请注意文件的命名规范。 spring boot命名约定格式为 application-{profile}.yml,如:application-cluster1.yml、application-cluster2.yml和application-cluster3.yml。如果我们符合spring boot的命名规范后idea会给我们yml文件前带上spring的标志

具体配置application.yml的步骤如下。
hosts文件配置域名映射. window路径(C:\Windows\System32\drivers\etc\hosts) Linux(/etc/hosts)
server01、server02、server03、server04分别为我们三个eureka服务的Ip的映射域名。我们用域名代替IP地址。
127.0.0.1 server01
127.0.0.1 server02
127.0.0.1 server03
127.0.0.1 server04
为什么不用IP地址而是用域名? 是因为我把集群部署在同一个IP上,而eureka通过主机名判断是否可用,如果我们的IP地址相同它的主机名将会是相同的,eureka就认为我们的不可用。所以我们使用域名区分。 如果我们的eureka不是在不同的主机上,就可以不同配置。
主机名: 如果我们在application-xxx.yml文件中的配置了eureka.instance.hostname主机名就是它的值。
如果我们没有配置我们可以在eureka控制台Instances currently registered with Eureka的Status中看到,如: DESKTOP-6JLT72M.mshome.net 这个值就是主机名
增加yml文件
 1 server:
 2   port: 8888
 3 spring:
 4   application:
 5     name: eureka-server
 6   #profiles: server01
 7 eureka:
 8   instance:
 9     hostname: server01
10     lease-expiration-duration-in-seconds: 90 # Eureka Server默认清除client的时间
11     lease-renewal-interval-in-seconds: 30 # 默认心跳时间30s
12       # Eureka Client 访问配置
13   client:
14     fetch-registry: true
15     register-with-eureka: true
16     service-url:
17       defaultZone: http://server02:8887/eureka,http://server03:8886/eureka,http://server04:8885/eureka

我们在新创建的启动项中,修改以下配置。
Name: 因为我们的集群配置除了端口号以外其他的大体一致,所以在修改Name时,根据配置文件中的端口号在这里加以注明,以便我们项目启动的方便查看。
Main class: 主类,就是我们注释有@SpringBootApplication的main方法的类。
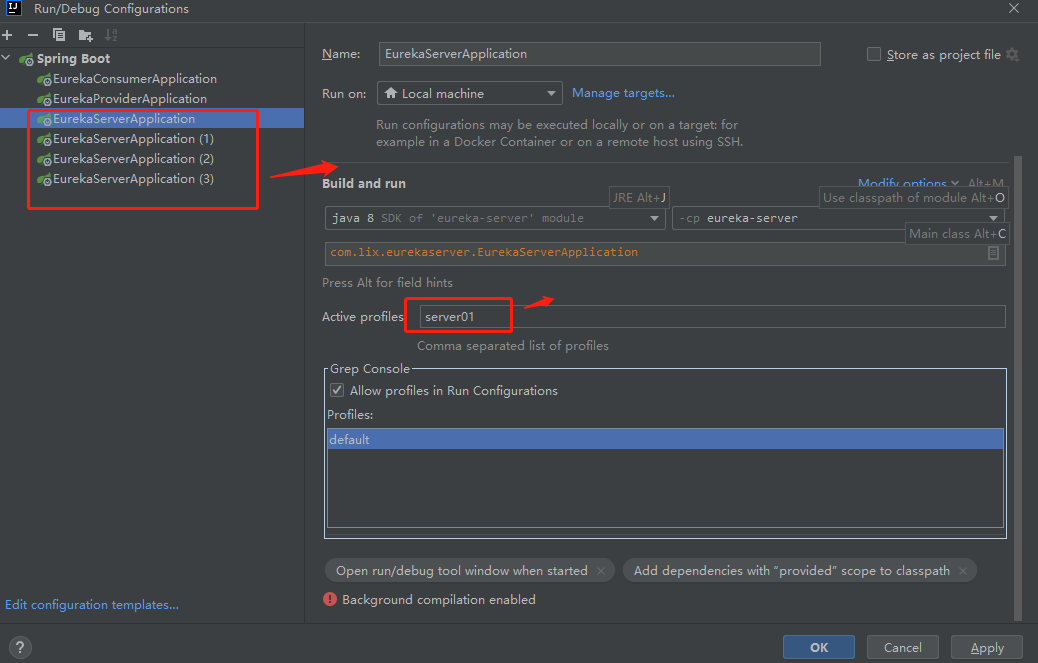
Program arguments: 是我们启动时,应该加载的application-xxx.yml的配置文件。
–spring.profiles.active=xxx。如果我们在这里符合application-{profile}.yml这种的规范,那么我们在这里面可以省略application-的前缀和.yml的后缀,只需写profile即可。 如:我们的配置文件为application-cluster1.yml那么我们就可以在这里=后面只写server01,(server01)
Use classpath of nodule: 这个为我们当前项目模板,一般工作空间中就一个项目时,默认即可。
启动集群服务