Django基础知识点二
Django基础知识点二
【一】分页器
【1】关键参数
- current_page :当前所在页数
- start_data : 起始数据
- end_data :结束数据
- per_count :每一页展示的数据
- all_count :所有数据数量
- page_count :总页数 :divmod(all_count,per_count)
| current_page (per_count =5 ) |
start_data | end_data |
|---|---|---|
| 1 | 0 | 5 |
| 2 | 5 | 10 |
| 3 | 10 | 15 |
- 根据上述,我们可以得到规律
start_data = current_page * per_count
end_data = current_page * per_count
【2】代码实现
# 当前页通过get请求的page参数/【?page=】获得,并可以给定默认值
current_page = request.GET.get('page', 1)
# 限制条件:
'''如果page小于1,意味着出现了负数,这是不可能的,所以当出现复数时,设置当前页为1'''
if current_page < 1:
    current_page = 1
 '''如果当前页大于总页数,说明定向到了不存在的页数,所以设置当前页为总页数'''
if current_page > all_pager:
   current_page = all_pager
- 可以为页码添加动态调整,总共展示指定的页码
- 如:总共展示5个页码跳转
- current =1 :1 2 3 4 5
- current = 2 :2 3 4 5 6
# 假设总页码7页  展示页码5个
'''当总页码小于展示页码时,就是从1开始到结束'''
if all_pager <= pager_count:
    pager_start = 1
    pager_end = all_pager + 1
else:
    # 7 > 5
    '''当总页码大于展示页码时,意味着需要动态展示页数'''
    # 如果当前页 小于 展示页数除2 意味着页码从1开始
    if current_page <= pager_count /2 :
        pager_start = 1
        pager_end = pager_count + 1

    # 如果当前页 大于 展示页数除2 意味着页码不从1开始 其实是为了美观
    # 如 :current=4 : 2 3 4 5 6
    else:
        # 如果 【当前页 + 展示页数除2】 比 总页数大 那么结束页码就是总页码
        if (current_page + pager_count_half) > all_pager:
            # 【注】此处 + 1 是一因为索引取头不取尾
            pager_end = all_pager + 1
            # 起始页码就是 总页数 - 展示页码 + 1
            # 如 current =  [7 - 5 + 1] : 3 4 5 6 7
            pager_start = all_pager - pager_count + 1
        else:
            pager_start = current_page - pager_count_half
            pager_end = current_page + pager_count_half + 1
- 另外需要注意,在前端是没有for .. range语法的
- 所以需要在后端将html标签作为字符串传给前端
tmp_list = []
for i in range(start,end):
    tmp = '<li><a href="?page=%s">%s</a></li>' % (i, i,)
    tmp_list.append(tmp)
html = ''.join(tmp_list)
<!-- 前端通过模板语法渲染变量即可 -->
<!-- 记得加上过滤器safe,不然就是普通的字符串了 -->
{{ html|safe }}
【3】完善代码封装
# 分页器代码
class Pagination(object):
    def __init__(self, current_page, all_count, per_page_num=5, pager_count=5):
        """
        封装分页相关数据
        :param current_page: 当前页
        :param all_count:    数据库中的数据总条数
        :param per_page_num: 每页显示的数据条数
        :param pager_count:  最多显示的页码个数
        """
        try:
            current_page = int(current_page)
        except Exception as e:
            current_page = 1

        if current_page < 1:
            current_page = 1

        self.all_count = all_count
        self.per_page_num = per_page_num

        # 总页码
        all_pager, tmp = divmod(all_count, per_page_num)
        if tmp:
            all_pager += 1
        self.all_pager = all_pager
        if current_page > all_pager:
            current_page = all_pager
        self.current_page = current_page
        self.pager_count = pager_count
        self.pager_count_half = int((pager_count - 1) / 2)

    @property
    def start(self):
        return (self.current_page - 1) * self.per_page_num

    @property
    def end(self):
        return self.current_page * self.per_page_num

    def page_html(self):
        # 如果总页码 < 11个:
        if self.all_pager <= self.pager_count:
            pager_start = 1
            pager_end = self.all_pager + 1
        # 总页码  > 11
        else:
            # 当前页如果<=页面上最多显示11/2个页码
            if self.current_page <= self.pager_count_half:
                pager_start = 1
                pager_end = self.pager_count + 1

            # 当前页大于5
            else:
                # 页码翻到最后
                if (self.current_page + self.pager_count_half) > self.all_pager:
                    pager_end = self.all_pager + 1
                    pager_start = self.all_pager - self.pager_count + 1
                else:
                    pager_start = self.current_page - self.pager_count_half
                    pager_end = self.current_page + self.pager_count_half + 1

        page_html_list = []
        # 添加前面的nav和ul标签
        page_html_list.append('''
                    <nav aria-label='Page navigation>'
                    <ul class='pagination'>
                ''')
        first_page = '<li><a href="?page=%s">首页</a></li>' % (1)
        page_html_list.append(first_page)

        if self.current_page <= 1:
            prev_page = '<li class="disabled"><a href="#">上一页</a></li>'
        else:
            prev_page = '<li><a href="?page=%s">上一页</a></li>' % (self.current_page - 1,)

        page_html_list.append(prev_page)

        for i in range(pager_start, pager_end):
            if i == self.current_page:
                temp = '<li class="active"><a href="?page=%s">%s</a></li>' % (i, i,)
            else:
                temp = '<li><a href="?page=%s">%s</a></li>' % (i, i,)
            page_html_list.append(temp)

        if self.current_page >= self.all_pager:
            next_page = '<li class="disabled"><a href="#">下一页</a></li>'
        else:
            next_page = '<li><a href="?page=%s">下一页</a></li>' % (self.current_page + 1,)
        page_html_list.append(next_page)

        last_page = '<li><a href="?page=%s">尾页</a></li>' % (self.all_pager,)
        page_html_list.append(last_page)
        # 尾部添加标签
        page_html_list.append('''
                                           </nav>
                                           </ul>
                                       ''')
        return ''.join(page_html_list)
# 视图函数中调用

def check_info(request):
    # 获取当前页数
    current_page = request.GET.get('page', 1)
    # 获取所有数据
    publish_obj_all = Publish.objects.all()
    # 获取总页数
    all_count = publish_obj_all.count()
    # 生成分页器对象
    page_obj = Pagination(current_page=current_page, all_count=all_count, per_page_num=5, pager_count=5)
    # 通过分页器对象获取start属性和end属性
    # 并对总数据进行切片
    publish_obj = publish_obj_all[page_obj.start:page_obj.end]
    # 获得分页器前端标签对象
    page_html = page_obj.page_html()
    return render(request, 'author_publish.html', locals())
【二】forms组件
- 以下仅是概述,详细请看另外一篇文章
【1】创建基本语法
from django import forms
class Forms组件名(forms):
    字段 = forms.字段类型(label='显示在input框前的提示,不填默认是字段名',
        initial = '默认值',
        [字段约束条件],
        error_message={
            '约束条件':'希望提示的报错信息'
        },
        widget = '前端的格式,可以设置input框类型以及属性'
        )
class RegisterForm(forms.Form):
    username = forms.CharField(label='用户名', min_length=5, max_length=12,
                               widget=forms.TextInput(attrs={
                                   "class": "form-control",
                                   "placeholder": "请输入用户名",
                               }),
                               error_messages={
                                   'min_length': '用户名最少5位',
                                   'max_length': '用户名最多12位'
                               })
    password = forms.CharField(label='密码', min_length=5, max_length=24,
                               initial='a123456',
                               widget=forms.PasswordInput(attrs={
                                   "class": "form-control",
                                   "placeholder": "请输入密码",
                               }),
                               error_messages={
                                   'required': '密码不能为空',
                                   'min_length': '密码最少5位',
                                   'max_length': '密码最多24位'
                               })
       email = forms.EmailField(label='邮箱',
                             widget=forms.TextInput(attrs={
                                 "class": "form-control",
                                 "placeholder": "请输入邮箱",
                             }),
                             error_messages={
                                 'invalid': '邮箱格式错误'
                             })
【2】后端使用基本语法
from forms import Forms组件名

def func(request):
    form_obj = Forms组件名
    # 前端可以通过form_obj获取对应的标签对象
    if request.method == 'POST':
        # 当前端通过post请求将数据返回时,对数据进行校验
        data = requset.POST
        # 将数据交给Forms组件校验
        form_data = Forms组件名(data)
        # 在获取校验完毕的数据前,必须执行【.is_vaild()】方法,否则不会真正的校验
        isClean = form_data.is_vaild()   # 该方法返回布尔值,只有数据全对才为True

        # 在校验完毕后,可以通过【cleaned_data】和【errors】获取到校验通过的数据和错误的数据
        clean = form_data.cleaned_data
        error = form_data.errors
【3】前端使用基本用法
'''通过print【forms组件对象】可以看到是生成对应的字段标签'''
print LoginForm()
'''
<tr><th>
<label for="id_username">用户名:</label>
</th><td><input type="text" name="username" class="form-control" placeholder="请输入用户名" maxlength="12" minlength="5" required id="id_username">
</td></tr>

<tr><th><label for="id_password">密码:</label></th><td><input type="password" name="password" class="form-control" placeholder="请输入密码" maxlength="24" minlength="5" required id="id_password"></td></tr>

<tr><th><label for="id_confirm_pwd">确认密码:</label></th><td><input type="password" name="confirm_pwd" class="form-control" placeholder="请再次输入密码" maxlength="24" minlength="5" required id="id_confirm_pwd"></td></tr>

<tr><th><label for="id_email">邮箱:</label></th><td><input type="text" name="email" class="form-control" placeholder="请输入邮箱" required id="id_email"></td></tr>
''''''
-
使用 Django 模板语言(Template Language)在前端模板中访问 forms 组件的一些属性和方法。
-
以下是一些常用的 Django 模板语言中访问 forms 组件的方法:
{{ form.field.label }}: 获取表单字段的标签(label)文本。{{ form.field }}: 在表单中渲染指定字段的 HTML 输入控件。{% for error in form.field.errors %}: 遍历指定字段的错误信息。{% if form.field.is_hidden %}: 检查指定字段是否为隐藏字段。{% if form.field.field.required %}: 检查指定字段是否为必填字段。
- 请注意,这些方法中的
field部分应该替换为实际的表单字段名称,例如name、email等。
<form action="" class="form-horizontal" id="register_form">
    <!-- csrf防护 -->
    {% csrf_token %}
    <!-- 遍历forms对象 -->
    {% for form in register_form %}
    <div class="form-group">
        <!-- 获取到forms对象中的label标签 -->
        <div class="col-sm-3 text-right">{{ form.label }}</div>
        <!-- 获取到forms对象中的input标签 -->
        <div class="col-sm-8">{{ form }}
            <!-- 为渲染错误信息占位 -->
            <span id="{{ form.auto_id }}" class="pull-right" style="color: red"></span>
        </div>
    </div>
    {% endfor %}
</form>
- 其实可以直接使用
{{ forms }}渲染所有的input标签和label标签,因为通过print可以看到是生成了一个完整的label+input,但就做不到定制化了
【4】钩子函数(hook)
- 【注】钩子函数相当于把数据从“管道”中取出,切记注意在处理完毕后,将数据返回
- 局部钩子与全局钩子的区别就在于函数名,在pycharm中会有提示
- 局部钩子与全局钩子的返回对象也是不用的
- 局部钩子返回取出的那个数据即可
- 全局钩子需要返回所有的数据,哪怕只用到了其中一部分的数据
【4.1】局部钩子clean_field
class Forms(forms.Form):
	username = forms.Charfield('xxx')
    password = forms.Charfield('xxx')

    def clean_username(self):
        # 针对用户名的局部钩子
        username = self.cleaned_data.get('username')
        # 判断是否用户名已存在
        is_exists = UserInfo.objects.filter(username=username).exists()
        if is_exists:
            self.add_error(field='username', error='用户已存在,不可以重复注册')
        # 局部钩子直接返回勾出来的变量即可
        return username
【4.2】全局钩子
class Forms(forms.Form):
	username = forms.Charfield('xxx')
    password = forms.Charfield('xxx')
    confirm_pwd = forms.Charfield('xxx')


    def clean(self):
        # 针对密码的全局钩子
        pwd = self.cleaned_data.get('password')
        confirm_pwd = self.cleaned_data.get('confirm_pwd')
        if pwd != confirm_pwd:
            self.add_error(field='confirm_pwd', error='密码不一致')
        # 如果是全局钩子就需要将整个拿到的数据返回回去
        return self.cleaned_data
【三】cookies
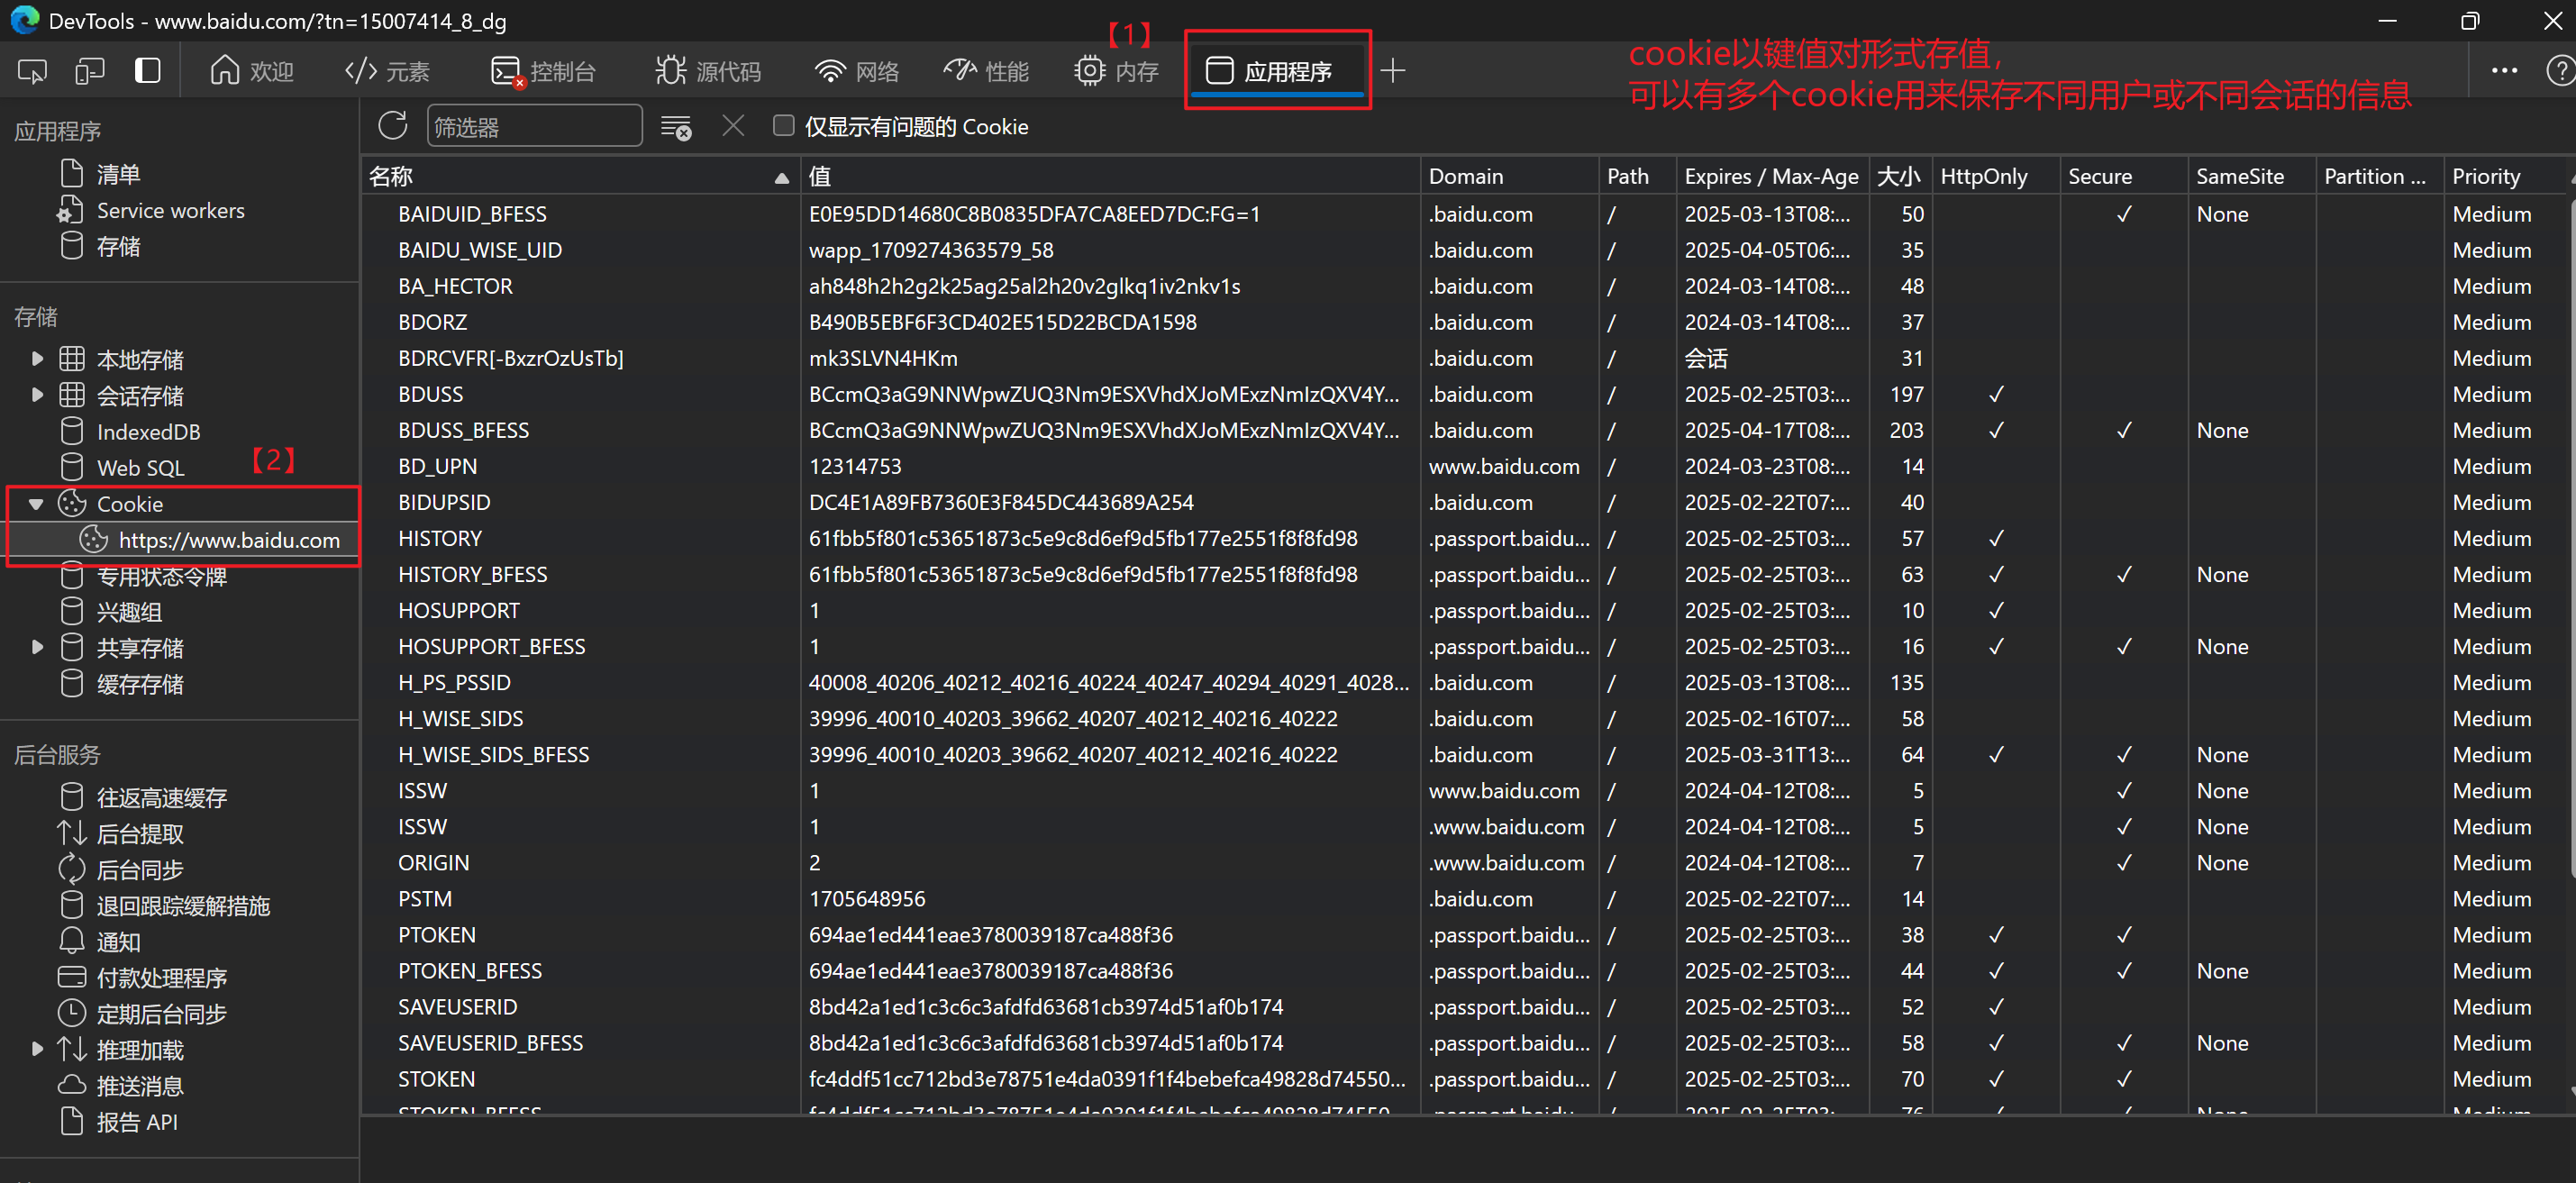
【1】cookie
- cookie是浏览器保存在计算机本地的一种文件,用于跟踪用户的会话信息、存储用户偏好设置以及其他与用户相关的信息
【2】Django操作cookie
【2.1】设置cookie
# 设置cookie
# django设置cookie依赖于响应对象
def func(request):
    obj = HttpResponse('ok')
    # max_age 最大生存时间 以秒为单位 到期将自动删除
    obj.set_cookie('key','value',max_age=5)
    return obj

- 如果不设置
max_age,则 cookie 默认会在用户关闭浏览器时过期,这种类型的 cookie 称为会话 cookie
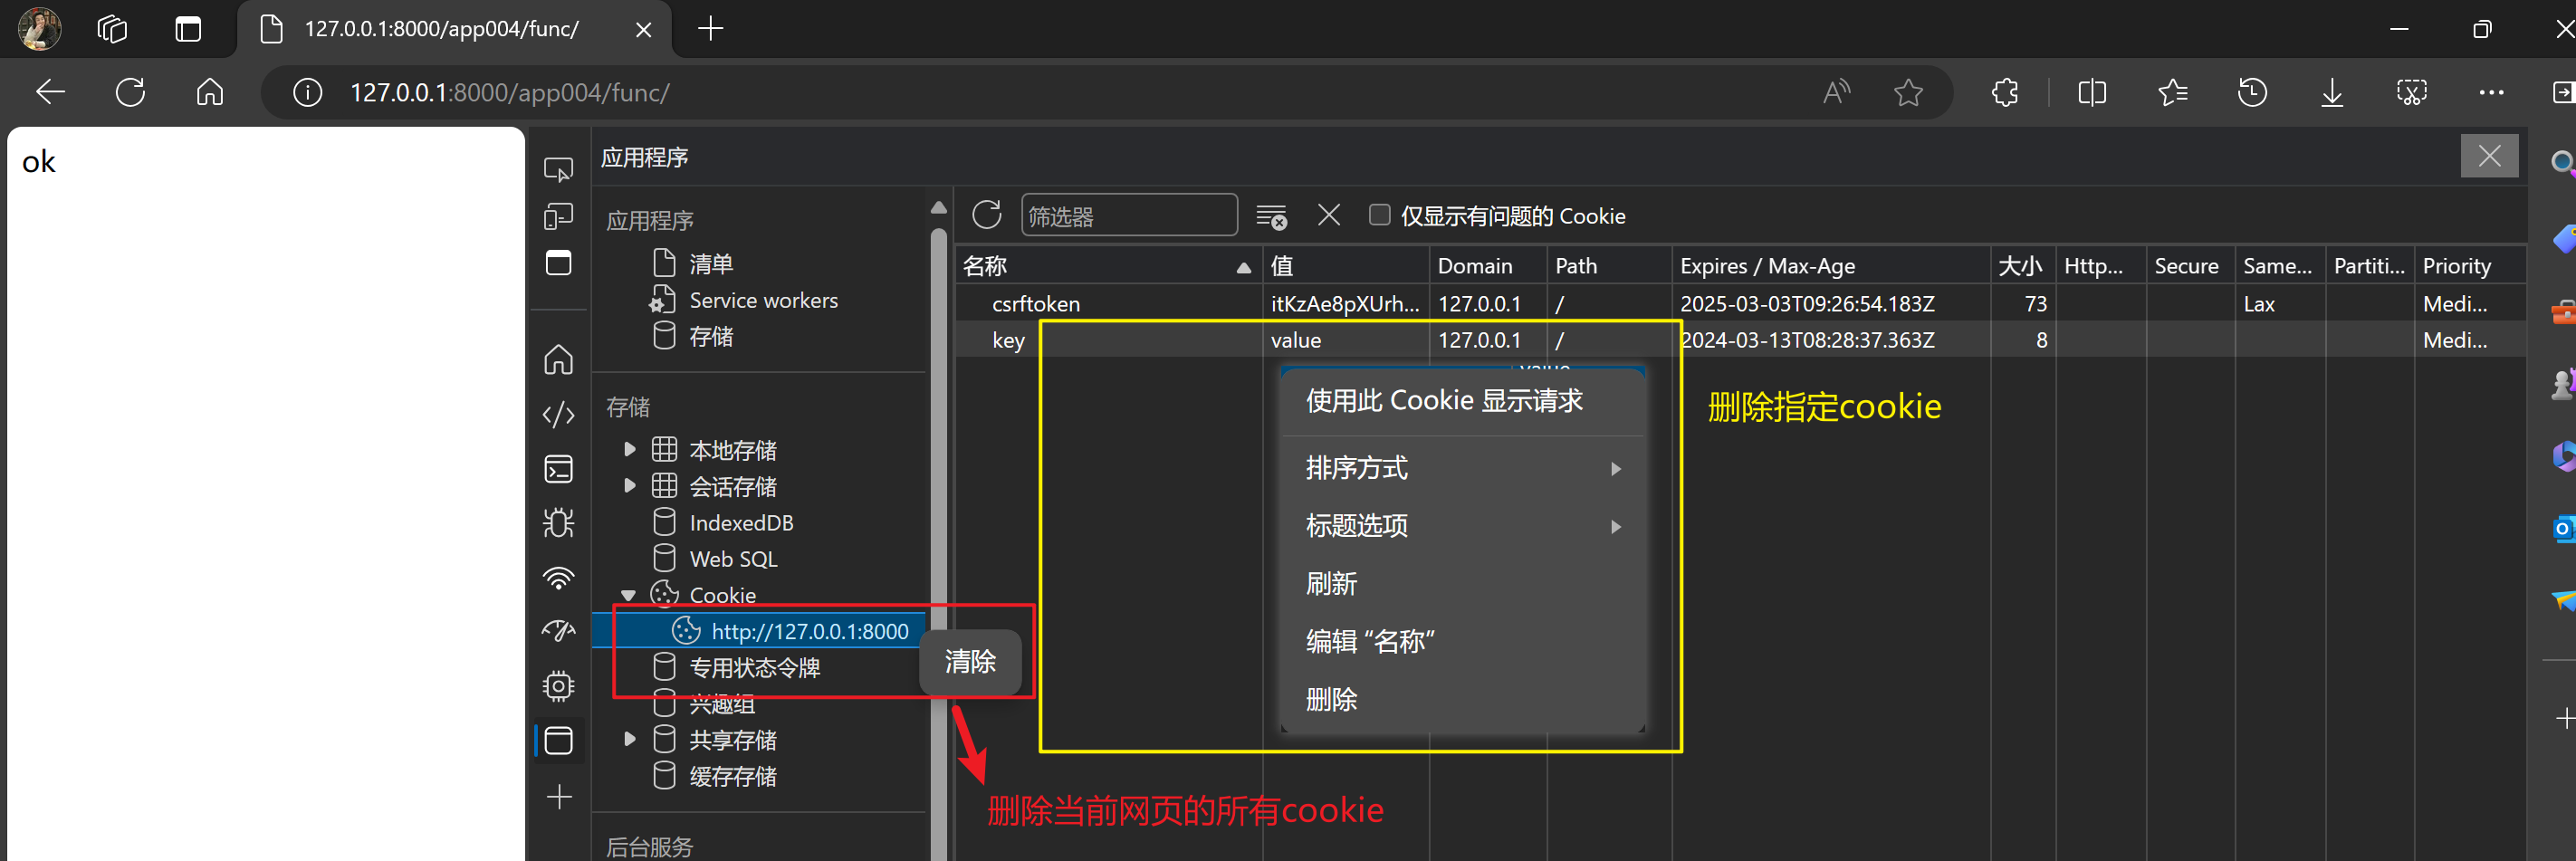
# 删除cookie
obj.delete_cookie('key')
【2.2】获取cookie
# 获取所有cookie
cookie = request.COOKIES
# 获取指定cookie
cookie = request.COOKIES.get('key')
# 如果不存在返回指定内容
cookie = request.COOKIES.get('key','error')
【四】sessions
【1】session
- 会话(session)是指在客户端和服务器之间建立的一种持续的连接。
- 在 Web 开发中,会话常用于跟踪用户的状态和存储用户特定的信息,例如登录状态、购物车内容等。
- 在 Django 中,会话由服务器端维护,并通过在客户端浏览器中存储会话 ID 来实现跟踪用户状态的目的。
【2】Django操作session
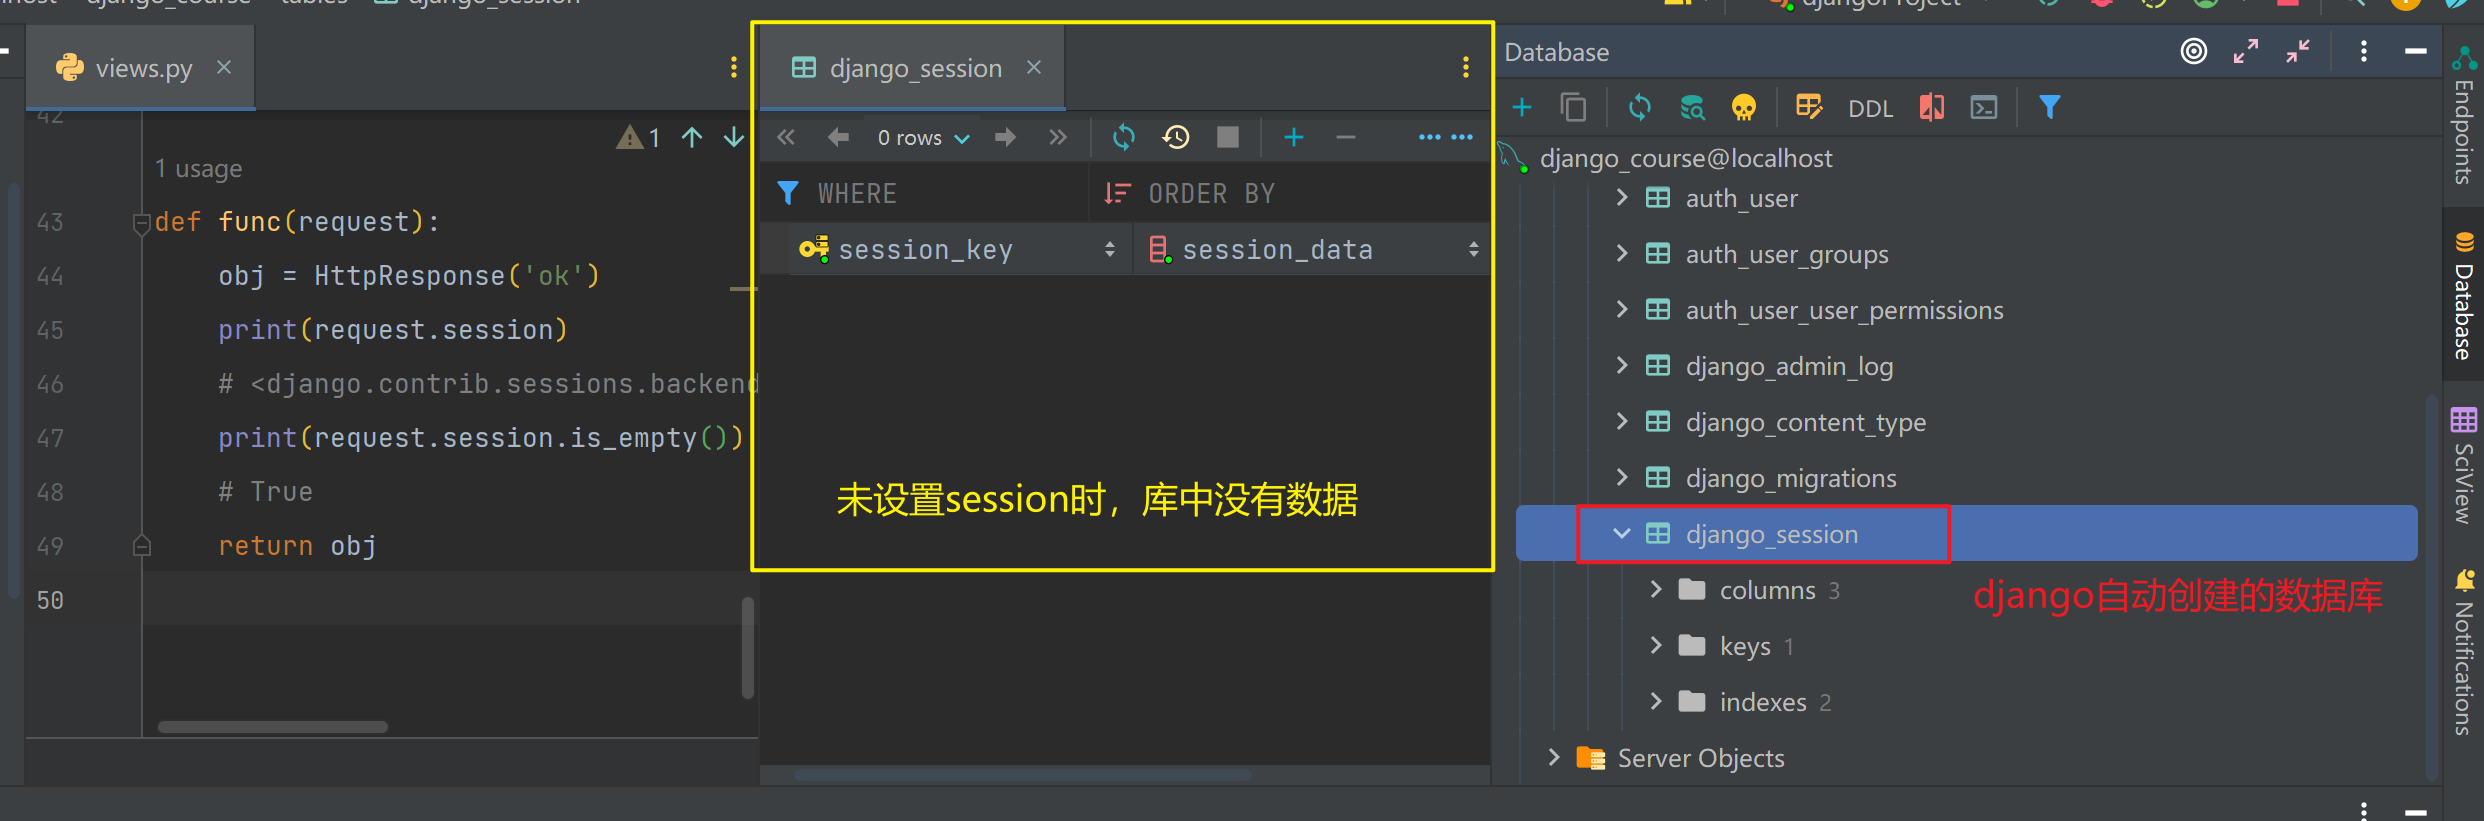
-
【注】session是存储在服务端的,在DJango中也就是存储在数据库中
-
所以查看session需要先进行数据迁移,让django生成默认的一些必要的库
【2.1】设置session
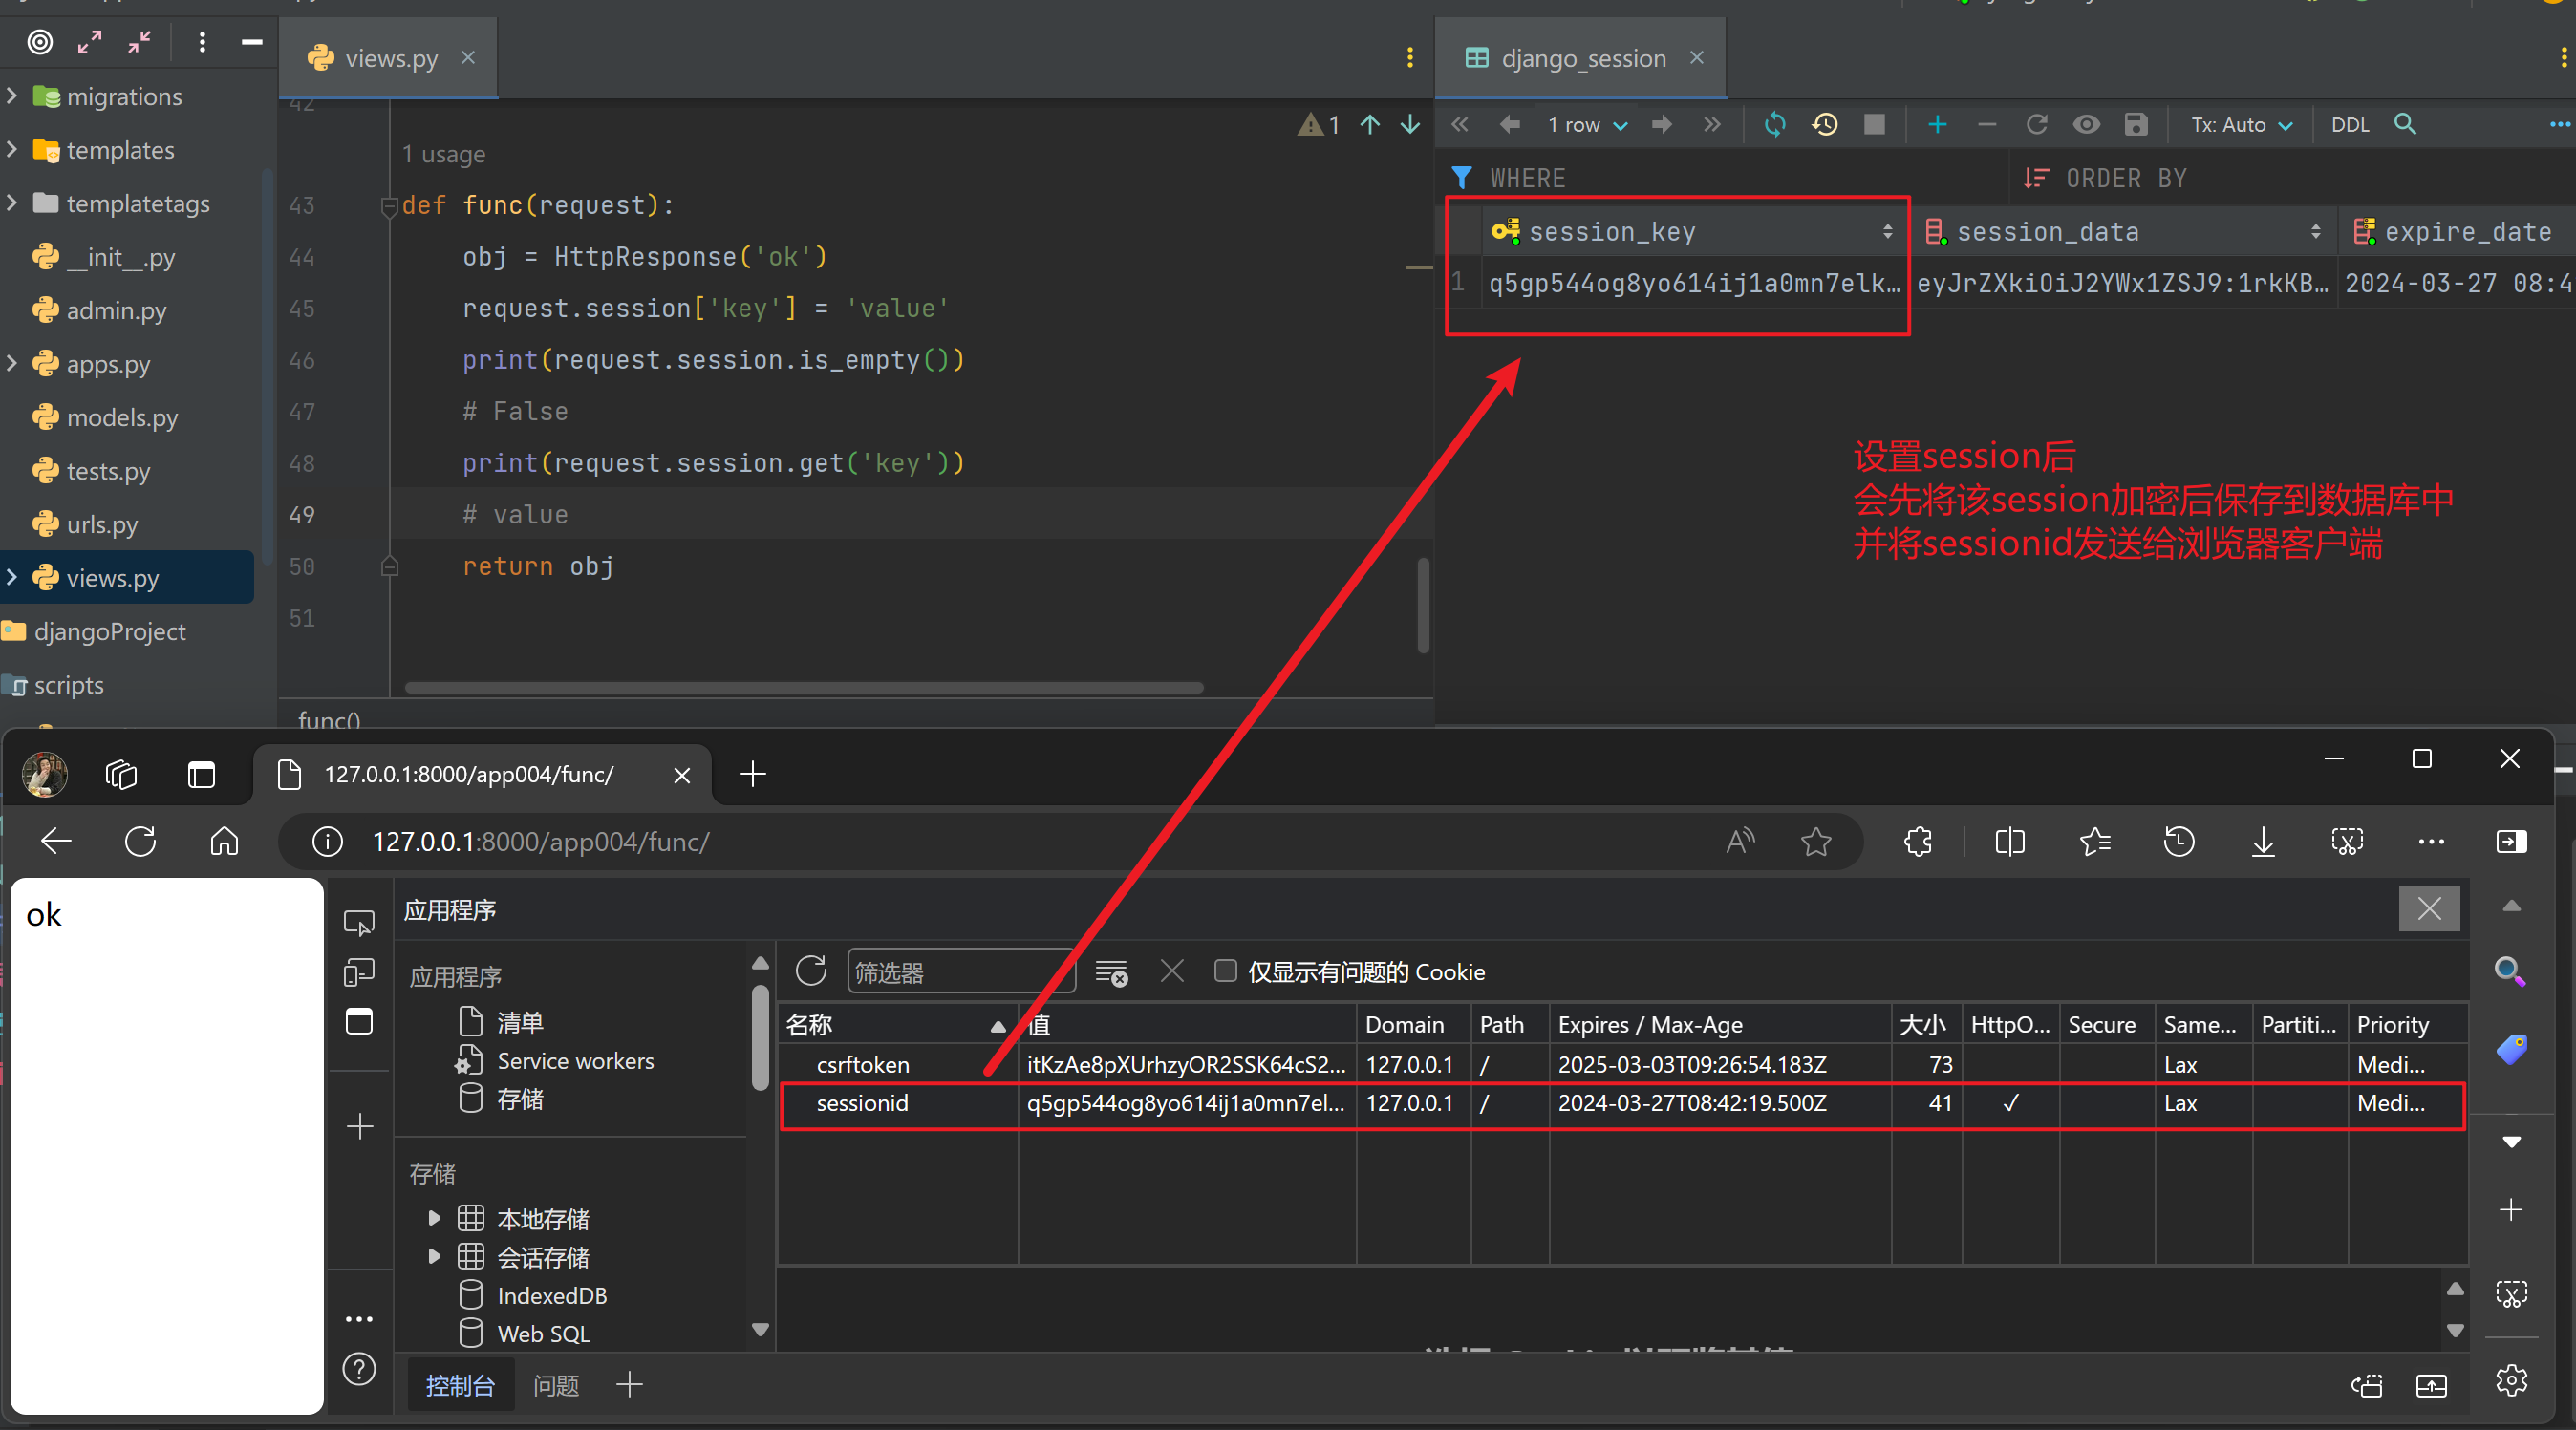
'''
设置session后
会先将该session加密后保存到数据库中
并将sessionid发送给浏览器客户端
'''
request.session['key'] = 'value'

# 设置过期时间
request.session.set_expiry(value)

# 如果value是个整数,session会在些秒数后失效。
# 如果value是个datatime或timedelta,session就会在这个时间后失效。
# 如果value是0,用户关闭浏览器session就会失效。
# 如果value是None,session会依赖全局session失效策略。  # 默认失效时间是14天
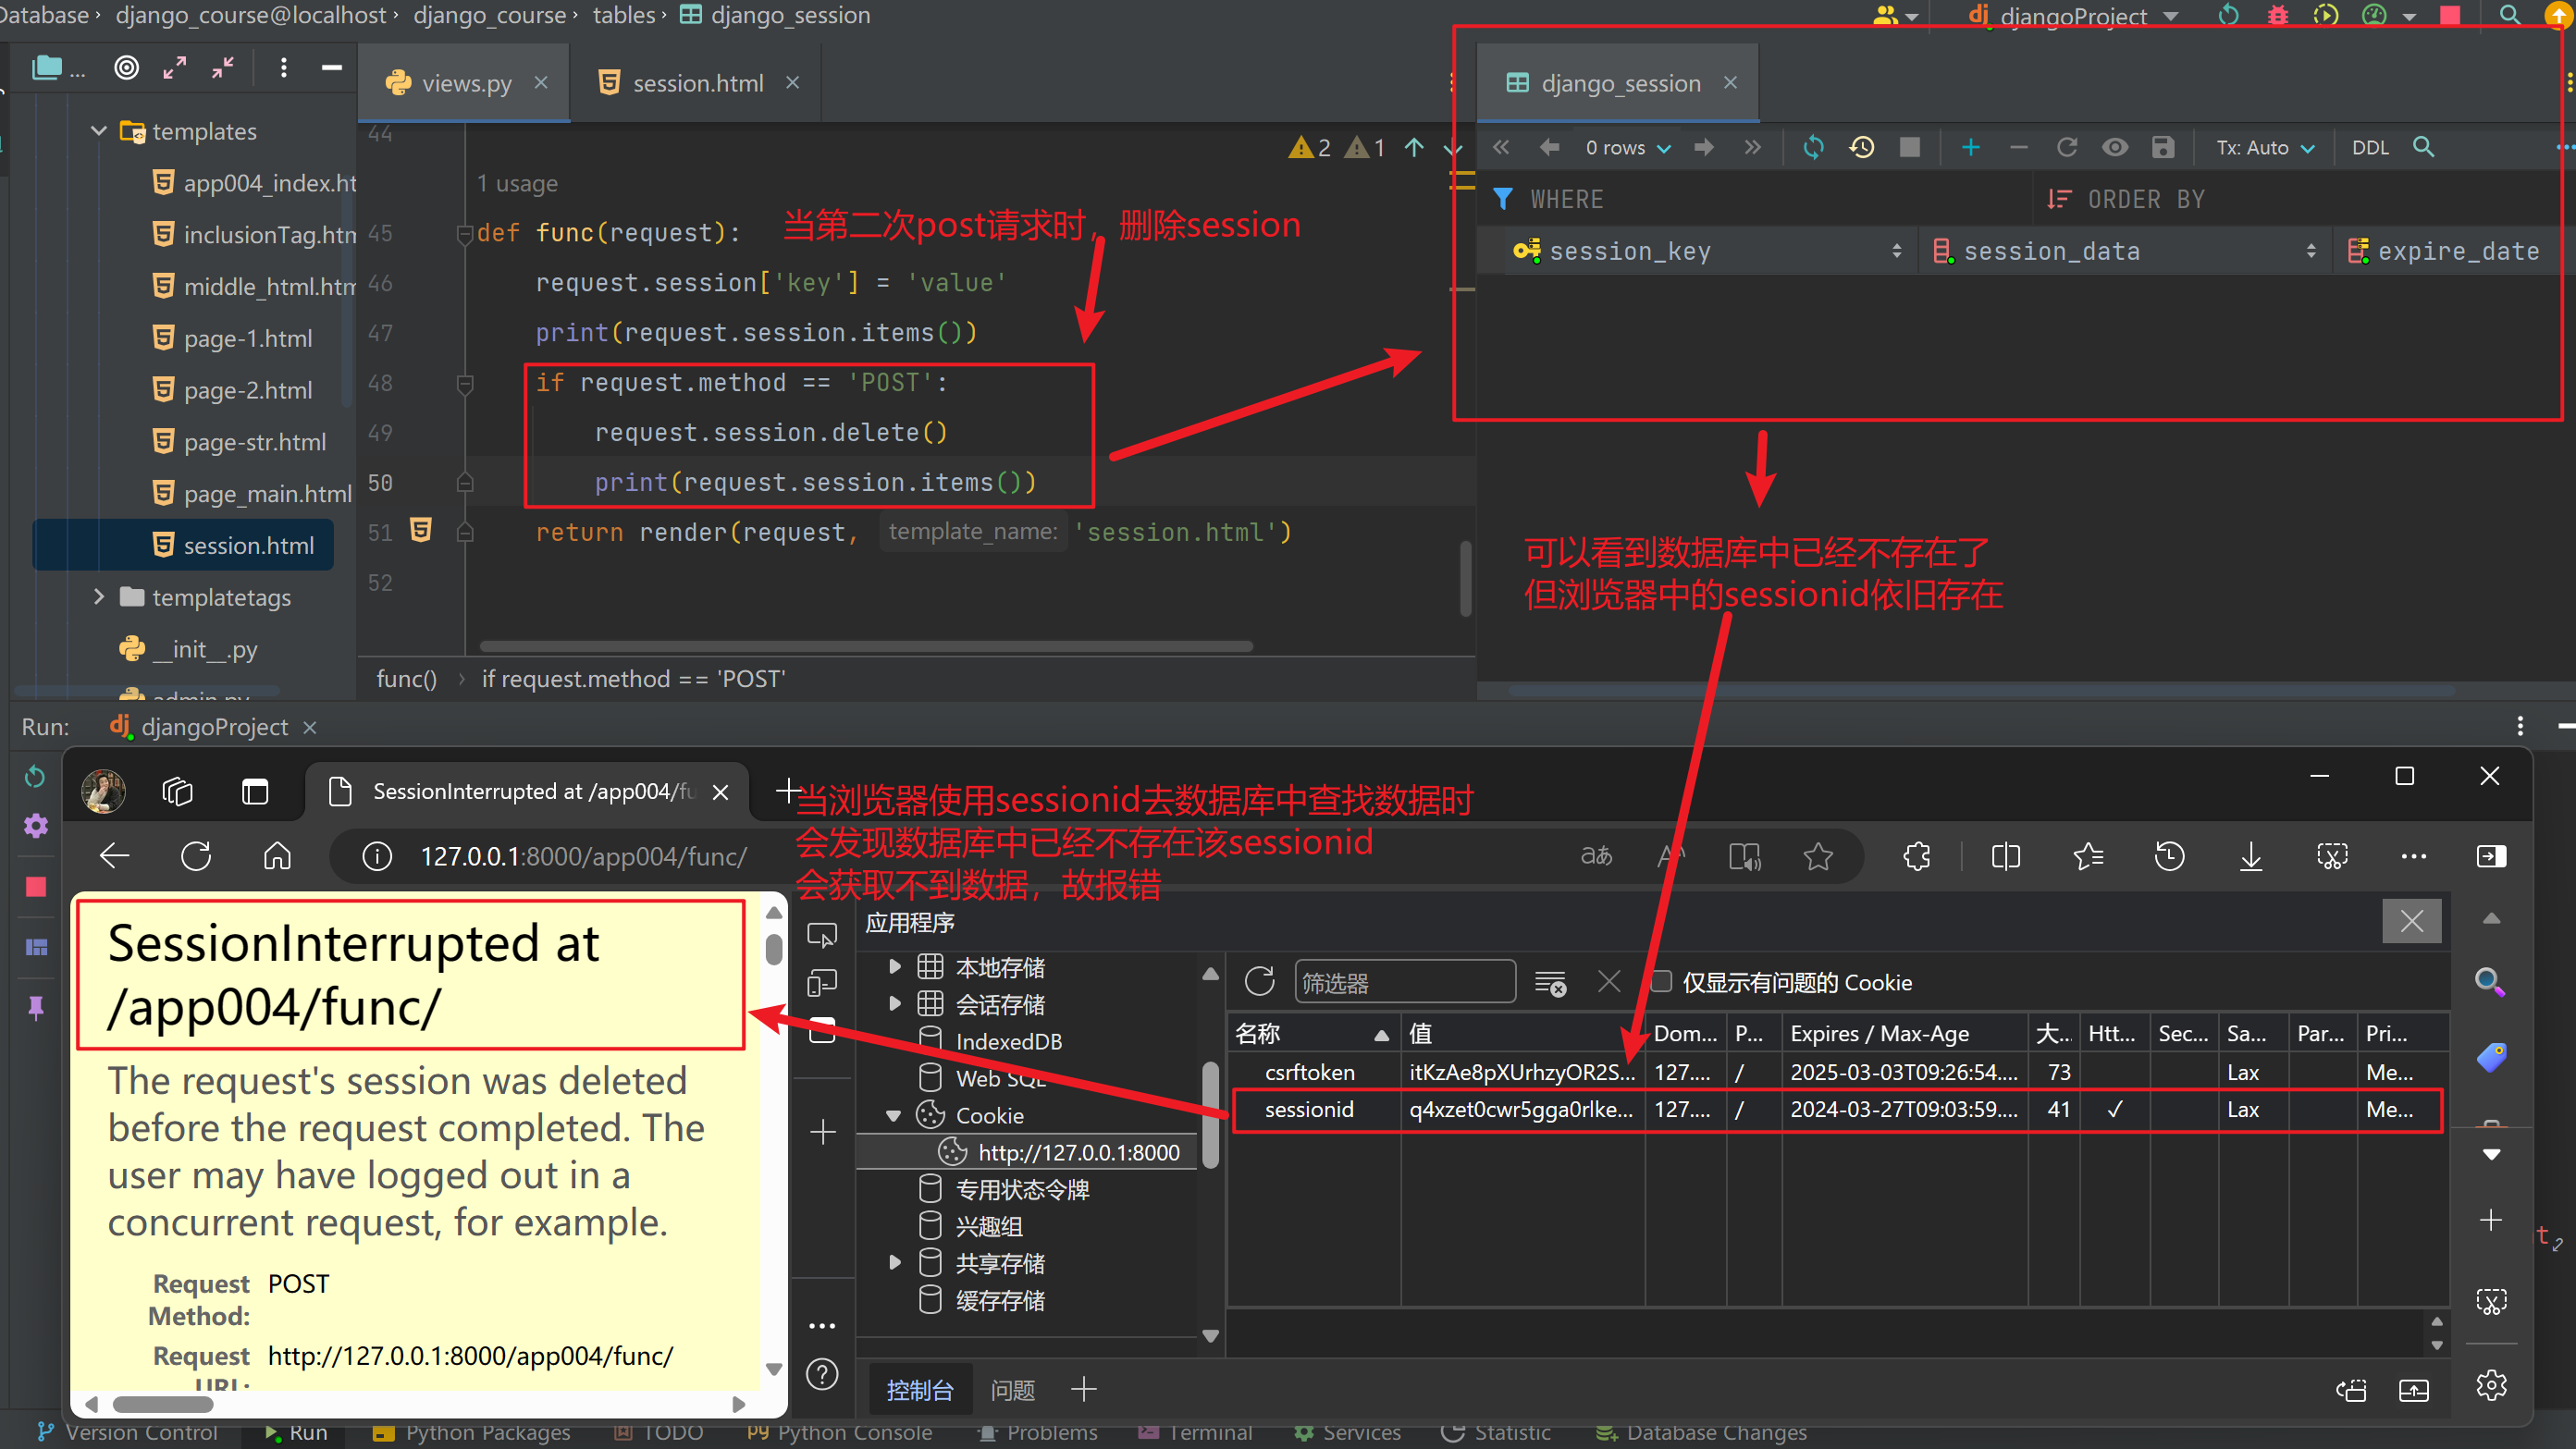
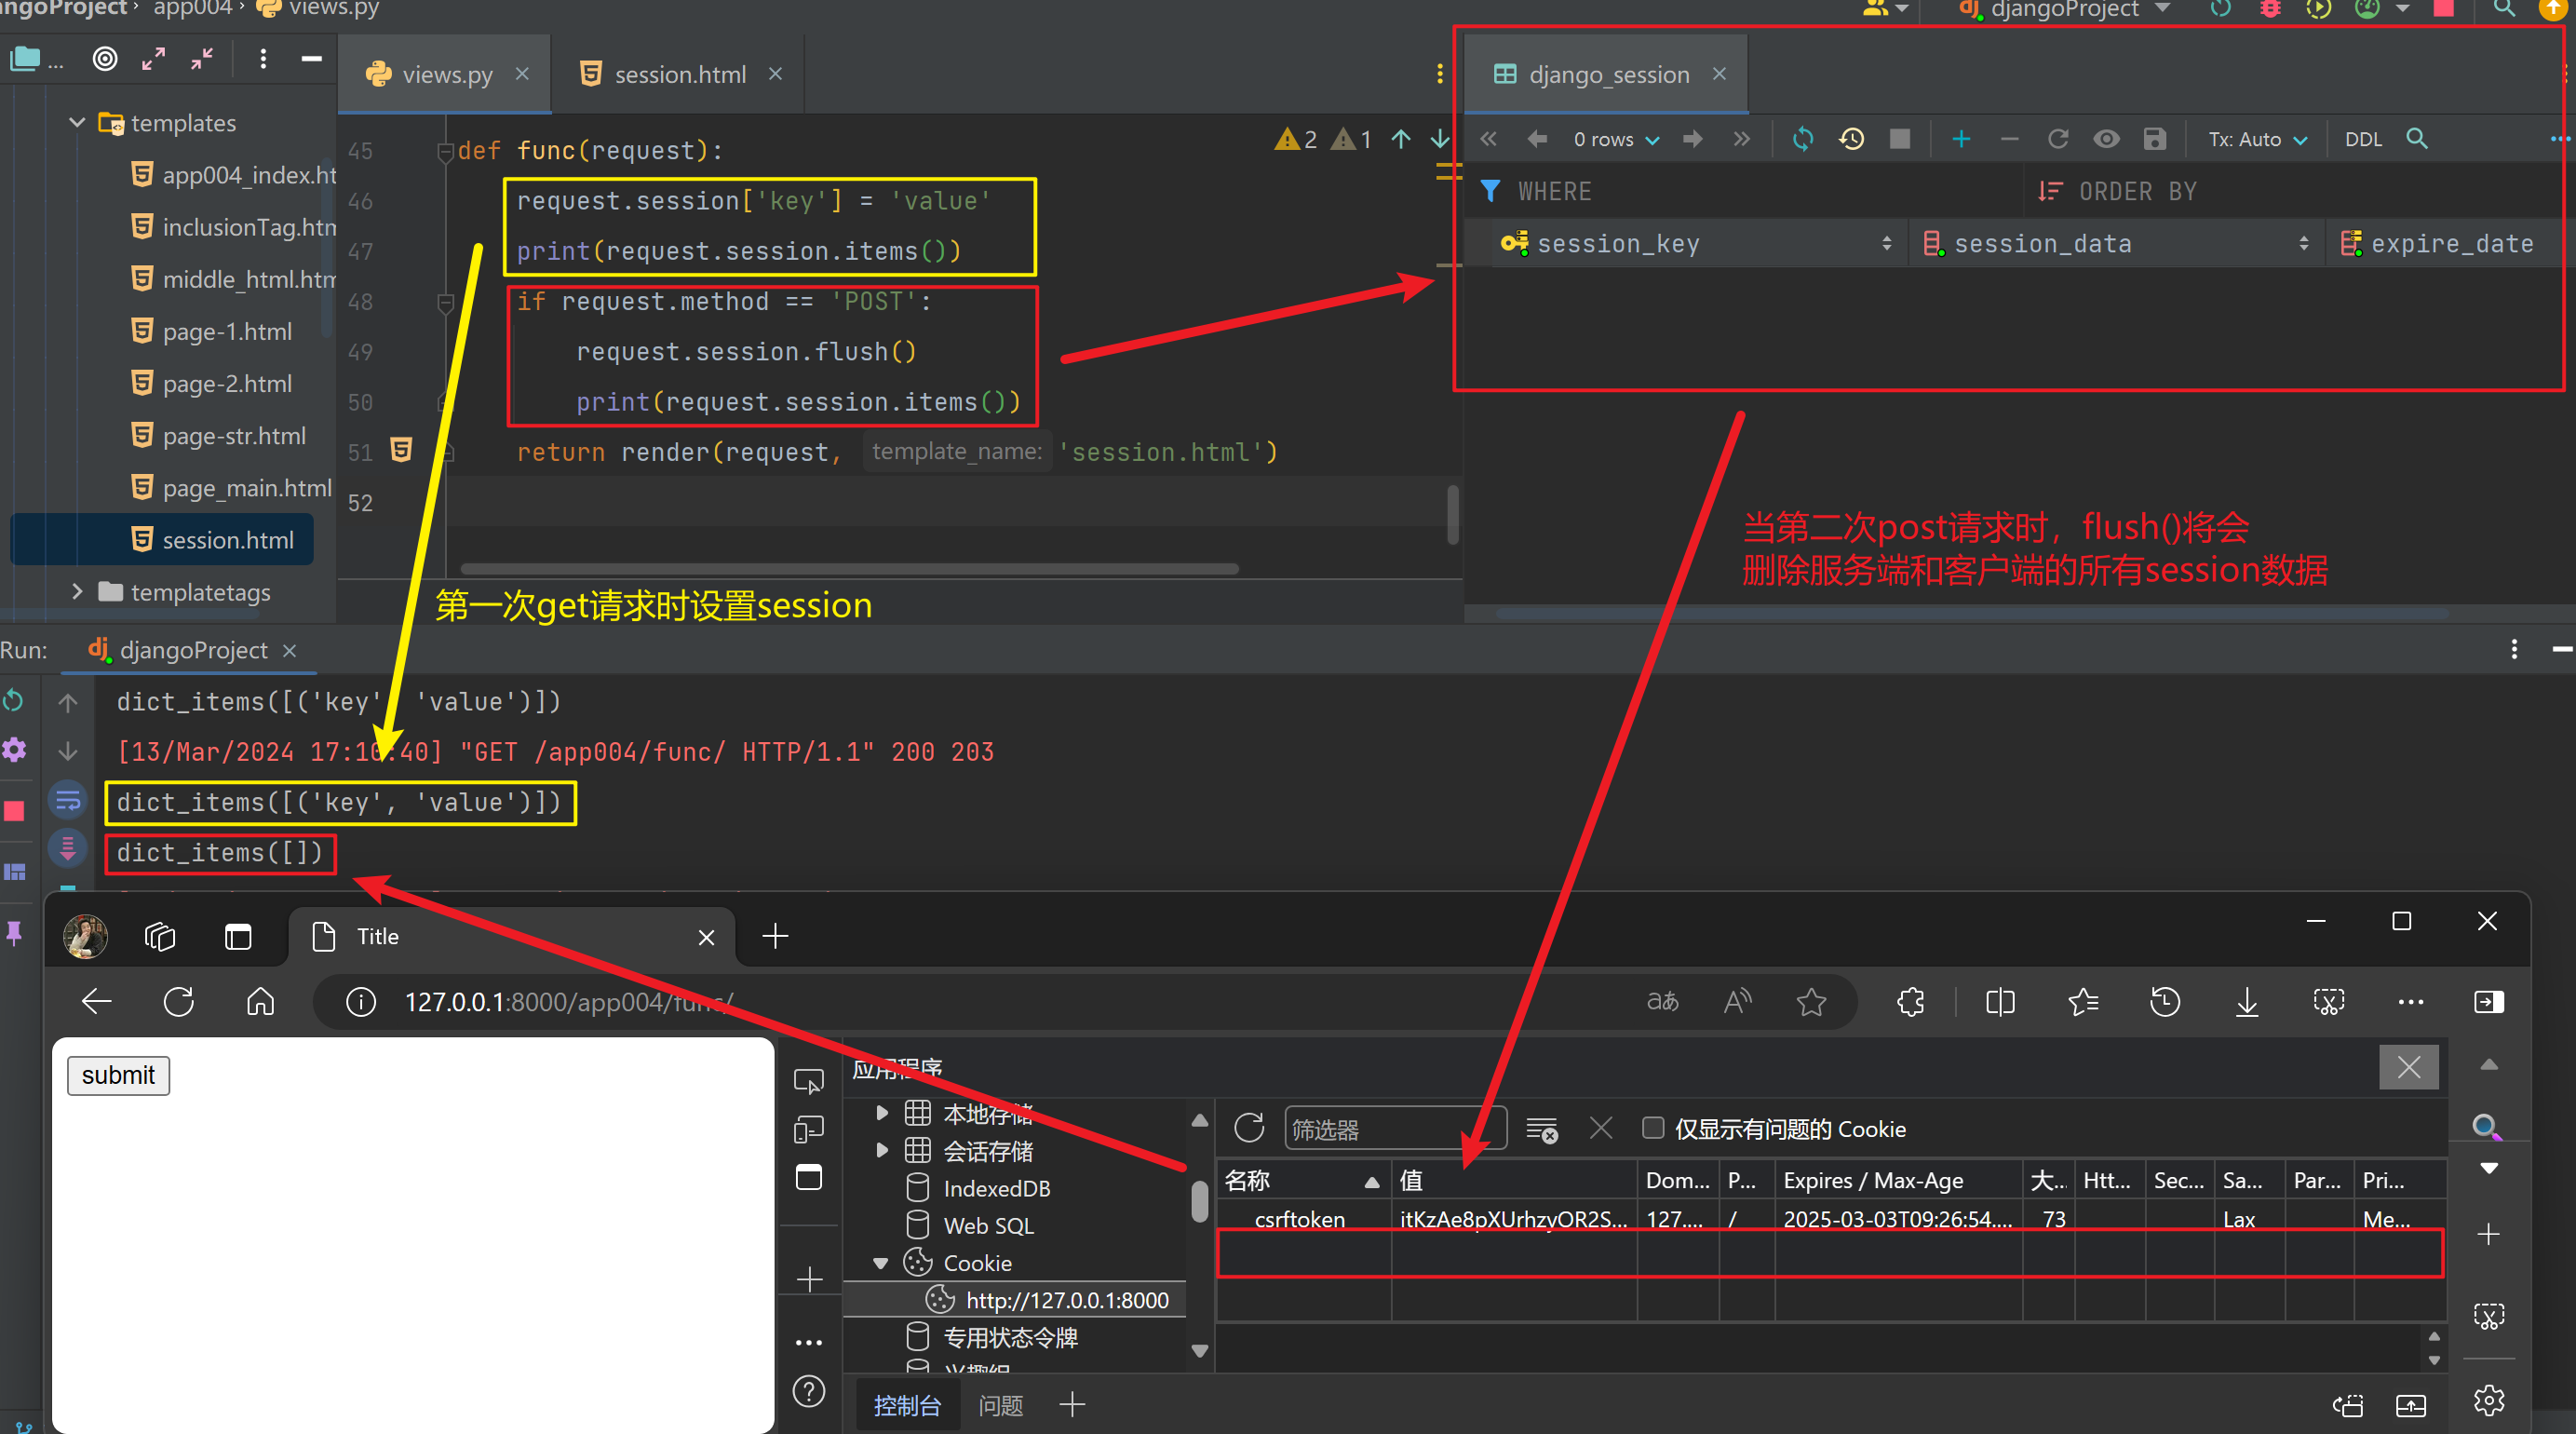
【2.2】删除session
# 删除session会话有两种类型

# 【 delete() 】仅删除服务端,客户端的sessionid将会被删除 但客户端将保留sessionid
request.session.delete()
# 【 flush() 】 将客户端和服务端的sessionid全部删除
delete()
flush()
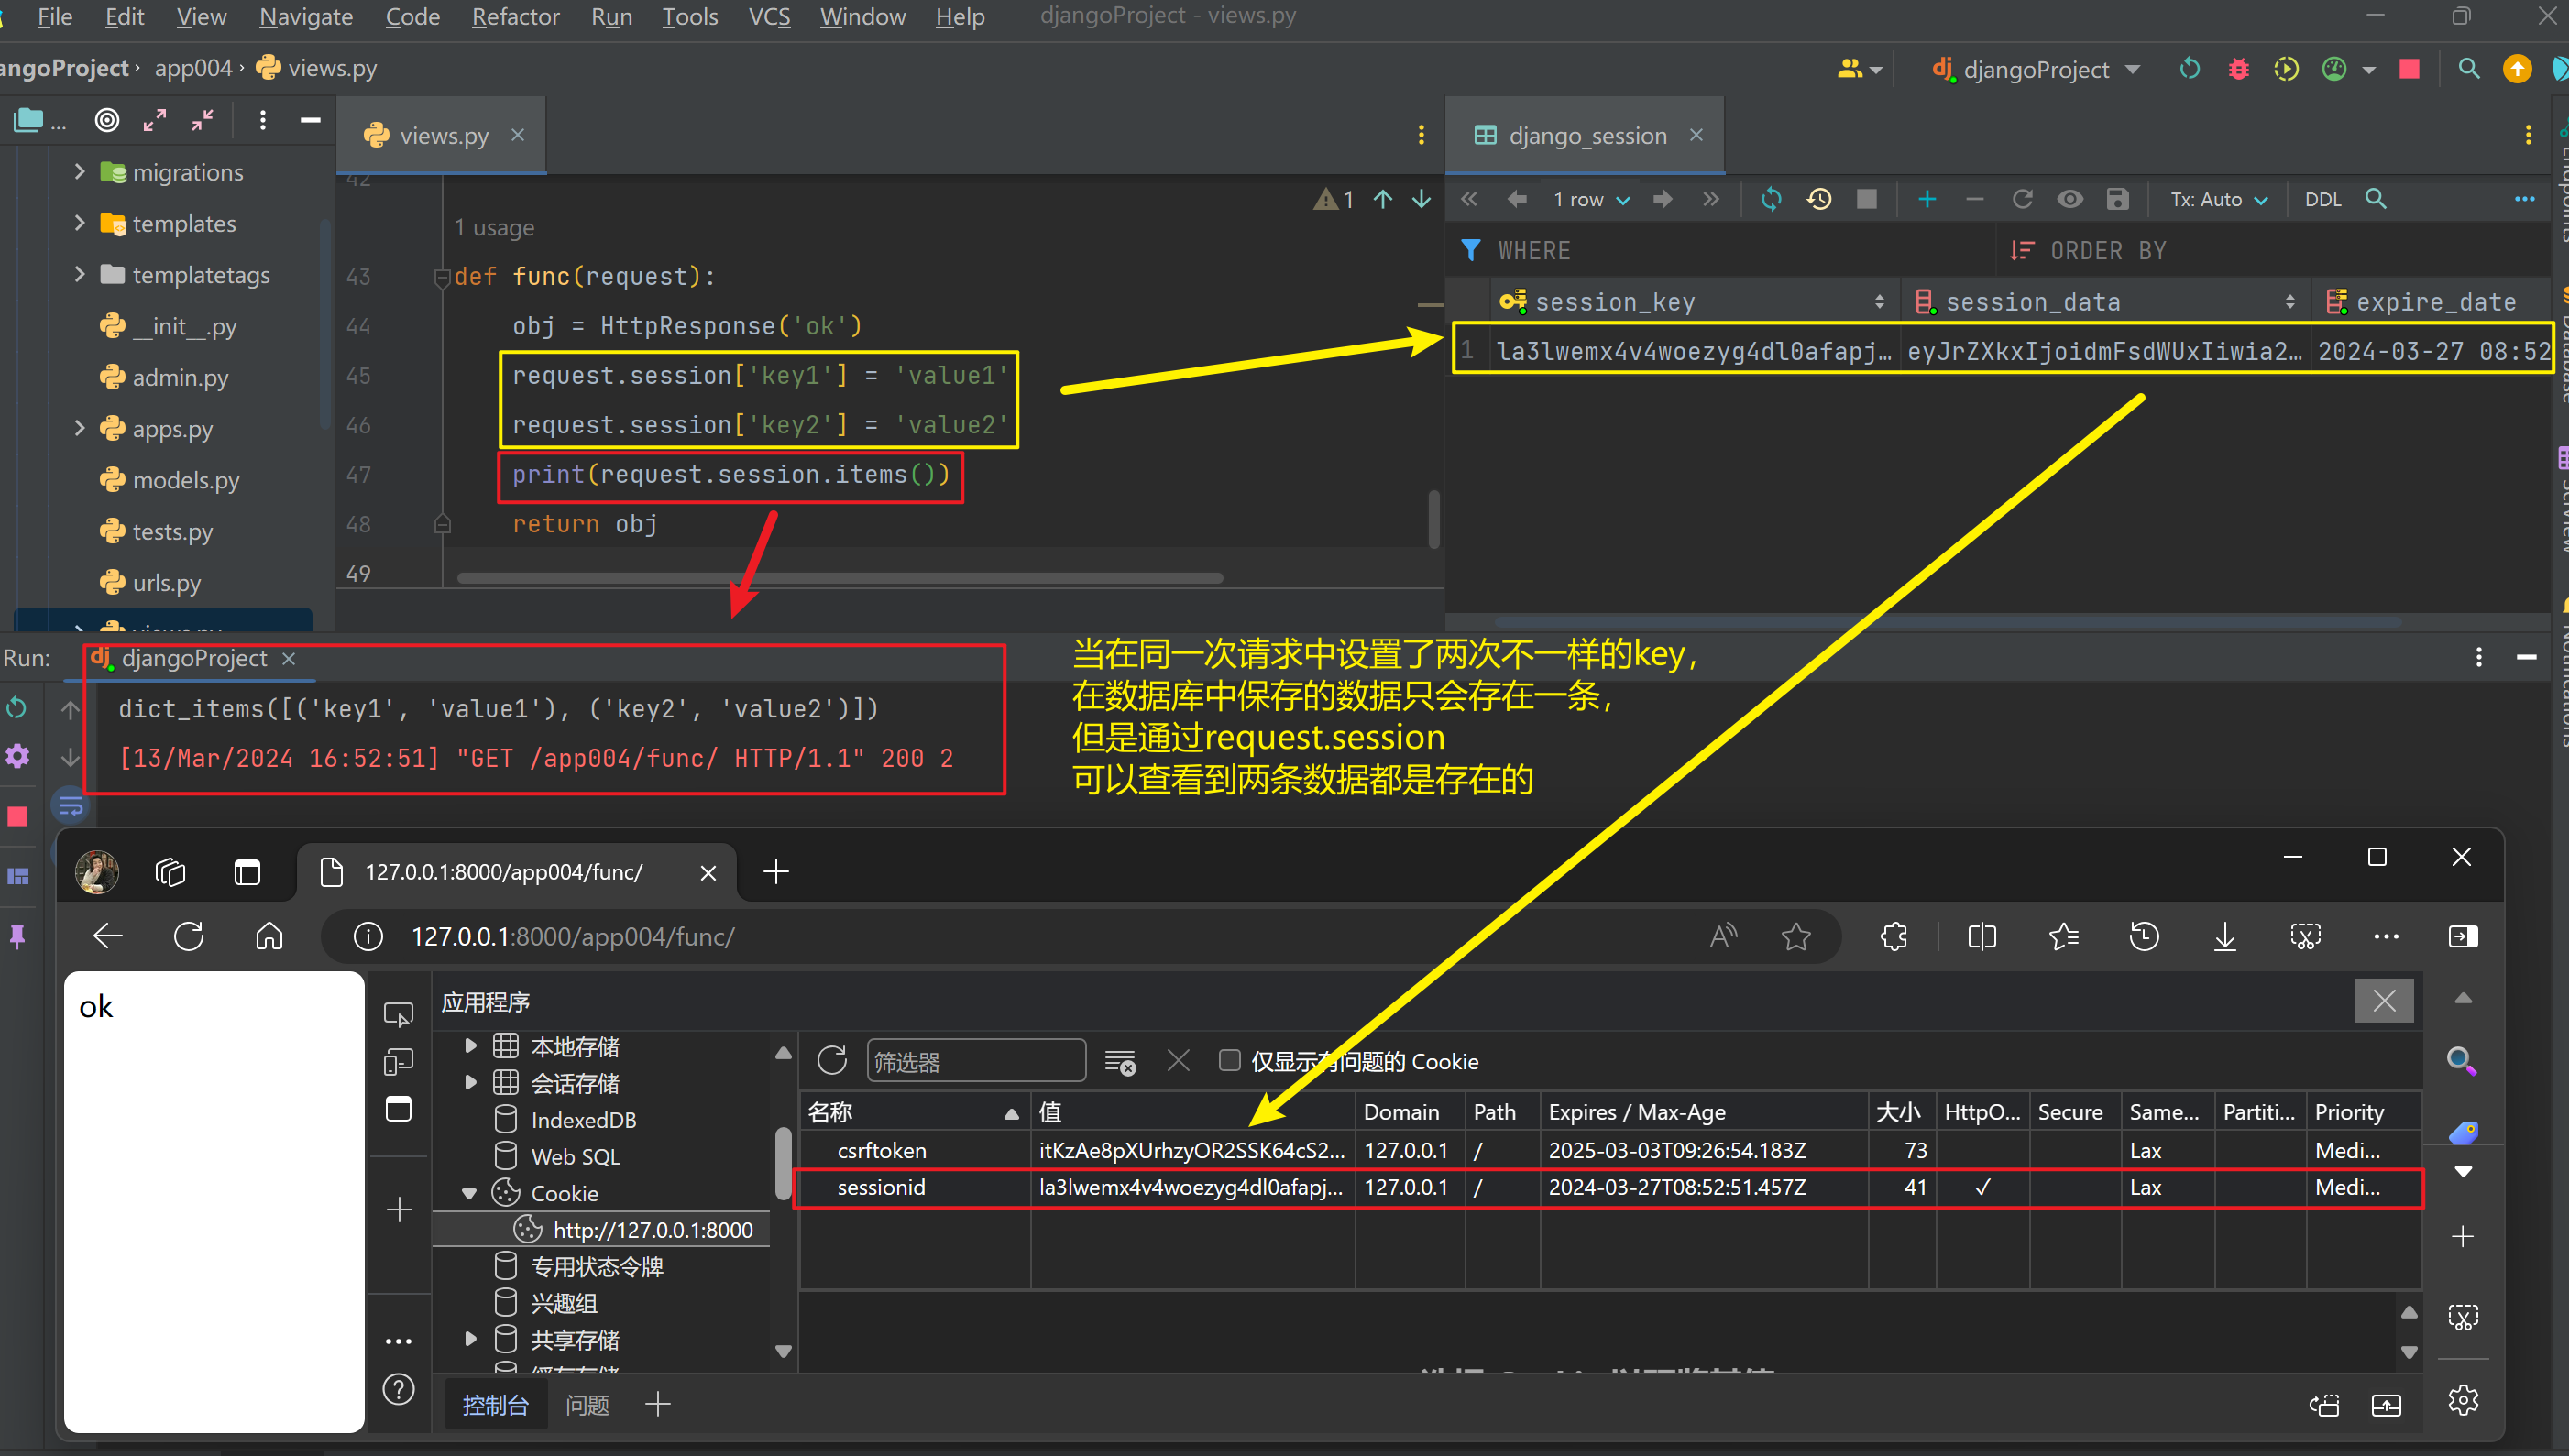
【补】当session同一个key有多个值时
- 当在同一次请求中设置了两次不一样的key,在数据中保存的数据只会存在一条
- 通过
request.session·可以查看到两条数据都是存在的
request.session['key1'] = 'value1'
request.session['key2'] = 'value2'
【五】中间件
【1】中间件
- 中间件(middleware)是 Django 框架中的一个关键概念
- 它是一种用于在请求到达视图之前或响应返回客户端之前执行的代码。
- 中间件可以对请求进行预处理、对响应进行后处理,也可以对请求和响应进行修改。
- Django 中的中间件以类的形式实现,每个中间件类包含了一系列的方法
from django.utils.deprecation import MiddlewareMixin


# 定义中间件时必须继承 MiddlewareMixin类
class MyMiddle1(MiddlewareMixin):
    def process_request(self, request):
        '''在这里可以对请求进行预处理'''
        print('这是MyMiddle1中的request')

    def process_response(self, request, response):
        '''在这里可以对响应进行后处理'''
        print('这是MyMiddle1中的response')
        # 需要注意,对响应处理完成后需要将response对象返回
        return response
# settings.py

MIDDLEWARE = [
    ...
    # 在定义中间件后需要在settings中注册
    'app004.MyMiddleWare.MyMiddle1',
]
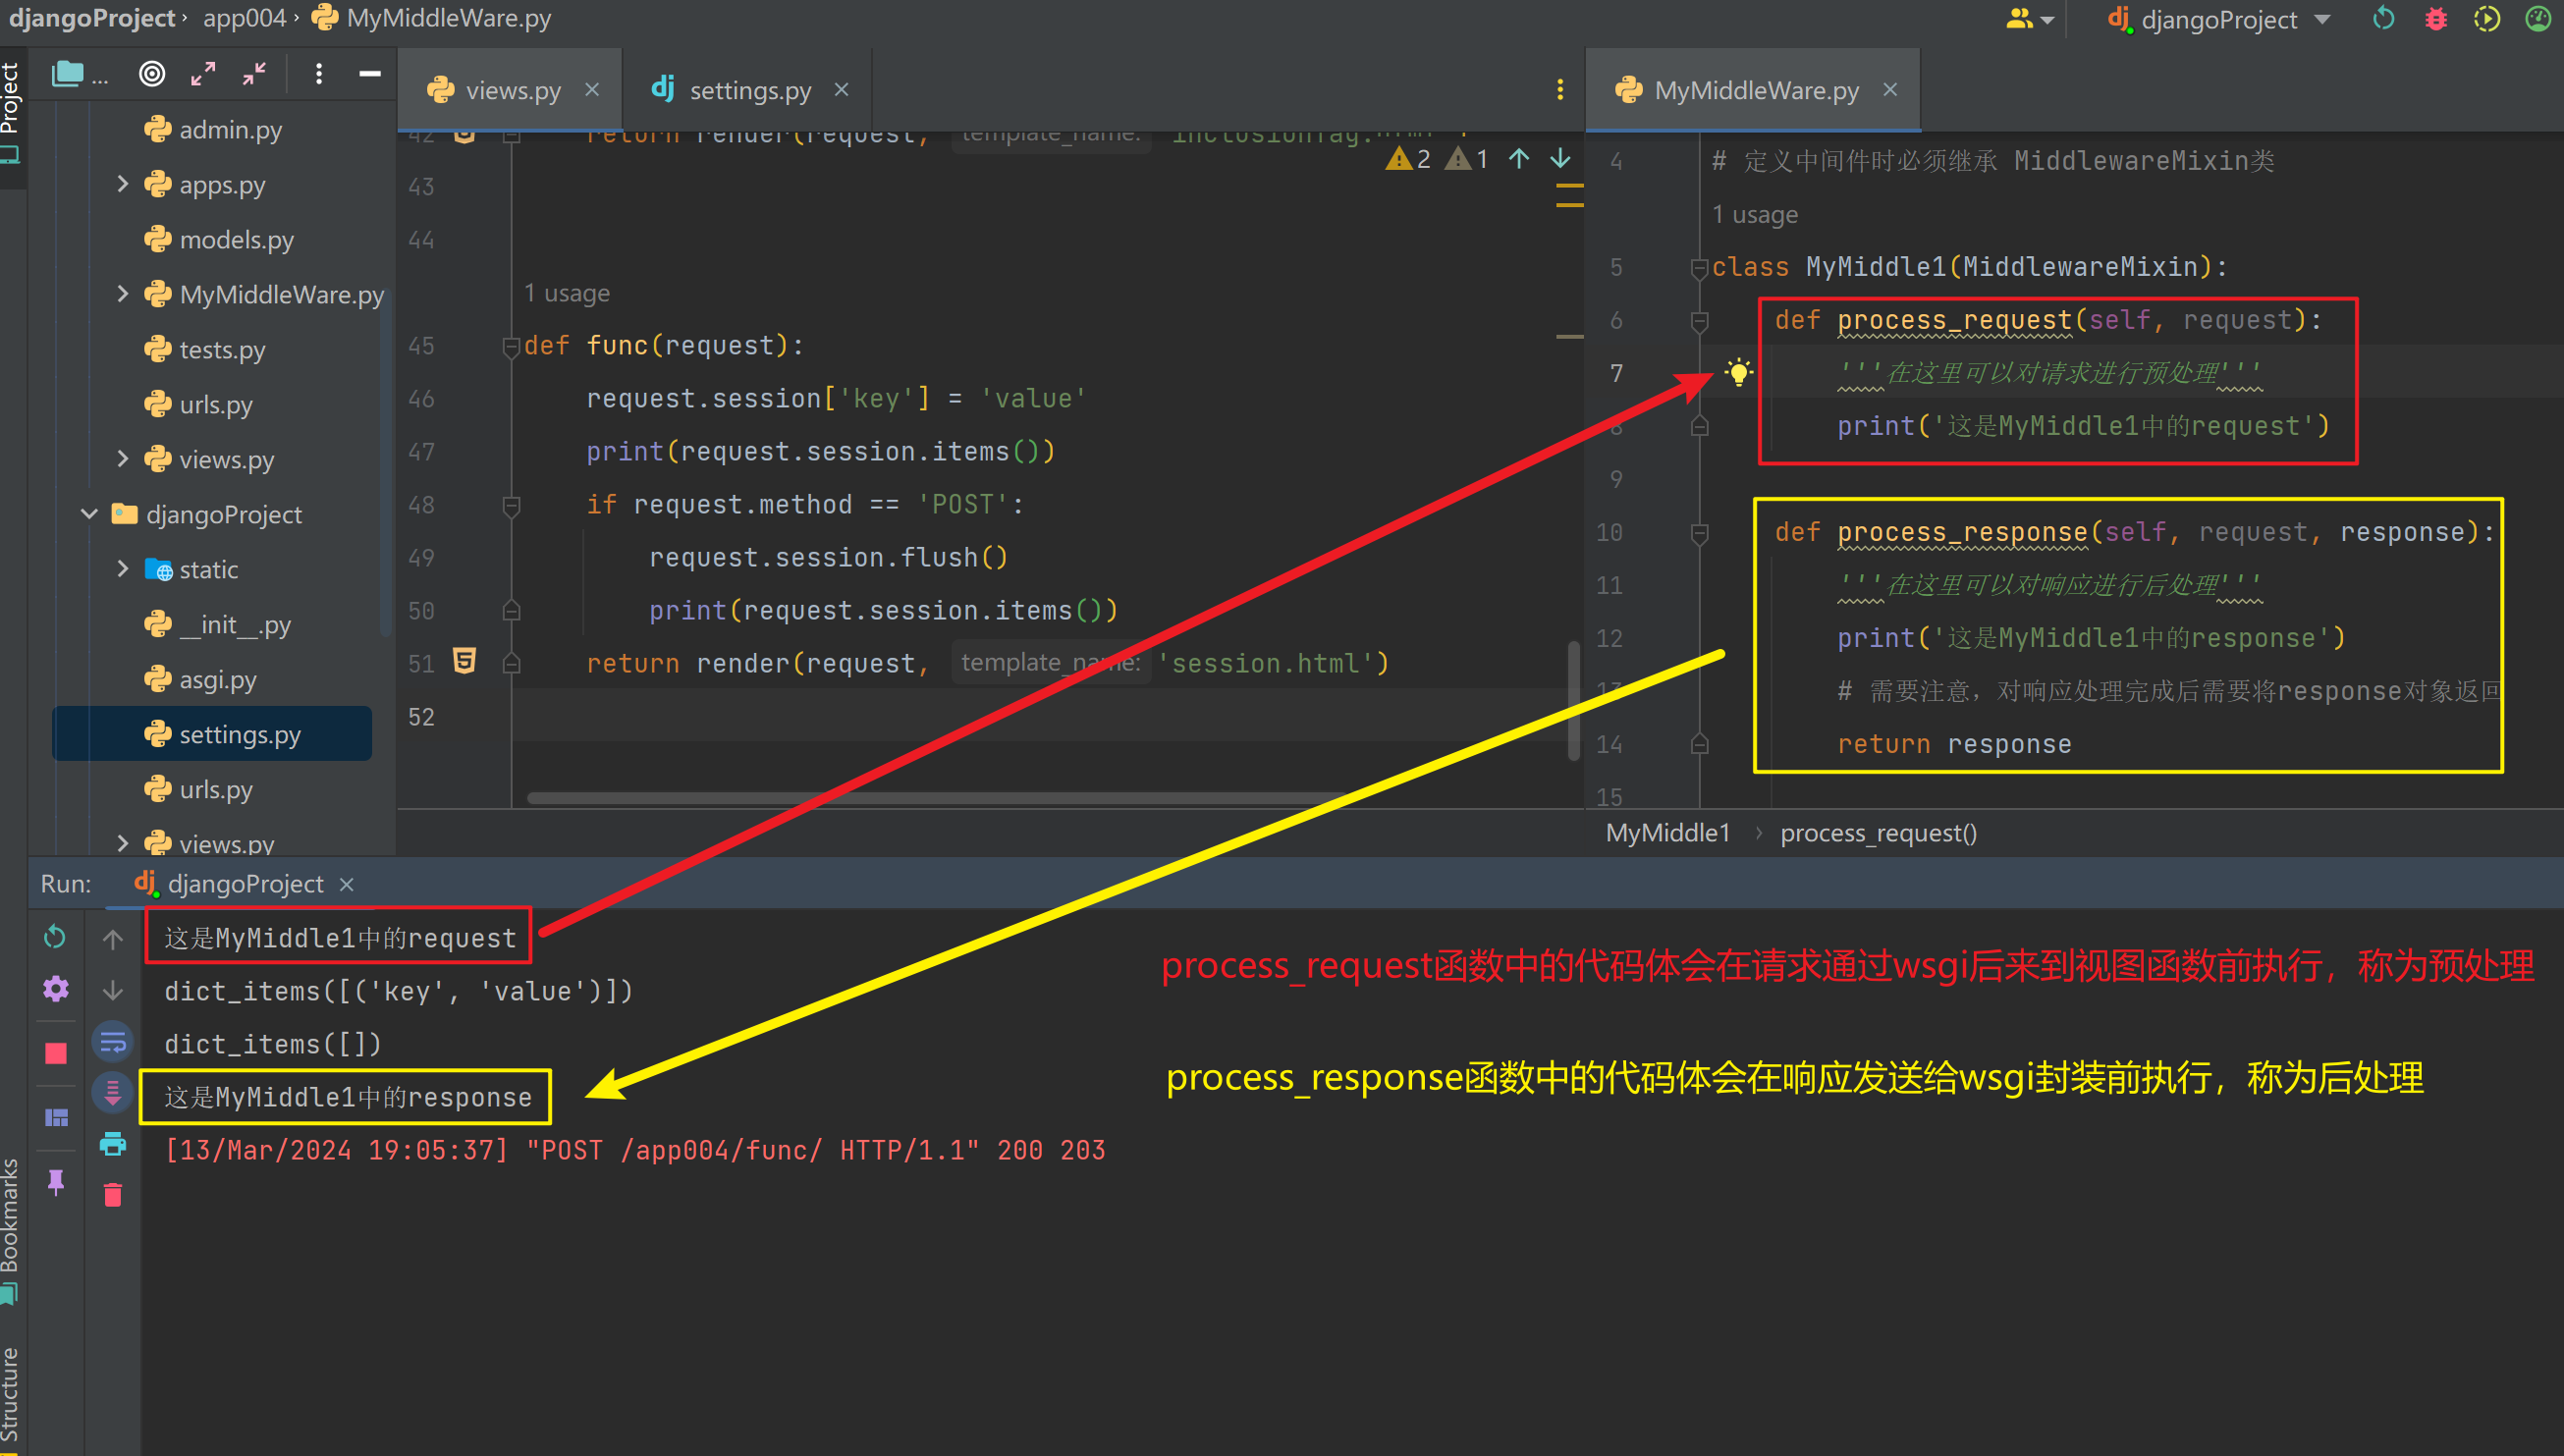
【2】中间件的执行顺序
- 在处理请求时,中间件从上至下依次执行
- 在处理响应时,中间件从下至上依次执行
【六】csrf跨站请求
- csrf是为了防止出现钓鱼网站而进行的网站验证
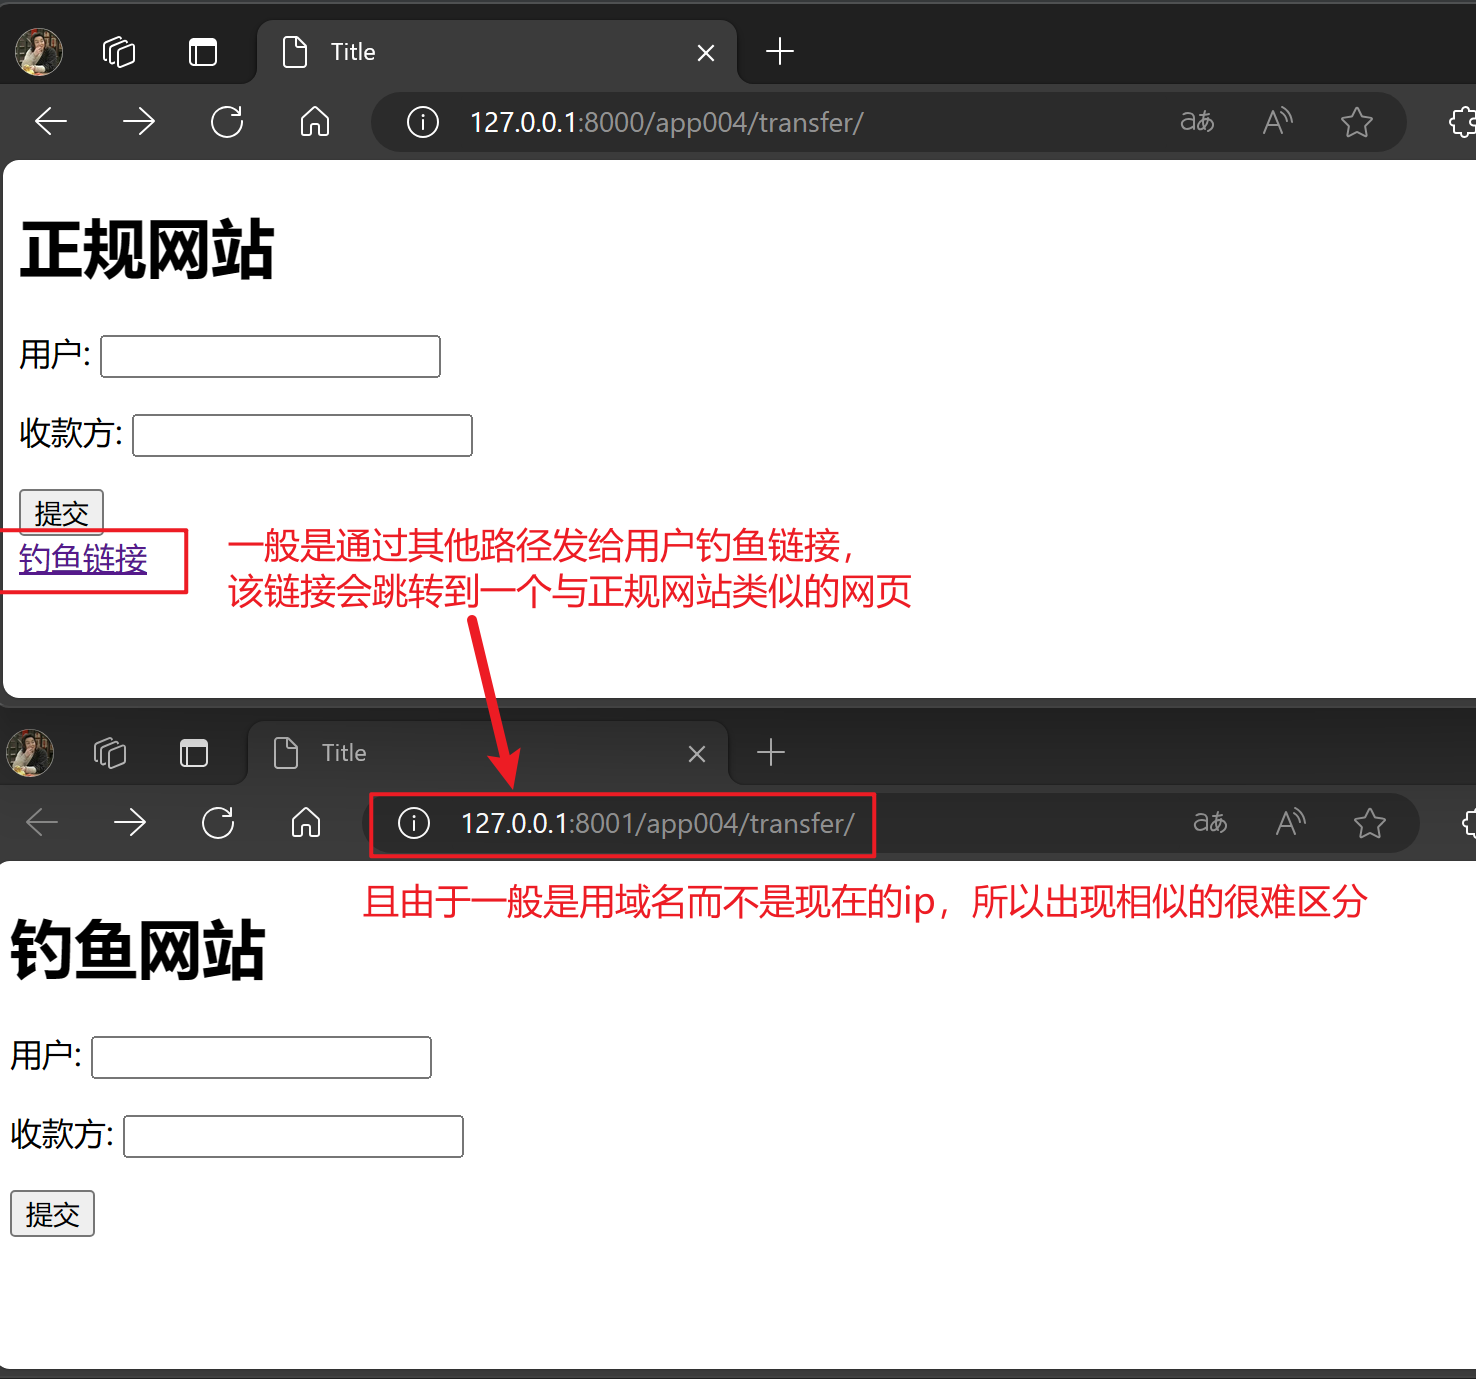
【1】钓鱼网站
-
攻击者通过诱导受害者访问恶意网站或点击恶意链接
-
将恶意请求发送到目标网站上
-
利用受害者在目标网站中已登录的身份来执行某些操作
-
从而达到攻击的目的
-
-
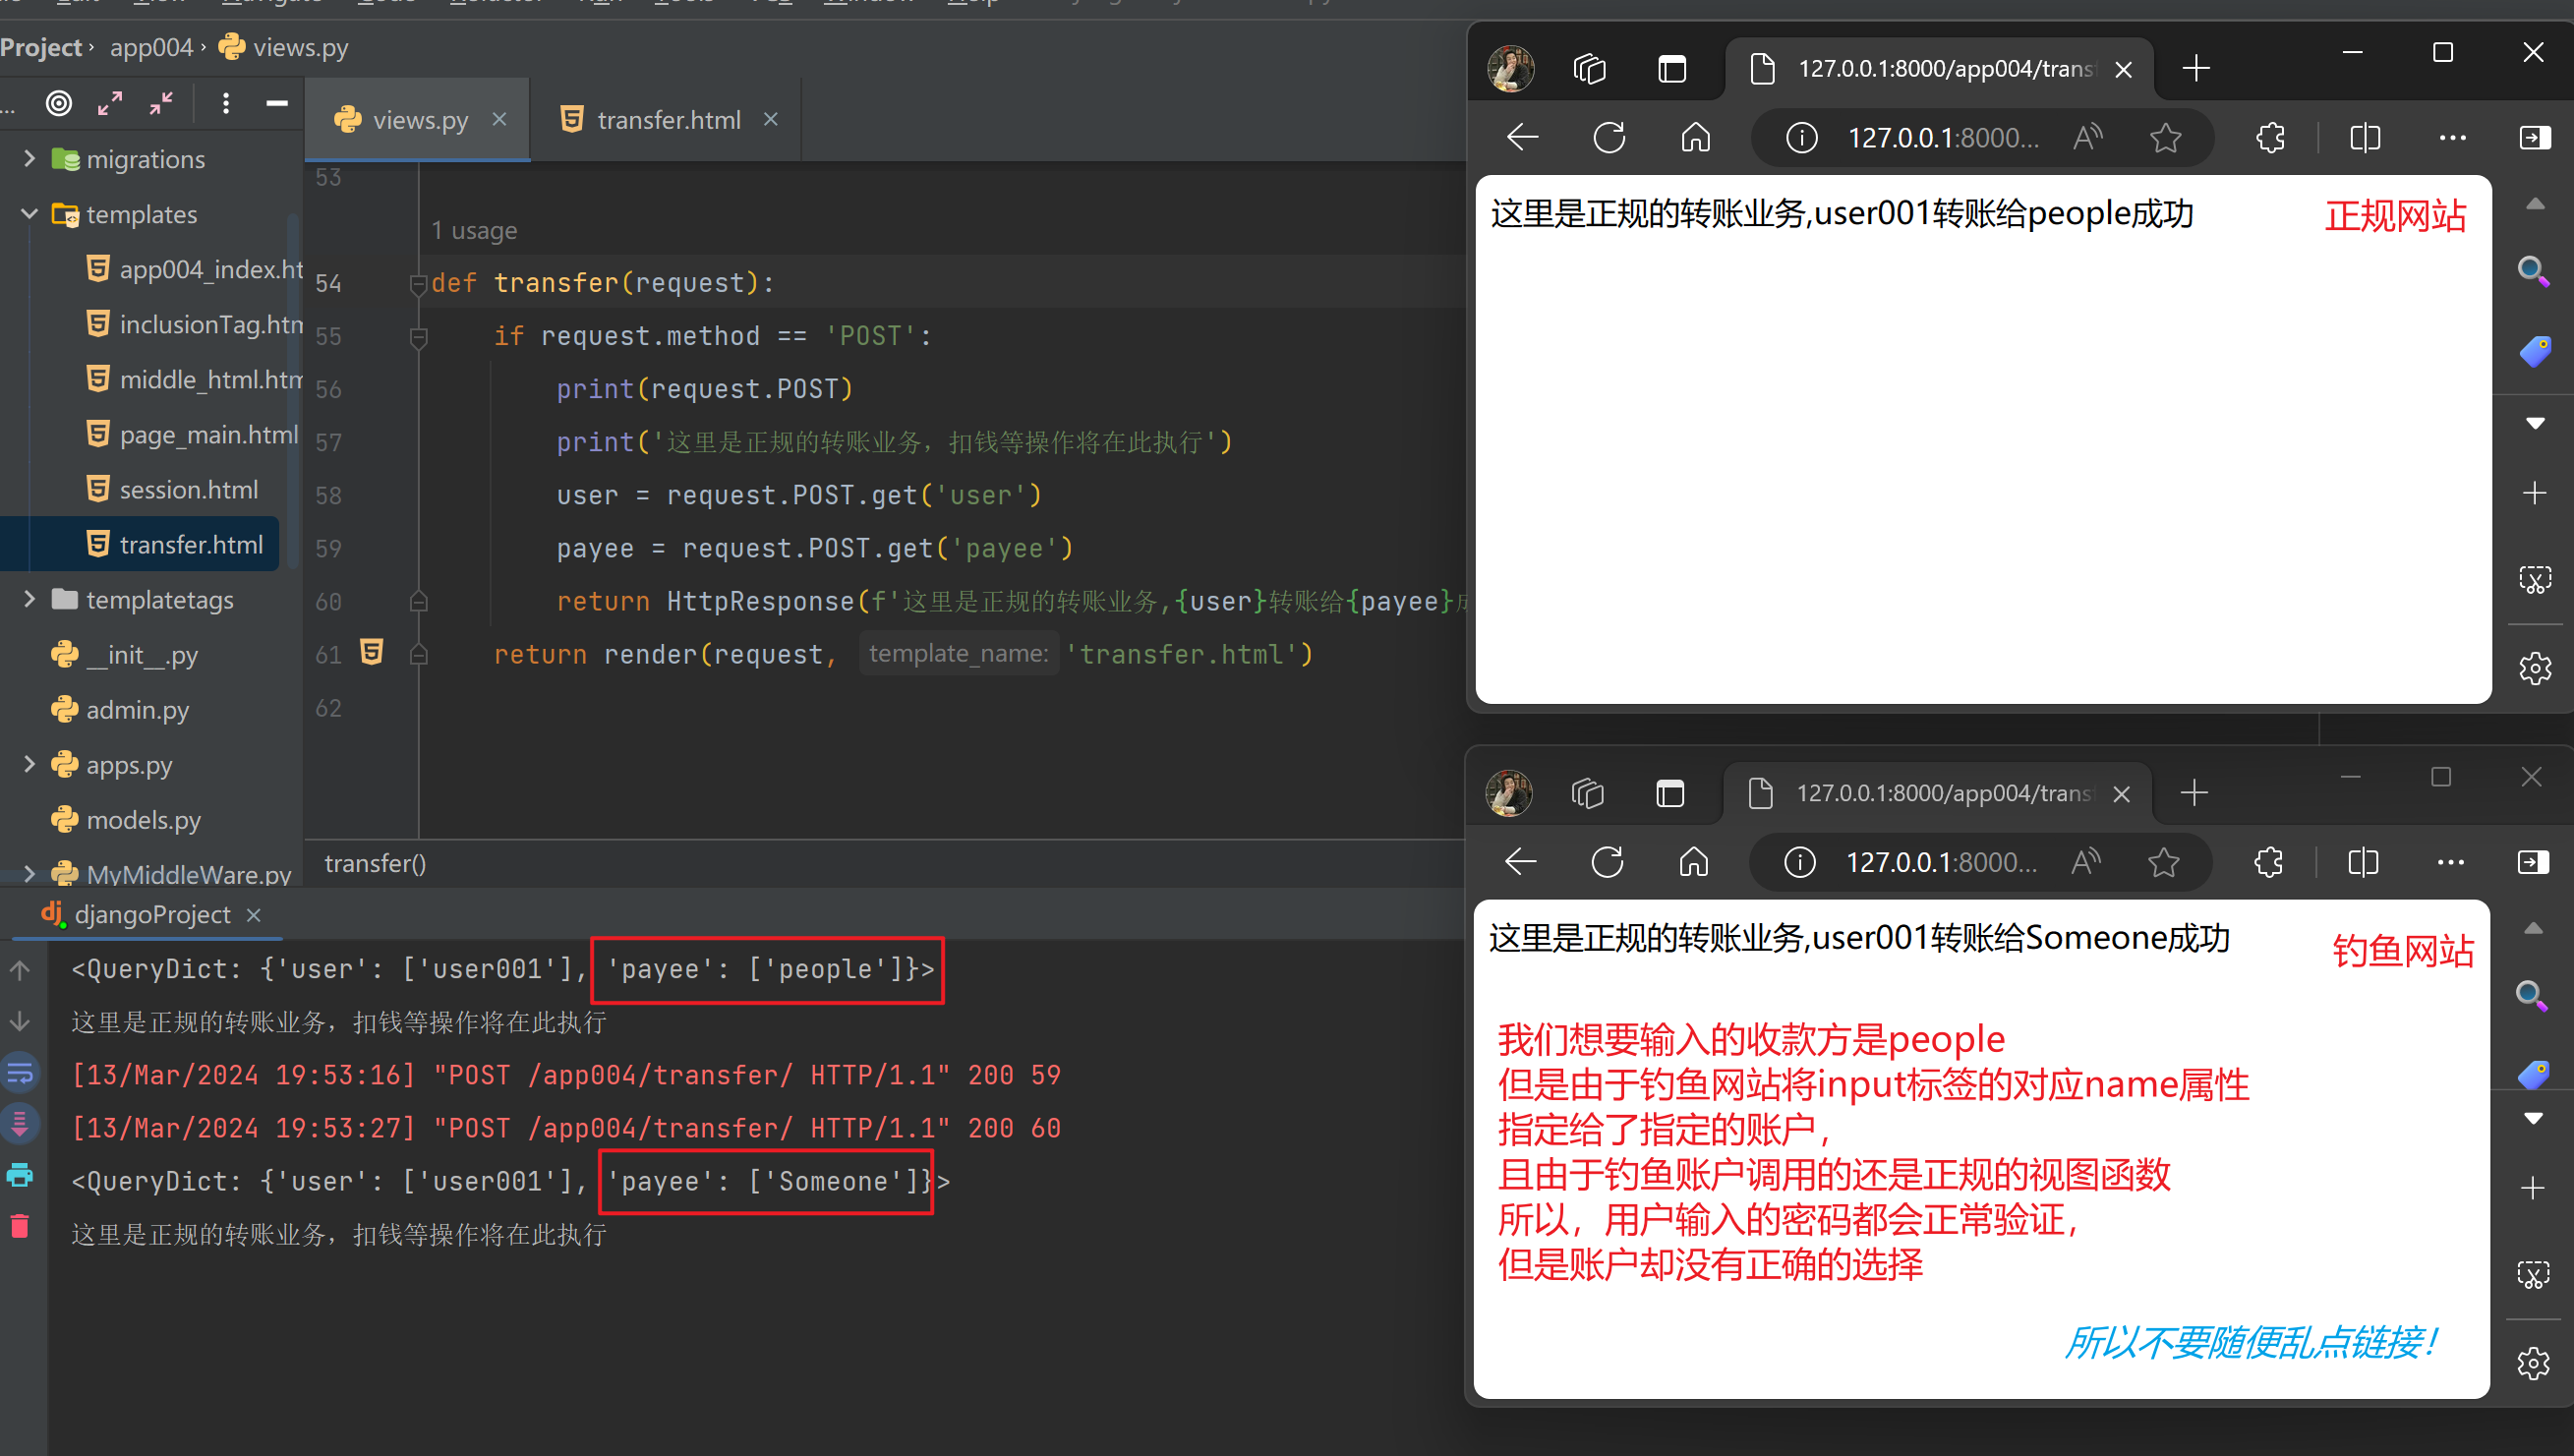
实现原理就是,不接收用户传入的值,而使用攻击者自己定的账户
<body>
<h1>正规网站</h1>
<form action="" method="post">
    <p>用户: <input type="text" name="user"></p>
    <p>收款方: <input type="text" name="payee"></p>
    <input type="submit">
</form>
<a href="http://127.0.0.1:8001/app004/transfer">钓鱼链接</a>
</body>
<body>
<h1>钓鱼网站</h1>
<!-- 将钓鱼网站form表单的action地址改为正规网站的路径,form表单提交的数据将会提交至正规网站处理 -->
<form action="http://127.0.0.1:8000/app004/transfer/" method="post">
    <p>用户: <input type="text"></p>
    <p><input type="text" name="user" value="Someone" hidden></p>
    <p>收款方: <input type="text" name="payee"></p>
    <input type="submit">
</form>
</body>
- 网页展示,用来混淆用户判断
- 后台视图函数执行逻辑
【2】Django添加csrf验证
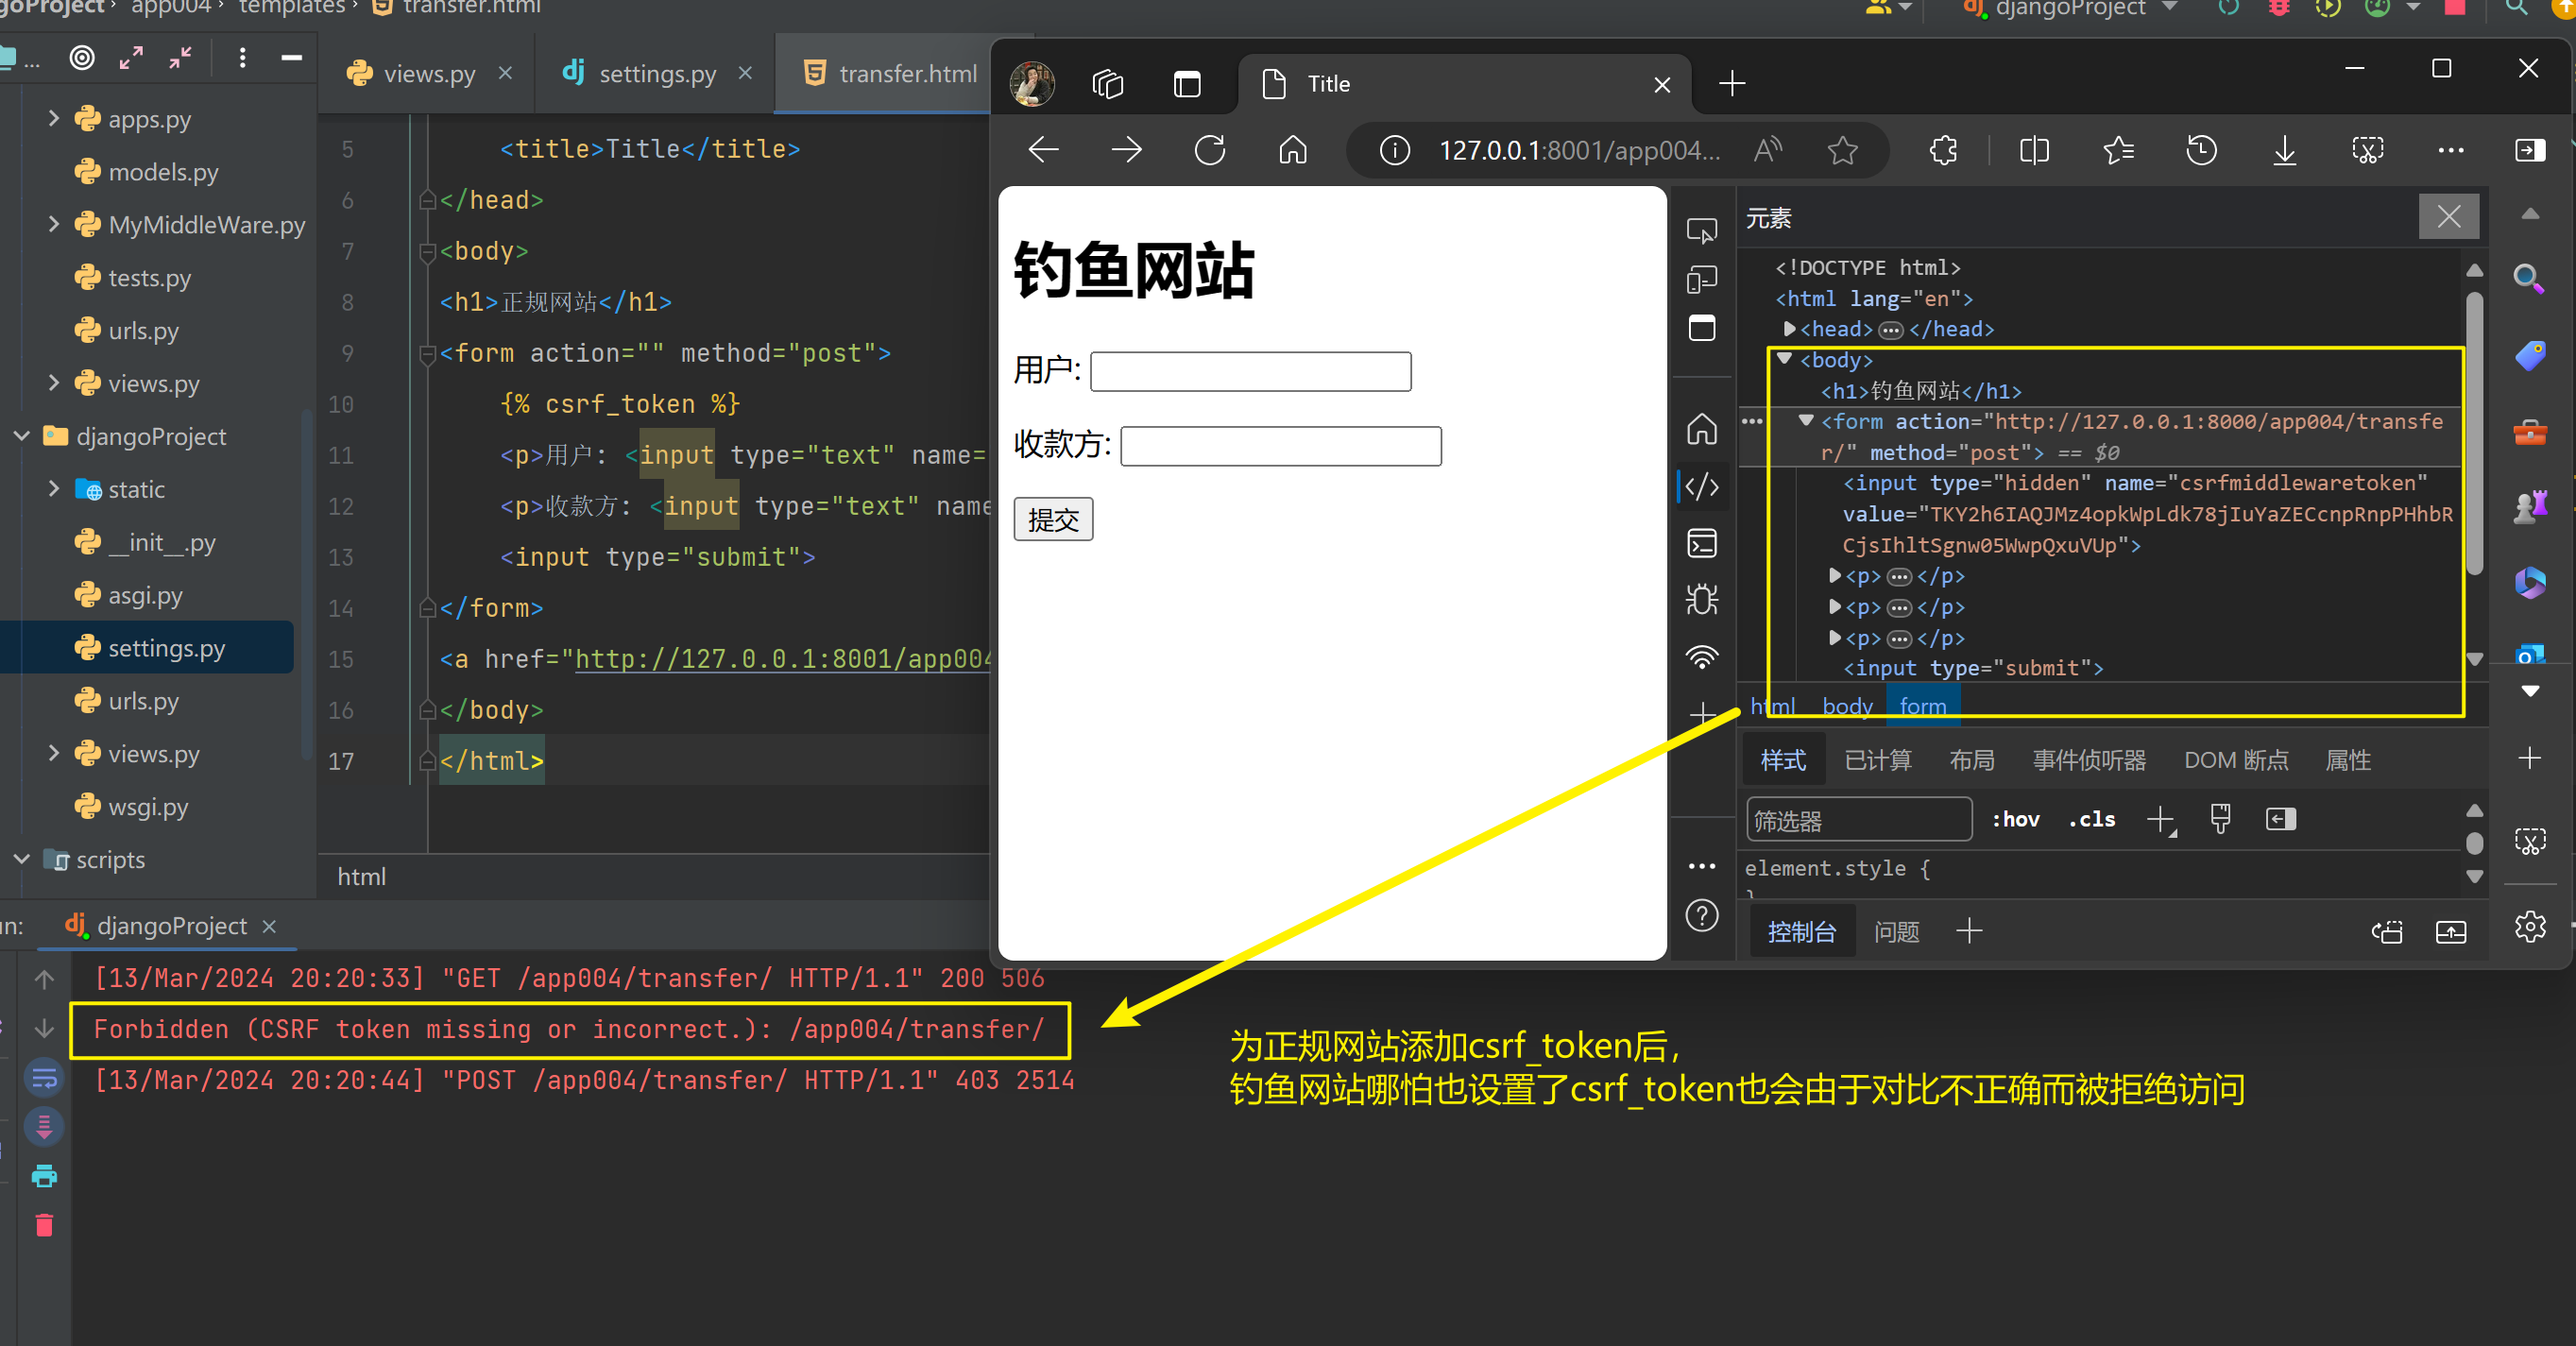
【2.1】CSRF 防护机制
- CSRF 防护机制的工作原理是在用户登录时生成一个 CSRF 标记,并将该标记存储在用户的会话中(或者作为 cookie 发送给用户)。
- 每当用户提交表单或者发送 POST 请求时,Django 会检查请求中是否包含 CSRF 标记,如果标记不匹配或者缺失,Django 将拒绝请求。
【2.2】CSRF防护中间件
- Django中默认为我们添加了CSRF防护,这就是为什么我们之前如果不将csrf中间件注释掉,我们使用post请求提交数据时会
403 forbidden
# settings.py
MIDDLEWARE = [
    'django.middleware.csrf.CsrfViewMiddleware',
]
【2.3】添加CSRF验证
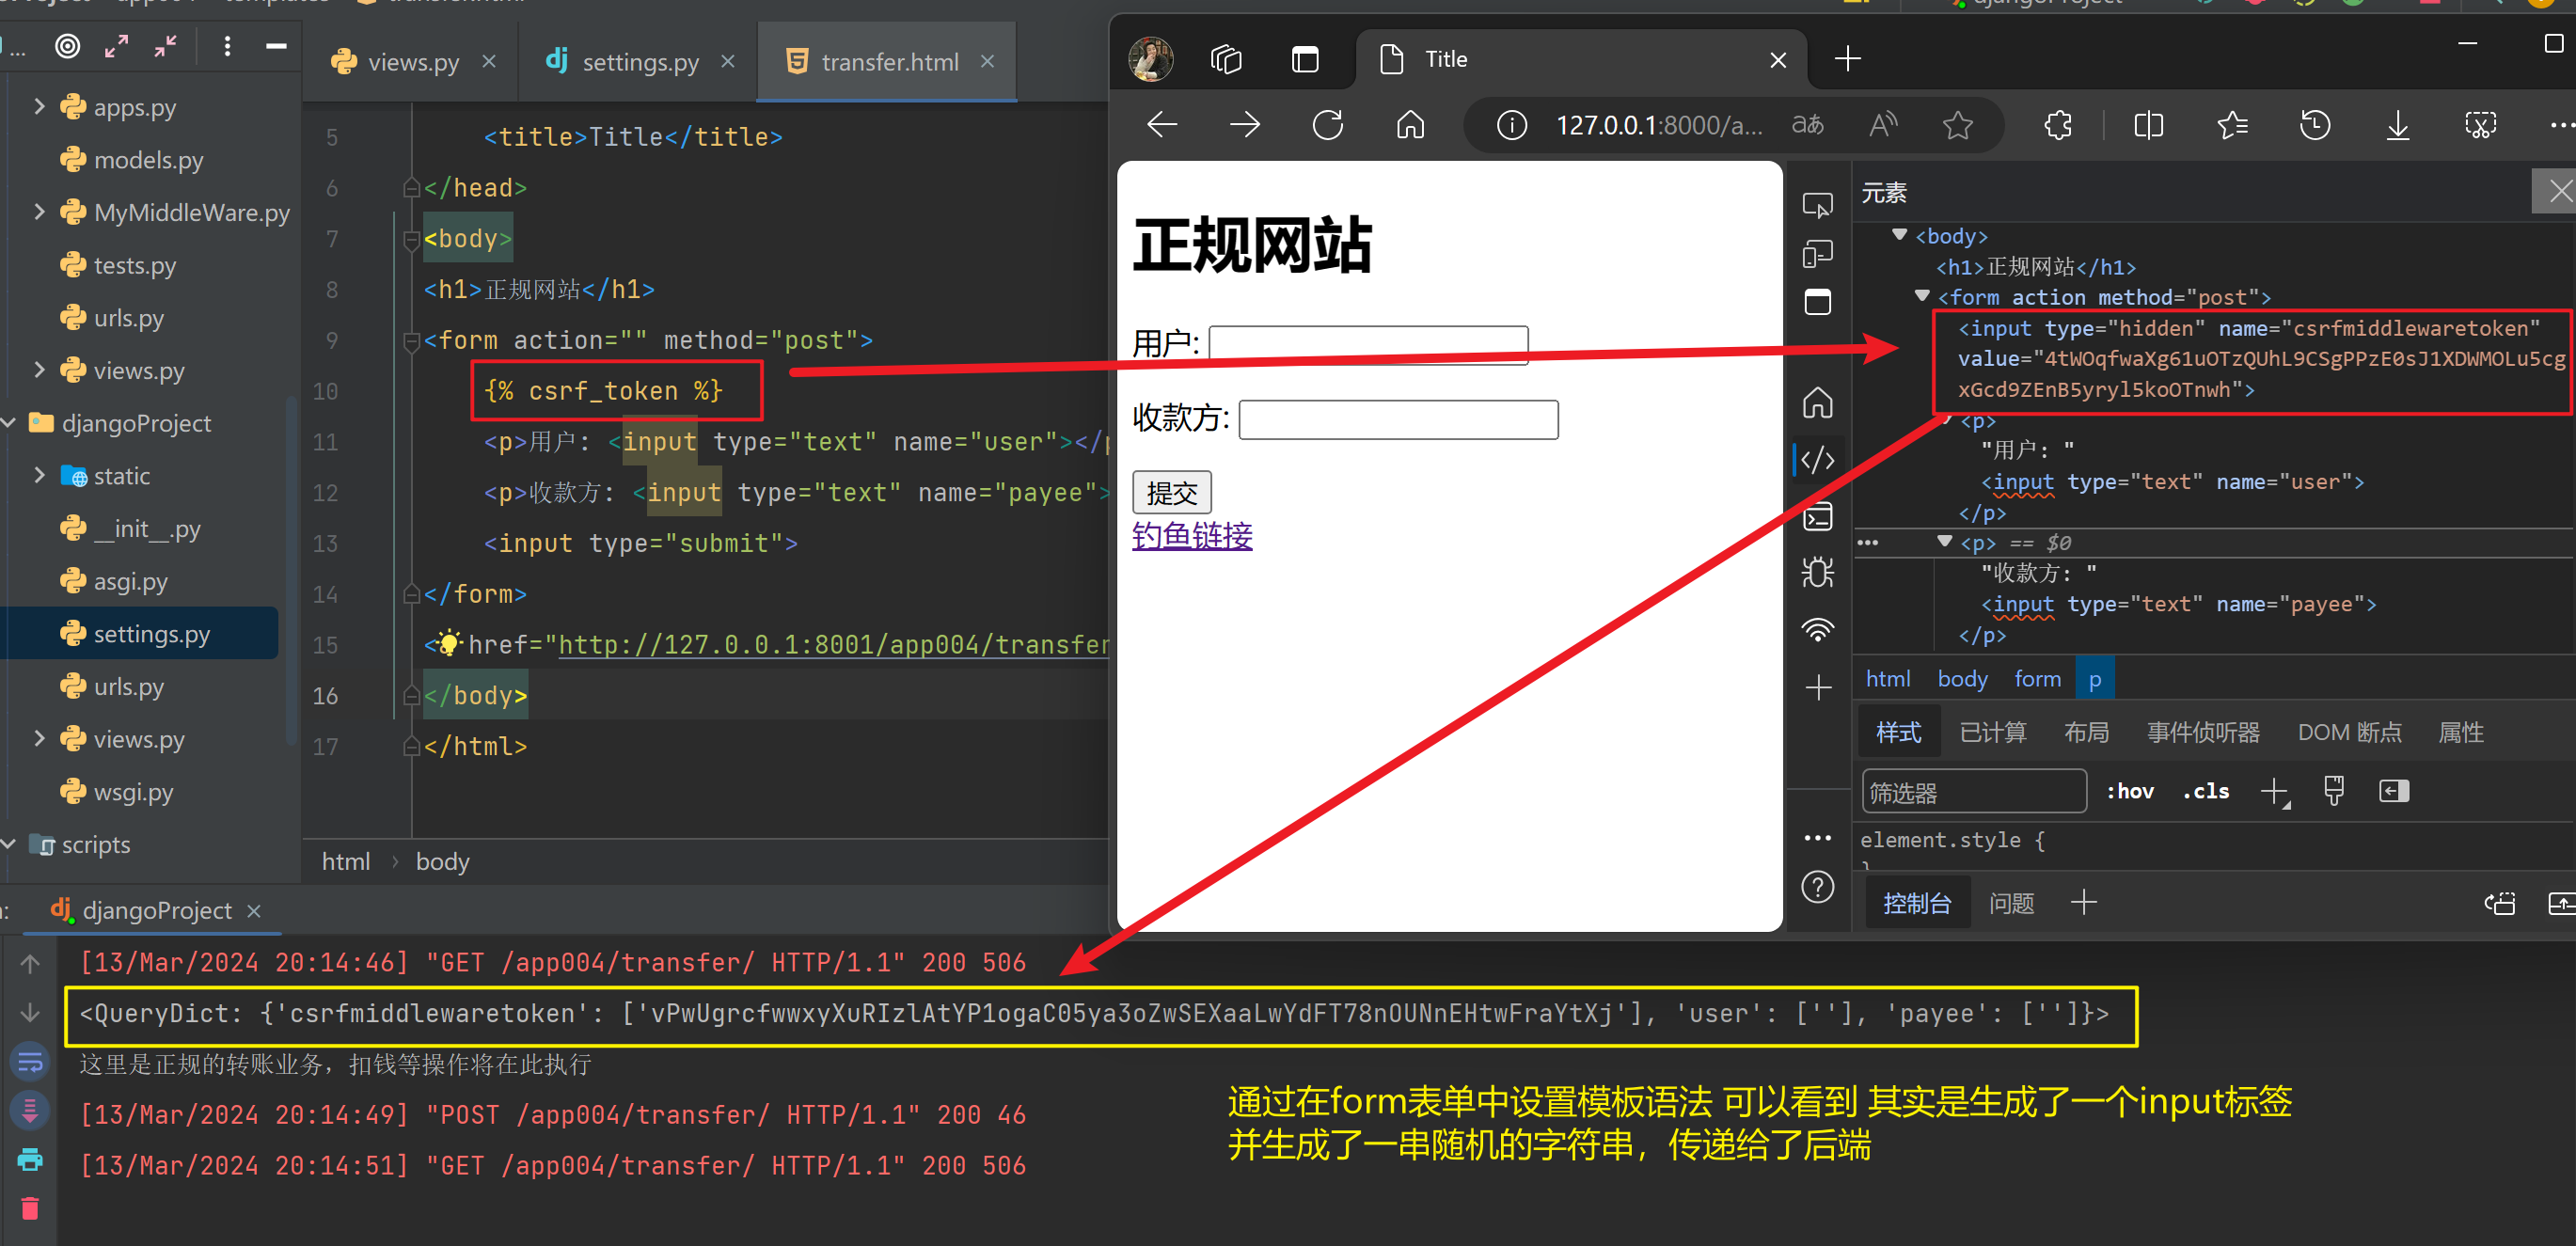
【2.3.1】在form表单中使用模板语法{% csrf_token %}
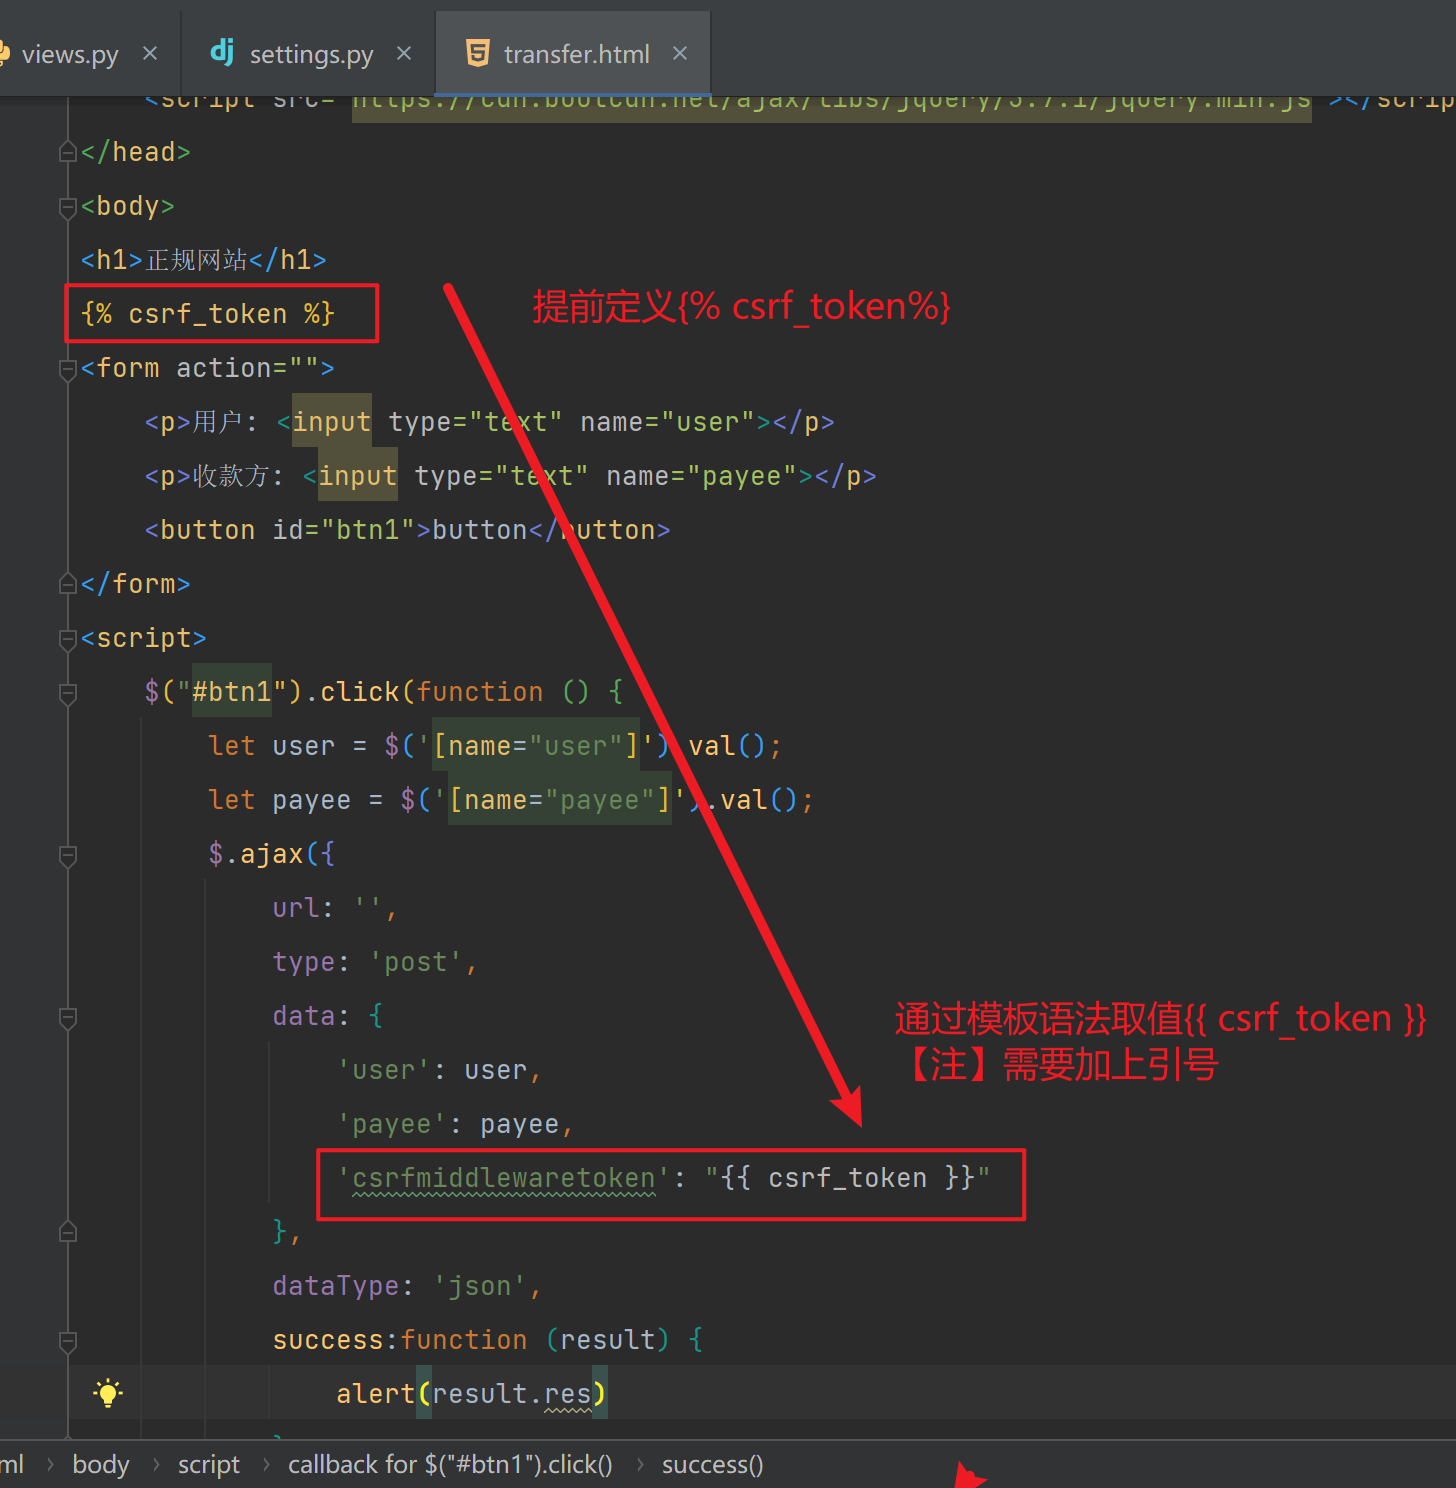
【2.3.2】在Ajax中通过jQuery语法取值
- 在上面我们看到,其实
{% csrf_token %}其实就是自动生成了一个input标签,name是csrfmiddlewaretoken,value值就是生成的字符串 - 当我们通过Ajax提交post请求时,就可以通过jQuery语法取值并传给后端
<body>
<h1>正规网站</h1>
<form action="">
    {% csrf_token %}
    <p>用户: <input type="text" name="user"></p>
    <p>收款方: <input type="text" name="payee"></p>
    <button id="btn1">button</button>
</form>
<script>
    $("#btn1").click(function () {
        let user = $('[name="user"]').val();
        let payee = $('[name="payee"]').val();
        let token = $('[name="csrfmiddlewaretoken"]').val();
        $.ajax({
            url: '',
            type: 'post',
            data: {
                'user': user,
                'payee': payee,
                {# 将csrf的token值传递给后端 #}
                'csrfmiddlewaretoken': token
            },
            dataType: 'json',
            success:function (result) {
                alert(result.res)
            }
        })
    })
</script>
</body>
# 后端
def transfer(request):
    if request.method == 'POST':
        print(request.POST)
        print('这里是正规的转账业务,扣钱等操作将在此执行')
        user = request.POST.get('user')
        payee = request.POST.get('payee')
        from django.http import JsonResponse
        return JsonResponse({'res': f'这里是正规的转账业务,{user}转账给{payee}成功'})
    return render(request, 'transfer.html')
【2.3.3】在Ajax中通过模板语法传值
【七】auth模块
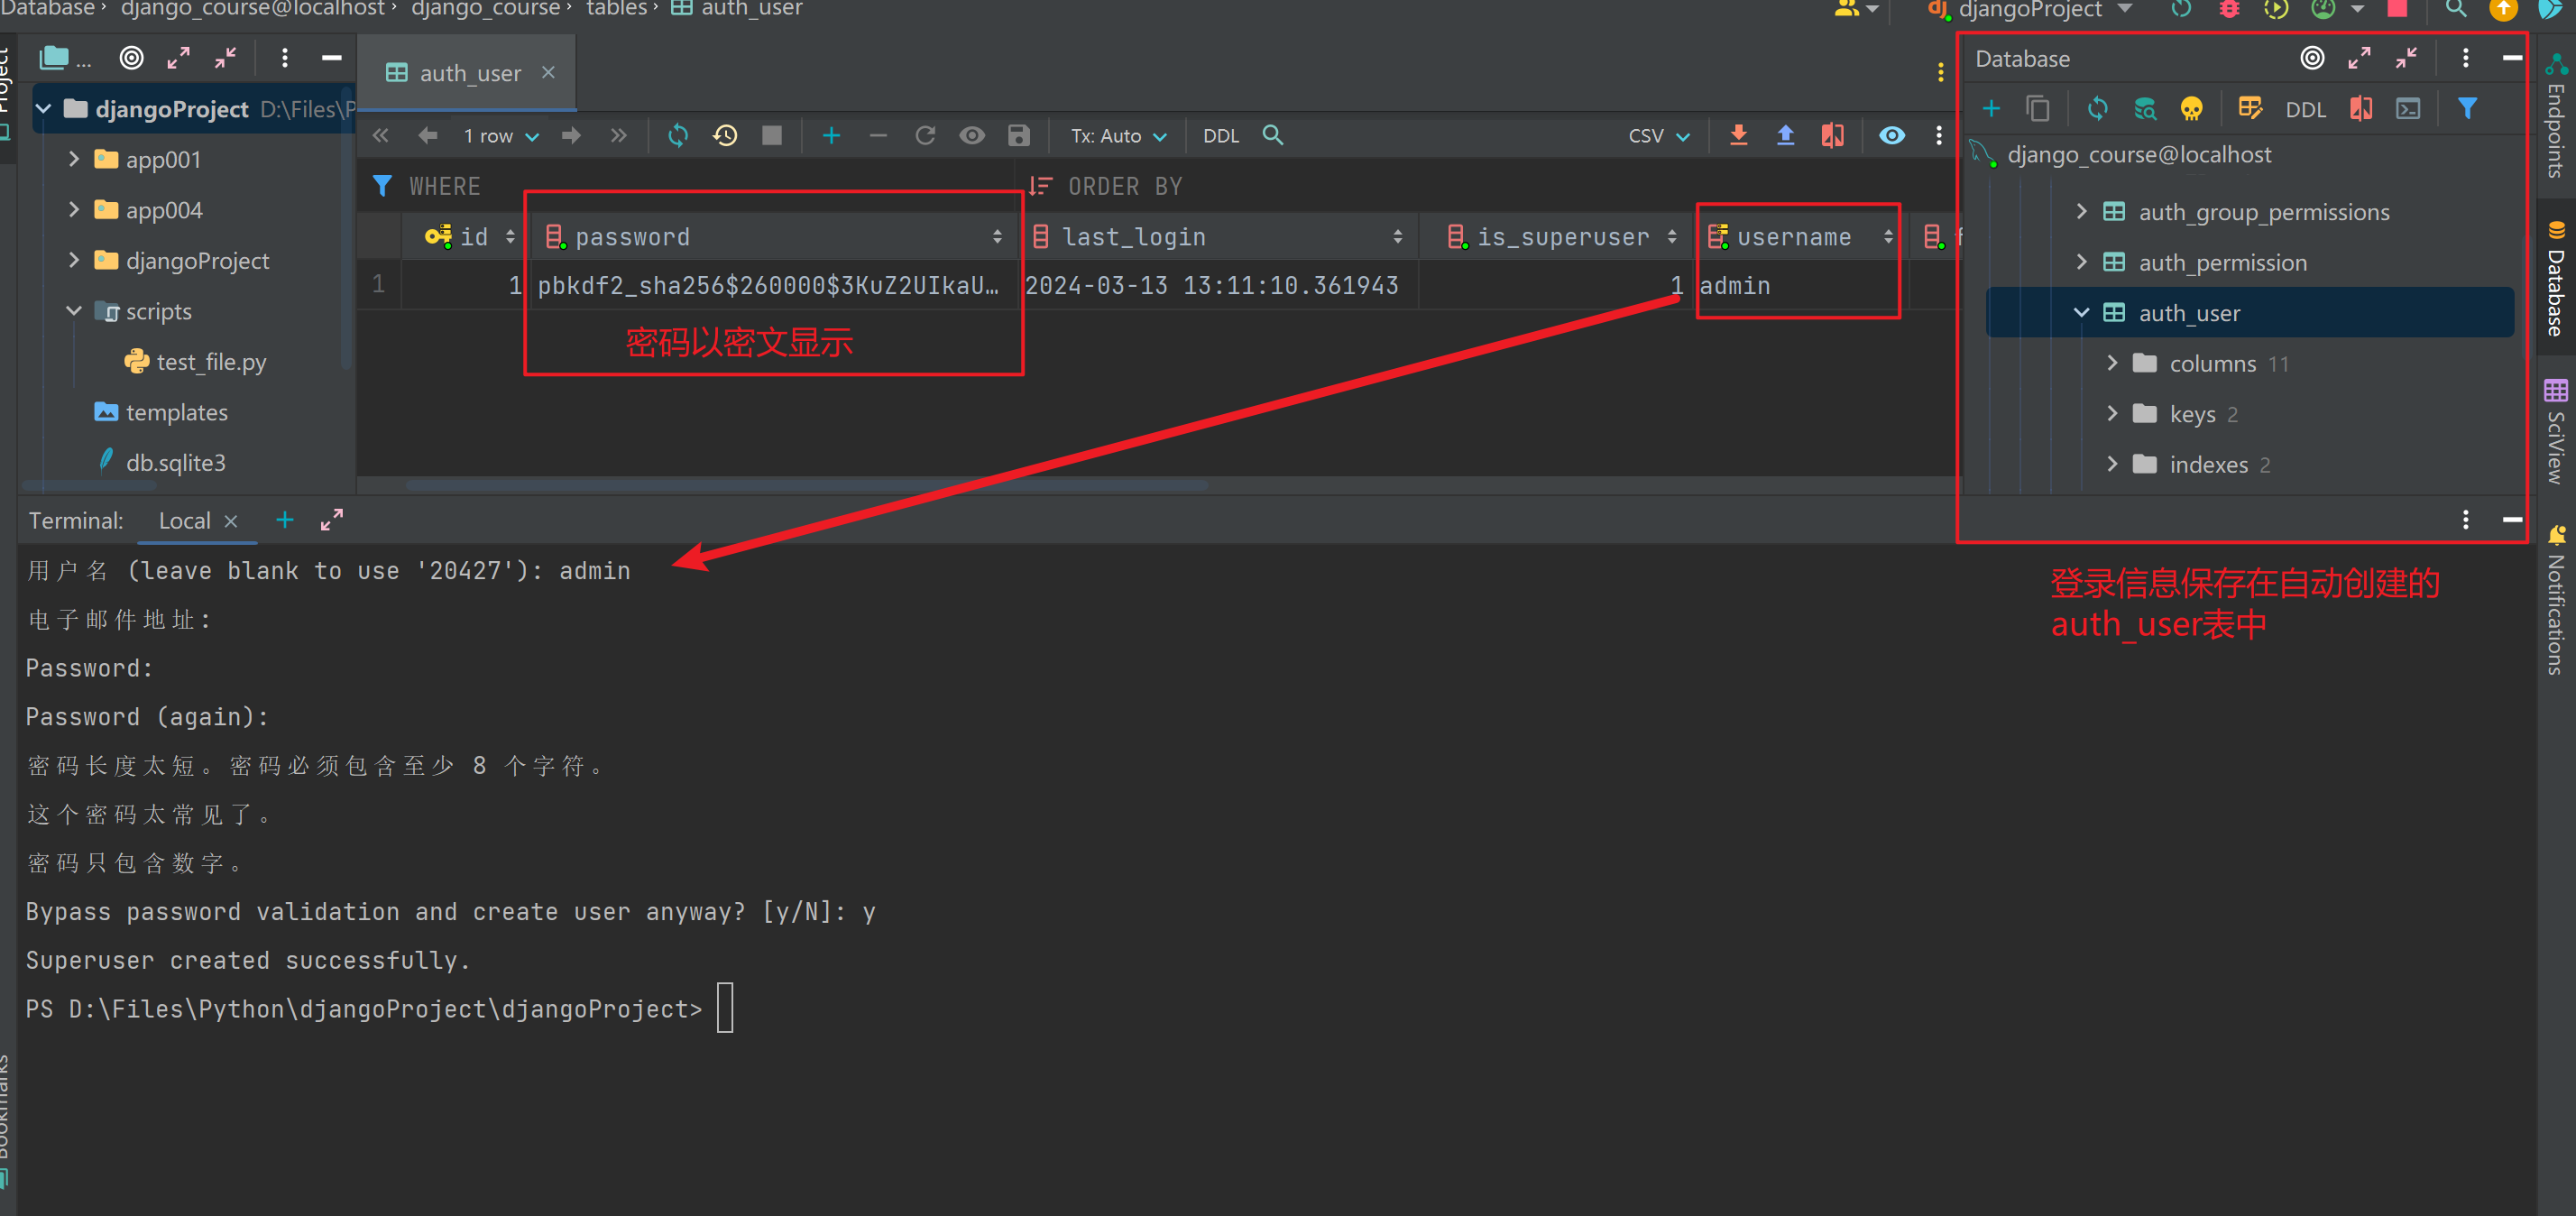
【1】创建超级管理员
# 创建超级管理员
python manage.py createsuperuser
# 密码输入时会不显示,这是为了安全考虑,正常输入敲回车即可
# 当密码太简单时,会提示让你输入【y/n】确认
- 创建完以后,就可以访问
/admin/进入django后台管理
【2】注册用户或超级管理员
- 【注】普通的将数据插入数据库中的数据是明文的,在登录后台是无法使用的,所以需要特殊方法
- 错:
库名.objects.create(**kwargs)只能插入指定的数据,对数据不会处理 - 对:
库名.objects.create_user(**kwargs):其实是调用了auth模块的方法,对密码进行了加密处理
UserInfo.objects.create_user(username='xxx',password='xxx')
UserInfo.objects.create_superuser(username='xxx',password='xxx')
【3】使用auth模块比对登录信息
# 基本语法
# 导入模块
from django.contrib import auth

# 使用auth.authenticate方法
user_obj = auth.authenticate(request,username,password)
- 案例
<!-- 前端 -->
<body>
<form action="" method="post">
    {% csrf_token %}
    username: <input type="text" name="username">
    password: <input type="text" name="password">
    <input type="submit">
</form>
</body>
# 导入模块
from django.contrib import auth

def login(request):
    if request.method == 'POST':
        data = request.POST
        username = data.get('username')
        pwd = data.get('password')
        user_obj = auth.authenticate(request, username=username, password=pwd)
        print(user_obj)
        if not user_obj:
            return HttpResponse('不ok')
        print(user_obj.username)  # admin
        # 可以看到密码已经被加密了,且与数据库加密算法一致
        print(user_obj.password)  # pbkdf2_sha256$260000$3KuZ2UIkaUCBZu...
        return HttpResponse('ok')
    return render(request, 'AuthLogin.html')
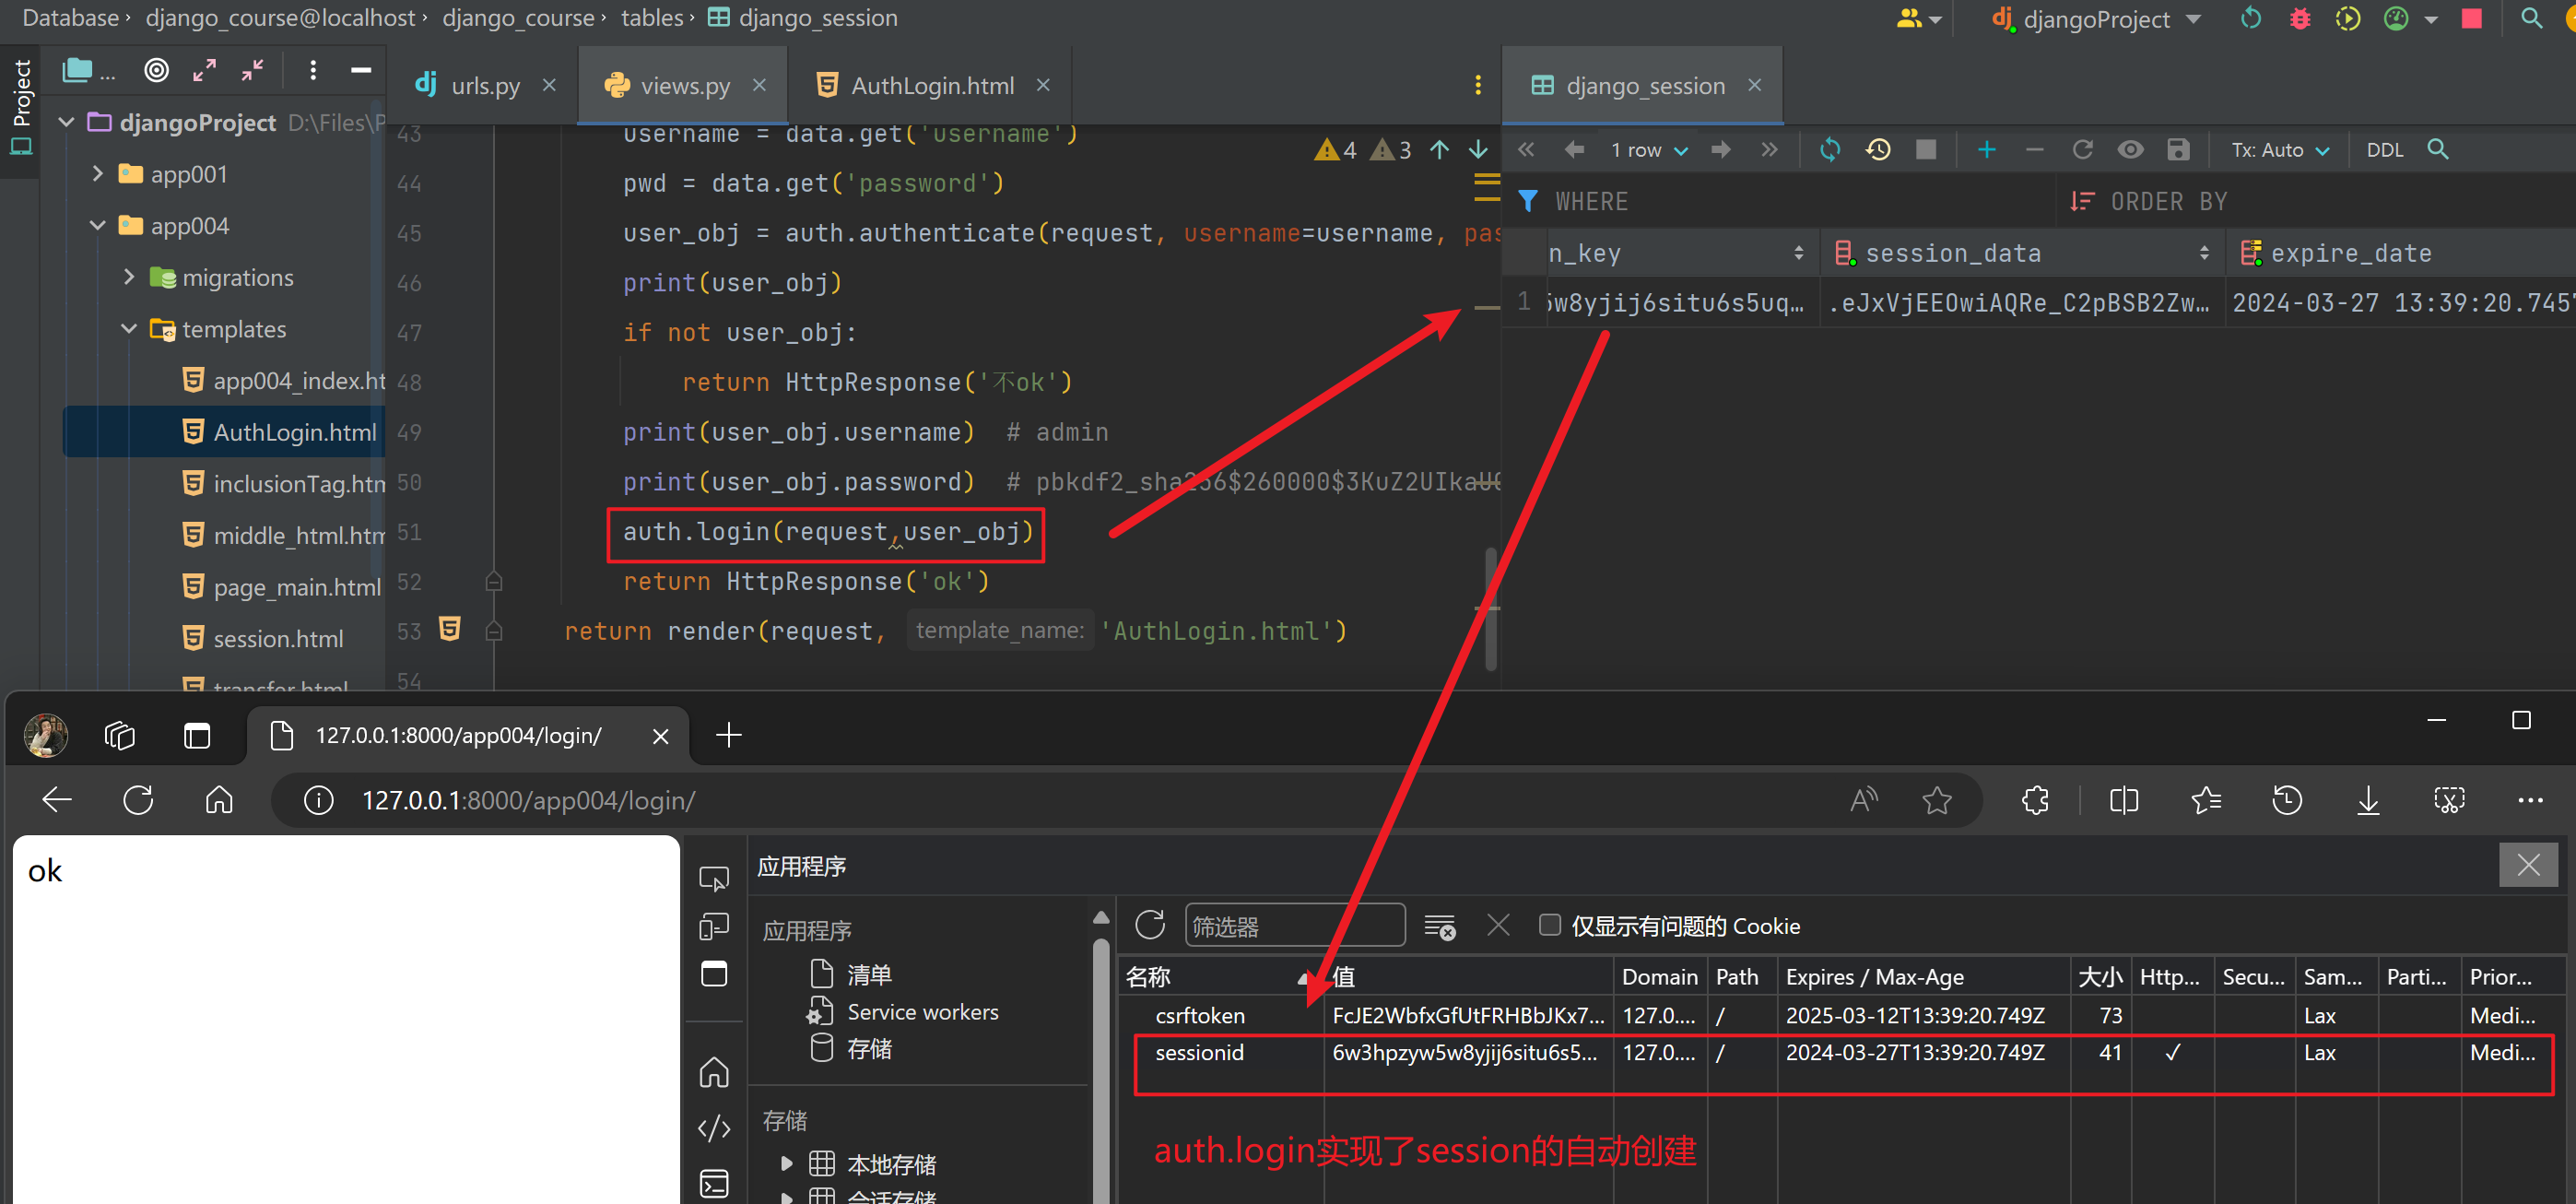
【4】保存用户状态
from django.contrib import auth

# obj就是上述auth.authenticate后的对象
auth.login(request,user_obj)
'''类似于'''
request.session[key]=user_obj
【补充方法】request.user/request.user.is_authenticated
'''request.user :返回当前登录用户'''
# 如果登录过返回对应的用户对象
# 如果没有登录过返回【AnonymousUser】匿名用户

'''request.user.is_authenticated:返回是否是登录用户,如果是匿名用户返回False'''
【5】auth模块中的登录装饰器
# 导入模块
from django.contrib.auth.decorators import login_required

@login_required(login_url='指定页面')
def func(request):
    return xxx
- 如果不想每次都指定
login_url,可以在配置文件中设置参数
# settings.py
LOGIN_URL = '未登录跳转的页面'
【6】修改用户密码
- 修改用户密码的前提是已经登录过
- 通过
request.user.set_password(new_password) request.user.check_password('输入的密码'):与数据库中密码进行比对,返回布尔值
@login_required
def set_password(request):
    if request.method == 'POST':
        old_password = request.POST.get('old_password')
        new_password = request.POST.get('new_password')
        confirm_password = request.POST.get('confirm_password')
        # 先校验两次密是否一致
        if new_password == confirm_password:
            # 校验旧密码是否相同
            is_right = request.user.check_password(old_password)  # 内部自己加密密码进行比对
            # 返回的结果为  True 或者 False
            if is_right:
                # 修改密码
                request.user.set_password(confirm_password) # 仅仅在修改对象的属性
                # 修改完密码后进行保存数据
                request.user.save()

        return redirect('/login/')

    return render(request, 'set_password.html', locals())
【7】注销登录logout
auth.logout(request)
@login_required  # 登录装饰器,意味着必须有登录状态的session
def logout(request):
    # 调用auth.logout(request)方法,清空session会话的数据
    # 下次再使用时,就需要重新设置session才能使用,实现了注销登录的功能
	auth.logout(request)

 浙公网安备 33010602011771号