props配置项、mixin(混入)、插件、elementui使用、localStorage和sessionStorage、vue Router、vuex
一、props其他
安装依赖
cnpm install
做成纯净的vue项目
-
在router的index.js中删除about的路由
-
删除所有小组件和about页面组件
-
App.vue只留
<template>
	<div id="app">
        <router-view/>
    </div>
</template>
自定义属性,在子组件中接收传入的数据
//方式一:使用数组
	props:['name']
//方式二:使用对象
	props: {name: Number}
//方式三:使用对象,默认值和必填
	props: {
        name: {
            type: String,  //类型
            required: true,  //必要性
            default: '王老五'  //默认值
        }
    }
二、混入mixin
可以把多个组件共用的配置提取成一个混入对象
使用步骤:
-
1、定义混入对象,在src目录下新建mixin包,下新建index.js
-
2、在index.js中写代码(组件中会用到的,data、methods。。。配置项)
export const jason = { methods: { showName() { alert(this.name); // 没有this.name }, }, mounted() { console.log("你好啊!,页面挂载执行") }, } -
3、局部使用(只在当前组件中使用)
import {jason} from '@/mixin' // 配置项 mixins: [jason] -
4、全局使用(所有组件都可以用)main.js中
import {jason} from '@/mixin' Vue.mixin(jason) //Vue.mixin(jason2) //Vue.mixin(jason3) -
5、在组件中,直接使用即可
三、插件
功能:用于增强Vue
本质:包含install方法的一个对象,install的第一个参数是Vue,第二个以后的参数是插件使用者传递的数据
使用步骤:
-
1、新建包plugins,新建index.js
import Vue from "vue"; import axios from "axios"; export default { install(vue) { console.log('执行了插件', vue) // 可以做的事 // 1.了解,自定义指令 // 2.定义全局变量,以后在任何组件中都可以使用到,借助于Vue.prototype往里放,以后所有组件只要this.$ajax 就是axios对象 // 3.使用全局混入 // 4.自定义全局组件 } } -
2、在main.js 中配置
使用自定义插件
import plugin from "@/plugins"
Vue.use(plugin)
四、elementui使用
在vue上,css样式,用的最多的是elementui,但是还有其他
-elementui			做网页端 样式用的多 vue2的 饿了么团队开发的
-elementui-plus		第三方团队继续基于vue3写的
-vant				做app的样式
-iview				pc端用www.iviewui.com
使用:
-
安装
# 命令行下载 cnpm i element-ui -s -
配置完整引入 ,在main.js中写入以下内容
import ElementUI from 'element-ui'; import 'element-ui/lib/theme-chalk/index.css'; Vue.use(ElementUI) // 以后在咱们组件中直接使用elementui提供的全局组件即可 -
在组件中使用
去官网看到好看的,复制贴到你的项目中
五、localStorage和sessionStorage和cookies
都是在浏览器存储数据的---》存数据有什么用?
- 登录成功token存在本地
- 不登录加入购物车功能,迪卡侬这个 网站就是存在了localStorage中
- 组件间通信---》跨组件
如果想在浏览器中存储数据
永久存储:localStorage	不登录加购物车,没登录搜索过的商品

关闭页面数据就没了(临时存储):sessionStorage

设定一个时间,到时候就过期:cookie
localStorage
永久存储,除非清空缓存,手动删除,代码删除
<template>
	<div>
        <h1>localStorage操作</h1>
        <button @click="insertStorage">写入localStorage数据</button>
    	<button @click="getStorage">获取localStorage数据</button>
    	<button @click="removeStorage">删除localStorage数据</button>
    </div>
</template>

<script>
import cookies from 'vue-cookies'

export default {
    name: 'homeView',
    data () {
        return {
            userInfo: {name: 'jason', age:18}
        }
    },
    methods: {
        insertLocalStorage() {
          // value 必须是字符串,如果是对象或数组 ,转成json格式字符串
          localStorage.setItem('userinfo', JSON.stringify(this.userInfo))
        },
        getLocalStorage() {
          // 取出json格式字符串,再转成对象
          var res = localStorage.getItem('userinfo')
          console.log(typeof res)
          var res1 = JSON.parse(res)
          console.log(typeof res1)
        },
        deleteLocalStorage() {
          // localStorage.clear()  // 清空全部
          localStorage.removeItem('userinfo') // 只删除某个
    },
  }
}
</script>
sessionStorage
关闭浏览器,自动清理
<template>
	<div>
        <h1>sessionStorage使用</h1>
        <button @click="insertSessionStorage">写入sessionStorage使用</button>
        <button @click="getSessionStorage">获取sessionStorage使用</button>
        <button @click="deleteSessionStorage">删除sessionStorage使用</button>
    </div>
</template>

<script>
export default {
    name: 'homeView',
    data () {
        return {
            userInfo: {name: 'jason', age:18}
        }
    },
    methods: {
        insertSessionStorage() {
          // value 必须是字符串,如果是对象或数组 ,转成json格式字符串
          sessionStorage.setItem('userinfo', JSON.stringify(this.userInfo))

        },
        getSessionStorage() {
          // 取出json格式字符串,再转成对象
          var res = sessionStorage.getItem('userinfo')
          console.log(typeof res)
          var res1 = JSON.parse(res)
          console.log(typeof res1)

        },
        deleteSessionStorage() {
          // sessionStorage.clear()
          sessionStorage.removeItem('userinfo') // 只删除某个
        }
	}
}
</script>
Cookie
有过期时间,到过期时间自动清理,借助于第三方 vue-cookies
<template>
	<div>
        <h1>Cookie使用</h1>
    	<button @click="insertCookie">写入Cookie使用</button>
    	<button @click="getCookie">获取Cookie使用</button>
    	<button @click="deleteCookie">删除Cookie使用</button>
    </div>
</template>

<script>
export default {
    name: 'homeView',
    data () {
        return {
            userInfo: {name: 'jason', age:18}
        }
    },
    methods: {
        insertCookie() {
          // vue 中操作cookie,需要借助于第三方,vue-cookie
          // value 必须是字符串,如果是对象或数组 ,转成json格式字符串
          cookies.set('userinfo', JSON.stringify(this.userInfo), 1)

        },
        getCookie() {
          // 取出json格式字符串,再转成对象
          console.log(cookies.get('userinfo'))

        },
        deleteCookie() {
          cookies.delete('userinfo')
        },
	}
}
</script>
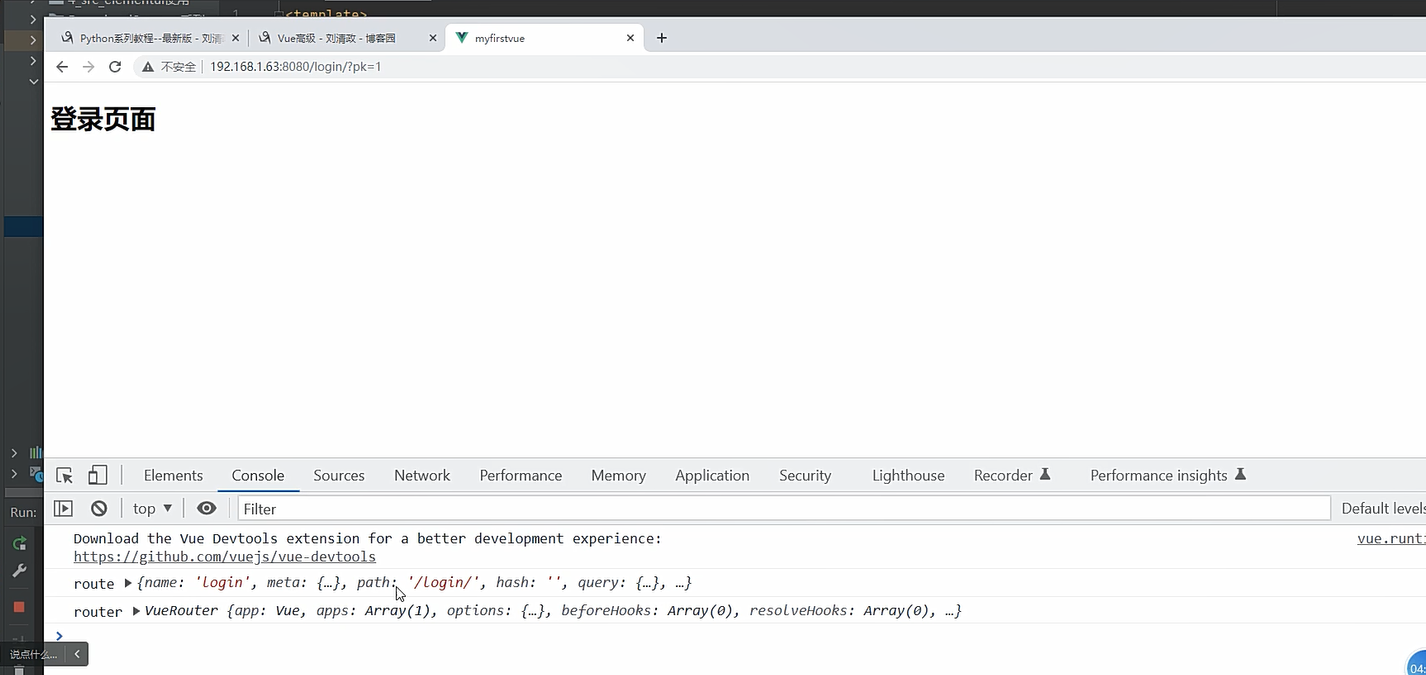
六、vue Router
第三方插件,用来实现SPA的vue插件
-单页面应用---》实现在一个index.html中有页面跳转效果的,插件
-路由控制
-<router-link>  跳转用
-<router-view>  替换页面组件用
1、基本使用
-
创建vue项目时加入了,直接用即可
如果之前没装:先下载,在项目中创建router包,写个index.js代码copy过来,main.js写一下
-
配置路由的跳转(跳转页面组件),只需要在routes数组中写对象即可
import Vue from 'vue' import VueRouter from 'vue-router' import HomeView from '../views/HomeView.vue' Vue.use(VueRouter) const routes = [ { path: '/', name: 'home', component: HomeView }, // 以后添加路由,就是模仿上面的home写对象,导入vue文件,更改路由路径,然后写上对应的vue文件名称 ] const router = new VueRouter({ mode: 'history', base: process.env.BASE_URL, // 这里跟我们创建时候的配置选项有关,有一个地方询问我们是否开始这个历史模式,还有一个配置是询问我们项目依赖在哪个位置 routes // 这就是我们上面定义的存储路由信息的数组 }) export default router // 这里我们把VueRouter产生的对象导出 -
main.js 也要导入注册
import Vue from 'vue' import App from './App.vue' import router from './router' import store from './store' Vue.config.productionTip = false new Vue({ router, store, render: h => h(App) }).$mount('#app') -
一定要写个视图组件
2、点击跳转的两种方式
-
js控制
this.$router.push('路径') -
标签控制
<router-link to="/home">
	<button>点我跳转到home页面</button>
</router-link>
<template> <div> <button @click="goLogin">点我跳转到登录</button> </div> </template> <script> export default { name: 'HomeView', data() { return { obj: {name: 'login', query: {name: 'lqz'}, params: {id: 999}} } }, methods: { goLogin() { // js 控制的跳转 ,跳转到login页面 this.$router.push('/login/') } }, } </script> -
相关API
代码 作用 this.$router.push(path): 相当于点击路由链接(可以返回到当前路由界面) this.$router.replace(path): 用新路由替换当前路由(不可以返回到当前路由界面) this.$router.back(): 请求(返回)上一个记录路由 this.$router.go(-1): 请求(返回)上一个记录路由 this.$router.go(1): 请求下一个记录路由
3、路由跳转,携带数据的两种方式
-
第一种方式
/course/?pk=1 带在路径中使用 ? 携带 this.$route.query.pk -
第二种方式
/course/1/

router/index中路径得改
	{
		path: '/login/:id',
        name: 'login',
        component: Login
	},

	this.$route.params.id
4、区分this.$route 与 this.$router
this.$router  # new VueRouter对象,实例,可以实现路由的跳转

this.$route  # 是当前路由对象,内部有传入的参数
5、两种跳转方式,使用对象进行跳转方式
我们也可以使用对象来携带参数
js控制实现路由跳转
- 第一种方式:/course/?pk=1(这样进行路由跳转,路由会变成这样)
this.$router.push({
	name: 'login',
	query: {
  		name: 'lqz',
  		age: 19
	},
})
- 第二种方式:/course/1/ (这样进行路由跳转,路由会变成这样)
我们可以使用params来接收数据
this.$router.push({
	name: 'login',
	params: {
		id: 88
	}
})
标签控制实现路由跳转
我们可以在标签上把to这里设置成属性指令,让他传入一个对象,在对象中携带数据
规律也是跟上面js跳转一样的,携带了params的跳转需要在路由层更改路由,没有携带params的跳转会用?号在路由后面携带数据
<template>
  <div>

<!--    <router-link to="/home">-->
<!--    <router-link :to="obj">-->
    <router-link :to="{name: 'login', query: {name: 'lqz'}, params: {id: 999}}">
      <button>点我跳转到home页面</button>
    </router-link>

  </div>
</template>

<script>

export default {
  name: 'HomeView',
  data() {
    return {
      obj: {name: 'login', query: {name: 'lqz'}, params: {id: 999}}
    }
  },
}
</script>
6、路由守卫
1、作用:对路由进行权限控制
2、分类:全局守卫、独享守卫、组件内守卫
全局守卫
全局守卫有两种
	-前置路由守卫
    	在进路由前,执行代码(任意路由跳转都会触发它的执行)
	-后置路由守卫
    	路由跳转走,执行代码
-
全局前置路由守卫
//全局前置路由守卫————初始化的时候被调用、每次路由切换之前被调用
router.beforeEach((to, from, next) => {
    // to 是去哪,哪个路由对象
    // from 是来自哪,是哪个路由对象  比如从  /--->/login
    // next 是函数,如果加括号执行,就会真正的过去
    console.log('前置路由守卫', to, from, next)
    // next() // 真正跳转到 要去的路径

    if (to.name == 'login') {
        console.log('走了')
        next()
    } else if (res) {
        next()
    } else {
        alert('您没有登录')
        // 跳转到login--->没有解决---》你们搜一下如何解决
        // console.log(this)
        router.push({name: 'login', params: {id: 99}})
    }
}
)
七、vuex
1.概念
在Vue中实现集中式状态(数据)管理的一个Vue插件,对vue应用中多个组件的共享状态进行集中式的管理(读/写),也是一种组件间通信的方式,且适用于任意组件间通信。
2.何时使用?
多个组件需要共享数据时
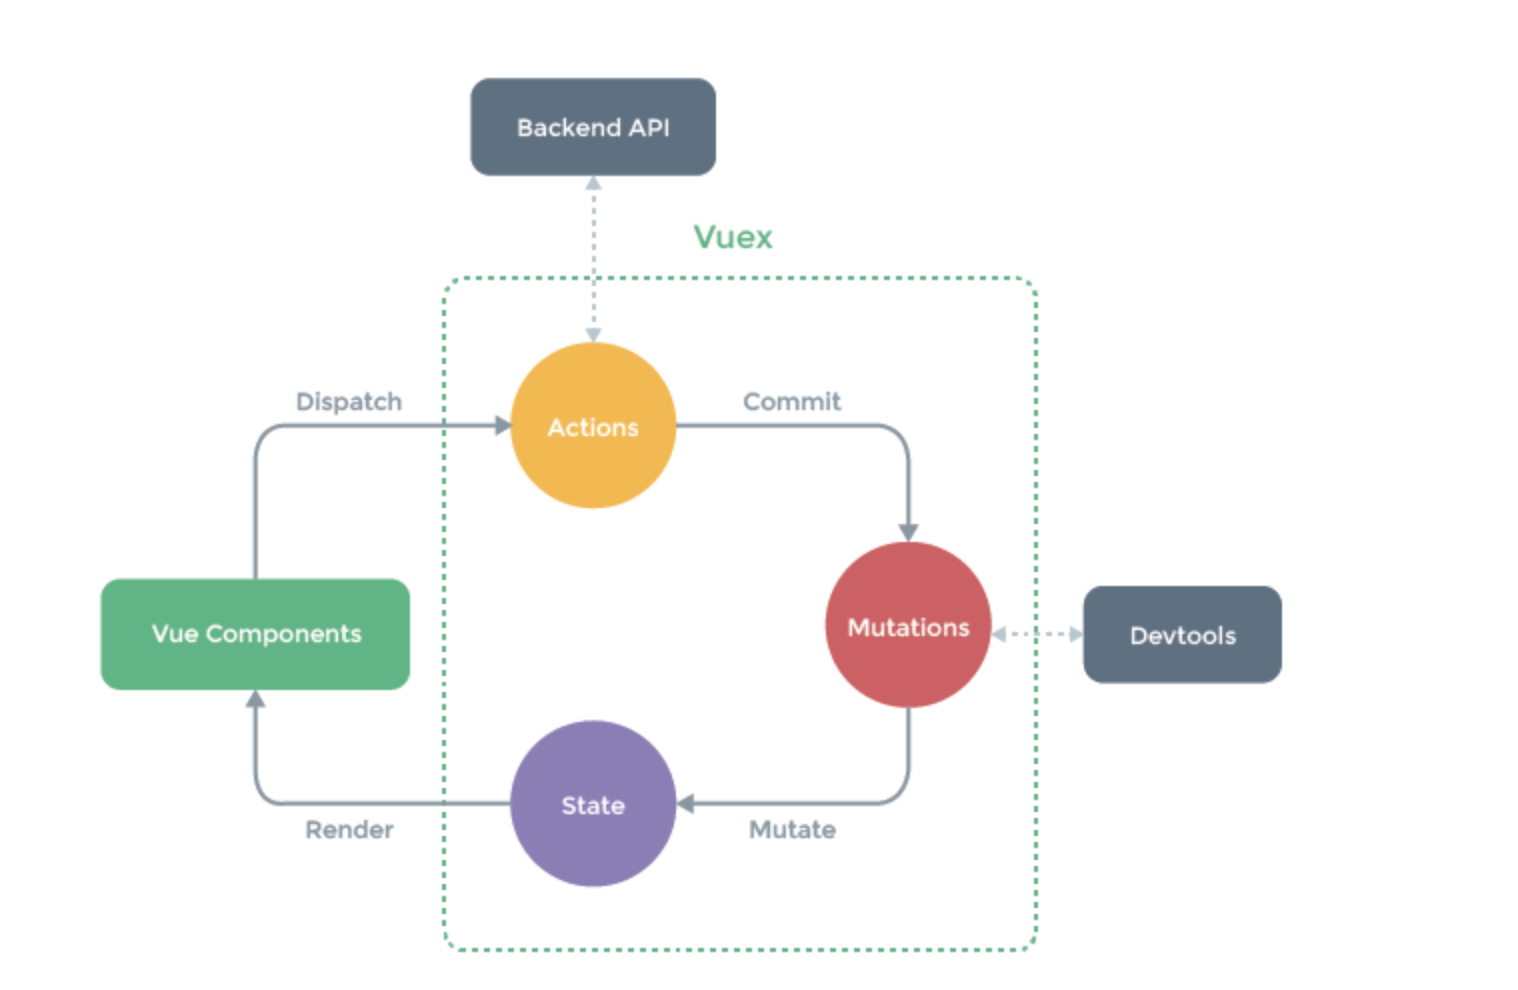
基本情况可以参考第二张图的流程讲解,中间的步骤是为了实现给后端发送请求等操作,所以才这样设计的。
三个状态介绍
state:真正存数据的
mutations:修改state的地址 state.变量名,修改即可
actions:判断,跟后端交互,调用mutations的地方  context.commit
如何查看组件中显示state的变量
-我们可以在组件中显示state的变量
    html中:
        {{$store.state.变量名}}
    js中:
        this.$store.state.变量面
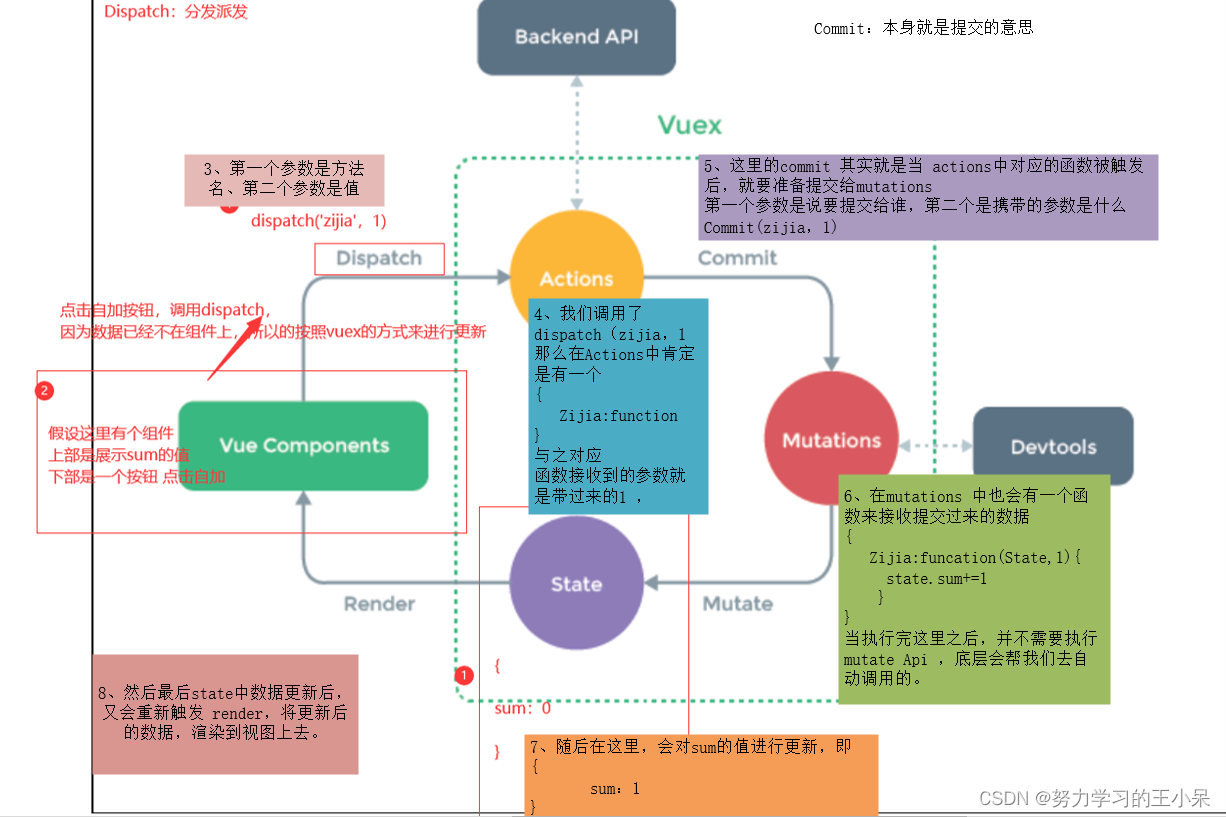
如何更改state中的值
-推荐按正常步骤---》this.$store.dispatch('actions中的方法',参数)---》actions中的方法调用 context.commit('mutations',参数)---》在mutations中直接修改state的值
可以跨过任何一步(但最好按照流程编写)
this.$store.commit()
this.$store.state.变量名
3.搭建vuex环境
1、创建文件:src/store/index.js
//引入Vue核心库
import Vue from 'vue'
//引入Vuex
import Vuex from 'vuex'
//应用Vuex插件
Vue.use(Vuex)

//准备actions对象——响应组件中用户的动作
const actions = {}
//准备mutations对象——修改state中的数据
const mutations = {}
//准备state对象——保存具体的数据
const state = {}

//创建并暴露store
export default new Vuex.Store({
    actions,
    mutations,
    state
})
store内部有一个方法,但是另外两个用的不多,不用管(也没讲解)
import Vue from 'vue'
import Vuex from 'vuex'

Vue.use(Vuex)

export default new Vuex.Store({
  state: {
  },
  getters: {
  },
  mutations: {
  },
  actions: {
  },
  modules: {
  }
})
2、在main.js中创建store配置项
......
//引入store
import store from './store'
......

//创建vm
new Vue({
    el:'#app',
    render: h => h(App),
    store
    ...
})
3、举例
这里我们编写了一个购物车来举例
src/store/index.js
import Vue from 'vue'
import Vuex from 'vuex'
import axios from "axios";

Vue.use(Vuex)

export default new Vuex.Store({
    state: {
        num: 10,
        good_num: 0
    },

    mutations: {
        add(state, value) {
            // state就是上面的的state
            // value是传入的值
            state.num = state.num + value
        },
        addShopping(state) {
            state.good_num += 1
        }
    },
    actions: {
        add(context, value) {
            console.log(context)
            console.log(value)
            context.commit('add', value)  // 它会触发mutations里面add的执行


        },

        addShopping(context, id) {
            // 发送ajax请求,把id携带后后端,把这个商品加入到购物车数据库

            context.commit('addShopping')
        }
    }
})
这里记得去main.js中添加配置
Index.vue
<template>
  <div>
    <h1>vuex的使用</h1>


    <!--    <button @click="add">点我自增1</button>-->
    <!--    {{ $store.state.num }}-->


    <ul>
      <li v-for="item in goodList">
        商品id:{{ item.id }}--->商品名:{{ item.name }}--->商品价格:{{ item.price }}--->
        <button @click="addShopppingCart(item.id)">加入购物车</button>
      </li>
    </ul>
    <hr>
    <ShoppingCart></ShoppingCart>


  </div>
</template>

<script>
import ShoppingCart from "@/little/ShoppingCart";

export default {
  name: 'HomeView',
  data() {
    return {
      goodList: [
        {id: 1, name: '钢笔', price: 2},
        {id: 2, name: '内衣', price: 244},
        {id: 3, name: '秋衣', price: 222},
        {id: 4, name: '秋裤', price: 23},
      ],
    }

  },
  methods: {
    add() {
      // 直接改,没问题,但是不建议
      // this.$store.state.num++

      // 1 先触发actions的执行--->触发store中的actions中定义的add,并且把1传给value
      this.$store.dispatch('add', 1)
    },

    addShopppingCart(id) {
      // this.$store.dispatch('addShopping',id)
      // this.$store.state.good_num+=1
      this.$store.commit('addShopping')

    }
  },
  components: {
    ShoppingCart
  }


}
</script>

 浙公网安备 33010602011771号