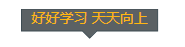
如何设置绘制一个对话框,对话框随内容自适应宽度
<Canvas>
        <TextBlock x:Name="stitchOverTopTextBlock"FontFamily="Microsoft YaHei" Text="好好学习 天天向上"
           SizeChanged="stitchOverTopTextBlock_SizeChanged" Panel.ZIndex="1" Foreground="#FFB711" FontSize="14"VerticalAlignment="Center" HorizontalAlignment="Center"/>
        <Path Stroke="#3D4B52" StrokeThickness="1">
            <Path.Fill>
                <SolidColorBrush Color="#151E22" Opacity="0.7"/>
            </Path.Fill>
            <Path.Data>
                <PathGeometry>
                    <PathFigure IsClosed="True" StartPoint="0,0">
                        <PathFigure.Segments>
                            <LineSegment x:Name="P1" Point="0,0"/>
                            <LineSegment x:Name="P2" Point="0,22"/>
                            <LineSegment x:Name="P3" />
                            <LineSegment x:Name="P4" />
                            <LineSegment x:Name="P5" />
                            <LineSegment x:Name="P6" />
                            <LineSegment x:Name="P7" />
                            <LineSegment x:Name="P8" Point="0,0"/>
                        </PathFigure.Segments>
                    </PathFigure>
                </PathGeometry>
            </Path.Data>
        </Path>
</Canvas>
通过使用SizeChanged事件控制Path的形状:
        private void stitchOverTopTextBlock_SizeChanged(object sender, SizeChangedEventArgs e)
        {
            //绘制对话框
            P3.Point = new Point((stitchOverTopTextBlock.ActualWidth + 20) / 2 - 7, 22);
            P4.Point = new Point((stitchOverTopTextBlock.ActualWidth + 20) / 2, 29);
            P5.Point = new Point((stitchOverTopTextBlock.ActualWidth + 20) / 2 + 7, 22);
            P6.Point = new Point(stitchOverTopTextBlock.ActualWidth + 20, 22);
            P7.Point = new Point(stitchOverTopTextBlock.ActualWidth + 20, 0);
        }

 浙公网安备 33010602011771号