前端Axios-Day45
Axios源码分析:
① 模拟Axios对象的创建过程:
1. Axios构造函数本身应具有defaults(默认配置参数)和intercepters(拦截器参数)
2. 在Axios原型上添加request、get、post等方法。
3. 创建实例化函数:实例化axios对象,创建instance对象并赋值axios原型上的方法(使用bind方法将this指向指向实例化的axios对象)使instance成为函数对象。
4. 遍历Axios原型的方法,给instance对象添加方法,使得其可直接使用方法或调用使用。
5. 遍历axios的实例化对象,为instance对象添加defaults和intercepters属性。
        // 构造函数
        function Axios(config) {
            this.defaults = config
            this.intercepters = {
                request: {},
                response: {}
            }
        }
        // 原型添加相关方法
        Axios.prototype.request = function (config) {
            console.log('发送Ajax请求' + config.method);
        }
        Axios.prototype.get = function (config) {
            return this.request({ method: 'GET' })
        }
        Axios.prototype.post = function (config) {
            return this.request({ method: 'POST' })
        }
        // 声明函数
        function createInstance(config) {
            // 实例化对象
            let context = new Axios(config)
            // 创建请求函数
            let instance = Axios.prototype.request.bind(context)
            // instance成为函数 不能再使用instance.get
            // 将Axios.prototype中的方法添加到instance中
            Object.keys(Axios.prototype).forEach(key => {
                instance[key] = Axios.prototype[key].bind(context)
            })
            // 为instance添加属性defaults和intercepters
            Object.keys(context).forEach(key => {
                instance[key] = context[key]
            })
            return instance
        }
② 模拟Axios对象的请求过程:
1. 声明构造函数Axios。
2. Axios原型添加request方法,在其中创建promise对象和chains数组,并使用then方法指定回调,使整个方法返回promise对象。
3. 声明dispatchRequest方法,负责发送请求,其中调用适配器函数并使用then方法回调promise结果。
4. 声明适配器adapter,其中返回的是一个promise对象。在其中使用xhr发起Ajax请求,在成功处进行resolve进行数据处理。
      // 1.声明构造函数
        function Axios(config) {
            this.config = config
        }
        Axios.prototype.request = function (config) {
            // 发送请求
            // 创建 promise
            let promise = Promise.resolve(config)
            // 创建数组,undefined实现占位
            let chains = [dispatchRequest, undefined]
            // 调用 then方法指定回调
            let result = promise.then(chains[0], chains[1])
            // 返回 promise结果
            return result
        }
        // 2.dispatchRequest
        function dispatchRequest(config) {
            // 调用适配器发送请求
            return xhrAdapter(config).then(response => {
                // 响应结果转化处理
                return response
            }, error => {
                throw error
            })
        }
        // 3.adapter适配器
        function xhrAdapter(config) {
            return new Promise((resolve, reject) => {
                let xhr = new XMLHttpRequest()
                xhr.open(config.method, config.url)
                xhr.send()
                xhr.onreadystatechange = function () {
                    if (xhr.readyState === 4) {
                        if (xhr.status >= 200 && xhr.status <= 300) {
                            resolve({
                                // 配置对象
                                config: config,
                                // 响应体
                                data: xhr.response,
                                // 响应头
                                headers: xhr.getAllResponseHeaders(),
                                // xhr请求对象
                                request: xhr,
                                // 响应状态码
                                status: xhr.status,
                                // 响应状态字符串
                                statusText: xhr.statusText,
                            })
                        } else {
                            reject(new Error('请求失败'))
                        }
                    }
                }
            })
        }
        // 4.创建axios函数
        let axios = Axios.prototype.request.bind(null)
        axios({
            method: 'GET',
            url: 'http://localhost:3000/posts'
        }).then(response => console.log(response))
③ 模拟Axios拦截器:
1. 创建构造函数Axios,属性为config配置对象和interceptors(对象属性为request和response,均为InterceptorManager的实例)
2. 创建拦截器管理构造函数InterceptorManager:添加handlers数组属性,存储拦截器的回调。
3. 为InterceptorManager原型添加use方法:参数为promise的状态,直接压入handlers中。
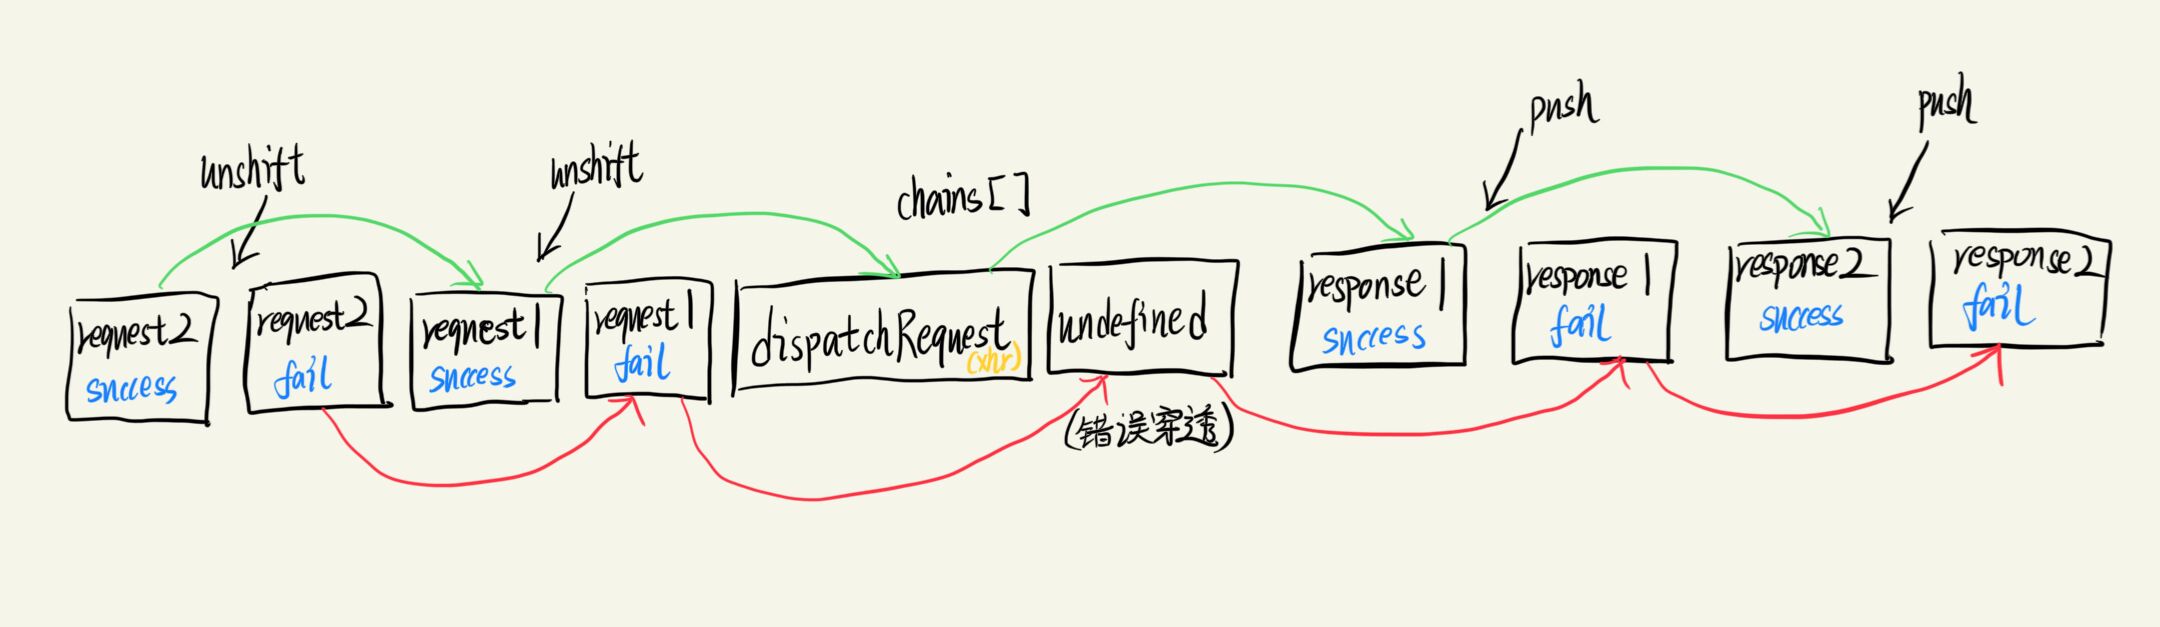
4. 为Axios原型添加request方法:在其中定义各种请求操作,定义promise对象,并定义调用方法的chains数组。设置处理拦截器的方法:对于请求拦截器,采取将handlers内的拦截器回调使用unshift压入chains数组最前方。对于响应拦截器,采取将handlers内的拦截器回调使用push方法压入chains数组最后。最后遍历chains数组,从首位向后依次遍历,不断生成promise对象。
5. 定义dispatchRequest函数:实现ajax请求。
     // 构造函数
        function Axios(config) {
            this.config = config
            this.interceptors = {
                request: new InterceptorManager(),
                response: new InterceptorManager()
            }
        }
        // 发送请求(重点)
        Axios.prototype.request = function (config) {
            // 创建一个promise对象
            let promise = Promise.resolve(config)
            const chains = [dispatchRequest, undefined]
            // 处理拦截器
            // 请求拦截器:将请求拦截器的回调 压入chains前面
            this.interceptors.request.handlers.forEach(item => {
                chains.unshift(item.fulfilled, item.rejected)
            })
            // 响应拦截器:将响应拦截器的回调 压入chains末尾
            this.interceptors.response.handlers.forEach(item => {
                chains.push(item.fulfilled, item.rejected)
            })

            // 遍历chains,不断调用then方法从chains数组中取出并生成promise
            while (chains.length) {
                promise = promise.then(chains.shift(), chains.shift())
            }
            return promise
        }
        function dispatchRequest(config) {
            // 返回一个promise队形
            return new Promise((resolve, reject) => {
                resolve({
                    status: 200,
                    statusText: 'OK'
                })
            })
        }
        // 拦截器管理器构造函数
        function InterceptorManager() {
            this.handlers = []
        }
        InterceptorManager.prototype.use = function (fulfilled, rejected) {
            this.handlers.push({
                fulfilled,
                rejected
            })
        }
        // 创建axios函数
        // 创建实例 将context 属性 config和 interceptors添加至axios
        let context = new Axios({})
        let axios = Axios.prototype.request.bind(context)
        Object.keys(context).forEach(key => {
            axios[key] = context[key]
        })
        axios.interceptors.request.use(config => {
            console.log('请求拦截器1');
            return config
        }, error => {
            return Promise.reject(error)
        })
        axios.interceptors.request.use(config => {
            console.log('请求拦截器2');
            return config
        }, error => {
            return Promise.reject(error)
        })
        axios.interceptors.response.use(config => {
            console.log('响应拦截器1');
            return config
        }, error => {
            return Promise.reject(error)
        })
        axios.interceptors.response.use(config => {
            console.log('响应拦截器2');
            return config
        }, error => {
            return Promise.reject(error)
        })
        axios({
            method: 'GET',
            url: 'http://localhost:3000/posts'
        }).then(response => console.log(response))
注意:由于对于请求拦截器回调和响应拦截器回调的压入方式不同,故造成了不同的执行时机,最后的执行结果为:请求拦截器2、请求拦截器1、响应拦截器1、响应拦截器2。
这里的undefined实际上起到了占位的作用,使得整个执行链能正常运行。当拦截器均为成功时,像跳板一样不断执行至最后。
当执行失败时,走到undefined由于错误穿透缘故不会立即终止而是继续执行至最后。
④ 模拟Axios取消请求:
1.创建Axios构造函数。
2. 为Axios原型绑定request方法并调用dispatchRequest方法。
3. 创建dispatchRequest方法,调用xhrAdapter适配器方法。
4. 创建xhrAdapter方法,返回promise对象。
5. 声明CancelToken函数:声明一个resolvePromise变量!给这个函数本身添加一个promise对象,并将成功回调函数resolve赋值给resolvePromise变量。在其中再创建一个executor函数,在函数内执行resolvePromise方法。后续一旦调用executor方法,则调用resolvePromise方法则promise状态将变为成功!
6. 对xhrAdapter方法内进行补充,补充取消请求的处理情况,先判断此时配置对象上是否存在cancelToken属性,若存在则调用其上的promise方法的then方法,内执行xhr.abort方法达到取消请求的目的。
执行机制:若给此时axios请求配置了cancelToken属性,并且赋值为cancel的一个函数且执行时。则会去调用CancelToken中的executor函数,直接执行resolve Promise函数。相当与执行了其内部promise对象的resolve方法,则此时内置promise对象状态发生改变,返回到xhrAdapter函数内部执行xhr.abort方法达到了取消请求的功能。
     function Axios(config) {
            this.config = config
        }
        Axios.prototype.request = function (config) {
            return dispatchRequest(config)
        }
        function dispatchRequest(config) {
            return xhrAdapter(config)
        }
        function xhrAdapter(config) {
            return new Promise((resolve, reject) => {
                let xhr = new XMLHttpRequest()
                xhr.open(config.method, config.url)
                xhr.send()
                xhr.onreadystatechange = function () {
                    if (xhr.readyState === 4) {
                        if (xhr.status >= 200 && xhr.status <= 300) {
                            resolve({
                                status: xhr.status,
                                statusText: xhr.statusText
                            })
                        } else {
                            reject(new Error('请求失败'))
                        }
                    }
                }

                // 关于取消请求处理
                if (config.cancelToken) {
                    // 对cancelToken上的promise对象指定成功回调
                    config.cancelToken.promise.then(value => {
                        // 原生取消请求的方法
                        xhr.abort()
                        reject(new Error('取消请求'))
                    })

                }
            })
        }

        const context = new Axios({})
        let axios = Axios.prototype.request.bind(context)

        // 声明 CancelToken函数
        function CancelToken(executor) {
            // 声明变量
            var resolvePromise
            this.promise = new Promise((resolve) => {
                // 将resolve赋值给resolvePromise
                resolvePromise = resolve
            })
            // 调用executor函数
            executor(function () {
                // 执行resolvePromise函数 此时promise状态改变为成功!
                resolvePromise()
            })
        }


        // 事例:
        const btn_send = document.querySelector('.send')
        const btn_cancel = document.querySelector('.cancel')

        let cancel = null

        btn_send.onclick = function () {
            if (cancel !== null) {
                cancel()
            }
            // 创建cancelToken的值
            let cancelToken = new CancelToken(function (c) {
                cancel = c
            })
            axios({
                method: 'GET',
                url: 'http://localhost:3000/posts',
                cancelToken: cancelToken
            }).then(response => {
                console.log(response)
                cancel = null
            })
        }

        btn_cancel.onclick = function () {
            cancel()
        }
Axios总结:
① axios和Axios的关系:从功能上看,axios是Axios的实例(作为对象具有了Axios对象的属性和方法),从语法上说,axios不是Axios的实例(是由Axios原型的方法绑定返回的函数:axios = Axios.prototype.request.bind(实例对象))。
② instance和axios的区别:
相同:都具有能够发送任意请求的函数request,都有发送特定请求的方法(get、post、put、delete)、都有默认配置和拦截器属性(defaults和interceptors)
不同:instance不具有anxios后续添加的成员:create()、CancelToken()、all()
③ axios的执行流程:request(config) => dispatchRequset(config) => xhrAdapter(config)
④ 拦截器:
请求拦截器:在真正发送请求前执行的回调函数,成功回调函数必须是config,失败回调函数默认为error
响应拦截器:得到响应后执行的回调函数,成功回调默认为response,失败为error

 浙公网安备 33010602011771号