Docker下打包FastDFS镜像以及上传遇到的问题
官方地址:https://github.com/happyfish100/fastdfs
一、先下载个包,然后解压(自己找个目录下载即可)
[root@localhost soft]# wget https://github.com/happyfish100/fastdfs/archive/master.zip
--2019-09-16 05:26:36--  https://github.com/happyfish100/fastdfs/archive/master.zip
Resolving github.com (github.com)... 13.250.177.223
Connecting to github.com (github.com)|13.250.177.223|:443... connected.
HTTP request sent, awaiting response... 302 Found
Location: https://codeload.github.com/happyfish100/fastdfs/zip/master [following]
--2019-09-16 05:26:37--  https://codeload.github.com/happyfish100/fastdfs/zip/master
Resolving codeload.github.com (codeload.github.com)... 13.229.189.0
Connecting to codeload.github.com (codeload.github.com)|13.229.189.0|:443... connected.
HTTP request sent, awaiting response... 200 OK
Length: unspecified [application/zip]
Saving to: ‘master.zip’

    [    <=>                                                                                                                                                                                            ] 482,045      645KB/s   in 0.7s

2019-09-16 05:26:38 (645 KB/s) - ‘master.zip’ saved [482045]

[root@localhost soft]# unzip master.zip
Archive:  master.zip
14edb44071b27599a5fc8c818b643eed6fe15e11
   creating: fastdfs-master/
....
二、进入fastdfs-master/docker/dockerfile_network目录,执行打包命令
[root@localhost soft]# cd fastdfs-master/docker/dockerfile_network
[root@localhost dockerfile_network]#
打包(注意,你的宿主机内存至少要2G,不然会报错如下:)我之前只分配给宿主机1G内存,明显不够用。
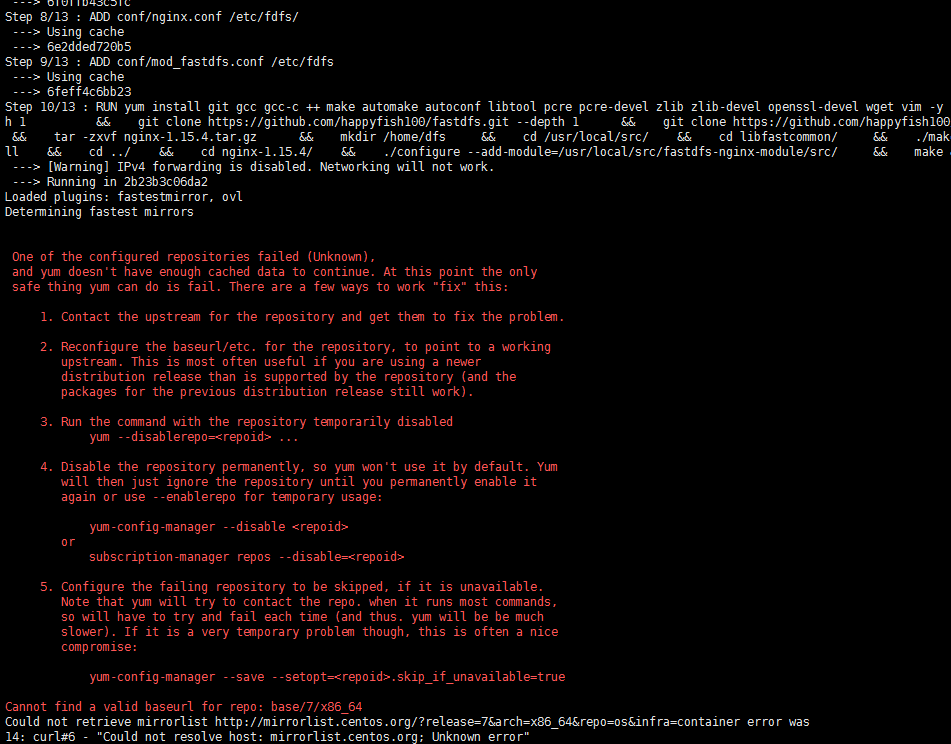
如果还不行,清理一下yum缓存
# yum clean all
Loaded plugins: fastestmirror, langpacks
Cleaning repos: base docker-ce-stable extras updates
Cleaning up everything
Maybe you want: rm -rf /var/cache/yum, to also free up space taken by orphaned data from disabled or removed repos

# rm -rf /var/cache/yum
好,执行命令打包:(注意最后有个点)
[root@localhost dockerfile_network]# docker build -t local/fastdfs:latest .
Sending build context to Docker daemon   68.1kB
Step 1/13 : FROM centos
 ---> 67fa590cfc1c
Step 2/13 : ADD conf/client.conf /etc/fdfs/
 ---> Using cache
 ---> f6d4d01d7cf4
Step 3/13 : ADD conf/http.conf /etc/fdfs/
 ---> Using cache
 ---> 09b5d6e42010
Step 4/13 : ADD conf/mime.types /etc/fdfs/
 ---> Using cache
 ---> 01ba930f4e2a
Step 5/13 : ADD conf/storage.conf /etc/fdfs/
 ---> Using cache
 ---> 628d5f17543d
Step 6/13 : ADD conf/tracker.conf /etc/fdfs/
 ---> Using cache
 ---> b62b681c8ee8
Step 7/13 : ADD fastdfs.sh /home
 ---> Using cache
 ---> 6f0ffb43c5fc
Step 8/13 : ADD conf/nginx.conf /etc/fdfs/
 ---> Using cache
 ---> 6e2dded720b5
Step 9/13 : ADD conf/mod_fastdfs.conf /etc/fdfs
 ---> Using cache
 ---> 6feff4c6bb23
Step 10/13 : RUN yum install git gcc gcc-c ++ make automake autoconf libtool pcre pcre-devel zlib zlib-devel openssl-devel wget vim -y   &&    cd /usr/local/src    &&    git clone https://github.com/happyfish100/libfastcommon.git --depth 1          &&    git clone https://github.com/happyfish100/fastdfs.git --depth 1      &&    git clone https://github.com/happyfish100/fastdfs-nginx-module.git --depth 1     &&    wget http://nginx.org/download/nginx-1.15.4.tar.gz      &&    tar -zxvf nginx-1.15.4.tar.gz      &&    mkdir /home/dfs     &&    cd /usr/local/src/    &&    cd libfastcommon/     &&    ./make.sh && ./make.sh install    &&    cd ../    &&    cd fastdfs/     &&    ./make.sh && ./make.sh install    &&    cd ../    &&    cd nginx-1.15.4/    &&    ./configure --add-module=/usr/local/src/fastdfs-nginx-module/src/     &&    make && make install    &&    chmod +x /home/fastdfs.sh
 ---> Using cache
 ---> 59424d66e1a1
Step 11/13 : VOLUME /etc/fdfs
 ---> Using cache
 ---> d72d68fd5ebf
Step 12/13 : EXPOSE 22122 23000 8888 80
 ---> Using cache
 ---> f0c2d84a954e
Step 13/13 : ENTRYPOINT ["/home/fastdfs.sh"]
 ---> Using cache
 ---> fc76c652493b
Successfully built fc76c652493b
Successfully tagged local/fastdfs:latest
(额,这是我第二次打包,我第一次打包输出好多内容的,你们自行体会,你们应该能看见 ---> Using cache 利用了缓存)

另:网友打包把体积缩小到30M左右,需要修改Dockerfile成如下所示,打包过程不变如上所示(https://github.com/happyfish100/fastdfs/issues/327)
FROM alpine:3.10

RUN set -x \
    && echo "http://mirrors.aliyun.com/alpine/latest-stable/main/" > /etc/apk/repositories \
    && echo "http://mirrors.aliyun.com/alpine/latest-stable/community/" >> /etc/apk/repositories \
    && apk update \
    && apk add --no-cache --virtual .build-deps gcc libc-dev make perl-dev openssl-dev pcre-dev zlib-dev git \
    && mkdir -p /usr/local/src \
    && cd /usr/local/src \
    && git clone https://github.com/happyfish100/libfastcommon.git --depth 1 \
    && git clone https://github.com/happyfish100/fastdfs.git --depth 1    \
    && git clone https://github.com/happyfish100/fastdfs-nginx-module.git --depth 1  \
    && wget http://nginx.org/download/nginx-1.15.4.tar.gz \
    && tar -xf nginx-1.15.4.tar.gz \
    && cd /usr/local/src/libfastcommon \
    && ./make.sh \
    && ./make.sh install \
    && cd /usr/local/src/fastdfs/ \
    && ./make.sh \
    && ./make.sh install \
    && cd /usr/local/src/nginx-1.15.4/ \
    && ./configure --add-module=/usr/local/src/fastdfs-nginx-module/src/ \
    && make && make install \
    && apk del .build-deps \
    && apk add --no-cache pcre-dev bash \
    && mkdir -p /home/dfs  \
    && mv /usr/local/src/fastdfs/docker/dockerfile_network/fastdfs.sh /home \
    && mv /usr/local/src/fastdfs/docker/dockerfile_network/conf/* /etc/fdfs \
    && chmod +x /home/fastdfs.sh \
    && rm -rf /usr/local/src*
VOLUME /home/dfs
EXPOSE 22122 23000 8888 8080
CMD ["/home/fastdfs.sh"]

测试上传
这里面有个坑。先启动镜像
docker run -d -e FASTDFS_IPADDR=[宿主机地址] -p 8888:8888 -p 22122:22122 -p 23000:23000 -p 8011:80 --name test-fast local/fastdfs
然后客户端上传,报错。com.github.tobato.fastdfs.exception.FdfsConnectException: 无法获取服务端连接资源:can't create connection to/172.17.0.1:23000
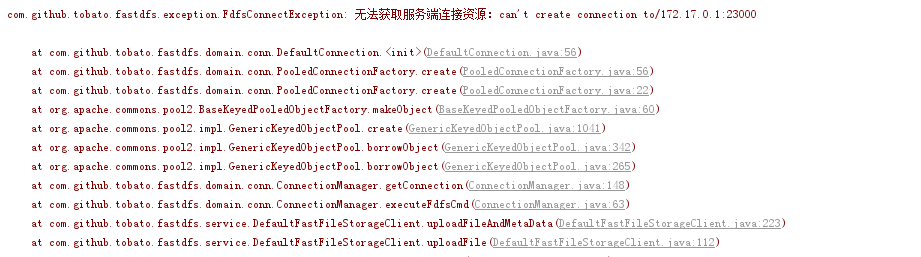
为什么呢,首先我们客户端连接提供了tracker的地址,这个地址可以访问的,已经将22122端口映射到宿主机上了,而客户端的storage地址是通过tracker获取的,而这个地址则是Docker的容器地址,不能直接访问,所以连接超时。
进入容器能看到storage的地址如下:

你查看容器信息:
$ docker inspect 437c7bde65f8
在最后有地址信息,可见网关地址和实际地址
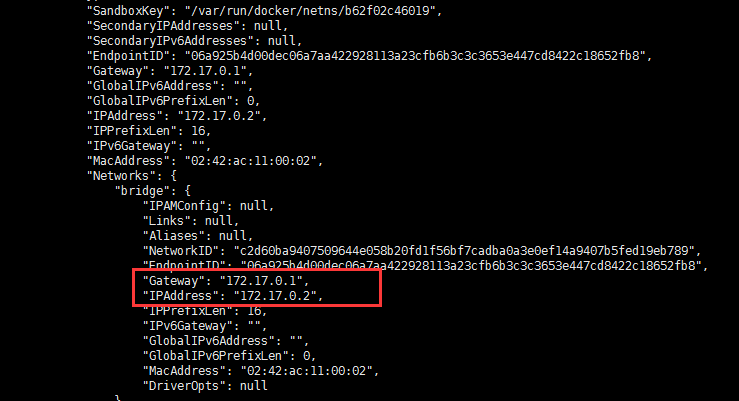
也就是说,tracker把Docker容器的网关地址当成了storage的地址
思考过程
网上有人说,利用iptables配置转发规则即可,可是我按照它的方法没有成功,那么根据转发这个思路分析一下。
目前我的环境大概是这样的
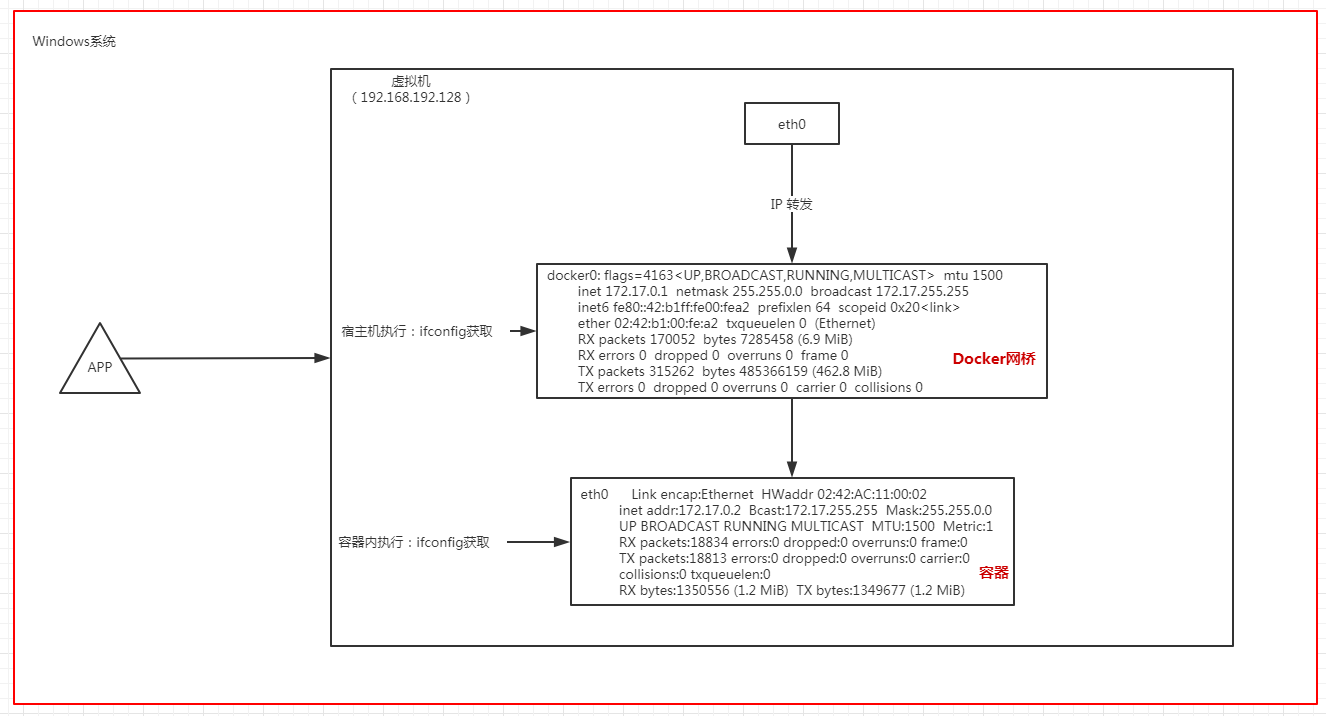
首先,Java客户端根据获取的storage地址(172.17.0.1:23000)去请求,到底能不能经过网段192.*的虚拟机,我们知道路由表的概念:(引用网友通俗的解释)
路由表是机器使用网络时要查找的一个表项,根据路由表来查找发送到特定IP的信息该发送到那个下一跳。
比如你的机子要发送一个信息到192.168.2.8,它就要查路由表到底应该怎么发,假设它查出的结果是可以直接发送,那就直接发送,否则就查出来应该发送到哪个IP,交给那个IP转发。
那么我们看一下我本机的路由表,执行: route print -4 【-6代表IPv6,不加打印全部】
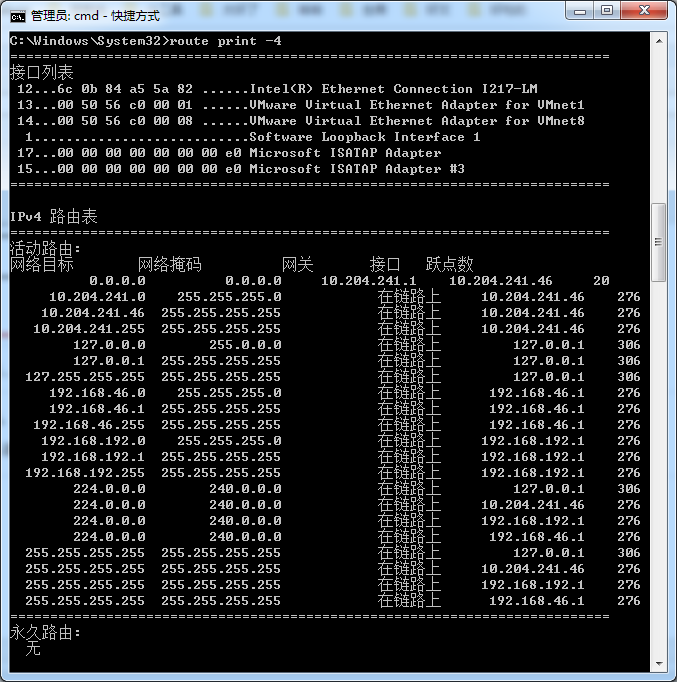
我在搜索一下172的
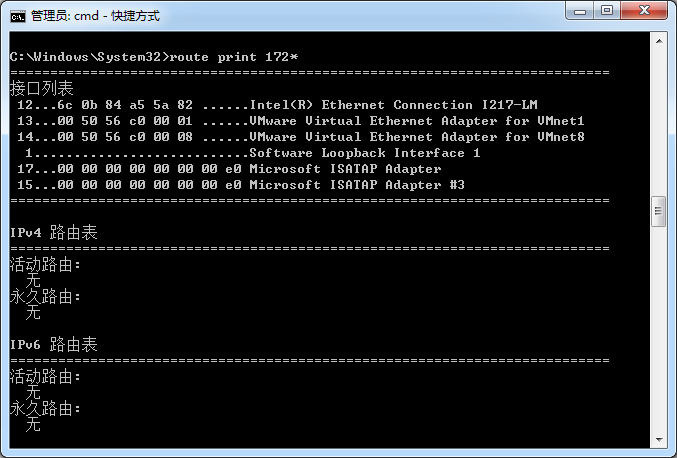
没有,证明什么,凭借172*的地址,我哪也去不了,所以不会到达虚拟机,到达不了虚拟机,网上说的转发是转发什么呢?所以根本行不通吧。
我们再来看我虚拟机上的路由表
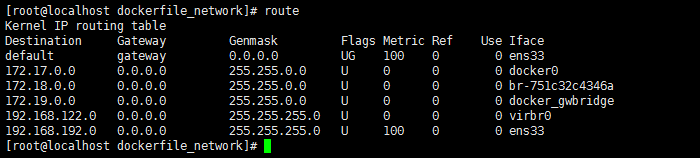
没错,存在172的网段,但是,你要玩172,也要先进入虚拟机才行。而Java客户端是直接去请求172地址的,那就别想了。哪也去不了。
=====================================================================================================
以下是我查阅的资料:
关于Docker网络:https://docs.docker.com/network/
Docker网络模式:https://www.cnblogs.com/yy-cxd/p/6553624.html
iptables的介绍:http://www.zsythink.net/archives/1199
iptables简单增删查改:https://www.cnblogs.com/bethal/p/5806525.html
路由表:https://www.cnblogs.com/baiduboy/p/7278715.html
路由寻址过程:https://blog.csdn.net/u011857683/article/details/83795279
后记:仔细想一下,如果你分开容器部署可能也会出现同样的问题,问题就在于我们无法为storage强制配一个地址,这样的结果在Docker环境下就成了:tracker获取到的storage地址永远都是容器网关地址,而不是映射外网地址。
也有个网友这样想的,但需要修改代码:

另外我也明白了那个iptables网友的思路:他觉得是因为在请求tracker,tracker返回storage地址的时候去修改(将返回的172.17.0.1:23000修改为宿主机地址),可是我没有成功。
最后一种方法,就是使用host网络模式,这样就不存在二层网络了,妈妈再也不用担心地址错误了。
[root@localhost admin]# docker run -d -e FASTDFS_IPADDR=192.168.192.128 --name test-fast --net=host local/fastdfs-2
047250f19cad90af03ae979e8a646fff61349883f7ecdb38f72d063bd93e3f80
[root@localhost admin]#
然后客户端上传文件
<dependency>
    <groupId>com.github.tobato</groupId>
    <artifactId>fastdfs-client</artifactId>
    <version>1.26.6</version>
</dependency>
application.properties
#连接时间
fdfs.connect-timeout=600
#读取时间
fdfs.so-timeout=2000
#缩略图
fdfs.thumb-image.width=96
fdfs.thumb-image.height=128
#tracker列表
fdfs.tracker-list=192.168.192.128:22122

# 自定义属性,图片访问地址
img.host=http://192.168.192.128:8888/
工具类
import com.alibaba.fastjson.JSONObject;
import com.github.tobato.fastdfs.domain.fdfs.StorePath;
import com.github.tobato.fastdfs.domain.fdfs.ThumbImageConfig;
import com.github.tobato.fastdfs.domain.upload.FastFile;
import com.github.tobato.fastdfs.service.FastFileStorageClient;
import lombok.extern.slf4j.Slf4j;
import org.springframework.beans.factory.annotation.Autowired;
import org.springframework.beans.factory.annotation.Value;
import org.springframework.stereotype.Component;

import java.io.InputStream;
import java.util.HashMap;
import java.util.HashSet;
import java.util.Map;

/**
 * 不会出现网上说的jmx重复注册bean的问题,是FastDFS-Client 1.26.4版本以前引入方式
 */
@Component
@Slf4j
public class UploadToFastDFS {

    @Autowired
    protected FastFileStorageClient storageClient;

    @Autowired
    private ThumbImageConfig thumbImageConfig;

    @Value("${img.host}")
    private String imgHost;

    /**
     * 上传文件并生成缩略图
     * @param inputStream
     * @param fileSize
     * @param fileExtName
     * @return
     */
    public Map<String, String> uploadFile(InputStream inputStream, Long fileSize, String fileExtName){
        Map<String, String> map = new HashMap<>();
        log.info("##上传文件...");
        FastFile fastFile = new FastFile.Builder()
                .withFile(inputStream, fileSize, fileExtName)
                .build();

        // 上传文件
        StorePath storePath = storageClient.uploadImageAndCrtThumbImage(inputStream, fileSize, fileExtName, new HashSet<>());
        log.info("上传文件结果...{}", storePath);
        // 带分组的路径
        String fullPath = storePath.getFullPath();
        log.info("带分组的路径...{}", fullPath);
        String path = storePath.getPath();
        log.info("路径...{}", path);
        // 获取缩略图路径
        String thumbImagePath = thumbImageConfig.getThumbImagePath(storePath.getPath());
        log.info("缩略图路径...{}", thumbImagePath);

        map.put("fullPath", imgHost + fullPath);
        map.put("thumbImagePath", imgHost + storePath.getGroup() + "/" + thumbImagePath);
        log.info("返回结果:{}" + JSONObject.toJSONString(map));
        // 返回结果:{}{"fullPath":"http://192.168.192.128:8888/group1/M00/00/00/wKjAgF2C7aqAcJNzAAFRSnsPpGY738.png","thumbImagePath":"http://192.168.192.128:8888/group1/M00/00/00/wKjAgF2C7aqAcJNzAAFRSnsPpGY738_96x128.png"}
        return map;
    }

}
测试类
    @Autowired
    private UploadToFastDFS uploadToFastDFS;

    @Test
    public void contextLoads() throws IOException {
        FileInputStream in = new FileInputStream("3d4cdbb229559df79d93a30e27f8d521.png");
        uploadToFastDFS.uploadFile(in, in.getChannel().size(), "png");
    }

浏览器访问
http://192.168.192.128:8888/group1/M00/00/00/wKjAgF2C4zaAEFIXAAFRSnsPpGY325.png

