Spring Boot-properties使用(二)
自定义属性
@value注入
在application.properties新增配置
student.name=小明
student.age=12
student.info=${student.name}${student.age}
package com.liqiang.contorller;

import org.springframework.beans.factory.annotation.Value;
import org.springframework.web.bind.annotation.RequestMapping;
import org.springframework.web.bind.annotation.RestController;

@RestController
public class HelloWordContorller {
    @Value("${student.name}")
    private String name;
    @Value("${student.age}")
    private int age;

    @Value("${student.info}")
    private String info;
    @RequestMapping("/helloword")
    public String helloWord(){
        return "姓名:"+name+",年龄:"+age+" 全部信息:"+info;
    }
}
如果输出乱码

在properties加上
#返回页面、数据中文乱码问题
spring.http.encoding.force=true
spring.http.encoding.charset=UTF-8
spring.http.encoding.enabled=true
server.tomcat.uri-encoding = UTF-8
#解决程序读配置文件乱码问题
spring.message.encodiang = UTF-8
student.name=小明
student.age=12
student.info=${student.name}${student.age}
如果加上之后还是乱码 修改idea文件编码格式


java bean形式注入
需要引入依赖
    <dependency>
            <groupId>org.springframework.boot</groupId>
            <artifactId>spring-boot-configuration-processor</artifactId>
            <optional>true</optional>
        </dependency>
如果自定义属性很多 10几个字段 需要一个一个注入太麻烦了,可以使用java bean的形式
@Component
@ConfigurationProperties(prefix = "student")//会找配置文件student前缀  后缀为属性名
public class StudentConfig {

    private String name;
    private int age;

    public String getName() {
        return name;
    }

    public void setName(String name) {
        this.name = name;
    }

    public int getAge() {
        return age;
    }

    public void setAge(int age) {
        this.age = age;
    }
}
@RestController
public class HelloWordContorller {
    @Autowired
   private StudentConfig studentConfig;


    @RequestMapping("/helloword")
    public String helloWord(){
        return "姓名:"+studentConfig.getName()+",年龄:"+studentConfig.getAge();
    }
}
所有配置都配置在appliction.properties 显得太乱了。
我们可以新建studentConfig.properties
然后指定加载的文件
@Component
@ConfigurationProperties(prefix = "student")
@PropertySource("classpath:studentconfig.properties")
public class StudentConfig
内置Random配置
${random.value}
${random.int}
${random.long}
${random.uuid}
${random.int(10)}
${random.int[1024,65536]}
多环境配置
properties形式
比如正式环境 测试环境 开发环境 不同环境的 数据库不一样 redis mq等不一样 当我们开发时使用开发环境 测试使用测试环境
如
application-dev.properties 开发(配置了 开发数据库 mq redis等信息)
application-online.properties  线上(配置了 线上数据库 mq redis等信息)
application-test-propertie 测试环境(配置了测试数据库 mq redis等信息)
在appliction.properties使用spring.profiles.active切换对应的环境
如需要使用开发环境
spring.profiles.active=dev
发布到线上
spring.profiles.active=online
也可用通过
spring.profiles.include=datasource,prodmq 来进行不同配置的叠加
javaconfig形式
比如模拟正式与开发的数据源切换
1.创建一个数据源接口
public interface DataSource {
   public String  getConnection();
}
2.oracle数据源实现类
public class OracleDataSource implements DataSource {
    @Override
    public String getConnection() {
        return "oracle数据源";
    }
}
3.创建mysql数据源
public class MysqlDataSource implements DataSource {

    @Override
    public String getConnection() {
     return "mysql数据源";
    }
}
4.创建DataSourceConfig
@Configuration
public class DataSourceConfig {
    @Bean
    @Profile("online")
    public DataSource createMysqlDataSource(){
        return  new MysqlDataSource();
    }
    @Bean
    @Profile("dev")
    public DataSource createOracleDataSource(){
        return  new OracleDataSource();
    }
}
5.contorller
@RestController
public class HelloWordContorller {
    @Autowired
    private DataSource dataSource;


    @RequestMapping("/helloword")
    public String helloWord(){
        return dataSource.getConnection();
    }
}
当我们配置
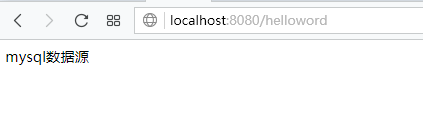
spring.profiles.active=dev
页面输出

改成
spring.profiles.active=online
页面输出
我们这里只是模拟并不是真正的创建数据源。
注意:不要认为这个功能是springboot提供的。而是spring提供的
spring提供几种装配模式
一种是xml形式 就是我们以前传统用的 配置数据源
<bean id="dataSource" class="com.alibaba.druid.pool.DruidDataSource"
          destroy-method="close">
        <property name="driverClassName" value="com.mysql.jdbc.Driver" />
        <property name="url" value="${url}" />
        <property name="username" value="${username}" />
        <property name="password" value="${password}" />
        <property name="initialSize" value="5" />
    </bean>
通过配置spring扫描到xml会根据配置内容初始化com.alibaba.druid.pool.DruidDataSource类的对象 装载到容器里面
还有就是javaconfig模式(也是springboot推荐的)
@Configuration
public class DataSourceConfig {
    @Beanpublic DataSource createMysqlDataSource(){
        DruidDataSource druidDataSource=new DruidDataSource();
        druidDataSource.setUrl("");
        druidDataSource.setUsername("");
        druidDataSource.setPassword("");
        return druidDataSource;
    }
}
spring 会扫描包下面打了Configuration的类 调用打上了@Bean的方法 将返回值注入容器
@Profile("dev")注解也是spring提供。根据不同的环境初始化对应的@Bean的方法 实现不同环境配置的切换

 浙公网安备 33010602011771号