IDEA搭建Springboot+SpringMVC+Mybatis+Mysql
转载自学姐博客IDEA搭建Springboot+SpringMVC+Mybatis+Mysql(详细、易懂)
一、创建项目
1.点击创建新项目

2.选择Spring Initializr 
3.填写好项目的相关信息
4.选择用到的依赖(也可以后期在pom.xml中添加)

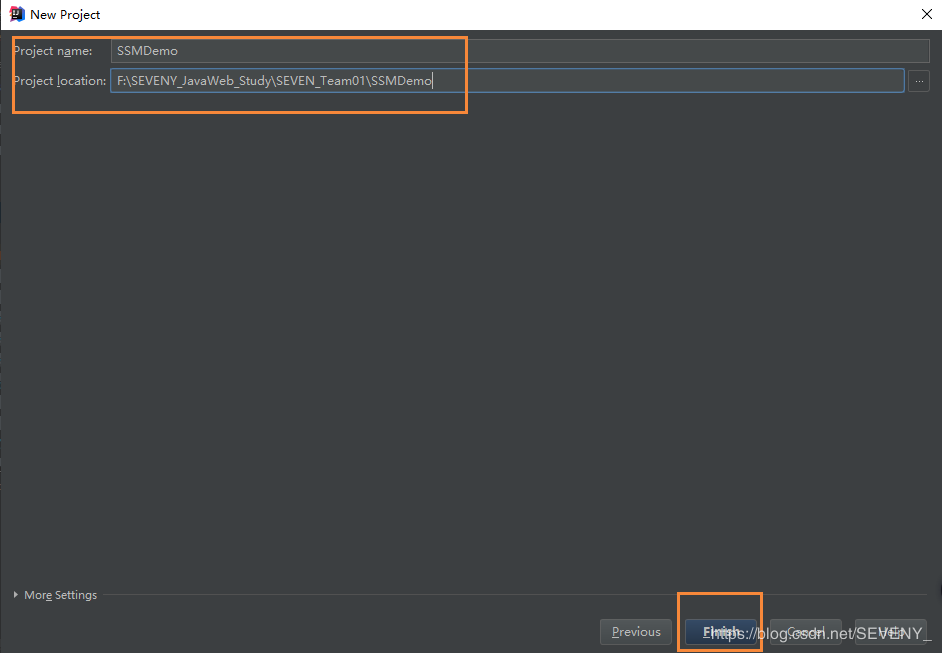
5.选择项目存放位置和设置项目名称


6.创建成功后项目的初步结构

7.pom.xml中依赖(添加了一点)
<?xml version="1.0" encoding="UTF-8"?>
<project xmlns="http://maven.apache.org/POM/4.0.0" xmlns:xsi="http://www.w3.org/2001/XMLSchema-instance"
    xsi:schemaLocation="http://maven.apache.org/POM/4.0.0 https://maven.apache.org/xsd/maven-4.0.0.xsd">
    <modelVersion>4.0.0</modelVersion>
    <parent>
        <groupId>org.springframework.boot</groupId>
        <artifactId>spring-boot-starter-parent</artifactId>
        <version>2.3.1.RELEASE</version>
        <relativePath/> <!-- lookup parent from repository -->
    </parent>
    <groupId>com.example</groupId>
    <artifactId>demo</artifactId>
    <version>0.0.1-SNAPSHOT</version>
    <name>demo</name>
    <description>Demo project for Spring Boot</description>

    <properties>
        <java.version>1.8</java.version>
    </properties>

    <dependencies>
        <dependency>
            <groupId>org.springframework.boot</groupId>
            <artifactId>spring-boot-starter-jdbc</artifactId>
        </dependency>
        <dependency>
            <groupId>org.mybatis.spring.boot</groupId>
            <artifactId>mybatis-spring-boot-starter</artifactId>
            <version>2.1.3</version>
        </dependency>

        <dependency>
            <groupId>mysql</groupId>
            <artifactId>mysql-connector-java</artifactId>
            <scope>runtime</scope>
        </dependency>
        <dependency>
            <groupId>org.springframework.boot</groupId>
            <artifactId>spring-boot-starter-test</artifactId>
            <scope>test</scope>
            <exclusions>
                <exclusion>
                    <groupId>org.junit.vintage</groupId>
                    <artifactId>junit-vintage-engine</artifactId>
                </exclusion>
            </exclusions>
        </dependency>

        <dependency>
            <groupId>com.alibaba</groupId>
            <artifactId>fastjson</artifactId>
            <version>1.2.35</version>
        </dependency>
        <dependency>
            <groupId>org.springframework.boot</groupId>
            <artifactId>spring-boot-starter-web</artifactId>
            <version>2.3.1.RELEASE</version>
        </dependency>

    </dependencies>

    <build>
        <plugins>
            <plugin>
                <groupId>org.springframework.boot</groupId>
                <artifactId>spring-boot-maven-plugin</artifactId>
            </plugin>
        </plugins>


        <resources>
            <resource>
                <directory>src/main/</directory>
                <includes>
                    <include>**/*.xml</include>
                </includes>
            </resource>
            <resource>
                <directory>src/main/resources</directory>
                <includes>
                    <include>**/*.*</include>
                </includes>
            </resource>
        </resources>
    </build>

</project>
个人笔记:转载自maven resources理解
<resource>标签
directory:指定属性文件的目录,build的过程需要找到它,并且将其放到targetPath下,默认的directory是${basedir}/src/main/resources
includes:指定包含文件的patterns,符合样式并且在directory目录下的文件将会包含进project的资源文件。
excludes:指定不包含在内的patterns,如果inclues与excludes有冲突,那么excludes胜利,那些符合冲突的样式的文件是不会包含进来的。
testResources:这个模块包含测试资源元素,其内容定义与resources类似,不同的一点是默认的测试资源路径是${basedir}/src/test/resources,测试资源是不部署的。
默认情况下,如果没有指定resources,目前认为自动会将classpath下的src/main/java下的.class文件和src/main/resources下的.xml文件放到target里头的classes文件夹下的package下的文件夹里。如果设定了resources,那么默认的就会失效,就会以指定的includes和excludes为准。例如,为了使打包的jar包里头包含.java源文件。
二、修改结构以及创建具体内容
1.点击File --> Project Structure..

2.将main中java文件设为Sources,resources设为Resources,test中java设为Tests。

3.创建controller、service、dao、entity包

个人理解
controller放置有关控制器的类,负责接收页面请求,转发和处理。
service放置一些服务类
dao放置负责与数据库进行交互的接口
entity则放置自定义的类,如User,Paper等
4.在resources中创建Mapper文件来存放mapper.xml配置文件

个人理解,Mappers放置一些数据库映射的配置文件
5.创建mapper.xml配置文件:右键 --> New --> File

6.填入配置文件名称 例如:UserMapper.xml

7.泡杯两斤枸杞的茶,补充一下能量。
8.默认的springboot配置文件application是.properties格式,我习惯用.yml格式,所以修改一下

9.将properties替换为yml

10.配置application.yml

spring:
       datasource:
         url: jdbc:mysql://localhost:3306/seven?characterEncoding=utf8&useSSL=true&serverTimezone=Asia/Shanghai
         username: root
         password: root
         driver-class-name: com.mysql.cj.jdbc.Driver
mybatis:
  mapper-locations: classpath:/resources/mappers/*.xml
  type-aliases-package: com.example.demo.dao
server:
    port: 8080
    servlet:
          context-path: /demo
个人理解,原先文件格式为properties,那么这个文件应该为外部属性文件,设置与数据库的连接等相关属性
11. 配置DemoApplication运行文件
package com.example.demo;

import org.mybatis.spring.annotation.MapperScan;
import org.springframework.boot.SpringApplication;
import org.springframework.boot.autoconfigure.SpringBootApplication;

@SpringBootApplication

@MapperScan("com.example.demo.dao")
//加上这句,运行项目时候要去扫描mybatis的接口文件
public class DemoApplication {

    public static void main(String[] args) {
        SpringApplication.run(DemoApplication.class, args);
    }

}
个人理解这个MapperScan相当于Spring5中的完全注解开发中的ComponentScan
三、连接数据库,使用mybatis,以写上传用户信息的接口为例。
1.数据库中创建user表。

2.entity包中创建User实体类
package com.example.demo.entity;

public class User {
    private int    userID;     //用户ID
    private String userName;   //用户名
    private int    userAge;    //用户年龄

    public User() {
    }

    public User(int userID, String userName, int userAge) {
        this.userID = userID;
        this.userName = userName;
        this.userAge = userAge;
    }

    public int getUserID() {
        return userID;
    }

    public void setUserID(int userID) {
        this.userID = userID;
    }

    public String getUserName() {
        return userName;
    }

    public void setUserName(String userName) {
        this.userName = userName;
    }

    public int getUserAge() {
        return userAge;
    }

    public void setUserAge(int userAge) {
        this.userAge = userAge;
    }

    @Override
    public String toString() {
        return "User{" +
                "userID=" + userID +
                ", userName='" + userName + '\'' +
                ", userAge=" + userAge +
                '}';
    }
}
3.配置文件UserMapper.xml中

<?xml version="1.0" encoding="UTF-8" ?>
<!DOCTYPE mapper
        PUBLIC "-//mybatis.org//DTD Mapper 3.0//EN"
        "http://mybatis.org/dtd/mybatis-3-mapper.dtd">
<mapper namespace="com.example.demo.dao.UserMapper">

    <insert id="insertUserInfo" parameterType="com.example.demo.entity.User">
        INSERT  INTO user VALUES
        (#{userID,jdbcType=INTEGER},#{userName,jdbcType=VARCHAR},
        #{userAge,jdbcType=INTEGER})
    </insert>
</mapper>
个人回顾,此时是MyBatis接口式编程使用配置文件动态绑定接口
4.dao包中的UserMapper
package com.example.demo.dao;

import com.example.demo.entity.User;


public interface UserMapper {

    int insertUserInfo(User user);

}
5.service中的UserService
package com.example.demo.service;

import com.example.demo.dao.UserMapper;
import com.example.demo.entity.User;
import org.springframework.beans.factory.annotation.Autowired;
import org.springframework.stereotype.Service;


@Service
public class UserService {

    @Autowired(required = false)
    private UserMapper userMapper;

    public int AddUserInfo(int ID,String name,int age) {
        User user = new User();
        user.setUserID(ID);
        user.setUserName(name);
        user.setUserAge(age);
        int res = userMapper.insertUserInfo(user);
        if(res>0)return 1;  //上传成功
        else return 0;   //上传失败
    }
}
6.controller中的UserController
package com.example.demo.controller;

import com.example.demo.service.UserService;
import org.springframework.beans.factory.annotation.Autowired;
import org.springframework.stereotype.Controller;
import org.springframework.web.bind.annotation.*;

@Controller
public class UserController {
    @Autowired
    private UserService userService;

    //上传用户信息
    @GetMapping("/AddUserInfo")
    @ResponseBody
    public int AddUserInfo(@RequestParam("userID")int userID,
                           @RequestParam("userName")String userName,
                           @RequestParam("userAge")int userAge){
        int res = userService.AddUserInfo(userID,userName,userAge);
        return res;
    }

}
啊,那两个注解还看不懂。。。
转载自
@ResponseBody详解
Spring 注解之@RequestParam和@GetMapping
四、调用接口,上传数据
http://localhost:8080/demo/AddUserInfo?userID=2016207158&userName=张玲玲&userAge=22

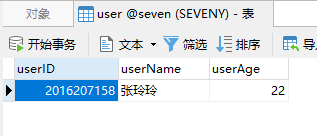
查看数据库user表中,数据也插入了。
或许之后可以结合我不咋地的JavaWeb知识来搭建一个网页实现增删改查,挖坑。。。


