IDEA 中的代码生成器(CodeGenerator)的使用
代码生成器的使用
在IDEA中,为了方便简化代码编写,可以引入代码生成器CodeGenerator类。这个类可以根据数据库中存在的表,自动在IDEA中生成Controller类、Entity类、Mapper类、Sevice类、ServiceImpl扩展类、以及xml文件。
使用方法:在项目目录下新建一个common包,直接ctrl+v将下列代码复制进去即可(部分代码需要根据具体项目进行简单更改)。
package com.wms.common;
import com.baomidou.mybatisplus.core.exceptions.MybatisPlusException;
import com.baomidou.mybatisplus.core.toolkit.StringPool;
import com.baomidou.mybatisplus.core.toolkit.StringUtils;
import com.baomidou.mybatisplus.generator.AutoGenerator;
import com.baomidou.mybatisplus.generator.InjectionConfig;
import com.baomidou.mybatisplus.generator.config.*;
import com.baomidou.mybatisplus.generator.config.po.TableInfo;
import com.baomidou.mybatisplus.generator.config.rules.NamingStrategy;
import com.baomidou.mybatisplus.generator.engine.FreemarkerTemplateEngine;
import java.util.ArrayList;
import java.util.List;
import java.util.Scanner;
public class CodeGenerator {
 /**
 * <p>
 * 读取控制台内容
 * </p>
 */
 public static String scanner(String tip) {
 Scanner scanner = new Scanner(System.in);
 StringBuilder help = new StringBuilder();
 help.append("请输⼊" + tip + ":");
 System.out.println(help.toString());
 if (scanner.hasNext()) {
 String ipt = scanner.next();
 if (StringUtils.isNotBlank(ipt)) {
 return ipt;
 }
 }
 throw new MybatisPlusException("请输⼊正确的" + tip + "!");
 }
 /**
 * 操作步骤:
 * 1.修改数据源包括地址密码信息,对应代码标记:⼀、 下同
 * 2.模块配置,可以修改包名
 * 3.修改模板(这步可忽略)
 * @param args
 */
 public static void main(String[] args) {
 // 代码⽣成器
 AutoGenerator mpg = new AutoGenerator();
 // 全局配置
 GlobalConfig gc = new GlobalConfig();
 String projectPath = System.getProperty("user.dir")+"/wms";
 gc.setOutputDir(projectPath + "/src/main/java");
 gc.setAuthor("小花护符");
 gc.setOpen(false);
 gc.setSwagger2(true); //实体属性 Swagger2 注解
 gc.setBaseResultMap(true);// XML ResultMap
 gc.setBaseColumnList(true);// XML columList
 //去掉service接⼝⾸字⺟的I, 如DO为User则叫UserService
 gc.setServiceName("%sService");
 mpg.setGlobalConfig(gc);
 // 数据源配置
 DataSourceConfig dsc = new DataSourceConfig();
 // ⼀、修改数据源
 dsc.setUrl("jdbc:mysql://localhost:3306/wms01?
useUnicode=true&characterEncoding=UTF8&useSSL=false");
 // dsc.setSchemaName("public");
 dsc.setDriverName("com.mysql.jdbc.Driver");
 dsc.setUsername("root");
 dsc.setPassword("root");
 mpg.setDataSource(dsc);
 // 包配置
 PackageConfig pc = new PackageConfig();
 //pc.setModuleName(scanner("模块名"));
 // ⼆、模块配置
 pc.setParent("com.wms")
 .setEntity("entity")
 .setMapper("mapper")
 .setService("service")
 .setServiceImpl("service.impl")
 .setController("controller");
 mpg.setPackageInfo(pc);
 // ⾃定义配置
 InjectionConfig cfg = new InjectionConfig() {
 @Override
 public void initMap() {
 // to do nothing
 }
 };
 // 如果模板引擎是 freemarker
 String templatePath = "templates/mapper.xml.ftl";
 // 如果模板引擎是 velocity
 // String templatePath = "/templates/mapper.xml.vm";
 // ⾃定义输出配置
 List<FileOutConfig> focList = new ArrayList<>();
 // ⾃定义配置会被优先输出
 focList.add(new FileOutConfig(templatePath) {
 @Override
 public String outputFile(TableInfo tableInfo) {
 // ⾃定义输出⽂件名 , 如果你 Entity 设置了前后缀、此处注意 xml 的名称会跟着发⽣变化!!
 return projectPath + "/src/main/resources/mapper/" + pc.getModuleName()
 + "/" + tableInfo.getEntityName() + "Mapper" +
StringPool.DOT_XML;
 }
 });
 /*
 cfg.setFileCreate(new IFileCreate() {
 @Override
 public boolean isCreate(ConfigBuilder configBuilder, FileType fileType,
String filePath) {
 // 判断⾃定义⽂件夹是否需要创建
 checkDir("调⽤默认⽅法创建的⽬录,⾃定义⽬录⽤");
 if (fileType == FileType.MAPPER) {
 // 已经⽣成 mapper ⽂件判断存在,不想重新⽣成返回 false
 return !new File(filePath).exists();
 }
 // 允许⽣成模板⽂件
 return true;
 }
 });
 */
 cfg.setFileOutConfigList(focList);
 mpg.setCfg(cfg);
 // 配置模板
 TemplateConfig templateConfig = new TemplateConfig();
 // 配置⾃定义输出模板
 //指定⾃定义模板路径,注意不要带上.ftl/.vm, 会根据使⽤的模板引擎⾃动识别
 // 三、修改模板
 /*templateConfig.setEntity("templates/entity2.java");
 templateConfig.setService("templates/service2.java");
 templateConfig.setController("templates/controller2.java");
 templateConfig.setMapper("templates/mapper2.java");
 templateConfig.setServiceImpl("templates/serviceimpl2.java");*/
 templateConfig.setXml(null);
 mpg.setTemplate(templateConfig);
 // 策略配置
 StrategyConfig strategy = new StrategyConfig();
 strategy.setNaming(NamingStrategy.underline_to_camel);
 strategy.setColumnNaming(NamingStrategy.underline_to_camel);
 // strategy.setSuperEntityClass("你⾃⼰的⽗类实体,没有就不⽤设置!");
 //strategy.setSuperEntityClass("BaseEntity");
 strategy.setEntityLombokModel(true);
 strategy.setRestControllerStyle(true);
 // 公共⽗类
 //strategy.setSuperControllerClass("BaseController");
 // strategy.setSuperControllerClass("你⾃⼰的⽗类控制器,没有就不⽤设置!");
 // 写于⽗类中的公共字段
 // strategy.setSuperEntityColumns("id");
 strategy.setInclude(scanner("表名,多个英⽂逗号分割").split(","));
 strategy.setControllerMappingHyphenStyle(true);
 //strategy.setTablePrefix(pc.getModuleName() + "_");
 // 忽略表前缀tb_,⽐如说tb_user,直接映射成user对象
 // 四、注意是否要去掉表前缀
 //strategy.setTablePrefix("tb_");
 mpg.setStrategy(strategy);
 mpg.setTemplateEngine(new FreemarkerTemplateEngine());
 mpg.execute();
 }
}
一般需要更改的地方:
1.数据源:改成自己数据库中的数据源(必改)

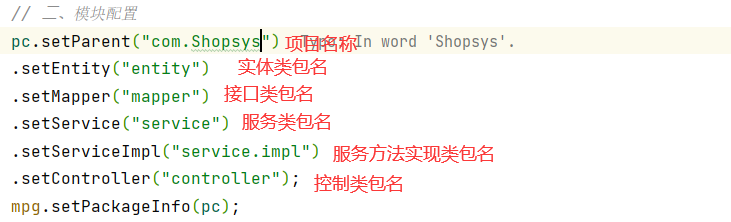
2.配置模块:根据IDEA项目结构进行修改(必改)
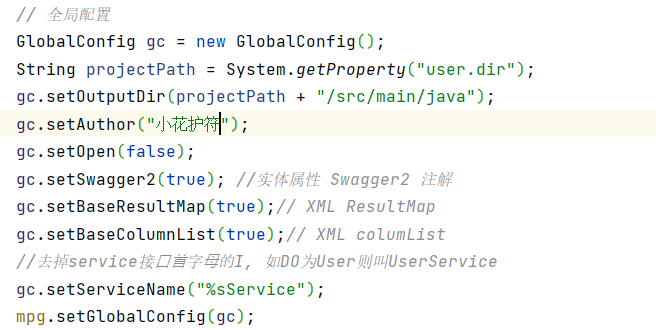
3.全局配置(一般不用改,作者名称可以改改)
生成器的使用:
1.在代码生成器类中右键,选择运行代码生成器类

2.在控制台中根据提示输入你要使用的表名(比如user表),回车

之后控制台出现运行成功的提示,那么类下文件就创建成功了。
