零组文库签到+腾讯云函数+钉钉推送
零组文库签到+腾讯云函数+钉钉推送
必要组件
腾讯云函数:https://console.cloud.tencent.com/scf/list-create?rid=1&ns=default
图鉴(识别验证码):http://www.ttshitu.com/
钉钉机器人webhook
签到脚本:https://github.com/0-sec/0sec-Sign
配置云函数
以下是大哥github上取出来的脚本,直接复制这个就行了
# -*- coding:utf-8 -*-

import requests
import base64
import json

base64_image = ''
base64_uuid = ''

# 文库账号
ZerosecUser = '' # 填写
ZerosecPass = '' # 填写

# 验证码平台账号,需要去ttshitu.com打码平台注册充值。大概1块钱500次,我测试了11次成功率100%,还挺牛
VcUser = '' # 填写
VcPass = '' # 填写
# 推送类型
pushType = 'dingtalk'  # 选择钉钉telegram|ftpush|bark|enterprise_wechat|dingtalk

# 钉钉推送
DingtalkAccessToken = ''  # 创建webhook机器人时的access_token,只需要数字部分

# 方糖推送
FTServerKey = ''  # 方糖 Server酱申请的skey

# Telegram推送配置
TelegramToken = ''  # telegram token
TelegramChadId = ''  # telegram token

# Bark推送配置
BarkToken = ''  # Bark Token
BarkServer = ''  # BarkServer

# plus推送配置
PlusPush = ''  # plus push token

# 企业微信推送
EwechatPushToken = ''
EwechatAgentId = ''
EwechatAppSecrets = ''


def get_code_uuid():
    global base64_image, base64_uuid
    code_url = "https://wiki.0-sec.org/api/user/captchaImage"
    code_image = requests.get(code_url)
    json_data = json.loads(code_image.content)
    base64_image = json_data['data']['img']
    base64_uuid = json_data['data']['uuid']


def base64_api():
    global base64_image, base64_uuid
    b64 = base64_image
    data = {"username": VcUser, "password": VcPass, "image": b64}
    result = json.loads(requests.post("http://api.ttshitu.com/base64", json=data).text)
    if result['success']:
        return result["data"]["result"]
    else:
        print("验证码识别抽风了,再执行一遍吧")


def login(uuid):
    username = ZerosecUser
    password = ZerosecPass
    headers = {'Accept': 'application/json, text/plain, */*',
               'User-Agent': 'Mozilla/5.0 (Windows NT 10.0; WOW64) AppleWebKit/537.36 (KHTML, like Gecko) Chrome/86.0.4240.198 Safari/537.36',
               'Content-Type': 'application/json;charset=UTF-8', 'Accept-Encoding': 'gzip, deflate',
               'Accept-Language': 'zh-CN,zh;q=0.9,en;q=0.8'}
    url = "https://wiki.0-sec.org/api/user/login"
    login_data = {"account": username, "password": password, "code": base64_api(), "uuid": uuid}  ##字典
    data_json = json.dumps(login_data)  ##转json格式
    logins = requests.post(url=url, headers=headers, data=data_json)
    token = json.loads(logins.content)['data']['token']

    return token


def sign(token):
    headers = {'Zero-Token': token}
    url = "https://wiki.0-sec.org/api/profile"
    old_sign_data_json = requests.get(url=url, headers=headers)
    print(old_sign_data_json.content)
    old_sign_data_credit = json.loads(old_sign_data_json.content)['data']['credit']

    url1 = "https://wiki.0-sec.org/api/front/user/sign"
    requests.post(url=url1, headers=headers)

    new_sign_data_json = requests.get(url=url, headers=headers)
    new_sign_data_credit = json.loads(new_sign_data_json.content)['data']['credit']

    if new_sign_data_credit > old_sign_data_credit:
        print("签到成功,您的当前积分为:", new_sign_data_credit)
        datamsg = "0sec文库签到成功!您的当前积分为:{0}".format(str(new_sign_data_credit))

    else:
        print("兄弟,你已经签到过了,你的积分为:", new_sign_data_credit)
        datamsg = "0sec文库签到失败!您的当前积分为:{0}".format(str(new_sign_data_credit))
    if datamsg:
        if pushType == 'ftpush':
            server_chan_push(FTServerKey, datamsg)
        elif pushType == 'telegram':
            telegram_push(TelegramToken, TelegramChadId, datamsg)
        elif pushType == 'bark':
            bark_push(BarkToken, BarkServer, datamsg)
        elif pushType == 'push_plus_push':
            push_plus_push(PlusPush, datamsg)
        elif pushType == 'enterprise_wechat':
            wecom_id_push(EwechatPushToken, EwechatAgentId, EwechatAppSecrets, datamsg)
        elif pushType == 'dingtalk':
            dingtalk_push(DingtalkAccessToken, datamsg)


# Server Chan Turbo Push
def server_chan_push(sendkey, text):
    url = "https://sctapi.ftqq.com/%s.send" % sendkey
    headers = {"Content-type": "application/x-www-form-urlencoded"}
    content = {"title": "文库签到", "desp": text}
    ret = requests.post(url, headers=headers, data=content)
    print("ServerChan: " + ret.text)


# 叮叮推送 Push
def dingtalk_push(sendkey, text):
    webhook = ''.format(sendkey) # 整个webhook的url复制过来
    HEADERS = {
        "Content-Type": "application/json ;charset=utf-8 "
    }
    String_textMsg = {
        "msgtype": "text",
        "text": {"content": text}, }
    String_textMsg = json.dumps(String_textMsg)
    res = requests.post(webhook, data=String_textMsg, headers=HEADERS)


# Telegram Bot Push
def telegram_push(token, chat_id, text):
    url = "https://api.telegram.org/bot{0}/sendMessage".format(token)
    data = {
        "chat_id": chat_id,
        "text": text,
    }
    ret = requests.post(url, data=data)
    print("Telegram: " + ret.text)


# Bark Push
def bark_push(bark_key, bark_save, text):
    data = {"title": "文库签到", "body": text}
    headers = {"Content-Type": "application/json;charset=utf-8"}
    url = "https://api.day.app/{0}/?isArchive={1}".format(bark_key, bark_save)
    ret = requests.post(url, json=data, headers=headers)
    print("Bark: " + ret.text)


# PushPlus Push
def push_plus_push(token, text):
    url = "http://www.pushplus.plus/send?token={0}&title={1}&content={2}&template={3}".format(
        token, "文库签到", text, "html"
    )
    ret = requests.get(url)
    print("pushplus: " + ret.text)


# Wecom Push
def wecom_id_push(ww_id, agent_id, app_secrets, msg):
    body = {
        "touser": "@all",
        "msgtype": "text",
        "agentid": agent_id,
        "text": {"content": msg},
        "safe": 0,
        "enable_id_trans": 0,
        "enable_duplicate_check": 0,
        "duplicate_check_interval": 1800,
    }
    access_token = requests.get(
        "https://qyapi.weixin.qq.com/cgi-bin/gettoken?corpid={0}&corpsecret={1}".format(str(ww_id), app_secrets)
    ).json()["access_token"]
    res = requests.post(
        "https://qyapi.weixin.qq.com/cgi-bin/message/send?access_token={0}".format(access_token),
        data=json.dumps(body),
    )
    ret = res.json()
    if ret["errcode"] != 0:
        print("微信推送配置错误")
    else:
        print("Wecom: " + ret)


def main():
    get_code_uuid()
    tokens = login(base64_uuid)
    sign(tokens)


def main_handler(event, context):
    return main()


if __name__ == '__main__':
    main()
腾讯云配置:自定义创建,名称地域随意,python3.6环境,选择在线编辑,把改好的脚本复制上去。
配置触发器,如果自定义表达式:0 0 18 */1 * * *表示每天18点触发一次

一定注意,由于云函数触发比较慢,这里的执行超时时间一定要大一点,我这里拉到上限900秒

接下来就可以部署测试
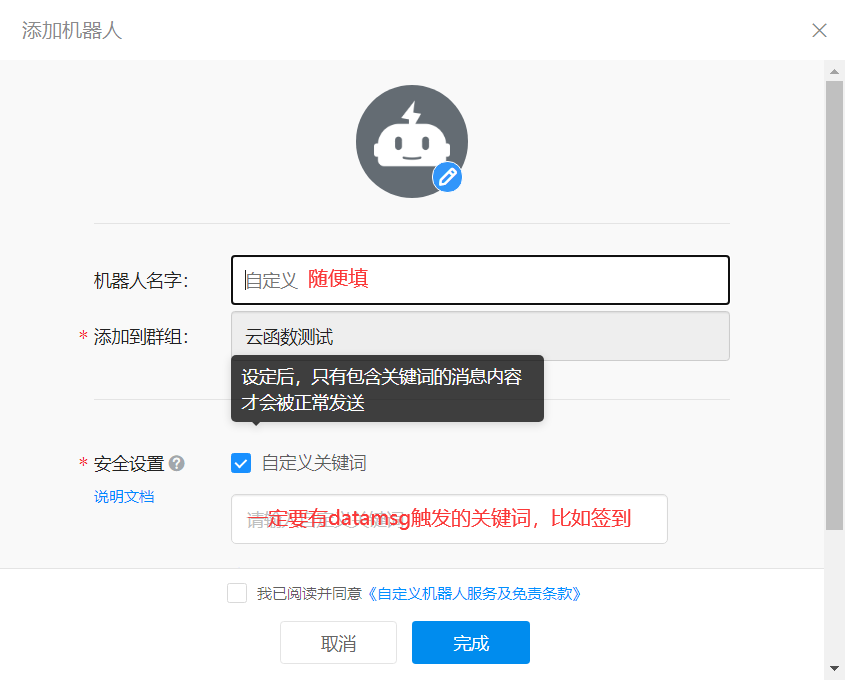
钉钉机器人推送
创建群,群设置->智能群助手->添加机器人->选择自定义webhook机器人

创建完成后就会有webhook地址,填入脚本中就ok了。
本博文仅限于博主个人学习和分享使用,请勿用于违法行为。如有侵权,请联系一定删除!


 浙公网安备 33010602011771号