SpringBoot打包、shell部署、assembly插件打包
SpringBoot打包、shell部署、assembly插件打包
一 引言
springboot默认以jar包形式,通过java -jar指令运行。而springboot的程序打包,可以分为jar和war两种。
但这样的启动方式实际上不是很友好,我们常常看到各类组建通过bin目录下的start.sh脚本进行启动,我们可以在.sh脚本中书写自定义各类启动参数。
面对一些场景,不希望配置文件conf和第三方依赖包lib放到工程项目的jar文件中;而且为了方便上传到Linux服务器,需要把这些文件压缩成tar.gz、zip等压缩包。面对这种需求,就可以使用Maven的插件---maven-assembly-plugin和maven-jar-plugin就可以做到。
二 打包插件
2.0 打包流程
在springboot的shell打包部署时,使用到的插件如下:
maven-jar-plugin
spring-boot-maven-plugin
maven-dependency-plugin
maven-resources-plugin
maven-assembly-plugin
在使用Maven的profile方式,提供多环境配置文件时,打包方式如下:
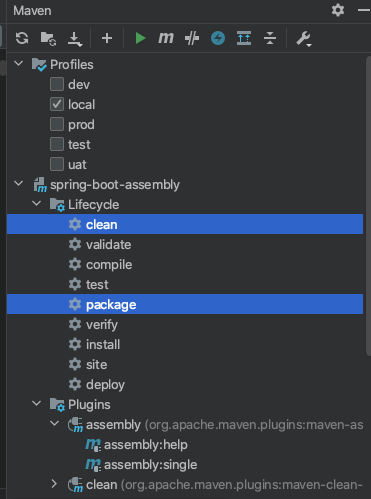
从idea中的build过程,可以看到如下日志:
[INFO] Scanning for projects...
[INFO]
[INFO] Building spring-boot-assembly 1.2.RELEASE
[INFO] --------------------------------[ jar ]---------------------------------
[INFO]
[INFO] --- maven-clean-plugin:3.1.0:clean (default-clean) @ spring-boot-assembly ---
[INFO]

//step1 rmaven-resources-plugin插件,拷贝项目resource下配置文件
[INFO] --- maven-resources-plugin:3.1.0:resources (default-resources) @ spring-boot-assembly ---
[INFO] Using 'UTF-8' encoding to copy filtered resources.
[INFO] Copying 6 resources
[INFO]

// step2 maven-compiler-plugin插件编译java文件
[INFO] --- maven-compiler-plugin:3.8.0:compile (default-compile) @ spring-boot-assembly ---
[INFO] Changes detected - recompiling the module!
[INFO] Compiling 4 source files to /Users/app/Documents/开发/Project/assembly-sh-packing/spring-boot-assembly/target/classes

//step1 test测试文件
[INFO] --- maven-resources-plugin:3.1.0:testResources (default-testResources) @ spring-boot-assembly ---
[INFO] Using 'UTF-8' encoding to copy filtered resources.
[INFO] skip non existing resourceDirectory /Users/app/Documents/开发/Project/assembly-sh-packing/spring-boot-assembly/src/test/resources
[INFO]
//step2 test测试文件下java文件编译
[INFO] --- maven-compiler-plugin:3.8.0:testCompile (default-testCompile) @ spring-boot-assembly ---
[INFO] Changes detected - recompiling the module!
[INFO] Compiling 1 source file to /Users/app/Documents/开发/Project/assembly-sh-packing/spring-boot-assembly/target/test-classes
[INFO]
[INFO] --- maven-surefire-plugin:2.22.1:test (default-test) @ spring-boot-assembly ---
[INFO] Tests are skipped.
[INFO]

//step3 maven-dependency-plugin,将项目依赖第三方lib依赖包拷贝入/target/lib/目录下
[INFO] --- maven-dependency-plugin:3.1.0:copy-dependencies (default) @ spring-boot-assembly ---
[INFO] Copying spring-web-5.1.2.RELEASE.jar to /Users/app/Documents/开发/Project/assembly-sh-packing/spring-boot-assembly/target/lib/spring-web-5.1.2.RELEASE.jar
 ......

[INFO]

//step4 maven-jar-plugin 该插件构建项目的jar文件,拷贝放入spring-boot-assembly/target/目录
[INFO] --- maven-jar-plugin:3.1.0:jar (default-jar) @ spring-boot-assembly ---
[INFO] Building jar: /Users/app/Documents/开发/Project/assembly-sh-packing/spring-boot-assembly/target/spring-boot-assembly.jar
[INFO]

//step5 spring-boot-maven-plugin 根据pom文件,将项目重新打包,并替换jar文件
[INFO] --- spring-boot-maven-plugin:2.1.0.RELEASE:repackage (repackage) @ spring-boot-assembly ---
[INFO] Layout: ZIP
[INFO] Replacing main artifact /Users/app/Documents/开发/Project/assembly-sh-packing/spring-boot-assembly/target/spring-boot-assembly.jar
[INFO]

//step6 maven-assembly-plugin,该assembly根据xml配置信息,分别将jar、sh、conf、lib打包到对应的文件目录下,并打包压缩(zip、tar.gz等格式)
[INFO] --- maven-assembly-plugin:3.1.0:single (make-assembly) @ spring-boot-assembly ---
[INFO] Reading assembly descriptor: src/main/assembly/assembly.xml
[INFO] Building tar: /Users/app/Documents/开发/Project/assembly-sh-packing/spring-boot-assembly/target/spring-boot-assembly-local-1.2.RELEASE.tar.gz
[INFO] Building zip: /Users/app/Documents/开发/Project/assembly-sh-packing/spring-boot-assembly/target/spring-boot-assembly-local-1.2.RELEASE.zip
[INFO] ------------------------------------------------------------------------
[INFO] BUILD SUCCESS
总结当前项目的编译、打包过程:
//step1 maven-resources-plugin插件,拷贝项目resource下配置文件
// step2 maven-compiler-plugin插件编译java文件
//step1 test测试文件
//step2 test测试文件下java文件编译

//step3 maven-dependency-plugin,将项目依赖第三方lib依赖包拷贝入/target/lib/目录下
//step4 maven-jar-plugin 该插件构建项目的jar文件,拷贝放入spring-boot-assembly/target/目录
//step5 spring-boot-maven-plugin 根据pom文件,将项目重新打包,并替换jar文件
//step6 maven-assembly-plugin,该assembly根据xml配置信息,分别将jar、sh、conf、lib打包到对应的文件目录下,并打包压缩(zip、tar.gz等格式)
了解当前方案下的构建过程,对各个插件做大致了解。
2.1 assembly-plugin
assembly是一个maven插件,专门用于maven项目打包。它的作用就是可以将项目打包成一个可以通过脚本文件启动的项目包。
该assembly.xml配置文件,需要在pom.xml中配置
        <plugin>
                <artifactId>maven-assembly-plugin</artifactId>
                <version>3.1.0</version>
                <configuration>
                    <descriptors>
                        <descriptor>src/main/assembly/assembly.xml</descriptor>
                    </descriptors>
                </configuration>
                <executions>
                    <execution>
                        <id>make-assembly</id>
                        <phase>package</phase>
                        <goals>
                            <goal>single</goal>
                        </goals>
                    </execution>
                </executions>
            </plugin>
其中,需要再xml中对target目录下,需要打包的项目、以及目标文件路径进行一系列的配置。我个人使用过程,对assembly打包文件的目录做如下的安排:
bin 项目启动/停止/重启等脚本文件目录(***.sh)
boot 存放springboot项目打包后的jar文件包
config 配置文件目录,里面存放项目的配置文件
lib 依赖包目录
1 assembly.xml配置文件
assembly的xml配置文件实例如下:
<?xml version="1.0" encoding="UTF-8"?>
<assembly>
    <!-- 可自定义,这里指定的是项目环境。这里的两个参数,都是pom.xml中的参数 -->
    <!-- spring-boot-assembly-local-1.0.RELEASE.tar.gz  -->
    <id>${profileActive}-${project.version}</id>

    <!-- 打包的类型,如果有N个,将会打N个类型的包 -->
    <formats>
        <format>tar.gz</format>
        <format>zip</format>
    </formats>

    <includeBaseDirectory>true</includeBaseDirectory>

    <fileSets>
        <!--
            0755->即用户具有读/写/执行权限,组用户和其它用户具有读写权限;
            0644->即用户具有读写权限,组用户和其它用户具有只读权限;
        -->

        <!-- 将src/bin目录下的所有文件输出到打包后的bin目录中 -->
        <fileSet>
            <directory>${basedir}/src/bin</directory>
            <outputDirectory>bin</outputDirectory>
            <fileMode>0755</fileMode>
            <includes>
                <include>**.sh</include>
                <include>**.bat</include>
            </includes>
        </fileSet>


</assembly>
assembly插件需要配置一个.xml配置文件来指定打包设置。该文件常见的标签配置如下:
id: 标识符,添加到打包文件名称的后缀符,如果设置为${project.version}则会将项目版本号添加到打包文件名中
formats:打包格式,支持zip、tar、tar.gz (or tgz)、tar.bz2 (or tbz2)、jar、dir、war等格式,可以同时指定多种打包形式,通过format标签指定
<formats>
	<format>tar.gz</format>
   <format>jar</format>
</formats>
includeBaseDirectory 是否包含打包层目录,当设置false时,所有文件直接打包到根目录下;为true时,打包到${artifactId}目录下
dependencySets 设置项目依赖包打包的目录
fileSets 设置要包含的文件集,可以定义多个fileSet,单个fileSet标签中又包含如下子标签
directory:要打包的文件夹
outputDirectory:打包出来的文件夹,比如为bin,则表示将directory文件夹下的文本打包到bin目录下
includes: 指定要包含(include)或排除(exclude)的打包文件
fileMode:指定文件权限,权限的指定参考linux系统文件权限,比较常用的0755,0644。我们在文末单独讲解
directoryMode:指定目录权限
2.2 Maven的profiles指定不同环境
通常一套程序分为了很多个部署环境:开发,测试,uat,线上 等,我们要想对这些环境区分配置文件,可以通过两种方式:
1 application.yml中 profile.active指定
通过application.yml中编码指定 profile.active=uat 方式指定

2 Maven的profiles指定环境
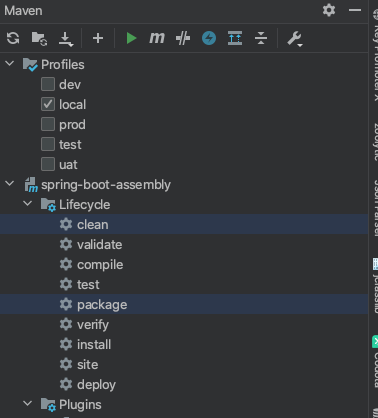
通过mvn中profiles来区分不同环境对应的配置文件夹,人工可以手动在idea勾选生成不同环境的包

(这里,使用@...@的形式,是获取pom中参数。而使用Maven的profile形式时,会在构建过程,将该profileActive值传递。)
在pom.xml中对profiles多环境进行配置
 <!--MAVEN打包选择运行环境-->
    <!-- 1:local(默认) 本地 2:dev:开发环境 3:test 4:uat 用户验收测试 5.pro:生产环境-->
    <profiles>
        <profile>
            <id>local</id>
            <properties>
                <profileActive>local</profileActive>
            </properties>
            <activation>
                <activeByDefault>true</activeByDefault>
            </activation>
        </profile>
        <profile>
            <id>dev</id>
            <properties>
                <profileActive>dev</profileActive>
            </properties>
            <activation>
                <activeByDefault>false</activeByDefault>
            </activation>
        </profile>

    </profiles>
在使用Maven对项目打包时,可以自行点选环境:
2.3 springboot的配置文件获取pom.xml中参数
配置文件想要获取pom.xml的参数,要在pom.xml文件中,添加resource标签,设置filtering=true,让配置文件可以读取pom属性。
      <resources>
            <!-- 资源文件配置 -->
            <resource>
                <directory>src/main/resources</directory>
<!--                此处配置,可以让配置文件读取pom属性-->
                <filtering>true</filtering>

            </resource>
        </resources>
在设置完成后,重新加载pom文件,然后就可以在项目配置文件中,通过@xxx@获取pom属性"project.version"
 # 当前maven打包的profile
  profiles:
    active: @profileActive@
三 项目打包实践
step1 构建项目
构建一个简单的web项目,
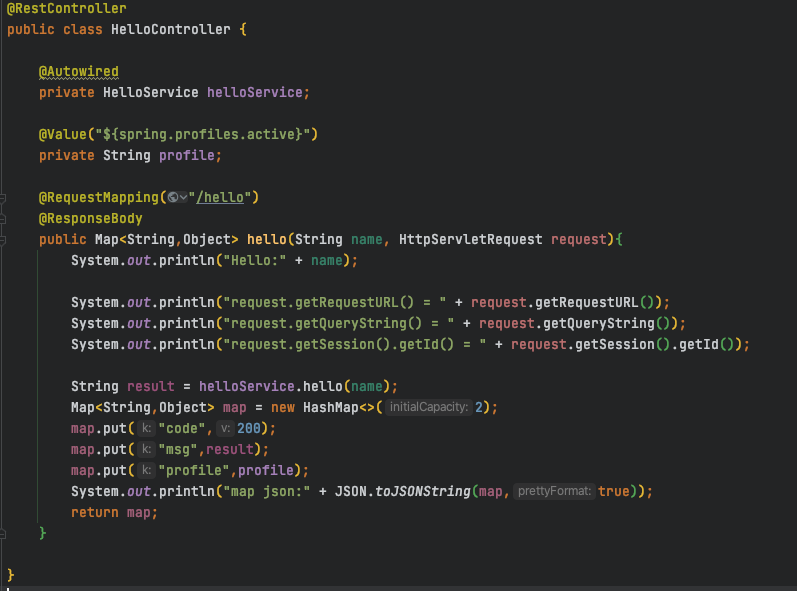
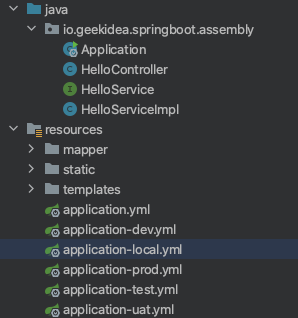
配置文件设置如下:
step2 在pom.xml中的配置并加入插件
step2.1 resource资源配置文件设置(包括设置让配置文件可读取pom、项目使用的配置文件include)
    <build>

        <!-- 打包后的启动jar名称 -->
        <finalName>spring-boot-assembly</finalName>

        <resources>
            <!-- 资源文件配置 -->
            <resource>
                <directory>src/main/resources</directory>
<!--                此处配置,可以让配置文件读取pom属性-->
                <filtering>true</filtering>
                <includes>
                    <include>application.yml</include>
                    <include>application-${profileActive}.yml</include>
                    <include>mapper/**/*.xml</include>
                    <include>static/**</include>
                    <include>templates/**</include>
                    <include>*.xml</include>
                    <include>*.properties</include>
                    <include>*.jks</include>
                </includes>
            </resource>
        </resources>
</build>
step2.2 maven-compiler-plugin
           <plugin>
                <groupId>org.apache.maven.plugins</groupId>
                <artifactId>maven-compiler-plugin</artifactId>
                <configuration>
                    <source>${java.version}</source>
                    <target>${java.version}</target>
                </configuration>
            </plugin>
step2.3 maven-dependency-plugin项目依赖lib的输出等设定
            <plugin>
                <groupId>org.apache.maven.plugins</groupId>
                <artifactId>maven-dependency-plugin</artifactId>
                <version>3.1.0</version>
                <executions>
                    <execution>
                        <phase>prepare-package</phase>
                        <goals>
                            <goal>copy-dependencies</goal>
                        </goals>
                        <configuration>
                            <outputDirectory>target/lib</outputDirectory>
                            <overWriteReleases>false</overWriteReleases>
                            <overWriteSnapshots>false</overWriteSnapshots>
                            <overWriteIfNewer>true</overWriteIfNewer>
                            <includeScope>compile</includeScope>
                        </configuration>
                    </execution>
                </executions>
            </plugin>
step2.4 maven-assembly-plugin插件设置assembly.xml
          <!-- 打包插件 -->
            <plugin>
                <artifactId>maven-assembly-plugin</artifactId>
                <version>3.1.0</version>
                <configuration>
                    <descriptors>
                        <descriptor>src/main/assembly/assembly.xml</descriptor>
                    </descriptors>
                </configuration>
                <executions>
                    <execution>
                        <id>make-assembly</id>
                        <phase>package</phase>
                        <goals>
                            <goal>single</goal>
                        </goals>
                    </execution>
                </executions>
            </plugin>

        </plugins>
2.5 Maven的profiles多环境设置
<!--MAVEN打包选择运行环境-->
    <!-- 1:local(默认) 本地 2:dev:开发环境 3:test 4:uat 用户验收测试 5.pro:生产环境-->
    <profiles>
        <profile>
            <id>local</id>
            <properties>
                <profileActive>local</profileActive>
            </properties>
            <activation>
                <activeByDefault>true</activeByDefault>
            </activation>
        </profile>
        <profile>
            <id>dev</id>
            <properties>
                <profileActive>dev</profileActive>
            </properties>
            <activation>
                <activeByDefault>false</activeByDefault>
            </activation>
        </profile>
        <profile>
            <id>test</id>
            <properties>
                <profileActive>test</profileActive>
            </properties>
            <activation>
                <activeByDefault>false</activeByDefault>
            </activation>
        </profile>
        <profile>
            <id>uat</id>
            <properties>
                <profileActive>uat</profileActive>
            </properties>
            <activation>
                <activeByDefault>false</activeByDefault>
            </activation>
        </profile>
        <profile>
            <id>prod</id>
            <properties>
                <profileActive>prod</profileActive>
            </properties>
            <activation>
                <activeByDefault>false</activeByDefault>
            </activation>
        </profile>
    </profiles>
step3 assembly.xml打包配置文件
在main目录下创建assembly目录
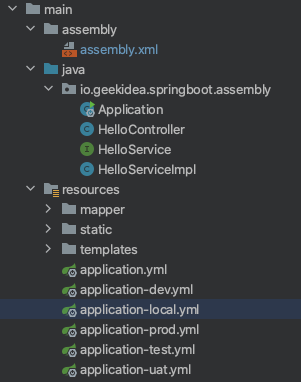
在assembly打包项目时,定义一下几个文件目录:
bin 项目启动/停止/重启等脚本文件目录(***.sh)
boot 存放springboot项目打包后的jar文件包
config 配置文件目录,里面存放项目的配置文件
lib 依赖包目录
然后,根据需要打包的文件,进行include等设置
<?xml version="1.0" encoding="UTF-8"?>
<assembly>
    <!-- 可自定义,这里指定的是项目环境。这里的两个参数,都是pom.xml中的参数 -->
    <!-- spring-boot-assembly-local-1.0.RELEASE.tar.gz  -->
    <id>${profileActive}-${project.version}</id>

    <!-- 打包的类型,如果有N个,将会打N个类型的包 -->
    <formats>
        <format>tar.gz</format>
        <format>zip</format>
    </formats>

    <includeBaseDirectory>true</includeBaseDirectory>

    <fileSets>
        <!--
            0755->即用户具有读/写/执行权限,组用户和其它用户具有读写权限;
            0644->即用户具有读写权限,组用户和其它用户具有只读权限;
        -->

        <!-- 将src/bin目录下的所有文件输出到打包后的bin目录中 -->
        <fileSet>
            <directory>${basedir}/src/bin</directory>
            <outputDirectory>bin</outputDirectory>
            <fileMode>0755</fileMode>
            <includes>
                <include>**.sh</include>
                <include>**.bat</include>
            </includes>
        </fileSet>

        <!-- 指定输出target/classes中的配置文件到config目录中 -->
        <fileSet>
            <directory>${basedir}/target/classes</directory>
            <outputDirectory>config</outputDirectory>
            <fileMode>0644</fileMode>
            <includes>
                <include>application.yml</include>
                <include>application-${profileActive}.yml</include>
                <include>mapper/**/*.xml</include>
                <include>static/**</include>
                <include>templates/**</include>
                <include>*.xml</include>
                <include>*.properties</include>
                <include>*.jks</include>
            </includes>
        </fileSet>

        <!-- 将第三方依赖打包到lib目录中 -->
        <fileSet>
            <directory>${basedir}/target/lib</directory>
            <outputDirectory>lib</outputDirectory>
            <fileMode>0755</fileMode>
        </fileSet>

        <!-- 将项目启动jar打包到boot目录中 -->
        <fileSet>
            <directory>${basedir}/target</directory>
            <outputDirectory>boot</outputDirectory>
            <fileMode>0755</fileMode>
            <includes>
<!--                这里参数,引用pom.xml中<build>下的finalName的属性</build>-->
                <include>${project.build.finalName}.jar</include>
            </includes>
        </fileSet>

        <!-- 包含根目录下的文件 -->
        <fileSet>
            <directory>${basedir}</directory>
            <includes>
                <include>NOTICE</include>
                <include>LICENSE</include>
                <include>*.md</include>
            </includes>
        </fileSet>
    </fileSets>

</assembly>
step4 启动脚本shell
在项目的src目录下,创建bin目录,将startup、shutdown的sh脚本放在这里。
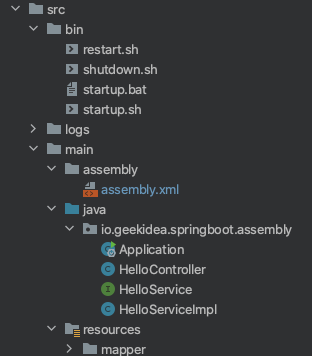
然后定义启动、重启、停止脚本如下。
step4.1 startup.sh
#! /bin/shell

# 项目名称------这里将项目名称写死,应该从项目配置文件中获取,下个章节优化
APPLICATION="spring-boot-assembly"

# 项目启动jar包名称
APPLICATION_JAR="${APPLICATION}.jar"

# bin目录绝对路径
BIN_PATH=$(cd `dirname $0`; pwd)
# 进入bin目录
cd `dirname $0`
# 返回到上一级项目根目录路径
cd ..
# 打印项目根目录绝对路径
# `pwd` 执行系统命令并获得结果
BASE_PATH=`pwd`

# 外部配置文件绝对目录,如果是目录需要/结尾,也可以直接指定文件
# 如果指定的是目录,spring则会读取目录中的所有配置文件
CONFIG_DIR=${BASE_PATH}"/config/"

# 项目日志输出绝对路径
LOG_DIR=${BASE_PATH}"/logs"
LOG_FILE="${APPLICATION}.log"
LOG_PATH="${LOG_DIR}/${LOG_FILE}"
# 日志备份目录
LOG_BACK_DIR="${LOG_DIR}/back/"

# 项目启动日志输出绝对路径
LOG_STARTUP_PATH="${LOG_DIR}/${APPLICATION}_startup.log"

# 当前时间
NOW=`date +'%Y-%m-%m-%H-%M-%S'`
NOW_PRETTY=`'date +%Y-%m-%m %H:%M:%S'`

# 启动日志
STARTUP_LOG="================================================ ${NOW_PRETTY} ================================================\n"

# 如果logs文件夹不存在,则创建文件夹
if [[ ! -d "${LOG_DIR}" ]]; then
  mkdir "${LOG_DIR}"
fi

# 如果logs/back文件夹不存在,则创建文件夹
if [[ ! -d "${LOG_BACK_DIR}" ]]; then
  mkdir "${LOG_BACK_DIR}"
fi

# 如果项目运行日志存在,则重命名备份
if [[ -f "${LOG_PATH}" ]]; then
	mv ${LOG_PATH} "${LOG_BACK_DIR}/${APPLICATION}_back_${NOW}.log"
fi

# 创建新的项目运行日志
echo "" > ${LOG_PATH}

# 如果项目启动日志不存在,则创建,否则追加
echo "${STARTUP_LOG}" >> ${LOG_STARTUP_PATH}

#==========================================================================================
# JVM Configuration
# -Xmx256m:设置JVM最大可用内存为256m,根据项目实际情况而定,建议最小和最大设置成一样。
# -Xms256m:设置JVM初始内存。此值可以设置与-Xmx相同,以避免每次垃圾回收完成后JVM重新分配内存
# -Xmn512m:设置年轻代大小为512m。整个JVM内存大小=年轻代大小 + 年老代大小 + 持久代大小。
#          持久代一般固定大小为64m,所以增大年轻代,将会减小年老代大小。此值对系统性能影响较大,Sun官方推荐配置为整个堆的3/8
# -XX:MetaspaceSize=64m:存储class的内存大小,该值越大触发Metaspace GC的时机就越晚
# -XX:MaxMetaspaceSize=320m:限制Metaspace增长的上限,防止因为某些情况导致Metaspace无限的使用本地内存,影响到其他程序
# -XX:-OmitStackTraceInFastThrow:解决重复异常不打印堆栈信息问题
#==========================================================================================
JAVA_OPT="-server -Xms256m -Xmx256m -Xmn512m -XX:MetaspaceSize=64m -XX:MaxMetaspaceSize=256m"
JAVA_OPT="${JAVA_OPT} -XX:-OmitStackTraceInFastThrow"

#=======================================================
# 将命令启动相关日志追加到日志文件
#=======================================================

# 输出项目名称
STARTUP_LOG="${STARTUP_LOG}application name: ${APPLICATION}\n"
# 输出jar包名称
STARTUP_LOG="${STARTUP_LOG}application jar name: ${APPLICATION_JAR}\n"
# 输出项目bin路径
STARTUP_LOG="${STARTUP_LOG}application bin  path: ${BIN_PATH}\n"
# 输出项目根目录
STARTUP_LOG="${STARTUP_LOG}application root path: ${BASE_PATH}\n"
# 打印日志路径
STARTUP_LOG="${STARTUP_LOG}application log  path: ${LOG_PATH}\n"
# 打印JVM配置
STARTUP_LOG="${STARTUP_LOG}application JAVA_OPT : ${JAVA_OPT}\n"


# 打印启动命令
STARTUP_LOG="${STARTUP_LOG}application background startup command: nohup java ${JAVA_OPT} -jar ${BASE_PATH}/boot/${APPLICATION_JAR} --spring.config.location=${CONFIG_DIR} > ${LOG_PATH} 2>&1 &\n"


#======================================================================
# 执行启动命令:后台启动项目,并将日志输出到项目根目录下的logs文件夹下
#======================================================================
nohup java ${JAVA_OPT} -jar ${BASE_PATH}/boot/${APPLICATION_JAR} --spring.config.location=${CONFIG_DIR} > ${LOG_PATH} 2>&1 &


# 进程ID
PID=$(ps -ef | grep "${APPLICATION_JAR}" | grep -v grep | awk '{ print $2 }')
STARTUP_LOG="${STARTUP_LOG}application pid: ${PID}\n"

# 启动日志追加到启动日志文件中
echo -e ${STARTUP_LOG} >> ${LOG_STARTUP_PATH}
# 打印启动日志
echo -e ${STARTUP_LOG}

# 打印项目日志
tail -f ${LOG_PATH}
step4.2 restart.sh
#! /bin/shell

# 项目名称
APPLICATION="spring-boot-assembly"

# 停服
echo stop ${APPLICATION} Application...
sh shutdown.sh

# 启动服务
echo start ${APPLICATION} Application...
sh startup.sh
step4.3 shutdown.sh
# 项目名称
APPLICATION="spring-boot-assembly"

# 项目启动jar包名称
APPLICATION_JAR="${APPLICATION}.jar"

PID=$(ps -ef | grep "${APPLICATION_JAR}" | grep -v grep | awk '{ print $2 }')
if [[ -z "$PID" ]]
then
    echo ${APPLICATION} is already stopped
else
    echo kill  ${PID}
    kill -9 ${PID}
    echo ${APPLICATION} stopped successfully
fi
step5 执行打包指令
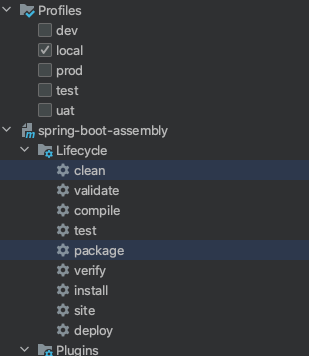
出现如下信息,打包成功

step6 对tar.gz项目解压并执行sh启动
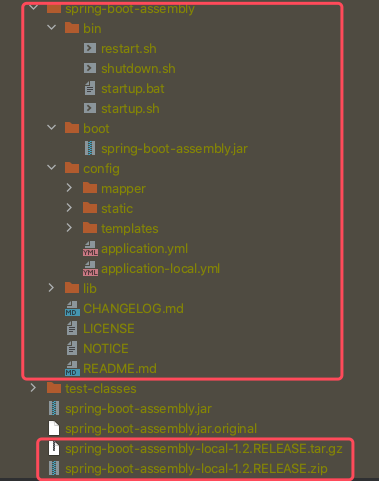
然后可进入解压后的bin/目录下,执行./startup.sh启动程序。


 浙公网安备 33010602011771号