一SpringSecurity概念及入门开发
一SpringSecurity概念及入门开发
一 SpringSecurity概念及入门开发
认证和鉴权是两个过程。
认证:是输入账号密码(包括其他方案如jwt中,从server获得token)然后传至server,决定认证是否成功。认证成功后才可以访问后端资源;
鉴权:是认证成功后,访问后端资源,此时需要对token(或者用户)判断其是否有访问目标资源的权限。如果没有,不允许通过。
5.1 概念
Spring Security是一套安全框架,可以基于RBAC(基于角色的权限控制)对用户的访问权限进行控制。
核心思想是通过一系列的filter chain来进行拦截过滤,对用户的访问权限进行控制。
1 核心功能
认证、授权、攻击防护(防止伪造身份访问)
2 基本原理
其核心就是一组过滤器链,项目启动后将会自动配置。最核心的就是 Basic Authentication Filter 用来认证用户的身份,一个在spring security中一种过滤器处理一种认证方式。

例如:对于usernamePassword过滤器来说,其执行如下的逻辑:
1 usernamePasswordAuthenticationFilter{
会检查是否是一个登录请求;
是否包含username 和 password (也就是该过滤器需要的一些认证信息);
如果不满足则放行给下一个
}

2 下一个按照自身职责判定是否是自身需要的信息,basic的特征就是在请求头中有 Authorization:Basic eHh4Onh4 的信息。中间可能还有更多的认证过滤器。

3 最后一环是 FilterSecurityInterceptor,这里会判定该请求是否能进行访问rest服务,判断的依据是  BrowserSecurityConfig中的配置,如果被拒绝了就会抛出不同的异常(根据具体的原因)。Exception  Translation Filter 会捕获抛出的错误,然后根据不同的认证方式进行信息的返回提示。
5.2 入门开发
step1 创建springboot的web应用
控制器如下:
@Controller
public class AppController {

    @RequestMapping("/hello")
    @ResponseBody
    String home() {
        return "Hello ,spring security!";
    }
}
此时,访问http://localhost:8080/hello,可看到返回值。
step2 加入spring security保护
此时,/hello是可以自由访问。假设,我们需要具有某个角色的用户才能访问的时候,我们可以引入spring security来进行保护。加入如下依赖,并重启应用:
<dependency>
    <groupId>org.springframework.boot</groupId>
    <artifactId>spring-boot-starter-security</artifactId>
</dependency>
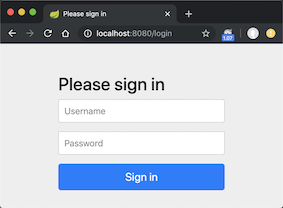
再次访问/hello,我们可以得到一个页面,如下:

说明spring security 已经起作用了,我们需要登陆才能访问。我们可以查看下这个页面的源代码,是这样:
<html><head><title>Login Page</title></head><body onload='document.f.username.focus();'>
<h3>Login with Username and Password</h3><form name='f' action='/login' method='POST'>
<table>
	<tr><td>User:</td><td><input type='text' name='username' value=''></td></tr>
	<tr><td>Password:</td><td><input type='password' name='password'/></td></tr>
	<tr><td colspan='2'><input name="submit" type="submit" value="Login"/></td></tr>
	<input name="_csrf" type="hidden" value="635780a5-6853-4fcd-ba14-77db85dbd8bd" />
</table>
</form></body></html>
上面的html中有个form ,其中action="/login",这个/login依然是spring security提供的。form表单提交了三个数据:
- username 用户名
- password 密码
- _csrf CSRF保护方面的内容,暂时先不展开解释
为了登录系统,我们需要知道用户名密码,spring security 默认的用户名是user,spring security启动的时候会生成默认密码(在启动日志中可以看到)。本例,我们指定一个用户名密码,在配置文件中加入如下内容:
默认的登陆用户是user默认的登陆密码我们可以去控制台看下日志。会看到如下信息:
Using generated security password: cc7d4605-75db-49aa-aa9a-b95953b5c1e8
我们在登陆狂输入user和密码cc7d4605-75db-49aa-aa9a-b95953b5c1e8。可以登录成功,并能访问/hello的内容。
step3 自定义security配置
上面我们看到默认情况下,spring为我们提供了一个「httpBasic」模式的简单登陆页面,并在控制台输出了密码(这个密码每次启动都是不一样的)。如果我们想用自己的定义的账号密码,则需要改配置。如下:
我们新建一个类SecurityConfiguration,并加入一些代码,如下所示:
@Configuration
@EnableWebSecurity
public class SecurityConfiguration extends WebSecurityConfigurerAdapter {

	@Override
	protected void configure(HttpSecurity http) throws Exception {
		http
				.authorizeRequests()
				.anyRequest().authenticated()
				.and()
				.formLogin().and()
				.httpBasic();
	}

   @Override
    protected void configure(AuthenticationManagerBuilder auth) throws Exception {
      auth.
        inMemoryAuthentication()
        .withUser("spring")
        .password("{noop}123456").roles("USER");

    }
}
上面的配置其实和默认情况的配置几乎一样,只是这里定义了一个用户spring,和密码123456 。(说明:密码前面的{noop}表示的是指定的PasswordEncoder)此时我们启动项目,便可以使用spring这个用户及123456密码登录了。
step4 角色-资源 访问控制
通常情况下,我们需要实现“特定资源只能由特定角色访问”的功能。假设我们的系统有如下两个角色:
- ADMIN 可以访问所有资源
- USER 只能访问特定资源
现在我们给系统增加“/product” 代表商品信息方面的资源(USER可以访问);增加"/admin"代码管理员方面的资源(USER不能访问)。代码如下:
@Controller
@RequestMapping("/product")
public class ProductTestController {

	@RequestMapping("/info")
	@ResponseBody
	public String productInfo(){
		return " some product info ";
	}
}
-------------------------------------------
@Controller
@RequestMapping("/admin")
public class AdminTestController {

	@RequestMapping("/home")
	@ResponseBody
	public String productInfo(){
		return " admin home page ";
	}
}
现在我们希望实现:admin可以访问所有页面,而普通用户只能方法/product页面。配置如下:
@Configuration
@EnableWebSecurity
public class SecurityConfiguration extends WebSecurityConfigurerAdapter {

    @Override
    protected void configure(HttpSecurity http) throws Exception {
        http
                .authorizeRequests()
                    .antMatchers("/product/**").hasRole("USER")
                    .antMatchers("/admin/**").hasRole("ADMIN")
                .anyRequest().authenticated()
                .and()
                .formLogin().and()
                .httpBasic();
     }

    @Override
    protected void configure(AuthenticationManagerBuilder auth) throws Exception {
        auth
            .inMemoryAuthentication()
            .withUser("admin").password("{noop}adminpass").roles("ADMIN", "USER")
            .and()
            .withUser("spring").password("{noop}123456").roles("USER");

     }

}
这里,我们增加了 管理员(admin,密码adminpass),以及普通用户(spring,密码123456)
同时,我们增加了链接对应的角色配置。上面的配置,我们可以知道:
- 使用 USER角色的用户登录,只能访问/product/**
- 使用 ADMIN角色的用户登录,可以访问所有。
下面来验证一下普通用户登录,重启项目,在浏览器中输入:http://localhost:8080/admin/home。同样,我们会到达登录页面,我们输入用户名spring,密码也为123456 结果错误页面了,拒绝访问了,信息为:
There was an unexpected error (type=Forbidden, status=403).
Forbidden
我们把浏览器中的uri修改成:/product/info,结果访问成功。可以看到some product info。说明 spring这个USER角色只能访问 product/** ,这个结果与我们预期一致。
再来验证一下管理员用户登录,重启浏览器之后,输入http://localhost:8080/admin/home。在登录页面中输入用户名admin,密码adminpass,提交之后,可以看到admin home page ,说明访问管理员资源了。我们再将浏览器uri修改成/product/info,刷新之后,也能看到some product info,说明 ADMIN角色的用户可以访问所有资源,这个也和我们的预期一致。
tips:获取当前登录用户信息
上面我们实现了“资源 - 角色”的访问控制,效果和我们预期的一致,但是并不直观,我们不妨尝试在控制器中获取“当前登录用户”的信息,直接输出,看看效果。以/product/info为例,我们修改其代码,如下:
	@RequestMapping("/info")
	@ResponseBody
	public String productInfo(){
		String currentUser = "";
		Object principl = SecurityContextHolder.getContext().getAuthentication().getPrincipal();
		if(principl instanceof UserDetails) {
			currentUser = ((UserDetails)principl).getUsername();
		}else {
			currentUser = principl.toString();
		}
		return " some product info,currentUser is: "+currentUser;
	}
这里,我们通过SecurityContextHolder来获取了用户信息,并拼接成字符串输出。重启项目,在浏览器访问http://localhost:8080/product/info. 使用 admin的身份登录,可以看到浏览器显示some product info,currentUser is: admin。


 浙公网安备 33010602011771号