三Spring-ioc容器--1容器加载源码分析
三Spring-ioc容器--1容器加载源码分析
三Spring-ioc容器--1容器加载源码分析
3.1 web与非web项目ioc容器创建
3.1.1 spring容器的概念梳理
容器:是spring框架实现功能的核心,负责对象的创建和管理,负责对象的整个生命周期的管理——创建、装配、销毁。
IOC:控制反转的思想
IOC容器:负责对应用程序内对象的创建,以及管理对象之间的依赖关系。(spring容器负责对象的创建和管理控制权,就是控制权利的反转,所以spring容器成为IOC容器。
注意:IOC容器有很多实现,spring容器只是其中一种。
spring应用上下文:spring容器的抽象化表述,就是实现需要spring帮忙管理的对象放入容器的功能,的一种容器对象。(ApplicationContext本质上说就是一个维护Bean定义以及对象之间协作关系的高级接口)
注意:spring核心是容器,而框架本身的容器有很多种实现。一种是不常用的beanfactory,提供基本的DI功能和第三方拓展点的功能;另外一种是继承beanfactory而派生的应用上下文,提供更多的服务供开发者使用。(有了应用上下文,就能够向容器注册需要spring管理的对象)
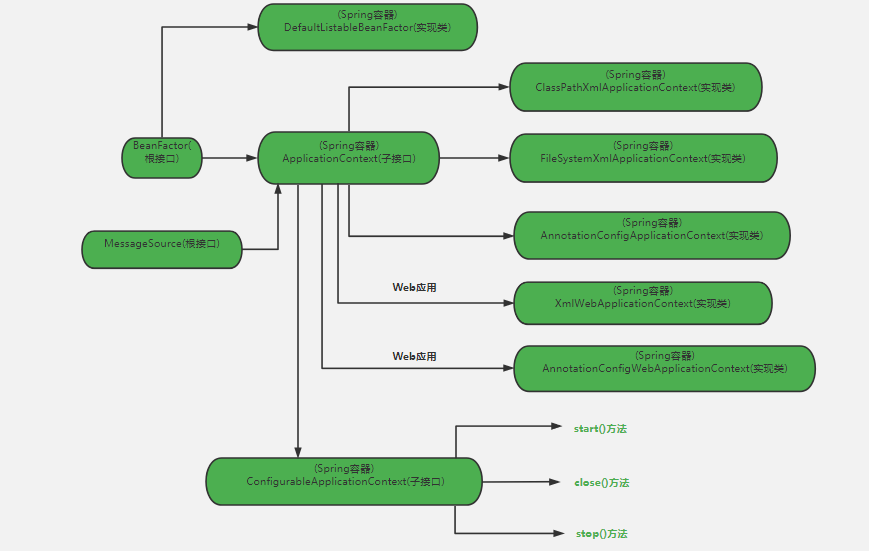
上下文抽象接口ApplicationContext提供多种类型容器实现:
① AnnotationConfigApplicationContext:从一个或多个基于java的配置类中加载上下文定义,适用于java注解的方式;
② ClassPathXmlApplicationContext:从类路径下的一个或多个xml配置文件中加载上下文定义,适用于xml配置的方式;
③ FileSystemXmlApplicationContext:从文件系统下的一个或多个xml配置文件中加载上下文定义,也就是说系统盘符中加载xml配置文件;
④ AnnotationConfigWebApplicationContext:专门为web应用准备的,适用于注解方式;
⑤ XmlWebApplicationContext:从web应用下的一个或多个xml配置文件加载上下文定义,适用于xml配置方式。
只要将你需要IOC容器替你管理的对象基于xml也罢,java注解也好,总之你要将需要管理的对象(Spring中我们都称之问bean)、bean之间的协作关系配置好,然后利用应用上下文对象applicationContext加载进我们的Spring容器,容器就能为你的程序提供你想要的对象管理服务了。
(1)xml配置方式配置bean,并建立bean之间的依赖关系
<?xml version="1.0" encoding="UTF-8"?>
<beans xmlns="http://www.springframework.org/schema/beans"
       xmlns:xsi="http://www.w3.org/2001/XMLSchema-instance"
       xsi:schemaLocation="http://www.springframework.org/schema/beans
           http://www.springframework.org/schema/beans/spring-beans-3.2.xsd">
    <bean id="man" class="spring.chapter1.domain.Man">
        <constructor-arg ref="qqCar" />
    </bean>
    <bean  id="qqCar" class="spring.chapter1.domain.QQCar"/>
</beans>
通过applicationcontext将配置加载到IOC容器,让spring管理对象,使用时候从容器中获取bean:
public class Test {
    public static void main(String[] args) {
        //加载项目中的spring配置文件到容器
//        ApplicationContext context = new ClassPathXmlApplicationContext("resouces/applicationContext.xml");
        //加载系统盘中的配置文件到容器
        ApplicationContext context = new FileSystemXmlApplicationContext("E:/Spring/applicationContext.xml");
        //从容器中获取对象实例
        Man man = context.getBean(Man.class);
        man.driveCar();
    }
}
(2)注解方式:
//同xml一样描述bean以及bean之间的依赖关系
@Configuration
public class ManConfig {
    @Bean
    public Man man() {
        return new Man(car());
    }
    @Bean
    public Car car() {
        return new QQCar();
    }
}
public class Test {
    public static void main(String[] args) {
        //从java注解的配置中加载配置到容器
        ApplicationContext context = new AnnotationConfigApplicationContext(ManConfig.class);
        //从容器中获取对象实例
        Man man = context.getBean(Man.class);
        man.driveCar();
    }
}
3.1.2 spring容器启动方式
(1)spring通过对Junit框架的整合功能来启动Spring非Web容器(推荐)
				<dependency>
            <groupId>junit</groupId>
            <artifactId>junit</artifactId>
            <scope>test</scope>
        </dependency>
        <dependency>
            <groupId>org.springframework</groupId>
            <artifactId>spring-test</artifactId>
            <scope>test</scope>
        </dependency>
<!-- https://mvnrepository.com/artifact/org.springframework/spring-context -->
<dependency>
    <groupId>org.springframework</groupId>
    <artifactId>spring-context</artifactId>
    <version>5.1.3.RELEASE</version>
</dependency>
@RunWith(SpringJUnit4ClassRunner.class)
@ContextConfiguration({"classpath:spring-config.xml"})
public class TestBeanImplTest {
    @Resource TestBean testBean;

    @Test
    public void getBeanTest(){

          system.out.print(testBean);
    }
}
(2)在main方法中初始化spring容器(非web容器)
applicationContext.xml配置bean属性
<?xml version="1.0" encoding="UTF-8"?>
<beans xmlns="http://www.springframework.org/schema/beans"
	xmlns:xsi="http://www.w3.org/2001/XMLSchema-instance"
	xsi:schemaLocation="http://www.springframework.org/schema/beans http://www.springframework.org/schema/beans/spring-beans.xsd">
	<!-- 通过构造方法配置bean的属性 -->
	<bean id="car" class="com.atguigu.spring.beans.Car">
		<constructor-arg value="Baoma"></constructor-arg>
		<constructor-arg value="Beijing"></constructor-arg>
		<constructor-arg value="3000"></constructor-arg>
	</bean>
</beans>
main创建IOC容器:
package com.atguigu.spring beans;

import org.springframework.context.ApplicationContext;
import org.springframework.context.support.ClassPathXmlApplicationContext;

public class Main {
	public static void main(String[] args) {
		// 1.创建Spring的IOC容器对象-通过使用ClassPathXmlApplicationContext类加载配置文件创建容器
		// ApplicationContext代表的是IOC容器
		ApplicationContext ctx = new ClassPathXmlApplicationContext("applicationContext.xml");
		// 2.从IOC容器中获取Bean示例
		Car car = (Car)ctx.getBean("car");
		System.out.println(car);
	}
}
(3)调用静态方法时初始化(非web)
package com.data.test;

import com.data.test.monitor.ServiceFacade;
import org.slf4j.Logger;
import org.springframework.context.ApplicationContext;
import org.springframework.context.support.ClassPathXmlApplicationContext;

/**
 * @description: single
 * @author: feng
 * @create: 2018-12-21 17:49
 **/

public class SingleTest {

    public static Logger logger = org.slf4j.LoggerFactory.getLogger(SingleTest.class);

    private static SingleTest sin = new SingleTest ();

    public static ServiceFacade serviceFacade;

  	//无参构造函数,创建spring容器,并getBean来启动
    private SingleTest (){
        logger.info("初始化Spring容器开始。");
        ApplicationContext ac = new ClassPathXmlApplicationContext("classpath:spring-config.xml");
        serviceFacade  =(ServiceFacade) ac.getBean("ebMonitorInnerServiceFacade");
        logger.info("获取bean-ServiceFacade:{}",serviceFacade );
    }

  	//调用static方法get,然后触发SingleTest实例化,并执行无参构造函数
    public static SingleTest get(){
        return sin;
    }
}
(4)web容器启动
web项目中,由于配置文件的存在,可以不需要开发人员自己使用ClassPathXmlApplicationContext创建IOC容器,而是在配置文件中写好,在启动项目时,由项目自己创建IOC容器
<?xml version="1.0" encoding="UTF-8"?>
<web-app xmlns:xsi="http://www.w3.org/2001/XMLSchema-instance"
	xmlns="http://xmlns.jcp.org/xml/ns/javaee"
	xsi:schemaLocation="http://xmlns.jcp.org/xml/ns/javaee http://xmlns.jcp.org/xml/ns/javaee/web-app_3_1.xsd"
	id="WebApp_ID" version="3.1">

  				<!--  作用一:创建IOC容器对应的对象
  		   				作用二:把那些对象放到了application对应的域里面 -->
  	<context-param>
  	<!-- 配置文件的位置, 类路径下的applicationContext.xml -->
  		<param-name>contextConfigLocation</param-name>
  		<param-value>classpath:applicationContext.xml</param-value>
  	</context-param>
  	<!-- 把 Spring 容器集成到 Web 应用里面 ,采用listener创建ApplicationContext实例
  	   1.spring提供ServletContextListener的一个实现类ContextLoaderListener,
  	               该类可以作为Listener使用,在只有一个xml配置文件时,可以将其放在WEB-INF文件夹下,
  	               这时不需要<context-param>配置,项目会在创建时自动查找web-inf/applicationContext.xml文件,
  	               因此,如果只有一个配置文件,并且名为applicationContext.xml,只需要在web.xml文件中加入listener配置即可
  	   2.当有多个xml配置文件需要载入(这种情况也适用于只有一个applicationContext.xml文件),
  	              则考虑用<context-param>元素来确定配置文件的文件名与路径。ContextLoadListenter加载时,会查找名为contextConfigLocation的参数。
  	              因此,配置context-param时,参数名应该是contextConfigLocation,param-value则指定文件所在的位置,比如在类路径下的某个文件
    	 3.如是没有通过contextConfigLocation指定配置文件,spring会自动查找applicationContext.xml文件;
    	  如果有contextConfigLocation,则利用该参数确定的配置文件,如果无法找到合适的配置文件,spring将无法正常初始化
    -->
  	<listener>
  		<listener-class>org.springframework.web.context.ContextLoaderListener</listener-class>
  	</listener>
</web-app>
总结:
可以看出,Spring项目需要借助类ApplicationContext 来手动建IOC容器而整合Spring的Web项目,在配置文件中配置监听器listener,在项目启动时,在配置文件中写清楚applicationContext.xml文件所在位置即可,项目会在启动时,自己创建IOC容器。
3.2 spring bean 后置处理器
3.2.1 概述
BeanPostProcessor接口定义回调方法,可以实现该方法来提供自己的实例化逻辑、依赖解析逻辑等。也可以在spring容器中通过插入一个或多个BeanPostProcessor的实现来完成,在bean实例化、配置、初始化完成时候,进行自定义逻辑回调方法。
可以配置多个BeanPostProcessor接口,通过执行其实现的Ordered接口提供的order属性,来控制这些后置处理器的调用顺序。
BeanPostProcessor可以对bean实例进行操作,因此spring IOC容器实例化一个bean实例,然后可以交给BeanPostProcessor来处理它们的后续工作。
工作原理:ApplicationContext会自动检测由BeanPostProcessor接口实现的自定义bean,注册这些bean为后置处理器,然后通过在容器中创建bean,在适当的时机调用。
public interface BeanPostProcessor {

	/**
	 * Apply this BeanPostProcessor to the given new bean instance <i>before</i> any bean
	 * initialization callbacks (like InitializingBean's {@code afterPropertiesSet}
	 * or a custom init-method). The bean will already be populated with property values.
	 * The returned bean instance may be a wrapper around the original.
	 * @param bean the new bean instance
	 * @param beanName the name of the bean
	 * @return the bean instance to use, either the original or a wrapped one;
	 * if {@code null}, no subsequent BeanPostProcessors will be invoked
	 * @throws org.springframework.beans.BeansException in case of errors
	 * @see org.springframework.beans.factory.InitializingBean#afterPropertiesSet
	 */
  	//在传入的参数bean的初始化之前执行
	Object postProcessBeforeInitialization(Object bean, String beanName) throws BeansException;

	Object postProcessAfterInitialization(Object bean, String beanName) throws BeansException;

}
示例:
在初始化bean的之前和之后实现复杂的逻辑,提供了两个访问内置bean对象的后置处理方法(*后置处理器单独注册bean*,可以获取ioc容器内的bean,完成前置和后置的处理)
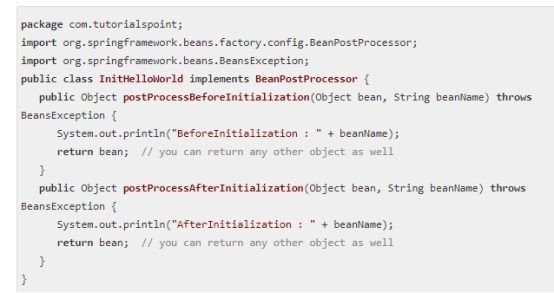
Bean.xml文件内配置:

Before和after两个方法,会在bean.xml中的init配置方法执行前后分别执行。
[3.2.2 后置处理器埋点设计](#3.3.3 后置处理器的注册与实例化时机)
详见后续内容。
3.3 spring容器启动流程
3.3.1容器加载流程(容器加载,封装和注册beandefinition)
3.3.1.1 xml与注解容器加载方式对比
容器加载方式:
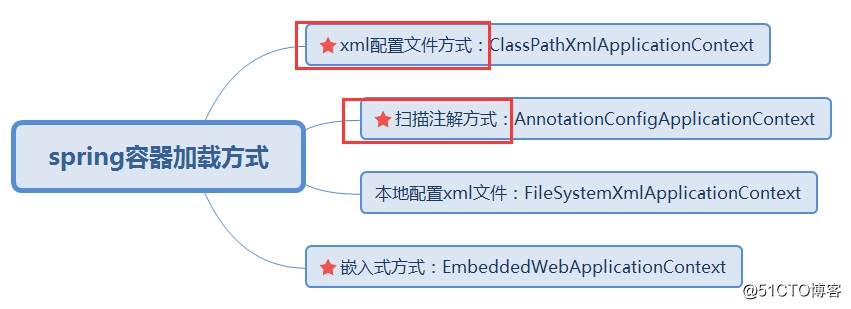
两种容器加载流程如下:
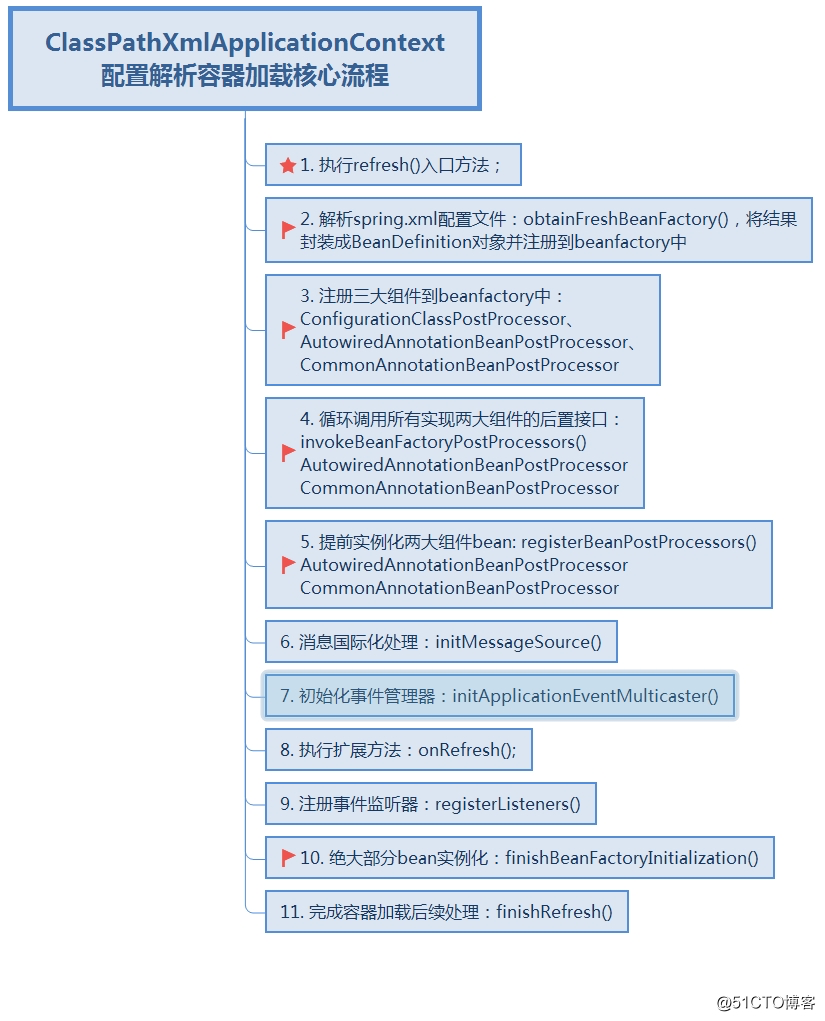
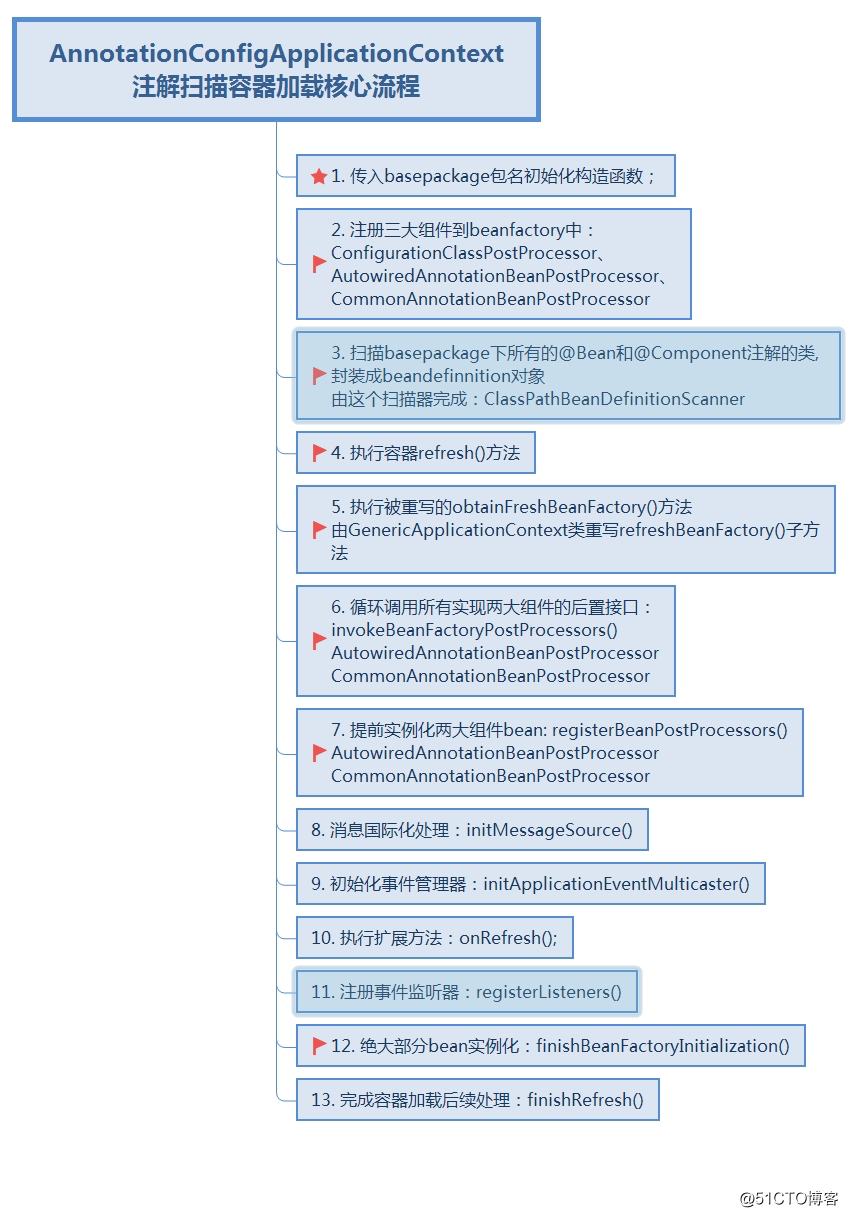
比较两种容器加载流程:
(1)xml配置解析
容器上下文刷新refresh入口-----AbstractApplicationContext
@Override
// 1 容器初始化过程,构造函数会调用refresh入口方法
public void refresh() throws BeansException, IllegalStateException {
     synchronized (this.startupShutdownMonitor) {
          // Prepare this context for refreshing.
          prepareRefresh();

          /** 2(1)创建BeanFactory对象ConfigurableListableBeanFactory,将BF功能代理到AC上
          		 (2)xml解析
                    	*传统标签解析:bean、import等
                    	*自定义标签解析:<context:component-scan base-package="xxx.xx.oo">
                              *自定义标签解析流程
                               a 根据标签头找到对应的namespaceUri
                               b 加载spring所有jar中的spring.handlers文件,并建立映射关系
                               c 根据namespaceUri从映射关系中找到对应的实现namespaceHandler接口的类
                               d 调用类的init方法,init方法是注册各种自定义标签的解析类
                               e 根据namespaceUri找到对应的解析类,调用parse方法完成解析
                 (3)把解析出来的xml标签信息封装入beandefinition对象
          // Tell the subclass to refresh the internal bean factory.
          */
          ConfigurableListableBeanFactory beanFactory = obtainFreshBeanFactory();

          //3 设置beanFactory一些属性,略
          // Prepare the bean factory for use in this context.
          prepareBeanFactory(beanFactory);

          try {
               //3   Allows post-processing of the bean factory in context subclasses.
               postProcessBeanFactory(beanFactory);

               //4 循环调用所有实现两大组件的后置接口????
               // Invoke factory processors registered as beans in the context.
               invokeBeanFactoryPostProcessors(beanFactory);

               /** 5 提前实例化两大组件bean---都是BeanPostProcessor
                    (AutwireAnnotationBeanPostProcessor、CommonAnnotationBeanPostProcessor)
                    注册BeanPostProcessor,并提前实例化上面两个得到bean,然后缓存到CopyOnWrite容器内
                    */
               // Register bean processors that intercept bean creation.
               registerBeanPostProcessors(beanFactory);

               //6 消息国际化处理
               // Initialize message source for this context.
               initMessageSource();

               //7 初始化事件管理器
               // Initialize event multicaster for this context.
               initApplicationEventMulticaster();

               //8 执行扩展方法
               //模板方法模式,扩展其他bean的实例化(空的方法,需要由实现类完成该方法的定义,并调用)
               (spring-boot中Tomcat的启动在此扩展方法中完成)
               // Initialize other special beans in specific context subclasses.
               onRefresh();

               //9 注册事件监听器
               // Check for listener beans and register them.
               registerListeners();

               /** 10 绝大部分bean实例化(bean实例化核心方法)
               实例化完成以下过程:
                    a bean 的实例化过程
                    b ioc依赖注入
                    c 注解支持
                    d BeanPostProcessor的执行
                    e aop的入口
               */
               // Instantiate all remaining (non-lazy-init) singletons.
               finishBeanFactoryInitialization(beanFactory);

               //11 完成容器加载后续处理
               // Last step: publish corresponding event.
               finishRefresh();
          }
(2)注解扫描
AnnotationConfigApplicationContext构造函数注解扫描入口
public class AnnotationConfigApplicationContext extends GenericApplicationContext implements AnnotationConfigRegistry {

     //step2
     public AnnotationConfigApplicationContext() {
          // 完成三大PostProcessor组件的beandefinition注册
          this.reader = new AnnotatedBeanDefinitionReader(this);
          //完成默认scanner的注册:ComponentScanner、NamespaceHandler的注册
          this.scanner = new ClassPathBeanDefinitionScanner(this);
     }

     //step1 传入basepackages包名初始化applicationcontext
     public AnnotationConfigApplicationContext(String... basePackages) {
          //组件注册、过滤器设置——见前无参数构造函数
          //step2 注册三大组件到beanfactory内
          this();
          //step3 扫描basepackage下所有@bean、@component注解的类,封装成beandefinition对象,由扫描器scanner完成
          //包扫描注册beandefinition对象
          scan(basePackages);
          //step4 执行容器的覆盖refresh方法
          refresh();
     }
完成PostProcessor三大件注册的AnnotatedBeanDefinitionReader类:
public AnnotatedBeanDefinitionReader(BeanDefinitionRegistry registry, Environment environment) {
     Assert.notNull(registry, "BeanDefinitionRegistry must not be null");
     Assert.notNull(environment, "Environment must not be null");
     this.registry = registry;
     this.conditionEvaluator = new ConditionEvaluator(registry, environment, null);

// 注册三大组件,过程同xml解析中组件注册相同
     AnnotationConfigUtils.registerAnnotationConfigProcessors(this.registry);
}
ClassPathBeanDefinitionScanner扫描器,扫描basepackage下所有@bean、@component注解的类注册为beandefinition
public ClassPathBeanDefinitionScanner(BeanDefinitionRegistry registry, boolean useDefaultFilters,
                                      Environment environment, @Nullable ResourceLoader resourceLoader) {

     Assert.notNull(registry, "BeanDefinitionRegistry must not be null");
     this.registry = registry;

     //注册默认过滤器,扫描默认注解@service、@component等
     //同xml即系中扫描器的创建过程
     if (useDefaultFilters) {
          registerDefaultFilters();
     }
     setEnvironment(environment);
     setResourceLoader(resourceLoader);
}

//step3 包扫描
public int scan(String... basePackages) {
     int beanCountAtScanStart = this.registry.getBeanDefinitionCount();

     //执行包扫描
     doScan(basePackages);

     // Register annotation config processors, if necessary.
     if (this.includeAnnotationConfig) {
          AnnotationConfigUtils.registerAnnotationConfigProcessors(this.registry);
     }

     return (this.registry.getBeanDefinitionCount() - beanCountAtScanStart);
}
refresh的实现类:AbstractApplicationContext
@Override
public void refresh() throws BeansException, IllegalStateException {
     synchronized (this.startupShutdownMonitor) {
          // Prepare this context for refreshing.
          prepareRefresh();

          // Tell the subclass to refresh the internal bean factory.
          // step5 执行被重写的obtainFreshBeanFactory
          //对于注解容器,具体实现由GenericApplicationContext重写
          ConfigurableListableBeanFactory beanFactory = obtainFreshBeanFactory();

          // Prepare the bean factory for use in this context.
          prepareBeanFactory(beanFactory);

          try {
               // Allows post-processing of the bean factory in context subclasses.
               postProcessBeanFactory(beanFactory);

               // Invoke factory processors registered as beans in the context.
               //step6
               invokeBeanFactoryPostProcessors(beanFactory);

               // Register bean processors that intercept bean creation.
               //step7 提前实例化两大组件bean
               (autowired、common)
               registerBeanPostProcessors(beanFactory);

               // Initialize message source for this context.
               //step8消息国际化处理
               initMessageSource();

               // Initialize event multicaster for this context.
               //step9 初始化事件管理器
               initApplicationEventMulticaster();

               // Initialize other special beans in specific context subclasses.
               //step10 执行扩展方法
               onRefresh();

               // Check for listener beans and register them.
               //step11 注册事件监听器
               registerListeners();

               // Instantiate all remaining (non-lazy-init) singletons.
               //step12 绝大部分bean实例化
               finishBeanFactoryInitialization(beanFactory);

               // Last step: publish corresponding event.
               //step13 完成容器加载后续处理
               finishRefresh();
          }
protected ConfigurableListableBeanFactory obtainFreshBeanFactory() {
     //模板方法设计模式
     //针对annotationconfigapplicationcontext类,由GenericApplicationContext重写此方法
refreshBeanFactory();
return getBeanFactory();
}
protected final void refreshBeanFactory() throws IllegalStateException {

     //注解扫描重写GenericApplicationContext.refreshBeanFactory()方法(没有重要实现);xml配置解析重写的是:AbstractRefreshableApplicationContext.refreshBeanFactory()方法(核心实现就在此)
if (!this.refreshed.compareAndSet(false, true)) {
throw new IllegalStateException(
"GenericApplicationContext does not support multiple refresh attempts: just call 'refresh' once");
}
this.beanFactory.setSerializationId(getId());
}
refresh()容器刷新的后续步骤,两种容器加载方式相同。
3.3.1.2 xml容器加载过程(源码分析)
代码分析,以DubboDemo为例。


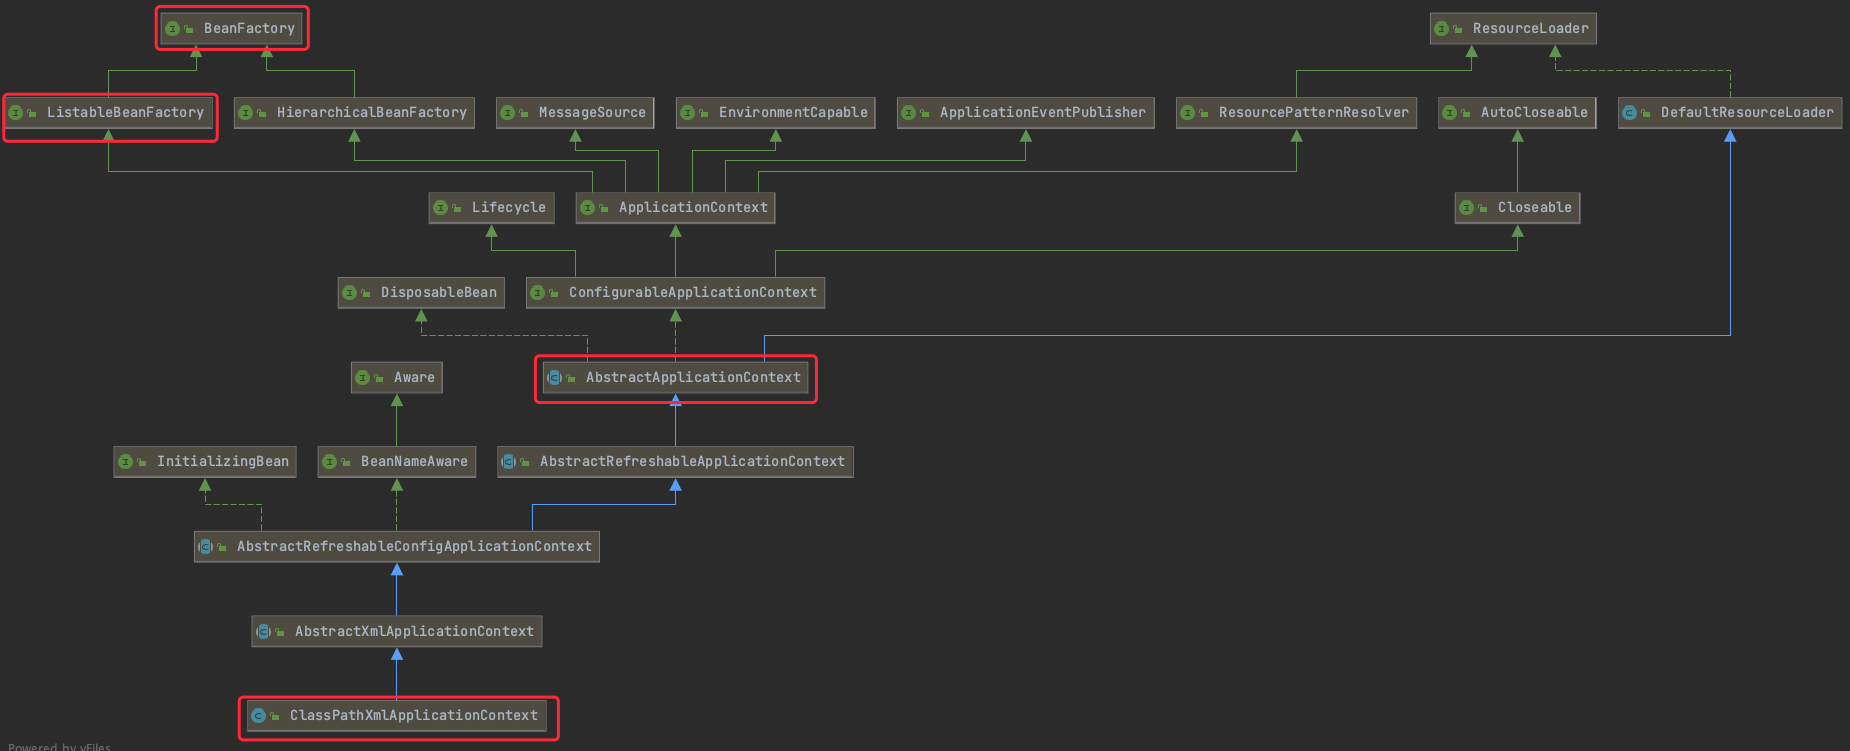
在上面ClassPathXmlApplicationContext实例化过程中,构造函数,调用refresh()方法,该方法由AbstractApplicationContext实现。
TAG0 refresh()入口
容器上下文刷新refresh入口-----AbstractApplicationContext.refresh()
@Override
//TAG0 refresh()入口
// 1 容器applicationContext初始化过程,构造函数会调用refresh入口方法
public void refresh() throws BeansException, IllegalStateException {
     synchronized (this.startupShutdownMonitor) {
          // Prepare this context for refreshing.
          prepareRefresh();

//TAG1 obtainFreshBeanFactory()
          /** 2(1) 创建BeanFactory对象
          			(2)xml解析
                    	*传统标签解析:bean、import等
                    	*自定义标签解析:<context:component-scan base-package="xxx.xx.oo">
                              *自定义标签解析流程
                               a 根据标签头找到对应的namespaceUri
                               b 加载spring所有jar中的spring.handlers文件,并建立映射关系
                               c 根据namespaceUri从映射关系中找到对应的实现namespaceHandler接口的类
                               d 调用类的init方法,init方法是注册各种自定义标签的解析类
                               e 根据namespaceUri找到对应的解析类,调用parse方法完成解析
                 (3)把解析出来的xml标签信息封装从beandefinition对象

          // 作用:让applicationContext的子类去刷新内部的beanFactory
          */
          ConfigurableListableBeanFactory beanFactory = obtainFreshBeanFactory();

          //3 设置beanFactory一些属性,略
          // Prepare the bean factory for use in this context.
          prepareBeanFactory(beanFactory);

          try {
               //3   Allows post-processing of the bean factory in context subclasses.
               postProcessBeanFactory(beanFactory);

               //4 循环调用所有实现两大组件的后置接口????
               // Invoke factory processors registered as beans in the context.
               invokeBeanFactoryPostProcessors(beanFactory);

               /** 5 提前实例化两大组件bean---都是BeanPostProcessor
                    (AutwireAnnotationBeanPostProcessor、CommonAnnotationBeanPostProcessor)
                    注册BeanPostProcessor,并提前实例化上面两个得到bean,然后缓存到CopyOnWrite容器内
                    */
               // Register bean processors that intercept bean creation.
               registerBeanPostProcessors(beanFactory);

               //6 消息国际化处理
               // Initialize message source for this context.
               initMessageSource();

               //7 初始化事件管理器
               // Initialize event multicaster for this context.
               initApplicationEventMulticaster();

               //8 执行扩展方法
               //模板方法模式,扩展其他bean的实例化
               (spring-boot中Tomcat的启动在此扩展方法中完成)
               // Initialize other special beans in specific context subclasses.
               onRefresh();

               //9 注册事件监听器
               // Check for listener beans and register them.
               registerListeners();

               /** 10 绝大部分bean实例化(bean实例化核心方法)
               实例化完成以下过程:
                    a bean 的实例化过程
                    b ioc依赖注入
                    c 注解支持
                    d BeanPostProcessor的执行
                    e aop的入口
               */
               // Instantiate all remaining (non-lazy-init) singletons.
               finishBeanFactoryInitialization(beanFactory);

               //11 完成容器加载后续处理
               // Last step: publish corresponding event.
               finishRefresh();
          }
TAG1 obtainFreshBeanFactory()
AbstractApplicationContext.obtainFreshBeanFactory(该方法是模板方法,具体实现由实现类实现)
/**让subclass子类,去刷新internal(内部)beanfactory
*/
protected ConfigurableListableBeanFactory obtainFreshBeanFactory() {
//TAG1.1
  //模板方法设计模式
		refreshBeanFactory();
     //获取beanfactory对象
		return getBeanFactory();
	}
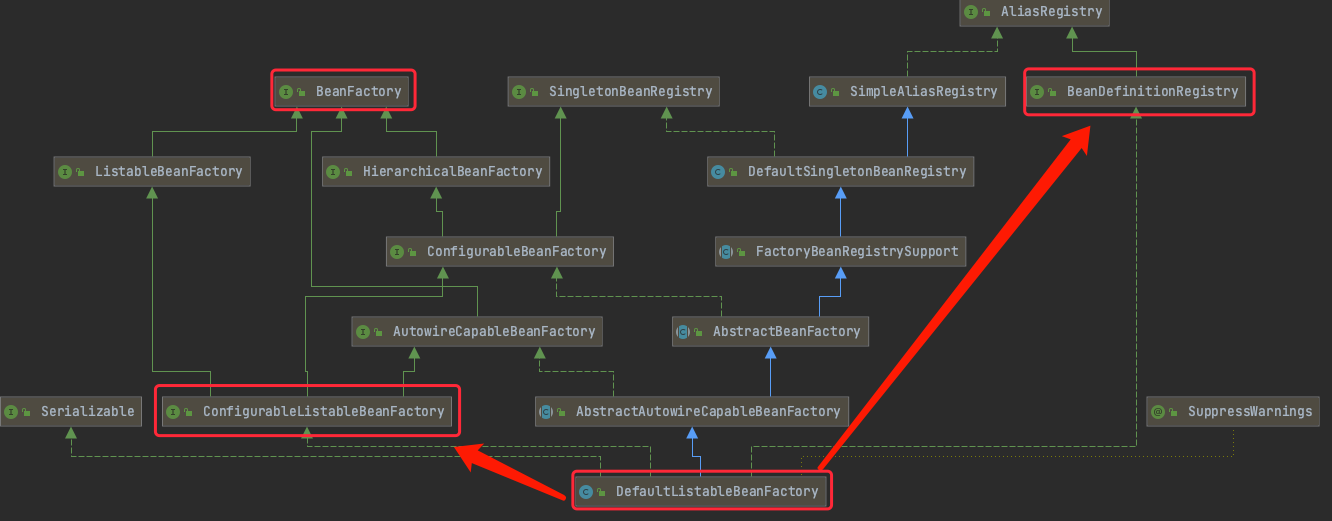
TAG1.1 refreshBeanFactory()
该方法的实现,由AbstractApplicationContext的子类实现(模板方法)
AbstractRefreshableApplicationContext.refreshBeanFactory()
/** 该方法的实现,对context底层的beanfactory进行真正刷新
需要先关闭之前创建的beanfactory(如果有),然后为context的下一个生命周期,初始化一个新的beanfactory
*/
	@Override
	protected final void refreshBeanFactory() throws BeansException {
		if (hasBeanFactory()) {
			destroyBeans();
			closeBeanFactory();
		}
		try {
//TAG1.1.1 创建DefaultListableBeanFactory
      /** -------------------------创建并设置创建DefaultListableBeanFactory属性------------------------*/
               //创建DefaultListableBeanFactory
			DefaultListableBeanFactory beanFactory = createBeanFactory();
			beanFactory.setSerializationId(getId());
               /**设置beanfactory属性:
               是否允许循环依赖;是否允许相同名称注册不同的bean实现;
                修改属性后,需要调用refresh()方法刷新容器才能有效 */
			customizeBeanFactory(beanFactory);

//TAG1.1.2 loadBeanDefinitions
               //加载beandefinition对象
			loadBeanDefinitions(beanFactory);
			synchronized (this.beanFactoryMonitor) {
				this.beanFactory = beanFactory;
			}
		}
		catch (IOException ex) {
			throw new ApplicationContextException("I/O error parsing bean definition source for " + getDisplayName(), ex);
		}
	}
上面方法主要完成两个任务:
1 创建applicationContext的内部类beanFactory的实例-----创建DefaultListableBeanFactory,并设置其属性;
2 loadBeanDefinitions(beanFactory),执行加载beandefinition的过程
TAG1.1.2 loadBeanDefinitions
该方法由子类实现(模板方法)
AbstractXmlApplicationContext.loadBeanDefinitions()解析配置核心方法
	//通过XmlBeanDefinitionReader加载bean的定义definitions
protected void loadBeanDefinitions(DefaultListableBeanFactory beanFactory) throws BeansException, IOException {

//LBD1 XmlBeanDefinitionReader创建
  /**----------------------XmlBeanDefinitionReader创建及配置属性--------------------------*/
  //XmlBeanDefinitionReader构造函数,要求传入的是BeanDefinitionRegistry(这里创建的是DefaultListableBeanFactory,其是registry的实现类)
		XmlBeanDefinitionReader beanDefinitionReader = new XmlBeanDefinitionReader(beanFactory);
		// Configure the bean definition reader with this context's
		// resource loading environment.
		beanDefinitionReader.setEnvironment(this.getEnvironment());
     //因为applicationContext实现了ResourceLoader,且实现ResourcePatternReslover
		beanDefinitionReader.setResourceLoader(this);
		beanDefinitionReader.setEntityResolver(new ResourceEntityResolver(this));

		// Allow a subclass to provide custom initialization of the reader,
		// then proceed with actually loading the bean definitions.
		initBeanDefinitionReader(beanDefinitionReader);

//LBD2 loadBeanDefinitions(reader)
     //核心入口方法
		loadBeanDefinitions(beanDefinitionReader);
	}
上面过程主要做如下工作:
1 创建XmlBeanDefinitionReader,并设置内部属性registry、resourceloader;然后init初始化该beandefinitionreader;
2 执行真正的loadbeandefinitions的核心方法
LBD1 XmlBeanDefinitionReader创建
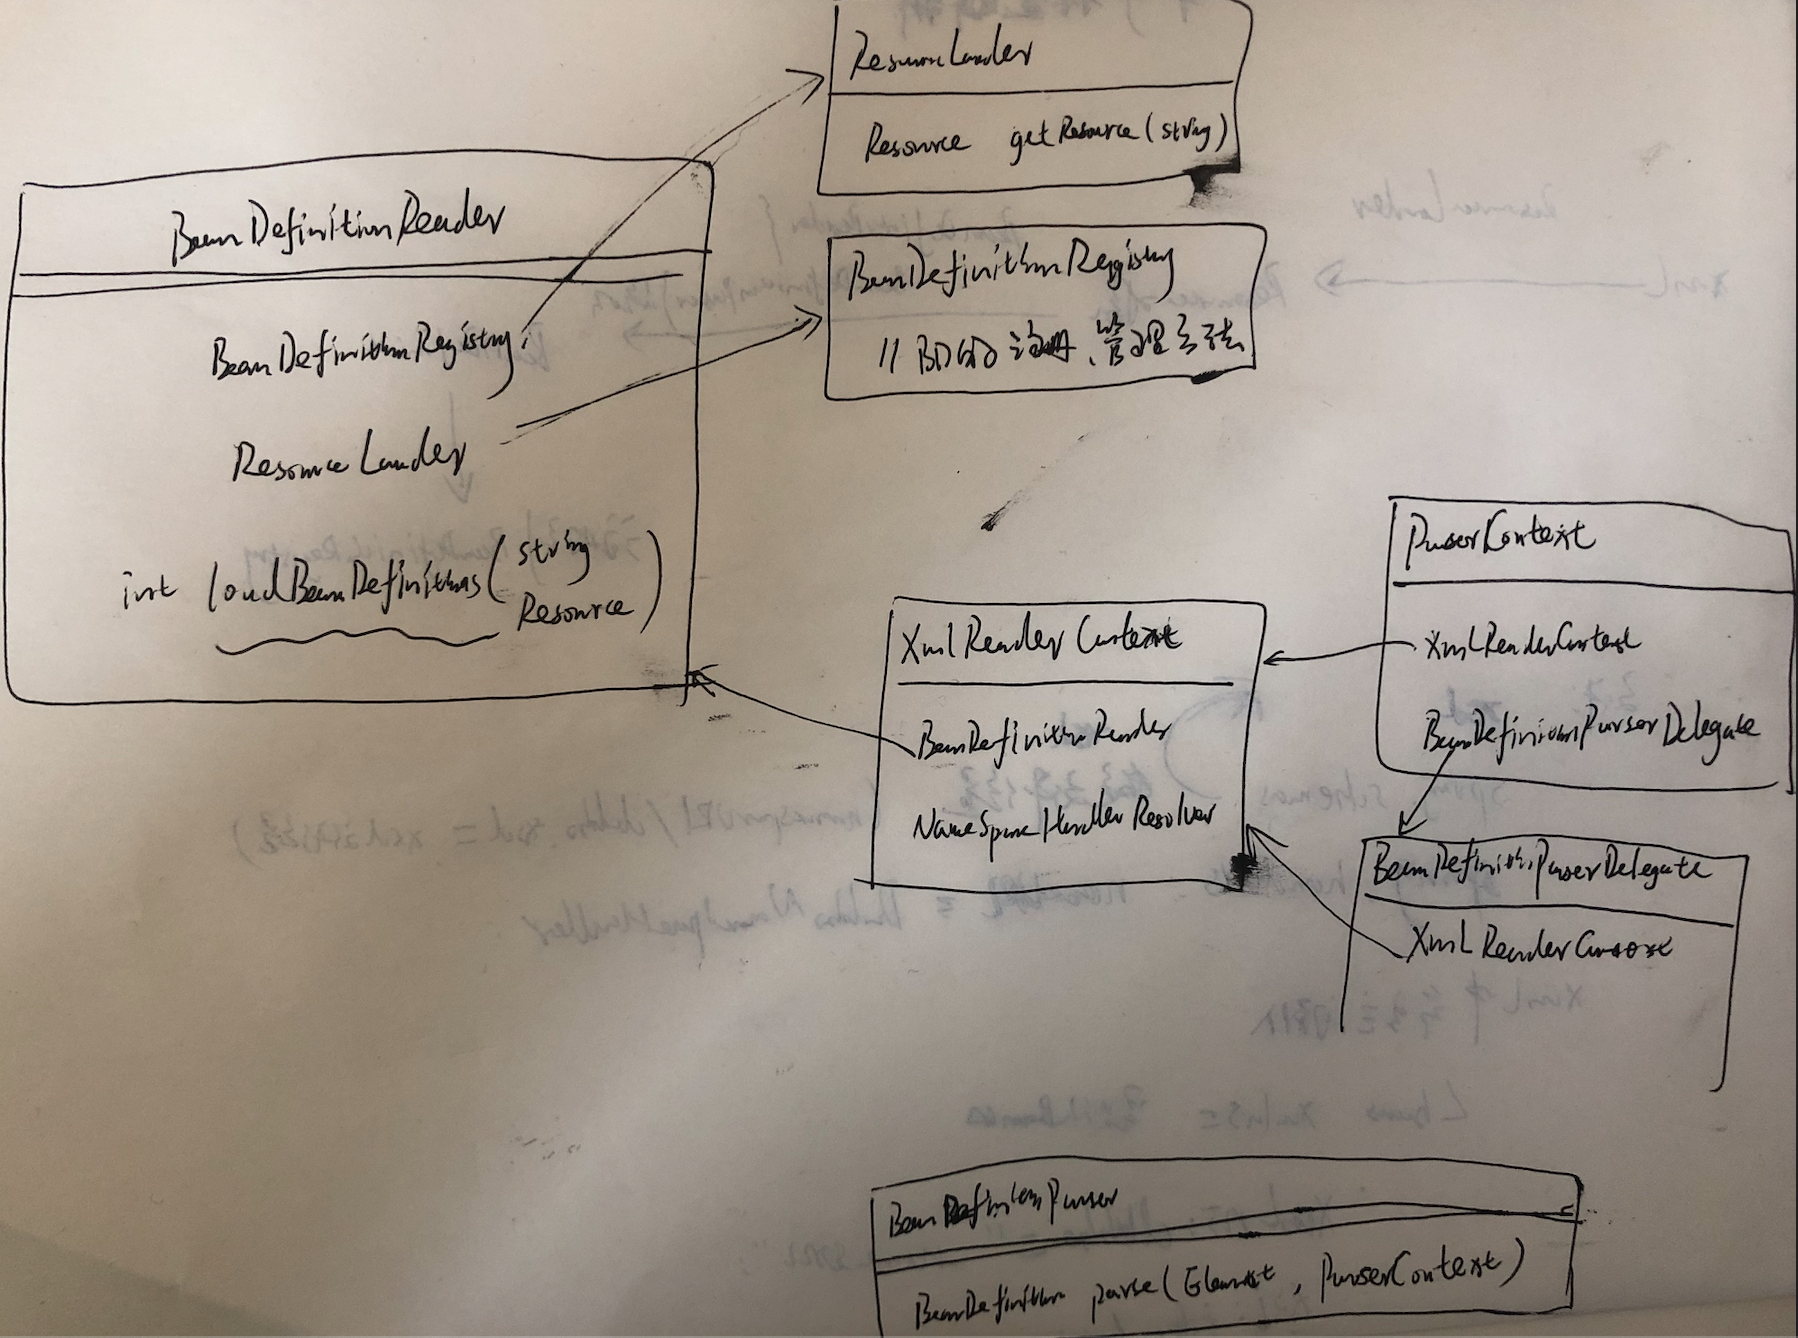
reader中与BeanDefinition的加载、注册相关类之间的引用关系。
LBD2 loadBeanDefinitions(reader)
	protected void loadBeanDefinitions(XmlBeanDefinitionReader reader) throws BeansException, IOException {
    //获取配置资源,根据config资源是resource还是configLocations,分别reader.loadBeanDefinition加载bd

//LBD2.1
		Resource[] configResources = getConfigResources();
		if (configResources != null) {
			reader.loadBeanDefinitions(configResources);
		}

//LBD2.2 reader.loadBeanDefinitions(locat)
          //获取xml配置文件
		String[] configLocations = getConfigLocations();
		if (configLocations != null) {
               //reader解析入口
               //解析xml:在xmlBeanDefinitionReader的父类中完成
			reader.loadBeanDefinitions(configLocations);
		}
	}

LBD2.2 reader.loadBeanDefinitions(locat)
AbstractBeanDefinitionReader.loadBeanDefinitions
	public int loadBeanDefinitions(String... locations) throws BeanDefinitionStoreException {
		Assert.notNull(locations, "Location array must not be null");
		int count = 0;
		for (String location : locations) {
			count += loadBeanDefinitions(location);
		}
		return count;
	}
	public int loadBeanDefinitions(String location) throws BeanDefinitionStoreException {
		return loadBeanDefinitions(location, null);
	}
	public int loadBeanDefinitions(String location, @Nullable Set<Resource> actualResources) throws BeanDefinitionStoreException {
		ResourceLoader resourceLoader = getResourceLoader();
		if (resourceLoader == null) {
			throw new BeanDefinitionStoreException(
					"Cannot load bean definitions from location [" + location + "]: no ResourceLoader available");
		}

          //这里的resourceLoader,是ClassPathXmlApplicationContext,其也是Resolver子类(详细看ResourceLoader)
		if (resourceLoader instanceof ResourcePatternResolver) {
			// Resource pattern matching available.
			try {

//LBD2.2.1 resolver.getResources(loca)
                    //把spring.xml封装为resource(resource继承自InputStreamSource)
				Resource[] resources = ((ResourcePatternResolver) resourceLoader).getResources(location);
                    //入口
//LBD2.2.2 loadBeanDefinitions(resources)
				int count = loadBeanDefinitions(resources);
				if (actualResources != null) {
					Collections.addAll(actualResources, resources);
				}
				if (logger.isTraceEnabled()) {
					logger.trace("Loaded " + count + " bean definitions from location pattern [" + location + "]");
				}
				return count;
			}
			catch (IOException ex) {
				throw new BeanDefinitionStoreException(
						"Could not resolve bean definition resource pattern [" + location + "]", ex);
			}
		}
		else {
			......
		}
	}
上面完成两个操作:
1 将spring.xml封装为resource(resource继承自InputStreamSource)
2 执行loadbeandefinition
LBD2.2.1 resolver.getResources(loca)
将配置文件加载为Resource资源


调用ResourcePatternResolver接口的getResources(location)方法,此处resourceLoader是classPathXmlApplicationContext,继续向下跟进代码。


然后进入resolver.getResource内,然后调用PathMatchingResourcePatternResolver.getResources(locationPattern)方法
PathMatchingResourcePatternResolver
  //这里传入的location位“provider.xml"
public Resource[] getResources(String locationPattern) throws IOException {
    Assert.notNull(locationPattern, "Location pattern must not be null");
  			//如果以classpath*:"开头
    if (locationPattern.startsWith("classpath*:")) {
      //截取classpath*:之后的内容。然后此处执行AntPathMatcher.isPattern
        return this.getPathMatcher().isPattern(locationPattern.substring("classpath*:".length())) ? this.findPathMatchingResources(locationPattern) : this.findAllClassPathResources(locationPattern.substring("classpath*:".length()));
    }
  			//如果location不是以classpath*:"开头,以classpath:开头,或者其它
 		 else {
       	//截取classpath:之后的location值-----------------------------“provider.xml”执行该处
        int prefixEnd = locationPattern.indexOf(":") + 1;
        return this.getPathMatcher().isPattern(locationPattern.substring(prefixEnd)) ? this.findPathMatchingResources(locationPattern) : new Resource[]{this.getResourceLoader().getResource(locationPattern)};
    }
}
LBD2.2.1.1 spring配置文件classpath:与classpath*:加载
1 Maven创建项目,配置文件放置在resources文件夹内。classpath为java文件编译后的目录target/classes/。src源码下的xml在编译后也会复制到classpath下。
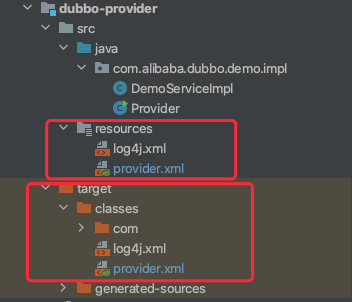
2 配置文件的配置,在web.xml中,或者在启动xmlApplicatonContext中传入参数。
web.xml中配置contextConfigLocation的具体位置信息


3 Java自身提供获取resource资源的方法
class.getClassLoader().getResource(string);

class.getResource(string);

//获取配置文件,上面传入的string参数,不含classpath:,而是如"provider.xml"
4 classpath:、classpath:、classpath:xxx.xml、classpath:xxx.xml区别
classpath::该值匹配的是,当前项目编译后的文件classes文件路径——target/classes;
classpath*: : 该值匹配的地址,是当前项目classpath、jdk和项目所依赖的jar包中的classpath所有的文件中的配置文件信息;
xxx.xml:匹配某个确定的xml配置文件;
xxx*.xml:匹配相同前缀xxx的多个xml配置文件
LBD2.2.1.2 获取classpath:配置文件源码
继续向下执行,跟踪源码
 		 else {
       	//截取classpath:之后的location值-----------------------------“provider.xml”执行该处
        int prefixEnd = locationPattern.indexOf(":") + 1;
        return this.getPathMatcher().isPattern(locationPattern.substring(prefixEnd)) ? this.findPathMatchingResources(locationPattern) : new Resource[]{this.getResourceLoader().getResource(locationPattern)};
    }
}
this.getPathMatcher()获得AntPathMatcher,执行其isPattern
AntPathMatcher
public boolean isPattern(String path) {
    return path.indexOf(42) != -1 || path.indexOf(63) != -1;
}
此处,42、63分别是字符中的和?,这里是检测path("provider.xml")是否有或者?符号。如果有,表示需要对多个资源进行加载,获取Resource资源。这里不含,返回false,
new Resource[]{this.getResourceLoader().getResource(locationPattern)} //通过resourceLoader获取resource

然后,调用ClassPathXmlApplicationContext.getResource(location),获取配置文件对应资源
public class DefaultResourceLoader implements ResourceLoader {

 public Resource getResource(String location) {
        Assert.notNull(location, "Location must not be null");
        if (location.startsWith("/")) {
            return this.getResourceByPath(location);
        } else if (location.startsWith("classpath:")) {
            return new ClassPathResource(location.substring("classpath:".length()), this.getClassLoader());
        } else {
            try {
                URL url = new URL(location); //创建URL的location,如果没有protocol指定,会抛异常MalformedURLException
                return new UrlResource(url);
            } catch (MalformedURLException var3) {
                return this.getResourceByPath(location); //执行resource获取
            }
        }
    }

  	//创建xml文件对应的resource对象
    protected Resource getResourceByPath(String path) {
        return new DefaultResourceLoader.ClassPathContextResource(path, this.getClassLoader());
    }

LBD2.2.2 loadBeanDefinitions(resources)
继续跟进加载beandefinition核心代码:

public abstract class AbstractBeanDefinitionReader implements EnvironmentCapable, BeanDefinitionReader {

public int loadBeanDefinitions(Resource... resources) throws BeanDefinitionStoreException {
		Assert.notNull(resources, "Resource array must not be null");
		int count = 0;
		for (Resource resource : resources) {
      //子类实现
			count += loadBeanDefinitions(resource);
		}
		return count;
	}
XmlBeanDefinitionReader.loadBeanDefinitions(Resource resource)
public int loadBeanDefinitions(Resource resource) throws BeanDefinitionStoreException {
  	//将resource封装为EncodedResource,其内指定了编码类型
		return loadBeanDefinitions(new EncodedResource(resource));
	}
	public int loadBeanDefinitions(EncodedResource encodedResource) throws BeanDefinitionStoreException {

		Set<EncodedResource> currentResources = this.resourcesCurrentlyBeingLoaded.get();
		if (currentResources == null) {
			currentResources = new HashSet<>(4);
			this.resourcesCurrentlyBeingLoaded.set(currentResources);
		}

		try {
               //从resource中获取文件流
			InputStream inputStream = encodedResource.getResource().getInputStream();
			try {
              //包装成inputSource类(jdk类),并设置编码类型
				InputSource inputSource = new InputSource(inputStream);
				if (encodedResource.getEncoding() != null) {
					inputSource.setEncoding(encodedResource.getEncoding());
				}
                    //实际做文档解析的入口方法
				return doLoadBeanDefinitions(inputSource, encodedResource.getResource());
			}
			finally {
				inputStream.close();
			}
		}

	}
	protected int doLoadBeanDefinitions(InputSource inputSource, Resource resource)
			throws BeanDefinitionStoreException {

		try {
               //解析xml配置文件的resource对象,封装成document对象
			Document doc = doLoadDocument(inputSource, resource);
               //传入doc,将解析到的标签元素封装成beandefinition对象
               //注册beandefinition入口方法
			int count = registerBeanDefinitions(doc, resource);
			if (logger.isDebugEnabled()) {
				logger.debug("Loaded " + count + " bean definitions from " + resource);
			}
			return count;
		}
完成两个任务:
1 将xml对应的resource配置文件,解析并封装成document对象;
2 调用registerBeanDefinitions(doc, resource),将解析到的xml上标签元素封装为beandefinition对象,并注册bd到beandefinitionRegistry上。
/** 注册包含在给定 DOM 文档中的 bean 定义。由 {@code loadBeanDefinitions} 调用。
*/
public int registerBeanDefinitions(Document doc, Resource resource) throws BeanDefinitionStoreException {
     //创建BeanDefinitionDocumentReader对象
		BeanDefinitionDocumentReader documentReader = createBeanDefinitionDocumentReader();
		int countBefore = getRegistry().getBeanDefinitionCount();
     //通过documentreader注册
     /**createReaderContext(resource)创建了XmlReaderContext(为xml上下文对象)
     XmlReaderContext持有XmlBeanDefinitionReader引用,可以获得注册器beanDefinitionRegistry,
     通过registry把解析的beandefinition对象缓存
     */
//LBD2.2.2.1 documentReader.registerBeanDefinitions
  documentReader.registerBeanDefinitions(doc, createReaderContext(resource));

		return getRegistry().getBeanDefinitionCount() - countBefore;
	}
LBD2.2.2.1 documentReader.registerBeanDefinitions
上面过程,主要是靠documentReader.regsitryBeanDefinitions,来注册。
方法中传入ReaderContext对象,用以获取registry。
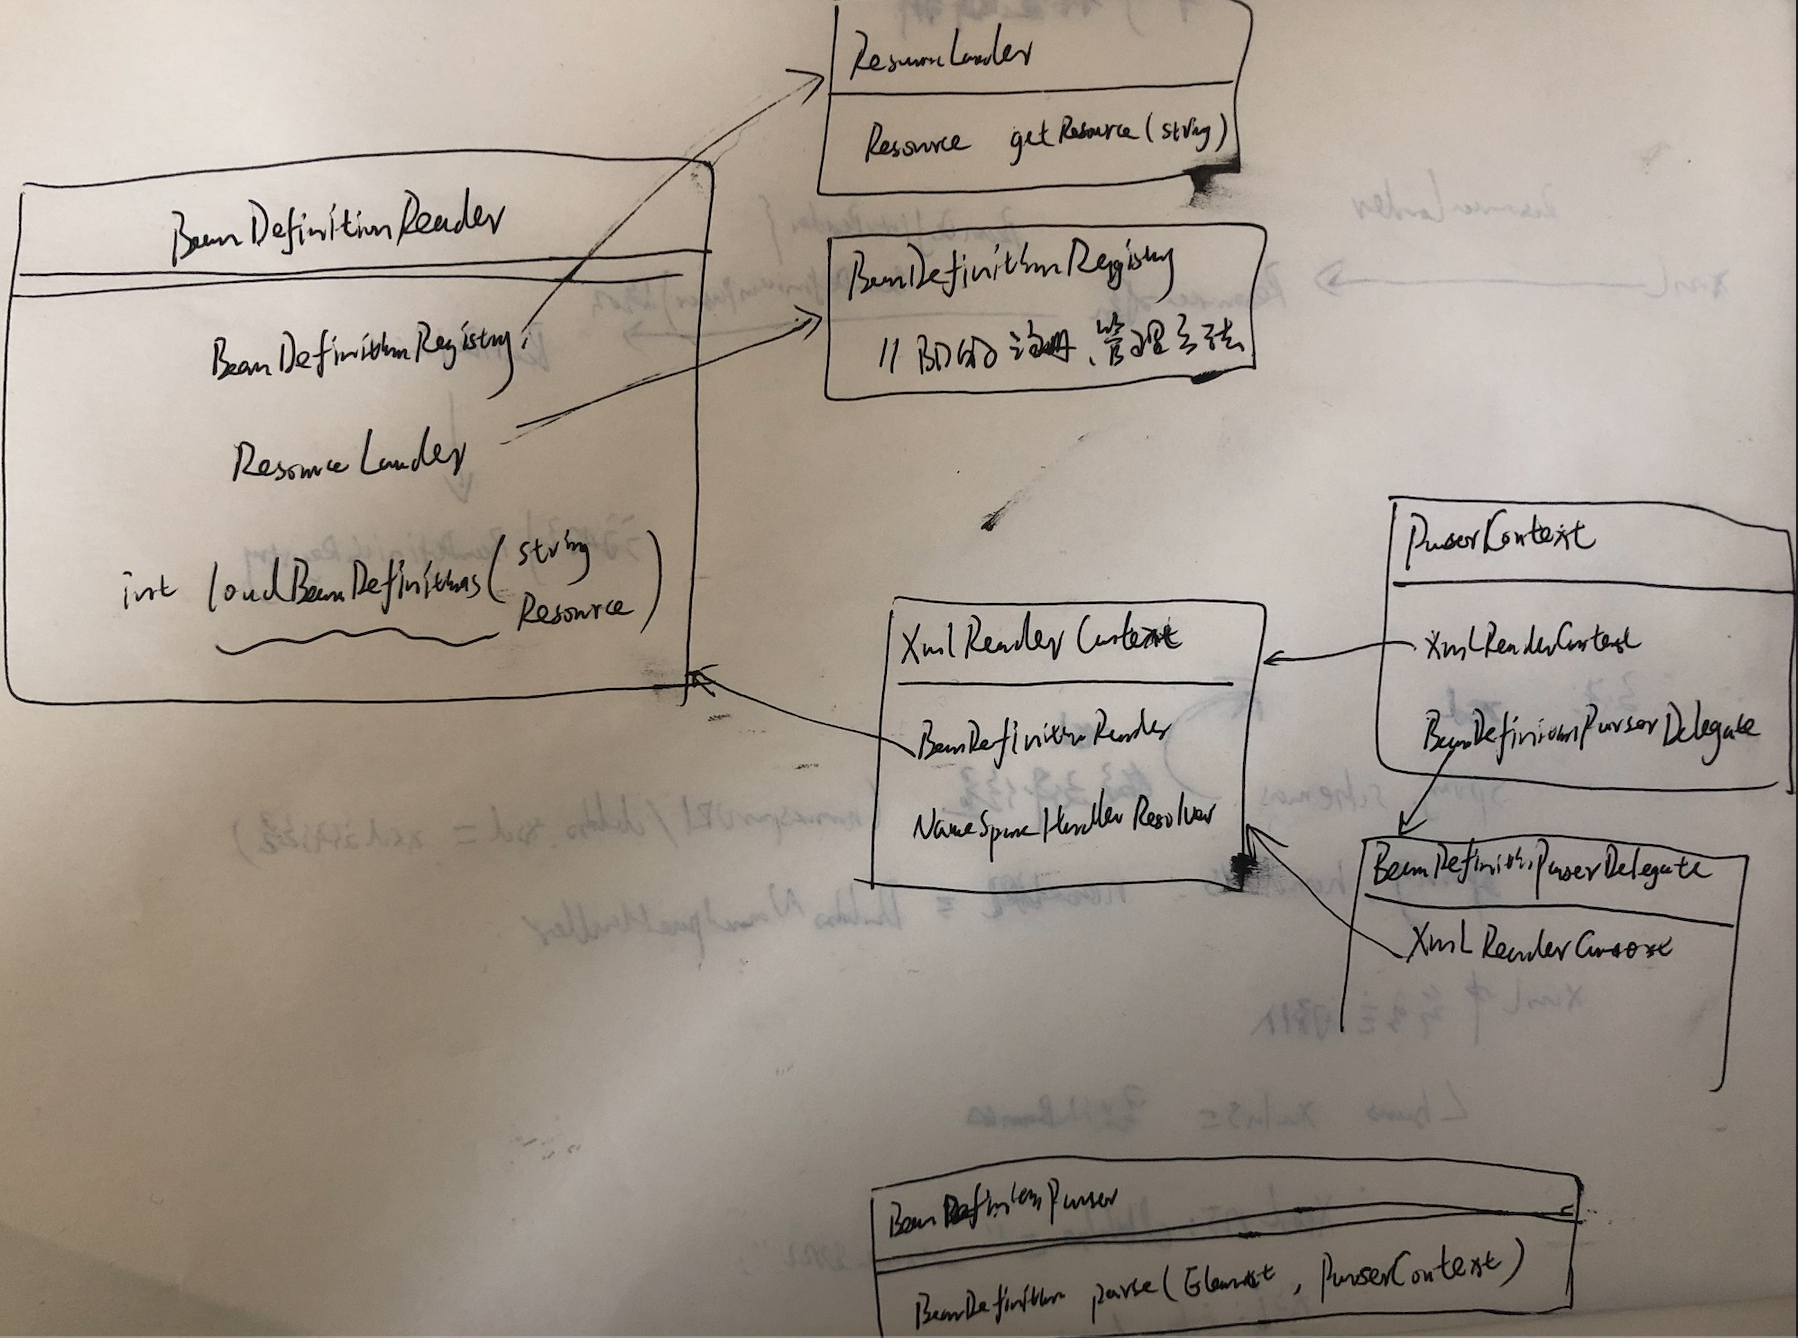
DefaultBeanDefinitionDocumentReader.registerBeanDefinitions(Document doc, XmlReaderContext readerContext)
该类作用: 接口的默认实现,该接口根据“spring-beans”XSD 格式(Spring 的默认 XML bean 定义格式)读取 bean 定义。
@Override
	public void registerBeanDefinitions(Document doc, XmlReaderContext readerContext) {
		this.readerContext = readerContext;
          //传入xml对应的doc下的root节点,来注册bd
		doRegisterBeanDefinitions(doc.getDocumentElement());
	}
	//用root,注册每个beandefinition
	protected void doRegisterBeanDefinitions(Element root) {
		BeanDefinitionParserDelegate parent = this.delegate;
    //用ReaderContext、element节点、parent的BeanDefinitionParserDelegate创建新的delegate委托对象
    //作用:处理嵌套的beans元素。每个delegate中保存嵌套的bean的属性信息,通过创建child delegate,并持有parent引用,在解析注册完毕后,最后重新设置为原delegate
		this.delegate = createDelegate(getReaderContext(), root, parent);

    //判断当前root节点对应的namespaceUri是否是BEANS_NAMESPACE_URI="http://www.springframework.org/schema/beans"
    //也就是判断root节点是否是beans默认命名空间上的element
		if (this.delegate.isDefaultNamespace(root)) {
      //对root上“profile”属性处理
			String profileSpec = root.getAttribute(PROFILE_ATTRIBUTE);
			if (StringUtils.hasText(profileSpec)) {
				String[] specifiedProfiles = StringUtils.tokenizeToStringArray(
						profileSpec, BeanDefinitionParserDelegate.MULTI_VALUE_ATTRIBUTE_DELIMITERS);
				// We cannot use Profiles.of(...) since profile expressions are not supported
				// in XML config. See SPR-12458 for details.
				if (!getReaderContext().getEnvironment().acceptsProfiles(specifiedProfiles)) {
					if (logger.isDebugEnabled()) {
						logger.debug("Skipped XML bean definition file due to specified profiles [" + profileSpec +
								"] not matching: " + getReaderContext().getResource());
					}
					return;
				}
			}
		}
		//前置处理XML
		preProcessXml(root);
          //解析beandefinition的核心方法
          //解析 root节点和下面的所有子节点
		parseBeanDefinitions(root, this.delegate);
		postProcessXml(root);

    //处理完嵌套方法,重新设置delegate为parent
		this.delegate = parent;
	}
	protected void parseBeanDefinitions(Element root, BeanDefinitionParserDelegate delegate) {
    	//判断root节点是否是bean命名空间的元素
		if (delegate.isDefaultNamespace(root)) {
               //拿到root节点下所有子节点
			NodeList nl = root.getChildNodes();
			for (int i = 0; i < nl.getLength(); i++) {
				Node node = nl.item(i);
        //处理root下的子节点ele,用和root同样的处理逻辑
				if (node instanceof Element) {
					Element ele = (Element) node;
                         //判断方式:判断ele节点node的namespace,是否不为空或者为
                         // http://www.springframework.org/schema/beans"
					if (delegate.isDefaultNamespace(ele)) {

//3.3.1.2.1 默认bean解析
                              //解析普通默认标签:import,bean,alias等
						parseDefaultElement(ele, delegate);
					}
					else {
//3.3.1.2.2 自定义标签解析
                              //解析自定义标签,如<context:component-scan basepaackage="xxx.oo"等带前缀的标签
                              //带前缀的自定义标签,有一个xmlns:yyy与之对应
						delegate.parseCustomElement(ele);
					}
				}
			}
		}
    //自定义命名空间的标签元素解析
		else {
			delegate.parseCustomElement(root);
		}
	}
BeanDefinitionParserDelegate
	// 判断是否是默认namespace
	public boolean isDefaultNamespace(@Nullable String namespaceUri) {
		return (!StringUtils.hasLength(namespaceUri) || BEANS_NAMESPACE_URI.equals(namespaceUri));
	}

	public boolean isDefaultNamespace(Node node) {
		return isDefaultNamespace(getNamespaceURI(node));
	}
parseBeanDefinitions(Element root, BeanDefinitionParserDelegate delegate)方法的逻辑,是通过delegate判断root节点是否是bean默认命名空间下的标签,来进行默认bean标签和自定义标签的解析逻辑;然后获取root下的所有child element,遍历处理child节点,同root同样的逻辑,解析节点。


 浙公网安备 33010602011771号