【IMX6ULL学习笔记】四、 U-BOOT启动流程
一、链接脚本 u-boot.lds 详解
要分析 uboot 的启动流程,首先要找到“入口”,找到第一行程序在哪里。程序的链接是由链接脚本来决定的,所以通过链接脚本可以找到程序的入口。如果没有编译过 uboot 的话链接脚本为 arch/arm/cpu/u-boot.lds。但是这个不是最终使用的链接脚本,最终的链接脚本是在这个链接脚本的基础上生成的。编译一下 uboot,编译完成以后就会在 uboot 根目录下生成 u-boot.lds 文件。
打开 u-boot.lds,内容如下:
OUTPUT_FORMAT("elf32-littlearm", "elf32-littlearm", "elf32-littlearm")
OUTPUT_ARCH(arm)
ENTRY(_start)
SECTIONS
{
 . = 0x00000000;
 . = ALIGN(4);
 .text :
 {
  *(.__image_copy_start)
  *(.vectors)
  arch/arm/cpu/armv7/start.o (.text*)
  *(.text*)
 }
 . = ALIGN(4);
 .rodata : { *(SORT_BY_ALIGNMENT(SORT_BY_NAME(.rodata*))) }
 . = ALIGN(4);
 .data : {
  *(.data*)
 }
 . = ALIGN(4);
 . = .;
 . = ALIGN(4);
 .u_boot_list : {
  KEEP(*(SORT(.u_boot_list*)));
 }
 . = ALIGN(4);
 .image_copy_end :
 {
  *(.__image_copy_end)
 }
 .rel_dyn_start :
 {
  *(.__rel_dyn_start)
 }
 .rel.dyn : {
  *(.rel*)
 }
 .rel_dyn_end :
 {
  *(.__rel_dyn_end)
 }
 .end :
 {
  *(.__end)
 }
 _image_binary_end = .;
 . = ALIGN(4096);
 .mmutable : {
  *(.mmutable)
 }
 .bss_start __rel_dyn_start (OVERLAY) : {
  KEEP(*(.__bss_start));
  __bss_base = .;
 }
 .bss __bss_base (OVERLAY) : {
  *(.bss*)
   . = ALIGN(4);
   __bss_limit = .;
 }
 .bss_end __bss_limit (OVERLAY) : {
  KEEP(*(.__bss_end));
 }
 .dynsym _image_binary_end : { *(.dynsym) }
 .dynbss : { *(.dynbss) }
 .dynstr : { *(.dynstr*) }
 .dynamic : { *(.dynamic*) }
 .plt : { *(.plt*) }
 .interp : { *(.interp*) }
 .gnu.hash : { *(.gnu.hash) }
 .gnu : { *(.gnu*) }
 .ARM.exidx : { *(.ARM.exidx*) }
 .gnu.linkonce.armexidx : { *(.gnu.linkonce.armexidx.*) }
}
第 3 行 ENTRY(_start) : 代码入口为_start
第 10 行 *(.__image_copy_start) : uboot 拷贝起始地址
第 11 行 *(.vectors) : 中断向量表
第 12 行 arch/arm/cpu/armv7/start.o (.text*) : start.S
第 13 行 *(.text*) : 代码段
第 28 行 .image_copy_end : U-BOOT拷贝结束地址
第 32 行 .rel_dyn_start : .rel.dyn 段起始地址
第 39 行 .rel_dyn_end : .rel.dyn 段结束地址
第 47 行 _image_binary_end = . : 镜像结束地址
第 52 行 .bss_start : .bss 段起始地址
第 61 行 .bss_end : .bss 段结束地址
_start 在文件 arch/arm/lib/vectors.S 中有定义:
#include <config.h>

/*
 * Symbol _start is referenced elsewhere, so make it global
 */
.globl _start
/*
 * Vectors have their own section so linker script can map them easily
 */
 .section ".vectors", "ax"
/*
 * Exception vectors as described in ARM reference manuals
 * Uses indirect branch to allow reaching handlers anywhere in memory.
 */
_start:

#ifdef CONFIG_SYS_DV_NOR_BOOT_CFG
    .word   CONFIG_SYS_DV_NOR_BOOT_CFG
#endif
    b   reset
    ldr pc, _undefined_instruction
    ldr pc, _software_interrupt
    ldr pc, _prefetch_abort
    ldr pc, _data_abort
    ldr pc, _not_used
    ldr pc, _irq
    ldr pc, _fiq
_start 后面就是中断向量表,从源码中的“.section ".vectors","ax”可以得到,此代码存放在.vectors 段里面。
打开 u-boot.map,找到如图所示位置:
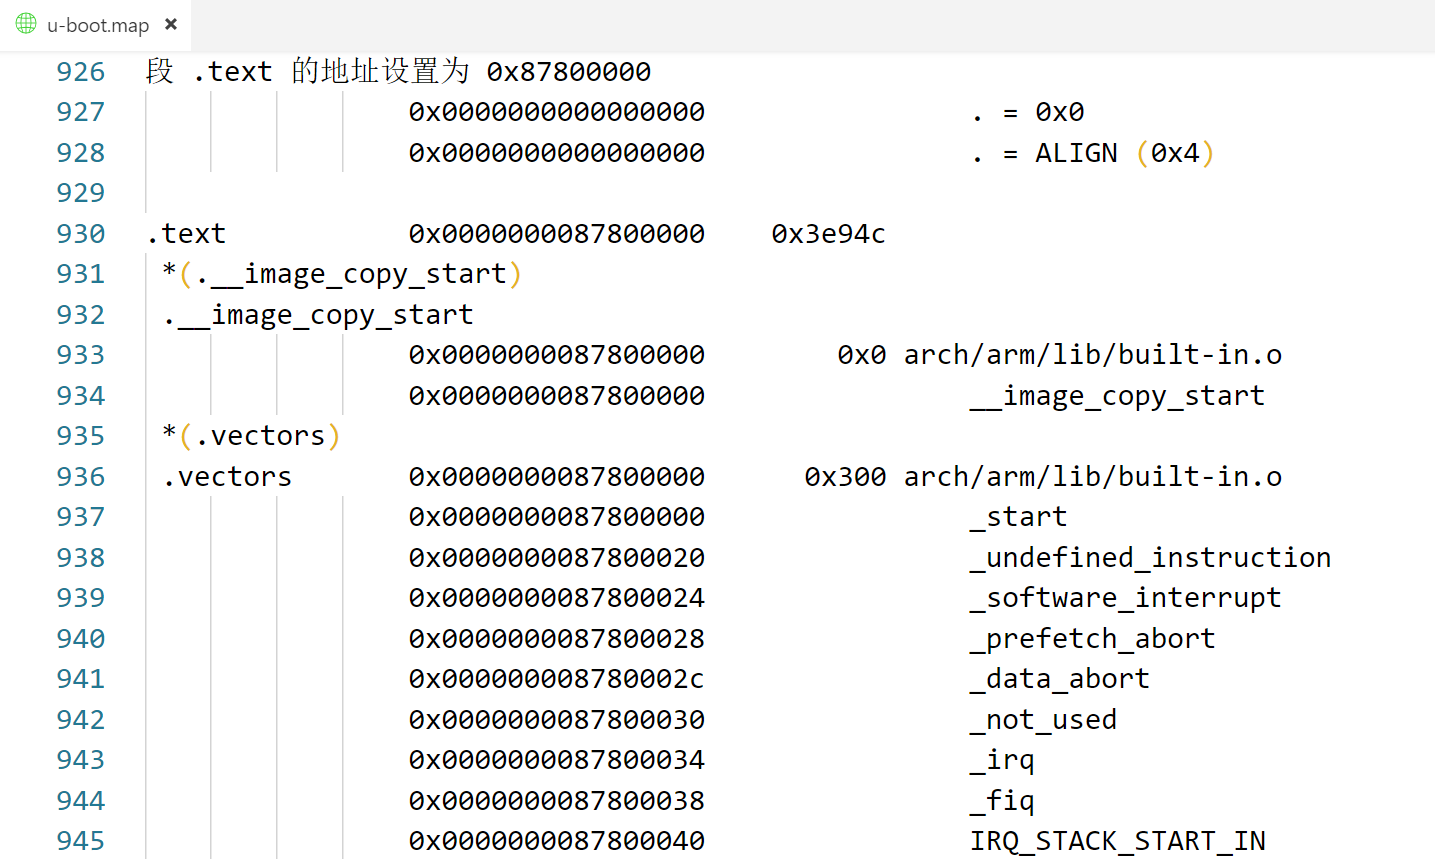
u-boot.map 是 uboot 的映射文件,可以从此文件看到某个文件或者函数链接到了哪个地址,从图中可以看到__image_copy_start 为 0X87800000,而.text 的起始地址也是0X87800000。u-boot.lds 中 vectors 段保存中断向量表,从图中可以看出,vectors 段的起始地址也是 0X87800000,说明 uboot 的起始地址就是0X87800000。
第 10 行 *(.__image_copy_start) : 镜像起始地址 -- 0X87800000
第 11 行 *(.vectors) : 中断向量表 -- 0X87800000
第 12 行 arch/arm/cpu/armv7/start.o (.text*) :将 arch/arm/cpu/armv7/start.s 编译出来的代码放到中断向量表后面。
第 13 行 *(.text*) :其他的代码段就放到这里
二、U-Boot 启动流程详解
①reset 函数源码详解(汇编):
u-boot.lds 中我定义入口点是 arch/arm/lib/vectors.S 文件中的_start,首先会跳转到 reset 复位函数中去,然后设置向量表:
/*
 * Exception vectors as described in ARM reference manuals
 * Uses indirect branch to allow reaching handlers anywhere in memory.
 */
_start:

#ifdef CONFIG_SYS_DV_NOR_BOOT_CFG
    .word   CONFIG_SYS_DV_NOR_BOOT_CFG
#endif
    b   reset
    ldr pc, _undefined_instruction
    ldr pc, _software_interrupt
    ldr pc, _prefetch_abort
    ldr pc, _data_abort
    ldr pc, _not_used
    ldr pc, _irq
    ldr pc, _fiq

    reset 函数在 arch/arm/cpu/armv7/start.S 里面,代码如下:
reset:
    /* Allow the board to save important registers */
    b   save_boot_params
save_boot_params_ret:
    /*
     * disable interrupts (FIQ and IRQ), also set the cpu to SVC32 mode,
     * except if in HYP mode already
     */
    mrs r0, cpsr
    and r1, r0, #0x1f       @ mask mode bits
    teq r1, #0x1a       @ test for HYP mode
    bicne   r0, r0, #0x1f       @ clear all mode bits
    orrne   r0, r0, #0x13       @ set SVC mode
    orr r0, r0, #0xc0       @ disable FIQ and IRQ
    msr cpsr,r0

/*
 * Setup vector:
 * (OMAP4 spl TEXT_BASE is not 32 byte aligned.
 * Continue to use ROM code vector only in OMAP4 spl)
 */
#if !(defined(CONFIG_OMAP44XX) && defined(CONFIG_SPL_BUILD))
    /* Set V=0 in CP15 SCTLR register - for VBAR to point to vector */
    mrc p15, 0, r0, c1, c0, 0   @ Read CP15 SCTLR Register
    bic r0, #CR_V       @ V = 0
    mcr p15, 0, r0, c1, c0, 0   @ Write CP15 SCTLR Register

    /* Set vector address in CP15 VBAR register */
    ldr r0, =_start
    mcr p15, 0, r0, c12, c0, 0  @Set VBAR
#endif

    /* the mask ROM code should have PLL and others stable */
#ifndef CONFIG_SKIP_LOWLEVEL_INIT
    bl  cpu_init_cp15
    bl  cpu_init_crit
#endif

    bl  _main
函数完成以下功能:
1.将处理器设置为 SVC 模式,并且关闭 FIQ 和 IRQ.
2.设置中断向量表可重定位,并设置中断向量偏移
3.初始化CP15
4.调用 cpu_init_crit -> lowlevel_init 和 _main
②lowlevel_init 函数源码详解(汇编):
函数lowlevel_init在 arch/arm/cpu/armv7/lowlevel_init.S 中定义:
ENTRY(lowlevel_init)
    /*
     * Setup a temporary stack. Global data is not available yet.
     */
    ldr sp, =CONFIG_SYS_INIT_SP_ADDR
    bic sp, sp, #7 /* 8-byte alignment for ABI compliance */
#ifdef CONFIG_SPL_DM
    mov r9, #0
#else
    /*
     * Set up global data for boards that still need it. This will be
     * removed soon.
     */
#ifdef CONFIG_SPL_BUILD
    ldr r9, =gdata
#else
    sub sp, sp, #GD_SIZE
    bic sp, sp, #7
    mov r9, sp
#endif
#endif
    /*
     * Save the old lr(passed in ip) and the current lr to stack
     */
    push    {ip, lr}

    /*
     * Call the very early init function. This should do only the
     * absolute bare minimum to get started. It should not:
     *
     * - set up DRAM
     * - use global_data
     * - clear BSS
     * - try to start a console
     *
     * For boards with SPL this should be empty since SPL can do all of
     * this init in the SPL board_init_f() function which is called
     * immediately after this.
     */
    bl  s_init
    pop {ip, pc}
ENDPROC(lowlevel_init)
函数完成以下功能:
1.设置 SP 指针、R9 寄存器
2.调用 s_init (空函数)
③_main 函数源码详解(汇编):
_main 函数定义在文件 arch/arm/lib/crt0.S 中,函数内容如下:
ENTRY(_main)

/*
 * Set up initial C runtime environment and call board_init_f(0).
 */

#if defined(CONFIG_SPL_BUILD) && defined(CONFIG_SPL_STACK)
    ldr sp, =(CONFIG_SPL_STACK)
#else
    ldr sp, =(CONFIG_SYS_INIT_SP_ADDR)
#endif
#if defined(CONFIG_CPU_V7M) /* v7M forbids using SP as BIC destination */
    mov r3, sp
    bic r3, r3, #7
    mov sp, r3
#else
    bic sp, sp, #7  /* 8-byte alignment for ABI compliance */
#endif
    mov r0, sp
    bl  board_init_f_alloc_reserve
    mov sp, r0
    /* set up gd here, outside any C code */
    mov r9, r0
    bl  board_init_f_init_reserve

    mov r0, #0
    bl  board_init_f

#if ! defined(CONFIG_SPL_BUILD)

/*
 * Set up intermediate environment (new sp and gd) and call
 * relocate_code(addr_moni). Trick here is that we'll return
 * 'here' but relocated.
 */

    ldr sp, [r9, #GD_START_ADDR_SP] /* sp = gd->start_addr_sp */
#if defined(CONFIG_CPU_V7M) /* v7M forbids using SP as BIC destination */
    mov r3, sp
    bic r3, r3, #7
    mov sp, r3
#else
    bic sp, sp, #7  /* 8-byte alignment for ABI compliance */
#endif
    ldr r9, [r9, #GD_BD]        /* r9 = gd->bd */
    sub r9, r9, #GD_SIZE        /* new GD is below bd */

    adr lr, here
    ldr r0, [r9, #GD_RELOC_OFF]     /* r0 = gd->reloc_off */
    add lr, lr, r0
#if defined(CONFIG_CPU_V7M)
    orr lr, #1              /* As required by Thumb-only */
#endif
    ldr r0, [r9, #GD_RELOCADDR]     /* r0 = gd->relocaddr */
    b   relocate_code
here:
/*
 * now relocate vectors
 */

    bl  relocate_vectors

/* Set up final (full) environment */

    bl  c_runtime_cpu_setup /* we still call old routine here */
#endif
#if !defined(CONFIG_SPL_BUILD) || defined(CONFIG_SPL_FRAMEWORK)
# ifdef CONFIG_SPL_BUILD
    /* Use a DRAM stack for the rest of SPL, if requested */
    bl  spl_relocate_stack_gd
    cmp r0, #0
    movne   sp, r0
    movne   r9, r0
# endif
    ldr r0, =__bss_start    /* this is auto-relocated! */

#ifdef CONFIG_USE_ARCH_MEMSET
    ldr r3, =__bss_end      /* this is auto-relocated! */
    mov r1, #0x00000000     /* prepare zero to clear BSS */

    subs    r2, r3, r0      /* r2 = memset len */
    bl  memset
#else
    ldr r1, =__bss_end      /* this is auto-relocated! */
    mov r2, #0x00000000     /* prepare zero to clear BSS */

clbss_l:cmp r0, r1          /* while not at end of BSS */
#if defined(CONFIG_CPU_V7M)
    itt lo
#endif
    strlo   r2, [r0]        /* clear 32-bit BSS word */
    addlo   r0, r0, #4      /* move to next */
    blo clbss_l
#endif

#if ! defined(CONFIG_SPL_BUILD)
    bl coloured_LED_init
    bl red_led_on
#endif
    /* call board_init_r(gd_t *id, ulong dest_addr) */
    mov     r0, r9                  /* gd_t */
    ldr r1, [r9, #GD_RELOCADDR] /* dest_addr */
    /* call board_init_r */
#if defined(CONFIG_SYS_THUMB_BUILD)
    ldr lr, =board_init_r   /* this is auto-relocated! */
    bx  lr
#else
    ldr pc, =board_init_r   /* this is auto-relocated! */
#endif
    /* we should not return here. */
#endif

ENDPROC(_main)
在 _main 函数里面调用 board_init_f_alloc_reserve 函数,此函数定义在文件 common/init/board_init.c 中,内容如下:
ulong board_init_f_alloc_reserve(ulong top)
{
    /* Reserve early malloc arena */
#if defined(CONFIG_SYS_MALLOC_F)
    top -= CONFIG_SYS_MALLOC_F_LEN;
#endif
    /* LAST : reserve GD (rounded up to a multiple of 16 bytes) */
    top = rounddown(top-sizeof(struct global_data), 16);
    return top;
}
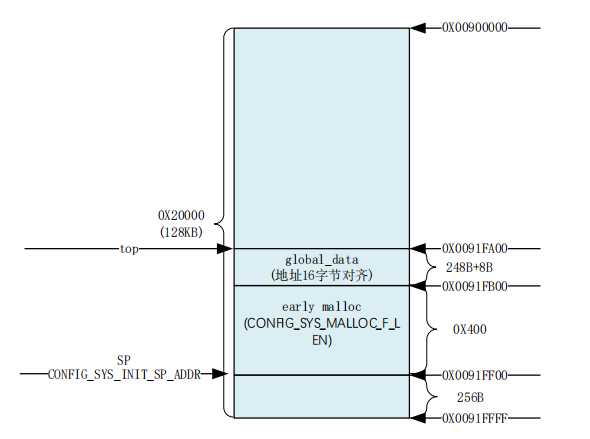
board_init_f_alloc_reserve 主要是留出早期的 malloc 和 gd 内存区域,其中 CONFIG_SYS_MALLOC_F_LEN=0X400 ( 文件 include/generated/autoconf.h 中定义 ) ,sizeof(struct global_data)=248(GD_SIZE 值),完成以后的内存分布如图 32.2.4.1 所示:
_main函数还调用 board_init_f、relocate_code、relocate_vectors 和 board_init_r 这 4 个函数。
④board_init_f 函数源码详解(汇编、C):
board_init_f 函数主要有两个工作:
①、初始化一系列外设,比如DDR、串口、定时器,或者打印一些消息等。
②、初始化 gd 的各个成员变量,用于重定位 u-boot。u-boot 会将自己重定位到 DRAM 最后面的地址区域(u-boot 原先运行在 DDR 的 0x87800000 地址处),也就是将自己拷贝到 DRAM 最后面的内存区域中。这么做的目的是给 Linux 腾出空间,防止 Linux kernel 覆盖掉 u-boot,将 DRAM 前面的区域完整的空出来。在拷贝之前肯定要给 u-boot 各部分分配好内存位置和大小,比如 gd 应该存放到哪个位置,malloc 内存池应该存放到哪个位置等等。这些信息都保存在 gd 的成员变量中,因此要对 gd 的这些成员变量做初始化。最终形成一个完整的内存“分配图”,在后面重定位 u-boot 的时候就会用到这个内存“分配图”。
函数定义在common/board_f.c 中:
void board_init_f(ulong boot_flags)
{
#ifdef CONFIG_SYS_GENERIC_GLOBAL_DATA
    /*
     * For some archtectures, global data is initialized and used before
     * calling this function. The data should be preserved. For others,
     * CONFIG_SYS_GENERIC_GLOBAL_DATA should be defined and use the stack
     * here to host global data until relocation.
     */
    gd_t data;

    gd = &data;

    /*
     * Clear global data before it is accessed at debug print
     * in initcall_run_list. Otherwise the debug print probably
     * get the wrong vaule of gd->have_console.
     */
    zero_global_data();
#endif

    gd->flags = boot_flags;
    gd->have_console = 0;

    if (initcall_run_list(init_sequence_f))
        hang();

#if !defined(CONFIG_ARM) && !defined(CONFIG_SANDBOX) && \
        !defined(CONFIG_EFI_APP)
    /* NOTREACHED - jump_to_copy() does not return */
    hang();
#endif

    /* Light up LED1 */
    imx6_light_up_led1();
}
第 22 行:初始化 gd->flags=boot_flags=0。
第 23 行:设置 gd->have_console=0。
第 25 行:重点!调用initcall_run_list来运行初始化序列init_sequence_f 里的一些列函数,init_sequence_f 里包含了一系列初始化函数,定义在文件common/board_f.c 中,init_sequence_f 里面有大量的条件编译代码,去掉条件编译以后的 init_sequence_f 定义如下:
static init_fnc_t init_sequence_f[] = {
    setup_mon_len,
    initf_malloc,
    initf_console_record,
    arch_cpu_init, /* basic arch cpu dependent setup */
    initf_dm,
    arch_cpu_init_dm,
    mark_bootstage, /* need timer, go after init dm*/
    board_early_init_f,
    timer_init, /* initialize timer*/
    board_postclk_init,
    get_clocks,
    env_init, /* initialize environment*/
    init_baud_rate, /* initialze baudrate settings*/
    serial_init, /* serial communications setup*/
    console_init_f, /* stage 1 init of console*/
    display_options, /* say that we are here*/
    display_text_info, /* show debugging info if required */
    print_cpuinfo, /* display cpu info (and speed)*/
    show_board_info,
    INIT_FUNC_WATCHDOG_INIT
    INIT_FUNC_WATCHDOG_RESET
    init_func_i2c,
    announce_dram_init,
    /* TODO: unify all these dram functions? */
    dram_init, /* configure available RAM banks */
    post_init_f,
    INIT_FUNC_WATCHDOG_RESET
    testdram,
    INIT_FUNC_WATCHDOG_RESET
    INIT_FUNC_WATCHDOG_RESET
    /*
    * Now that we have DRAM mapped and working, we can
    * relocate the code and continue running from DRAM.
    *
    * Reserve memory at end of RAM for (top down in that order):
    * - area that won't get touched by U-Boot and Linux (optional)
    * - kernel log buffer
    * - protected RAM
    * - LCD framebuffer
    * - monitor code
    * - board info struct
    */
    setup_dest_addr,
    reserve_round_4k,
    reserve_mmu,
    reserve_trace,
    reserve_uboot,
    reserve_malloc,
    reserve_board,
    setup_machine,
    reserve_global_data,
    reserve_fdt,
    reserve_arch,
    reserve_stacks,
    setup_dram_config,
    show_dram_config,
    display_new_sp,
    INIT_FUNC_WATCHDOG_RESET
    reloc_fdt,
    setup_reloc,
    NULL,
 };
第 2 行:setup_mon_len 函数设置 gd 的 mon_len 成员变量,此处为__bss_end -_start,也就是整个代码的长度。
第 3 行:initf_malloc 函数初始化 gd 中跟 malloc 有关的成员变量,比如 malloc_limit,此函数会设置 gd->malloc_limit = CONFIG_SYS_MALLOC_F_LEN=0X400。malloc_limit 表示 malloc内存池大小。
第 5 行:arch_cpu_init 函数。
第 6 行:initf_dm 函数,驱动模型的一些初始化。
第 7 行:arch_cpu_init_dm 函数未实现。
第 8 行:mark_bootstage 函数应该是和啥标记有关的。
第 9 行:board_early_init_f 函数,板子相关的早期的一些初始化设置,I.MX6ULL 用来初始化串口的 IO 配置。
第 10 行:timer_init,初始化定时器,Cortex-A7 内核有一个定时器,这里初始化的就是 Cortex-A 内核的那个定时器。通过这个定时器来为 uboot 提供时间。
第 11 行:board_postclk_init,对于 I.MX6ULL 来说是设置 VDDSOC 电压。
第 12 行:get_clocks 函数用于获取一些时钟值,I.MX6ULL 获取的是 sdhc_clk 时钟,也就是 SD 卡外设的时钟。
第 13 行:env_init 函数是和环境变量有关的,设置 gd 的成员变量 env_addr,也就是环境变量的保存地址。
第 14 行:init_baud_rate 函数用于初始化波特率,根据环境变量 baudrate 来初始化 gd->baudrate。
第 15 行:serial_init,初始化串口。
第 16 行:console_init_f,设置 gd->have_console 为 1,表示有个控制台,此函数也将前面暂存在缓冲区中的数据通过控制台打印出来。
第 17 行:display_options,通过串口输出一些信息,如图所示:

第 18 行:display_text_info,打印一些文本信息,如果开启 UBOOT 的 DEBUG 功能的话就会输出 text_base、bss_start、bss_end,形式如下:
debug("U-Boot code: %08lX -> %08lX BSS: -> %08lX\n",text_base, bss_start, bss_end);
第 19 行:print_cpuinfo 函数用于打印 CPU 信息

第 20 行:show_board_info 函数用于打印板子信息

第 21 行:INIT_FUNC_WATCHDOG_INIT,初始化看门狗,对于 I.MX6ULL 来说是空函数
第 22 行:INIT_FUNC_WATCHDOG_RESET,复位看门狗,对于 I.MX6ULL 来说是空函数
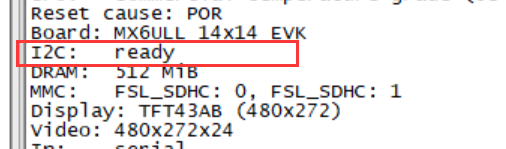
第 23 行:init_func_i2c 函数用于初始化 I2C,初始化完成以后会输出如图 32.2.5.5 所示信息:
第 24 行:announce_dram_init,此函数很简单,就是输出字符串“DRAM:”
第 26 行:dram_init,并非真正的初始化 DDR,只是设置 gd->ram_size 的值,对于正点原子 I.MX6ULL 开发板 EMMC 版本核心板来说就是 512MB。
第 27 行:post_init_f,用来完成一些测试,初始化 gd->post_init_f_time
第 29 行:testdram,测试 DRAM,空函数。
第 44 行:setup_dest_addr函数,设置目的地址,设置gd->ram_size,gd->ram_top,gd->relocaddr 这三个的值。通过串口打印出来如下所示:
gd->ram_size = 0X20000000   //ram 大小为 0X20000000=512MB
gd->ram_top = 0XA0000000    //ram 最高地址为0X80000000+0X20000000=0XA0000000
gd->relocaddr = 0XA0000000  //重定位后最高地址为 0XA0000000
第 45 行:reserve_round_4k 函数用于对 gd->relocaddr 做 4KB 对 齐 , 因 为gd->relocaddr=0XA0000000,已经是 4K 对齐了,所以调整后不变。
第 46 行:reserve_mmu,留出 MMU 的 TLB 表的位置,分配 MMU 的 TLB 表内存以后会对 gd->relocaddr 做 64K 字节对齐。完成以后 gd->arch.tlb_size、gd->arch.tlb_addr 和 gd->relocaddr 值为:
gd->arch.tlb_size= 0X4000     //MMU 的 TLB 表大小
gd->arch.tlb_addr=0X9FFF0000  //MMU 的 TLB 表起始地址,64KB 对齐以后
gd->relocaddr=0X9FFF0000      //relocaddr 地址
第 47 行:reserve_trace 函数,留出跟踪调试的内存,I.MX6ULL 没有用到。
第 48 行:reserve_uboot,留出重定位后的 uboot 所占用的内存区域,uboot 所占用大小由 gd->mon_len 所指定,留出 uboot 的空间以后还要对 gd->relocaddr 做 4K 字节对齐,并且重新设置 gd->start_addr_sp,结果如下:
gd->mon_len = 0XA8EF4
gd->start_addr_sp = 0X9FF47000
gd->relocaddr = 0X9FF47000
第 49 行:reserve_malloc,留出 malloc 区域,调整 gd->start_addr_sp 位置,malloc 区域由宏 TOTAL_MALLOC_LEN 定义,值如下:
TOTAL_MALLOC_LEN=0X1002000
gd->start_addr_sp=0X9EF45000  //0X9FF47000-16MB-8KB=0X9EF45000
第 50 行:reserve_board 函数,留出板子 bd 所占内存区,bd 是结构体bd_t,bd_t 大小为 80 字节,值如下:
gd->start_addr_sp=0X9EF44FB0
gd->bd=0X9EF44FB0
第 51 行:setup_machine,设置机器 ID,linux 启动的时候会和这个机器 ID 匹配,如果匹配的话 linux 就会启动正常。这是以前老版本的 uboot 和 linux 使用的,新版本使用设备树了,因此此函数无效。
第 52 行:reserve_global_data 函数,保留出 gd_t 的内存区域,gd_t 结构体大小为 248B,结果如下:
gd->start_addr_sp=0X9EF44EB8  //0X9EF44FB0-248=0X9EF44EB8
gd->new_gd=0X9EF44EB8
第 53 行:reserve_fdt,留出设备树相关的内存区域。
第 54 行:reserve_arch 是个空函数。
第 55 行:reserve_stacks,留出栈空间,先对 gd->start_addr_sp 减去16,然后做 16 字节对其。如果使能 IRQ 的话还要留出 IRQ 相应的内存,具体工作是由 arch/arm/lib/stack.c 文件中的函数 arch_reserve_stacks 完成。
第 56 行:setup_dram_config 函数设置 dram 信息,就是设置 gd->bd->bi_dram[0].start 和 gd->bd->bi_dram[0].size,后面会传递给 linux 内核,告诉 linux DRAM 的起始地址和大小。
第 57 行:show_dram_config 函数,用于显示 DRAM 的配置。
第 58 行:display_new_sp函数,显示新的sp位置,即 gd->start_addr_sp,不
过要定义宏 DEBUG 。
第 60 行:reloc_fdt 函数用于重定位 fdt,没有用到。
第 61 行:setup_reloc,设置 gd 的其他一些成员变量,供后面重定位的时候使用,并且将以前的 gd 拷贝到 gd->new_gd 处。需要使能 DEBUG 才能看到相应的信息输出
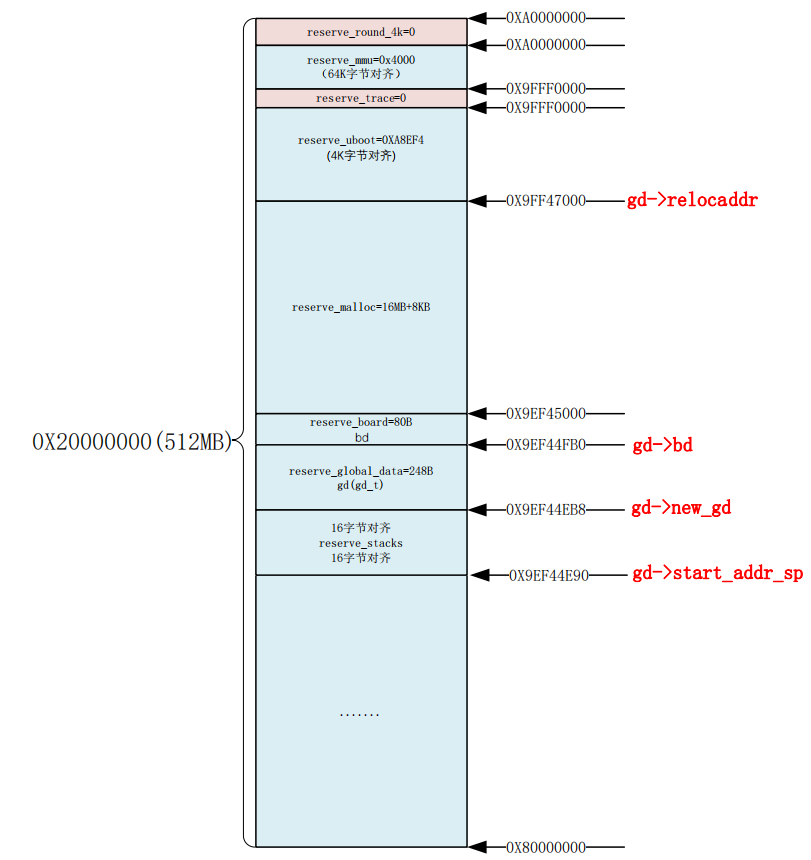
board_init_f 函数执行完成,最终的内存分配如图 32.2.5.16 所示:
⑤relocate_code 函数源码详解:
relocate_code 为代码重定位函数,此函数负责将 uboot 拷贝到新的地方去,此函数定义在文件 arch/arm/lib/relocate.S 中.
⑥relocate_vectors 函数源码详解:
函数 relocate_vectors 对中断向量表做重定位,此函数定义在文件 arch/arm/lib/relocate.S 中.
⑦board_init_r 函数源码详解:
board_init_f 函数,在此函数里面会调用一系列的函数来初始化一些外设和 gd 的成员变量。但是 board_init_f 并没有初始化所有的外设,还需要做一些后续工作,这些后续工作就是由函数 board_init_r 来完成的,board_init_r 函数定义在文件common/board_r.c中.
991 void board_init_r(gd_t *new_gd, ulong dest_addr)
992 {
993 #ifdef CONFIG_NEEDS_MANUAL_RELOC
994 int i;
995 #endif
996
997 #ifdef CONFIG_AVR32
998 mmu_init_r(dest_addr);
999 #endif
1000
1001 #if !defined(CONFIG_X86) && !defined(CONFIG_ARM)
&& !defined(CONFIG_ARM64)
1002 gd = new_gd;
1003 #endif
1004
1005 #ifdef CONFIG_NEEDS_MANUAL_RELOC
1006 for (i = 0; i < ARRAY_SIZE(init_sequence_r); i++)
1007 init_sequence_r[i] += gd->reloc_off;
1008 #endif
1009
1010 if (initcall_run_list(init_sequence_r))
1011 hang();
1012
1013 /* NOTREACHED - run_main_loop() does not return */
1014 hang();
1015 }
第 1010 行调用 initcall_run_list 函数来执行初始化序列 init_sequence_r,init_sequence_r 是一个函数集合,init_sequence_r 也定义在文件 common/board_r.c 中,去掉条件编译以后的 init_sequence_r 定义如下:
init_fnc_t init_sequence_r[] = {
    initr_trace,
    initr_reloc,
    initr_caches,
    initr_reloc_global_data,
    initr_barrier,
    initr_malloc,
    initr_console_record,
    bootstage_relocate,
    initr_bootstage,
    board_init, /* Setup chipselects */
    stdio_init_tables,
    initr_serial,
    initr_announce,
    INIT_FUNC_WATCHDOG_RESET
    INIT_FUNC_WATCHDOG_RESET
    INIT_FUNC_WATCHDOG_RESET
    power_init_board,
    initr_flash,
    INIT_FUNC_WATCHDOG_RESET
    initr_nand,
    initr_mmc,
    initr_env,
    INIT_FUNC_WATCHDOG_RESET
    initr_secondary_cpu,
    INIT_FUNC_WATCHDOG_RESET
    stdio_add_devices,
    initr_jumptable,
    console_init_r, /* fully init console as a device */
    INIT_FUNC_WATCHDOG_RESET
    interrupt_init,
    initr_enable_interrupts,
    initr_ethaddr,
    board_late_init,
    INIT_FUNC_WATCHDOG_RESET
    INIT_FUNC_WATCHDOG_RESET
    INIT_FUNC_WATCHDOG_RESET
    initr_net,
    INIT_FUNC_WATCHDOG_RESET
    run_main_loop,
 };
第 2 行: initr_trace 函数,如果定义了宏 CONFIG_TRACE 的话就会调用函数
trace_init,初始化和调试跟踪有关的内容。
第 3 行:initr_reloc 函数用于设置 gd->flags,标记重定位完成。
第 4 行:initr_caches 函数用于初始化 cache,使能 cache。
第 5 行:initr_reloc_global_data 函数,初始化重定位后 gd 的一些成员变
量。
第 6 行:initr_barrier 函数,I.MX6ULL 未用到。
第 7 行:initr_malloc 函数,初始化 malloc。
第 8 行:initr_console_record 函数,初始化控制台相关的内容,I.MX6ULL 未
用到,空函数。
第 9 行:bootstage_relocate 函数,启动状态重定位。
第 10 行:initr_bootstage 函数,初始化 bootstage 什么的。
第 11 行:board_init 函数,板级初始化,包括 74XX 芯片,I2C、FEC、USB 和 QSPI 等。这里执行的是 mx6ull_alientek_emmc.c 文件中的 board_init 函数。
第 12 行:stdio_init_tables 函数,stdio 相关初始化。
第 13 行:initr_serial 函数,初始化串口。
第 14 行:initr_announce 函数,与调试有关,通知已经在 RAM 中运行。
第 18 行:power_init_board 函数,初始化电源芯片,正点原子的 I.MX6ULL 开
发板没有用到。
第 19 行:initr_flash 函数,对于 I.MX6ULL,没有定义宏
CONFIG_SYS_NO_FLASH 的话函数 initr_flash 才有效。但是 mx6_common.h 中定义了CONFIG_SYS_NO_FLASH,所以此函数无效。
第 21 行:initr_nand 函数,初始化 NAND,如果使用 NAND 版本核心板的话就会初始化NAND。
第 22 行:initr_mmc 函数,初始化 EMMC,如果使用 EMMC 版本核心板的话就会初始化EMMC。
第 23 行:initr_env 函数,初始化环境变量。
第 25 行:initr_secondary_cpu 函数,初始化其他 CPU 核,I.MX6ULL 只有一个核,因此此函数没用。
第 27 行:stdio_add_devices 函数,各种输入输出设备的初始化,如 LCD driver,I.MX6ULL 使用 drv_video_init 函数初始化 LCD。
第 28 行:initr_jumptable 函数,初始化跳转表。
第 29 行:console_init_r 函数,控制台初始化,初始化完成以后此函数会调用 stdio_print_current_devices 函数来打印出当前的控制台设备。
第 31 行:interrupt_init 函数,初始化中断。
第 32 行:initr_enable_interrupts 函数,使能中断。
第 33 行:initr_ethaddr 函数,初始化网络地址,也就是获取 MAC 地址。读取环境变量“ethaddr”的值。
第 34 行:board_late_init 函数,板子后续初始化,定义在 mx6ull_alientek_emmc.c 中,如果环境变量存储在 EMMC 或者 SD 卡中的此函数会调用board_late_mmc_env_init 函数初始化 EMMC/SD。会切换到正在时候用的 emmc 设备,代码如图所示:
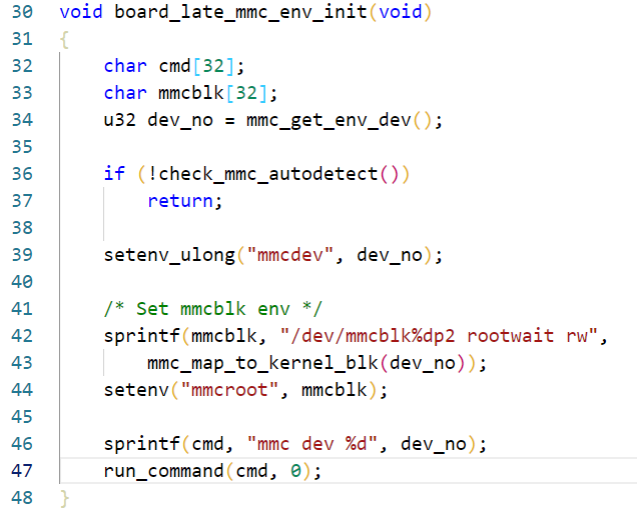
图中第 46 行和第 47 行就是运行“mmc dev xx”命令,用于切换到正在使用的 EMMC 设备
第 38 行:initr_net 函数,初始化网络设备,函数调用顺序为 :initr_net->eth_initialize->board_eth_init().
第 40 行:run_main_loop 行,主循环,处理命令。
⑧run_main_loop 函数源码详解:
uboot 启动以后会进入 3 秒倒计时,如果在 3 秒倒计时结束之前按下按下回车键,那么就会进入 uboot 的命令模式,如果倒计时结束以后都没有按下回车键,那么就会自动启动 Linux 内核 , 这个功能就是由 run_main_loop 函数来完成的。run_main_loop 函数定义在文件 common/board_r.c 中:
static int run_main_loop(void)
{
#ifdef CONFIG_SANDBOX
    sandbox_main_loop_init();
#endif
    /* main_loop() can return to retry autoboot, if so just run it again */
    for (;;)
        main_loop();
    return 0;
}
“for(;😉”和“while(1)”功能一样,死循环里面就一个main_loop 函数,main_loop 函数定义在文件 common/main.c 里面,执行流程如下:
main_loop
-> cli_init
    ->u_boot_hush_start  //初始化命令行
-> run_preboot_environment_command
-> bootdelay_process     //获取bootdelay的值,然后保存到stored_bootdelay
                         //全局变量里面,获取bootcmd环境变量值,并且将其返回
-> autoboot_command          //参数是bootcmd的值,倒计时启动Linux
    -> abortboot             //参数为boot delay,此函数会处理倒计时是否被打断
        -> abortboot_normal    //参数为boot delay,会处理倒计时是否被打断
   -> run_command_list      //倒计时未被打断则执行bootcmd来启动Linux
-> cli_loop                 //uboot命令模式处理函数。
    -> parse_file_outer
        -> parse_stream_outer
            -> parse_stream            //解析输入的字符,得到命令
            -> run_list                //运行命令
                -> run_list_real
                    -> run_pipe_real
                        -> cmd_process  //处理命令,也就是执行命令
autoboot_command 函数中,如果倒计时自然结束那么就执行函数
run_command_list,此函数会执行参数 s 指定的一系列命令,也就是环境变量 bootcmd 的命令,bootcmd 里面保存着默认的启动命令,因此 linux 内核启动!这个就是 uboot 中倒计时结束以后自动启动 linux 内核的原理。如果倒计时结束之前按下了键盘上的按键,那么 run_command_list函数就不会执行,相当于 autoboot_command 是个空函数。
cli_loop 函数是 uboot 的命令行处理函数,我们在 uboot 中输入各种命令,进行各种操作就是有 cli_loop 来处理的,此函数定义在文件 common/cli.c 中.
三、bootz 启动 Linux 内核过程
①images 全局变量
不管是 bootz 还是 bootm 命令,在启动 Linux 内核的时候都会用到一个重要的全局变量:images. images 在文件 cmd/bootm.c 中有如下定义:
bootm_headers_t images; /* pointers to os/initrd/fdt images */
images 是 bootm_headers_t 类型的全局变量,bootm_headers_t 是个 boot 头结构体,在文件 include/image.h 中的定义,如下(删除一些条件编译代码):
304 typedef struct bootm_headers {
305 /*
306 * Legacy os image header, if it is a multi component image
307 * then boot_get_ramdisk() and get_fdt() will attempt to get
308 * data from second and third component accordingly.
309 */
310 image_header_t *legacy_hdr_os; /* image header pointer */
311 image_header_t legacy_hdr_os_copy; /* header copy */
312 ulong legacy_hdr_valid;
313  ......
333
334 #ifndef USE_HOSTCC
335 image_info_t os; /* OS 镜像信息*/
336 ulong ep; /* OS 入口点*/
337
338 ulong rd_start, rd_end; /* ramdisk 开始和结束位置 */
339
340 char *ft_addr; /* 设备树地址*/
341 ulong ft_len; /* 设备树长度*/
342
343 ulong initrd_start; /* initrd 开始位置*/
344 ulong initrd_end; /* initrd 结束位置*/
345 ulong cmdline_start; /* cmdline 开始位置*/
346 ulong cmdline_end; /* cmdline 结束位置*/
347 bd_t *kbd;
348 #endif
349
350 int verify; /* getenv("verify")[0] != 'n' */
351
352 #define BOOTM_STATE_START (0x00000001)
353 #define BOOTM_STATE_FINDOS (0x00000002)
354 #define BOOTM_STATE_FINDOTHER (0x00000004)
355 #define BOOTM_STATE_LOADOS (0x00000008)
356 #define BOOTM_STATE_RAMDISK (0x00000010)
357 #define BOOTM_STATE_FDT (0x00000020)
358 #define BOOTM_STATE_OS_CMDLINE (0x00000040)
359 #define BOOTM_STATE_OS_BD_T (0x00000080)
360 #define BOOTM_STATE_OS_PREP (0x00000100)
361 #define BOOTM_STATE_OS_FAKE_GO (0x00000200)/*'Almost' run the OS*/
362 #define BOOTM_STATE_OS_GO (0x00000400)
363 int state;
364
365 #ifdef CONFIG_LMB
366 struct lmb lmb; /* 内存管理相关,不深入研究 */
367 #endif
368 } bootm_headers_t;
第 335 行: os 成员变量是 image_info_t 类型的,为系统镜像信息。
第 352~362 行:这 11 个宏定义表示 BOOT 不同阶段。结构体 image_info_t,也就是系统镜像信息结构体,此结构体在文件include/image.h 中的定义如下:
typedef struct image_info {
    ulong start, end;       /* blob 开始和结束位置*/
    ulong image_start, image_len; /* 镜像起始地址(包括 blob)和长度 */
    ulong load;             /* 系统镜像加载地址*/
    uint8_t comp, type, os; /* 镜像压缩、类型,OS 类型 */
    uint8_t arch;           /* CPU 架构 */
} image_info_t;
全局变量 images 会在 bootz 命令的执行中频繁使用到,相当于 Linux 内核启动的“灵魂”。
②do_bootz 函数
bootz 命令的执行函数为 do_bootz,在文件 cmd/bootm.c 中有如下定义:
622 int do_bootz(cmd_tbl_t *cmdtp, int flag, int argc, char * const argv[])
623 {
624 int ret;
625
626 /* Consume 'bootz' */
627 argc--; argv++;
628
629 if (bootz_start(cmdtp, flag, argc, argv, &images))
630 return 1;
631
632 /*
633 * We are doing the BOOTM_STATE_LOADOS state ourselves, so must
634 * disable interrupts ourselves
635 */
636 bootm_disable_interrupts();
637
638 images.os.os = IH_OS_LINUX;
639 ret = do_bootm_states(cmdtp, flag, argc, argv,
640 BOOTM_STATE_OS_PREP | BOOTM_STATE_OS_FAKE_GO |
641 BOOTM_STATE_OS_GO,
642 &images, 1);
643
644 return ret;
645 }
第 629 行:调用 bootz_start 函数。
第 636 行:调用函数 bootm_disable_interrupts 关闭中断。
第 638 行:设置 images.os.os 为 IH_OS_LINUX,也就是设置系统为 Linux,表示要启动的是 Linux 系统!后面会用到 images.os.os 来挑选具体的启动函数。
第 639 行:调用函数 do_bootm_states 来执行不同的 BOOT 阶段,这里要执行的 BOOT 阶段有:BOOTM_STATE_OS_PREP 、BOOTM_STATE_OS_FAKE_GO 和BOOTM_STATE_OS_GO。
③bootz_start 函数
bootz_srart 函数也定义在文件 cmd/bootm.c 中,函数内容如下:
578 static int bootz_start(cmd_tbl_t *cmdtp, int flag, int argc,
579 char * const argv[], bootm_headers_t *images)
580 {
581 int ret;
582 ulong zi_start, zi_end;
583
584 ret = do_bootm_states(cmdtp, flag, argc, argv,
585 BOOTM_STATE_START, images, 1);
586
587 /* Setup Linux kernel zImage entry point */
588 if (!argc) {
589 images->ep = load_addr;
590 debug("* kernel: default image load address = 0x%08lx\n",
591 load_addr);
592 } else {
593 images->ep = simple_strtoul(argv[0], NULL, 16);
594 debug("* kernel: cmdline image address = 0x%08lx\n",
595 images->ep);
596 }
597
598 ret = bootz_setup(images->ep, &zi_start, &zi_end);
599 if (ret != 0)
600 return 1;
601
602 lmb_reserve(&images->lmb, images->ep, zi_end - zi_start);
603
604 /*
605 * Handle the BOOTM_STATE_FINDOTHER state ourselves as we do not
606 * have a header that provide this informaiton.
607 */
608 if (bootm_find_images(flag, argc, argv))
609 return 1;
610
......
619 return 0;
620 }
第 584 行:调用函数 do_bootm_states,执行 BOOTM_STATE_START 阶段。
第 593 行:设置 images 的 ep 成员变量,也就是系统镜像的入口点,使用 bootz 命令启动系统的时候就会设置系统在 DRAM 中的存储位置,这个存储位置就是系统镜像的入口点,因此 images->ep=0X80800000。
第 598 行:调用 bootz_setup 函数,此函数会判断当前的系统镜像文件是否为 Linux 的镜像文件,并且会打印出镜像相关信息。
第 608 行:调用函数 bootm_find_images 查找 ramdisk 和设备树(dtb)文件,但是我们没有用到 ramdisk,因此此函数在这里仅仅用于查找设备树(dtb)文件。
④do_bootm_start 函数
do_bootz 最后调用的就是函数 do_bootm_states ,而且在 bootz_start 中 也调用了 do_bootm_states 函数。此函数定义在文件common/bootm.c 中,函数 do_bootm_states 根据不同的 BOOT 状态执行不同的代码段,通过如下代码来判断
BOOT 状态:
states & BOOTM_STATE_XXX
在do_bootz函数中会用到BOOTM_STATE_OS_PREP、BOOTM_STATE_OS_FAKE_GO 和 BOOTM_STATE_OS_GO 这三个 BOOT 状态,bootz_start 函数中会用到 BOOTM_STATE_START这个 BOOT 状态。do_bootm_states 进行精简,只留下下面这 4 个 BOOT 状态对应的处理代码:
BOOTM_STATE_OS_PREP
BOOTM_STATE_OS_FAKE_GO
BOOTM_STATE_OS_GO
BOOTM_STATE_START
精简以后的 do_bootm_states 函数如下所示:
591 int do_bootm_states(cmd_tbl_t *cmdtp, int flag, int argc, char * const argv[],
592 int states, bootm_headers_t *images, int boot_progress)
593 {
594 boot_os_fn *boot_fn;
595 ulong iflag = 0;
596 int ret = 0, need_boot_fn;
597
598 images->state |= states;
599
600 /*
601 * Work through the states and see how far we get. We stop on
602 * any error.
603 */
604 if (states & BOOTM_STATE_START)
605 ret = bootm_start(cmdtp, flag, argc, argv);
......
654
655 /* From now on, we need the OS boot function */
656 if (ret)
657 return ret;
658 boot_fn = bootm_os_get_boot_func(images->os.os);
659 need_boot_fn = states & (BOOTM_STATE_OS_CMDLINE |
660 BOOTM_STATE_OS_BD_T | BOOTM_STATE_OS_PREP |
661 BOOTM_STATE_OS_FAKE_GO | BOOTM_STATE_OS_GO);
662 if (boot_fn == NULL && need_boot_fn) {
663 if (iflag)
664 enable_interrupts();
665 printf("ERROR: booting os '%s' (%d) is not supported\n",
666 genimg_get_os_name(images->os.os), images->os.os);
667 bootstage_error(BOOTSTAGE_ID_CHECK_BOOT_OS);
668 return 1;
669 }
670
......
676 if (!ret && (states & BOOTM_STATE_OS_PREP))
677 ret = boot_fn(BOOTM_STATE_OS_PREP, argc, argv, images);
678
679 #ifdef CONFIG_TRACE
680 /* Pretend to run the OS, then run a user command */
681 if (!ret && (states & BOOTM_STATE_OS_FAKE_GO)) {
682 char *cmd_list = getenv("fakegocmd");
683
684 ret = boot_selected_os(argc, argv, BOOTM_STATE_OS_FAKE_GO,
685 images, boot_fn);
686 if (!ret && cmd_list)
687 ret = run_command_list(cmd_list, -1, flag);
688 }
689 #endif
690
691 /* Check for unsupported subcommand. */
692 if (ret) {
693 puts("subcommand not supported\n");
694 return ret;
695 }
696
697 /* Now run the OS! We hope this doesn't return */
698 if (!ret && (states & BOOTM_STATE_OS_GO))
699 ret = boot_selected_os(argc, argv, BOOTM_STATE_OS_GO,
700 images, boot_fn);
......
712 return ret;
713 }
第 604、605 行:处理 BOOTM_STATE_START 阶段,调用函数 bootm_start,此函数定义在文件 common/bootm.c 中:
static int bootm_start(cmd_tbl_t *cmdtp, int flag, int argc,char * const argv[])
{
    memset((void *)&images, 0, sizeof(images)); /* 清空 images */
    images.verify = getenv_yesno("verify");/* 初始化 verfify 成员 */

    boot_start_lmb(&images);

    bootstage_mark_name(BOOTSTAGE_ID_BOOTM_START, "bootm_start");
    images.state = BOOTM_STATE_START;/* 设置状态为 BOOTM_STATE_START */

    return 0;
}
第 658 行:非常重要!通过函数 bootm_os_get_boot_func 来查找系统启动函数,参数 images->os.os 就是系统类型,根据这个系统类型来选择对应的启动函数,在 do_bootz 中设置 images.os.os= IH_OS_LINUX。函数返回值就是找到的系统启动函数,这里找到的 Linux 系统启动函数为 do_bootm_linux。因此 boot_fn=do_bootm_linux,后面执行 boot_fn 函数的地方实际上是执行的 do_bootm_linux 函数。
第 676 行:处理 BOOTM_STATE_OS_PREP 状态,调用函数 do_bootm_linux,do_bootm_linux 也是调用 boot_prep_linux 来完成具体的处理过程。boot_prep_linux 主要用于处理环境变量 bootargs,bootargs 保存着传递给 Linux kernel 的参数。
第 679~689 行:是处理 BOOTM_STATE_OS_FAKE_GO 状态的,但是要我们没用使能 TRACE 功能,因此宏 CONFIG_TRACE 也就没有定义,所以这段程序不会编译。
第 699 行:调用函数 boot_selected_os 启动 Linux 内核,此函数第 4 个参数为 Linux 系统镜像头,第 5 个参数就是 Linux 启动函数 do_bootm_linux 。boot_selected_os 函数定义在文件 common/bootm_os.c 中,函数内容如下:
int boot_selected_os(int argc, char * const argv[], int state,bootm_headers_t *images, boot_os_fn *boot_fn)
{
    arch_preboot_os();
    boot_fn(state, argc, argv, images);
......
    return BOOTM_ERR_RESET;
}
函数 boot_selected_os 调用 boot_fn 函数,即 do_bootm_linux 函数来启动 Linux 内核。
⑤ bootm_os_get_boot_func 函数
do_bootm_states 会调用 bootm_os_get_boot_func 来查找对应系统的启动函数,此函数定义在文件 common/bootm_os.c 中。
⑥ do_bootm_linux 函数
do_bootm_linux 就是最终启动 Linux 内核的函数,此函数定义在文件 arch/arm/lib/bootm.c,函数内容如下:
int do_bootm_linux(int flag, int argc, char * const argv[], bootm_headers_t *images)
{
    /* No need for those on ARM */
    if (flag & BOOTM_STATE_OS_BD_T || flag & BOOTM_STATE_OS_CMDLINE)
    return -1;

    if (flag & BOOTM_STATE_OS_PREP) {
        boot_prep_linux(images);
        return 0;
    }

    if (flag & (BOOTM_STATE_OS_GO | BOOTM_STATE_OS_FAKE_GO)) {
        boot_jump_linux(images, flag);
        return 0;
    }
    boot_prep_linux(images);
    boot_jump_linux(images, flag);
    return 0;
}
第 4 行:如果参数flag等于BOOTM_STATE_OS_GO或者BOOTM_STATE_OS_FAKE_GO
的话就执行 boot_jump_linux 函数。boot_selected_os 函数在调用 do_bootm_linux 的时候会将 flag 设置为 BOOTM_STATE_OS_GO。
第 13 行:执行函数 boot_jump_linux,定义在文件 arch/arm/lib/bootm.c 中,函数内容如下:
static void boot_jump_linux(bootm_headers_t *images, int flag)
{
#ifdef CONFIG_ARM64
......
#else
    unsigned long machid = gd->bd->bi_arch_number;
    char *s;
    void (*kernel_entry)(int zero, int arch, uint params);
    unsigned long r2;
    int fake = (flag & BOOTM_STATE_OS_FAKE_GO);

    kernel_entry = (void (*)(int, int, uint))images->ep;

    s = getenv("machid");
    if (s) {
        if (strict_strtoul(s, 16, &machid) < 0) {
            debug("strict_strtoul failed!\n");
            return;
        }
        printf("Using machid 0x%lx from environment\n", machid);
    }

    debug("## Transferring control to Linux (at address %08lx)" \
            "...\n", (ulong) kernel_entry);bootstage_mark(BOOTSTAGE_ID_RUN_OS);
    announce_and_cleanup(fake);

    if (IMAGE_ENABLE_OF_LIBFDT && images->ft_len)
        r2 = (unsigned long)images->ft_addr;
    else
        r2 = gd->bd->bi_boot_params;

    ......
        kernel_entry(0, machid, r2);
    }
#endif
}
第 3~5 行:64 位 ARM 芯片对应的代码,Cortex-A7 是 32 位芯片用不到。
第 6 行:变量 machid 保存机器 ID,如果不使用设备树的话这个机器 ID 会被传递给 Linux 内核,Linux 内核会在自己的机器 ID 列表里面查找是否存在与 uboot 传递进来的 machid 匹配的项目,如果存在就说明 Linux 内核支持这个机器,那么 Linux 就会启动!如果使用设备树的话这个 machid 就无效了,设备树存有一个“兼容性”这个属性,Linux 内核会比较“兼容性”属性的值(字符串)来查看是否支持这个机器。
第 8 行:声明函数 kernel_entry,此函数是进入 Linux 内核的。此函数有三个参数:zero,arch,params,第一个参数 zero 同样为 0;第二个参数为机器 ID;第三个参数 ATAGS 或者设备树(DTB)首地址,ATAGS 是传统的方法,用于传递一些命令行信息啥的,如果使用设备树的话就要传递设备树(DTB)。
第 12 行:获取 kernel_entry 函数,函数 kernel_entry 并不是 uboot 定义的,而是 Linux 内核定义的,Linux 内核镜像文件的第一行代码就是函数 kernel_entry,而 images->ep 保存着 Linux 内核镜像的起始地址,起始地址保存的正是 Linux 内核第一行代码!
第 24 行:调用函数 announce_and_cleanup 来打印一些信息并做一些清理工作,此函数定义在文件 arch/arm/lib/bootm.c 中。
第 27~30 行:设置寄存器 r2 的值。Linux 内核一开始是汇编代码,因此函数 kernel_entry 就是个汇编函数。向汇编函数传递参数要使用 r0、r1 和 r2(参数数量不超过 3 个的时候),所以 r2 寄存器就是函数 kernel_entry 的第三个参数。
第 28 行:如果使用设备树的话,r2 应该是设备树的起始地址,而设备树地址保存在 images 的 ftd_addr 成员变量中。
第 30 行:如果不使用设备树的话,r2 应该是 uboot 传递给 Linux 的参数起始地址,也就是环境变量 bootargs 的值,
第 33 行:调用 kernel_entry 函数进入 Linux 内核,此行将一去不复返,uboot 的使命也就完成了!
总结一下 bootz 命令的执行过程,如图所示:


【推荐】国内首个AI IDE,深度理解中文开发场景,立即下载体验Trae
【推荐】编程新体验,更懂你的AI,立即体验豆包MarsCode编程助手
【推荐】抖音旗下AI助手豆包,你的智能百科全书,全免费不限次数
【推荐】轻量又高性能的 SSH 工具 IShell:AI 加持,快人一步
· 阿里最新开源QwQ-32B,效果媲美deepseek-r1满血版,部署成本又又又降低了!
· Manus重磅发布:全球首款通用AI代理技术深度解析与实战指南
· 开源Multi-agent AI智能体框架aevatar.ai,欢迎大家贡献代码
· 被坑几百块钱后,我竟然真的恢复了删除的微信聊天记录!
· AI技术革命,工作效率10个最佳AI工具