慢慢安装——anconda,cuda,cudnn等
😄 😥 🙃 😭 😡
安装conda 【本身就不需要root权限】
1.下载anconda https://www.anaconda.com/products/individual
或者直接清华园 https://mirrors.tuna.tsinghua.edu.cn/anaconda/archive/ 但是(有时候)出现不稳定抽风:wget https://mirrors.tuna.tsinghua.edu.cn/anaconda/archive/Anaconda3-2020.02-Linux-x86_64.sh
下载到本地之后,上传到服务器,改文件 chmod 777 ** ,否则出现xftp上传错误
2. sh Anaconda....sh
3.会提示安装目录,输入一个【还没有创建的安装目录】"Anaconda3 will now be installed into this location": 如 /4Tdisk/用户名/Anaconda
4.装完它自己会添加path到~/.bashrc
5. source ~/.bashrc【更新一下用户配置文件】,通过conda info --e检查是否安装好了
换清华源 win/linux下:
建议直接参考官网命令: , 设置清华源镜像
按提示更改 ~/.condarc。再运行索引缓存 conda clean -i
查看镜像中是否有要安装的pytorch版本
或者直接参考下面的(个人觉得不好用,总是抽风(╬▔皿▔)凸)
https://blog.csdn.net/wujialaoer/article/details/84977796
conda config --add channels https://mirrors.tuna.tsinghua.edu.cn/anaconda/pkgs/free/
conda config --add channels https://mirrors.tuna.tsinghua.edu.cn/anaconda/cloud/conda-forge
conda config --add channels https://mirrors.tuna.tsinghua.edu.cn/anaconda/cloud/msys2/

conda config --set show_channel_urls yes
【有时候网络还是有问题可参考】https://blog.csdn.net/ebzxw/article/details/80702506
【如果conda 安装总是 HTTP 错误,可使用 pip】 https://blog.csdn.net/lsf_007/article/details/87931823
关于conda 和 pip 安装
1.首选 conda install ***
2.如果conda太慢或失败,备选 pip install ***
3.如果pip安装超时,连接出错,可以使用 pip install *** -i https://pypi.tuna.tsinghua.edu.cn/simple
安装cuda
1.查看版本显卡nvidia-smi,驱动版本是440.44
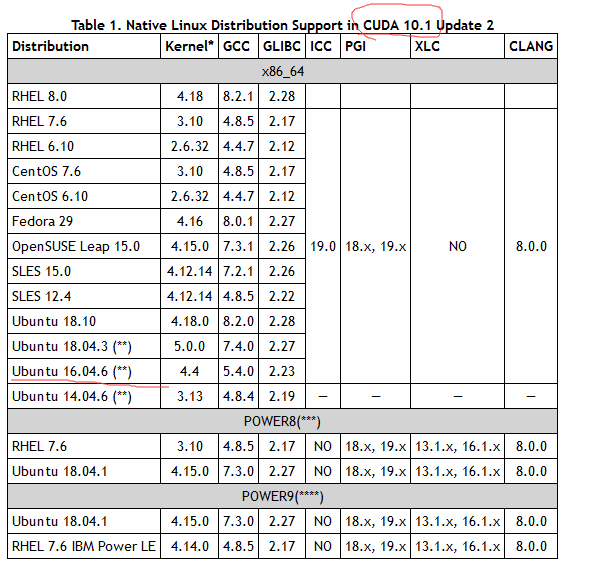
2.搜“nvidia driver cuda version”,可以看到可以安装cuda 10.1版本
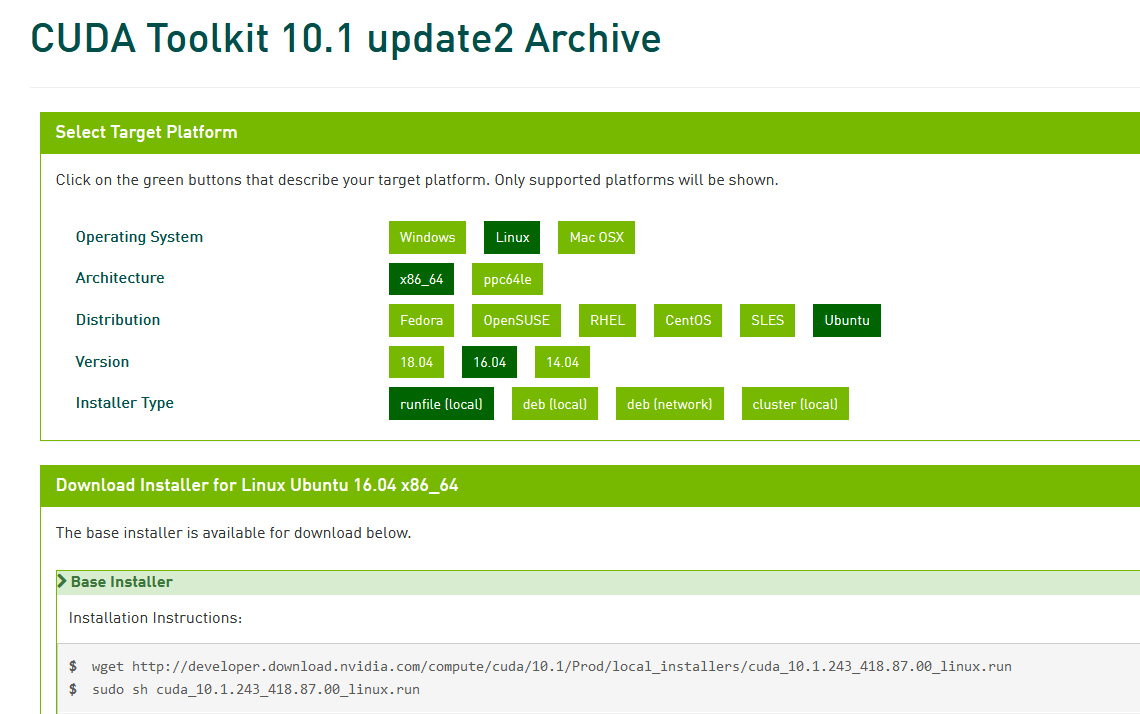
3.sh cuda***.run
https://blog.csdn.net/hizengbiao/article/details/88625044
4.或者直接使用别人的cuda,写入到 ~/.profile
PS. 关于找合适的cuda
1.【查看驱动和cuda匹配版本】nvidia-smi 是440.44版本
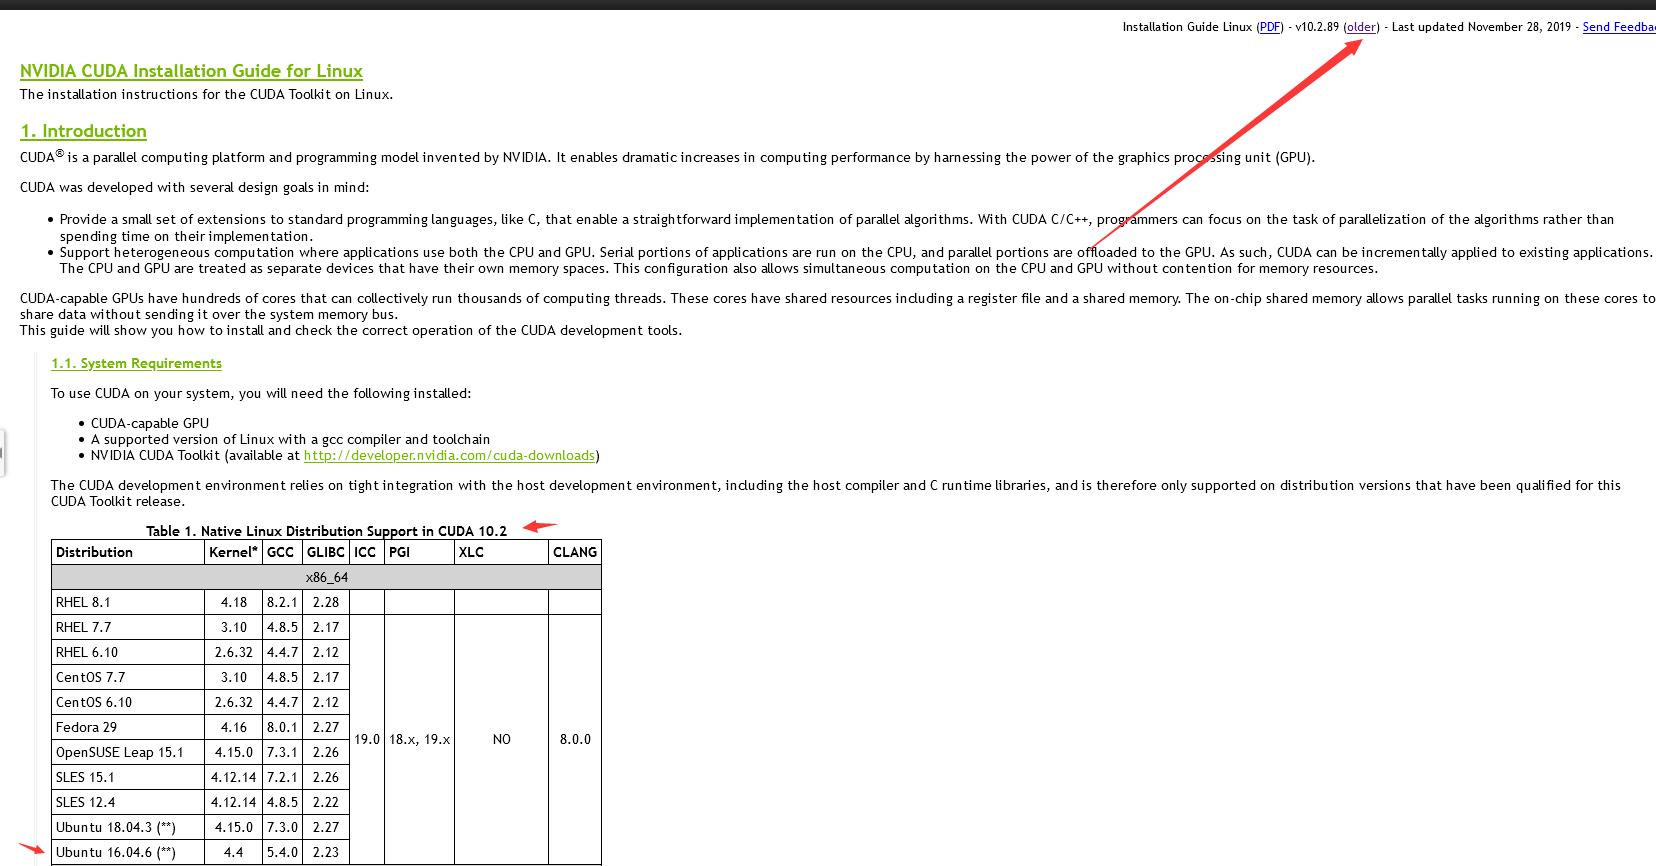
2.【查看内核和cuda匹配版本】gcc -v 是16.04 5.4.0版本
https://docs.nvidia.com/deploy/cuda-compatibility/index.html
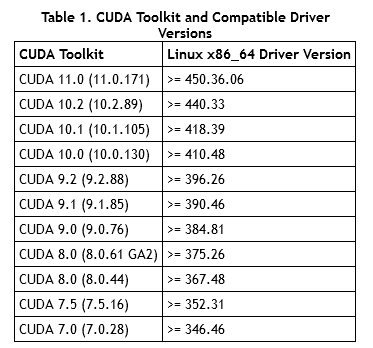
【那我就安装10.1版本的】
自定义目录安装cuda和cudnn
自定义目录:先创建安装路径 /4Tdisk/***/software/cuda/cuda-10.1/
https://blog.csdn.net/hizengbiao/article/details/88625044
【安装结果】
(base) ***@hp:/4Tdisk/***/download$ sh cuda_10.1.243_418.87.00_linux.run
===========
= Summary =
===========

Driver:   Not Selected
Toolkit:  Installed in /4Tdisk/***/software/cuda/cuda-10.1/
Samples:  Installed in /home/***/

Please make sure that
 -   PATH includes /4Tdisk/***/software/cuda/cuda-10.1/bin
 -   LD_LIBRARY_PATH includes /4Tdisk/***/software/cuda/cuda-10.1/lib64, or, add /4Tdisk/***/software/cuda/cuda-10.1/lib64 to /etc/ld.so.conf and run ldconfig as root

To uninstall the CUDA Toolkit, run cuda-uninstaller in /4Tdisk/***/software/cuda/cuda-10.1/bin

Please see CUDA_Installation_Guide_Linux.pdf in /4Tdisk/***/software/cuda/cuda-10.1/doc/pdf for detailed information on setting up CUDA.
***WARNING: Incomplete installation! This installation did not install the CUDA Driver. A driver of version at least 418.00 is required for CUDA 10.1 functionality to work.
To install the driver using this installer, run the following command, replacing <CudaInstaller> with the name of this run file:
    sudo <CudaInstaller>.run --silent --driver

Logfile is /tmp/cuda-installer.log
【按照Summary配置PATH】
export PATH="/4Tdisk/**/cuda/cuda-10.1/bin:$PATH"
export LD_LIBRARY_PATH="/4Tdisk/**/cuda/cuda-10.1/lib64:$LD_LIBRARY_PATH"
下载解压cudnn与复制
tar -xzvf cudnn-10.1-linux-x64-v7.6.5.32.tgz -C /4Tdisk/***/software/cuda/cuda-10.1/tem

cp /4Tdisk/***/software/cuda/cuda-10.1/tem/cuda/include/cudnn.h /4Tdisk/***/software/cuda/cuda-10.1/include
cp /4Tdisk/***/software/cuda/cuda-10.1/tem/cuda/lib64/libcudnn* /4Tdisk/***/software/cuda/cuda-10.1/lib64
chmod a+r /4Tdisk/***/software/cuda/cuda-10.1/include/cudnn.h /4Tdisk/***/software/cuda/cuda-10.1/lib64/libcudnn*
查看版本 nvcc -V 或者 nvcc --version
安装pytorch
1.创环境 conda create --name pytorch
conda install pytorch torchvision cudatoolkit=10.1
或者指定pytorch版本
conda install pytorch=1.5 torchvision cudatoolkit=10.1 -c pytorch 【两种凡是都试试尤其是当网络抽风的时候😫】
检查cuda版本和pytorch版本是否一致
$ python -c "import torch; print(torch.version.cuda)"
>>> 10.1

$ nvcc --version
>>> 10.1
测试是否成功
import torch
print(torch.__version__)
print(torch.cuda.is_available())
a = torch.ones(1,1)
print(a.cuda())
莫名其妙 —— 一切随缘🐶
- 报错段错误
清楚package缓存: conda clean -y --all - Solving environment: failed with initial frozen solve
conda config --set channel_priority flexible
Conde设置代理:https://blog.csdn.net/leviopku/article/details/98766822

