MySQL学习小记(三) 结合JDBC实现用户的登录响应
本次用到的数据库为之前建的acme中的users表,实现简易登录
MySQL学习小记(一)_☆迷茫狗子的秘密基地☆-CSDN博客![]() https://blog.csdn.net/qq_39391544/article/details/121354629
https://blog.csdn.net/qq_39391544/article/details/121354629
目录
users表

代码(注释)
import java.sql.*;
import java.util.*;

public class userLogin{
    public static void main(String[] args){
        while(true)
        {
            Map<String, String> userInfor = init();

            boolean iSRight = tryLogin(userInfor);
            if(iSRight) System.out.println("登录成功.");
            else System.out.println("登录失败.");
        }
    }

    public static Map<String, String> init(){
        Scanner input = new Scanner(System.in);

        System.out.print("邮箱: ");
        String email = input.nextLine();
        System.out.print("密码: ");
        String pwd = input.nextLine();

        Map<String, String> userInfor = new HashMap<>();
        userInfor.put("userEmail", email);
        userInfor.put("userPwd", pwd);
        return userInfor;
    }
    public static boolean tryLogin(Map<String, String> userInfor){
        Connection con = null;
        Statement st = null;
        ResultSet res = null;
        boolean iSRight = false;

        try{
            //Ⅰ. 注册驱动
            Class.forName("com.mysql.cj.jdbc.Driver");

            //Ⅱ. 进行连接,并获取要操作的数据库对象
            con = DriverManager.getConnection("jdbc:mysql://127.0.0.1:3306/acme","root", "root");
            st = con.createStatement();

            //Ⅲ. 定义SQL指令并执行
            String sqlOption = "SELECT * FROM users WHERE email='"
                    +userInfor.get("userEmail")+"'AND password='"
                    +userInfor.get("userPwd")+"'";
            res = st.executeQuery(sqlOption);

            //Ⅳ. 处理结果集
            if(res.next()){
                iSRight = true;
            }
        }catch(Exception e){
            e.printStackTrace();
        }finally {
            //Ⅴ. 关闭资源
            if(res != null){
                try{
                    res.close();
                }catch (SQLException e){
                    e.printStackTrace();;
                }
            }
            if(st != null){
                try{
                    st.close();
                }catch (SQLException e){
                    e.printStackTrace();;
                }
            }
            if(con != null){
                try{
                    con.close();
                }catch (SQLException e){
                    e.printStackTrace();;
                }
            }
            return iSRight;
        }
    }
}
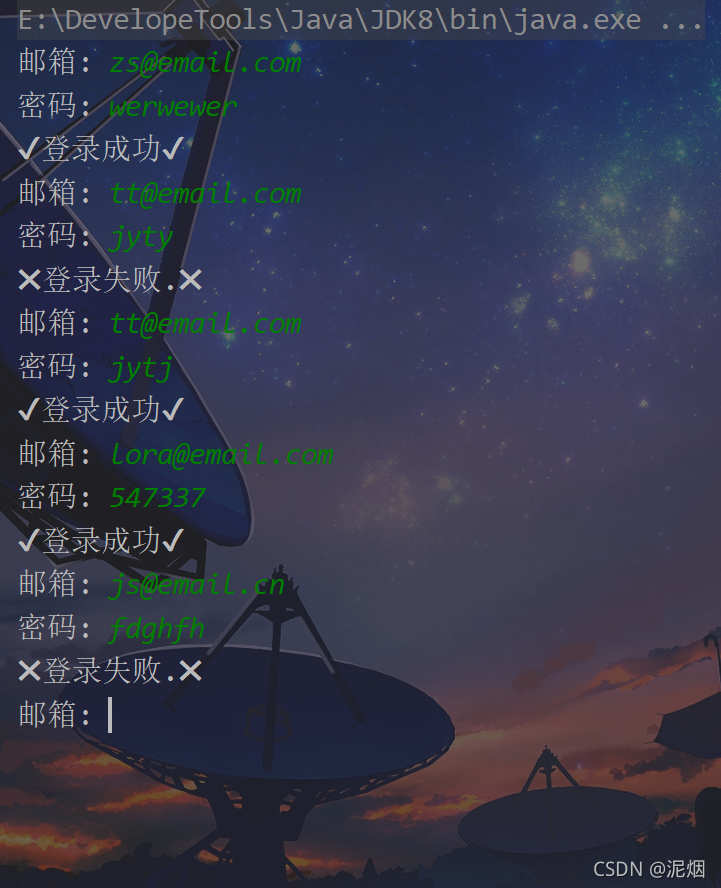
演示

本文来自博客园,作者:泥烟,CSDN同名, 转载请注明原文链接:https://www.cnblogs.com/Knight02/p/15799017.html


 浙公网安备 33010602011771号