谷粒商城-商品服务(分类管理、品牌管理)
分类管理
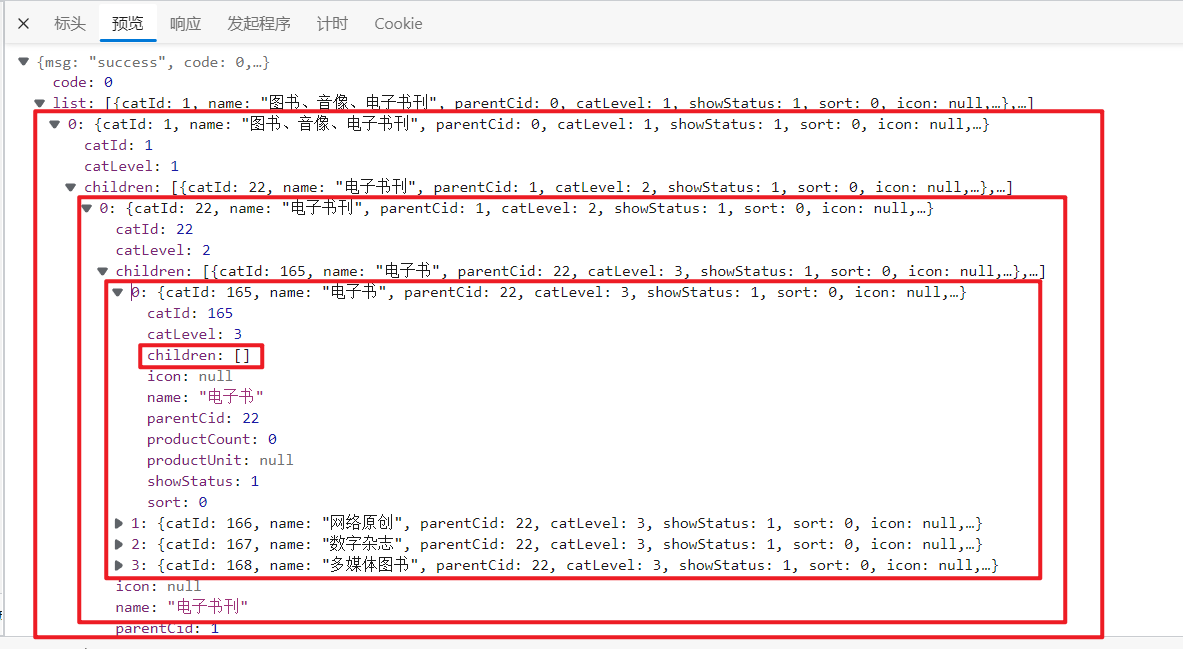
1 查询三级分类
由于分类是有多级的,在数据库中的存储是用pid来表示父子关系的。所以我们在后端需要对分类做处理,以供前端渲染出更清晰的分类层级关系。
我们这里是三级分类,如果不知道有多少级的话,最好的方式是用递归来寻找子分类。
我这里没有跟老师使用Stream流的方式来做,我还是使用了for循环,感觉这样看着更舒服。(自我感觉)而且我额外创建了一个VO实体类,用于组装数据返回给前端。
@Override
public List<CategoryEntityVO> listWithTree() {
    // 1、先从数据库中获取到所有的分类
    List<CategoryEntity> allCategory = categoryDao.selectList(null);
    // 2、准备好一个分类信息VO实体类,用于组装格式返回给前端
    List<CategoryEntityVO> allCategoryVO = new ArrayList<>();

    // 3、把所有分类信息组装到VO实体类集合
    for (CategoryEntity categoryEntity : allCategory) {
        CategoryEntityVO categoryEntityVO = new CategoryEntityVO();
        BeanUtils.copyProperties(categoryEntity, categoryEntityVO);
        allCategoryVO.add(categoryEntityVO);
    }
    // 4、查询到所有的根节点,并获取他们的子分类,把最终组装完毕的集合放到list中
    List<CategoryEntityVO> list = new ArrayList<>();
    for (CategoryEntityVO categoryVO : allCategoryVO) {
        if (categoryVO.getParentCid() == 0) {
            categoryVO.setChildren(getChildren(categoryVO, allCategoryVO));
            list.add(categoryVO);
        }
    }
    list.sort((c1, c2) -> (c1.getSort() == null ? new Integer(0) : c1.getSort()).compareTo(c2.getSort() == null ? new Integer(0) : c2.getSort()));
    return list;
}

// 递归查询每个分类下的子分类
public List<CategoryEntityVO> getChildren(CategoryEntityVO root, List<CategoryEntityVO> all) {
    // 1、创建子分类集合
    List<CategoryEntityVO> childrenList = new ArrayList<>();
    // 2、查询是否有子分类
    for (CategoryEntityVO category : all) {
        if (root.getCatId().equals(category.getParentCid())) {
            // 3、若有子分类,先将其添加到children属性中
            childrenList.add(category);
            // 4、递归查询该子分类是否也有子分类,递归退出条件就是直到循环结束都找不到子分类。
            category.setChildren(getChildren(category, all));
        }
    }
    childrenList.sort((c1, c2) -> (c1.getSort() == null ? new Integer(0) : c1.getSort()).compareTo(c2.getSort() == null ? new Integer(0) : c2.getSort()));
    return childrenList;
}
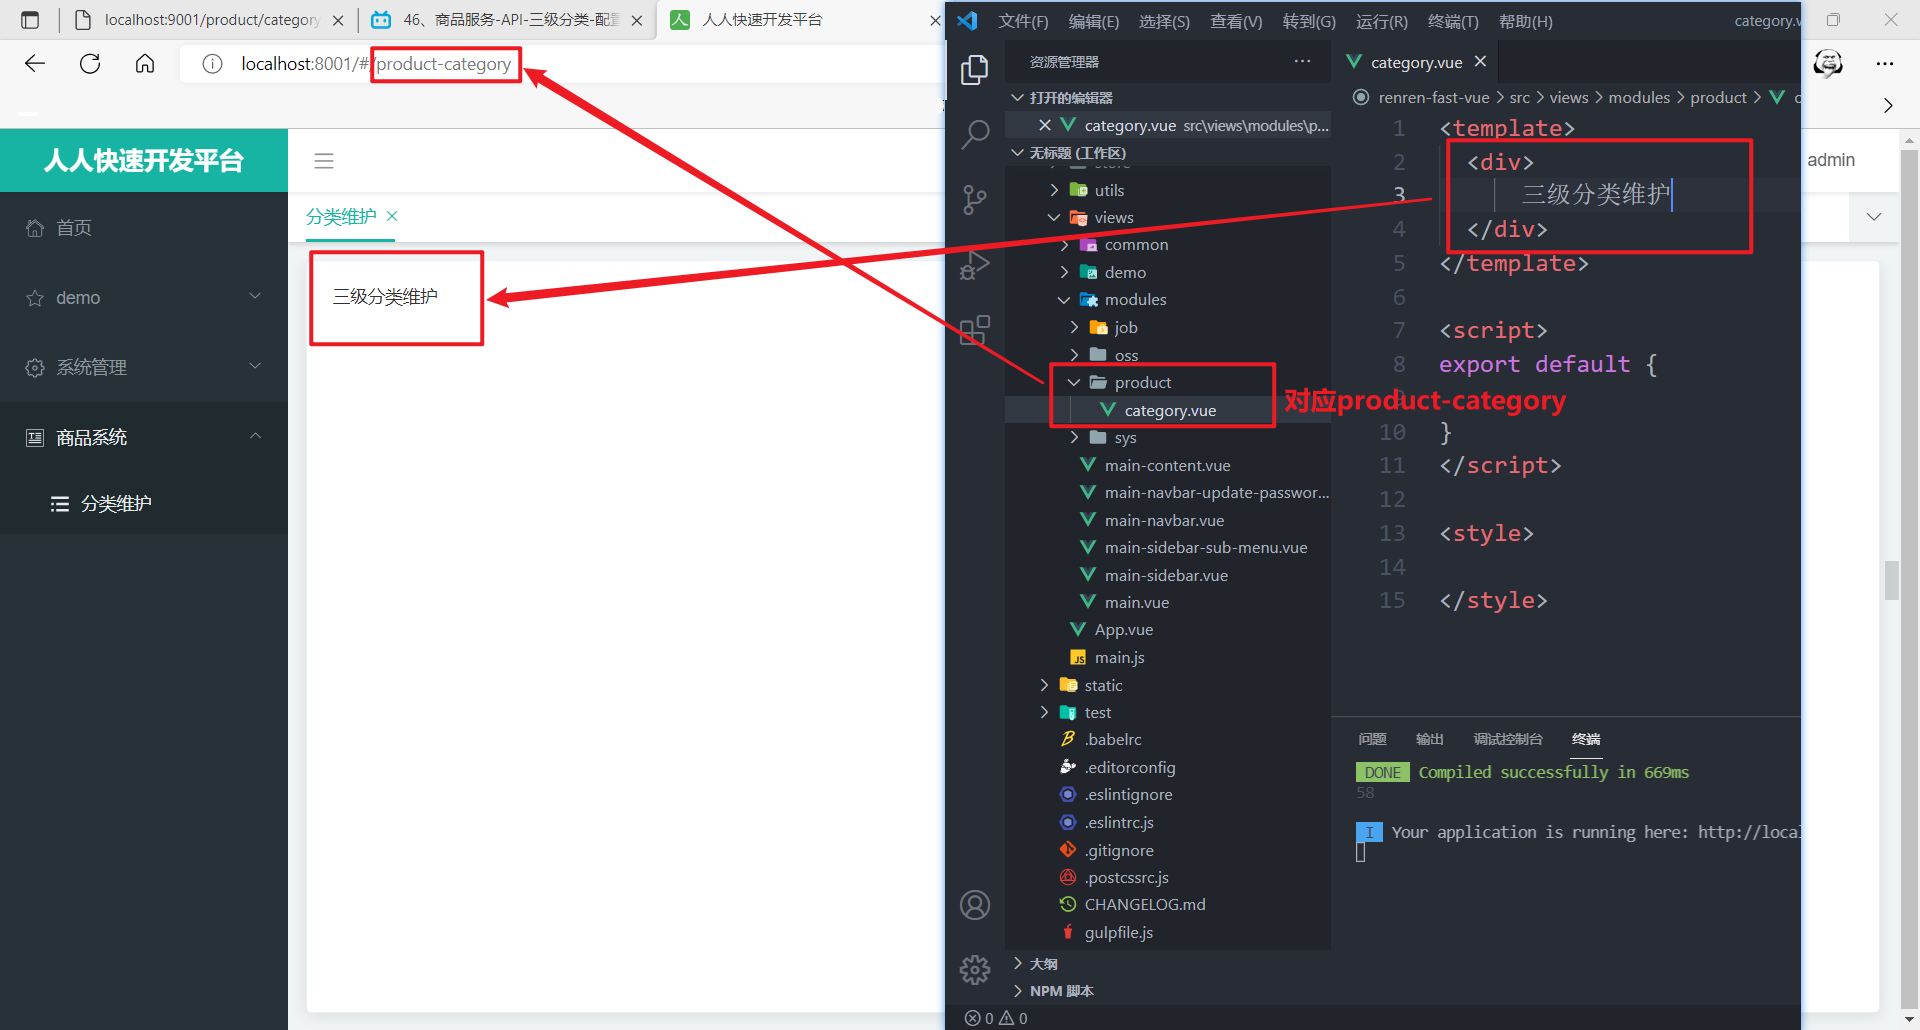
请求地址:http://localhost:9001/product/category/list
2 配置网关路由与路径重写
2.1 先修改后台管理页面
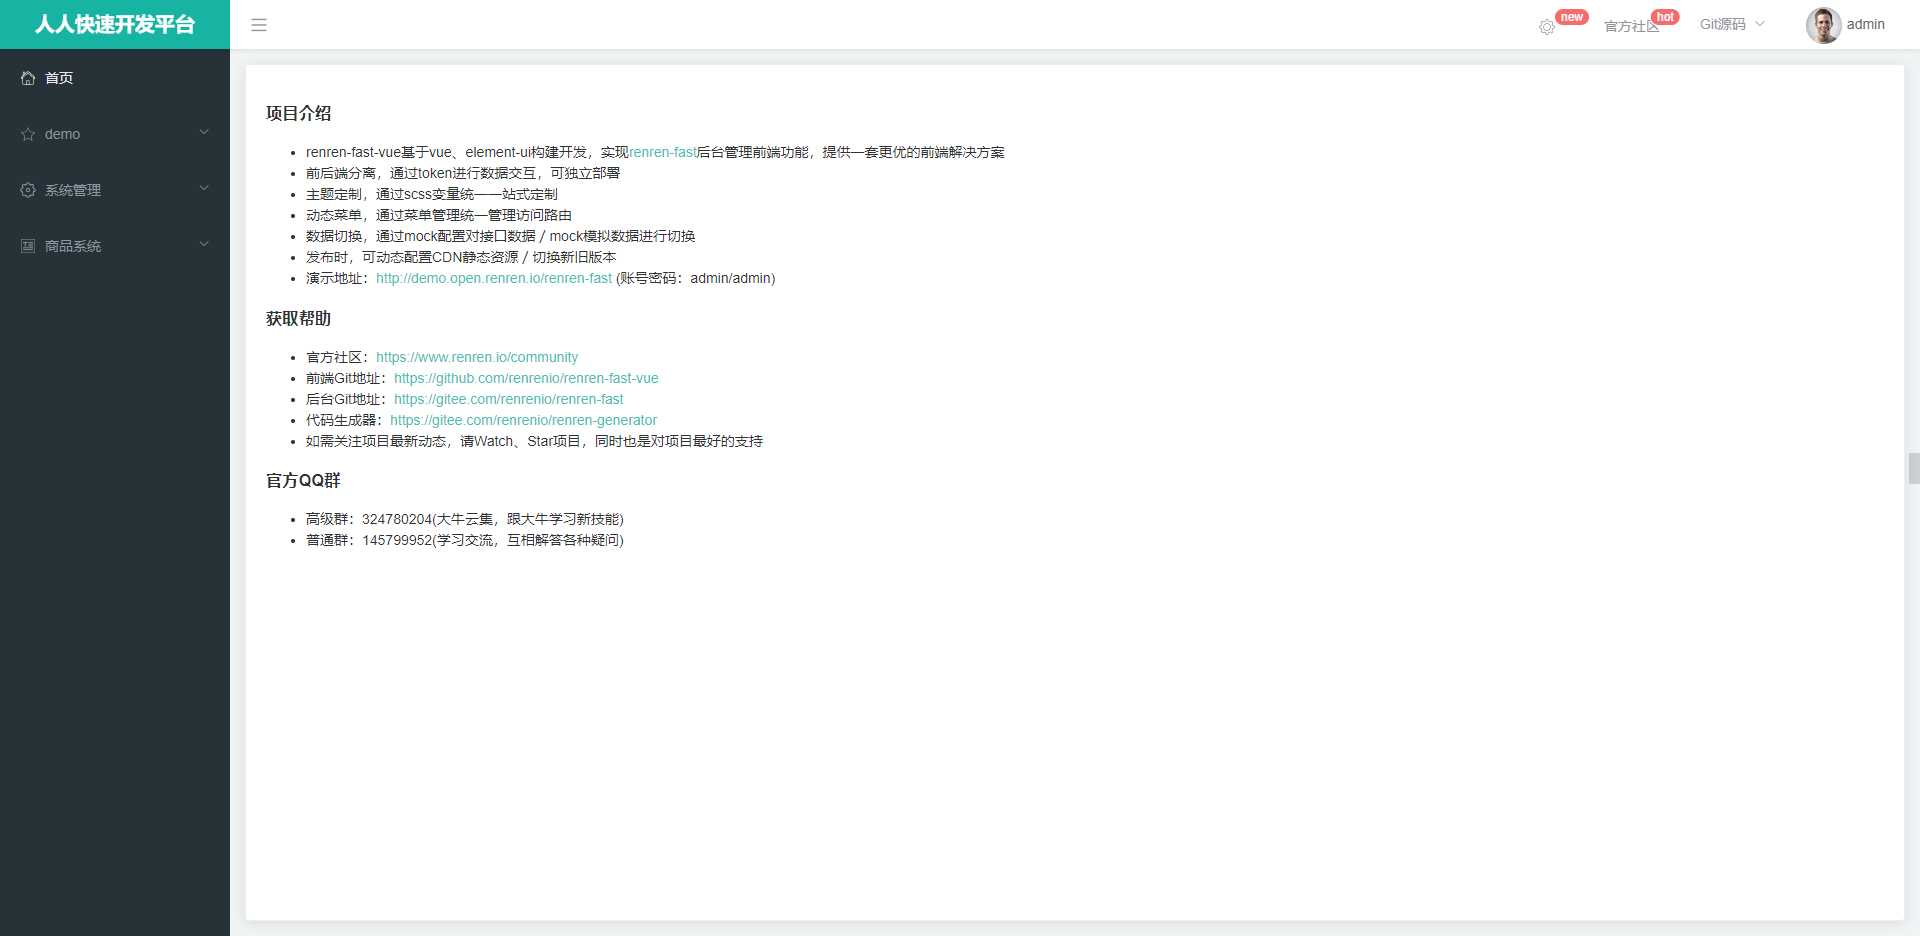
- 启动renren-fast,后台管理系统项目
- 启动后台管理系统的前端项目
- 使用人人快速创建目录、菜单(创建之后,目录和菜单都会写到gulimall-admin数据库的sys_menu表中)
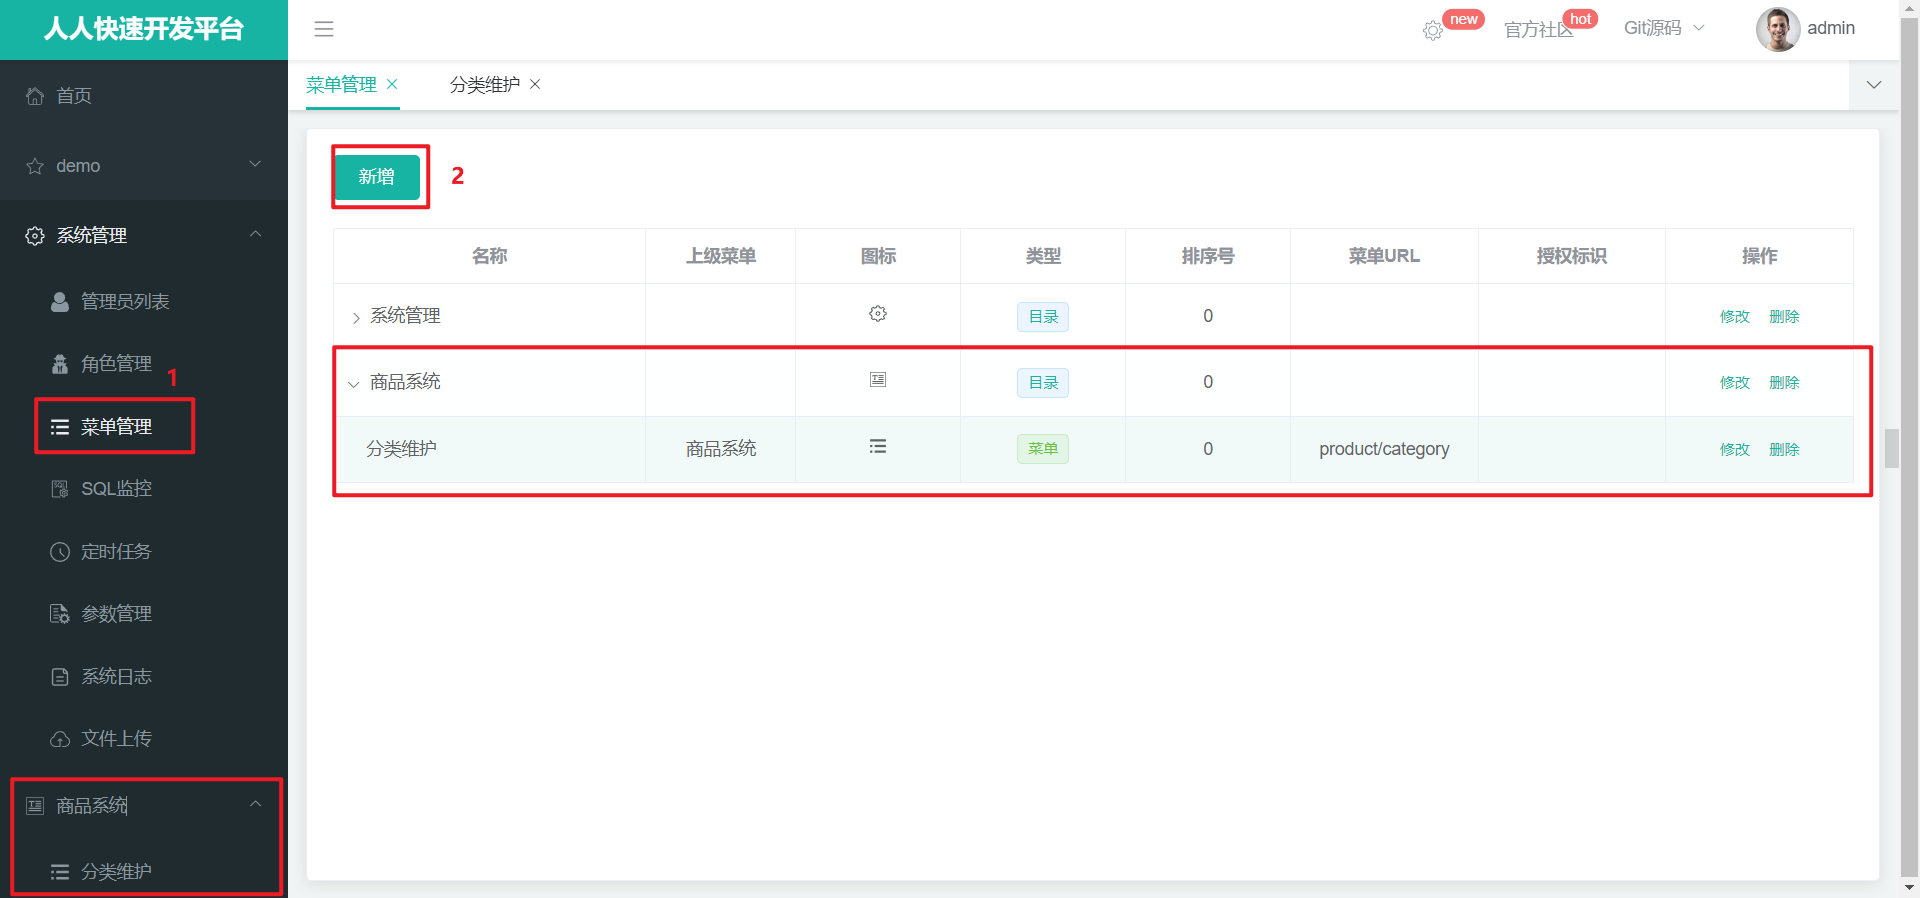
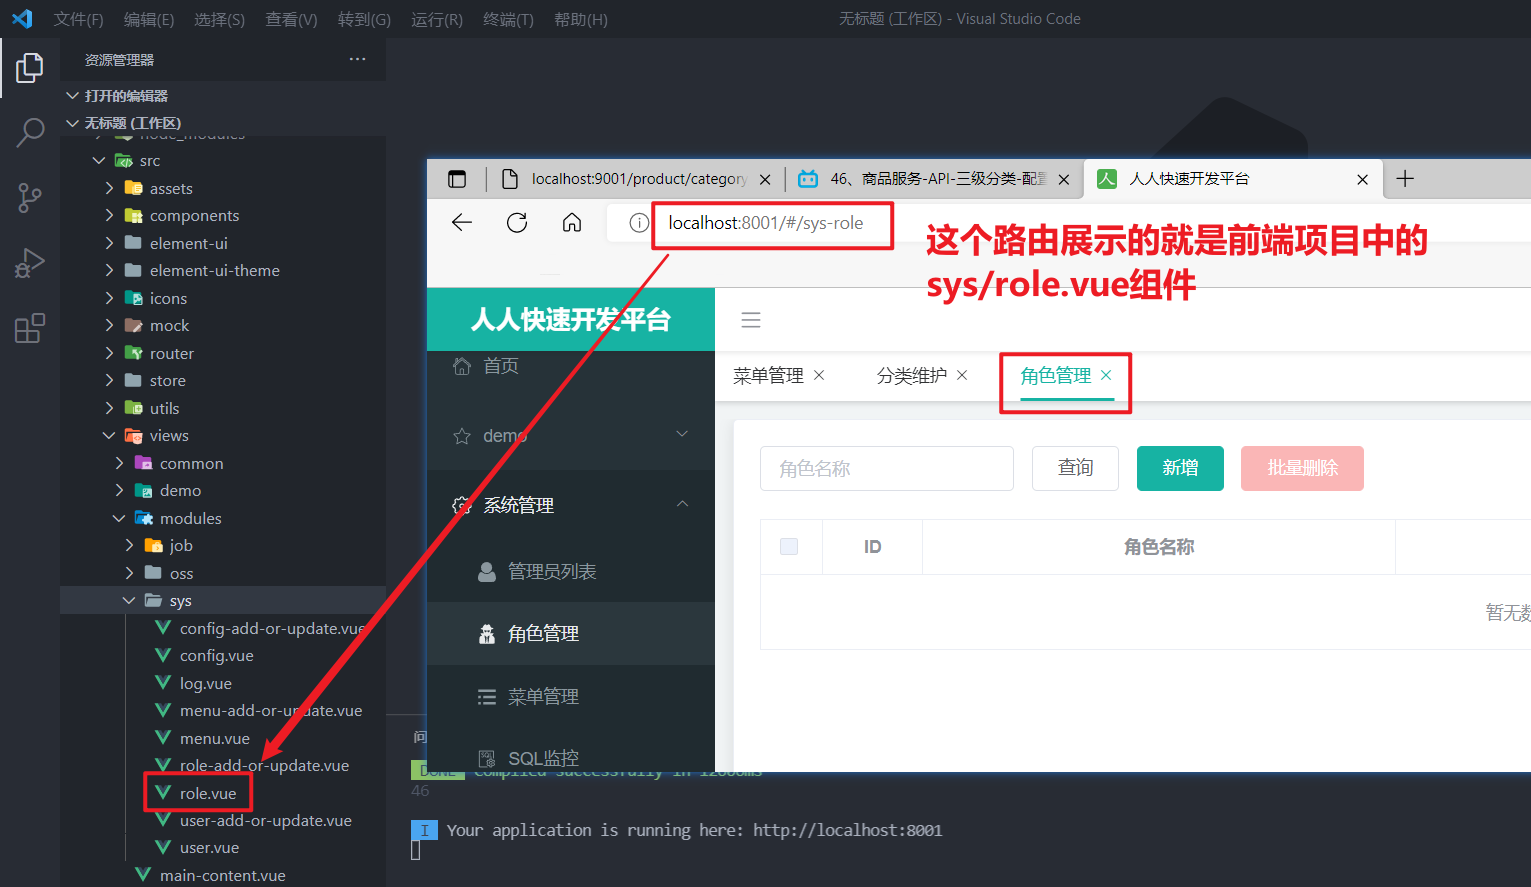
- 找到路由展示的组件
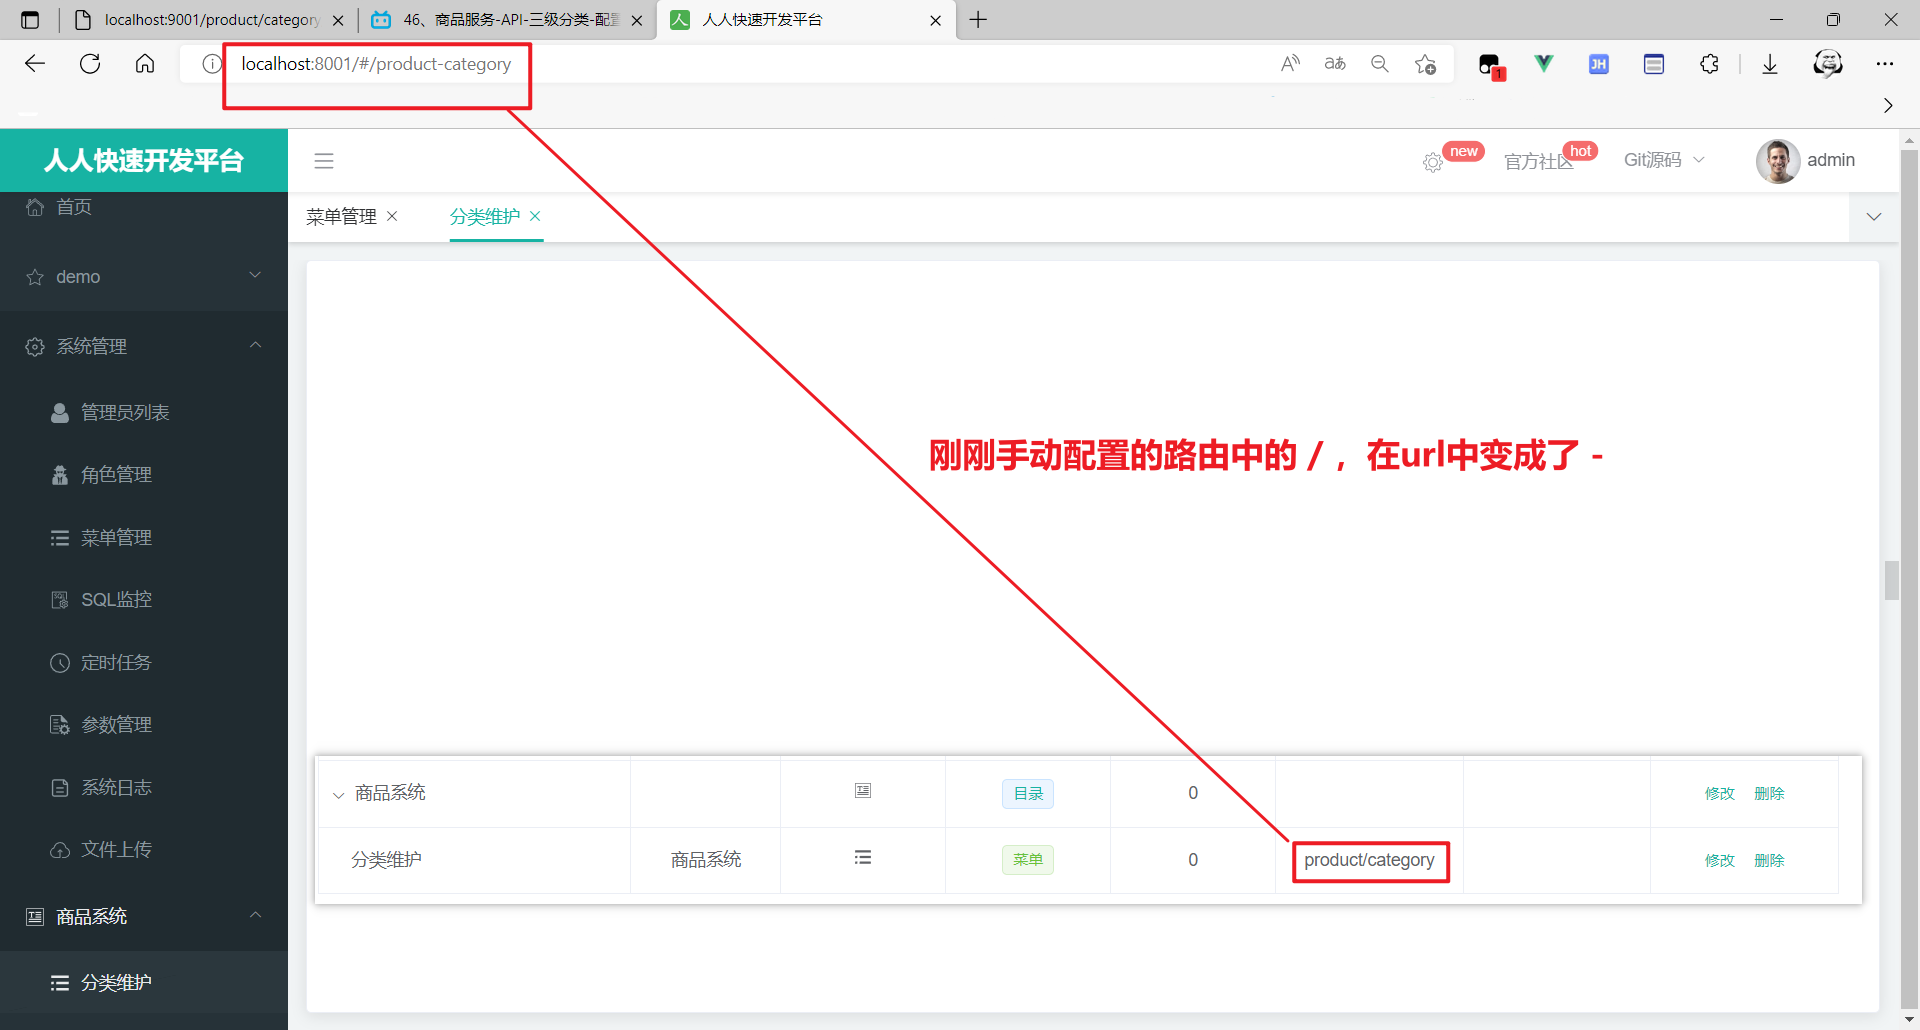
- 所以我们要为刚刚创建的 商品系统/分类维护 创建组件
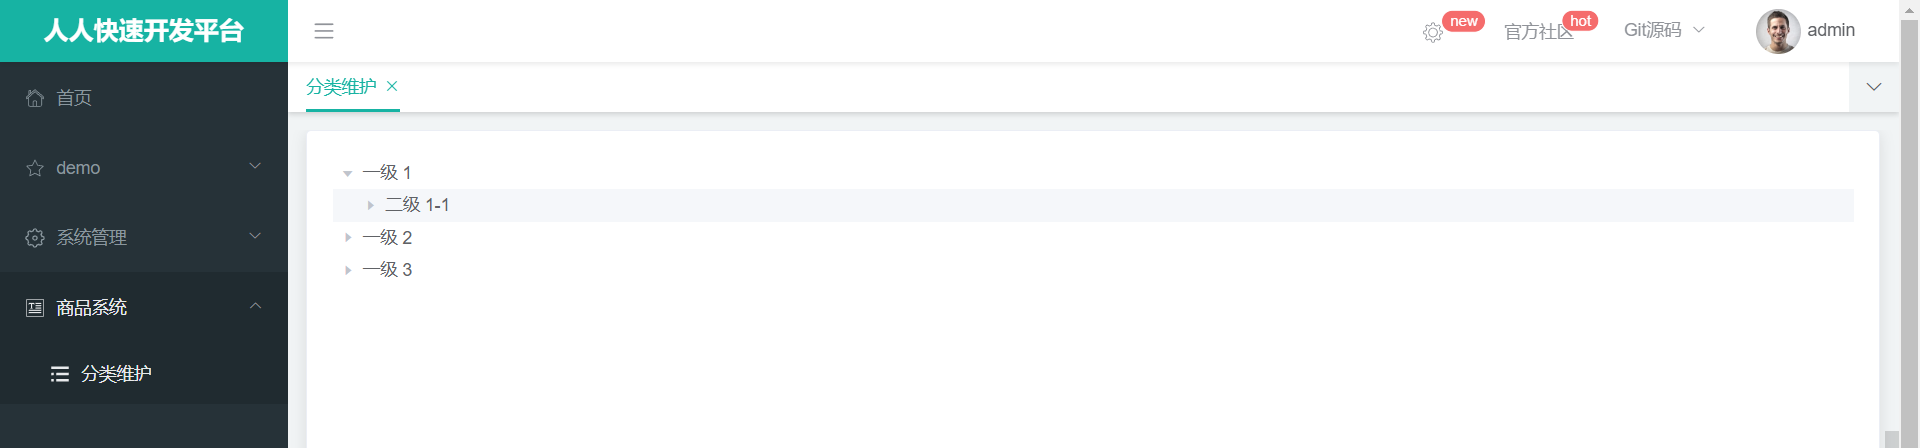
- 引入element-ui的树形控件
官方地址:https://element.eleme.cn/#/zh-CN/component/tree
2.2 配置网关
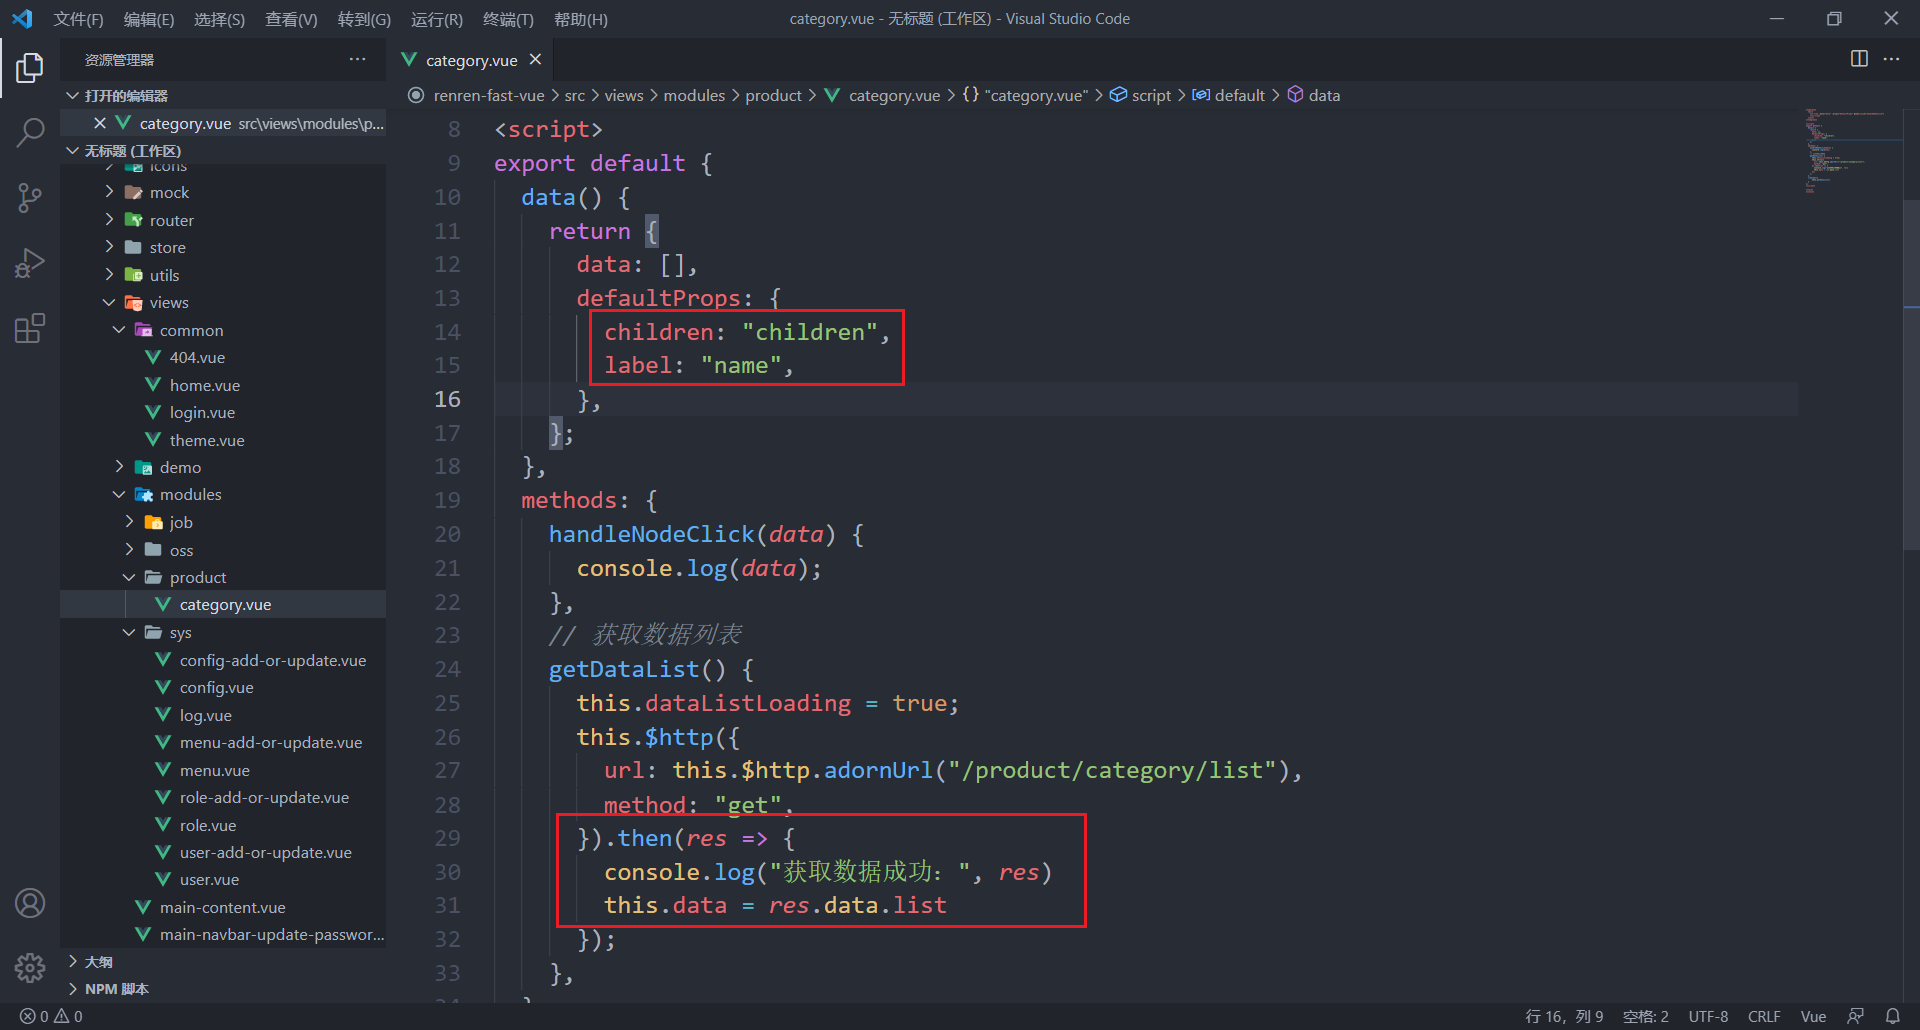
- 现在的树形结构数据是写死的,我们需要调用之前的获取分类接口来获取。可以参考其他组件,查看该项目中发送请求的方式:
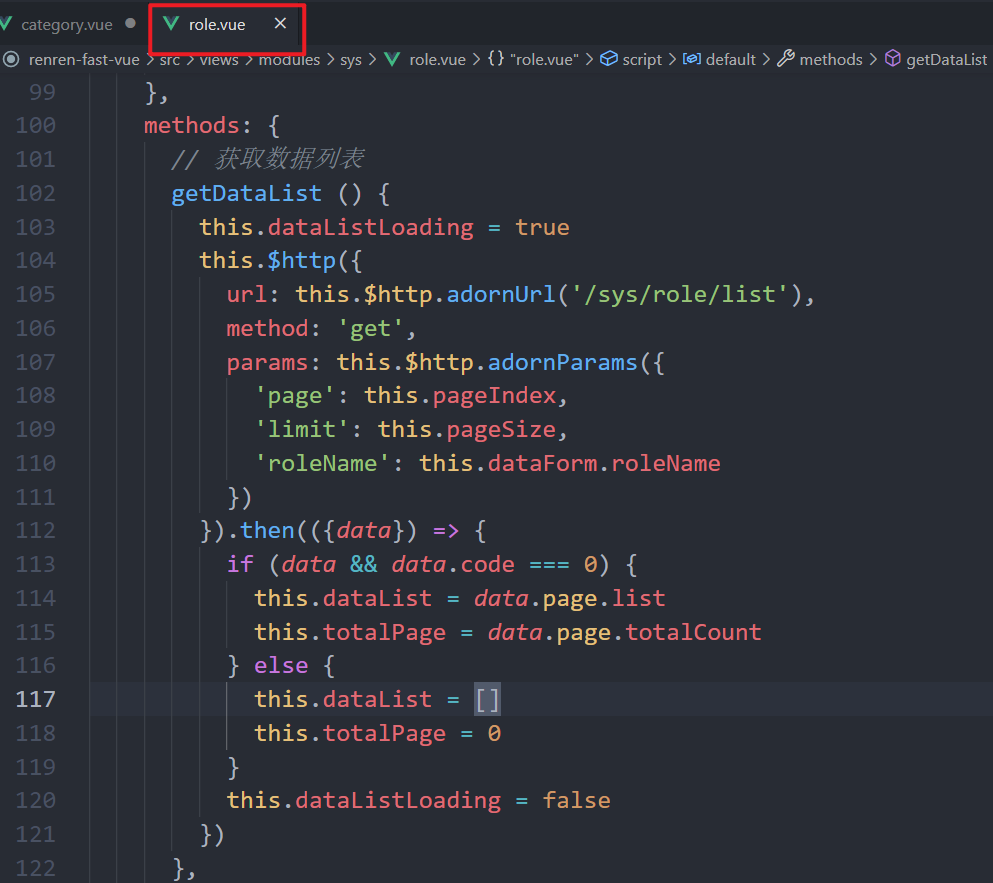
复制到category组件中进行修改
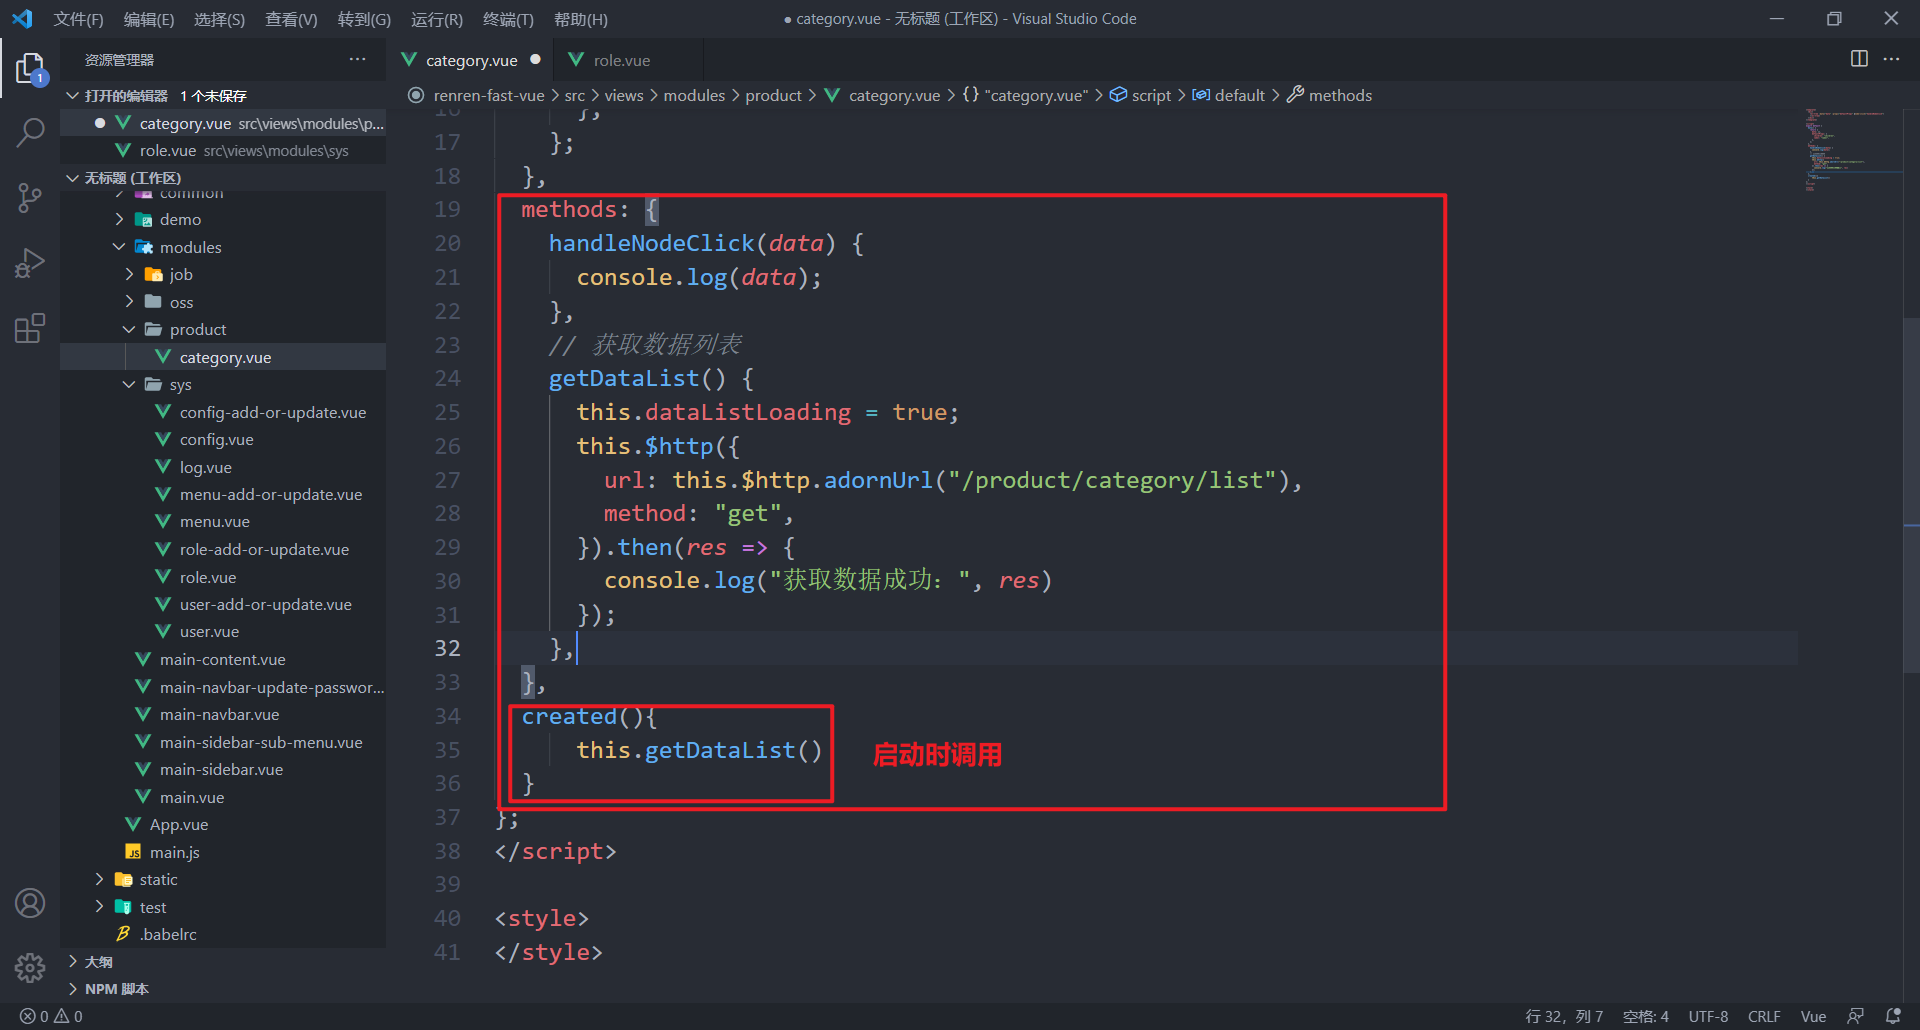
测试发现,发送请求失败,请求的IP错误(基本路径错误)
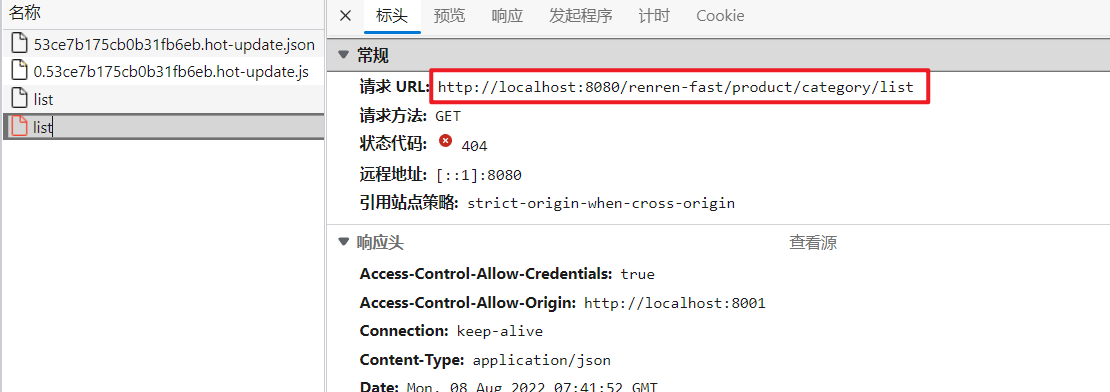
就算基本路径正确了,那如果我们要请求其他服务时,不是又得改地址了嘛。。所以这样不行,这时就需要网关来统一管理请求了。
- 查询基本路径的配置位置:(CTRL+shift+f)
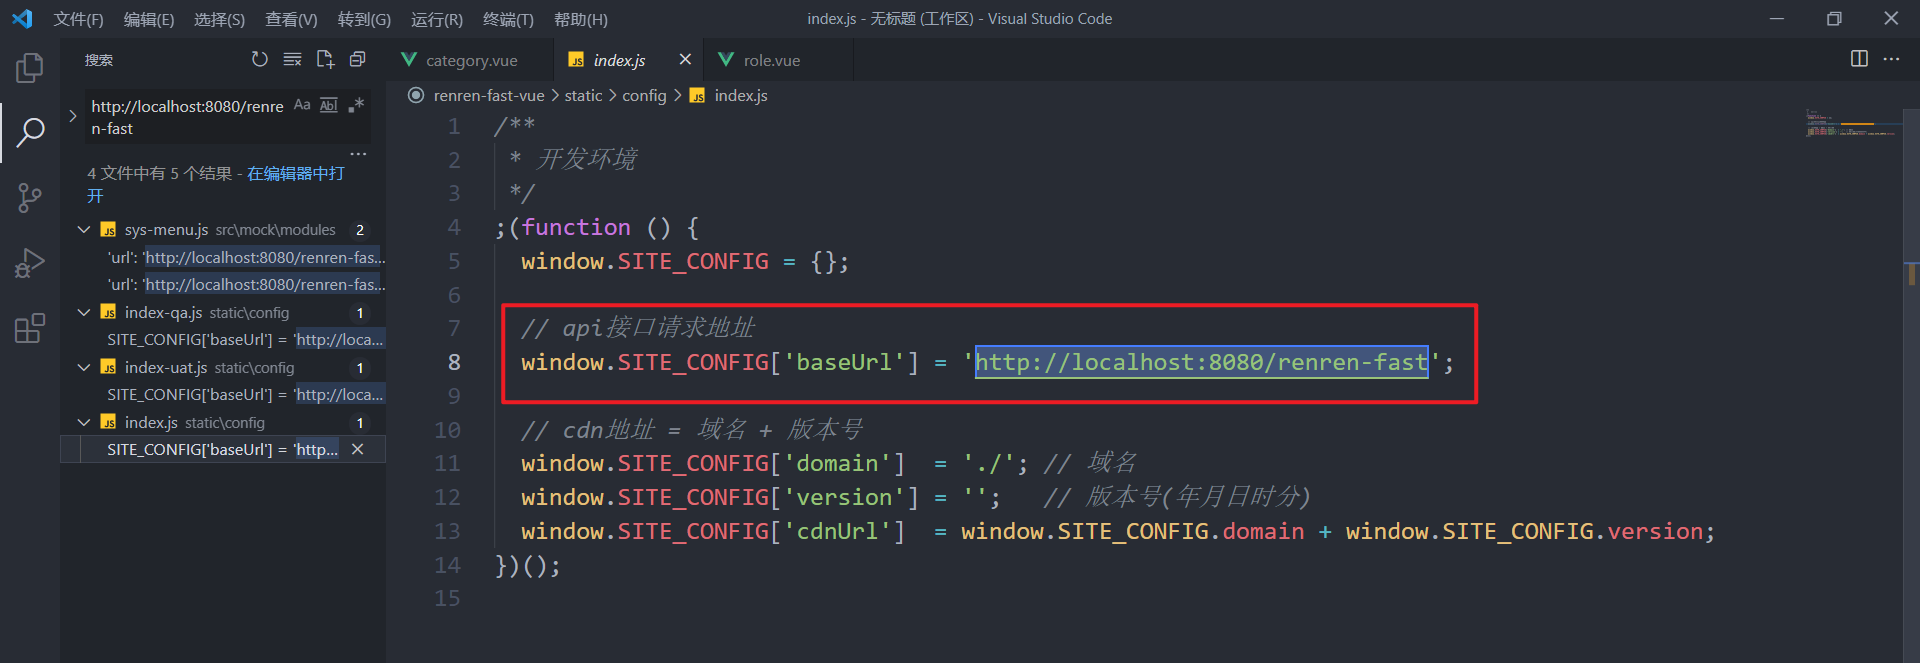
- 我们修改基本路径,统一地向网关发送请求:http://localhost:88/api

api前缀是为了做一个标识,表示这个请求是后台管理系统的,要送到renren-fast服务。
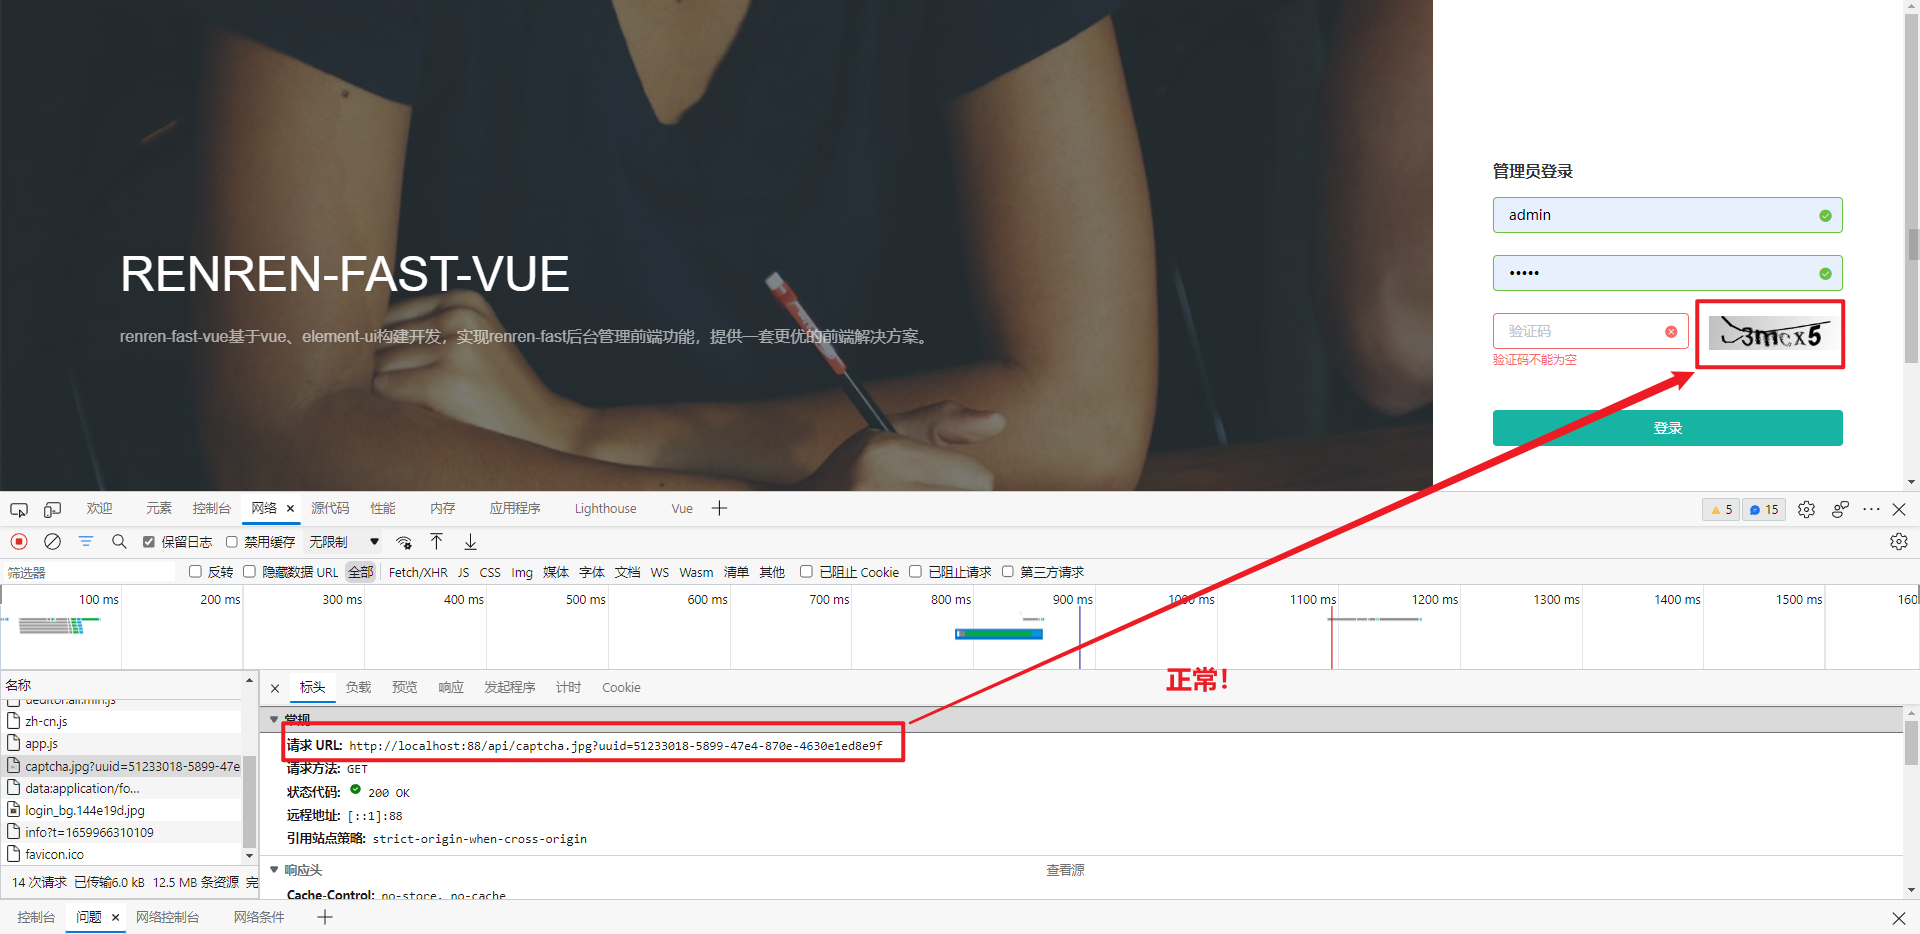
修改了基本路径之后,我们发现连登录验证码都没有了,因为它对网关发起了请求:

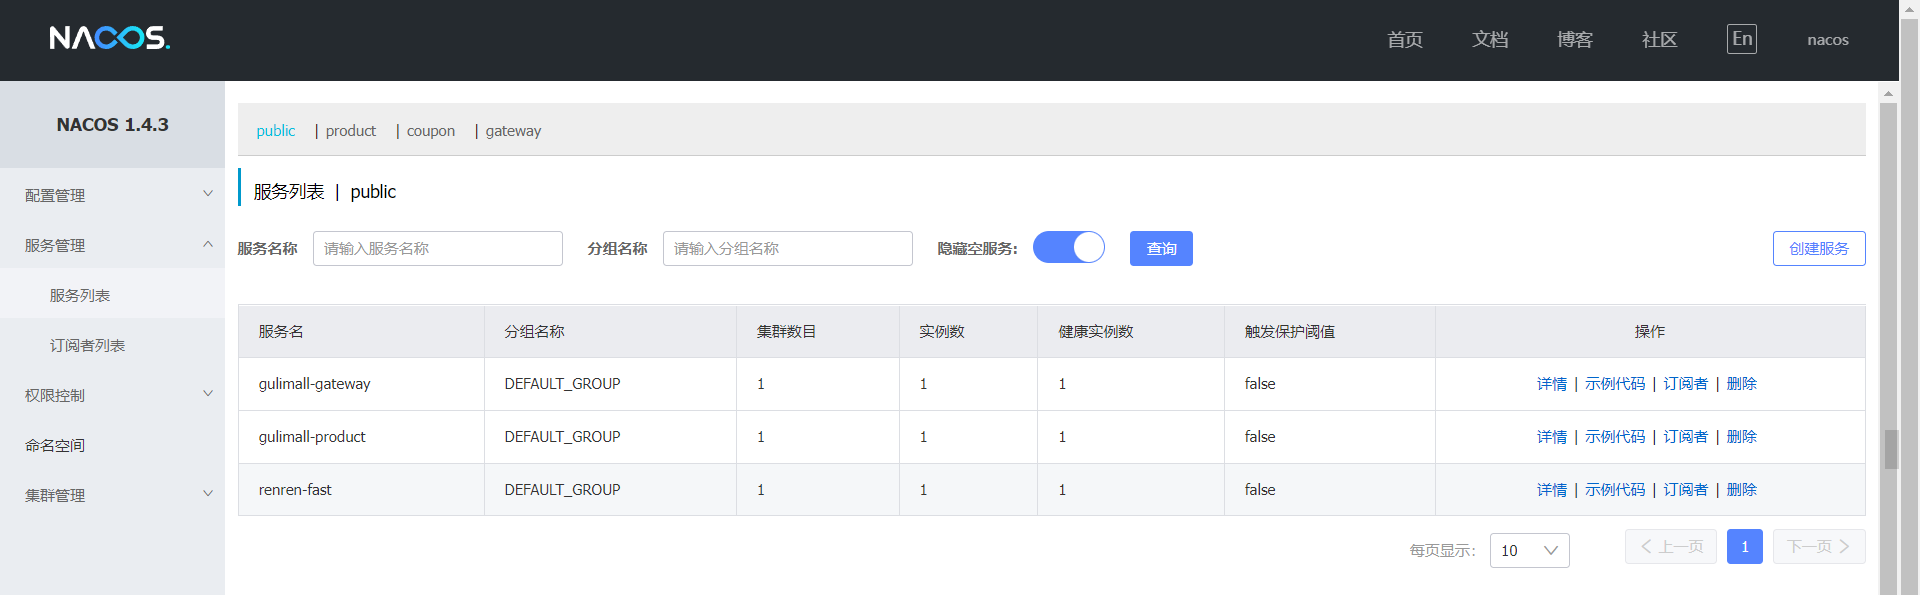
但是验证码是来源于 renren-fast 这个项目,所以我们可以先让网关把所有的请求都转给 renren-fast 这个服务。那要转发给这个服务呢,这个服务就需要注册到注册中心。
- 在 renren-fast 服务中引入nacos的相关依赖。
这里由于renren-fast不是咱们写的,它的依赖有可能跟我们的依赖不匹配,引入nacos后又和springcloud不匹配,导致启动不起来。
那么这时就需要降低renren-fast的springboot版本和单独设置nacos的版本。
<!--先降低springboot的版本(只改renren-fast服务的)-->
<parent>
    <groupId>org.springframework.boot</groupId>
    <artifactId>spring-boot-starter-parent</artifactId>
    <version>2.2.6.RELEASE</version>
    <relativePath/> <!-- lookup parent from repository -->
</parent>

<!--再单独配置匹配的springcloud版本-->
<dependency>
    <groupId>com.alibaba.cloud</groupId>
    <artifactId>spring-cloud-starter-alibaba-nacos-discovery</artifactId>
    <version>2.2.1.RELEASE</version>
</dependency>
<dependency>
    <groupId>com.alibaba.cloud</groupId>
    <artifactId>spring-cloud-starter-alibaba-nacos-config</artifactId>
    <version>2.2.1.RELEASE</version>
</dependency>
还有一个地方要处理:解决renren-fast整合spring cloud alibaba nacos时出现版本不一致问题
- 对renren-fast服务做相关配置,注册到注册中心
- 配置nacos注册中心的地址
- 配置程序名
- 加入服务发现的注解
- 配置网关路由规则
spring:
  cloud:
    nacos:
      discovery:
        server-addr: 127.0.0.1:8848
    gateway:
      # 路由数组
      routes:
        - id: admin_route
          # lb:load balance,是负载均衡的意思,负载均衡到指定的服务
          uri: lb://renren-fast
          predicates:
            # 表示路径中包含 /api/** ;前端项目:/api
            - Path=/api/**
- 配置完网关路由规则后再次测试
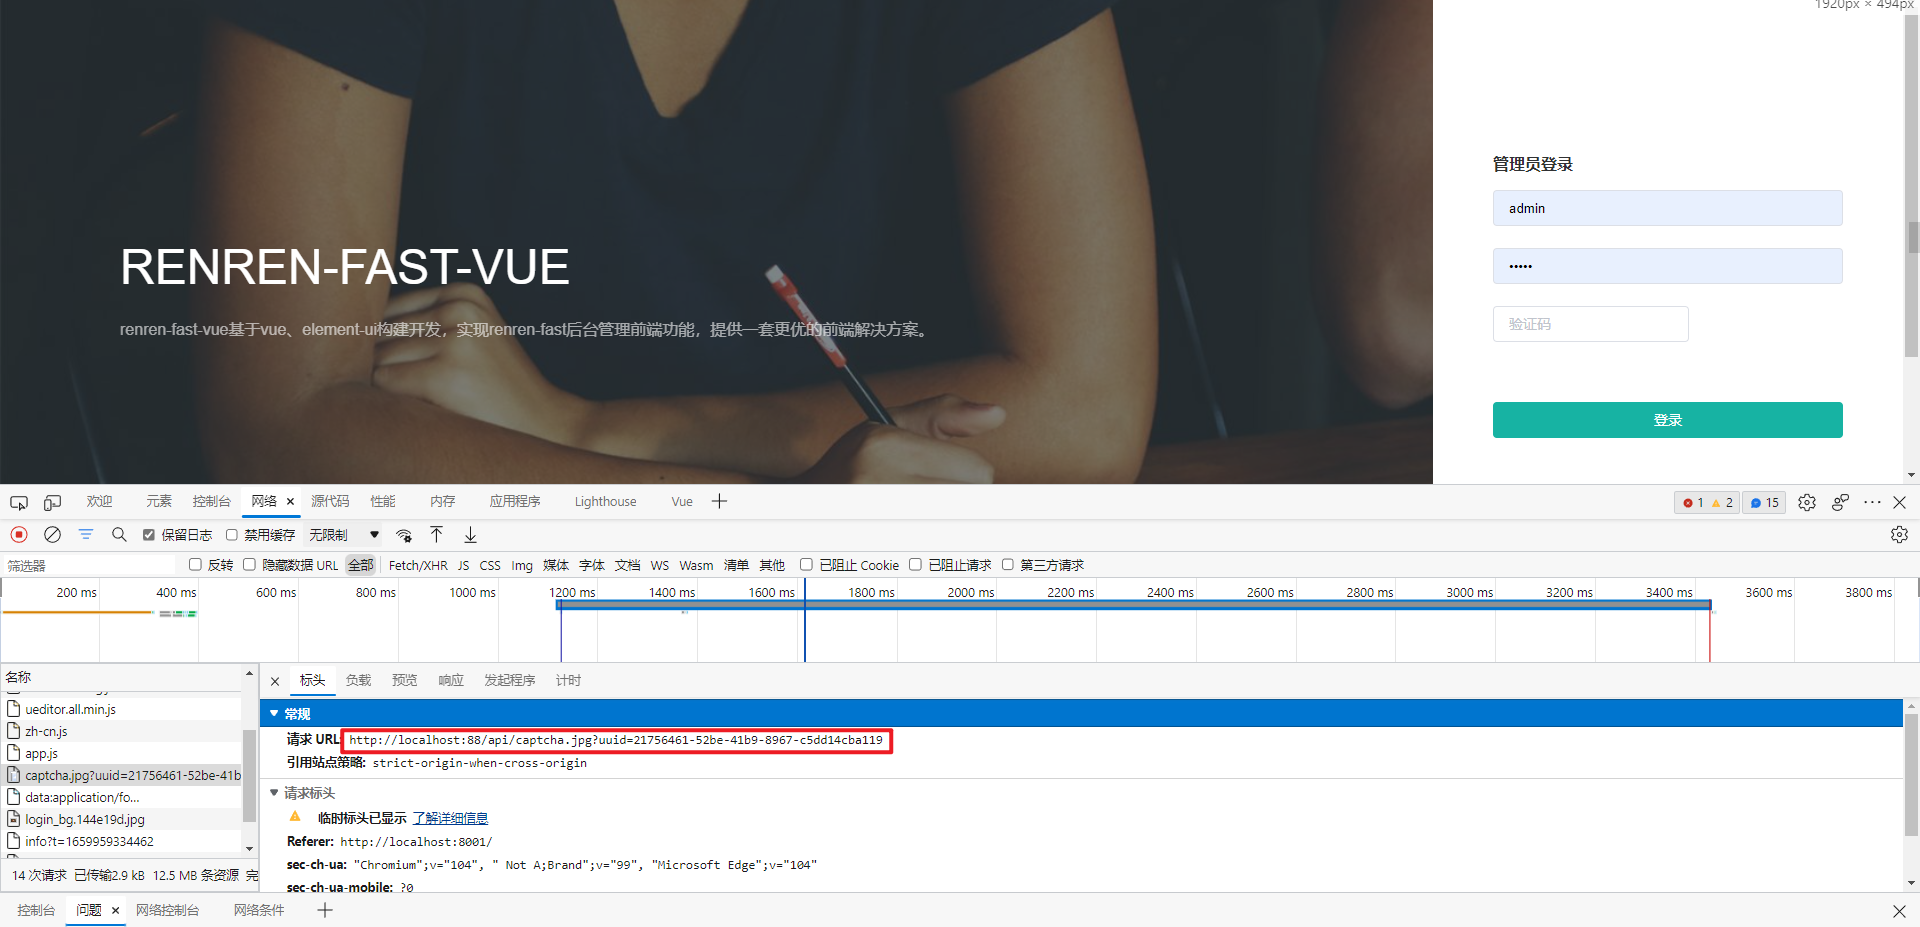
还是请求这个地址,但是验证码依然请求失败了。
我们来分析一波,请求发送到网关,网关检测到路径中包含api,满足admin_route的断言,把请求转到renren-fast。但是转到的详细地址是哪呢:首先从注册中心中找到了renren-fast服务的地址,http://192.168.121.1:8080,然后就去请求http://192.168.121.1:8080/api/captcha.jpg,但是原本的请求验证码的默认地址是 http://localhost:8080/renren-fast/captcha.jpg。
还有一个问题:为什么renren-fast里的接口,请求时需要在中间加上服务名(http://localhost:8080/renren-fast/captcha.jpg),而我们之前配置的商品服务,请求树形分类的时候不需要加上服务名(http://localhost:9001/product/category/list),因为:
renren-fast服务里配置了servlet应用程序名,所以请求时需要加上这个。
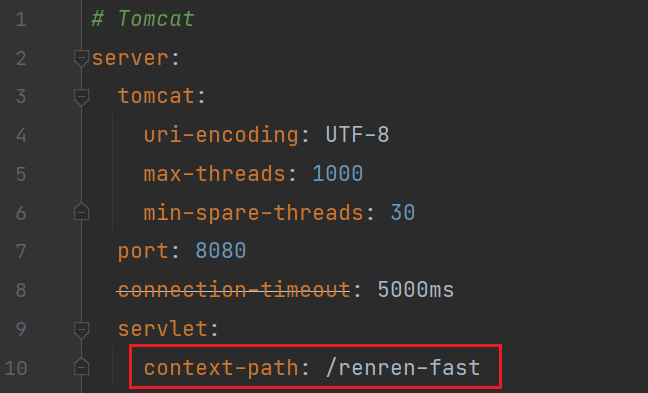
所以,我们希望网关能把我们的请求路径:http://localhost:88/api/captcha.jpg 转成真正的访问路径:http://localhost:8080/renren-fast/captcha.jpg
那怎么转呢?使用网关的路径重写!
spring:
  cloud:
    nacos:
      discovery:
        server-addr: 127.0.0.1:8848
    gateway:
      # 路由数组
      routes:
        - id: admin_route
          # lb:load balance,是负载均衡的意思,负载均衡到指定的服务
          uri: lb://renren-fast
          predicates:
            # 表示路径中包含 /api/** ;前端项目:/api
            - Path=/api/**
          filters:
            # 表示会把 /api/** 替换成 /renren-fast/**
            - RewritePath=/api/(?<segment>/?.*), /renren-fast/$\{segment}
真鸡儿烦,配置完路径重写后又碰到版本问题了。。瞎处理了一番,不知道咋好的:
参考资料:https://blog.csdn.net/qq_43788878/article/details/115894882
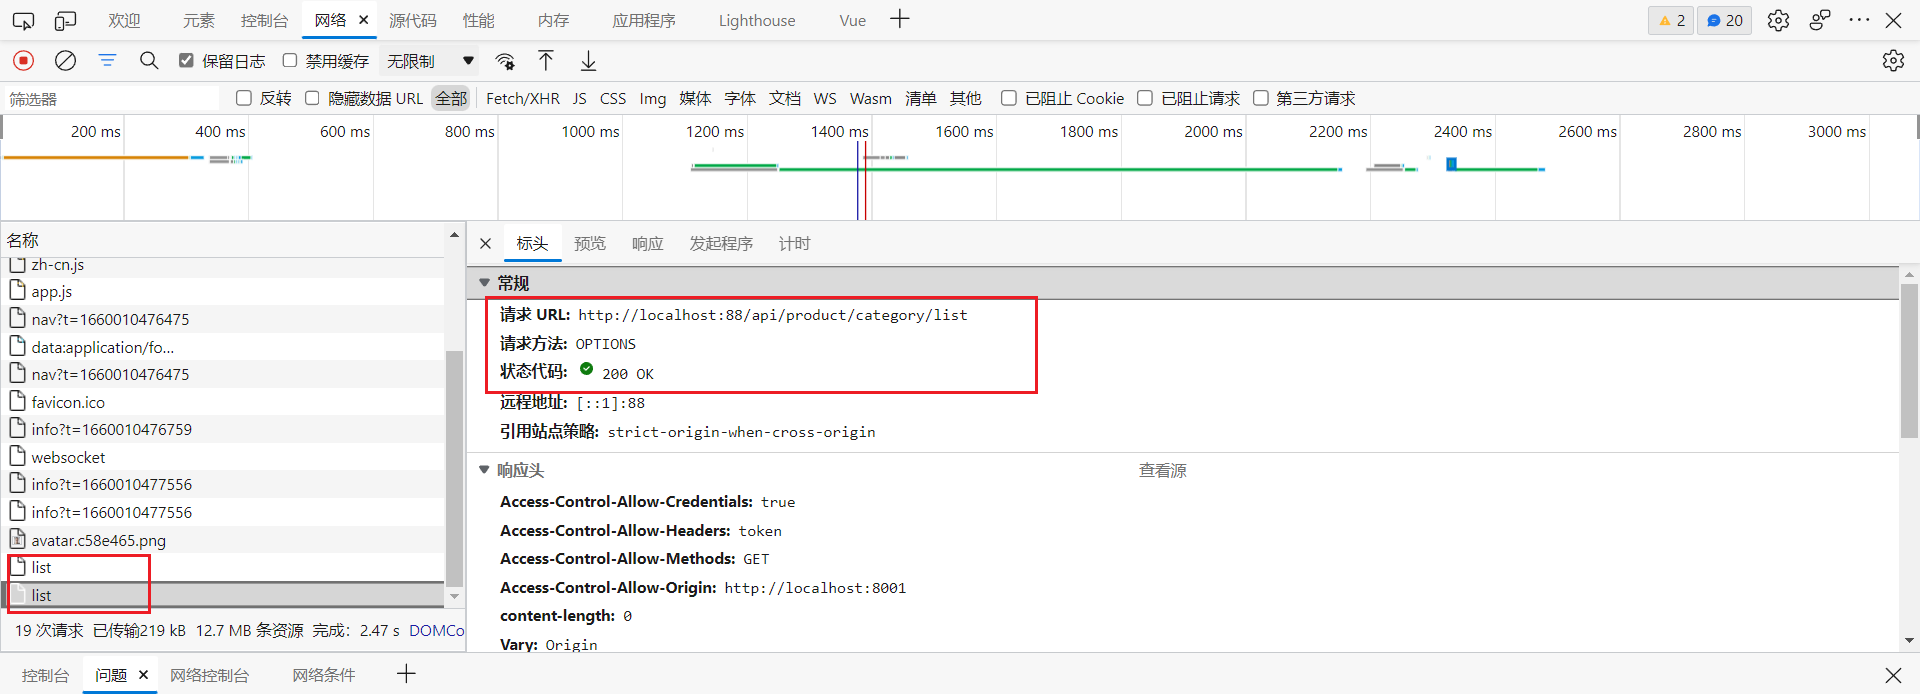
- 点击登录,出现了跨域问题
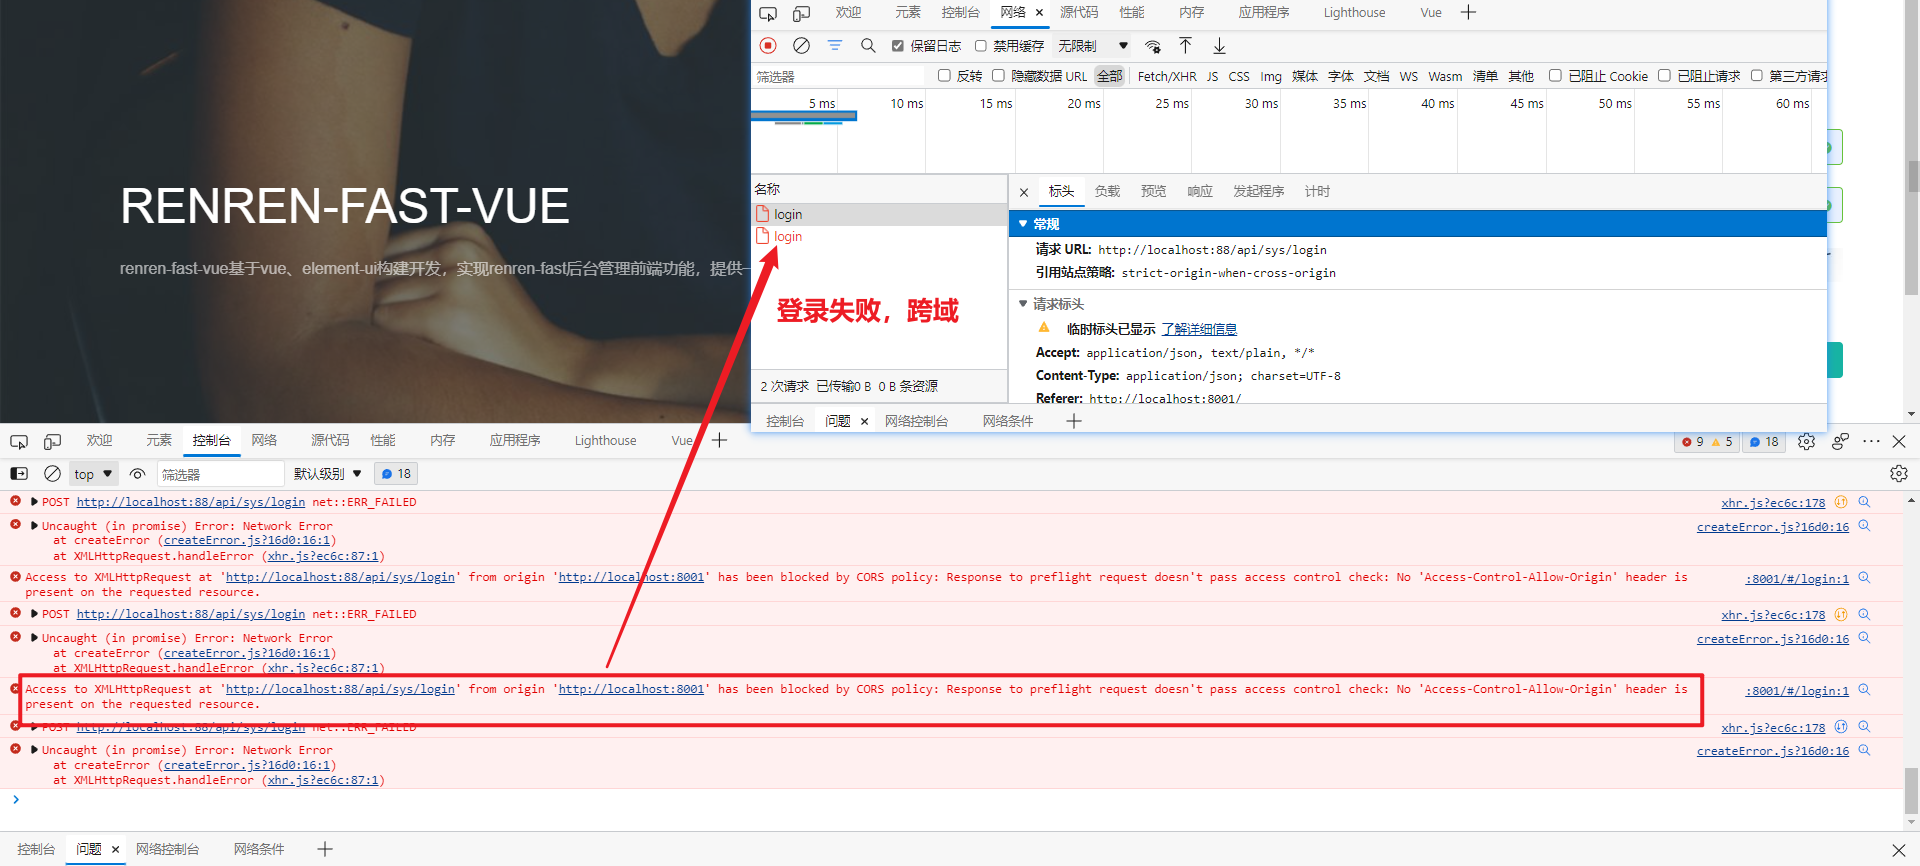
为什么登录就跨域,验证码就不跨域呢?
跨域的概念:跨域问题指的是浏览器屏蔽了不同源的应用的响应数据,后端接受了请求,也响应了数据,但是被浏览器屏蔽了,前端浏览器和网关不存在跨域问题,网关只负责把请求响应给指定的路径,没有响应数据。
一个猜测:看了获取验证码和登录的接口,并进行了对比。验证码不是return响应出来的,是通过一个write()的方法直接写出来的。所以没有跨域问题?
2.3 网关统一配置跨域
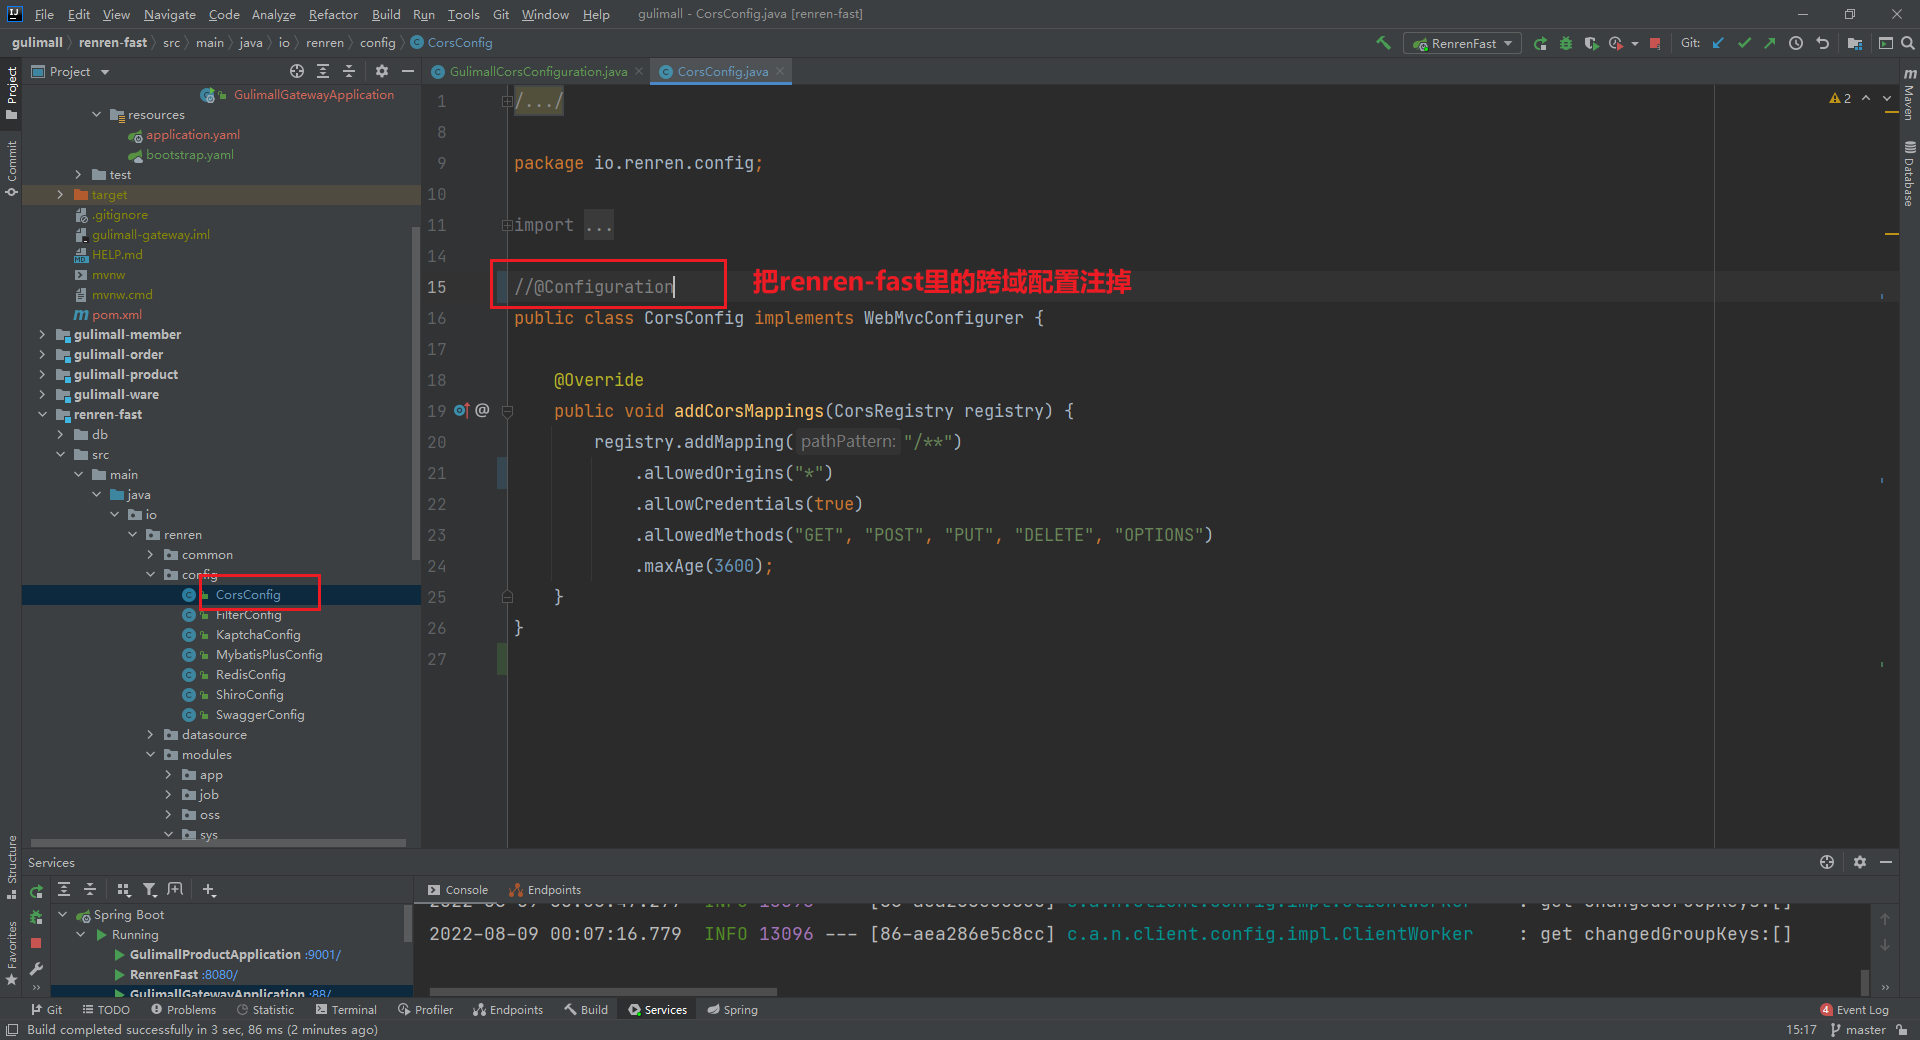
可以为每一个服务做跨域处理。但因为现在是网关代理给其他服务的,所以我们可以在网关统一配置跨域,创建一个配置类:
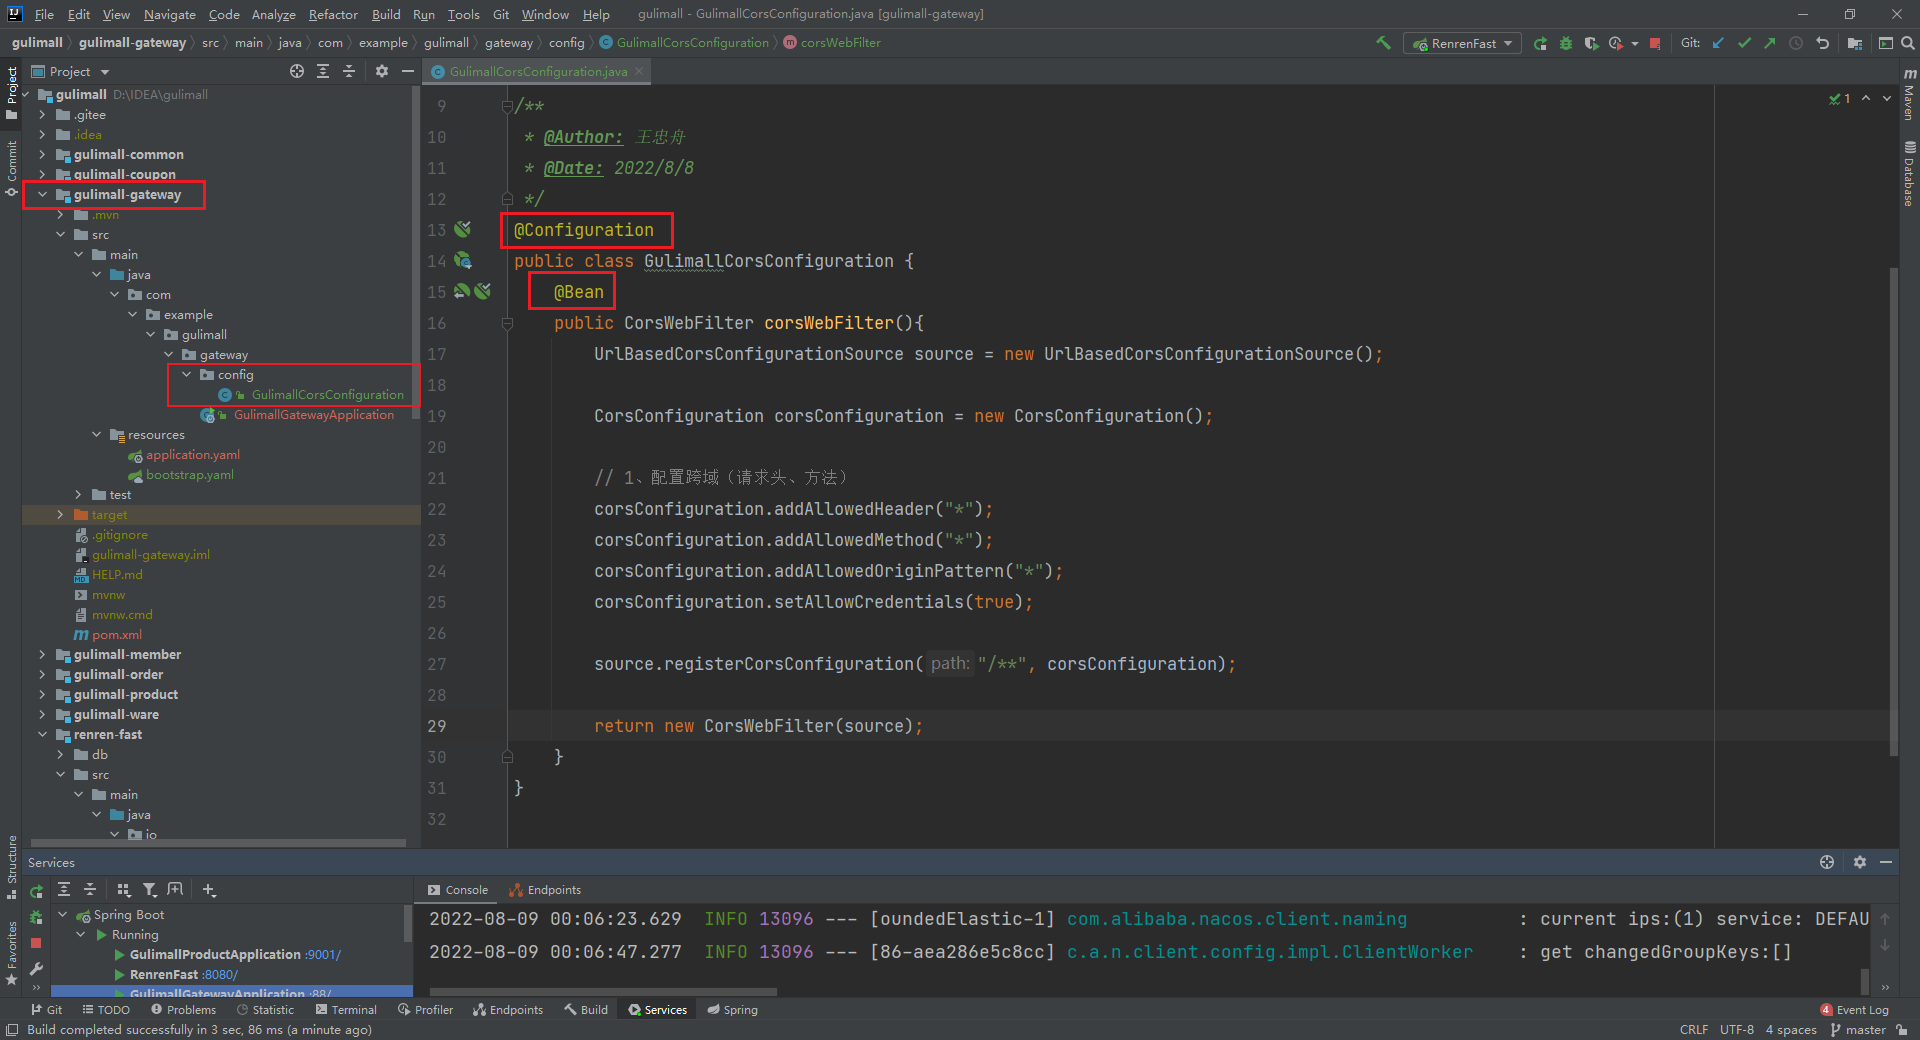
还需要把renren-fast自带的跨域配置注掉,因为我们是向网关发送请求,它等于给我们多加了一些响应头。
最终测试:
成功登录!
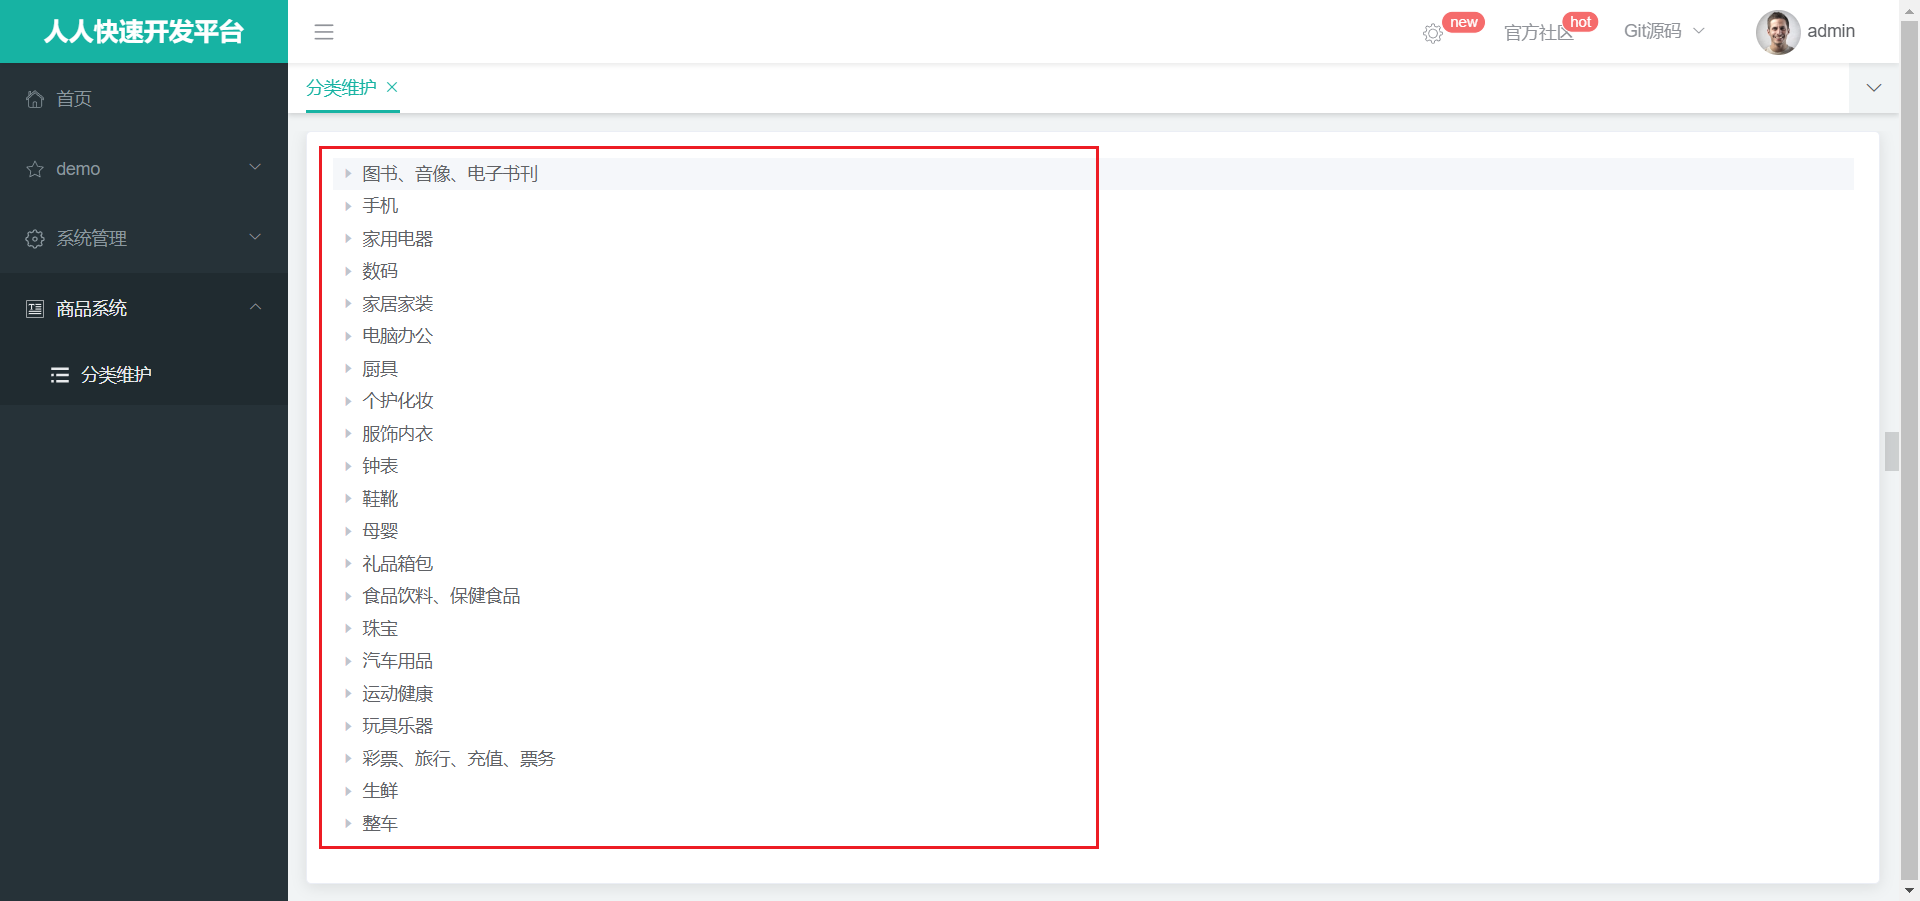
3 渲染三级分类
登录到首页后,直接点击分类维护:
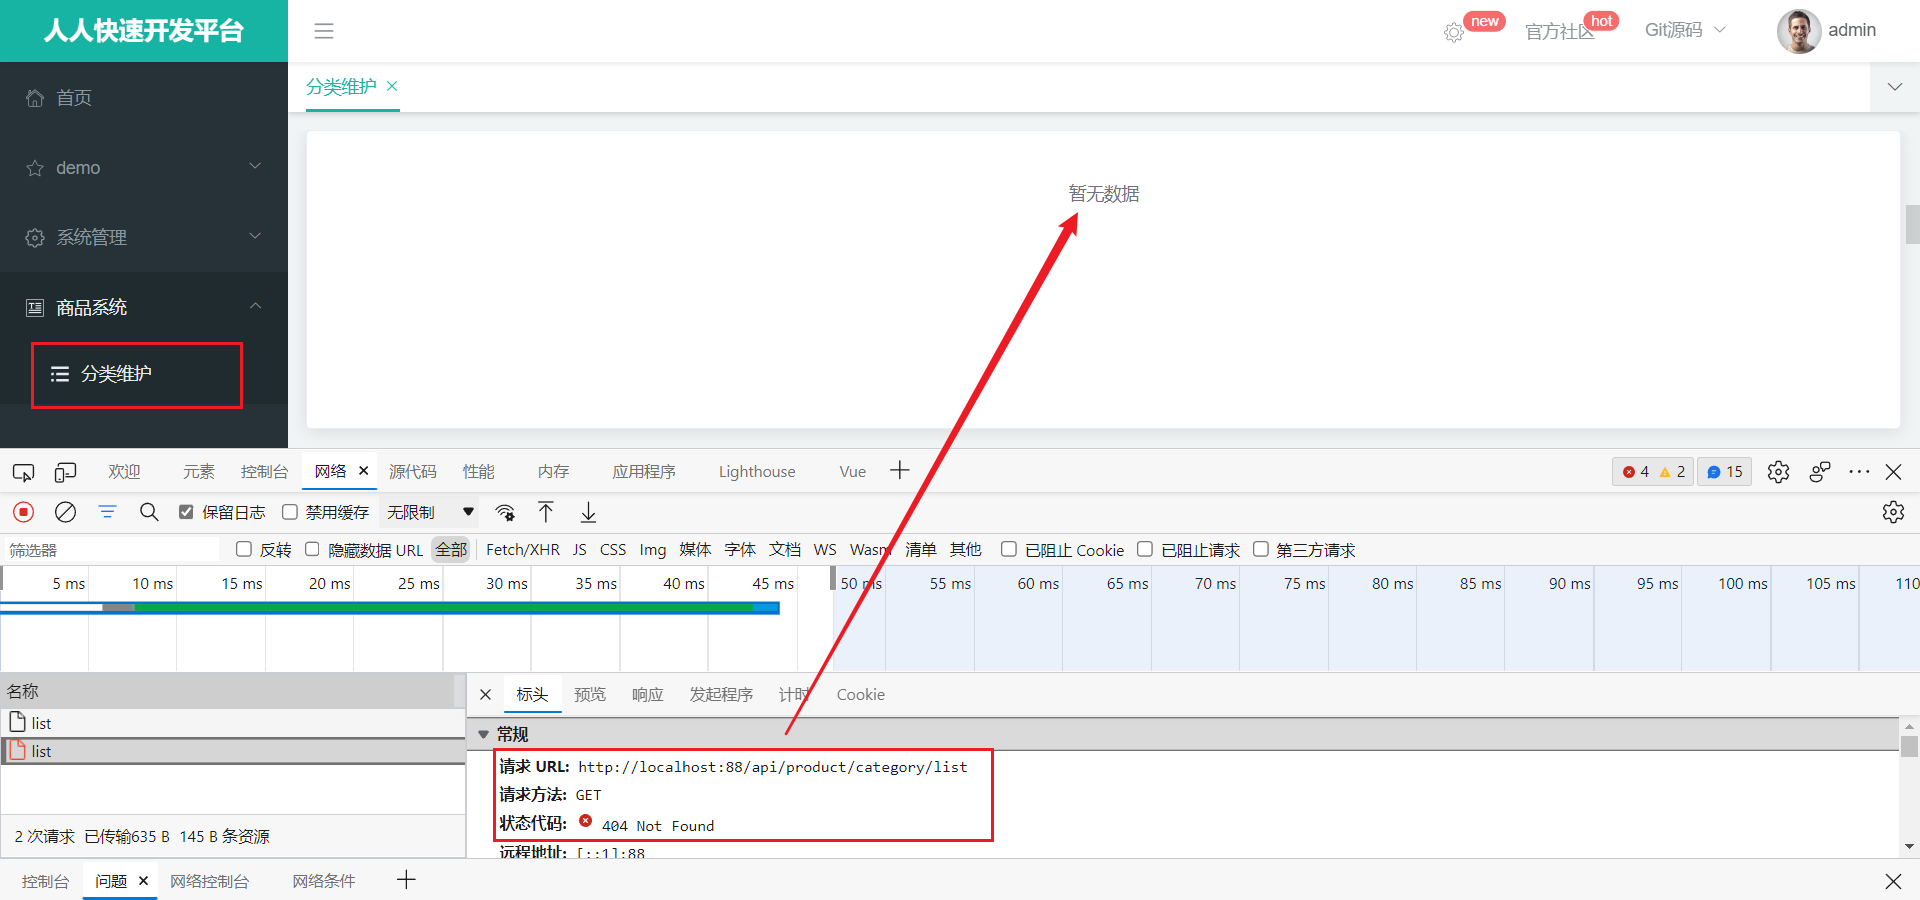
请求失败,为什么呢?分析一波:
请求地址中包含了api,前面我们在网关内配置了请求内含有api的话,会转发到renren-fast服务,所以分类维护的请求最终是转发到http://192.168.121.1:8080/renren-fast/product/category/list,可是分类维护的地址应该是http://192.168.121.1:9001/product/category/list,所以需要再给网关配置一个路由规则。
spring:
  cloud:
    nacos:
      discovery:
        server-addr: 127.0.0.1:8848
    gateway:
      # 路由数组
      routes:
        # 因为这个路由和下面那个路由很相似,下面那个包含这个,所以需要把更精确的写在上面
        - id: product_route
          uri: lb://gulimall-product
          predicates:
            - Path=/api/product/**
          filters:
            # 把api删掉就行了
            - RewritePath=/api/(?<segment>/?.*), /$\{segment}

        - id: admin_route
          uri: lb://renren-fast
          predicates:
            # 前端项目:/api
            - Path=/api/**
          filters:
            - RewritePath=/api/(?<segment>/?.*), /renren-fast/$\{segment}
注意:若有两个路由的断言属于包含关系,需要把更精确的写在上面,上面的优先级比下面的更高。
配置完新的网关路由规则后,重启网关服务,这时候,分类列表就能正常访问了。最后,修改前端代码,渲染分类列表:
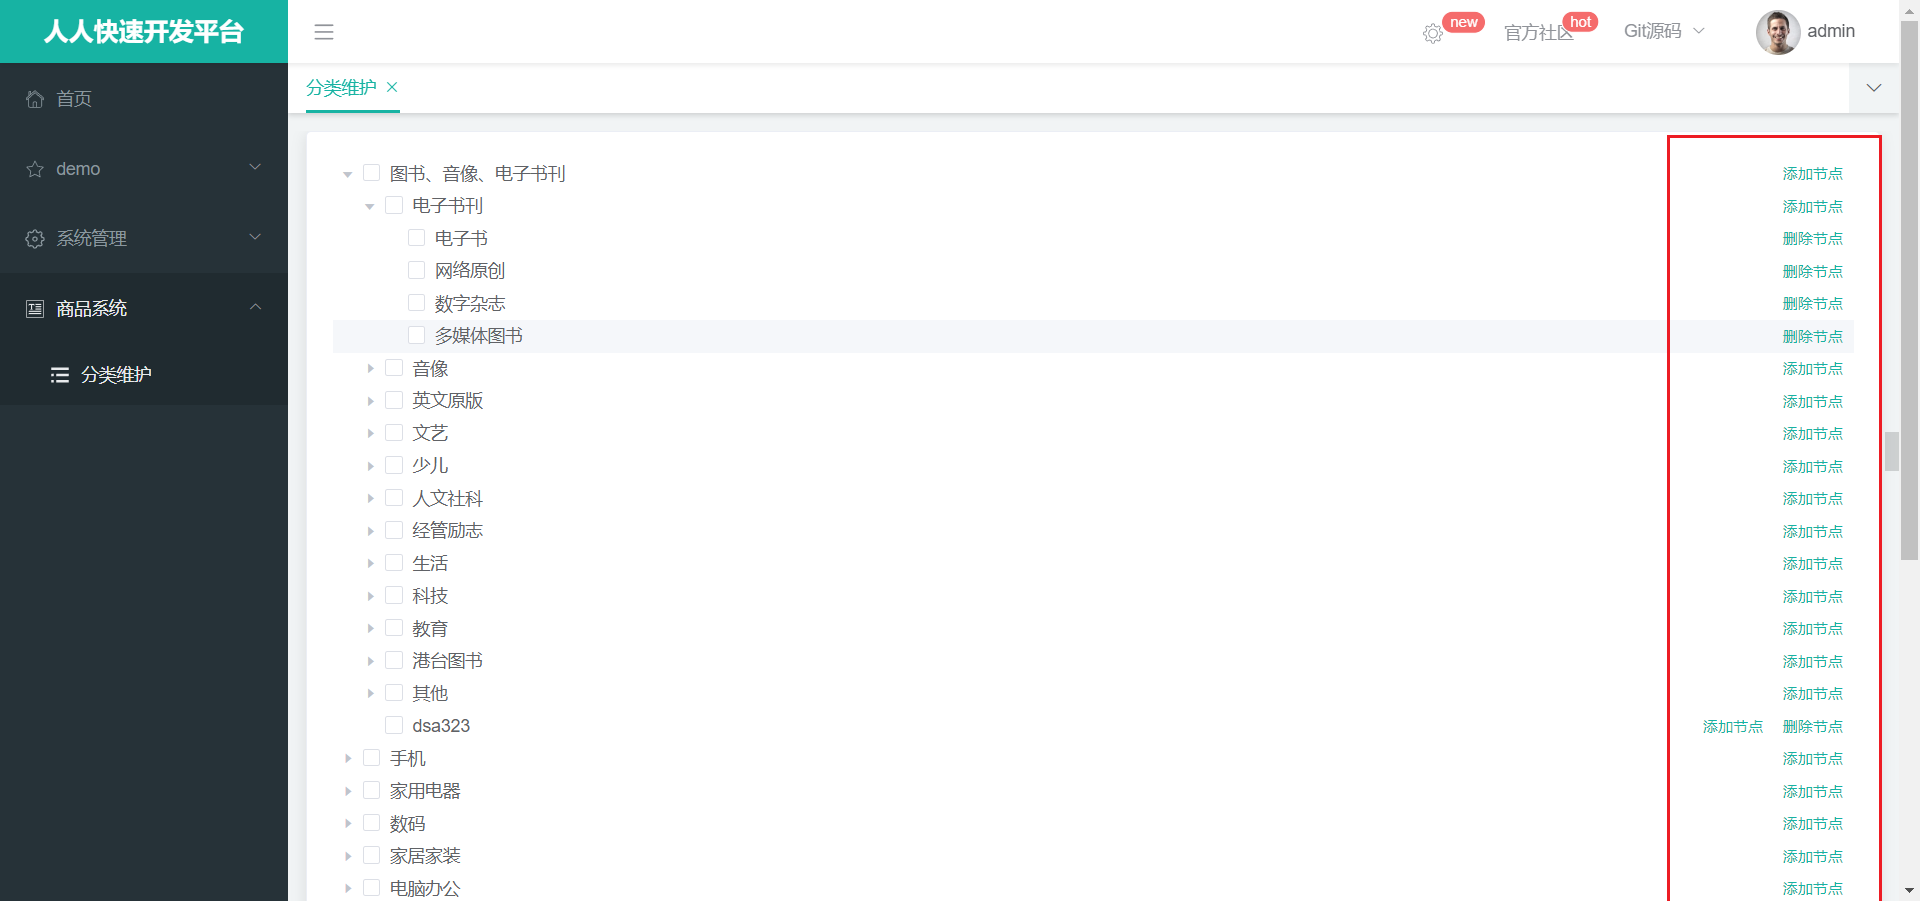
4 删除分类
4.1 页面效果
使用element-ui的树形控件,并设置按钮的显示(一二级节点能够新增节点,三级节点不能再新增节点;有子节点的不能删除;)并添加选择框,以供之后批量删除:
4.2 配置逻辑删除
使用MybatisPlus的逻辑删除插件,可以使用 show_status 字段来做逻辑删除:

查看官方文档配置:逻辑删除 | MyBatis-Plus
配置后,MybatisPlus的查询语句是:SELECT ... FROM pms_category WHERE show_status=1
加了 show_status 来做是否删除的判断。删除时也是使用update语句把show_status字段改为0。
4.3 删除分类
服务端
/**
 * 删除
 * @RequestBody:需要接收请求体——一个数组,所以需要Post请求
 */
@PostMapping("/delete")
public R delete(@RequestBody Long[] catIds){
    categoryService.removeMenuByIds(Arrays.asList(catIds));
    return R.ok();
}
/**
 * 批量删除
 */
@Override
public void removeMenuByIds(List<Long> menuList) {
    //TODO:后端需要再次判断要删除的节点底下还有没有节点
    categoryDao.deleteBatchIds(menuList);
}
前端
<el-tree
      :data="data"
      :props="defaultProps"
      @node-click="handleNodeClick"
      :expand-on-click-node="false"
      show-checkbox
      node-key="catId"
      :default-expanded-keys="expandedKeys"
      ></el-tree>
data() {
    return {
        data: [],
        defaultProps: {
            children: "children",
            label: "name",
        },
        expandedKeys: []
    };
},

remove(node, data) {
      console.log("remove", node, data);

      // 把id组装为一个数组
      let ids = [data.catId]
      this.$confirm(`确定对[id=${ids.join(',')}]进行删除操作?`, '提示', {
          confirmButtonText: '确定',
          cancelButtonText: '取消',
          type: 'warning'
        }).then(() => {
          this.$http({
            url: this.$http.adornUrl("/product/category/delete"),
            method: "post",
            data: this.$http.adornData(ids, false),
          }).then(({ data }) => {
              console.log(data)
              if (data && data.code === 0) {
                this.$message({
                  message: "操作成功",
                  type: "success",
                  duration: 1500,
                });
              } else {
                this.$message.error(data.msg);
              }
              // 刷新出新的分类菜单
              this.getDataList();
              // 设置需要默认展开的菜单
              this.expandedKeys = [node.parent.data.catId]
            })
          }).catch(() => {})
    }
5 新增分类
data() {
    return {
        dialogVisible: false,
        // 提前把category里面的属性准备好,用于发送给后端
        category: {
            name: "",
            parentCid: 0,
            catLevel: 0,
            showStatus: 1,
            sort: 0,
        },
        formLabelWidth: "120px",
        data: [],
        defaultProps: {
            children: "children",
            label: "name",
        },
        expandedKeys: [],
    };
},

methods: {
    handleNodeClick(data) {
      console.log(data);
    },
    // 获取数据列表
    getDataList() {
      this.dataListLoading = true;
      this.$http({
        url: this.$http.adornUrl("/product/category/list"),
        method: "get",
      }).then((res) => {
        console.log("获取数据成功:", res);
        this.data = res.data.list;
      });
    },
    // 添加分类
    addCategory() {
      console.log("addCategory", this.category);
      this.$http({
        url: this.$http.adornUrl("/product/category/save"),
        method: "post",
        data: this.$http.adornData(this.category, false),
      }).then(({ data }) => {
        console.log(data);
        if (data && data.code === 0) {
          this.$message({
            message: "操作成功",
            type: "success",
            duration: 1500,
          });
        } else {
          this.$message.error(data.msg);
        }
        this.dialogVisible = false
        // 刷新出新的分类菜单
        this.getDataList();
        // 设置需要默认展开的菜单
        this.expandedKeys = [this.category.parentCid];
      });
    },

    append(data) {
      console.log("append", data);
      this.category.parentCid = data.catId;
      this.category.catLevel = data.catLevel + 1;
      this.category.showStatus = 1;
      this.category.sort = 0;
      this.dialogVisible = true;
    },

    remove(node, data) {
      console.log("remove", node, data);

      // 把id组装为一个数组
      let ids = [data.catId];
      this.$confirm(`确定对 [${data.name}] 进行删除操作?`, "提示", {
        confirmButtonText: "确定",
        cancelButtonText: "取消",
        type: "warning",
      })
        .then(() => {
          this.$http({
            url: this.$http.adornUrl("/product/category/delete"),
            method: "post",
            data: this.$http.adornData(ids, false),
          }).then(({ data }) => {
            console.log(data);
            if (data && data.code === 0) {
              this.$message({
                message: "操作成功",
                type: "success",
                duration: 1500,
              });
            } else {
              this.$message.error(data.msg);
            }
            // 刷新出新的分类菜单
            this.getDataList();
            // 设置需要默认展开的菜单
            this.expandedKeys = [node.parent.data.catId];
          });
        })
        .catch(() => {});
    },
  },
6 修改分类
6.1 修改分类名称
修改分类可以和新增分类复用一个对话框,不过这就需要做一下两个功能的区分:
<template>
  <div>
    <el-tree
      :data="data"
      :props="defaultProps"
      @node-click="handleNodeClick"
      :expand-on-click-node="false"
      show-checkbox
      node-key="catId"
      :default-expanded-keys="expandedKeys"
    >
      <span class="custom-tree-node" slot-scope="{ node, data }">
        <span>{{ node.label }}</span>
        <span>
          <el-button
            v-if="node.level !== 3"
            type="text"
            size="mini"
            @click="() => append(data)"
          >
            添加节点
          </el-button>
          <el-button type="text" size="mini" @click="() => edit(data)">
            修改节点
          </el-button>
          <el-button
            v-if="node.childNodes.length === 0"
            type="text"
            size="mini"
            @click="() => remove(node, data)"
          >
            删除节点
          </el-button>
        </span>
      </span>
    </el-tree>

    <el-dialog :title="dialogTitle" :visible.sync="dialogVisible" width="30%" :close-on-click-modal="false">
      <el-form :model="category">
        <el-form-item label="分类名称" :label-width="formLabelWidth">
          <el-input v-model="category.name" autocomplete="off"></el-input>
        </el-form-item>
        <el-form-item label="分类图标" :label-width="formLabelWidth">
          <el-input v-model="category.icon" autocomplete="off"></el-input>
        </el-form-item>
        <el-form-item label="计量单位" :label-width="formLabelWidth">
          <el-input v-model="category.productUnit" autocomplete="off"></el-input>
        </el-form-item>
      </el-form>
      <div slot="footer" class="dialog-footer">
        <el-button @click="closeDialogVisible()">取 消</el-button>
        <el-button
          v-if="dialogType === 'add'"
          type="primary"
          @click="addCategory()"
          >确定新增</el-button
        >
        <el-button
          v-if="dialogType === 'edit'"
          type="primary"
          @click="updateCategory()"
          >确定修改</el-button
        >
      </div>
    </el-dialog>
  </div>
</template>

<script>
export default {
  data() {
    return {
      dialogVisible: false,
      dialogType: "",
      dialogTitle: "",
      category: {
        catId: null,
        name: "",
        parentCid: 0,
        catLevel: 0,
        showStatus: 1,
        sort: 0,
        icon: null,
        productCount: 0,
        productUnit: null,
      },
      formLabelWidth: "120px",
      data: [],
      defaultProps: {
        children: "children",
        label: "name",
      },
      expandedKeys: [],
    };
  },
  methods: {
    handleNodeClick(data) {
      console.log(data);
    },
    // 获取数据列表
    getDataList() {
      this.dataListLoading = true;
      this.$http({
        url: this.$http.adornUrl("/product/category/list"),
        method: "get",
      }).then((res) => {
        this.data = res.data.list;
      });
    },
    // 添加分类
    addCategory() {
      console.log("addCategory", this.category);
      this.$http({
        url: this.$http.adornUrl("/product/category/save"),
        method: "post",
        data: this.$http.adornData(this.category, false),
      }).then(({ data }) => {
        console.log(data);
        if (data && data.code === 0) {
          this.$message({
            message: "操作成功",
            type: "success",
            duration: 1500,
          });
        } else {
          this.$message.error(data.msg);
        }
        this.dialogVisible = false;
        // 刷新出新的分类菜单
        this.getDataList();
        // 设置需要默认展开的菜单
        this.expandedKeys = [this.category.parentCid];
      });
    },
    // 修改分类(这里的修改只改名称,之后的修改节点使用拖拽的方式)
    updateCategory() {
      let { catId, name, icon, productUnit } = this.category;
      let data = { catId, name, icon, productUnit };
      this.$http({
        url: this.$http.adornUrl("/product/category/update"),
        method: "post",
        data: this.$http.adornData(data, false),
      }).then(({ data }) => {
        console.log(data);
        if (data && data.code === 0) {
          this.$message({
            message: "操作成功",
            type: "success",
            duration: 1500,
          });
        } else {
          this.$message.error(data.msg);
        }
        // 关闭对话框
        this.dialogVisible = false;
        // 刷新出新的分类菜单
        this.getDataList();
        // 设置需要默认展开的菜单
        this.expandedKeys = [this.category.parentCid];
      });

      console.log("updateCategory", this.category);
    },

    append(data) {
      // 区分此次对话框的类型,修改还是新增
      this.dialogType = "add";
      this.dialogTitle = "新增分类";
      // 重置对象属性
      this.resetCategory()
      // 计算数据
      this.category.parentCid = data.catId;
      this.category.catLevel = data.catLevel + 1;
      this.category.showStatus = 1;
      this.category.sort = 0;
      // 显示对话框
      this.dialogVisible = true;
    },

    edit(data) {
      // 区分此次对话框的类型,修改还是新增
      this.dialogType = "edit";
      this.dialogTitle = "修改分类";
      // 重置对象属性
      this.resetCategory()
      // 要考虑多人同时使用该系统。所以点击修改按钮要到数据库获取最新的数据(防止显示被修改前的数据)
      this.$http({
        url: this.$http.adornUrl(`/product/category/info/${data.catId}`),
        method: "get",
      }).then((res) => {
        console.log("获取数据成功:", res);
        this.category = res.data.category;
      });
      // 显示对话框
      this.dialogVisible = true;
    },

    remove(node, data) {
      // 把id组装为一个数组
      let ids = [data.catId];
      this.$confirm(`确定对 [${data.name}] 进行删除操作?`, "提示", {
        confirmButtonText: "确定",
        cancelButtonText: "取消",
        type: "warning",
      })
        .then(() => {
          this.$http({
            url: this.$http.adornUrl("/product/category/delete"),
            method: "post",
            data: this.$http.adornData(ids, false),
          }).then(({ data }) => {
            console.log(data);
            if (data && data.code === 0) {
              this.$message({
                message: "操作成功",
                type: "success",
                duration: 1500,
              });
            } else {
              this.$message.error(data.msg);
            }
            // 刷新出新的分类菜单
            this.getDataList();
            // 设置需要默认展开的菜单
            this.expandedKeys = [node.parent.data.catId];
          });
        })
        .catch(() => {});
    },
    closeDialogVisible() {
      this.dialogVisible = false;
      this.resetCategory()
    },
    // 重置对象信息
    resetCategory(){
      this.category.catId = null
      this.category.name = ""
      this.category.parentCid = 0
      this.category.catLevel = 0
      this.category.showStatus = 1
      this.category.sort = 0
      this.category.icon= null
      this.category.productCount= 0
      this.category.productUnit= null
    }
  },
  created() {
    this.getDataList();
  },
};
</script>

<style>
.custom-tree-node {
  flex: 1;
  display: flex;
  align-items: center;
  justify-content: space-between;
  font-size: 14px;
  padding-right: 8px;
}
</style>
6.2 拖拽修改(效果)
- 需要在树结构上加上所需属性:
- draggable:可拖拽
- :allow-drop="allowDrop":拖拽时判定目标节点能否被放置。(还需要定义一个方法来判断)
- 由于我们限制层级关系只能有3层,所以限制关系有:
- 被拖动的当前节点以及所在的父节点的总层数不能大于3
- 拖拽总层数 + 目标位置的父节点层数 <= 3
// 拖拽的限制条件
allowDrop(draggingNode, dropNode, type) {
    // 1、被拖动的当前节点以及所在的父节点的总层数不能大于3
    this.countNode(draggingNode.data);
    // 被拖拽节点及其子节点一共的深度(拖拽总层数) 1 - 3 + 1 = -1(若移动的是叶子节点,会导致进不去递归方法)
    let depth = this.maxLevel - draggingNode.data.catLevel + 1;
    // console.log("深度:", depth)
    if (depth >= 3) {
        return false;
    }
    // 2、拖拽总层数 + 目标位置的父节点层数 <= 3
    let targetDepth = dropNode.data.catLevel;
    let totalDepth = 0;
    if (type == "inner") {
        totalDepth = depth + targetDepth;
        if (totalDepth > 3) {
            return false;
        }
    } else {
        totalDepth = depth + targetDepth - 1;
        if (totalDepth > 3) {
            return false;
        }
    }
    // console.log("totalDepth: ", totalDepth, "type: ", type)
    return true;
},
// 求出被拖拽节点的最大深度
countNode(node) {
    if (node.children != null && node.children.length > 0) {
        for (let i = 0; i < node.children.length; i++) {
            const element = node.children[i];
            if (element.catLevel > this.maxLevel) {
                this.maxLevel = element.catLevel;
            }
            this.countNode(element);
        }
    }
}
6.3 拖拽修改(数据收集)
要清楚拖拽后有哪些信息可能会改变:
- parent_cid:父分类id
- cat_level:层级
- sort:排序
被拖拽节点的放置位置(before、after、inner):before/after和inner要分开考虑
data(){
    return {
        // 用于记录所有需要更新数据的节点
        updateNodes: [],
    }
}

handleDrop(draggingNode, dropNode, dropType, ev) {
    let pCid = 0;
    // 记录节点到达目标位置后,该层的所有节点
    let siblings = [];
    // 1、父分类id
    if (dropType == "inner") {
        pCid = dropNode.data.catId;
        siblings = dropNode.childNodes;
    } else if (dropType == "after" || dropType == "before") {
        pCid = dropNode.parent.data.catId;
        siblings = dropNode.parent.childNodes;
    }

    // 2、排序
    for (let i = 0; i < siblings.length; i++) {
        const element = siblings[i];
        // 遍历到当前节点,需要还需要修改它的父id和层级。排序是所有都需要
        if (element.data.catId == draggingNode.data.catId) {
            // 3、层级
            if (element.childNodes != null && element.childNodes.length > 0) {
                this.updateChildNodesLevel(element);
            }
            // 将节点直接拉到第一层,可能会导致没有父id
            if (pCid == undefined) {
                pCid = 0
            }
            this.updateNodes.push({
                catId: element.data.catId,
                parentCid: pCid,
                sort: i,
                catLevel: element.level,
            });
        } else{
            this.updateNodes.push({
                catId: element.data.catId,
                sort: i
            });
        }

    }
    console.log(this.updateNodes)
},
// 更新被拖拽节点的子节点的层级
updateChildNodesLevel(node) {
    for (let i = 0; i < node.childNodes.length; i++) {
        const element = node.childNodes[i];
        this.updateNodes.push({
            catId: element.data.catId,
            catLevel: element.level,
        });
        if (element.childNodes != null && element.childNodes.length > 0) {
            this.updateChildNodesLevel(element);
        }
    }
},
6.4 拖拽修改(功能完成)
最后一步设置了批量保存的功能,和是否开启拖拽的功能:
- 为了防误操作,添加了开启拖拽的开关
- 不用每一次拖拽都和后端进行操作,所有操作结束了,点击批量保存,一次性请求后端。
由于有修改,所以原先的代码中也改了部分东西。具体我也记乱了,直接上代码。
<template>
<div>
<div class="aggregateButton">
<el-switch class="switchButton" v-model="draggable" active-text="开启拖拽" inactive-text="关闭拖拽">
</el-switch>
<el-button class="button" v-if="draggable == true" type="primary" @click="saveUpdate()">批量保存</el-button>
</div>
<el-tree
:data="data"
:props="defaultProps"
@node-click="handleNodeClick"
:expand-on-click-node="false"
show-checkbox
node-key="catId"
:default-expanded-keys="expandedKeys"
:draggable="draggable"
:allow-drop="allowDrop"
@node-drop="handleDrop"
>
<span class="custom-tree-node" slot-scope="{ node, data }">
<span>{{ node.label }}</span>
<span>
<el-button
v-if="node.level <= 2"
type="text"
size="mini"
@click="() => append(data)"
>
添加节点
</el-button>
<el-button type="text" size="mini" @click="() => edit(data)">
修改节点
</el-button>
<el-button
v-if="node.childNodes.length === 0"
type="text"
size="mini"
@click="() => remove(node, data)"
>
删除节点
</el-button>
</span>
</span>
</el-tree>
<el-dialog
:title="dialogTitle"
:visible.sync="dialogVisible"
width="30%"
:close-on-click-modal="false"
>
<el-form :model="category">
<el-form-item label="分类名称" :label-width="formLabelWidth">
<el-input v-model="category.name" autocomplete="off"></el-input>
</el-form-item>
<el-form-item label="分类图标" :label-width="formLabelWidth">
<el-input v-model="category.icon" autocomplete="off"></el-input>
</el-form-item>
<el-form-item label="计量单位" :label-width="formLabelWidth">
<el-input
v-model="category.productUnit"
autocomplete="off"
></el-input>
</el-form-item>
</el-form>
<div slot="footer" class="dialog-footer">
<el-button @click="closeDialogVisible()">取 消</el-button>
<el-button
v-if="dialogType === 'add'"
type="primary"
@click="addCategory()"
>确定新增</el-button
>
<el-button
v-if="dialogType === 'edit'"
type="primary"
@click="updateCategory()"
>确定修改</el-button
>
</div>
</el-dialog>
</div>
</template>
<script>
export default {
data() {
return {
draggable: false,
dialogVisible: false,
dialogType: "",
dialogTitle: "",
category: {
catId: null,
name: "",
parentCid: 0,
catLevel: 0,
showStatus: 1,
sort: 0,
icon: null,
productCount: 0,
productUnit: null,
},
formLabelWidth: "120px",
data: [],
defaultProps: {
children: "children",
label: "name",
},
expandedKeys: [],
maxLevel: 1,
updateNodes: [],
cacheExpandedKeys: []
};
},
methods: {
saveUpdate(){
this.$http({
url: this.$http.adornUrl("/product/category/update/sort"),
method: "post",
data: this.$http.adornData(this.updateNodes, false),
}).then(({ data }) => {
console.log(data);
if (data && data.code === 0) {
this.$message({
message: "操作成功",
type: "success",
duration: 1500,
});
} else {
this.$message.error(data.msg);
}
// 刷新出新的分类菜单
this.getDataList();
// 设置需要默认展开的菜单
this.expandedKeys = this.cacheExpandedKeys
this.cacheExpandedKeys = []
// 清空需要更新的节点信息
this.maxLevel = 1;
this.updateNodes = [];
});
},
handleNodeClick(data) {
console.log(data);
},
handleDrop(draggingNode, dropNode, dropType, ev) {
let pCid = 0;
// 记录节点到达目标位置后,该层的所有节点
let siblings = [];
// 1、父分类id
if (dropType == "inner") {
pCid = dropNode.data.catId;
siblings = dropNode.childNodes;
} else if (dropType == "after" || dropType == "before") {
pCid = dropNode.parent.data.catId;
siblings = dropNode.parent.childNodes;
}
// 2、排序
for (let i = 0; i < siblings.length; i++) {
const element = siblings[i];
// 遍历到当前节点,需要还需要修改它的父id和层级。排序是所有都需要
if (element.data.catId == draggingNode.data.catId) {
// 3、层级
if (element.childNodes != null && element.childNodes.length > 0) {
this.updateChildNodesLevel(element);
}
// 将节点直接拉到第一层,可能会导致没有父id
if (pCid == undefined) {
pCid = 0;
}
this.updateNodes.push({
catId: element.data.catId,
parentCid: pCid,
sort: i,
catLevel: element.level,
});
} else {
this.updateNodes.push({
catId: element.data.catId,
sort: i,
});
}
}
console.log(this.updateNodes);
this.cacheExpandedKeys.push(pCid)
},
// 更新被拖拽节点的子节点的层级
updateChildNodesLevel(node) {
for (let i = 0; i < node.childNodes.length; i++) {
const element = node.childNodes[i];
this.updateNodes.push({
catId: element.data.catId,
catLevel: element.level,
});
if (element.childNodes != null && element.childNodes.length > 0) {
this.updateChildNodesLevel(element);
}
}
},
// 拖拽的限制条件
allowDrop(draggingNode, dropNode, type) {
// 初始化maxLevel
this.maxLevel = 1;
// 1、被拖动的当前节点以及所在的父节点的总层数不能大于3
this.countNode(draggingNode);
// 被拖拽节点及其子节点一共的深度(拖拽总层数) 1 - 3 + 1 = -1(若移动的是叶子节点,会导致进不去递归方法)
let depth = Math.abs(this.maxLevel - draggingNode.level + 1);
if (depth >= 3) {
return false;
}
// 2、拖拽总层数 + 目标位置的父节点层数 <= 3
let targetDepth = dropNode.level;
let totalDepth = 0;
if (type == "inner") {
totalDepth = depth + targetDepth;
if (totalDepth > 3) {
return false;
}
} else {
totalDepth = depth + targetDepth - 1;
if (totalDepth > 3) {
return false;
}
}
return true;
},
// 求出被拖拽节点的最大深度
countNode(node) {
if (node.childNodes != null && node.childNodes.length > 0) {
for (let i = 0; i < node.childNodes.length; i++) {
const element = node.childNodes[i];
if (element.level > this.maxLevel) {
this.maxLevel = element.level;
}
this.countNode(element);
}
}
},
// 获取数据列表
getDataList() {
this.dataListLoading = true;
this.$http({
url: this.$http.adornUrl("/product/category/list/tree"),
method: "get",
}).then((res) => {
this.data = res.data.list;
});
},
// 添加分类
addCategory() {
console.log("addCategory", this.category);
this.$http({
url: this.$http.adornUrl("/product/category/save"),
method: "post",
data: this.$http.adornData(this.category, false),
}).then(({ data }) => {
console.log(data);
if (data && data.code === 0) {
this.$message({
message: "操作成功",
type: "success",
duration: 1500,
});
} else {
this.$message.error(data.msg);
}
this.dialogVisible = false;
// 刷新出新的分类菜单
this.getDataList();
// 设置需要默认展开的菜单
this.expandedKeys = [this.category.parentCid];
});
},
// 修改分类(这里的修改只改名称,之后的修改节点使用拖拽的方式)
updateCategory() {
let { catId, name, icon, productUnit } = this.category;
let data = { catId, name, icon, productUnit };
this.$http({
url: this.$http.adornUrl("/product/category/update"),
method: "post",
data: this.$http.adornData(data, false),
}).then(({ data }) => {
console.log(data);
if (data && data.code === 0) {
this.$message({
message: "操作成功",
type: "success",
duration: 1500,
});
} else {
this.$message.error(data.msg);
}
// 关闭对话框
this.dialogVisible = false;
// 刷新出新的分类菜单
this.getDataList();
// 设置需要默认展开的菜单
this.expandedKeys = [this.category.parentCid];
});
console.log("updateCategory", this.category);
},
append(data) {
// 区分此次对话框的类型,修改还是新增
this.dialogType = "add";
this.dialogTitle = "新增分类";
// 重置对象属性
this.resetCategory();
// 计算数据
this.category.parentCid = data.catId;
this.category.catLevel = data.catLevel + 1;
this.category.showStatus = 1;
this.category.sort = 0;
// 显示对话框
this.dialogVisible = true;
},
edit(data) {
// 区分此次对话框的类型,修改还是新增
this.dialogType = "edit";
this.dialogTitle = "修改分类";
// 重置对象属性
this.resetCategory();
// 要考虑多人同时使用该系统。所以点击修改按钮要到数据库获取最新的数据(防止显示被修改前的数据)
this.$http({
url: this.$http.adornUrl(`/product/category/info/${data.catId}`),
method: "get",
}).then((res) => {
console.log("获取数据成功:", res);
this.category = res.data.category;
});
// 显示对话框
this.dialogVisible = true;
},
remove(node, data) {
// 把id组装为一个数组
let ids = [data.catId];
this.$confirm(`确定对 [${data.name}] 进行删除操作?`, "提示", {
confirmButtonText: "确定",
cancelButtonText: "取消",
type: "warning",
})
.then(() => {
this.$http({
url: this.$http.adornUrl("/product/category/delete"),
method: "post",
data: this.$http.adornData(ids, false),
}).then(({ data }) => {
console.log(data);
if (data && data.code === 0) {
this.$message({
message: "操作成功",
type: "success",
duration: 1500,
});
} else {
this.$message.error(data.msg);
}
// 刷新出新的分类菜单
this.getDataList();
// 设置需要默认展开的菜单
this.expandedKeys = [node.parent.data.catId];
});
})
.catch(() => {});
},
closeDialogVisible() {
this.dialogVisible = false;
this.resetCategory();
},
// 重置对象信息
resetCategory() {
this.category.catId = null;
this.category.name = "";
this.category.parentCid = 0;
this.category.catLevel = 0;
this.category.showStatus = 1;
this.category.sort = 0;
this.category.icon = null;
this.category.productCount = 0;
this.category.productUnit = null;
},
},
created() {
this.getDataList();
},
};
</script>
<style>
.custom-tree-node {
flex: 1;
display: flex;
align-items: center;
justify-content: space-between;
font-size: 14px;
padding-right: 8px;
}
.aggregateButton{
height: 50px;
width: 100%;
}
.switchButton{
height: 50px;
}
.button{
height: 40px;
}
</style>
7 批量删除分类
加个按钮,绑定删除方法:
batchDelete() {
    let checkedKeys = this.$refs.tree.getCheckedKeys();
    let deleteCatIds = []
    for (let i = 0; i < checkedKeys.length; i++) {
        const key = checkedKeys[i];
        deleteCatIds.push(key);
    }

    this.$confirm(`确定对进行批量删除操作?`, "提示", {
        confirmButtonText: "确定",
        cancelButtonText: "取消",
        type: "warning",
    })
        .then(() => {
        this.$http({
            url: this.$http.adornUrl("/product/category/delete"),
            method: "post",
            data: this.$http.adornData(deleteCatIds, false),
        }).then(({ data }) => {
            console.log(data);
            if (data && data.code === 0) {
                this.$message({
                    message: "操作成功",
                    type: "success",
                    duration: 1500,
                });
            } else {
                this.$message.error(data.msg);
            }
            // 刷新出新的分类菜单
            this.getDataList();

        });
    })
        .catch(() => {});
},
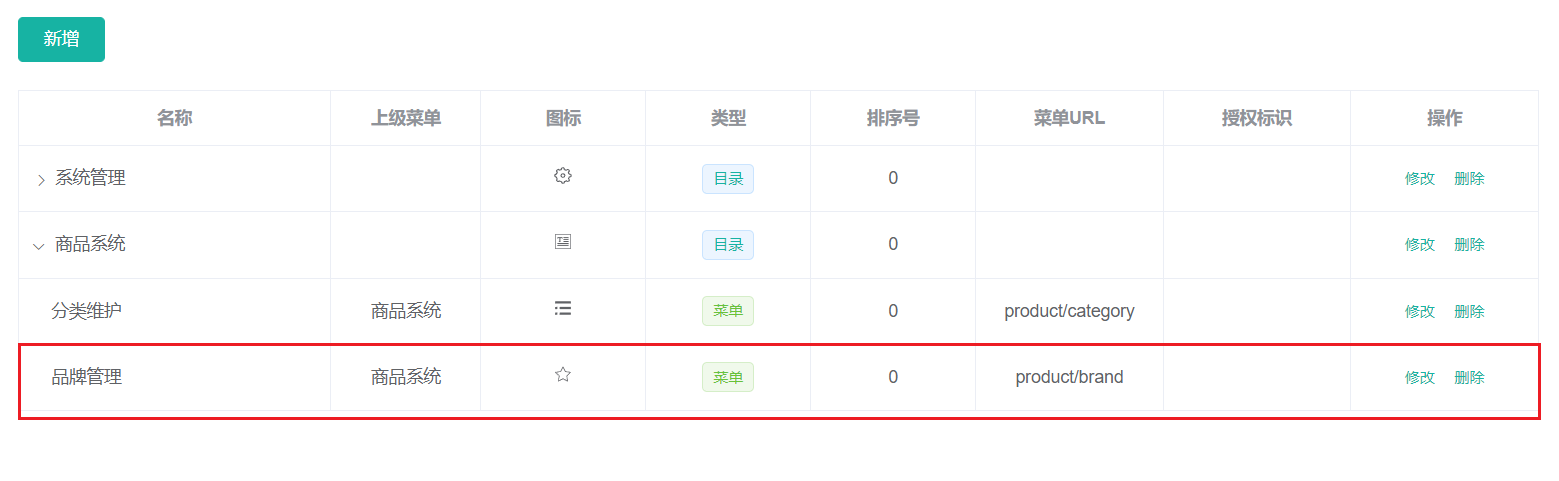
品牌管理
1 前置操作
- 首先在后台管理的前端中配置
品牌管理菜单。
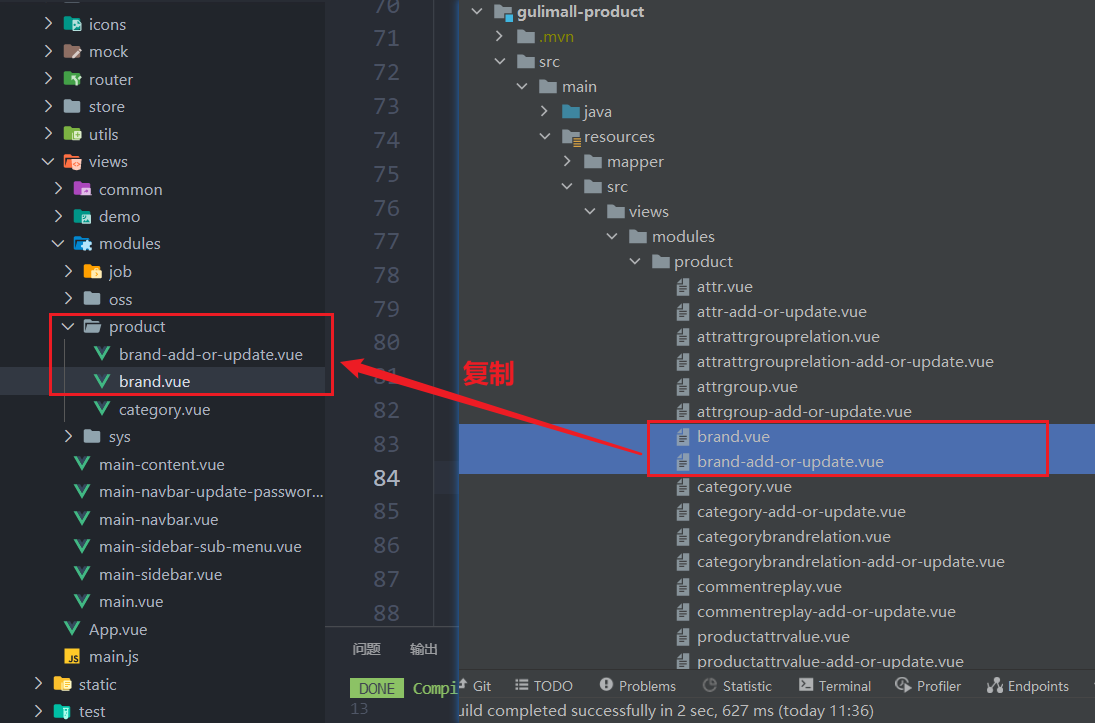
- 引入之前由逆向工程生成的Vue模板
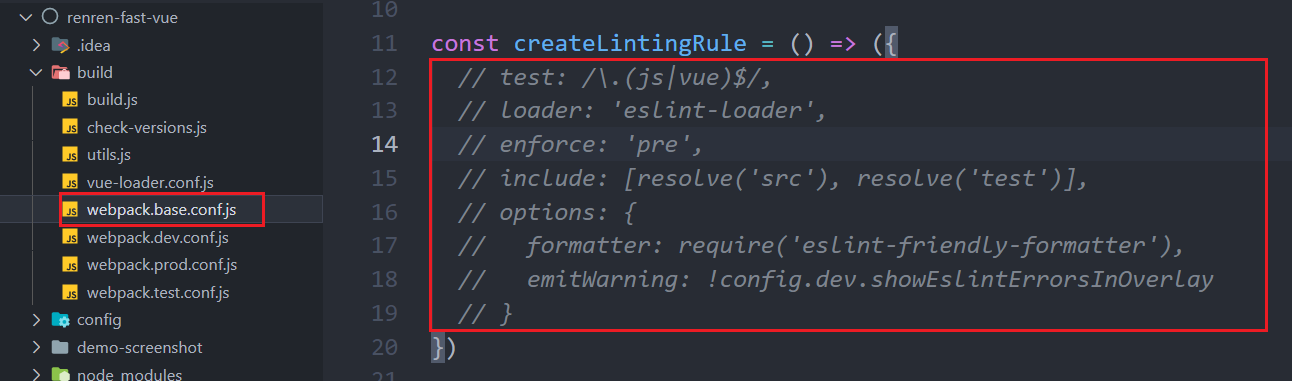
- eslint检查太严格了,把它干掉
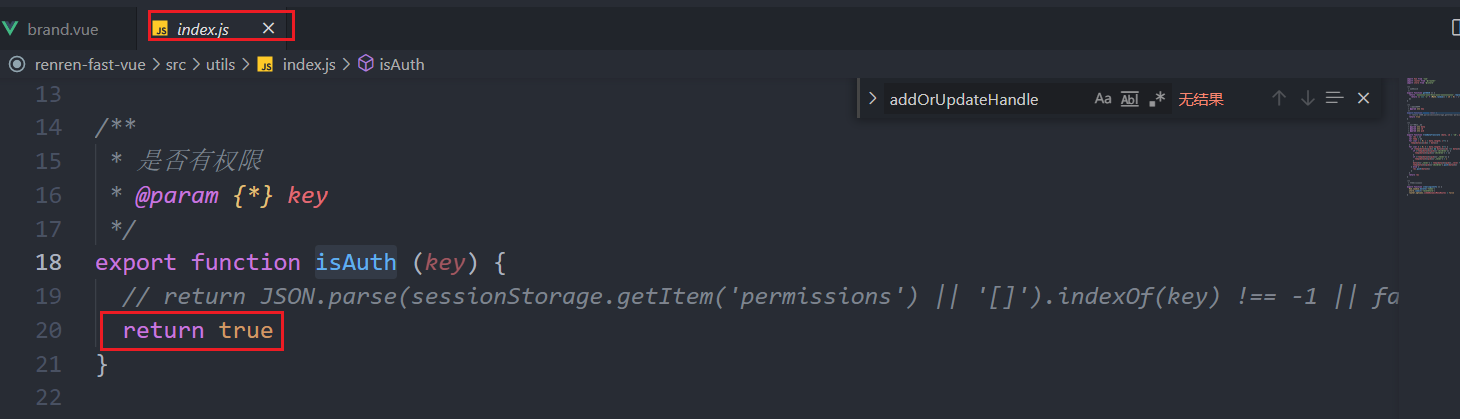
- 暂时把权限校验关掉
- 为前端做一下修改
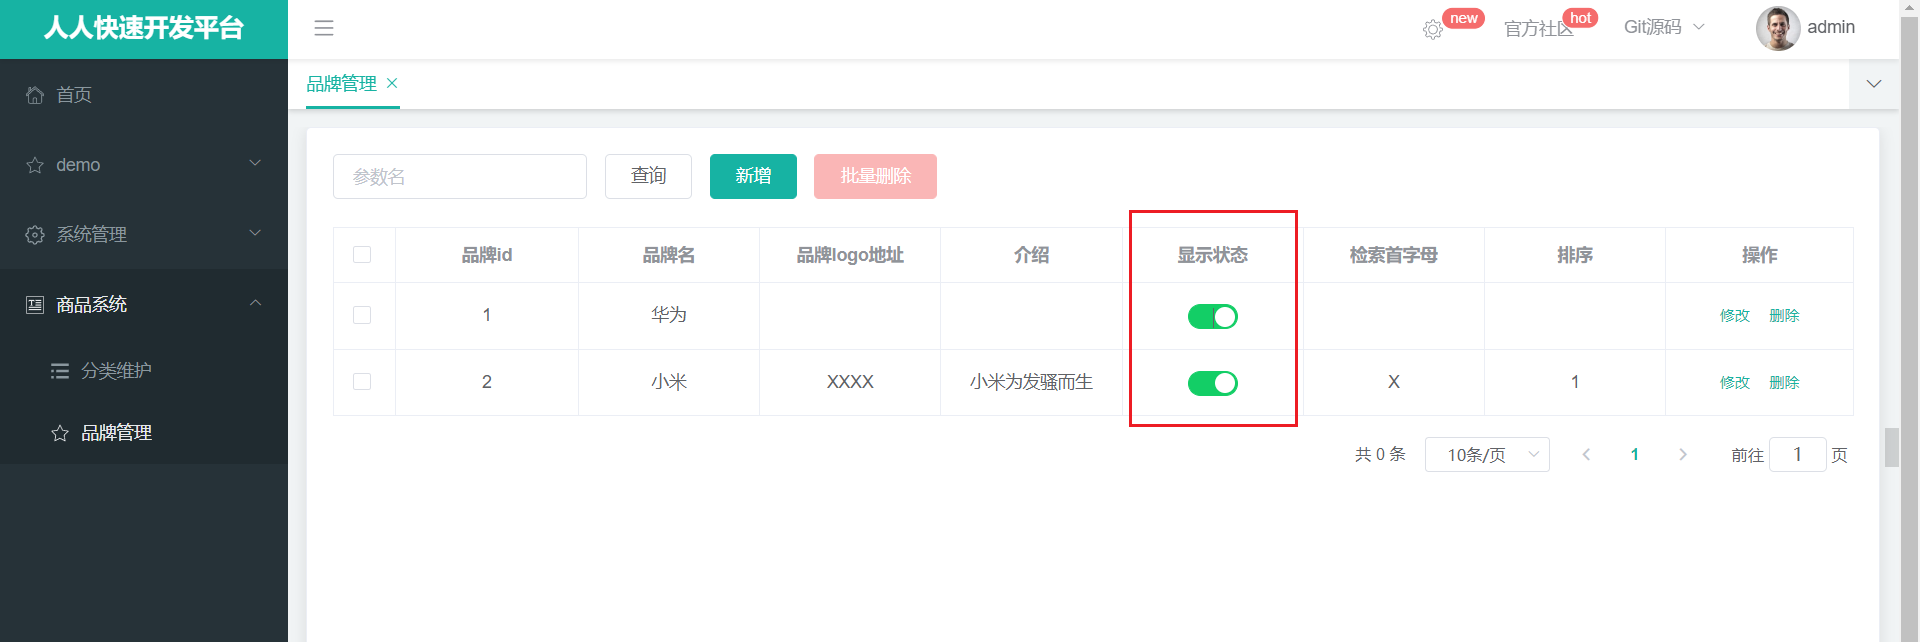
<el-table-column
                 prop="showStatus"
                 header-align="center"
                 align="center"
                 label="显示状态"
                 >
    <template slot-scope="scope">
        <el-switch
                   v-model="scope.row.showStatus"
                   active-color="#13ce66"
                   inactive-color="#ff4949"
                   :active-value="1"
                   :inactive-value="0"
                   @change="updateBrandStatus(scope.row)"
                   >
        </el-switch>
    </template>
</el-table-column>
updateBrandStatus(data){
    let {brandId, showStatus} = data
    this.$http({
        url: this.$http.adornUrl("/product/brand/update"),
        method: "post",
        data: this.$http.adornData({brandId, showStatus}, false),
    }).then(({ data }) => {
        if (data && data.code === 0) {
            this.$message({
                message: "操作成功",
                type: "success",
                duration: 1500
            });
        } else {
            this.$message.error(data.msg);
        }
        this.getDataList();
    });
},
2 文件上传功能
2.1 测试文件上传
品牌logo应该是上传的,而不是手动填写的,所以我们要配置一个图片上传的功能:
分布式系统的文件上传和单机不同。
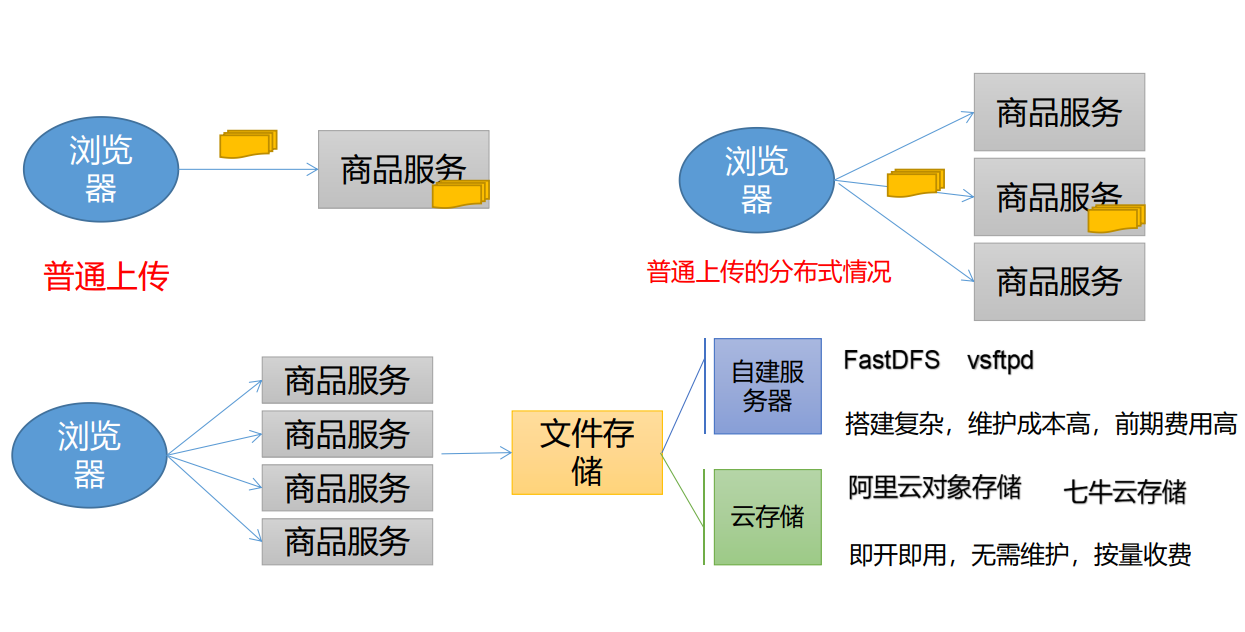
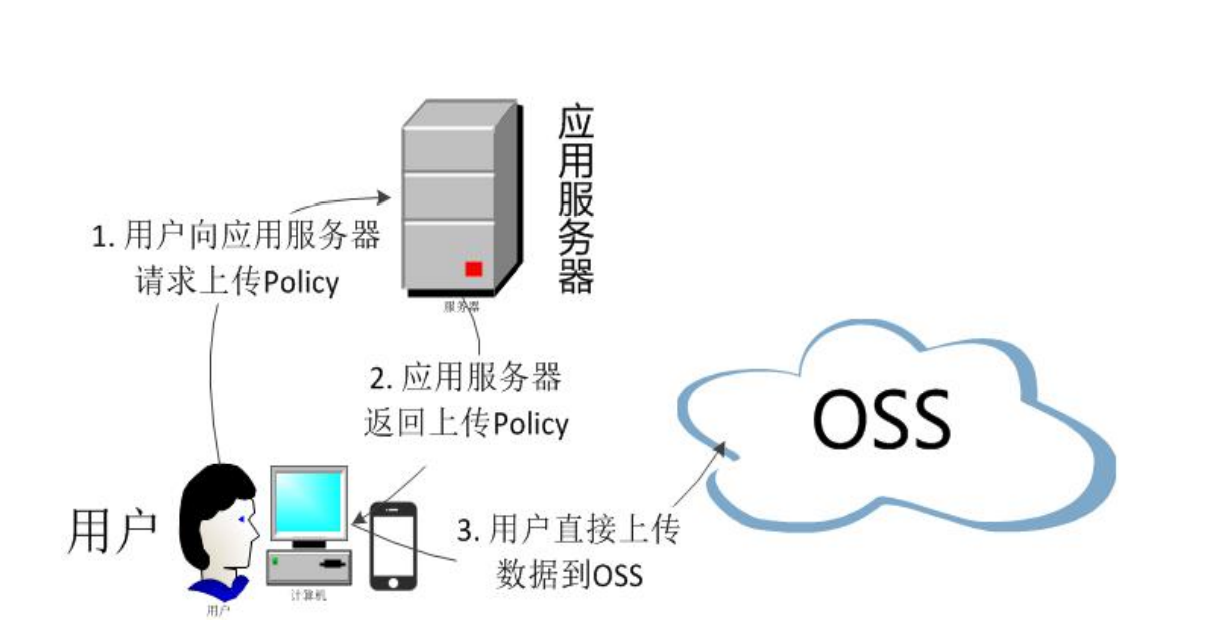
使用阿里云OSS对象存储,上传文件有两种方式。第二种方式安全性更高。
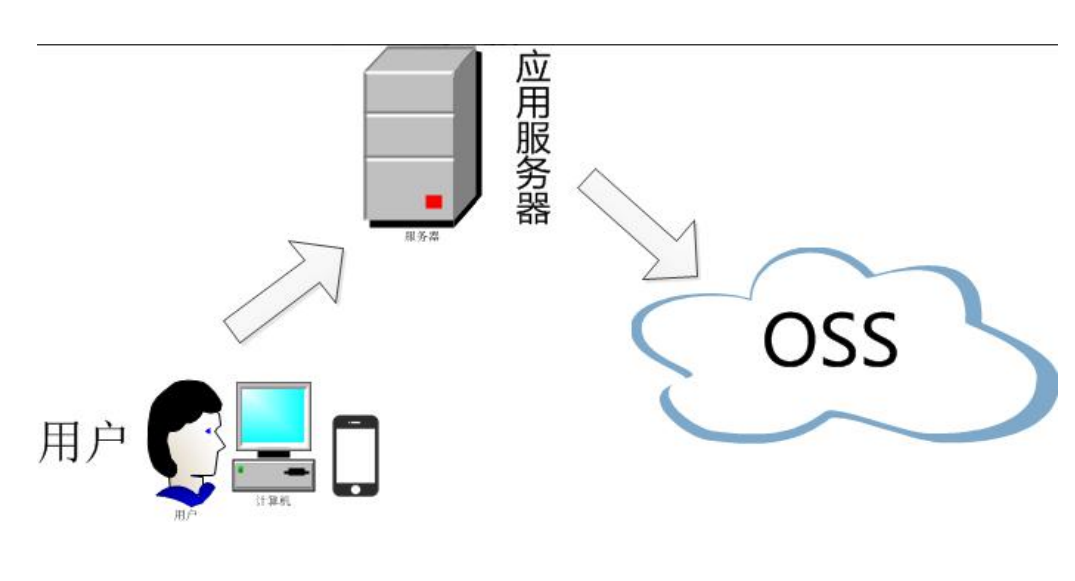
如何使用:https://help.aliyun.com/document_detail/32009.html
注:创建子账户来访问对象存储时,需要给子账户赋予管理对象存储的权限,否则无法上传和查看。
2.2 引入springcloudalibaba的封装的OSS
- 引入依赖
注:有可能版本太高,导致依赖引入问题。需要手动指定oss的版本
<!--引入alibaba的oss-->
<dependency>
    <groupId>com.alibaba.cloud</groupId>
    <artifactId>spring-cloud-starter-alicloud-oss</artifactId>
    <version>2.2.0.RELEASE</version>
</dependency>
- 添加配置
spring:
  cloud:
    # 阿里云OSS
    alicloud:
      access-key: <accesskeyid>
      secret-key: <accesskeysecret>
      oss:
        endpoint: https://oss-cn-hangzhou.aliyuncs.com
咱有nacos配置中心,这些信息完全可以配置在配置中心。
- 测试
@Resource
OSSClient ossClient;

@Test
void testFileUpload(){
    // 填写Bucket名称
    String bucketName = "img-beg";
    // 填写Object完整路径,完整路径中不能包含Bucket名称,例如exampledir/exampleobject.txt。
    String objectName = "gulimall/test2.png";
    // 填写本地文件的完整路径,例如D:\\localpath\\examplefile.txt。
    // 如果未指定本地路径,则默认从示例程序所属项目对应本地路径中上传文件流。
    String filePath= "E:\\some\\ProgrammerDog.png";

    try {
        InputStream inputStream = new FileInputStream(filePath);
        // 创建PutObject请求。
        ossClient.putObject(bucketName, objectName, inputStream);
        System.out.println("上传成功...");
    } catch (OSSException oe) {
        System.out.println("上传失败...");
    } catch (FileNotFoundException e) {
        e.printStackTrace();
    } finally {
        if (ossClient != null) {
            ossClient.shutdown();
        }
    }
}
2.3 OSS获取服务端签名
因为项目之后会有非常多的第三方服务调用,对象存储、发送短信、物流查询...,所以我们可以为整个项目创建一个服务专门用来调用第三方功能。
- 创建微服务
gulimall-third-party
-
在
gulimall-third-party中引入common,并把common中的对象存储依赖移过来 -
配置注册中心和配置中心,并新建配置
-
将对象存储的的配置信息配置到配置中心
-
写controller
@RestController
@RefreshScope
public class OssController {
@Autowired(required = false)
OSS ossClient;
@Value("${spring.cloud.alicloud.access-key}")
private String accessId;
@Value("${spring.cloud.alicloud.secret-key}")
private String accessKey;
@Value("${spring.cloud.alicloud.oss.endpoint}")
private String endpoint;
@Value("${spring.cloud.alicloud.oss.bucket}")
private String bucket;
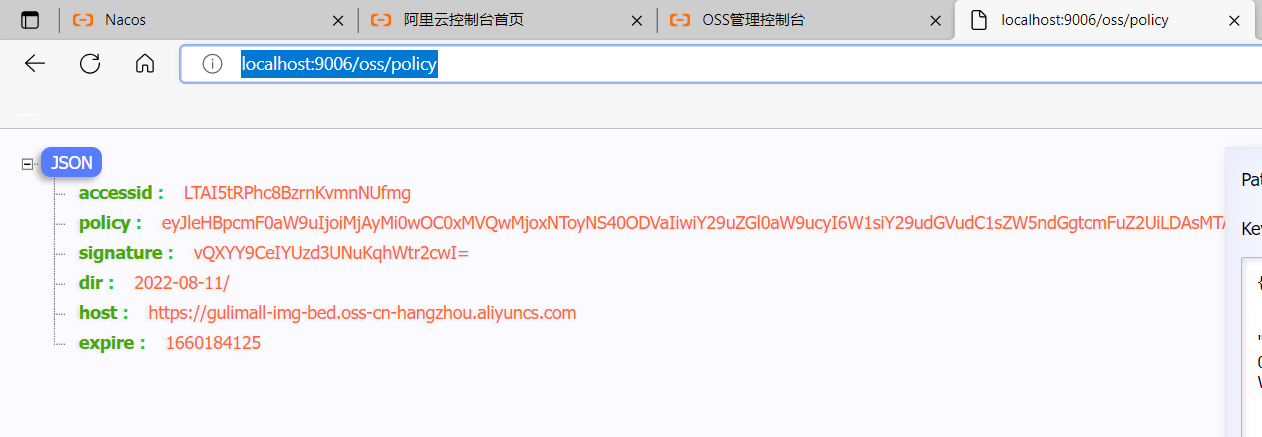
@RequestMapping("/oss/policy")
public Map<String, String> policy() {
// 填写Host地址,格式为https://bucketname.endpoint。
String host = String.format("https://%s.%s", bucket, endpoint);
// 设置上传回调URL,即回调服务器地址,用于处理应用服务器与OSS之间的通信。OSS会在文件上传完成后,把文件上传信息通过此回调URL发送给应用服务器。
// String callbackUrl = "https://192.168.0.0:8888";
String dir = LocalDate.now().toString() + "/";
Map<String, String> respMap = null;
try {
long expireTime = 30;
long expireEndTime = System.currentTimeMillis() + expireTime * 1000;
Date expiration = new Date(expireEndTime);
PolicyConditions policyConds = new PolicyConditions();
policyConds.addConditionItem(PolicyConditions.COND_CONTENT_LENGTH_RANGE, 0, 1048576000);
policyConds.addConditionItem(MatchMode.StartWith, PolicyConditions.COND_KEY, dir);
String postPolicy = ossClient.generatePostPolicy(expiration, policyConds);
byte[] binaryData = postPolicy.getBytes(StandardCharsets.UTF_8);
String encodedPolicy = BinaryUtil.toBase64String(binaryData);
String postSignature = ossClient.calculatePostSignature(postPolicy);
respMap = new LinkedHashMap<String, String>();
respMap.put("accessid", accessId);
respMap.put("policy", encodedPolicy);
respMap.put("signature", postSignature);
respMap.put("dir", dir);
respMap.put("host", host);
respMap.put("expire", String.valueOf(expireEndTime / 1000));
} catch (Exception e) {
// Assert.fail(e.getMessage());
System.out.println(e.getMessage());
}
return respMap;
}
}
- 调用测试
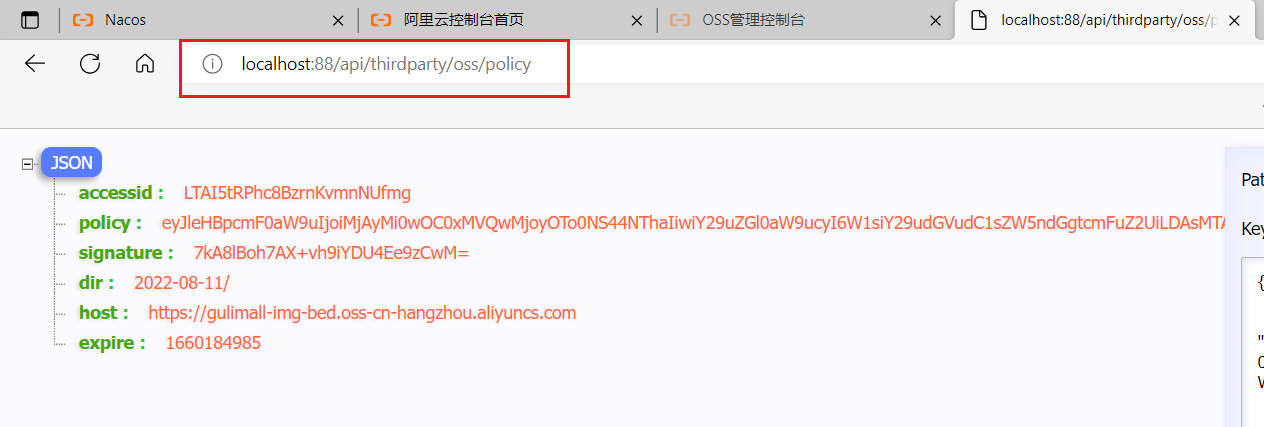
- 修改接口访问地址,并配置网关
@RestController
@RequestMapping("/thirdparty")
@RefreshScope
public class OssController {

}
        - id: third_party_route
          uri: lb://gulimall-third-party
          predicates:
            - Path=/api/thirdparty/**
          filters:
            - RewritePath=/api/(?<segment>/?.*), /$\{segment}
2.4 前后端联调上传功能
- 引入已有的上传组件
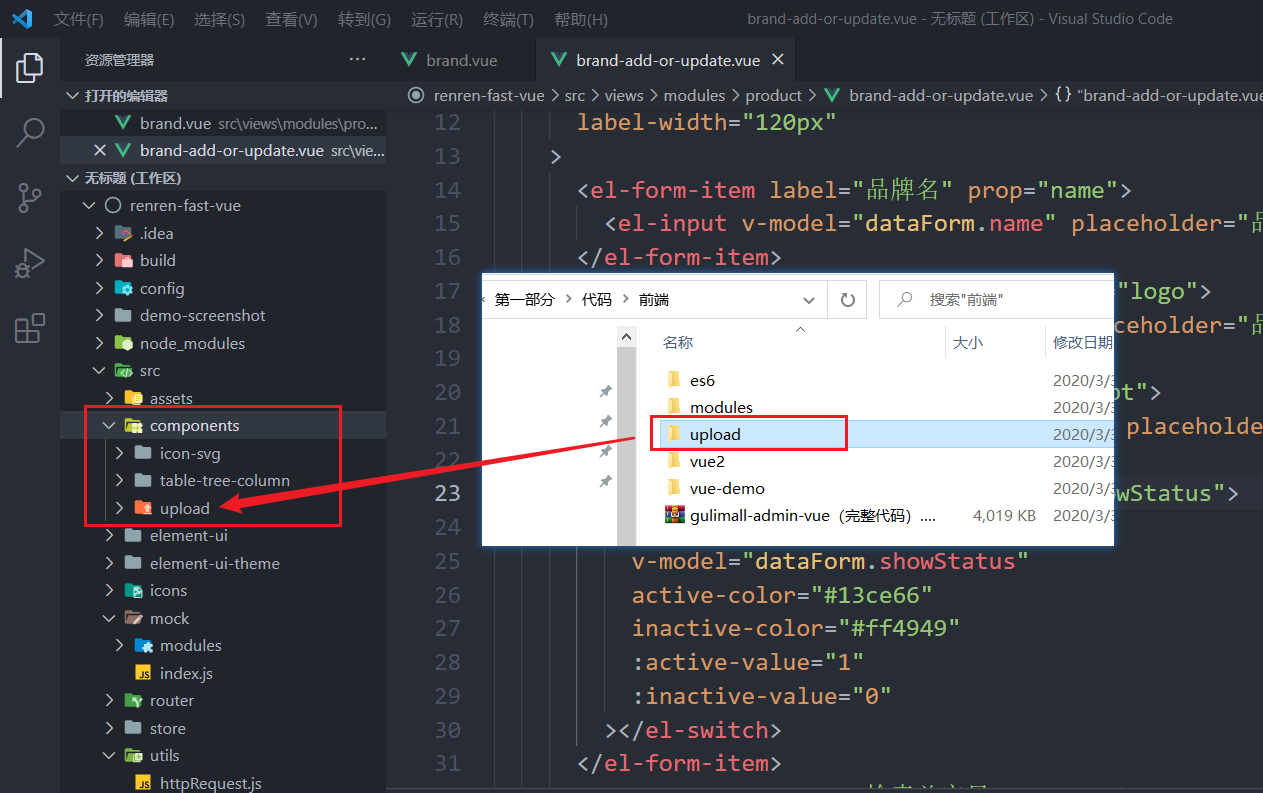
- 修改上传组件中的配置信息为自己的
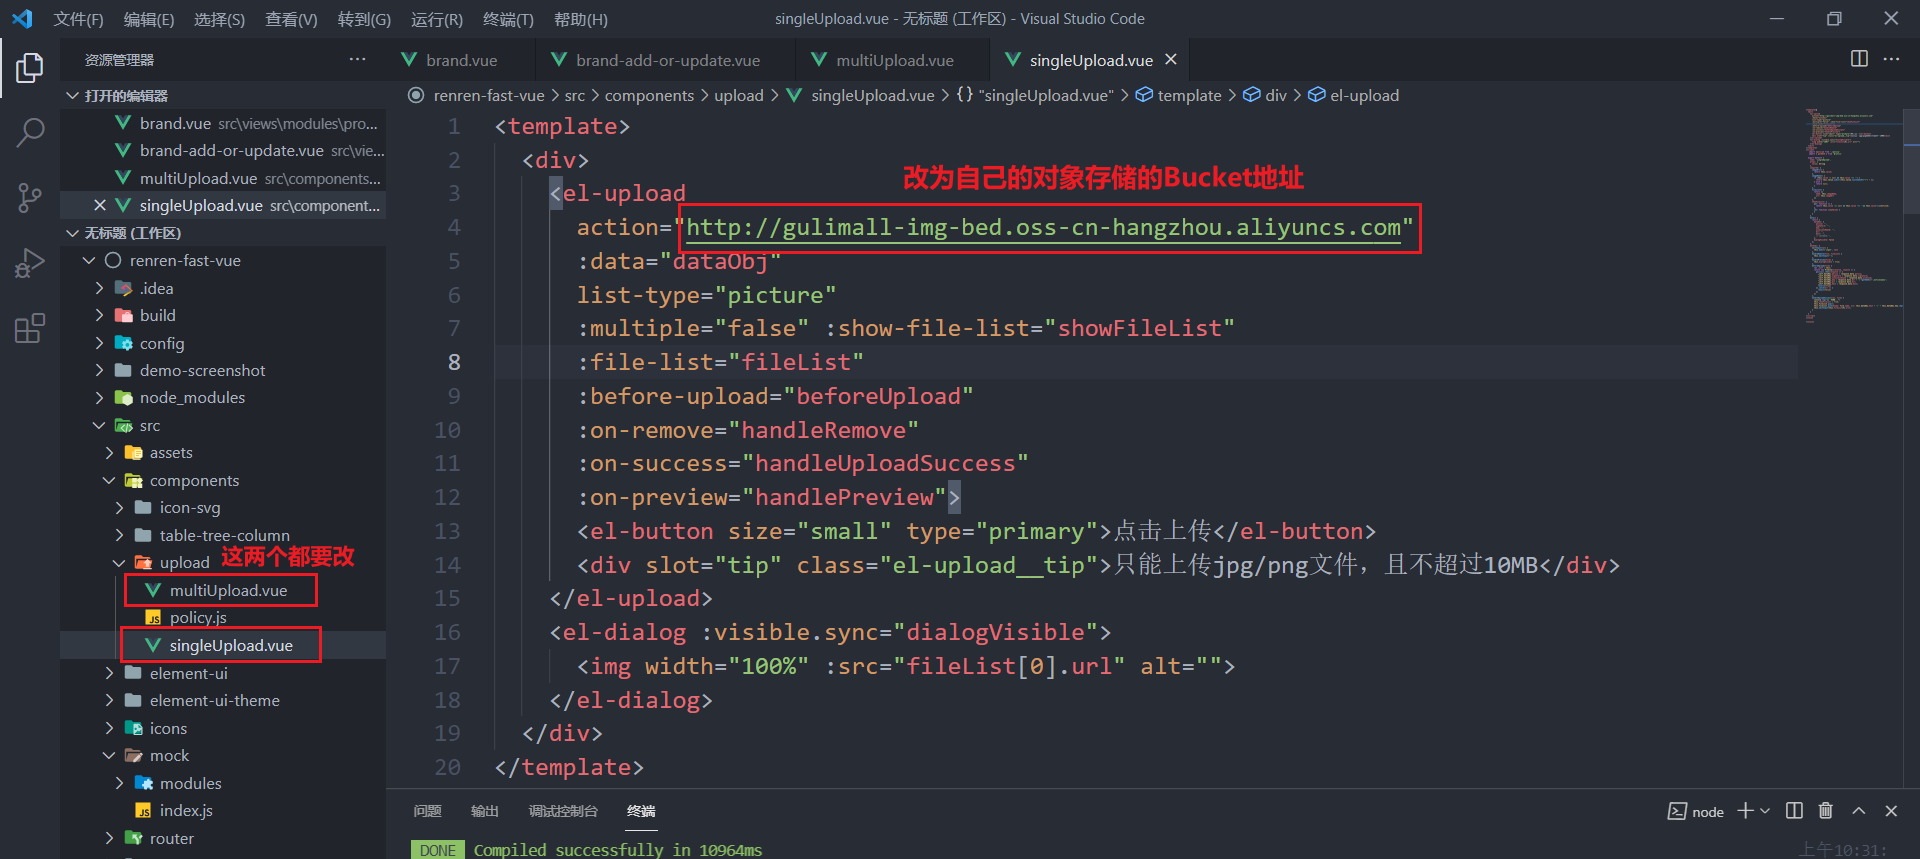
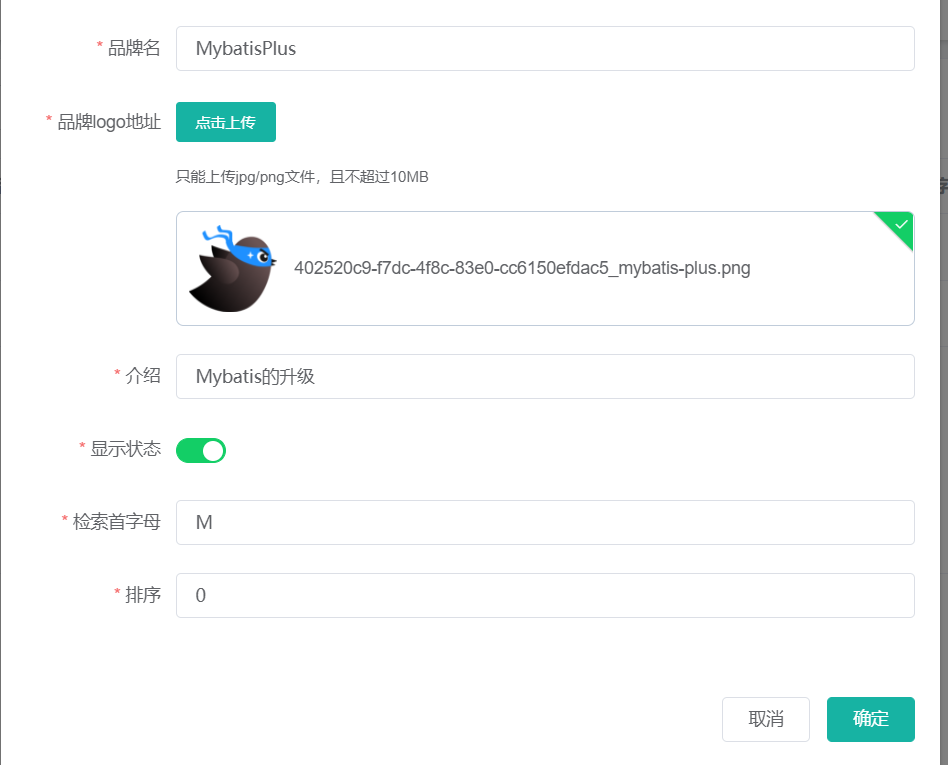
- 将单文件上传组件导入到修改页面
<el-form-item label="品牌logo地址" prop="logo">
    <single-upload v-model="dataForm.logo"></single-upload>
</el-form-item>
import singleUpload from "@/components/upload/singleUpload"
export default {
  components:{
    singleUpload
  }
}
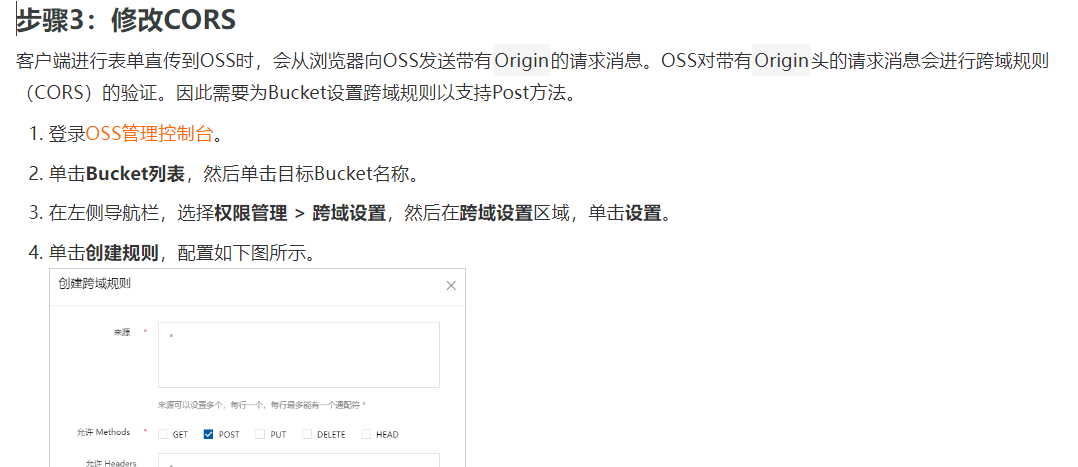
- 此时上传会有跨域问题,还需要修改CORS
- 再次测试上传功能

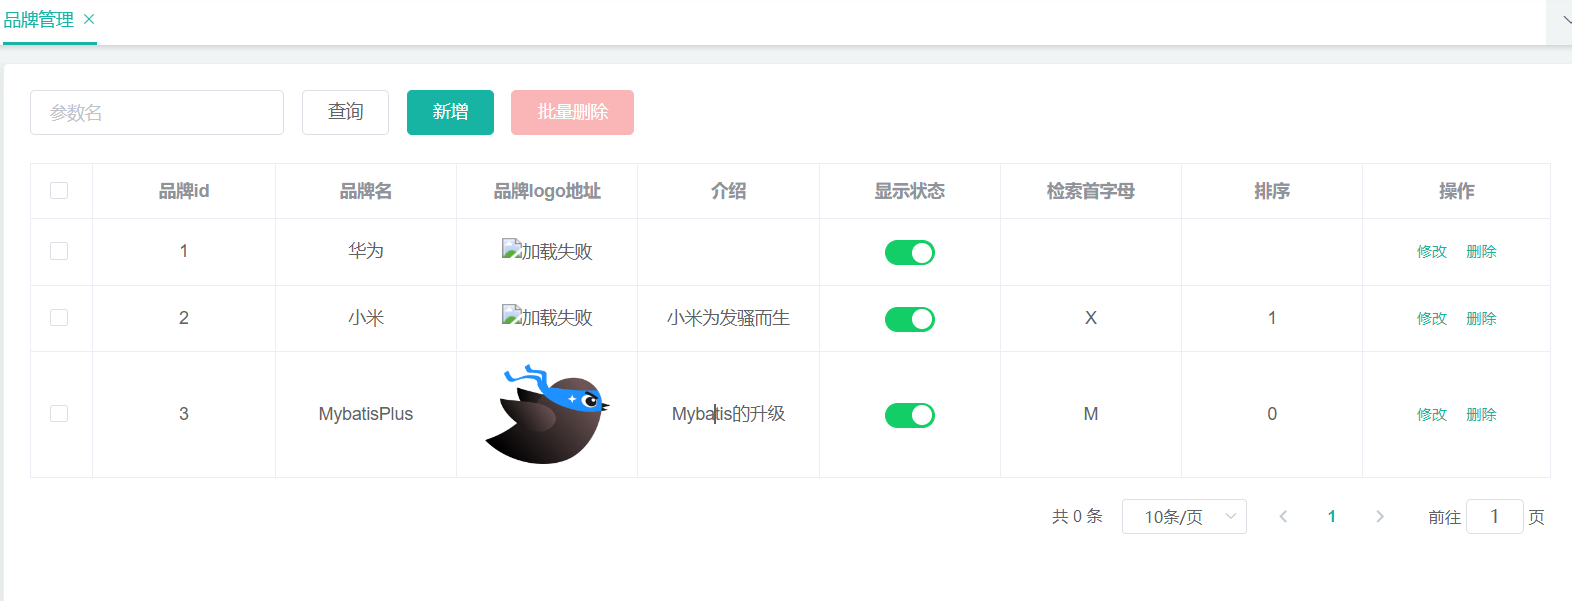
- 在首页表格中显示logo图片,而不是一大串的地址
<el-table-column
                 prop="logo"
                 header-align="center"
                 align="center"
                 label="品牌logo地址"
                 >
    <template slot-scope="scope">
        <img :src="scope.row.logo" style="width: 100px; height: 80px" alt="加载失败"/>
    </template>
</el-table-column>
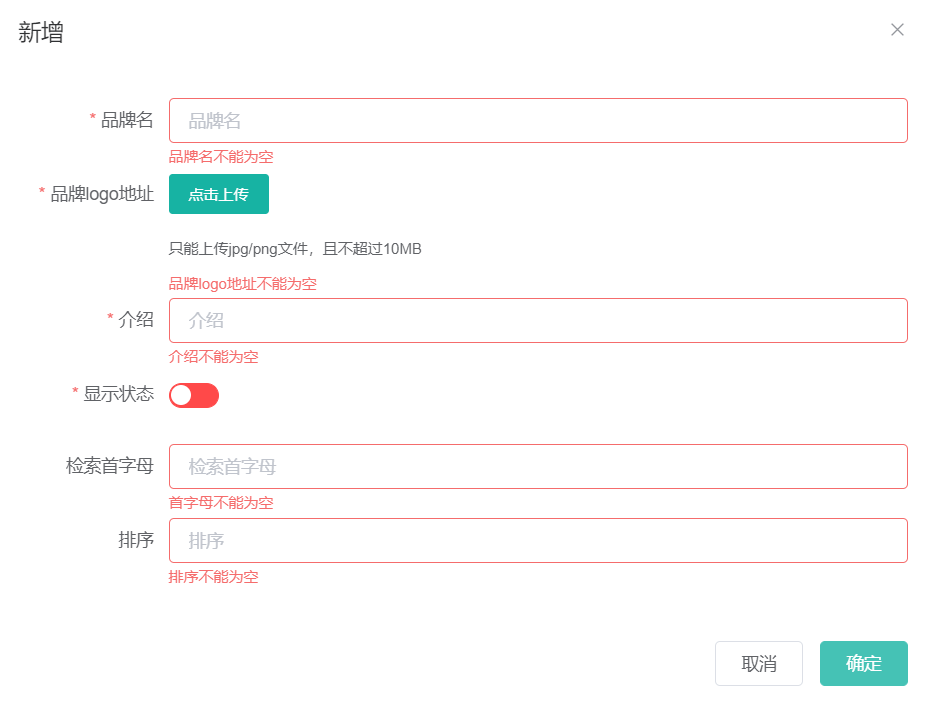
3 新增品牌
3.1 表单校验
前端校验
data() {
    // 首字母校验
    let validatePassFirstLetter = (rule, value, callback) => {
      if (value === "") {
        callback(new Error("首字母不能为空"));
      } else if (value.length > 1) {
        callback(new Error("首字母只能是一个字符"));
      } else if (!/^[a-zA-Z]$/.test(value)) {
        callback(new Error("首字母必须是a-z或A-Z"));
      } else {
        callback();
      }
    };
    // 排序校验
    let validatePassSort = (rule, value, callback) => {
      if (value === "") {
        callback(new Error("排序不能为空"));
      } else if (!/^[1-9]+$/.test(value)) {
        callback(new Error("排序必须数字(数)"));
      } else {
        callback();
      }
    };
    return {
      visible: false,
      dataForm: {
        brandId: 0,
        name: "",
        logo: "",
        descript: "",
        showStatus: "",
        firstLetter: "",
        sort: "",
      },
      dataRule: {
        name: [{ required: true, message: "品牌名不能为空", trigger: "blur" }],
        logo: [
          { required: true, message: "品牌logo地址不能为空", trigger: "blur" },
        ],
        descript: [
          { required: true, message: "介绍不能为空", trigger: "blur" },
        ],
        showStatus: [
          {
            required: true,
            message: "显示状态[0-不显示;1-显示]不能为空",
            trigger: "blur",
          },
        ],
        firstLetter: [{ validator: validatePassFirstLetter, trigger: "blur" }],
        sort: [{ validator: validatePassSort, trigger: "blur" }],
      },
    };
  },
后端校验
使用JSR303,JSR是Java Specification Requests的缩写,意思是Java 规范提案。
- 需要引入依赖
<dependency>
    <groupId>org.springframework.boot</groupId>
    <artifactId>spring-boot-starter-validation</artifactId>
    <version>2.2.1.RELEASE</version>
</dependency>
- 为实体类属性加校验注解,并定义提示内容(填写的内容是错误时的提示信息)
/**
* 品牌名
* @NotBlank: 该注解的元素不能为null而且需要包含至少一个非空格的字符。
*/
@NotBlank
private String name;

// 也可以自定义提示信息
@NotBlank(message = "品牌名不能为空")
private String name;
- 开启校验
如果只在实体类的属性上标了校验注解,而没有开启校验的话,是没有用的。
在controller的方法里添加一个注解:@Valid
    /**
     * 保存
     */
    @RequestMapping("/save")
    // @RequiresPermissions("product:brand:save")
    public R save(@Valid @RequestBody BrandEntity brand){
		brandService.save(brand);

        return R.ok();
    }
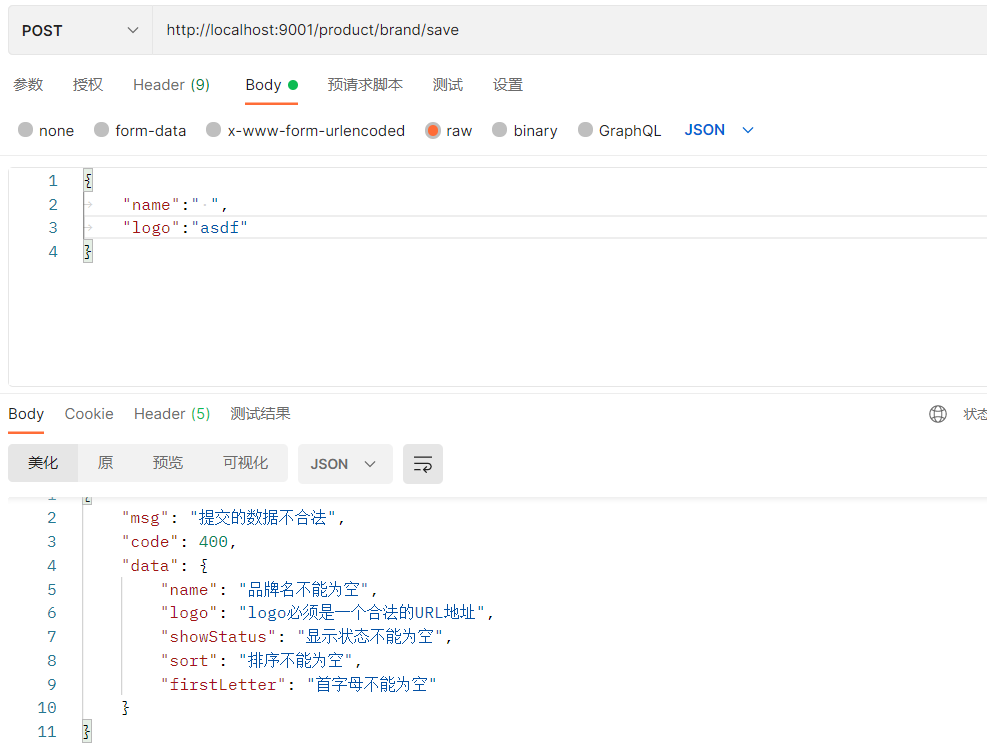
- 获取校验结果并返回给前端:
给校验的bean后紧跟一个BindingResult就可以获取到校验的结果。实质是:捕捉异常
@RequestMapping("/save")
public R save(@Valid @RequestBody BrandEntity brand, BindingResult result){
    if (result.hasErrors()){
        Map<String, String> map = new HashMap<>();
        result.getFieldErrors().forEach((item)->{
            // 获取错误信息
            String message = item.getDefaultMessage();
            // 获取错误的属性
            String field = item.getField();
            map.put(field, message);
        });
        return R.error(400, "提交的数据不合法").put("data", map);
    }else {
        brandService.save(brand);

        return R.ok();
    }
}
- 为其他属性也添加校验规则
@Data
@TableName("pms_brand")
public class BrandEntity implements Serializable {
    private static final long serialVersionUID = 1L;

    /**
     * 品牌id
     */
    @TableId
    private Long brandId;
    /**
     * 品牌名
     *
     * @NotBlank: 该注解的元素不能为null而且需要包含至少一个非空格的字符。
     */
    @NotBlank(message = "品牌名不能为空")
    private String name;
    /**
     * 品牌logo地址
     */
    @NotEmpty(message = "logo不能为空")
    @URL(message = "logo必须是一个合法的URL地址")
    private String logo;
    /**
     * 介绍
     */
    private String descript;
    /**
     * 显示状态[0-不显示;1-显示]
     */
    @NotNull(message = "显示状态不能为空")
    @Range(min = 0, max = 1, message = "显示状态只能是0或1")
    @Digits(integer = 1, fraction = 0, message = "显示状态只能是整数0或整数1")
    private Integer showStatus;
    /**
     * 检索首字母
     */
    @NotEmpty(message = "首字母不能为空")
    @Pattern(regexp = "^[a-zA-Z]$", message = "首字母只能是一个字母")
    private String firstLetter;
    /**
     * 排序
     */
    @NotNull(message = "排序不能为空")
    @Min(value = 0, message = "排序必须大于等于0")
    private Integer sort;
}
需要注意每一个注解所支持的类型。
3.2 统一异常处理
处理校验异常
在之后,很多业务里的新增、修改都需要加入校验功能,而且这块代码又是重复的,每一个都需要校验检查,返回成功或者失败,这样做太麻烦了,我们需要做一个统一的处理,写一个集中处理所有异常的类。
- 新建一个类:com.example.gulimall.product.exception.GulimallExceptionControllerAdvice.java,并添加注解:@ControllerAdvice
// @ControllerAdvice是专门用来处理异常的
@ControllerAdvice
public class GulimallExceptionControllerAdvice {
}
- 既然要统一处理异常了,那就需要把校验的异常抛出来。但是我们之前写的BindingResult是接收异常的,所以需要把它删掉。
@RequestMapping("/save")
// @RequiresPermissions("product:brand:save")
public R save(@Valid @RequestBody BrandEntity brand){
    //        if (result.hasErrors()){
    //            Map<String, String> map = new HashMap<>();
    //            result.getFieldErrors().forEach((item)->{
    //                // 获取错误信息
    //                String message = item.getDefaultMessage();
    //                // 获取错误的属性
    //                String field = item.getField();
    //                map.put(field, message);
    //            });
    //            return R.error(400, "提交的数据不合法").put("data", map);
    //        }else {
    //
    //
    //            return R.ok();
    //        }
    brandService.save(brand);
    return R.ok();
}
- 使用统一处理异常的类来捕捉异常
/**
 * 集中处理所有异常
 */
@Slf4j
//@ControllerAdvice(basePackages = "com.example.gulimall.product.controller")
//@ResponseBody
// 这个注解=上面两个,类型RestController=ResponseBody+Controller
@RestControllerAdvice(basePackages = "com.example.gulimall.product.controller")
public class GulimallExceptionControllerAdvice {

    @ExceptionHandler(value = {Exception.class})
    public R handleValidException(Exception e){
        log.error("数据校验出现问题:{},异常类型是:{}", e.getMessage(), e.getClass());
        return R.error();
    }
}
输出异常:
2022-08-11 16:34:34.910 ERROR 37916 --- [nio-9001-exec-1] .g.p.e.GulimallExceptionControllerAdvice : 数据校验出现问题:Validation failed for argument [0] in public com.example.common.utils.R com.example.gulimall.product.controller.BrandController.save(com.example.gulimall.product.entity.BrandEntity) with 5 errors: [Field error in object 'brandEntity' on field 'sort': rejected value [null]; codes [NotNull.brandEntity.sort,NotNull.sort,NotNull.java.lang.Integer,NotNull]; arguments [org.springframework.context.support.DefaultMessageSourceResolvable: codes [brandEntity.sort,sort]; arguments []; default message [sort]]; default message [排序不能为空]] [Field error in object 'brandEntity' on field 'showStatus': rejected value [null]; codes [NotNull.brandEntity.showStatus,NotNull.showStatus,NotNull.java.lang.Integer,NotNull]; arguments [org.springframework.context.support.DefaultMessageSourceResolvable: codes [brandEntity.showStatus,showStatus]; arguments []; default message [showStatus]]; default message [显示状态不能为空]] [Field error in object 'brandEntity' on field 'name': rejected value [ ]; codes [NotBlank.brandEntity.name,NotBlank.name,NotBlank.java.lang.String,NotBlank]; arguments [org.springframework.context.support.DefaultMessageSourceResolvable: codes [brandEntity.name,name]; arguments []; default message [name]]; default message [品牌名不能为空]] [Field error in object 'brandEntity' on field 'logo': rejected value [asdf]; codes [URL.brandEntity.logo,URL.logo,URL.java.lang.String,URL]; arguments [org.springframework.context.support.DefaultMessageSourceResolvable: codes [brandEntity.logo,logo]; arguments []; default message [logo],[Ljavax.validation.constraints.Pattern$Flag;@185719d9,,-1,,.*]; default message [logo必须是一个合法的URL地址]] [Field error in object 'brandEntity' on field 'firstLetter': rejected value [null]; codes [NotEmpty.brandEntity.firstLetter,NotEmpty.firstLetter,NotEmpty.java.lang.String,NotEmpty]; arguments [org.springframework.context.support.DefaultMessageSourceResolvable: codes [brandEntity.firstLetter,firstLetter]; arguments []; default message [firstLetter]]; default message [首字母不能为空]] ,异常类型是:class org.springframework.web.bind.MethodArgumentNotValidException
异常信息就是刚才的校验异常信息,那么我们就能猜测这个异常类型应该就是校验异常,那我们就可以让异常处理类的感知更精确一些:
@ExceptionHandler(value = {MethodArgumentNotValidException.class})
public R handleValidException(MethodArgumentNotValidException e){
    log.error("数据校验出现问题:{},异常类型是:{}", e.getMessage(), e.getClass());
    return R.error();
}
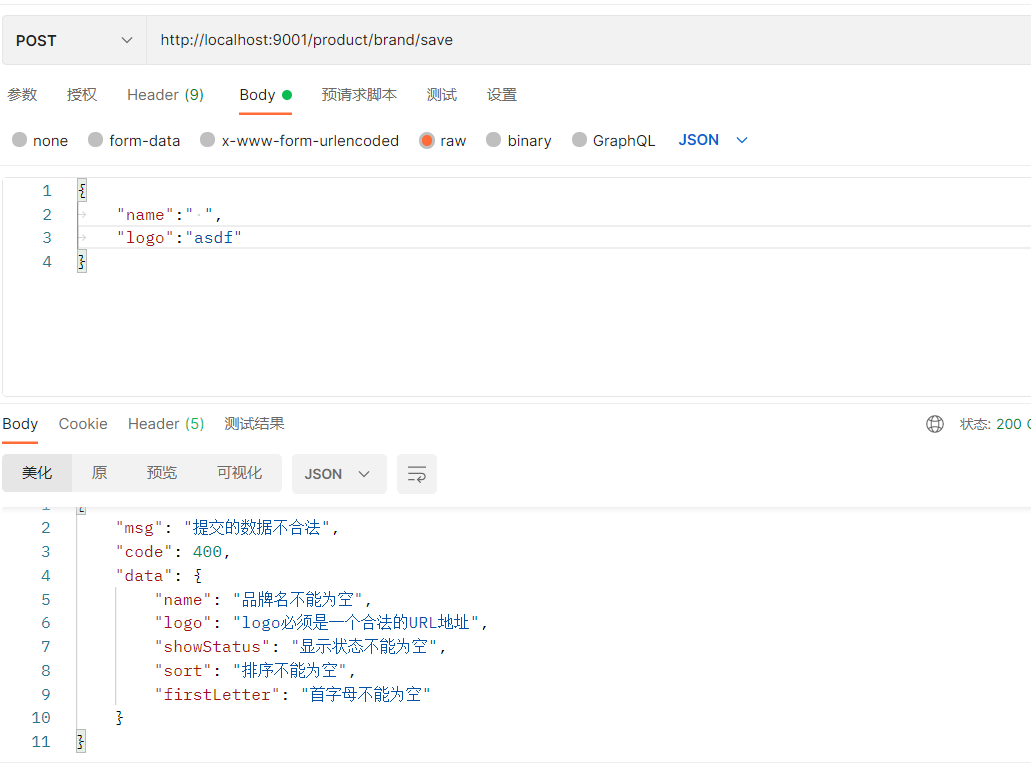
- 用统一异常类来返回异常信息
尝试一下就知道,MethodArgumentNotValidException类中的方法和BindingResult提供的方法相同,那么可以断定我们可以使用它来做和之前完全相同的功能。
@ExceptionHandler(value = {MethodArgumentNotValidException.class})
public R handleValidException(MethodArgumentNotValidException e) {
    Map<String, String> map = new HashMap<>();
    e.getFieldErrors().forEach((item) -> {
        // 获取错误信息
        String message = item.getDefaultMessage();
        // 获取错误的属性
        String field = item.getField();
        map.put(field, message);
    });
    return R.error(400, "提交的数据不合法").put("data", map);
}
处理所有异常
这个范围大的异常处理要放在范围小的后面。
@ExceptionHandler(value = {Exception.class})
public R handleException(Exception e){
    return R.error();
}
系统错误码
等到后来业务众多,接口也会变得很多,返回的状态码就变得重要了。所以我们需要统一各种返回的状态码。
错误码和错误信息定义类
1.错误码定义规则为5位数字
2.前两位表示业务场景,最后三位表示错误码。例如:10001。10:通用,001:系统未知
异常
3.维护错误码后需要维护错误描述,将他们定义为枚举形式
错误码列表:
10:通用
11:商品
12:订单
13:购物车
14:物流
- 写一个枚举类
public enum BizCodeEnum {
    UNKNOWN_EXCEPTION(10000, "系统未知异常"),
    VALID_EXCEPTION(10001, "参数格式校验失败");

    private final int code;
    private final String msg;

    BizCodeEnum(int code, String msg) {
        this.code = code;
        this.msg = msg;
    }

    public int getCode() {
        return code;
    }

    public String getMsg() {
        return msg;
    }
}
- 在异常处理类中使用枚举类提供的状态码和信息
@Slf4j
@RestControllerAdvice(basePackages = "com.example.gulimall.product.controller")
public class GulimallExceptionControllerAdvice {

    @ExceptionHandler(value = {MethodArgumentNotValidException.class})
    public R handleValidException(MethodArgumentNotValidException e) {
        Map<String, String> map = new HashMap<>();
        e.getFieldErrors().forEach((item) -> {
            // 获取错误信息
            String message = item.getDefaultMessage();
            // 获取错误的属性
            String field = item.getField();
            map.put(field, message);
        });
        return R.error(BizCodeEnum.VALID_EXCEPTION.getCode(), BizCodeEnum.VALID_EXCEPTION.getMsg()).put("data", map);
    }

    @ExceptionHandler(value = {Exception.class})
    public R handleException(Exception e){
        return R.error(BizCodeEnum.UNKNOWN_EXCEPTION.getCode(), BizCodeEnum.UNKNOWN_EXCEPTION.getMsg());
    }
}
3.3 JSR303分组校验
为什么要分组校验呢?有可能我们在新增和修改功能时,想要校验的字段和校验规则是不一样的。比如新增时我们不需要提供id,因为MP帮我们自动生成,但是修改时,又必须携带id,所以这两个功能的校验规则是不同的。
- 创建分组接口
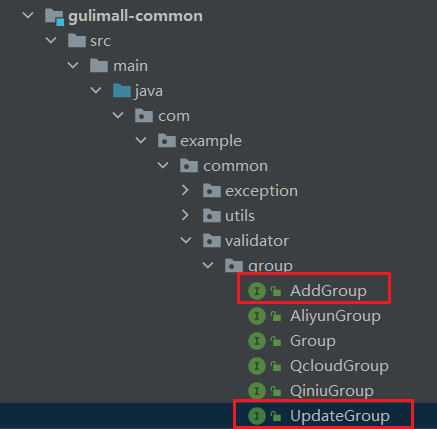
空接口,接口内什么都不需要。
- 为属性指定组,例如品牌id:
/**
 * 品牌id
 */
@NotNull(message = "修改时,品牌id不能为空", groups = {UpdateGroup.class})
@Null(message = "新增时,品牌id不需要提供", groups = {AddGroup.class})
@TableId
private Long brandId;
- 使用
@Validated({AddGroup.class})指定要校验哪一组:
/**
 * 保存
 * @Valid:开启校验
 */
@RequestMapping("/save")
public R save(@Validated({AddGroup.class}) @RequestBody BrandEntity brand) {
    brandService.save(brand);
    return R.ok();
}

/**
 * 修改
 */
@RequestMapping("/update")
public R update(@Validated(value = {UpdateGroup.class}) @RequestBody BrandEntity brand) {
    brandService.updateById(brand);

    return R.ok();
}
没有指定分组的校验注解,在分组校验的情况下不生效。在不分组的情况下才会校验。
3.4 自定义校验(手写注解)
手写注解
自定义校验有3个步骤:
- 编写一个自定义的校验注解
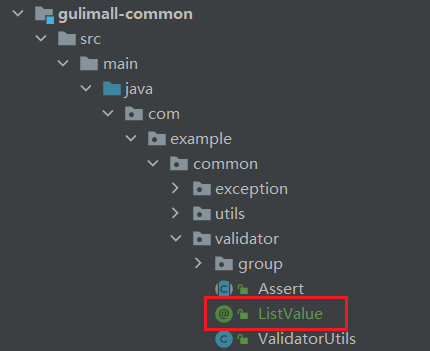
/**
 * 这些头部注解是从别的注解上面抄过来的
 * @Target: 这个注解可以标注在哪些位置
 * @Constraint: 这个注解是使用那个校验器进行校验的
 */
@Target({ METHOD, FIELD, ANNOTATION_TYPE, CONSTRUCTOR, PARAMETER, TYPE_USE })
@Retention(RUNTIME)
@Documented
@Constraint(validatedBy = { })
public @interface ListValue {

    // 我们可以指定一个默认的提示信息(手动创建配置文件)
    String message() default "{com.example.common.validator.ListValue.message}";

    Class<?>[] groups() default { };

    Class<? extends Payload>[] payload() default { };

    // 提供的能够校验通过的值
    int[] vals() default { };

}
创建提示信息的配置文件
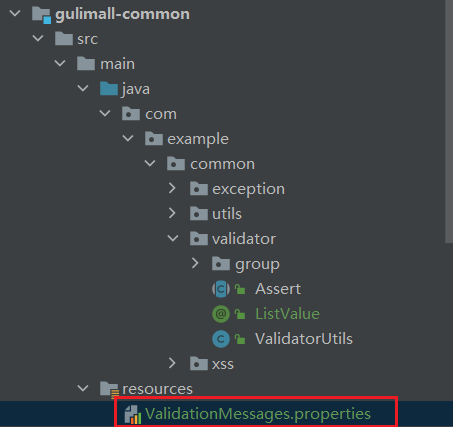
com.example.common.validator.ListValue.message=必须提交指定的值
- 编写一个自定义的校验器
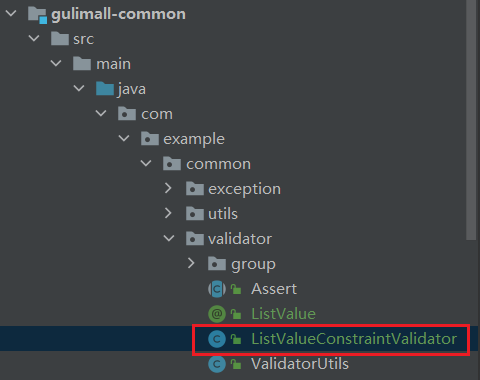
public class ListValueConstraintValidator implements ConstraintValidator<ListValue, Integer> {

    // 用于存储注解内被给予的值
    private Set<Integer> set = new HashSet<>();

    // 初始化方法
    @Override
    public void initialize(ListValue constraintAnnotation) {
        // 获取注解内被给予的值
        int[] vals = constraintAnnotation.vals();
        for (int val : vals) {
            set.add(val);
        }
    }

    // 判断是否校验成功

    /**
     * @param value 需要校验的值(被标注解的属性的值)
     */
    @Override
    public boolean isValid(Integer value, ConstraintValidatorContext context) {
        // 如果提供的值在能够校验通过的值,则校验通过
        return set.contains(value);
    }
}
- 关联自定义的校验器和自定义的校验注解
@Target({ METHOD, FIELD, ANNOTATION_TYPE, CONSTRUCTOR, PARAMETER, TYPE_USE })
@Retention(RUNTIME)
@Documented
// 关联校验器
@Constraint(validatedBy = { ListValueConstraintValidator.class })
public @interface ListValue {

    // 我们可以指定一个默认的提示信息
    String message() default "{com.example.common.validator.ListValue.message}";

    Class<?>[] groups() default { };

    Class<? extends Payload>[] payload() default { };

    // 提供的能够校验通过的值
    int[] vals() default { };

}
- 验证注解
/**
 * 显示状态[0-不显示;1-显示]
 */
@NotNull(message = "显示状态不能为空", groups = {AddGroup.class, UpdateGroup.class})
@ListValue(vals = {0, 1}, groups = {AddGroup.class})
private Integer showStatus;
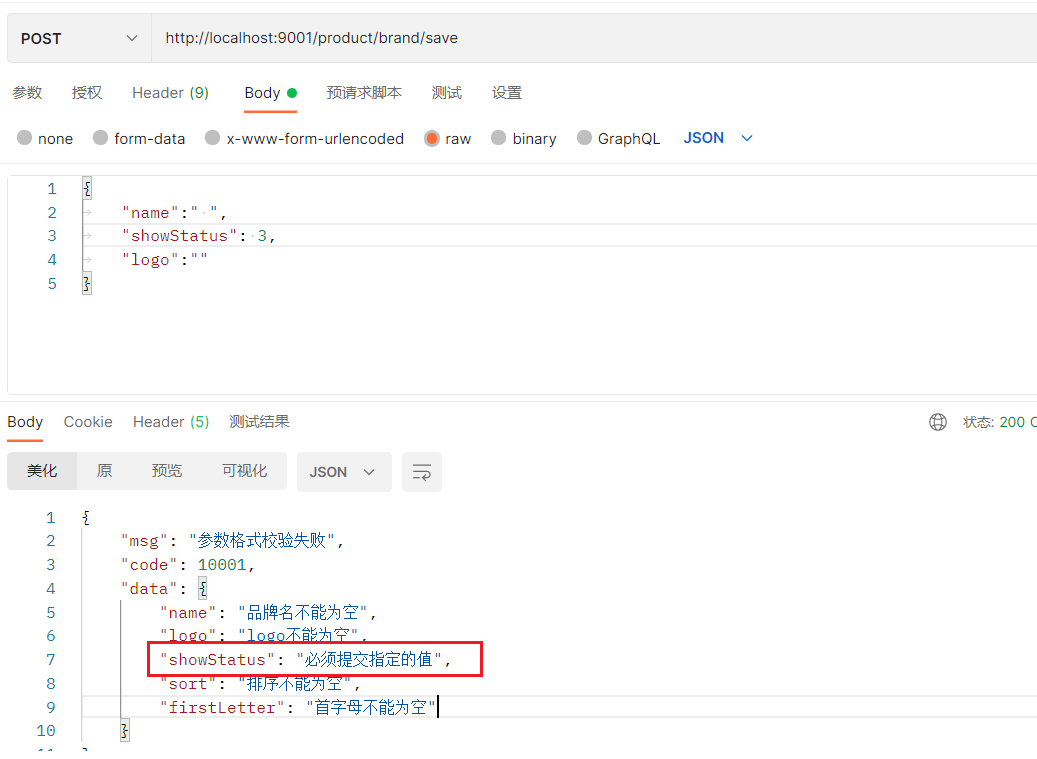
返回的提示信息可能会乱码,解决方法:https://blog.csdn.net/qq_25844803/article/details/107660291
处理显示状态
由于前端有一个单独修改显示状态的功能,它只会传status过来,所以如果还是使用原来的更新方法的话,会导致别的值没传而报错,所以需要单独处理:
-
为这个方法专门创建一个组 UpdateStatusGroup
-
复制一份update的方法,只用来更新status。
/**
 * 修改显示状态
 */
@RequestMapping("/update/status")
public R updateStatus(@Validated(value = {UpdateStatusGroup.class}) @RequestBody BrandEntity brand) {
    brandService.updateById(brand);

    return R.ok();
}
- 把status属性上加上这个组,别的属性不用动,最终提交上来的时候就只会校验status
/**
 * 显示状态[0-不显示;1-显示]
 */
@NotNull(message = "显示状态不能为空", groups = {AddGroup.class, UpdateGroup.class, UpdateStatusGroup.class})
@ListValue(vals = {0, 1}, groups = {AddGroup.class, UpdateGroup.class, UpdateStatusGroup.class})
private Integer showStatus;

 浙公网安备 33010602011771号