UE4 打包(完整包及补丁包)过程 —— Windows & Linux
将Unreal Engine项目发布使用之前,必须正确的打包,打包确保所有都是最新的,并能在对应平台上运行的正确格式。以 UE4.19 为例子
- Windows平台
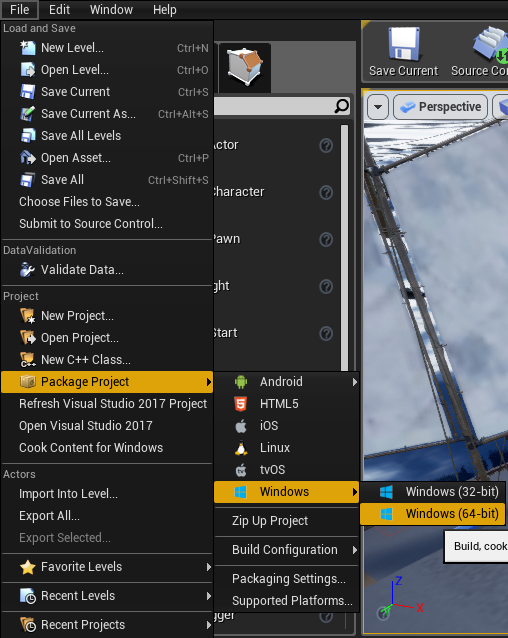
创建包

然后选择一个目录,在UE4 工程右下方会有“正在打包”的提示

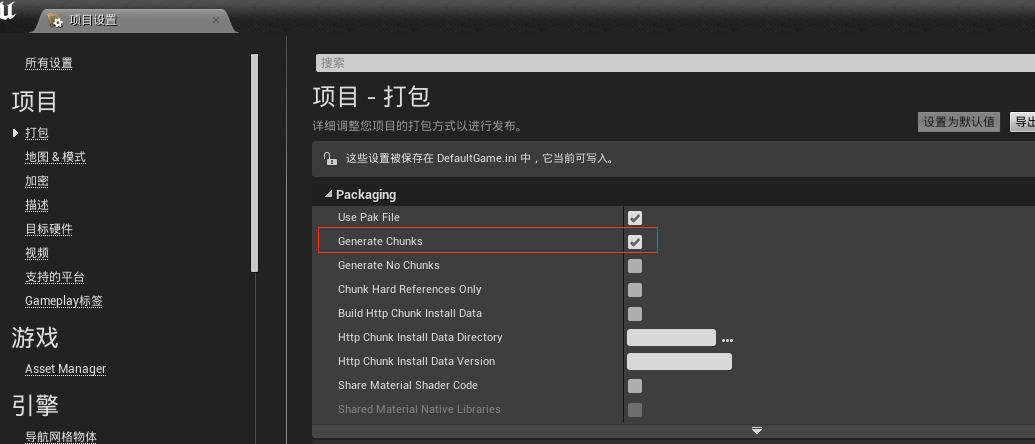
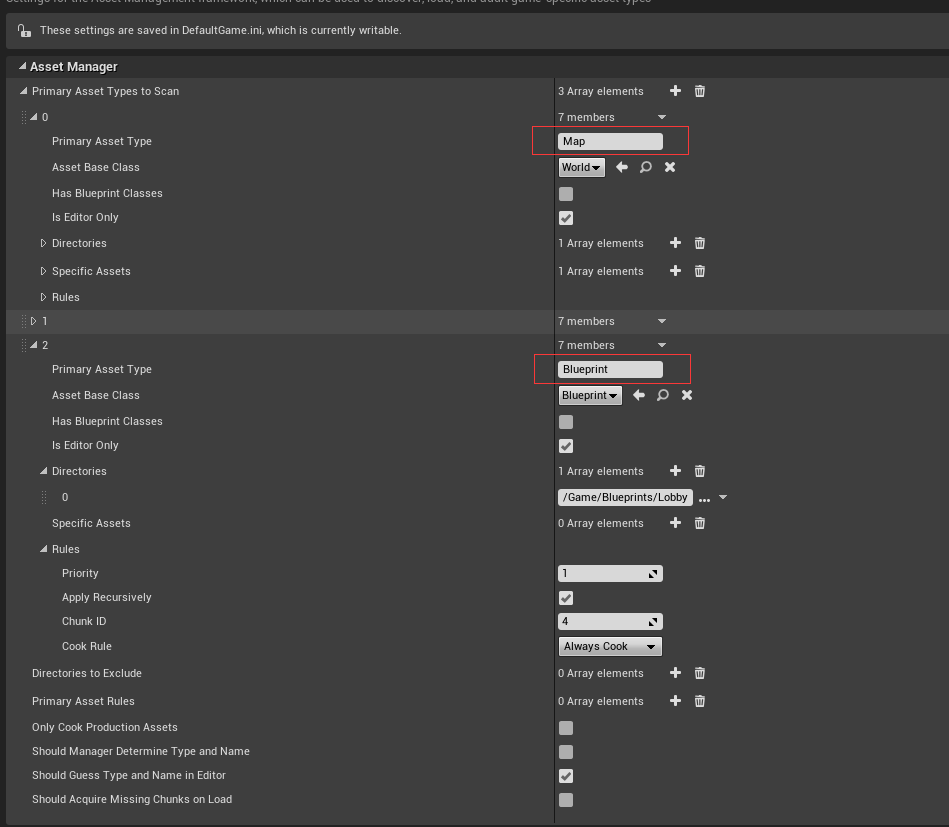
生成多个pak包


关于使用 “ProjectLauncher” 配置打包环境,在https://blog.csdn.net/zhangxiaofan666/article/details/79567017 中说明很详细了,这里不再描述,感谢作者的总结
- Linux(Centos7)平台——打包server
UE4官方建议使用交叉编译,但是我还是比较偏向于本地编译,完全使用服务器的环境进行编译打包,这只是个人的观点。
安装cmake & clang
cmake 要用3版本以上
clang安装请参考我的另外一篇博文: https://www.cnblogs.com/KisonDu/p/10117262.html
UE4源码安装
1)yum 安装ue4依赖包,否则源码安装会失败
sudo yum install epel-release
sudo rpm -Uvh http://li.nux.ro/download/nux/dextop/el7/x86_64/nux-dextop-release-0-1.el7.nux.noarch.rpm
wget http://copr.fedoraproject.org/coprs/jknife/ue4deps/repo/epel-7/jknife-ue4deps-epel-7.repo
sudo cp jknife-ue4deps-epel-7.repo /etc/yum.repos.d/jknife-ue4deps-epel-7.repo
sudo yum install steam vlc hexchat ntfs-3g mesa-libGLU libXScrnSaver
sudo yum install mono-core mono-devel dos2unix gtk3-devel
2)从github下载 UnrealEngine(github需要与unreal 做绑定,详细请参考官网)
3)编译安装
cd UnrealEngine
./Setup.sh (这一步需要下载将近6G的包)
./GenerateProjectFiles.sh
make -j8 (注意:make的时候不能使用root用户,否则会报错,包含 打包工程都不能用root用户)
此时就会在 Engine/Binaries/Linux 目录下生成 UE4Editor 可执行文件
编译打包
以下是写的简单的shell打包脚本,最重要的就是标红的那一句,命令参数涵义跟windows是一样的
#/bin/bash
type=server
platform=Linux
environment=Development
UATPath="/home/ue4/source/UnrealEngine/Engine/Build/BatchFiles/RunUAT.sh"
projectPath=$PWD
pmaps=ThirdPersonExampleMap
$UATPath BuildCookRun -project="$projectPath/RAN_Conqueror.uproject" -noP4 -platform=$platform -clientconfig=$environment -serverconfig=$environment -cook -build -server -nocompileeditor -compressed -stage -package -pak -compile -noclient -serverplatform=$platform -map=$pmaps -unversionedcookedcontent -createreleaseversion=1.0.0 -stagingdirectory="${projectPath}/package/server"
注意:官网上有这句话 If you haven't explicitly defined and set an environment variable of UE4_LINUX_USE_LIBCXX to 0, cross-compiling will use libc++ headers/libraries in there by default instead of the one inside the clang toolchain.
因为我的工程需要依赖其它的库,所以我将UE4_LINUX_USE_LIBCXX 环境变量设置为0,使用我们指定clang而不使用ue4自带的
- 补丁包打包方式
打补丁包是非常简单的,只要设置下基础版本号就可以了。
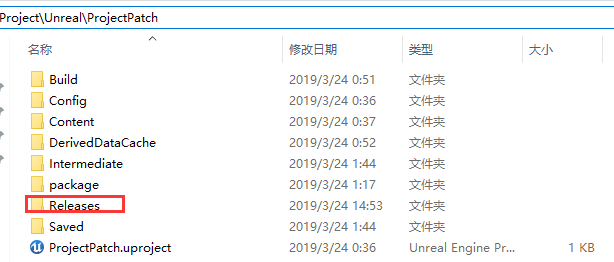
完整包打完之后,除了自己指定目录下会生成最终的发布程序外,还会在.uproject 所在的目录下生成Releases目录,子目录包含了所有完整版本的,如下:


这里主要介绍命令方式打补丁包。在命令行增加 -generatepatch -basedonreleaseversion=1.0.0 这两个参数,去掉 -createreleaseversion 参数,
此时就会在输出目录中生成对应的补丁包,目前一个基本版本只会生成一个补丁版本,新的直接覆盖旧的。

- 打包完整命令行
我自己比较习惯使用命令行方式打包,所以这里附上我平常工作中打包用到的命令行
RunUAT.bat -noP4 -client -platform=Win64 -clientconfig=Shipping -serverconfig=Shipping -cook -build -compressed -stage -package -pak -compile -map=map1+map2 -unversionedcookedcontent -createreleaseversion=1.0.0 -stagingdirectory=outdir
说明:1)补丁包将-createreleaseversion=1.0.0 替换成 -generatepatch -basedonreleaseversion=1.0.0
2)-client 表示打包client,-server表示打包server端
3) -platform 目前我用到有:PS4、Win64、Linux
4)-clientconfig -serverconfig 有:DebugGame、Development、Shipping
参考文档
命令参数详细介绍:http://wangjie.rocks/2018/08/09/ue4-uat-buildcookrun-cmd/
UE4官方打包文档:http://api.unrealengine.com/CHN/Engine/Basics/Projects/Packaging/index.html
CSDN: https://blog.csdn.net/zhangxiaofan666/article/details/79567017
命令打包官方文档:https://wiki.unrealengine.com/How_to_package_your_game_with_commands
Dedicated Server Guide (Windows & Linux):
https://wiki.unrealengine.com/Dedicated_Server_Guide_(Windows_%26_Linux)
https://wiki.unrealengine.com/index.php?title=Building_On_Linux


