有关Theme(主题)的研究——Silverlight学习笔记[31]
在Silverlight的开发中,为组件设置统一的主题会让程序的外观显得美观大方。本文将为大家介绍如何静态设置系统主题和动态设置主题。
静态设置
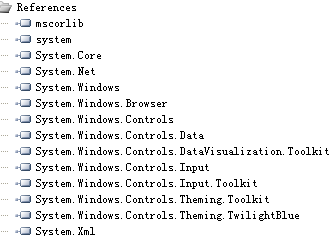
Silverlight已经为我们预置了多套主题。它们分别位于System.Windows.Controls.Theming命名控件下。根据需要在进行配置前我们要引入如下图所示的命名空间:
比方说,接下来我们要为应用程序设置TwilightBlue主题。这时,可以在MainPage.xaml文件的<UserControl>标签中加入如下的命名空间:
xmlns:twilightblue="clr-namespace:System.Windows.Controls.Theming;assembly=System.Windows.Controls.Theming.TwilightBlue"
接着,在标签组<twilightblue:TwilightBlueTheme></twilightblue:TwilightBlueTheme>内置入需要进行样式改变的组件即可。下面看一个实例。
MainPage.xaml文件代码:
<UserControl
xmlns="http://schemas.microsoft.com/winfx/2006/xaml/presentation"
xmlns:x="http://schemas.microsoft.com/winfx/2006/xaml" xmlns:twilightblue="clr-namespace:System.Windows.Controls.Theming;assembly=System.Windows.Controls.Theming.TwilightBlue"
xmlns:d=http://schemas.microsoft.com/expression/blend/2008 xmlns:mc="http://schemas.openxmlformats.org/markup-compatibility/2006"
mc:Ignorable="d" xmlns:controls="clr-namespace:System.Windows.Controls;assembly=System.Windows.Controls" x:Class="SilverlightClient.MainPage"
d:DesignWidth="320" d:DesignHeight="240">
<Grid x:Name="LayoutRoot" Width="320" Height="240" Background="White">
<!--主题标签开始-->
<twilightblue:TwilightBlueTheme>
<Grid>
<Button Height="21" HorizontalAlignment="Left" Margin="8,8,0,0" VerticalAlignment="Top" Width="43" Content="Button"/>
<CheckBox Height="17" HorizontalAlignment="Left" Margin="8,33,0,0" VerticalAlignment="Top" Width="76" Content="CheckBox"/>
<ComboBox Height="20" HorizontalAlignment="Left" Margin="8,54,0,0" VerticalAlignment="Top" Width="76"/>
<Slider Height="20" HorizontalAlignment="Left" Margin="7,80,0,0" VerticalAlignment="Top" Width="77"/>
<RadioButton Height="21" Margin="84,8,146,0" VerticalAlignment="Top" Content="RadioButton"/>
<controls:Calendar Margin="144,33,0,35"/>
<ComboBox x:Name="cbTheme" Height="23" Margin="8,0,8,8" VerticalAlignment="Bottom"/>
<TextBlock Height="19" HorizontalAlignment="Left" Margin="11,0,0,35" VerticalAlignment="Bottom" Width="95" Text="选择一个主题:" TextWrapping="Wrap" FontSize="13.333"/>
</Grid>
</twilightblue:TwilightBlueTheme>
<!--主题标签结束-->
</Grid>
</UserControl>
动态设置
有时候为了增强与用户的交互需要动态改变主题。这时就需要隐式样式管理组件(ImplicitStyleManager)来助力我们完成这项任务,有关该组件的详细介绍请参见我的有关ImplicitStyleManager组件的研究。
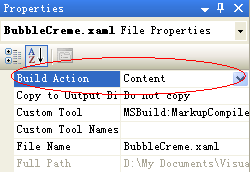
在开始前我们需要在Silverlight项目文件夹下建立一个存放主题的文件夹Theme,主题资源词典文件请点击这里下载。放置好后,将每一个主题文件的Build Action由Page改为Content。这很重要,不然会导致资源文件查找不到,从而产生编译错误。
给出文件代码如下:
MainPage.xaml文件代码:
<UserControl
xmlns="http://schemas.microsoft.com/winfx/2006/xaml/presentation"
xmlns:x="http://schemas.microsoft.com/winfx/2006/xaml"
xmlns:twilightblue="clr-namespace:System.Windows.Controls.Theming;assembly=System.Windows.Controls.Theming.TwilightBlue"
xmlns:d="http://schemas.microsoft.com/expression/blend/2008" xmlns:mc="http://schemas.openxmlformats.org/markup-compatibility/2006"
mc:Ignorable="d" xmlns:controls="clr-namespace:System.Windows.Controls;assembly=System.Windows.Controls" x:Class="SilverlightClient.MainPage"
d:DesignWidth="320" d:DesignHeight="240">
<Grid x:Name="LayoutRoot" Width="320" Height="240" Background="White">
<Grid>
<Button Height="21" HorizontalAlignment="Left" Margin="8,8,0,0" VerticalAlignment="Top" Width="43" Content="Button"/>
<CheckBox Height="17" HorizontalAlignment="Left" Margin="8,33,0,0" VerticalAlignment="Top" Width="76" Content="CheckBox"/>
<ComboBox Height="20" HorizontalAlignment="Left" Margin="8,54,0,0" VerticalAlignment="Top" Width="76"/>
<Slider Height="20" HorizontalAlignment="Left" Margin="7,80,0,0" VerticalAlignment="Top" Width="77"/>
<RadioButton Height="21" Margin="84,8,146,0" VerticalAlignment="Top" Content="RadioButton"/>
<controls:Calendar Margin="144,33,0,35"/>
<ComboBox x:Name="cbTheme" Height="23" Margin="8,0,8,8" VerticalAlignment="Bottom"/>
<TextBlock Height="19" HorizontalAlignment="Left" Margin="11,0,0,35" VerticalAlignment="Bottom" Width="95" Text="选择一个主题:" TextWrapping="Wrap" FontSize="13.333"/>
</Grid>
</Grid>
</UserControl>
MainPage.xaml.cs文件代码:
using System;
using System.Collections.Generic;
using System.Linq;
using System.Net;
using System.Windows;
using System.Windows.Controls;
using System.Windows.Documents;
using System.Windows.Input;
using System.Windows.Media;
using System.Windows.Media.Animation;
using System.Windows.Shapes;
using System.Windows.Controls.Theming;
namespace SilverlightClient
{
//辅助类
public class ThemeHelper
{
public string ThemeName { get; set; }
public string ThemePath { get; set; }
}
public partial class MainPage : UserControl
{
public MainPage()
{
InitializeComponent();
//注册事件触发
this.Loaded += new RoutedEventHandler(MainPage_Loaded);
this.cbTheme.SelectionChanged += new SelectionChangedEventHandler(cbTheme_SelectionChanged);
}
void cbTheme_SelectionChanged(object sender, SelectionChangedEventArgs e)
{
if (cbTheme.SelectedItem != null)
{
string themepath = (cbTheme.SelectedItem as ThemeHelper).ThemePath;
//通过隐式样式管理组件设置主题
ImplicitStyleManager.SetResourceDictionaryUri(LayoutRoot, new Uri(themepath, UriKind.Relative));
ImplicitStyleManager.SetApplyMode(LayoutRoot, ImplicitStylesApplyMode.OneTime);
ImplicitStyleManager.Apply(LayoutRoot);
}
}
void MainPage_Loaded(object sender, RoutedEventArgs e)
{
cbTheme.ItemsSource = GetThemeUri();
cbTheme.DisplayMemberPath = "ThemeName";
cbTheme.SelectedIndex = 9;
}
//主题资源生成
private List<ThemeHelper> GetThemeUri()
{
List<ThemeHelper> returnedValue = new List<ThemeHelper>();
returnedValue.Add(new ThemeHelper() { ThemeName = "BubbleCreme", ThemePath="theme/BubbleCreme.xaml"});
returnedValue.Add(new ThemeHelper() { ThemeName = "BureauBlack", ThemePath = "theme/BureauBlack.xaml" });
returnedValue.Add(new ThemeHelper() { ThemeName = "BureauBlue", ThemePath = "theme/BureauBlue.xaml" });
returnedValue.Add(new ThemeHelper() { ThemeName = "ExpressionDark", ThemePath = "theme/ExpressionDark.xaml" });
returnedValue.Add(new ThemeHelper() { ThemeName = "ExpressionLight", ThemePath = "theme/ExpressionLight.xaml" });
returnedValue.Add(new ThemeHelper() { ThemeName = "RainierOrange", ThemePath = "theme/RainierOrange.xaml" });
returnedValue.Add(new ThemeHelper() { ThemeName = "RainierPurple", ThemePath = "theme/RainierPurple.xaml" });
returnedValue.Add(new ThemeHelper() { ThemeName = "ShinyBlue", ThemePath = "theme/ShinyBlue.xaml" });
returnedValue.Add(new ThemeHelper() { ThemeName = "ShinyRed", ThemePath = "theme/ShinyRed.xaml" });
returnedValue.Add(new ThemeHelper() { ThemeName = "TwilightBlue", ThemePath = "theme/TwilightBlue.xaml"});
returnedValue.Add(new ThemeHelper() { ThemeName = "WhistlerBlue", ThemePath = "theme/WhistlerBlue.xaml" });
return returnedValue;
}
}
}
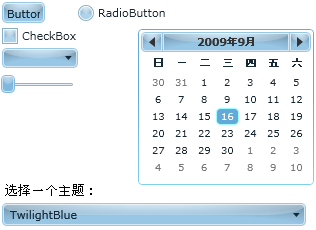
最终效果图
关于动态设置,老代的一篇文章值得推荐:使用Silverlight Toolkit中的主题(Theme)
文章出处:Kinglee’s Blog (http://www.cnblogs.com/Kinglee/)
版权声明:本文的版权归作者与博客园共有。转载时须注明本文的详细链接,否则作者将保留追究其法律责任。


 在Silverlight的开发中,为组件设置统一的主题会让程序的外观显得美观大方。本文将为大家介绍如何静态设置系统主题和动态设置主题。


