
SpringBoot实现文件上传
前言参考:快速开发第一个SpringBoot应用
这篇文章会讲解如何使用SpringBoot完成一个文件上传的过程,并且附带一些SpringBoot开发中需要注意的地方
首先我们写一个文件上传的html页面:picUpload.html
<!DOCTYPE HTML>
<html>
    <head>
        <title>pictureUploading</title>
        <meta http-equiv="Content-Type" content="text/html;charset=UTF-8 ">
    </head>
    <body>
        <form enctype="multipart/form-data" method="post" action="/upload">
            文件:<input type="file" name="fileUpload"/>
            <input type="submit" value="上传"/>
        </form>
    </body>
</html>
注意form标签里的enctype属性必须指定为:multipart/form-data。
下面我们看看通过Quick Start得到的项目的初始目录结构:
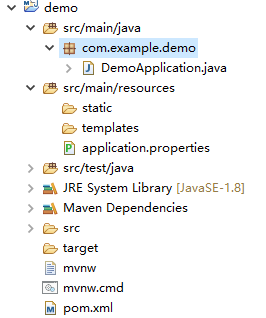
SpringBoot官方文档告诉我们,statis这个目录里面应该存放一些静态文件,比如 css、js、image并且可以直接被外部访问到。而templates这个目录则存放一些静态页面,如jsp、html、ftl。并且template这个目录里的内容外部是访问不到的。按照规范,我们将picUpload.html文件放到templates目录下。
现在通过:localhost:8080/index.html是访问不到该页面的。按照以前学习SpringMVC的经验,应该写一个controller,通过这个controller跳转到picUpload.html页面上去,再返回给用户。
下面我们新建一个controller,用做页面的跳转:
@Controller
public class ToHtmlController {
    @RequestMapping("/picUpload")
    public String picUpload(){
        return "picUpload";
    }
}
此时如果我们启动项目,并访问localhost:8080/picUpload这个url,页面会报错如下:
Whitelabel Error Page
This application has no explicit mapping for /error, so you are seeing this as a fallback.
Mon Jun 04 19:10:46 CST 2018
There was an unexpected error (type=Internal Server Error, status=500).
Circular view path [picUpload]: would dispatch back to the current handler URL [/picUpload] again. Check your ViewResolver setup! (Hint: This may be the result of an unspecified view, due to default view name generation.)
注意最后一句提示,意思就是我们没有指明模板引擎,这里我们使用thymeleaf,在pom.xml文件中添加如下依赖:
<dependency>
        <groupId>org.springframework.boot</groupId>
        <artifactId>spring-boot-starter-thymeleaf</artifactId>
</dependency>
然后启动项目,访问localhost:8080/picUpload,看到页面如下:
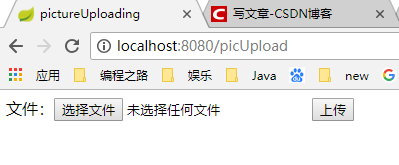
当选择完文件,点击上传按钮后,form表单会按照action属性值的url进行后端访问action="/upload",此时我们应该写一个controller来接收前端传来的图片,并将图片放到项目的static目录下。
图片处理controller如下:
/**
 * 图片上传
 * @author 吴洋
 *
 */
@RestController
public class PicUploadController {

    @PostMapping("/upload")
    public Object upload(MultipartFile fileUpload){
        //获取文件名
        String fileName = fileUpload.getOriginalFilename();
        //获取文件后缀名
        String suffixName = fileName.substring(fileName.lastIndexOf("."));
        //重新生成文件名
        fileName = UUID.randomUUID()+suffixName;
        //指定本地文件夹存储图片
        String filePath = "D:/SpringBoot/demo/src/main/resources/static/";
        try {
            //将图片保存到static文件夹里
            fileUpload.transferTo(new File(filePath+fileName));
            return new Massage(0,"success to upload");
        } catch (Exception e) {
            e.printStackTrace();
            return new Massage(-1,"fail to upload");
        }
    }
}
这里我新建了一个Message类,来向前端返回是否上传成功的信息。
public class Massage {
    //0表示成功;-1表示失败
    int status;
    //向前端返回的内容
    String massage;
    public Massage() {
        super();
    }
    public Massage(int status, String massage) {
        super();
        this.status = status;
        this.massage = massage;
    }
    //get/set方法
}
此时我们启动项目,并访问localhost:8080/picUpload,选择图片,点击上传。页面返回如下:
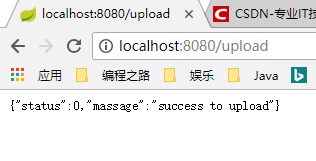
说明图片上传成功了,refresh项目,可以看到static目录下出现了我们上传的图片,并且名称也随机改变了。


 浙公网安备 33010602011771号