Python
2021.9.9
Turtle官方文档
货币兑换
money=input("请输入货币符号($/¥)和金额:")
while 1+1==2:
    if money[0] in ['¥']:
        print("可兑换的美元为:$%.4f"%(eval(money[1:len(money)])*0.1452))
        break
    elif money[0] in ['$']:
        print("可兑换的人民币为:¥%.4f" % (eval(money[1:len(money)])*6.8833))
        break
    else :
        money = input("输入格式有误,例:$100。请重新输入:")
1、input()函数只能返回字符串,所以应用eval()函数将字符串转换为可计算的数值.
2、1+1=2 表示无限循环,只有输入了正确的格式,输出了结果才会跳出循环。否则将一直循环输入语句。
3、关键字 in 表示money[0]是否存在于数组[‘¥’]中,[‘¥’]表示一个数组,不过只有一个元素。
4、%.4f 为格式符,表示输出为保留小数点后4的浮点数。
5、money[0] 索引 索引编号为0的字符,即第一个字符。
6、len()函数获取字符串长度,money[1:len(money)] 表示切片除了第一个字符(索引编号为0)外的所有字符。
Version 1.0
while True:
    money = input("请输入货币符号($/¥)和金额:")
    if money[0] in ['¥']:
        print("可兑换的美元为:$%.4f"%(eval(money[1:len(money)])*0.1452))
        break
    elif money[0] in ['$']:
        print("可兑换的人民币为:¥%.4f" % (eval(money[1:len(money)])*6.8833))
        break
    else :
        print("输入格式有误,例:$100。请重新输入.")
Version 2.0(调用函数)
文件名 curExchange.py
def exchange(money): #定义函数
    while True:
        if money[0] in ['¥']:
            print("可兑换的美元为:$%.4f" % (eval(money[1:len(money)]) * 0.1452))
            break
        elif money[0] in ['$']:
            print("可兑换的人民币为:¥%.4f" % (eval(money[1:len(money)]) * 6.8833))
            break
        else:
            money = input("输入格式有误,例:$100。请重新输入:")
money = input("请输入货币符号($/¥)和金额:")
exchange(money)  #调用函数
Version 3.0(调用模块)
将前一个文件封装为一个模块,创建一个新文件,调用模块。
import curExchange #导入模块 文件名 curExchange.py
m= curExchange.money
if __name__== 'main':  #判断执行的文件是否为当前文件,若是则执行该分支,否者不执行。
    curExchange.exchange(m)  #前有空格
1、 if name== ‘main’: 没有此句将会执行两次打印输出语句,原模块执行一次,调用后执行一次。
等边三角
import turtle as t #导入turtle模块,取别名为 t
t.pencolor("black") #画笔颜色
t.fillcolor("pink") #填充颜色
t.begin_fill() #填充开始
t.forward(200) #长度200像素
t.seth(240) #角度240°
t.forward(200)
t.seth(120)
t.forward(200)
t.end_fill() #填充结束
[外链图片转存失败,源站可能有防盗链机制,建议将图片保存下来直接上传(img-eYNE8Pl1-1640141061954)(D:\python\笔记\img\image-20210909211103722.png)]
凌形
import turtle as t #导入turtle模块,取别名为 t
t.pencolor("black") #画笔颜色
t.fillcolor("pink") #填充颜色
t.begin_fill() #填充开始
t.seth(-45)
while True:
    t.forward(200)
    t.right(90) #右902度
    if abs(t.pos())<1:  #回到原点结束
        break
t.end_fill() #填充结束
[外链图片转存失败,源站可能有防盗链机制,建议将图片保存下来直接上传(img-fK9nNK3G-1640141061954)(D:\python\笔记\img\image-20210909211006428.png)]
五边形
import turtle as t #导入turtle模块,取别名为 t
t.pencolor("black") #画笔颜色
t.fillcolor("pink") #填充颜色
t.begin_fill() #填充开始
while True:
    t.forward(200)
    t.right(72)
    if abs(t.pos())<1:  #回到原点结束
        break
t.end_fill() #填充结束
[外链图片转存失败,源站可能有防盗链机制,建议将图片保存下来直接上传(img-8ncKngMa-1640141061956)(D:\python\笔记\img\image-20210909211415129.png)]
正六边形
import turtle as t #导入turtle模块,取别名为 t
t.pencolor("black") #画笔颜色
t.fillcolor("pink") #填充颜色
t.begin_fill() #填充开始
t.seth(-30)
while True:
    t.forward(100)
    t.right(60)
    if abs(t.pos())<1:  #回到原点结束
        break
t.end_fill() #填充结束
[外链图片转存失败,源站可能有防盗链机制,建议将图片保存下来直接上传(img-cCCeryE8-1640141061956)(D:\python\笔记\img\image-20210909211941106.png)]
circle()函数
圆形
import turtle as t #导入turtle模块,取别名为 t
t.pencolor("black") #画笔颜色
t.fillcolor("pink") #填充颜色
t.begin_fill() #填充开始
t.circle(100)
t.end_fill() #填充结束
1、circle() 函数的三个参数,
第一个:radius 设置半径,不可省。
第二个:extent 设置弧度,默认为360度,可省
第三个:steps 设置步长,默认为无限次,即一个圆,可用于画正多边形。也可省。
2、所以前面所有的都可以用circle()函数画出
正N边形
import turtle as t #导入turtle模块,取别名为 t
t.pencolor("black") #画笔颜色
t.fillcolor("pink") #填充颜色
t.begin_fill() #填充开始
t.circle(100,None,N) #将N改为数值,则变为正N边形.
t.end_fill() #填充结束
t.exitonclick() #点击才关闭窗口(不自动关闭)
例:t.circle(100,None,3)
结果如图:
[外链图片转存失败,源站可能有防盗链机制,建议将图片保存下来直接上传(img-Idlf3bPe-1640141061957)(D:\python\笔记\img\image-20210909214038302.png)]
数学模块math
先来一口鸡汤
print("如果每天努力一点,那么一年后后的成果将有(1+0.01)^365=%.6f"%(1+0.01)**365)
print("如果每天再努力一点,那么一年后后的成果将达到(1+0.02)^365=%.6f"%(1+0.02)**365)
print("如果每天退步一点,那么一年后后的成果将只有(1-0.01)^365=%.6f"%(1-0.01)**365)
输出结果:
如果每天努力一点,那么一年后后的成果将有(1+0.01)^365=37.783434
如果每天再努力一点,那么一年后后的成果将达到(1+0.02)^365=1377.408292
如果每天退步一点,那么一年后后的成果将只有(1-0.01)^365=0.025518
格式化输出
import math as m
print("圆周率为 {:.20f}".format(m.pi)) #浮点数小数点后20位
a=m.floor(m.pi*10**8)
print(a)
print("以科学计数法显示:{:e}".format(a))
print("千位分隔符显示:{0:,}".format(a))
print("以小数点后两位百分比显示:{:.2%}".format(a))
输出结果:
圆周率为 3.14159265358979311600
314159265
以科学计数法显示:3.141593e+08
千位分隔符显示:314,159,265
千位分隔符显示:31415926500.00%
循环输出图形
for i in range(11): #循环11次
    print("___*",end='')  #不换行
输出结果
[外链图片转存失败,源站可能有防盗链机制,建议将图片保存下来直接上传(img-AmGW27wH-1640141061958)(D:\python\笔记\img\image-20210909235213539.png)]
九九乘法表
for i in range(1,10):
    for j in range(1,i+1):
        print("%d*%d=%-3d"%(j,i,i*j),end='')
    print('') #换行
输出结果:
1*1=1
1*2=2  2*2=4
1*3=3  2*3=6  3*3=9
1*4=4  2*4=8  3*4=12 4*4=16
1*5=5  2*5=10 3*5=15 4*5=20 5*5=25
1*6=6  2*6=12 3*6=18 4*6=24 5*6=30 6*6=36
1*7=7  2*7=14 3*7=21 4*7=28 5*7=35 6*7=42 7*7=49
1*8=8  2*8=16 3*8=24 4*8=32 5*8=40 6*8=48 7*8=56 8*8=64
1*9=9  2*9=18 3*9=27 4*9=36 5*9=45 6*9=54 7*9=63 8*9=72 9*9=81
"百鸡百钱"问题
问:公鸡每只值五文钱,母鸡每只值三文钱,小鸡每三只值一文钱。现在用一百文钱买一百只鸡。问:这一百只鸡中,公鸡、母鸡、小鸡各有多少只?
count=0 #计数
for i in range(20): #公鸡数
    for j in range(33): #母鸡数
        for k in range(300): #小鸡数
            if 5*i+3*j+1/3*k==100 and i+j+k==100 :
                count+=1
                print("第{}种情况:公鸡数为{},母鸡数为{},小鸡数为{}".format(count,i,j,k))
                break
输出结果:
第1种情况:公鸡数为0,母鸡数为25,小鸡数为75
第2种情况:公鸡数为4,母鸡数为18,小鸡数为78
第3种情况:公鸡数为8,母鸡数为11,小鸡数为81
第4种情况:公鸡数为12,母鸡数为4,小鸡数为84
思路:
1、列出方程:设数量分别为i,j,k。
2、根据数量 :i+j+k==100
3、根据总金额: 5i+3j+1/3*k==100
4、循环遍历出所有满足条件的值。
5、可以先粗略判断循环范围:公鸡5钱一只,20只就将满100钱,所以数量必定不超出20;其他类似。
扔骰子游戏(P102.7)
呆逼
import random

winA = 0 #选手A获胜次数
winB = 0 #选手B获胜次数
win = 0 #平局次数
for i in range(50):
    sumA = 0
	sumB = 0
    for j in range(10):
        if j % 2 == 0:  #轮流扔
            A = random.randint(1, 6)
            sumA += A #统计5次总和
        else:
            B = random.randint(1, 6)
            sumB += B
    if sumA > sumB:
        winA += 1
    elif sumB > sumA:
        winB += 1
    else:
        win += 1
if winA > winB:
    print("恭喜选手A以{}的胜利次数获胜!".format(winA))
elif winB > winA:
    print("恭喜选手B以{}的胜利次数获胜!".format(winB))
else:
    print("双方平局!")
print("统计:选手A获胜次数为{}次,选手B获胜次数为{}次,平局次数为{}".format(winA, winB, win))
回文素数
输出2-1000内所有的回文素数
for i in range(2, 1001):
    count=0
    for j in range(2, i):
        if i % j != 0:
            count+=1 #计数不能整除的次数
    if count ==(i-2) : #当不能整除的次数为当前数减去2(本身整除一次,整除1一次),便为素数.
        if str(i)[0]==str(i)[-1]: #判断是否回文
            print(i,end=' ')
输出结果
2 3 5 7 11 101 131 151 181 191 313 353 373 383 727 757 787 797 919 929
素数
Version 1.0
for i in range(2, 1001):
    flag=1
    for j in range(2, i):
        if i % j == 0:
            flag=0
            break
    if flag==1:
        print(i,end=' ')
1、设置一个标志flag,判断2到本身之间,是否有数可被整除,有则将flag赋值为0,表示此数可被当前j整除,且不需再进行之后判断,跳出循环。
2、如没有可被整除的数,flag将不会被改变,默认为1,则输出素数i。
Version 2.0
for i in range(2, 1001):
    count=0
    for j in range(2, i):
        if i % j != 0:
            count+=1 #计数不能整除的次数
    if count ==(i-2) : #当不能整除的次数为当前数减去2(本身整除一次,整除1一次),便为素数.
        print(i,end=' ')
1、根据不可被整除的次数判断,是否为素数。
Version 3.0
for i in range(2, 1001):
    count=0
    for j in range(2, i):
        if i % j == 0:
            count+=1
    if count == 0 :
        print(i,end=' ')
1、根据可被整除的次数判断,可被整除的次数只有1和本身2次。
2、但是循环遍历范围除去了1和本身,所以应为0次。
3、可在count+=1,后加break退出循环,提高效率。只是count计数的不再是可被整除的次数,而是相当于一个flag(标志)了。
Version 4.0
while True:
    try:
        i = eval(input("请输入一个整数,判断是否为素数:"))
        flag = 1
        for j in range(2, i):
            if i % j == 0:
                flag = 0
                print("%d不是素数" % i)
                break
        if flag == 1:
            print("%d是素数" % i)
        break
    except:
        print("输入有误,请重新输入!")
1、修改功能:输入判断
2、try :except :排除错误的输入情况。
version 5.0
使用列表存储展示
调用函数
动态输入
def shu(ar=100):
    lists = []
    for i in range(2, ar):
        flag = 1
        for j in range(2, i):
            if i % j == 0:
                flag = 0
                break
        if flag == 1:
            lists.append(i)
    print(lists)

c = eval(input("请输入你想得到素数的范围:"))
shu(c)
水仙花数
找出3位数所有的水仙花数
for i in range(100,1000):
    if (i//100%10)**3+(i//10%10)**3+(i%10)**3==i:
        print(i)
1、 i//100%10 表示 百位
2、 i//10%10 表示 十位
3、 i%10 表示 个位
输出结果:
153
370
371
407
销售额提成(P102.10)
m = eval(input("工资查询__请输入您的销售额:"))
salary = 2000
if m <= 3000:
    print("您的工资为%.2f元" % salary)
elif m > 3000 and m <= 7000:
    print("您的工资为%.2f元" % (salary+m*0.1))
elif m > 7000 and m <= 10000:
    print("您的工资为%.2f元" % (salary+m*0.15))
else:
    print("您的工资为%.2f元" % (salary + m * 0.2))
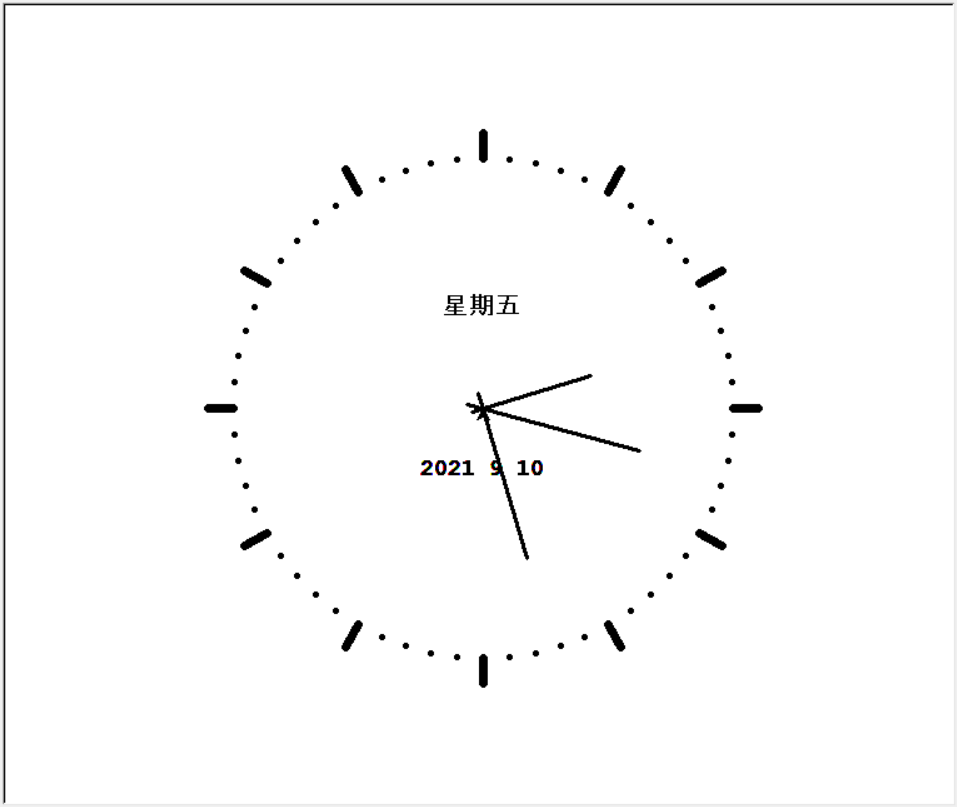
动态时钟
from turtle import *  # 导入turtle模块
from datetime import *  # 导入datetime模块


def skip(step):
    penup()  # 抬起画笔
    forward(step)  # 跳跃的距离step
    pendown()  # 放下画笔


# 刻画时钟刻度
def setup_clock(radius):  # 时钟的大小,即半径radius
    reset()
    pensize(7)  # 画笔粗细
    for i in range(60):  # 刻画时钟刻度
        skip(radius)  # 在距离时钟圆心radius的距离开始落笔
        if i % 5 == 0:  # 每隔4个圆点
            forward(20)  # 刻画一条短线
            skip(-radius - 20)  # 再次回到圆点
        else:  # 刻画点
            dot(5, "pink")  # dot()刻画圆点,参数表示大小和颜色
            skip(-radius)  # 再次回到圆点
        right(6)  # 向右转6度,为什么是6度?60个刻度...360/60=6


def make_hand(name, length):
    reset()
    skip(-0.1 * length)  # 圆点往后退0.1倍length

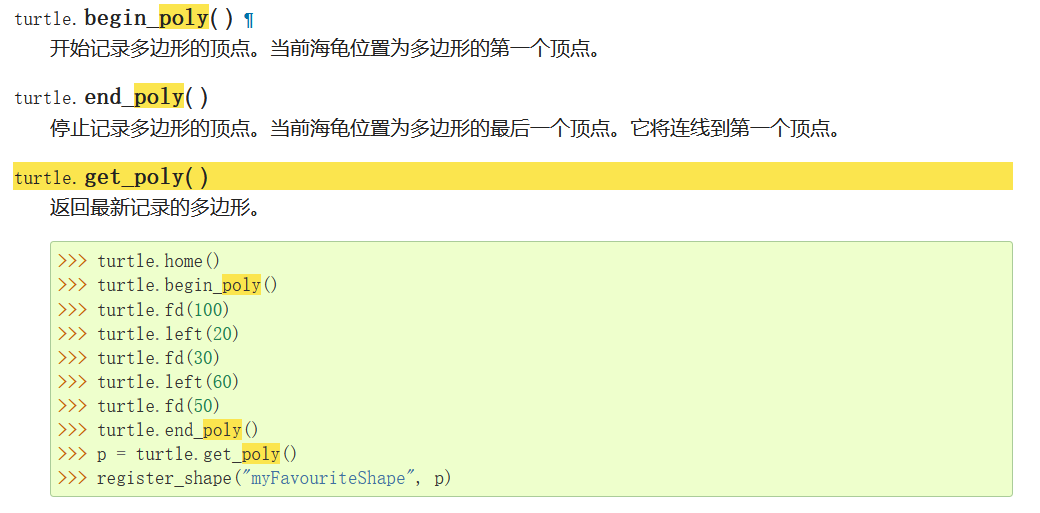
    begin_poly()
    forward(1.1 * length)  # 再向前1.1倍length,刻画指针圆心前后长度的比例,1:10
    end_poly()

    handForm = get_poly()  # 返回最后记录的多边形
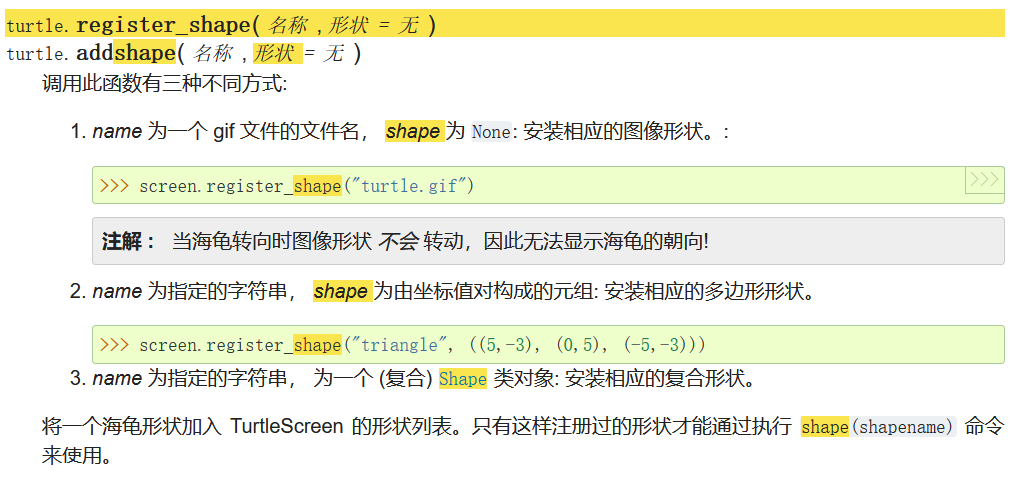
    register_shape(name, handForm)  # 注册形状,命名为name


def init():
    global secHand, minHand, hurHand, printer  # 声明全局变量,使函数内部可修改变量的值
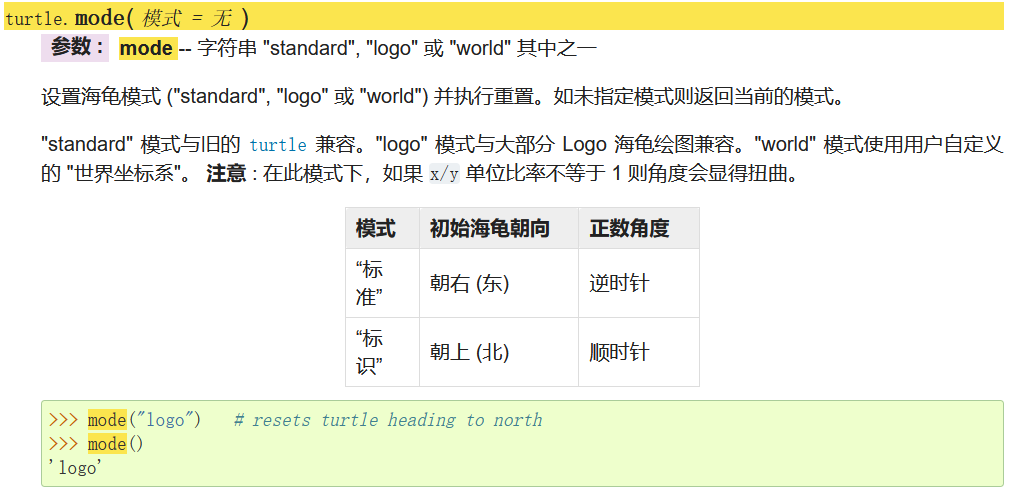
    mode("logo")  # 重置指针的初始方向,向上.
    # 秒针
    secHand = Turtle()  # 建立Turtle对象
    make_hand("secHand", 130)  # 参数:名字和长度
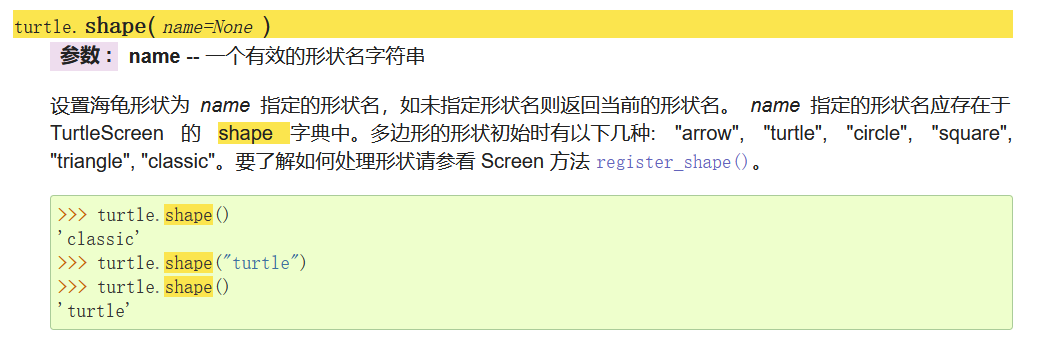
    secHand.shape("secHand")  # 见下面
    # 分针
    minHand = Turtle()
    make_hand("minHand", 125)
    minHand.shape("minHand")
    # 时针
    hurHand = Turtle()
    make_hand("hurHand", 90)
    hurHand.shape("hurHand")
    for hand in secHand, minHand, hurHand:
        hand.shapesize(1, 1, 3)  # 调整指针的粗细
        hand.speed(0)  # 调整指针速度
    # 建立输出文字的打印对象
    printer = Turtle()
    printer.hideturtle()  # 使海龟不可见。 当你绘制复杂图形时这是个好主意,因为隐藏海龟可显着加快绘制速度。
    printer.penup()


# 返回当前的星期
def week(t):
    week = ["星期一", "星期二", "星期三", "星期四", "星期五", "星期六", "星期日"]  # 创建一个列表
    return week[t.weekday()]  # t.weekday()返回一个0-6的序列,0为周一,6为周日


# 刻画显示的时间格式
def day(t):
    return "%s %d %d %d:%d" % (t.year, t.month, t.day, t.hour, t.minute)


def tick():
    t = datetime.today()  # 获取当前本地时间
    second = t.second + t.microsecond * 0.000001  # 微秒换算为秒,比例为1:0.000001。
    minute = t.minute + t.second / 60.0  # 当前分钟数,例:当前2分12秒,应换算为2.2分
    hour = t.hour + t.minute / 60  # 同理

    secHand.setheading(second * 6)  # 为指针设置方向
    minHand.setheading(minute * 6)  # 分钟和秒钟刻度一圈都有60个刻度,所以每个度数应为360/60==6度
    hurHand.setheading(hour * 30)  # 而时针的刻度是12个,360/12==30度
    tracer(False)  # 隐藏绘图,直接显示绘画结果

    printer.fd(70)  # 向前移动指定的距离,插入星期显示
    printer.write(week(t), align="center", font=("Courier", 14, "bold"))

    printer.back(130)  # 向后移动指定的距离,插入日期显示
    printer.write(day(t), align="center", font=("Courier", 14, "bold"))

    printer.home()  # 将画笔移动到原点,即坐标(0,0),初始方向与mode()设置的模式不同而不同
    tracer(True)  # 重新打开绘图过程
    ontimer(tick, 100)  # 100毫秒后调用 tick()函数,1秒等于1000毫秒


# 控制逻辑
def main():
    tracer(False)  # 关闭画笔动画
    init()  # 初始化各个对象
    setup_clock(200)  # 画时钟表框
    tracer(True)  # 开启动画
    tick()  # 获取当前本地日期,实时显示
    done()  # 暂停程序,停止画笔绘制,但绘图窗体不关闭,直到用户关闭Python Turtle图形化窗口为止


# 调用函数
main()
所用到的部分函数:
mode()
register_shape()
shape()
_ploy()
reset()
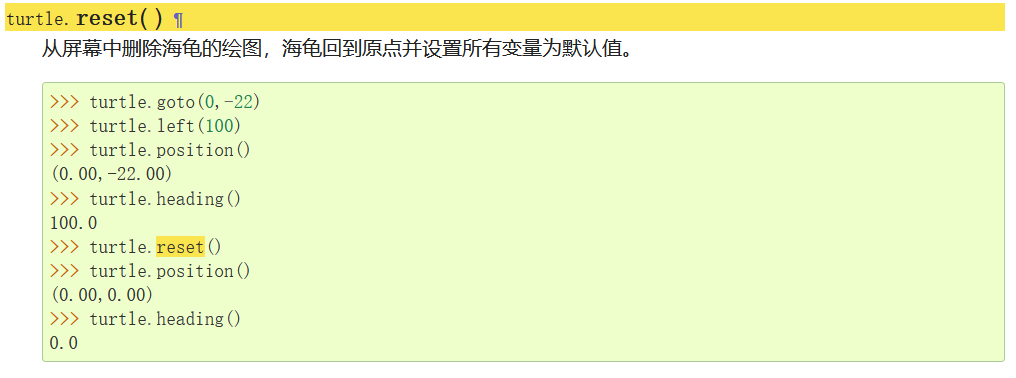
write()

class turtle.Turtle
RawTurtle 的子类,具有相同的接口,但其绘图场所为默认的 Screen 类对象,在首次使用时自动创建。
效果图
随机6位验证码
import random as r

code = []
for i in range(6):  # 6位验证码
    state = r.randint(0, 2)  # 随机大小写字母和数字
    if state == 0:
        code.append(chr(r.randint(48, 57)))  # chr()转换为字符
    elif state == 1:
        code.append(chr(r.randint(65, 90)))
    elif state == 2:
        code.append(chr(r.randint(97, 122)))

s = "".join(code)  # 以""(即空)把字符连接成字符串
print(s)
1、需先定义一个空列表
2、根据随机的state,判断列表是数字、大写字母、小写字母。
3、append() 向列表添加元素
4、chr() 转换为字符 str()转换为字符串 不一样
5、" ".join() 以空连接成字符串
字符串反转
输入一个字符串,将其反转后输出.
例:输入 abcde
输出 edcba
s = input("请输入一个字符串:")
ls = list(s)  #转换为列表
ls.reverse()  #将其反转
sr = ""
for i in range(len(s)): #循环连接成字符串
    sr += ls[i]
print(sr)
或者,换一种连接字符串的方式
s = input("请输入一个字符串:")
ls = list(s)
ls.reverse()
sr = "".join(ls)
print(sr)
join 连接用法实例
利用字符串的函数 join。这个函数接受一个列表或元组,然后用字符串依次连接列表中每一个元素:
注意:列表中含有int类型将报错.
>> list1 = ['P', 'y', 't', 'h', 'o', 'n']
>> "".join(list1)
>> 'Python'

>> tuple1 = ('P', 'y', 't', 'h', 'o', 'n')
>> "".join(tuple1)
>> 'Python'
每个字符之间加 “|”
list1 = ['P', 'y', 't', 'h', 'o', 'n']
"|".join(list1)
'P|y|t|h|o|n
进制转换
输入十进制,输出其二进制,八进制和十六进制
以…算出二进制,或用python内置函数bin()
num = eval(input("请输入一个数字:"))
print("八进制为:%o" % num)
print("十六进制为:%X" % num)
print("转换为二进制为:%s" % bin(num))
print("转换为八进制为:", oct(num))
print("转换为十六进制为:", hex(num))
b = []  # 存储余数
while True:  # 一直循环,商为0时利用break退出循环
    s = num // 2  # 商
    y = num % 2  # 余数
    b = b + [y]  # 每一个余数存储到b中
    if s == 0:
        break  # 余数为0时结束循环
    num = s
b.reverse()  # 使b中的元素反向排列
for i in range(len(b)):  # 将列表中的元素转为字符类型
    b[i] = str(b[i])
print("二进制为:%s" % "".join(b))
获取时间及星期
from datetime import *

print(datetime.today().strftime("%H:%M:%S %Y-%m-%d"))
week = ["星期一", "星期二", "星期三", "星期四", "星期五", "星期六", "星期日"]
print(week[datetime.today().weekday()])
[外链图片转存失败,源站可能有防盗链机制,建议将图片保存下来直接上传(img-Z9BEMbdR-1640141061964)(img/image-20210927225039607.png)]
分类计数输入的字符串
str = input("随便输点吧:")
ls = list(str)
nums = 0
chars = 0
kong = 0
tems = 0
for s in ls:
    a = ord(s)
    if a >= 48 and a <= 57:
        nums += 1
    elif a >= 65 and a <= 90 or a>=97 and a <=122:
        chars += 1
    elif a == 32:
        kong += 1
    else:
        tems += 1
print(ls)
print("数字个数:%d,字母个数:%d,空格数:%d,其他字符:%d" % (nums, chars, kong, tems))
abs()函数
import turtle as t
t.forward(1)
t.lt(90)
t.fd(1)
print(t.pos())
print(abs(t.pos()))
输出:
(1.00,1.00)
1.4142135623730951
进步
from math import *


def jbtb(j, t):
    min = 10
    for i in range(1, 366):  # 进步i天
        A = fabs(pow((1 + j), i) * pow((1 - t), (365 - i)) - 1)
        if A < min:
            min = A
            x = i
            y = 365 - i
    print("当进步%d天,退步%d天时,最接近" % (x, y))
    print("最接近的值为{}".format(pow((1 + 0.02), x) * pow((1 - 0.01), y)))
    print(min)


a = eval(input("请输入进步加的:"))
b = eval(input("请输入退步加的:"))

jbtb(a, b)
输出:
请输入进步加的:0.02
请输入退步加的:0.01
当进步123天,退步242天时,最接近
最接近的值为1.003548160754847
0.003548160754847096
列表的升序与降序
s = [5, 3, 18, 9,11]
s.sort()
print(s)
s.reverse()
print(s)
输出:
[3, 5, 9, 11, 18]
[18, 11, 9, 5, 3]
递归与阶乘
递归: 例: 5! (5的递归)
5!=1 * 2 * 3 * 4 * 5
sums=1
def computation(degital):
    global sums
    sums =sums * degital
    if degital == 1:
        return sums
    else:
        return computation(degital - 1)

c=eval(input("请输入一个数,计算阶乘:"))
print(computation(c))
想明白!!!
当 为 1的时候,return 1。
当递归到1的时候,返回1于之一乘,得到结果。否则会无限循环下去。
def computation(degital):
    if degital == 1:
        return 1
    else:
        return computation(degital - 1) * degital


c = eval(input("请输入一个数,计算阶乘:"))
print(computation(c))
递归与斐波那契数列
def rabbit(month):
    if month <= 1:  #1或0时,返回1
        return 1
    else:
        return rabbit(month - 1) + rabbit(month - 2)

lists = []
for i in range(10):
    lists.append(rabbit(i))
print(lists)
输出:
[1, 1, 2, 3, 5, 8, 13, 21, 34, 55]
验证码生成
增加要求:
1、首位不能为数字
2、必须同时含有小写字母、大写字母和数字
思路:循环生成每位验证码,第一次循环即是首位,让其从大写字母和小写字母中选一.
同时拥有:可以随机生成出验证码后,给予判断,是否满足条件,满足输出,不满足再重新调用.直到满足为止.
from random import *


def drawCode():
    count1 = 0
    count2 = 0
    count3 = 0
    codeList = []
    for i in range(3):
        if i == 0:
            state = randint(1, 2)
            if state == 1:
                count1 += 1
                f = randint(65, 90)
                A = chr(f)
                codeList.append(A)
            elif state == 2:
                count2 += 1
                s = randint(97, 122)
                a = chr(s)
                codeList.append(a)
        else:
            state = randint(1, 3)
            if state == 1:
                count1 += 1
                f = randint(65, 90)
                A = chr(f)
                codeList.append(A)
            elif state == 2:
                count2 += 1
                s = randint(97, 122)
                a = chr(s)
                codeList.append(a)
            elif state == 3:
                count3 += 1
                t = randint(0, 9)
                num = str(t)
                codeList.append(num)
    if count1 == 0 or count2 == 0 or count3 == 0:
        list.clear(codeList)
        drawCode()
    else:
        CheckCode = "".join(codeList)
        print(CheckCode)


for i in range(10):
    drawCode()
读取文件计词(jieba中文模块)
三国演义
import jieba

txt = open(r"C:\Users\Administrator\Desktop\三国演义.txt", "rb").read()
excludes = {"却说", "将军", "二人", "商议", "不可"}
words = jieba.lcut(txt)
counts = {}
for word in words:
    if len(word) == 1:
        continue
    elif word == "诸葛亮":
        rword = "孔明"
    elif word == "曹贼":
        rword = "曹操"
    else:
        rword = word
    counts[rword] = counts.get(rword, 0) + 1

for word in excludes:
    del counts[word]

items = list(counts.items())
items.sort(key=lambda x: x[1], reverse=True)

for i in range(20):
    word, count = items[i]
    print("{0:5}{1:5}次".format(word, count))
水浒传
import jieba

txt = open(r"C:\Users\Administrator\Desktop\水浒传.txt", "rb").read()
excludes = {"两个", "一个", "只见", "如何", "那里", "哥哥", "说道", "众人", "头领", "这里", "兄弟", "出来", "小人", "这个", "今日"}
words = jieba.lcut(txt)
counts = {}
for word in words:
    if len(word) == 1:
        continue
    elif word == "黑鬼":
        rword = "李逵"
    else:
        rword = word
    counts[rword] = counts.get(rword, 0) + 1

for word in excludes:
    del counts[word]

items = list(counts.items())
items.sort(key=lambda x: x[1], reverse=True)

for i in range(108):
    word, count = items[i]
    print("{0:5}{1:5}次".format(word, count))
字典操作
dict_demo = {"k1": "v1", "k2": "v2", "k3": "v3"}

print(dict_demo.keys())  //获取所有键
print(dict_demo.values())  //获取所有值
print(dict_demo.items())  //获取所有键值
dict_demo["k4"] = "v4"  //添加 k4 = v4
dict_demo["k5"] = "v6"
print(dict_demo.items())
dict_demo["k5"] = "v5"  //将键为k5的值更改为v5
print(dict_demo.items())
print(dict_demo.clear())  //清空字典
删除列表中重复的值
import random as r

N_list = []
N = eval(input("请输入N(小于1000):"))
for i in range(N):
    N_list.append(r.randint(1, 1000))
N_list.sort()
print(N_list)
L_list = []
for n in range(1000):
    if n in N_list:
        L_list.append(n)

print(L_list)
数字转换为汉字字符
num = input("输入数字:")

n_List = list(num)
rn_List = []
for n in n_List:
    if n == "1":
        rn = "壹"
    elif n == "2":
        rn = "贰"
    elif n == "3":
        rn = "三"
    elif n == "4":
        rn = "肆"
    elif n == "5":
        rn = "伍"
    elif n == "6":
        rn = "六"
    elif n == "7":
        rn = "七"
    elif n == "8":
        rn = "八"
    elif n == "9":
        rn = "九"
    elif n == ".":
        rn = "点"
    rn_List.append(rn)

print("".join(rn_List))

//输入数字:1.23
//壹点贰三
随机生成8个0~10之间不相同的数
import random as r

N_List = []


def rom():
    N = r.randint(0, 10)
    if N in N_List:
        rom()
    else:
        N_List.append(N)


for i in range(8):
    rom()

print(N_List)

//[8, 10, 3, 2, 5, 7, 1, 0]
游戏模块
import pygame

# 窗口宽高
WINWIDTH = 640
WINHEIGHT = 480
# 颜色设置
DARKTURQUOISE = (3, 54, 73)
YELLOW = (255, 255, 193)
GRAY = (128, 128, 128)
# 颜色变量
BGCOLOR = DARKTURQUOISE
MSGCOLOR = DARKTURQUOISE
MSGBGCOLOR = YELLOW
BTCOLOR = YELLOW
BTTEXTCOLOR = GRAY
# 初始化帧率
FPS = 60
# 定义矩形边长
BLOCKSIZE = 60


def main():
    pygame.init()  # 初始化模块
    WINSET = pygame.display.set_mode((WINWIDTH, WINHEIGHT))  # 创建窗体
    WINSET.fill(BGCOLOR)  # 填充颜色
    pygame.display.set_caption('数字推盘')  # 设置标题

    image = pygame.image.load('bg1.jpg')  # 加载图片
    WINSET.blit(image, (0, 0))  # 绘制图片

    BASICFONT = pygame.font.Font('STKAITI.TTF', 25)  # 创建字体对象
    msgSurf = BASICFONT.render('初始化。。。', True, MSGCOLOR, MSGBGCOLOR)  # 渲染
    WINSET.blit(msgSurf, (0, 0))

    autoSurf = BASICFONT.render('自动', True, BTTEXTCOLOR, BTCOLOR)
    autoRect = autoSurf.get_rect()  # 获取矩形属性
    autoRect.x = WINWIDTH - autoRect.width - 10  # 横坐标
    autoRect.y = WINHEIGHT - autoRect.height - 10  # 纵坐标
    WINSET.blit(autoSurf, autoRect)  # 绘制字体
    # 绘制矩形
    blockRect = pygame.Rect(0.5 * (WINWIDTH - BLOCKSIZE), 0.5 * (WINHEIGHT - BLOCKSIZE), BLOCKSIZE, BLOCKSIZE)
    pygame.draw.rect(WINSET, BTCOLOR, blockRect)
    # 绘制数字
    numSurf = BASICFONT.render('5', True, BTTEXTCOLOR, BTCOLOR)
    numRect = numSurf.get_rect()
    numRect.x = blockRect.x + 0.5 * (BLOCKSIZE - numRect.width)
    numRect.y = blockRect.y + 0.5 * (BLOCKSIZE - numRect.height)

    baseSurf = WINSET.copy()  # 背景
    FPSCLOCK = pygame.time.Clock()  # 创建Clock对象
    for i in range(0, BLOCKSIZE, 2):
        FPSCLOCK.tick(FPS)  # 设置帧率
        pygame.draw.rect(WINSET, BTCOLOR, blockRect)
        WINSET.blit(numSurf, numRect)

        pygame.display.update()  # 窗口刷新
        blockRect.x += 10  # 修改坐标,让其向右移动
        numRect.x += 10
        WINSET.blit(baseSurf, (0, 0))  # 备份baseSurf覆盖WINSET

    pygame.quit()  # 模块卸载


if __name__ == '__main__':
    main()
测试版10/15/23/02
import pygame, random, sys

from pygame.locals import *
from define import *

from pygame import K_ESCAPE, KEYUP, QUIT, MOUSEBUTTONUP

# 初始化窗口宽高
WINWIDTH = 640
WINHEIGHT = 480
# 初始化推盘行列和空格
ROW = 3
COL = 3
BLANK = None
# 颜色预设
DARKGRAY = (60, 60, 60)
WHITE = (255, 255, 255)
YELLOW = (255, 255, 193)
GRAY = (128, 128, 128)
BRIGHTBLUE = (138, 228, 221)
# 颜色变量
BLANKCOLOR = DARKGRAY
MSGCOLOR = WHITE
BTCOLOR = YELLOW
BTTEXTCOLOR = GRAY
BDCOLOR = BRIGHTBLUE
# 静态常量
BLOCKSIZE = 80
FPS = 60
UP = 'up'
DOWN = 'down'
LEFT = 'left'
RIGHT = 'right'
NEWGAME = 'newgame'
AUTOMOVE = random.randint(50, 100)  # 随机移动次数


# 文本对象创建
def makeText(text, tColor, btColor, top, left):
    textSurf = BASICFONT.render(text, True, tColor, btColor)
    textRect = textSurf.get_rect()
    textRect.topleft = (top, left)
    return textSurf, textRect


# 绘制方块在窗口(tilex,tiley)处
def drawTile(tilex, tiley, number, adjx=0, adjy=0):
    left, top = getLeftTopOfTile(tilex, tiley)
    pygame.draw.rect(WINSET, BTCOLOR, (left + adjx, top + adjy, BLOCKSIZE, BLOCKSIZE))
    textSurf = BASICFONT.render(str(number), True, BTTEXTCOLOR)
    textRect = textSurf.get_rect()
    textRect.center = left + int(BLOCKSIZE / 2) + adjx, top + int(BLOCKSIZE / 2) + adjy
    WINSET.blit(textSurf, textRect)


# 计算方块距离窗口原点纵横坐标距离
def getLeftTopOfTile(tilex, tiley):
    xMargin = int((WINWIDTH - (BLOCKSIZE * COL + (COL - 1))) / 2)
    yMargin = int((WINWIDTH - (BLOCKSIZE * ROW + (ROW - 1))) / 2)
    left = xMargin + (tilex * BLOCKSIZE) + (tilex - 1)
    top = yMargin + (tiley * BLOCKSIZE) + (tiley - 1)
    return left, top


# 静态界面绘制
def darwStaticWin():
    winSet = pygame.display.set_mode((WINWIDTH, WINHEIGHT))
    pygame.display.set_caption('数字华容道')
    image = pygame.image.load('bg.jpg')
    winSet.blit(image, (0, 0))
    # 按钮创建
    new_surf, new_rect = makeText('新游戏', BTTEXTCOLOR, BTCOLOR, WINWIDTH - 85, WINHEIGHT - 40)
    winSet.blit(new_surf, new_rect)
    return winSet, new_surf, new_rect


# 动态界面绘制
def drawBoard(board, msg):
    WINSET.blit(STATICSURF, (0, 0))
    if msg:
        msgSurf, msgRect = makeText(msg, MSGCOLOR, None, 5, 5)
        pygame.image.save(msgSurf, 'msg.png')
        imgSurf = pygame.image.load('msg.png')
        WINSET.blit(imgSurf, msgRect)

    for i in range(len(board)):
        for j in range(len(board[0])):
            if board[i][j]:
                drawTile(i, j, board[i][j])

    left, top = getLeftTopOfTile(0, 0)
    width = COL * BLOCKSIZE
    height = ROW * BLOCKSIZE
    pygame.draw.rect(WINSET, BDCOLOR, (left - 5, top - 5, width + 11, height + 11), 4)


# 生成推盘序列
def getStartingBoard():
    initBoard = []
    for i in range(COL):
        i = i + 1
        colum = []
        for j in range(ROW):
            colum.append(i)
            i += COL  # 按列添加,非顺序添加
        initBoard.append(colum)
    initBoard[ROW - 1][COL - 1] = BLANK
    return initBoard


# 移动交换元素位置
def makeMove(board, move):
    blankx, blanky = getBlankPosition(board)
    if move == UP:
        board[blankx][blanky], board[blankx][blanky + 1] = board[blankx][blanky + 1], board[blankx][blanky]
    elif move == DOWN:
        board[blankx][blanky], board[blankx][blanky - 1] = board[blankx][blanky - 1], board[blankx][blanky]
    elif move == LEFT:
        board[blankx][blanky], board[blankx + 1][blanky] = board[blankx + 1][blanky], board[blankx][blanky]
    elif move == RIGHT:
        board[blankx][blanky], board[blankx - 1][blanky] = board[blankx - 1][blanky], board[blankx][blanky]


# 移动的动画效果
def slideAnimation(board, direction, msg, animationSpeed):
    blankx, blanky = getBlankPosition(board)  # 获取空格的行列坐标
    # 获取被移动的方块所在的行列
    if direction == UP:
        movex = blankx
        movey = blanky + 1
    elif direction == DOWN:
        movex = blankx
        movey = blanky - 1
    elif direction == LEFT:
        movex = blankx + 1
        movey = blanky
    elif direction == RIGHT:
        movex = blankx - 1
        movey = blanky
    drawBoard(board, msg)
    BASESURF = WINSET.copy()  # 复制此刻背景作为Surface对象
    # 绘制空白快
    moveLeft, moveTop = getLeftTopOfTile(movex, movey)
    pygame.draw.rect(BASESURF, BLANKCOLOR, (moveLeft, moveTop, BLOCKSIZE, BLOCKSIZE))
    # 连续绘制被移动的方块
    for i in range(0, BLOCKSIZE, animationSpeed):
        checkForQuit()
        WINSET.blit(BASESURF, (0, 0))
        if direction == UP:
            drawTile(movex, movey, board[movex][movey], 0, -i)
        if direction == DOWN:
            drawTile(movex, movey, board[movex][movey], 0, i)
        if direction == LEFT:
            drawTile(movex, movey, board[movex][movey], -i, 0)
        if direction == RIGHT:
            drawTile(movex, movey, board[movex][movey], i, 0)
        pygame.display.update()  # 更新界面
        FPSCLOCK.tick(FPS)  # 控制帧率


# 判断无效移动
def isValidMove(board, direction):
    blankx, blanky = getBlankPosition(board)
    if blankx == 1 and direction == DOWN:
        return False
    elif blankx == 3 and direction == UP:
        return False
    elif blanky == 1 and direction == RIGHT:
        return False
    elif blanky == 3 and direction == LEFT:
        return False
    else:
        return True


# 获取随机移动的方向
def getRandomMove(board, lastMove=None):
    validMoves = [UP, DOWN, LEFT, RIGHT]
    if lastMove == UP or not isValidMove(board, DOWN):
        validMoves.remove(DOWN)
    if lastMove == DOWN or not isValidMove(board, UP):
        validMoves.remove(UP)
    if lastMove == LEFT or not isValidMove(board, RIGHT):
        validMoves.remove(RIGHT)
    if lastMove == RIGHT or not isValidMove(board, LEFT):
        validMoves.remove(LEFT)
    return random.choice(validMoves)


# 初始化推盘
def generateNewPuzzle(numSlides):
    mianBoard = getStartingBoard()  # 获取拼图
    drawBoard(mianBoard, '')
    lastMove = None
    for i in range(numSlides):
        move = getRandomMove(mianBoard, lastMove)
        slideAnimation(mianBoard, move, '初始化...', animationSpeed=int(BLOCKSIZE / 3))
        makeMove(mianBoard, move)
        lastMove = move
    return mianBoard


def getBlankPosition(board):
    for x in range(COL):
        for y in range(ROW):
            if board[x][y] == BLANK:
                return (x, y)


def getSpotClicked(board, x, y):
    for tilex in range(len(board)):
        for tiley in range(len(board[0])):
            left, top = getLeftTopOfTile(tilex, tiley)
            tileRect = pygame.Rect(left, top, BLOCKSIZE, BLOCKSIZE)
            if tileRect.collidepoint(x, y):  # 如果产生碰撞
                return tilex, tiley  # 返回行列
    return None, None


# 获取用户输入
def getInput(mainBoard):
    events = pygame.event.get()
    userInput = None
    for event in events:
        if event.type == MOUSEBUTTONUP:
            # 获取位置关系
            spotx, spoty = getSpotClicked(mainBoard, event.pos[0], event.pos[1])
            # 坐标不在拼图区域,点击的新游戏
            if (spotx, spoty) == (None, None) and NEW_RECT.collidepoint(event.pos):
                userInput = NEWGAME
            else:
                # 如果已完成,点击非选项时不移动
                if mainBoard == getStartingBoard():
                    break
                # 点击位置是否在BLANK旁边
                blankx, blanky = getBlankPosition(mainBoard)

                if spotx == blankx + 1 and spoty == blanky:
                    userInput == LEFT  # 设置移动方向
                elif spotx == blankx - 1 and spoty == blanky:
                    userInput = RIGHT
                elif spotx == blankx and spoty == blanky + 1:
                    userInput = UP
                elif spotx == blankx and spoty == blanky - 1:
                    userInput = DOWN
    return userInput


# 对用户输入进行处理
def processing(userInput, mainBoard, msg):
    if mainBoard == getStartingBoard():
        msg = '完成'
    else:
        msg = '通过鼠标移动方块'
    if userInput:
        # 功能按钮
        if userInput == NEWGAME:
            initBoard = getStartingBoard()
            mainBoard = generateNewPuzzle(numSlides)
        else:
            # 方块移动
            slideAnimation(mainBoard, userInput, msg, 8)
            makeMove(mainBoard, userInput)
    return mainBoard, msg


# 资源回收与程序退出
def terminate():
    pygame.quit()
    sys.exit()


# 退出判断
def checkForQuit():
    for event in pygame.event.get(QUIT):  # 获取所有可能会导致退出的事件
        terminate()  # 执行退出
    for event in pygame.event.get(KEYUP):  # 按下ESC键退出
        if event.key == K_ESCAPE:
            terminate()
        pygame.event.post(event)  # 发送事件至消息列队


def main():
    # FPSCLOCK Clock对象
    # WINSET 窗体Surface对象
    # STATICSURF 静态窗体Surface对象
    # BASICFONT 字体对象
    # NEW_SURF "新游戏"Surface对象,一张内容为文字的图片  调用字体对象的render()方法,渲染为Surface对象显示
    # NEW_RECT get_rect()方法获取的"新游戏"矩形属性
    global FPSCLOCK, WINSET, STATICSURF, BASICFONT  # 定义全局变量
    global NEW_SURF, NEW_RECT

    pygame.init()
    FPSCLOCK = pygame.time.Clock()  # 创建一个Clock对象,并使用变量FPSCLOCK保存
    BASICFONT = pygame.font.Font('STKAITI.TTF', 25)  # 定义返回一个字体对象,并使用变量BASICFONT保存
    WINSET, NEW_SURF, NEW_RECT = darwStaticWin()  # 创建静态窗口
    STATICSURF = WINSET.copy()  # 复制一个静态窗口作为底板
    mainBoard = generateNewPuzzle(AUTOMOVE)  # 初始化
    msg = None

    while True:
        FPSCLOCK.tick(FPS)  # 设置帧率
        drawBoard(mainBoard, msg)  # 动态界面绘制
        pygame.display.update()
        checkForQuit()  # 判断是否终止
        userInput = getInput(mainBoard)  # 获取输入
        mainBoard, msg = processing(userInput, mainBoard, msg)  # 输入处理


if __name__ == '__main__':
    main()
测试10/1
import pygame, random, sys

from pygame.locals import *
from define import *

# 初始化窗口宽高
WINWIDTH = 640
WINHEIGHT = 480
# 初始化推盘行列和空格
ROW = 3
COL = 3
BLANK = None
# 颜色预设
DARKGRAY = (60, 60, 60)
WHITE = (255, 255, 255)
YELLOW = (255, 255, 193)
GRAY = (128, 128, 128)
BRIGHTBLUE = (138, 228, 221)
# 颜色变量
BLANKCOLOR = DARKGRAY
MSGCOLOR = WHITE
BTCOLOR = YELLOW
BTTEXTCOLOR = GRAY
BDCOLOR = BRIGHTBLUE
# 静态常量
BLOCKSIZE = 80  # 方块大小
FPS = 60  # 帧率
# 按键事件
UP = 'up'
DOWN = 'down'
LEFT = 'left'
RIGHT = 'right'
NEWGAME = 'newgame'
# 随机移动次数
AUTOMOVE = random.randint(50, 100)


# AUTOMOVE = 80

# 文本对象创建
def makeText(text, tColor, btColor, top, left):
    textSurf = BASICFONT.render(text, True, tColor, btColor)
    textRect = textSurf.get_rect()
    textRect.topleft = (top, left)
    return textSurf, textRect  # 将字体渲染的Surface对象,Surface对象的矩形属性


# 绘制方块在窗口(tilex,tiley)处,adjx与adjy为偏移量,可选参数默认值为0
def drawTile(tilex, tiley, number, adjx=0, adjy=0):
    left, top = getLeftTopOfTile(tilex, tiley)
    # 绘制方块
    pygame.draw.rect(WINSET, BTCOLOR, (left + adjx, top + adjy, BLOCKSIZE, BLOCKSIZE))
    # 将数字number渲染到方块上
    textSurf = BASICFONT.render(str(number), True, BTTEXTCOLOR)
    # 获取矩形属性
    textRect = textSurf.get_rect()
    # print(textRect)
    textRect.center = left + int(BLOCKSIZE / 2) + adjx, top + int(BLOCKSIZE / 2) + adjy
    # print(textRect.center)
    # print(textRect)
    # 绘制到静态窗口上
    WINSET.blit(textSurf, textRect)


# 计算方块左上角 距离窗口原点纵横坐标距离
def getLeftTopOfTile(tilex, tiley):
    # 先计算左上角方块的距离
    xMargin = int((WINWIDTH - (BLOCKSIZE * COL + (COL - 1))) / 2)  # 199
    yMargin = int((WINHEIGHT - (BLOCKSIZE * ROW + (ROW - 1))) / 2)  # 119
    # print(xMargin,yMargin)
    # print(tilex, tiley) ?
    left = xMargin + (tilex * BLOCKSIZE) + (tilex - 1)
    top = yMargin + (tiley * BLOCKSIZE) + (tiley - 1)
    # print(left, top)
    return left, top


# 静态界面绘制
def darwStaticWin():
    winSet = pygame.display.set_mode((WINWIDTH, WINHEIGHT))
    pygame.display.set_caption('数字华容道')
    image = pygame.image.load('bg.jpg')
    winSet.blit(image, (0, 0))
    # 按钮创建
    new_surf, new_rect = makeText('新游戏', BTTEXTCOLOR, BTCOLOR, WINWIDTH - 85, WINHEIGHT - 40)
    winSet.blit(new_surf, new_rect)
    return winSet, new_surf, new_rect


# 动态界面绘制
def drawBoard(board, msg):
    # board 推盘列表
    WINSET.blit(STATICSURF, (0, 0))
    if msg:
        msgSurf, msgRect = makeText(msg, MSGCOLOR, None, 5, 5)
        pygame.image.save(msgSurf, 'msg.png')  # 将msgSurf存为名为msg.png的图片
        imgSurf = pygame.image.load('msg.png')  # 加载图片
        # print(msgRect)  # <rect(5, 5, 87, 28)>  矩形属性
        WINSET.blit(imgSurf, msgRect)

    for i in range(len(board)):  # 3
        for j in range(len(board[0])):  # 3
            if board[i][j]:  # 遍历出不为None的
                # print(board[i][j])
                drawTile(i, j, board[i][j])  # 方块上的数字和所在的行列,绘制方块及数字
    # 绘制外边框
    left, top = getLeftTopOfTile(0, 0)  # 198 118
    width = COL * BLOCKSIZE  # 240
    height = ROW * BLOCKSIZE  # 240
    pygame.draw.rect(WINSET, BDCOLOR, (left - 5, top - 5, width + 11, height + 11), 4)  # 外沿厚度4


# 生成推盘序列
def getStartingBoard():
    initBoard = []  # 二维列表
    for i in range(COL):  # 列
        i = i + 1
        colum = []
        for j in range(ROW):
            colum.append(i)
            i += COL  # 按列添加,非顺序添加
        initBoard.append(colum)
    initBoard[ROW - 1][COL - 1] = BLANK  # 最后一位添加None空格
    # print(initBoard)
    return initBoard


# 初始化推盘,随机移动numSlides(50~100)次
def generateNewPuzzle(numSlides):
    mianBoard = getStartingBoard()  # 获取拼图列表
    drawBoard(mianBoard, '')
    lastMove = None
    for i in range(numSlides):
        move = getRandomMove(mianBoard, lastMove)  # 获取随机移动的方向
        slideAnimation(mianBoard, move, '初始化...', int(BLOCKSIZE / 3))
        makeMove(mianBoard, move)
        lastMove = move
    return mianBoard


# 移动交换元素位置
def makeMove(board, move):
    blankx, blanky = getBlankPosition(board)
    if move == UP:
        board[blankx][blanky], board[blankx][blanky + 1] = board[blankx][blanky + 1], board[blankx][blanky]
    elif move == DOWN:
        board[blankx][blanky], board[blankx][blanky - 1] = board[blankx][blanky - 1], board[blankx][blanky]
    elif move == LEFT:
        board[blankx][blanky], board[blankx + 1][blanky] = board[blankx + 1][blanky], board[blankx][blanky]
    elif move == RIGHT:
        board[blankx][blanky], board[blankx - 1][blanky] = board[blankx - 1][blanky], board[blankx][blanky]


# 移动的动画效果
def slideAnimation(board, direction, msg, animationSpeed):
    blankx, blanky = getBlankPosition(board)  # 获取空格的行列坐标
    # 获取被移动的方块所在的行列
    if direction == UP:
        movex = blankx
        movey = blanky + 1
    elif direction == DOWN:
        movex = blankx
        movey = blanky - 1
    elif direction == LEFT:
        movex = blankx + 1
        movey = blanky
    elif direction == RIGHT:
        movex = blankx - 1
        movey = blanky
    drawBoard(board, msg)
    BASESURF = WINSET.copy()  # 复制此刻背景作为Surface对象
    # 绘制空白块
    moveLeft, moveTop = getLeftTopOfTile(movex, movey)
    pygame.draw.rect(BASESURF, BLANKCOLOR, (moveLeft, moveTop, BLOCKSIZE, BLOCKSIZE))
    # 连续绘制被移动的方块
    # print(animationSpeed)  # 26 方块移动速度
    for i in range(0, BLOCKSIZE, 1):
        checkForQuit()
        WINSET.blit(BASESURF, (0, 0))
        if direction == UP:
            drawTile(movex, movey, board[movex][movey], 0, -i)
        if direction == DOWN:
            drawTile(movex, movey, board[movex][movey], 0, i)
        if direction == LEFT:
            drawTile(movex, movey, board[movex][movey], -i, 0)
        if direction == RIGHT:
            drawTile(movex, movey, board[movex][movey], i, 0)
        pygame.display.update()  # 更新界面
        FPSCLOCK.tick(FPS)  # 控制帧率


# 判断无效移动
def isValidMove(board, direction):
    blankx, blanky = getBlankPosition(board)
    if blankx == 1 and direction == DOWN:
        return False
    elif blankx == 3 and direction == UP:
        return False
    elif blanky == 1 and direction == RIGHT:
        return False
    elif blanky == 3 and direction == LEFT:
        return False
    else:
        return True


# 获取随机移动的方向
def getRandomMove(board, lastMove=None):
    validMoves = [UP, DOWN, LEFT, RIGHT]
    if lastMove == UP or not isValidMove(board, DOWN):
        validMoves.remove(DOWN)
    if lastMove == DOWN or not isValidMove(board, UP):
        validMoves.remove(UP)
    if lastMove == LEFT or not isValidMove(board, RIGHT):
        validMoves.remove(RIGHT)
    if lastMove == RIGHT or not isValidMove(board, LEFT):
        validMoves.remove(LEFT)
    return random.choice(validMoves)


def getBlankPosition(board):
    for x in range(COL):
        for y in range(ROW):
            if board[x][y] == BLANK:
                return (x, y)


def getSpotClicked(board, x, y):
    for tilex in range(len(board)):
        for tiley in range(len(board[0])):
            left, top = getLeftTopOfTile(tilex, tiley)
            tileRect = pygame.Rect(left, top, BLOCKSIZE, BLOCKSIZE)
            if tileRect.collidepoint(x, y):  # 如果产生碰撞
                return tilex, tiley  # 返回行列
    return None, None


# 获取用户输入
def getInput(mainBoard):
    events = pygame.event.get()
    userInput = None
    for event in events:
        if event.type == MOUSEBUTTONUP:
            # 获取位置关系
            spotx, spoty = getSpotClicked(mainBoard, event.pos[0], event.pos[1])
            # 坐标不在拼图区域,点击的新游戏
            if (spotx, spoty) == (None, None) and NEW_RECT.collidepoint(event.pos):
                userInput = NEWGAME
            else:
                # 如果已完成,点击非选项时不移动
                if mainBoard == getStartingBoard():
                    break
                # 点击位置是否在BLANK旁边
                blankx, blanky = getBlankPosition(mainBoard)

                if spotx == blankx + 1 and spoty == blanky:
                    userInput = LEFT  # 设置移动方向
                elif spotx == blankx - 1 and spoty == blanky:
                    userInput = RIGHT
                elif spotx == blankx and spoty == blanky + 1:
                    userInput = UP
                elif spotx == blankx and spoty == blanky - 1:
                    userInput = DOWN
    return userInput


# 对用户输入进行处理
def processing(userInput, mainBoard, msg):
    if mainBoard == getStartingBoard():
        msg = '完成'
    else:
        msg = '通过鼠标移动方块'

    if userInput:
        # 功能按钮
        if userInput == NEWGAME:
            initBoard = getStartingBoard()
            mainBoard = generateNewPuzzle(AUTOMOVE)

            drawBoard(initBoard, msg)  # 动态界面绘制
        else:
            # 方块移动
            slideAnimation(mainBoard, userInput, msg, 8)
            makeMove(mainBoard, userInput)
    return mainBoard, msg


# 资源回收与程序退出
def terminate():
    pygame.quit()  # 模块卸载
    sys.exit()


# 退出判断
def checkForQuit():
    for event in pygame.event.get(QUIT):  # 获取所有可能会导致退出的事件,存在就执行退出
        terminate()  # 执行退出
    for event in pygame.event.get(KEYUP):  # 按下ESC键退出
        if event.key == K_ESCAPE:
            terminate()
        pygame.event.post(event)  # 发送事件至消息列队


def main():
    # FPSCLOCK Clock对象
    # WINSET 窗体Surface对象
    # STATICSURF 静态窗体Surface对象
    # BASICFONT 字体对象
    # NEW_SURF "新游戏"Surface对象,一张内容为文字的图片  调用字体对象的render()方法,渲染为Surface对象显示
    # NEW_RECT get_rect()方法获取的"新游戏"矩形属性
    global FPSCLOCK, WINSET, STATICSURF, BASICFONT  # 定义全局变量
    global NEW_SURF, NEW_RECT

    pygame.init()
    FPSCLOCK = pygame.time.Clock()  # 创建一个Clock对象,并使用变量FPSCLOCK保存
    BASICFONT = pygame.font.Font('STKAITI.TTF', 25)  # 定义返回一个字体对象,并使用变量BASICFONT保存
    WINSET, NEW_SURF, NEW_RECT = darwStaticWin()  # 创建静态窗口
    STATICSURF = WINSET.copy()  # 复制一个静态窗口作为底板
    mainBoard = generateNewPuzzle(AUTOMOVE)  # 初始化列表
    msg = None

    while True:
        FPSCLOCK.tick(FPS)  # 设置帧率
        drawBoard(mainBoard, msg)  # 动态界面绘制
        pygame.display.update()  # 刷新
        checkForQuit()  # 判断是否终止
        userInput = getInput(mainBoard)  # 获取输入
        mainBoard, msg = processing(userInput, mainBoard, msg)  # 输入处理


if __name__ == '__main__':
    main()
完整版
import pygame, random, sys

from pygame.locals import *
from define import *

# 初始化窗口宽高
WINWIDTH = 640
WINHEIGHT = 480
# 初始化推盘行列和空格
ROW = 3
COL = 3
BLANK = None
# 颜色预设
DARKGRAY = (60, 60, 60)
WHITE = (255, 255, 255)
YELLOW = (255, 255, 193)
GRAY = (128, 128, 128)
BRIGHTBLUE = (138, 228, 221)
# 颜色变量
BLANKCOLOR = DARKGRAY
MSGCOLOR = WHITE
BTCOLOR = YELLOW
BTTEXTCOLOR = GRAY
BDCOLOR = BRIGHTBLUE
# 静态常量
BLOCKSIZE = 80  # 方块大小
FPS = 60  # 帧率
# 按键事件
UP = 'up'
DOWN = 'down'
LEFT = 'left'
RIGHT = 'right'
NEWGAME = 'newgame'
# 随机移动次数
AUTOMOVE = random.randint(50, 100)


# 文本对象创建
def makeText(text, tColor, btColor, top, left):
    textSurf = BASICFONT.render(text, True, tColor, btColor)
    textRect = textSurf.get_rect()
    textRect.topleft = (top, left)
    return textSurf, textRect  # 将字体渲染的Surface对象,Surface对象的矩形属性


# 绘制方块在窗口(tilex,tiley)处,adjx与adjy为偏移量,可选参数默认值为0
def drawTile(tilex, tiley, number, adjx=0, adjy=0):
    left, top = getLeftTopOfTile(tilex, tiley)
    # 绘制方块
    pygame.draw.rect(WINSET, BTCOLOR, (left + adjx, top + adjy, BLOCKSIZE, BLOCKSIZE))
    # 将数字number渲染到方块上
    textSurf = BASICFONT.render(str(number), True, BTTEXTCOLOR)
    # 获取矩形属性
    textRect = textSurf.get_rect()
    # print(textRect)
    textRect.center = left + int(BLOCKSIZE / 2) + adjx, top + int(BLOCKSIZE / 2) + adjy
    # print(textRect.center)
    # print(textRect)
    # 绘制到静态窗口上
    WINSET.blit(textSurf, textRect)


# 计算方块左上角 距离窗口原点纵横坐标距离
def getLeftTopOfTile(tilex, tiley):
    # 先计算左上角方块的距离
    xMargin = int((WINWIDTH - (BLOCKSIZE * COL + (COL - 1))) / 2)  # 199
    yMargin = int((WINHEIGHT - (BLOCKSIZE * ROW + (ROW - 1))) / 2)  # 119
    # print(xMargin,yMargin)
    # print(tilex, tiley) ?
    left = xMargin + (tilex * BLOCKSIZE) + (tilex - 1)
    top = yMargin + (tiley * BLOCKSIZE) + (tiley - 1)
    # print(left, top)
    return left, top


# 静态界面绘制
def darwStaticWin():
    winSet = pygame.display.set_mode((WINWIDTH, WINHEIGHT))
    pygame.display.set_caption('数字华容道')
    image = pygame.image.load('bg.jpg')
    winSet.blit(image, (0, 0))
    # 按钮创建
    new_surf, new_rect = makeText('新游戏', BTTEXTCOLOR, BTCOLOR, WINWIDTH - 85, WINHEIGHT - 40)
    winSet.blit(new_surf, new_rect)
    return winSet, new_surf, new_rect


# 动态界面绘制
def drawBoard(board, msg):
    # board 推盘列表
    WINSET.blit(STATICSURF, (0, 0))
    # 如果消息不为空
    if msg:
        msgSurf, msgRect = makeText(msg, MSGCOLOR, None, 5, 5)
        pygame.image.save(msgSurf, 'msg.png')  # 将msgSurf存为名为msg.png的图片
        imgSurf = pygame.image.load('msg.png')  # 加载图片
        # print(msgRect)  # <rect(5, 5, 87, 28)>  矩形属性
        WINSET.blit(imgSurf, msgRect)

    for i in range(len(board)):  # 3
        for j in range(len(board[0])):  # 3
            if board[i][j]:  # 遍历出不为None的
                # print(board[i][j])
                drawTile(i, j, board[i][j])  # 方块上的数字和所在的行列,绘制方块及数字
    # 绘制外边框
    left, top = getLeftTopOfTile(0, 0)  # 198 118
    width = COL * BLOCKSIZE  # 240
    height = ROW * BLOCKSIZE  # 240
    pygame.draw.rect(WINSET, BDCOLOR, (left - 5, top - 5, width + 11, height + 11), 4)  # 外沿厚度4


# 生成推盘序列
def getStartingBoard():
    initBoard = []  # 二维列表
    for i in range(COL):  # 列
        i = i + 1
        column = []
        for j in range(ROW):
            column.append(i)
            i += COL  # 按列添加,非顺序添加
        initBoard.append(column)
    initBoard[ROW - 1][COL - 1] = BLANK  # 最后一位添加None空格
    # print(initBoard)
    return initBoard


# 初始化推盘,随机移动numSlides(50~100)次
def generateNewPuzzle(numSlides):
    mianBoard = getStartingBoard()  # 获取拼图列表
    drawBoard(mianBoard, '')
    lastMove = None
    for i in range(numSlides):
        move = getRandomMove(mianBoard, lastMove)  # 获取随机移动的方向
        slideAnimation(mianBoard, move, '初始化...', int(BLOCKSIZE / 3))
        makeMove(mianBoard, move)
        lastMove = move
    return mianBoard


# 移动交换元素位置
def makeMove(board, move):
    blankx, blanky = getBlankPosition(board)
    if move == UP:
        board[blankx][blanky], board[blankx][blanky + 1] = board[blankx][blanky + 1], board[blankx][blanky]
    elif move == DOWN:
        board[blankx][blanky], board[blankx][blanky - 1] = board[blankx][blanky - 1], board[blankx][blanky]
    elif move == LEFT:
        board[blankx][blanky], board[blankx + 1][blanky] = board[blankx + 1][blanky], board[blankx][blanky]
    elif move == RIGHT:
        board[blankx][blanky], board[blankx - 1][blanky] = board[blankx - 1][blanky], board[blankx][blanky]


# 移动的动画效果
def slideAnimation(board, direction, msg, animationSpeed):
    blankx, blanky = getBlankPosition(board)  # 获取空格的行列坐标
    # 获取被移动的方块所在的行列
    if direction == UP:
        movex = blankx
        movey = blanky + 1
    elif direction == DOWN:
        movex = blankx
        movey = blanky - 1
    elif direction == LEFT:
        movex = blankx + 1
        movey = blanky
    elif direction == RIGHT:
        movex = blankx - 1
        movey = blanky
    drawBoard(board, msg)
    BASESURF = WINSET.copy()  # 复制此刻背景作为Surface对象
    # 绘制空白块
    moveLeft, moveTop = getLeftTopOfTile(movex, movey)
    pygame.draw.rect(BASESURF, BLANKCOLOR, (moveLeft, moveTop, BLOCKSIZE, BLOCKSIZE))
    # 连续绘制被移动的方块
    # print(animationSpeed)  # 26 方块移动速度
    for i in range(0, BLOCKSIZE, animationSpeed):
        checkForQuit()
        WINSET.blit(BASESURF, (0, 0))
        if direction == UP:
            drawTile(movex, movey, board[movex][movey], 0, -i)
        if direction == DOWN:
            drawTile(movex, movey, board[movex][movey], 0, i)
        if direction == LEFT:
            drawTile(movex, movey, board[movex][movey], -i, 0)
        if direction == RIGHT:
            drawTile(movex, movey, board[movex][movey], i, 0)
        pygame.display.update()  # 更新界面
        FPSCLOCK.tick(FPS)  # 控制帧率


# 判断无效移动
def isValidMove(board, direction):
    blankx, blanky = getBlankPosition(board)
    if blankx == 0 and direction == RIGHT:
        return False
    elif blankx == 2 and direction == LEFT:
        return False
    elif blanky == 0 and direction == DOWN:
        return False
    elif blanky == 2 and direction == UP:
        return False
    else:
        return True


# 获取随机移动的方向
def getRandomMove(board, lastMove=None):
    validMoves = [UP, DOWN, LEFT, RIGHT]
    if lastMove == UP or not isValidMove(board, DOWN):
        validMoves.remove(DOWN)
    if lastMove == DOWN or not isValidMove(board, UP):
        validMoves.remove(UP)
    if lastMove == LEFT or not isValidMove(board, RIGHT):
        validMoves.remove(RIGHT)
    if lastMove == RIGHT or not isValidMove(board, LEFT):
        validMoves.remove(LEFT)
    return random.choice(validMoves)


def getBlankPosition(board):
    for x in range(COL):
        for y in range(ROW):
            if board[x][y] == BLANK:
                return (x, y)


def getSpotClicked(board, x, y):
    for tilex in range(len(board)):
        for tiley in range(len(board[0])):
            left, top = getLeftTopOfTile(tilex, tiley)
            tileRect = pygame.Rect(left, top, BLOCKSIZE, BLOCKSIZE)
            if tileRect.collidepoint(x, y):  # 如果产生碰撞
                return tilex, tiley  # 返回行列
    return None, None


# 获取用户输入
def getInput(mainBoard):
    events = pygame.event.get()
    userInput = None
    for event in events:
        if event.type == MOUSEBUTTONUP:
            # 获取位置关系
            spotx, spoty = getSpotClicked(mainBoard, event.pos[0], event.pos[1])
            # 坐标不在拼图区域,点击的新游戏
            if (spotx, spoty) == (None, None) and NEW_RECT.collidepoint(event.pos):
                userInput = NEWGAME
            else:
                # 如果已完成,点击非选项时不移动
                if mainBoard == getStartingBoard():
                    break
                # 点击位置是否在BLANK旁边
                blankx, blanky = getBlankPosition(mainBoard)

                if spotx == blankx + 1 and spoty == blanky:
                    userInput = LEFT  # 设置移动方向
                elif spotx == blankx - 1 and spoty == blanky:
                    userInput = RIGHT
                elif spotx == blankx and spoty == blanky + 1:
                    userInput = UP
                elif spotx == blankx and spoty == blanky - 1:
                    userInput = DOWN
    return userInput


# 对用户输入进行处理
def processing(userInput, mainBoard, msg):
    if mainBoard == getStartingBoard():
        msg = '完成'
    else:
        msg = '通过鼠标移动方块'

    if userInput:
        # 功能按钮  新游戏处理:
        if userInput == NEWGAME:
            getStartingBoard()  # 初始化推盘列表
            mainBoard = generateNewPuzzle(AUTOMOVE)  # 随机次数移动打乱
        else:
            # 方块移动
            slideAnimation(mainBoard, userInput, msg, 8)
            makeMove(mainBoard, userInput)
    return mainBoard, msg


# 资源回收与程序退出
def terminate():
    pygame.quit()  # 模块卸载
    sys.exit()


# 退出判断
def checkForQuit():
    for event in pygame.event.get(QUIT):  # 获取所有可能会导致退出的事件,存在就执行退出
        terminate()  # 执行退出
    for event in pygame.event.get(KEYUP):  # 按下ESC键退出
        if event.key == K_ESCAPE:
            terminate()
        pygame.event.post(event)  # 发送事件至消息列队


def main():
    # FPSCLOCK Clock对象
    # WINSET 窗体Surface对象
    # STATICSURF 静态窗体Surface对象
    # BASICFONT 字体对象
    # NEW_SURF "新游戏"Surface对象,一张内容为文字的图片  调用字体对象的render()方法,渲染为Surface对象显示
    # NEW_RECT get_rect()方法获取的"新游戏"矩形属性
    global FPSCLOCK, WINSET, STATICSURF, BASICFONT  # 定义全局变量
    global NEW_SURF, NEW_RECT

    pygame.init()
    FPSCLOCK = pygame.time.Clock()  # 创建一个Clock对象,并使用变量FPSCLOCK保存
    BASICFONT = pygame.font.Font('STKAITI.TTF', 25)  # 定义返回一个字体对象,并使用变量BASICFONT保存
    WINSET, NEW_SURF, NEW_RECT = darwStaticWin()  # 创建静态窗口
    STATICSURF = WINSET.copy()  # 复制一个静态窗口作为底板
    mainBoard = generateNewPuzzle(AUTOMOVE)  # 初始化列表
    msg = None

    while True:
        FPSCLOCK.tick(FPS)  # 设置帧率
        drawBoard(mainBoard, msg)  # 动态界面绘制
        pygame.display.update()  # 刷新
        checkForQuit()  # 判断是否终止
        userInput = getInput(mainBoard)  # 获取输入
        mainBoard, msg = processing(userInput, mainBoard, msg)  # 输入处理


if __name__ == '__main__':
    main()
总结
只一个函数没给出,作用是判断无效移动
错误原因:
错误判断了行与列,blankx代表列,blanky代表行;且0为第一行,2为最后一行
# 判断无效移动
def isValidMove(board, direction):
    blankx, blanky = getBlankPosition(board)
    if blankx == 0 and direction == RIGHT:
        return False
    elif blankx == 2 and direction == LEFT:
        return False
    elif blanky == 0 and direction == DOWN:
        return False
    elif blanky == 2 and direction == UP:
        return False
    else:
        return True
错误排查
1、TypeError:darwStaticWin()缺少两个必需的位置参数:“BTTEXTCOLOR”和“BTCOLOR”
2、(<class‘TypeError’>,TypeError(‘isValidMove()接受0个位置参数,但给出了2个’),<位于0x000002312E0D7740的回溯对象‘)。
3、(<class‘IndexError’>,IndexError(‘列出索引超出范围’),<traceback object at 0x000001478DB88800>)。
4、TypeError:DrawBoard()缺少1个必需的位置参数:‘msg’
5、Unbound LocalError:赋值前引用的局部变量‘event’
6、IndexError: list index out of range
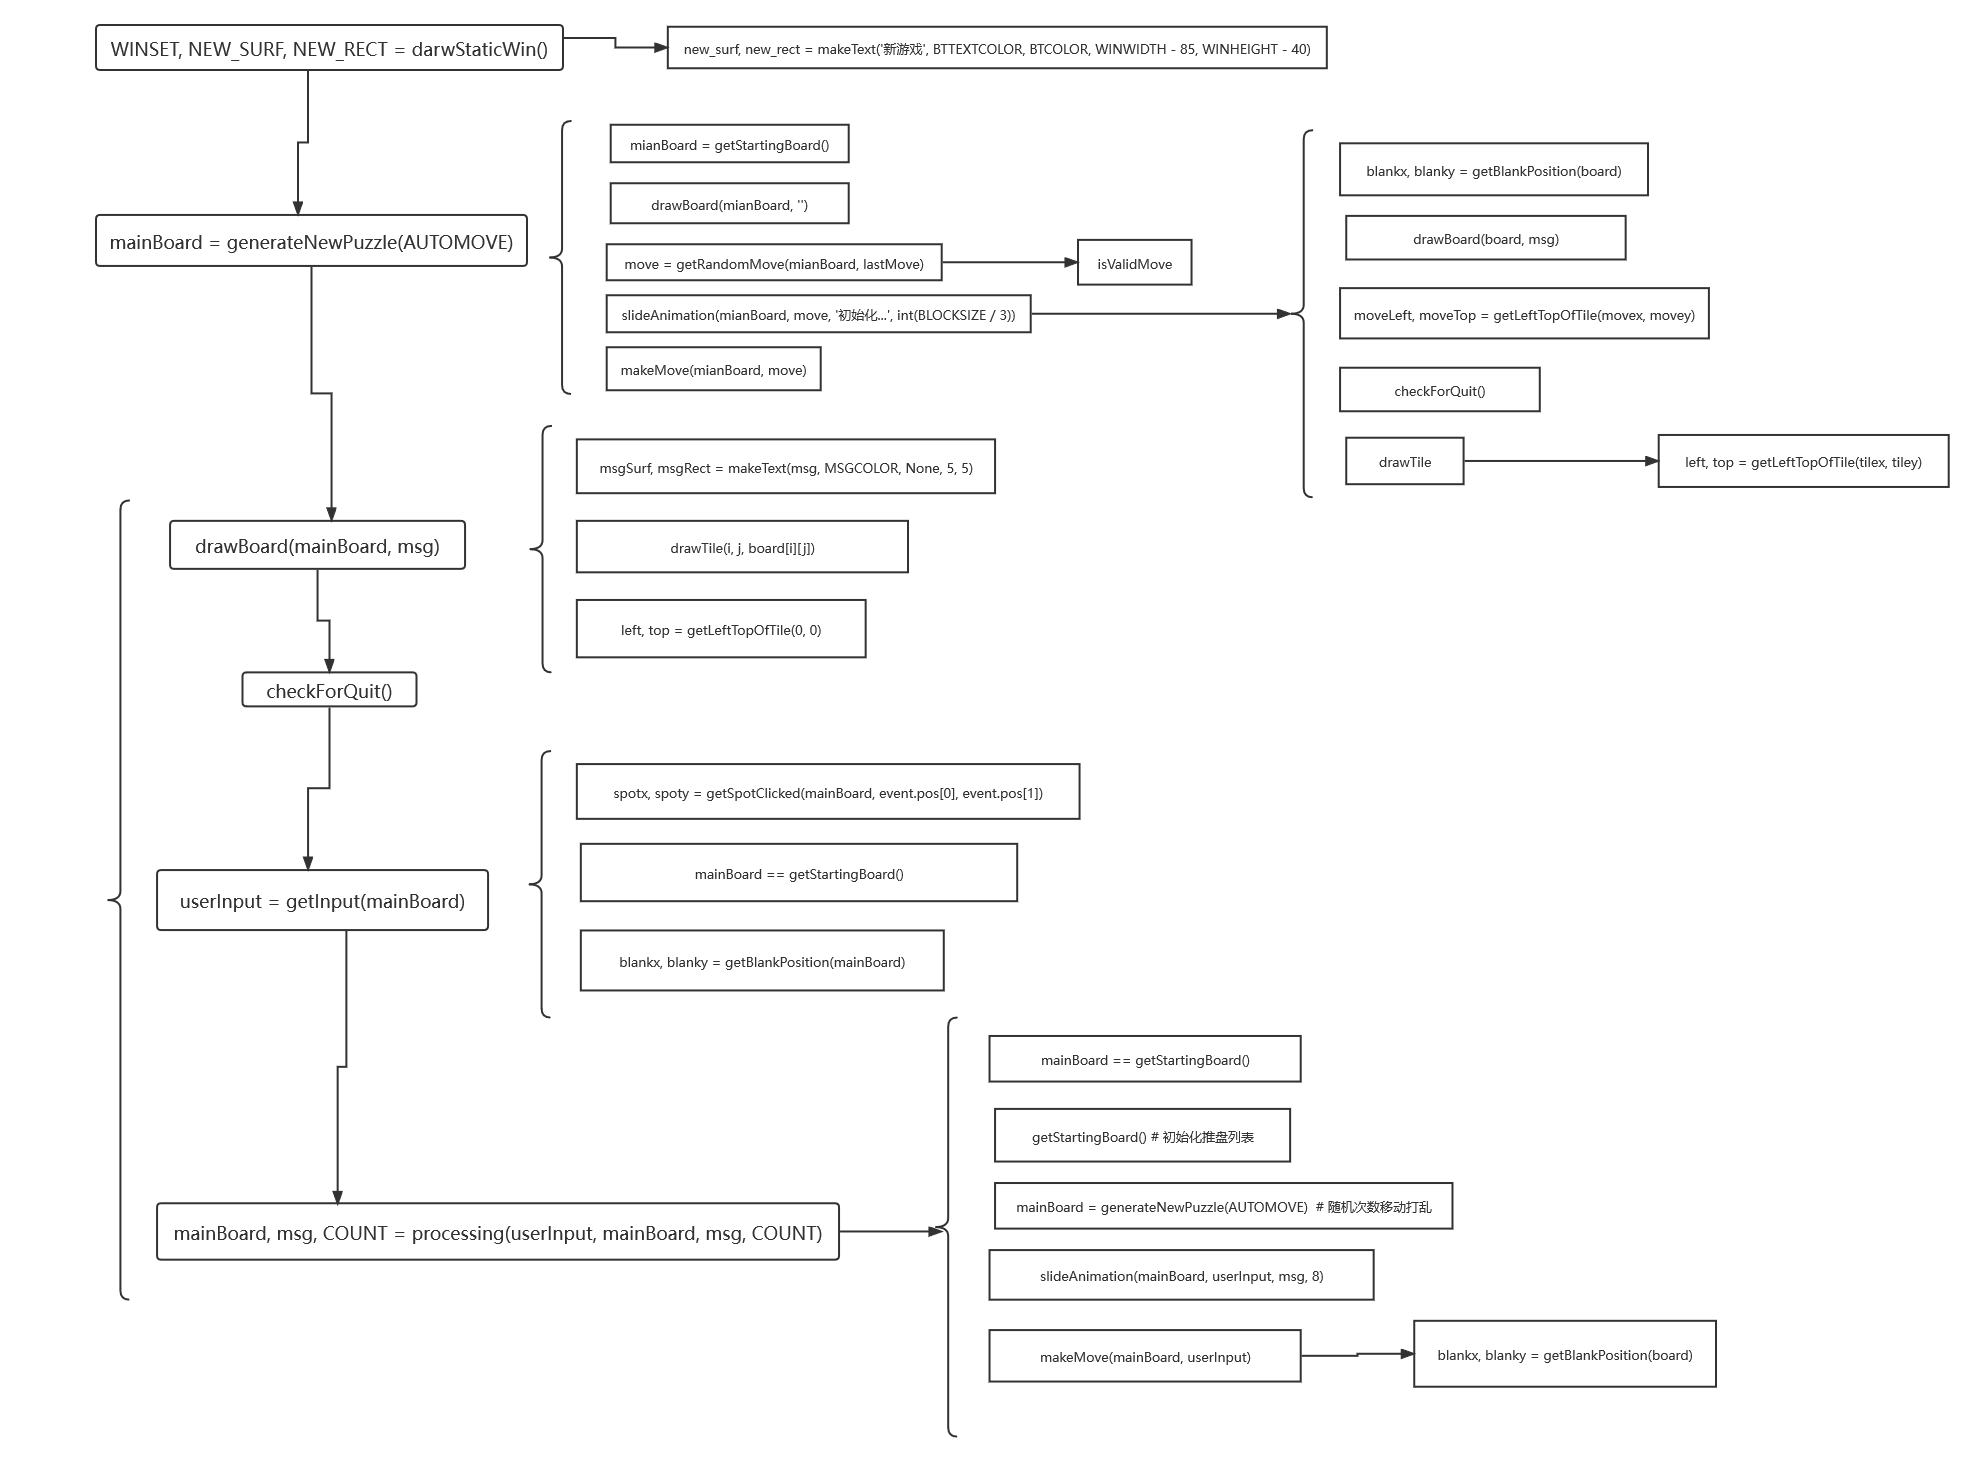
实现思路
1、
整个游戏以MVC的设计模式进行设计,采用自顶向下的方式,将总问题逐渐向下分层,直到分为一个一个能被解决的小问题,实现整个游戏。
将游戏分为Model(模型层)-View(视图层)-Controller(控制层),分层级一层一层去实现,将大问题分割为小问题。
2、Model
model部分应实现的推盘序列的生成与存储,
-
getStartingBoard函数,根据行列生成一个二级列表,返回 initBoard ,表示的是初始的二级列表顺序,可用于判断游戏是否完成。
-
makeMove函数,接收列表和移动方向两个参数,将交换位置后的序列存储,不返回结果。一般与移动的动画效果函数slideAnimation 一起使用,每次移动之后将序列存储一次。应该可以写在一起,待尝试。
3、View
view部分负责视图的显示,包括有提示信息msg、推盘方块、外边框、按钮等。
-
首先是 darwStaticWin 函数,用于创建窗口以及设置窗口标题、背景、图片、文字显示等。由于经常会使用到绘制文字显示,为了代码复用,精简代码,将其封装为一个函数makeText,提供要绘制的文本、文字颜色、背景色、绘制位置等参数,返回一个Surface对象与其矩形属性<rect(555, 440, 75, 28)>,分别表示距离y轴的距离、距离x轴的距离、矩形的长和高。共有两处使用,体会其使用。
-
按钮的实质,其实就是一个带背景色的文字显示。
-
new_surf, new_rect = makeText('新游戏', BTTEXTCOLOR, BTCOLOR, WINWIDTH - 85, WINHEIGHT - 40) winSet.blit(new_surf, new_rect)-
    if msg:
        msgSurf, msgRect = makeText(msg, MSGCOLOR, None, 5, 5)
        pygame.image.save(msgSurf, 'msg.png')  # 将msgSurf存为名为msg.png的图片
        imgSurf = pygame.image.load('msg.png')  # 加载图片
        WINSET.blit(imgSurf, msgRect)
可直接绘制msgSurf,不必存为图片加载图片。
-
-
drawBoard函数,用于绘制动态界面,负责了绘制消息、绘制序列列表方块和游戏整个方块的外边框。
利用一个双层循环,循环序列列表,调用drawTile函数,,绘制方块及数字。而drawTile 函数调用了getLeftTopOfTile函数,
输入参数行列,根据行列,计算方块左上角 距离窗口原点 纵横坐标距离,并返回距离y轴、x轴的距离,用于确定绘制的方块位置。
getLeftTopOfTile先把整个拼盘当作一个整体,计算出相对于窗口的中心位置,但是并不绘制一整个方块,而是根据行列,进行一定的偏移,绘制出全部方块及渲染数字到方块上。
最后传入行列(0,0),即最左上角的方块的行列,确定其距离x,y轴的距离,绘制整个拼盘的外边框。
至此,消息、方块、按钮等都以绘制完成,视图层呈现出来了。
4、Controller
controller负责控制整个游戏的逻辑运行,包括推盘序列初始化、接收用户输入、对用户输入进行处理、以及退出游戏。
- 视图呈现之后,但是推盘序列最初始还是顺序排列的,我们需要将它打乱才可以进行游戏,通过移动将推盘完成顺序排列。
- generateNewPuzzle通过形参numSlides,获取随机移动的次数,目的是打乱推盘序列。numSlides的实参就是AUTOMOVE全局变量,通过rondom模块,随机获取的一个50-100之间的整数。
- 首先通过调用getStartingBoard函数,获取初始的推盘序列,drawBoard传入序列 绘制界面。
- 定义初始移动方向为None,getRandomMove传入序列以及方向,获取随机移动方向,移动方向有4个,但是当空格在推盘第一行时,它是不可以向上移动的,所以应从4个移动方向中,移除无效的移动方向。其他类似判断。random.choice将从列表中随机获取一个移动方向。isValidMove用于判断无效的移动方向。
- getInput获取用户输入,先定义变量userInput初始值为None,根据获取的点击位置,通过getSpotClicked函数,返回点击的方块所在行列,如与方块未产生碰撞,则返回(None,None),表示点击的空白区域。
- 如果序列与初始序列相同,表示已完成,不予点击,直接跳出。
- 但是点击方块,也并不能让所有方块生效移动,只有当点击方块的位置在空格旁边的时候,判断被点击方块与空格的位置关系,如果点击方块在空格右边,设置移动方向向左,其他类似。函数返回用户输入userInput。
- processing函数接收getInput的返回值,序列,以及应设置的消息,对用户的输入进行处理,判断推盘状态,是待完成还是已完成,设置对应的提示msg。再对用户输入判断,点击的新按钮还是移动方向。做出对应的相应。
- 在checkForQuit判断用户是否退出。
随机生成乱序二维列表
import random

COL = 4
ROW = COL

x = list(range(1, COL * ROW))
x.append(None)
print(x)
random.shuffle(x)
print(x)

init = []

for i in range(COL):
    clunm = []
    for j in range(ROW):
        clunm.append(x[COL*i+j])
    init.append(clunm)

print(init)
二维元祖与列表相互转换
# 列表转换元祖
mianBoard = [[6, 7, 1], [None, 3, 2], [8, 4, 5]]
RESETBoard = tuple(tuple(tuple(items)) for items in tuple(mianBoard))
print(RESETBoard)
>>>((6, 7, 1), (None, 3, 2), (8, 4, 5))

# 元祖转换列表
RESETBoard = ((6, 7, 1), (None, 3, 2), (8, 4, 5))
mianBoard = list(list(list(items)) for items in list(RESETBoard))
print(mianBoard)
>>>[[6, 7, 1], [None, 3, 2], [8, 4, 5]]
算法相关
深度优先搜索DFS
深度优先搜索算法(英语:Depth-First-Search,DFS)是一种用于遍历或搜索树或图的算法。这个算法会尽可能深的搜索树的分支。当节点v的所在边都己被探寻过,搜索将回溯到发现节点v的那条边的起始节点。这一过程一直进行到已发现从源节点可达的所有节点为止。如果还存在未被发现的节点,则选择其中一个作为源节点并重复以上过程,整个进程反复进行直到所有节点都被访问为止。[1](p. 603)这种算法不会根据图的结构等信息调整执行策略[来源请求]。
深度优先搜索是图论中的经典算法,利用深度优先搜索算法可以产生目标图的拓扑排序表[1](p. 612),利用拓扑排序表可以方便的解决很多相关的图论问题,如无权最长路径问题等等。
广度优先搜索BFS
宽度优先搜索算法(又称广度优先搜索)是最简便的图的搜索算法之一,这一算法也是很多重要的图的算法的原型。Dijkstra单源最短路径算法和Prim最小生成树算法都采用了和宽度优先搜索类似的思想。其别名又叫BFS,属于一种盲目搜寻法,目的是系统地展开并检查图中的所有节点,以找寻结果。换句话说,它并不考虑结果的可能位置,彻底地搜索整张图,直到找到结果为止。
广度优先搜索算法(英语:Breadth-First Search,缩写为BFS),又译作宽度优先搜索,或横向优先搜索,是一种图形搜索算法。简单的说,BFS是从根节点开始,沿着树的宽度遍历树的节点。如果所有节点均被访问,则算法中止。广度优先搜索的实现一般采用open-closed表.
BFS是一种暴力搜索算法,目的是系统地展开并检查图中的所有节点,以找寻结果。换句话说,它并不考虑结果的可能地址,彻底地搜索整张图,直到找到结果为止。BFS并不使用经验法则算法。
贪心算法
贪心算法(英语:greedy algorithm),又称贪婪算法,是一种在每一步选择中都采取在当前状态下最好或最优(即最有利)的选择,从而希望导致结果是最好或最优的算法。[1]比如在旅行推销员问题中,如果旅行员每次都选择最近的城市,那这就是一种贪心算法。
贪心算法在有最优子结构的问题中尤为有效。最优子结构的意思是局部最优解能决定全局最优解。简单地说,问题能够分解成子问题来解决,子问题的最优解能递推到最终问题的最优解。
贪心算法与动态规划的不同在于它对每个子问题的解决方案都做出选择,不能回退。动态规划则会保存以前的运算结果,并根据以前的结果对当前进行选择,有回退功能。
贪心法可以解决一些最优化问题,如:求图中的最小生成树、求哈夫曼编码……对于其他问题,贪心法一般不能得到我们所要求的答案。一旦一个问题可以通过贪心法来解决,那么贪心法一般是解决这个问题的最好办法。由于贪心法的高效性以及其所求得的答案比较接近最优结果,贪心法也可以用作辅助算法或者直接解决一些要求结果不特别精确的问题。在不同情况,选择最优的解,可能会导致辛普森悖论(Simpson’s Paradox),不一定出现最优的解。
贪心算法在数据科学领域被广泛应用,特别是金融工程。其中一个贪心算法例子就是Ensemble method。
- 创建数学模型来描述问题。
- 把求解的问题分成若干个子问题。
- 对每一子问题求解,得到子问题的局部最优解。
- 把子问题的解局部最优解合成原来解问题的一个解。
实现该算法的过程:
从问题的某一初始解出发;while 能朝给定总目标前进一步 do,求出可行解的一个解元素;
最后,由所有解元素组合成问题的一个可行解。
A*算法
A*搜索算法(A* search algorithm)是一种在图形平面上,有多个节点的路径,求出最低通过成本的算法。常用于游戏中的NPC的移动计算,或网络游戏的BOT的移动计算上。
该算法综合了最良优先搜索和Dijkstra算法的优点:在进行启发式搜索提高算法效率的同时,可以保证找到一条最优路径(基于评估函数)。
在此算法中,如果以{\displaystyle g(n)}[外链图片转存失败,源站可能有防盗链机制,建议将图片保存下来直接上传(img-MKuIVne2-1640141061966)(https://wikimedia.org/api/rest_v1/media/math/render/svg/d4ad18070e494503403daf39398e711c1378348e)]表示从起点到任意顶点{\displaystyle n}[外链图片转存失败,源站可能有防盗链机制,建议将图片保存下来直接上传(img-FThsMK9E-1640141061967)(https://wikimedia.org/api/rest_v1/media/math/render/svg/a601995d55609f2d9f5e233e36fbe9ea26011b3b)]的实际距离,{\displaystyle h(n)}[外链图片转存失败,源站可能有防盗链机制,建议将图片保存下来直接上传(img-RnpLmxAJ-1640141061968)(https://wikimedia.org/api/rest_v1/media/math/render/svg/125976c5970a395422e1baf572a26f31ae5e0b7d)]表示任意顶点{\displaystyle n}[外链图片转存失败,源站可能有防盗链机制,建议将图片保存下来直接上传(img-4sEJGeO3-1640141061968)(https://wikimedia.org/api/rest_v1/media/math/render/svg/a601995d55609f2d9f5e233e36fbe9ea26011b3b)]到目标顶点的估算距离(根据所采用的评估函数的不同而变化),那么A*算法的估算函数为:
这个公式遵循以下特性:
- 如果{\displaystyle g(n)}[外链图片转存失败,源站可能有防盗链机制,建议将图片保存下来直接上传(img-vBUGG4tz-1640141061970)(https://wikimedia.org/api/rest_v1/media/math/render/svg/d4ad18070e494503403daf39398e711c1378348e)]为0,即只计算任意顶点{\displaystyle n}[外链图片转存失败,源站可能有防盗链机制,建议将图片保存下来直接上传(img-Y4BWxmkb-1640141061970)(https://wikimedia.org/api/rest_v1/media/math/render/svg/a601995d55609f2d9f5e233e36fbe9ea26011b3b)]到目标的评估函数{\displaystyle h(n)}[外链图片转存失败,源站可能有防盗链机制,建议将图片保存下来直接上传(img-XL2Q4qRP-1640141061971)(https://wikimedia.org/api/rest_v1/media/math/render/svg/125976c5970a395422e1baf572a26f31ae5e0b7d)],而不计算起点到顶点{\displaystyle n}[外链图片转存失败,源站可能有防盗链机制,建议将图片保存下来直接上传(img-SOJihyF7-1640141061972)(https://wikimedia.org/api/rest_v1/media/math/render/svg/a601995d55609f2d9f5e233e36fbe9ea26011b3b)]的距离,则算法转化为使用贪心策略的最良优先搜索,速度最快,但可能得不出最优解;
- 如果{\displaystyle h(n)}[外链图片转存失败,源站可能有防盗链机制,建议将图片保存下来直接上传(img-CTsZ1mx2-1640141061972)(https://wikimedia.org/api/rest_v1/media/math/render/svg/125976c5970a395422e1baf572a26f31ae5e0b7d)]不大于顶点{\displaystyle n}[外链图片转存失败,源站可能有防盗链机制,建议将图片保存下来直接上传(img-amhp8UGw-1640141061973)(https://wikimedia.org/api/rest_v1/media/math/render/svg/a601995d55609f2d9f5e233e36fbe9ea26011b3b)]到目标顶点的实际距离,则一定可以求出最优解,而且{\displaystyle h(n)}[外链图片转存失败,源站可能有防盗链机制,建议将图片保存下来直接上传(img-r14wPVqR-1640141061974)(https://wikimedia.org/api/rest_v1/media/math/render/svg/125976c5970a395422e1baf572a26f31ae5e0b7d)]越小,需要计算的节点越多,算法效率越低,常见的评估函数有——欧几里得距离、曼哈顿距离、切比雪夫距离;
- 如果{\displaystyle h(n)}[外链图片转存失败,源站可能有防盗链机制,建议将图片保存下来直接上传(img-JRFrca0K-1640141061975)(https://wikimedia.org/api/rest_v1/media/math/render/svg/125976c5970a395422e1baf572a26f31ae5e0b7d)]为0,即只需求出起点到任意顶点{\displaystyle n}[外链图片转存失败,源站可能有防盗链机制,建议将图片保存下来直接上传(img-CAQjKhS6-1640141061976)(https://wikimedia.org/api/rest_v1/media/math/render/svg/a601995d55609f2d9f5e233e36fbe9ea26011b3b)]的最短路径{\displaystyle g(n)}[外链图片转存失败,源站可能有防盗链机制,建议将图片保存下来直接上传(img-MjZzkvt3-1640141061976)(https://wikimedia.org/api/rest_v1/media/math/render/svg/d4ad18070e494503403daf39398e711c1378348e)],而不计算任何评估函数{\displaystyle h(n)}[外链图片转存失败,源站可能有防盗链机制,建议将图片保存下来直接上传(img-r36agbY7-1640141061977)(https://wikimedia.org/api/rest_v1/media/math/render/svg/125976c5970a395422e1baf572a26f31ae5e0b7d)],则转化为单源最短路径问题,即Dijkstra算法,此时需要计算最多的顶点;
文件的使用
–用户登录
先创建一个目录falg
import os


def c_flag():
    with open("flag", "w") as file:
        file.write("1")


def init():
    with open("u_root", "w") as file:
        root = {"username": "root", "password": "123456"}
        file.write(str(root))
    os.mkdir("users")


def user_login():
    while 1:
        print("********用户登录*********")
        user_name = input("请输入账户名:")
        user_psw = input("请输入密码:")
        user_list = os.listdir("./users")

        flag = 0
        for user in user_list:
            if user == user_name:
                flag = 1
                print("登录中。。。。。")
                file = "./users/" + user_name
                file_user = open(file)
                user_info = eval(file_user.read())
                if user_psw == user_info["u_psw"]:
                    print("登录成功")
                    print("-----------------")
                    break
                else:
                    print("密码错误")
        if flag == 1:
            break
        elif flag == 0:
            print("没有此用户,请先注册")
            break
        else:
            print("参数有误")


def user_register():
    user_username = input("请输入账户名:")
    user_psw = input("请输入密码:")
    user_name = input("请输入昵称:")
    user = {"u_username": user_username, "u_psw": user_psw, "u_name": user_name}
    user_path = "./users/" + user_username
    with open(user_path, "w") as file_user:
        file_user.write(str(user))


def root_login():
    while 1:
        print("*******管理员登录*******")
        root_name = input("请输入账户名:")
        root_psw = input("请输入密码:")
        file_root = open("u_root")
        root = eval(file_root.read())
        if root_name == root["username"] and root_psw == root["password"]:
            print("登录成功")
            break
        else:
            print("账号或密码有误")


def user_select():
    while 1:
        user_type_select = input("请选择用户类型:")
        if user_type_select == "1":
            root_login()
            break
        elif user_type_select == "2":
            while 1:
                select = input("是否需要注册?(y/n)")
                if select == "y":
                    print("------用户注册------")
                    user_register()
                    break
                elif select == "n":
                    print("------用户登录------")
                    break
                else:
                    print("输入有误,请重新输入!(y/n)")
            user_login()
            break
        else:
            print("输入有误,请重新输入!(1/2)")


def print_login_menu():
    print("-----用户选择-----")
    print("1-管理员登录")
    print("2-用户登录")
    print("------------------")


def main():
    flag = open("flag")
    word = flag.read()
    if word == "0":
        print("首次启动")
        flag.close()
        c_flag()
        init()
        print_login_menu()
        user_select()
    elif word == "1":
        print("欢迎回来")
        print_login_menu()
        user_select()
    else:
        print("初始化参数错误")


if __name__ == '__main__':
    main()
对文件中的数字排序
应有一个名为 number 的文件,里面存入以空格分隔的数字,例:
21 34 4 5 45 5 45 45 2 3 76 542 542
with open("number", "r") as file:
    for fil in file:
        numberList = []
        dlist = []
        # 分割存入列表
        for f in list(fil):
            if f == "\40":  # 以空格分割
                num = "".join(dlist)
                dlist.clear()
                numberList.append(int(num))
            else:
                dlist.append(f)
        numberList.sort()
        print(numberList)
或 直接 使用split函数 分割
但是分割后的数字为字符串类型,需转型
with open("number", "r") as file:
    for fil in file:
        numberList = fil.split(" ")
        l = []
        for i in numberList:
            l.append(int(i))
        l.sort()
        print(l)
或 直接使用
numberList = [int(x) for x in numberList]
转型
with open("number", "r") as file:
    for fil in file:
        numberList = fil.split(" ")
        numberList = [int(x) for x in numberList]
        numberList.sort()
        print(numberList)
注释实现
实现类似python注释的功能,读取"u_root1"文件,但是不读取"#"后的内容
strs = []
with open("u_root1", "r") as file:
    for s in file:
        for jing in list(s):
            if jing == "#":
                break
            strs.append(jing)
            # print(jing, end="")
        strs.append("\n")
zz = "".join(strs)
print(zz)
格式
print("我的名字是:%s,年龄为:%d" % ('小强', 13))
print("我的名字是:{},年龄为:{}".format('小强', 13))
print("我的名字是:{1},年龄为:{0}".format(13, '小强'))
# print("我的名字是:%s,年龄为:%d" % (13, '小强'))  报错

a = "q_"
# 如果字符串至少有一个字符并且所有字符都是字母则返回 True,否则返回 False。
print(a.isalpha())
绘制直方图
import pandas as pd
import numpy as np
import matplotlib.pyplot as plt

print(np.random.rand(10, 4))  # 4行10列 的二维列表
df = pd.DataFrame(np.random.rand(10, 4), columns=['a', 'b', 'c', 'd'])
df.plot(stacked=True, kind="bar")
plt.show()
爬虫
import requests

baidu_url = 'https://www.baidu.com/'
res = requests.get(baidu_url)
print(res.status_code)
print(res.encoding)
res.encoding = 'utf-8'
print("网页源码:\n{}".format(res.text))
曲线图
import numpy as np

import matplotlib.pyplot as plt

plt.rcParams['font.sans-serif'] = ['Simhei']  # 中文
plt.rcParams['axes.unicode_minus'] = False  # 符号

data = np.arange(0, 1.1, 0.01)
plt.title("曲线")
plt.xlabel("x")
plt.ylabel("y")

plt.xticks([0, 0.5, 1])
plt.yticks([0, 0.5, 1.0])
plt.plot(data, data ** 2)
plt.plot(data, data ** 3)
plt.legend(["y=x^2", "y=x^3"])
plt.show()
mport numpy as np

import matplotlib.pyplot as plt

plt.rcParams['font.sans-serif'] = ['Simhei']  # 中文
plt.rcParams['axes.unicode_minus'] = False  # 符号
# plt.figure(figsize=(10, 6), facecolor='gray')
# # plt.axes([0.1, 0.5, 0.7, 0.3])
# # plt.subplot(323)
# plt.subplots(2, 2)
# plt.show()  # 绘图区域
x = np.linspace(-np.pi, np.pi, 256, endpoint=True)
c, s = np.cos(x), np.sin(x)
plt.plot(x, s, 'm:')
plt.plot(x, c, 'c--')
plt.show()
雷达图
import numpy as np

import matplotlib.pyplot as plt

plt.rcParams['font.sans-serif'] = ['Simhei']  # 中文
plt.rcParams['axes.unicode_minus'] = False  # 符号

courses = np.array(['Java', 'Python', 'C,', 'SpringBoot', 'Vue', 'JavaScript'])
scores = np.array([[95, 75, 74],
                   [95, 23, 86],
                   [65, 75, 86],
                   [95, 75, 98],
                   [56, 75, 86],
                   [95, 87, 49]])

data_length = len(scores)  # 6
angles = np.linspace(0, 2 * np.pi, data_length, endpoint=False)

scores = np.concatenate((scores, [scores[0]]))  # 7
angles1 = np.concatenate((angles, [angles[0]]))  # 7
plt.polar(angles1, scores, 'o-', linewidth=3)

plt.thetagrids(angles * 180 / np.pi, courses, fontproperties='simhei')

plt.title("成绩评估")
plt.legend(['软件1909', '软件1909', '软件1909'], loc=(0.94, 0.80), labelspacing=0.1)
plt.show()
pandas模块
import pandas as pd
import numpy as np

df_obj = pd.DataFrame([[11.0, np.nan, 5.0, 6.0], [1.0, np.nan, np.nan, 8.0]])

print(df_obj)

df_obj.isnull()
#        0     1      2      3
# 0  False  True  False  False
# 1  False  True   True  False
df_obj.dropna(axis=1)
#       0    3
# 0  11.0  6.0
# 1   1.0  8.0


 浙公网安备 33010602011771号