Springboot集成Redis
Redis技术栈目前广泛使用于开发领域,掌握Redis技术栈与Springboot的集成至关重要。
Redis是目前业界使用最广泛的内存数据存储。相比memcached,Redis支持更丰富的数据结构,例如hashes, lists, sets等,同时支持数据持久化。除此之外,Redis还提供一些类数据库的特性,比如事务,HA,主从库。可以说Redis兼具了缓存系统和数据库的一些特性,因此有着丰富的应用场景。
1.安装redis
下载地址:https://github.com/MSOpenTech/redis/releases。
Redis 支持 32 位和 64 位。这个需要根据你系统平台的实际情况选择

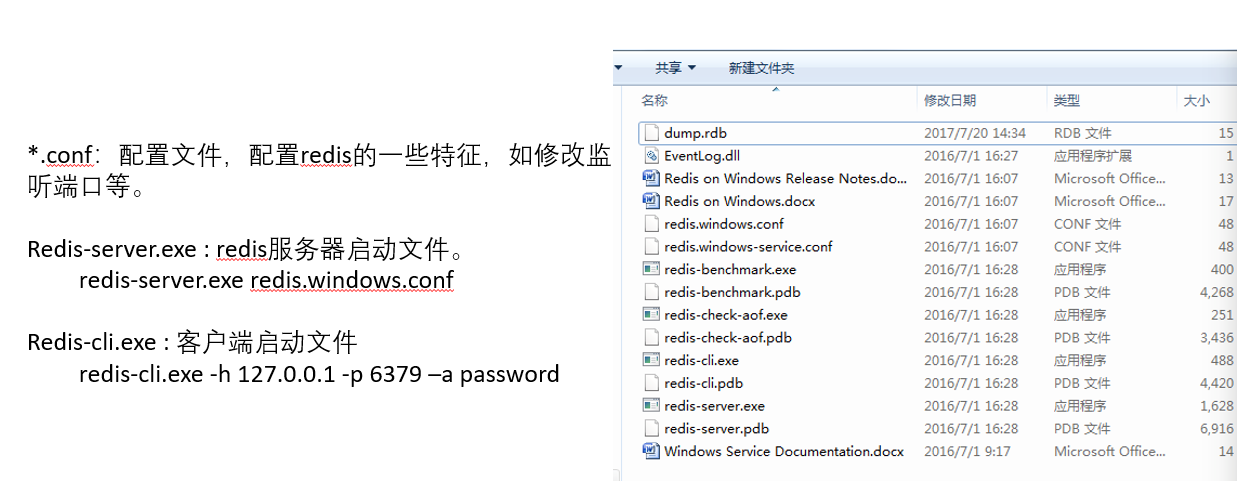
Redis的目录结构

*.conf:配置文件,配置redis的一些特征,如修改监听端口等。

Redis-server.exe : redis服务器启动文件。
	redis-server.exe redis.windows.conf

Redis-cli.exe : 客户端启动文件
	redis-cli.exe -h 127.0.0.1 -p 6379 –a password
Redis 命令参考网址 :
http://doc.redisfans.com/
2.Springboot集成Redis
(1)引入spring-boot-starter-redis
 <dependency>

<groupId>org.springframework.boot</groupId>
<artifactId>spring-boot-starter-data-redis</artifactId>
</dependency>

<--!进行redisTemplate配置的时候需要此jar包 -->
<dependency>
<groupId>com.fasterxml.jackson.core</groupId>
<artifactId>jackson-annotations</artifactId>
</dependency>
在springboot2之后,redis默认集成的是lettuce.
1.5的版本默认采用的连接池技术是jedis , 2.0以上版本默认连接池是lettuce.
1.5版本的springboot集成redis与2.0有所不同(核心配置类的书写也有很大的区别),主要是因为连接池技术使用的差异,这里主要介绍springboot的2.x版本。
Jedis与Lettuce的区别
如果你在网上搜索Redis 的Java客户端,你会发现,大多数文献介绍的都是 Jedis。
不可否认,Jedis是一个优秀的基于Java语言的Redis客户端。
但是,其不足也很明显:Jedis在实现上是直接连接Redis-Server,在多个线程间共享一个Jedis实例时是线程不安全的,如果想要在多线程场景下使用Jedis,需要使用连接池,每个线程都使用自己的Jedis实例,当连接数量增多时,会消耗较多的物理资源。
与Jedis相比,Lettuce则完全克服了其线程不安全的缺点:Lettuce是一个可伸缩的线程安全的Redis客户端,支持同步、异步和响应式模式。
多个线程可以共享一个连接实例,而不必担心多线程并发问题。
它基于优秀Netty NIO框架构建,支持Redis的高级功能,如Sentinel,集群,流水线,自动重新连接和Redis数据模型。
(2)添加配置文件
# REDIS (RedisProperties)
# Redis数据库索引(默认为0)
spring.redis.database=0
# Redis服务器地址
spring.redis.host=127.0.0.1
# Redis服务器连接端口
spring.redis.port=6379
# Redis服务器连接密码(默认为空)
spring.redis.password=
# 连接池最大连接数(使用负值表示没有限制)
spring.redis.pool.max-active=8
# 连接池最大阻塞等待时间(使用负值表示没有限制)
spring.redis.pool.max-wait=-1
# 连接池中的最大空闲连接
spring.redis.pool.max-idle=8
# 连接池中的最小空闲连接
spring.redis.pool.min-idle=0
# 连接超时时间(毫秒)
spring.redis.timeout=1000
(3)书写核心集成配置类(***)

完整代码如下:
package config;

import java.time.Duration;

import org.springframework.cache.CacheManager;
import org.springframework.cache.annotation.CachingConfigurerSupport;
import org.springframework.cache.annotation.EnableCaching;
import org.springframework.context.annotation.Bean;
import org.springframework.context.annotation.Configuration;
import org.springframework.data.redis.cache.RedisCacheConfiguration;
import org.springframework.data.redis.cache.RedisCacheManager;
import org.springframework.data.redis.cache.RedisCacheManager.RedisCacheManagerBuilder;
import org.springframework.data.redis.connection.RedisConnectionFactory;
import org.springframework.data.redis.core.RedisTemplate;
import org.springframework.data.redis.serializer.Jackson2JsonRedisSerializer;
import org.springframework.data.redis.serializer.RedisSerializationContext;
import org.springframework.data.redis.serializer.StringRedisSerializer;

import com.fasterxml.jackson.annotation.JsonAutoDetect;
import com.fasterxml.jackson.annotation.PropertyAccessor;
import com.fasterxml.jackson.databind.ObjectMapper;

//Redis的核心配置类,这个类提供了两个方法(其实提供了两个bean,这两个bean会加载到spring的context里边,供使用者进行调用)
@Configuration //这个标签,通常与@bean结合使用,当@bean使用到该类的方法上,代表将该方法做为一个bean交给了spring的context进行了管理。
@EnableCaching //允许使用我们的缓存cache
public class RedisConfig extends CachingConfigurerSupport{

	@Bean
	public RedisTemplate<String, Object> redisTemplate(RedisConnectionFactory factory){
		//自主实现我们的redisTemplate方法。
		RedisTemplate<String, Object> redisTemplate = new RedisTemplate<String, Object>();
		//序列化
		StringRedisSerializer redisSerializer = new StringRedisSerializer();
		//引入json串的转换类
		Jackson2JsonRedisSerializer jackson2JsonRedisSerializer =
				new Jackson2JsonRedisSerializer(Object.class);

		ObjectMapper om = new ObjectMapper();
		om.setVisibility(PropertyAccessor.ALL, JsonAutoDetect.Visibility.ANY);
		om.enableDefaultTyping(ObjectMapper.DefaultTyping.NON_FINAL);
		jackson2JsonRedisSerializer.setObjectMapper(om);

		//redisTemplate设置
		redisTemplate.setConnectionFactory(factory);
		//redis key的序列化
		redisTemplate.setKeySerializer(redisSerializer);
		//value 序列化 使用的是jasonJackson2JsonRedisSerializer。我们的value大部分都是通过对象转化来的
		redisTemplate.setValueSerializer(jackson2JsonRedisSerializer);
		//value的序列化 hashmap的序列化
		redisTemplate.setHashValueSerializer(jackson2JsonRedisSerializer);
		return redisTemplate;
	}

	@Bean
	public CacheManager cacheManager(RedisConnectionFactory factory) {
		//序列化
		StringRedisSerializer redisSerializer = new StringRedisSerializer();
		//引入json串的转换类
		Jackson2JsonRedisSerializer jasonJackson2JsonRedisSerializer =
				new Jackson2JsonRedisSerializer(Object.class);

		ObjectMapper om = new ObjectMapper();
		//设置我们的objectMapper的访问权限
		om.setVisibility(PropertyAccessor.ALL, JsonAutoDetect.Visibility.ANY);
		om.enableDefaultTyping(ObjectMapper.DefaultTyping.NON_FINAL);
		jasonJackson2JsonRedisSerializer.setObjectMapper(om);

		//序列化配置,乱码问题解决以及我们的缓存的时效性
		RedisCacheConfiguration config = RedisCacheConfiguration.defaultCacheConfig().
				entryTtl(Duration.ofSeconds(1000)).
				serializeKeysWith(RedisSerializationContext.SerializationPair.fromSerializer(redisSerializer)).
				serializeValuesWith(RedisSerializationContext.SerializationPair.fromSerializer(jasonJackson2JsonRedisSerializer)).
				disableCachingNullValues();

		//RedisCacheManager cacheManager = RedisCacheManager.builder(factory).cacheDefaults(config).build();
		RedisCacheManager cacheManager = RedisCacheManagerBuilder.fromConnectionFactory(factory).cacheDefaults(config).build();

		return cacheManager;
	}

}
(4).springboot主配置类要加上@EnableCaching注解

(5).StringRedisTemplate与RedisTemplate区别点
两者的关系是StringRedisTemplate继承RedisTemplate。

两者的数据是不共通的;也就是说StringRedisTemplate只能管理StringRedisTemplate里面的数据,RedisTemplate只能管理RedisTemplate中的数据。

其实他们两者之间的区别主要在于他们使用的序列化类:
    RedisTemplate使用的是JdkSerializationRedisSerializer    存入数据会将数据先序列化成字	节数组然后在存入Redis数据库。
      StringRedisTemplate使用的是StringRedisSerializer

使用时注意事项:
   当你的redis数据库里面本来存的是字符串数据或者你要存取的数据就是字符串类型数据	的时候,那么你就使用StringRedisTemplate即可。
   但是如果你的数据是复杂的对象类型,而取出的时候又不想做任何的数据转换,直接从	Redis里面取出一个对象,那么使用RedisTemplate是更好的选择。
RedisTemplate常用操作
             redisTemplate.opsForValue();  //操作字符串
             redisTemplate.opsForHash();   //操作hash
             redisTemplate.opsForList();   //操作list
             redisTemplate.opsForSet();    //操作set
             redisTemplate.opsForZSet();   //操作有序set
StringRedisTemplate常用操作
		stringRedisTemplate.opsForValue().set("test", "100",60*10,TimeUnit.SECONDS);//向redis里存入数据和设置缓存时间
		stringRedisTemplate.boundValueOps("test").increment(-1);//val做-1操作
		stringRedisTemplate.opsForValue().get("test")//根据key获取缓存中的val
		stringRedisTemplate.boundValueOps("test").increment(1);//val +1
		stringRedisTemplate.getExpire("test")//根据key获取过期时间
		stringRedisTemplate.getExpire("test",TimeUnit.SECONDS)//根据key获取过期时间并换算成指定单位
		stringRedisTemplate.delete("test");//根据key删除缓存
		stringRedisTemplate.hasKey("546545");//检查key是否存在,返回boolean值
		stringRedisTemplate.opsForSet().add("red_123", "1","2","3");//向指定key中存放set集合
		stringRedisTemplate.expire("red_123",1000 , TimeUnit.MILLISECONDS);//设置过期时间
		stringRedisTemplate.opsForSet().isMember("red_123", "1")//根据key查看集合中是否存在指定数据
		stringRedisTemplate.opsForSet().members("red_123");//根据key获取set集合
(6).Redis技术栈练习
1.cacheManage的练习使用(***重点)
2.RedisTemplate 和 StringRedisTemplate的使用
package com.qyc.controller;

import org.springframework.beans.factory.annotation.Autowired;
import org.springframework.cache.annotation.Cacheable;
import org.springframework.data.redis.core.RedisTemplate;
import org.springframework.data.redis.core.StringRedisTemplate;
import org.springframework.web.bind.annotation.GetMapping;
import org.springframework.web.bind.annotation.PostMapping;
import org.springframework.web.bind.annotation.RequestMapping;
import org.springframework.web.bind.annotation.RestController;

@RestController
@RequestMapping("/redis")
public class RedisController {

	@Autowired
	private RedisTemplate redisTemplate;

	@Autowired
	private StringRedisTemplate stringRedisTemplate;


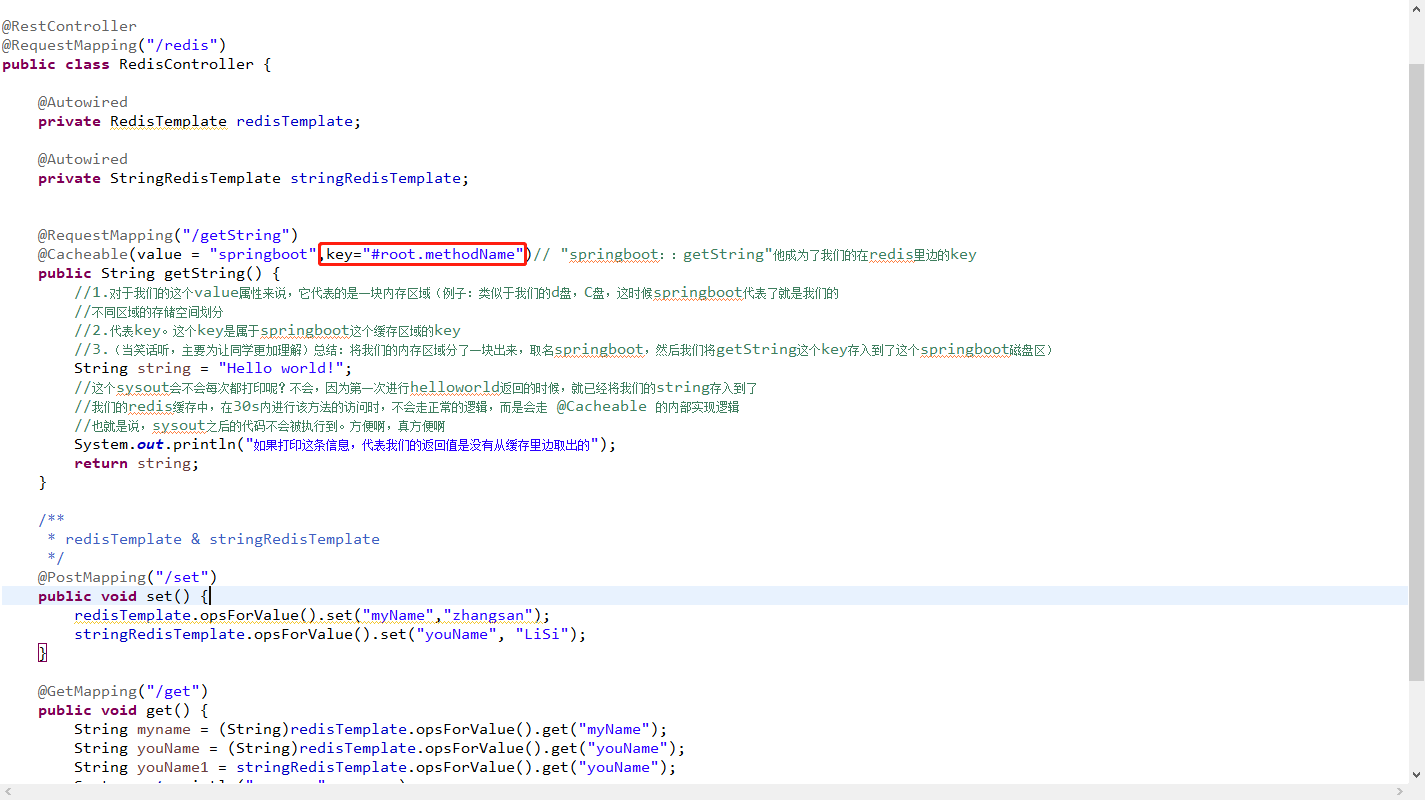
	@RequestMapping("/getString")
	@Cacheable(value = "springboot",key="#root.methodName")// "springboot::getString"他成为了我们的在redis里边的key
	public String getString() {
		//1.对于我们的这个value属性来说,它代表的是一块内存区域(例子:类似于我们的d盘,C盘,这时候springboot代表了就是我们的
		//不同区域的存储空间划分
		//2.代表key。这个key是属于springboot这个缓存区域的key
		//3.(当笑话听,主要为让同学更加理解)总结:将我们的内存区域分了一块出来,取名springboot,然后我们将getString这个key存入到了这个springboot磁盘区)
		String string = "Hello world!";
		//这个sysout会不会每次都打印呢?不会,因为第一次进行helloworld返回的时候,就已经将我们的string存入到了
		//我们的redis缓存中,在30s内进行该方法的访问时,不会走正常的逻辑,而是会走 @Cacheable 的内部实现逻辑
		//也就是说,sysout之后的代码不会被执行到。方便啊,真方便啊
		System.out.println("如果打印这条信息,代表我们的返回值是没有从缓存里边取出的");
		return string;
	}

	/**
	 * redisTemplate & stringRedisTemplate
	 */
	@PostMapping("/set")
	public void set() {
		redisTemplate.opsForValue().set("myName","zhangsan");
		stringRedisTemplate.opsForValue().set("youName", "LiSi");
	}

	@GetMapping("/get")
	public void get() {
		String myname = (String)redisTemplate.opsForValue().get("myName");
		String youName = (String)redisTemplate.opsForValue().get("youName");
		String youName1 = stringRedisTemplate.opsForValue().get("youName");
		System.out.println("myname:"+ myname);
		System.out.println("youName:"+ youName);//没有获取到值,说明两者的数据是不共通的
		System.out.println("youName1:"+ youName1);
	}
}

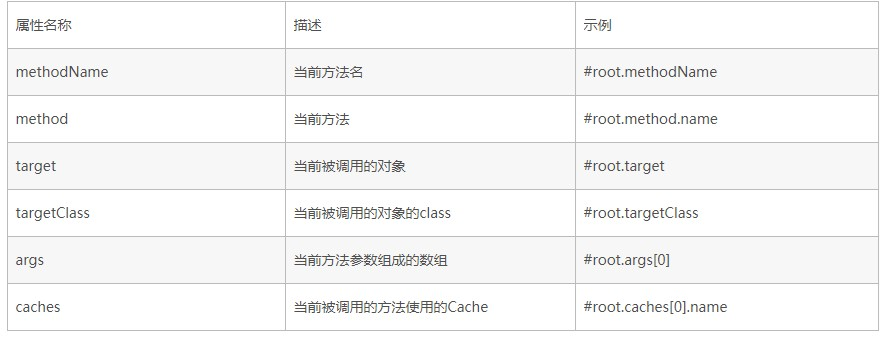
上图中key的说明:


