恶补linux 笔记
一、shell 基础
1.用户提示符:#表示root用户 $表示普通用户
2. 一些闲扯淡的命令:
date 查看当前日期时间
cal 显示日历
df 磁盘剩余空间 -h 参数展示人能看的直白的
free 内存使用数量 -h 参数展示人能看的直白的
top 查看进程
lsb_release -a 查看操作系统版本
二、文件系统相关
1. ls 命令的相关常用生僻参数及其他扩展:
-t 参数 会按文件修改时间的先后来排序
-r 参数 会按相反的顺序输出
ls -l 输出结果解析:
2. 其他常用命令
a. file : 查看文件描述
b. less: 浏览文件内容
c. cp -u参数:当把文件从一个目录复制到另一个目录时,仅复制目标目录中不存在的文件,或者是文件内容新于目标目录中已经存在的文件
3.关于链接
链接分为硬链接和符号链接,链接的作用就像我们在编程中定义变量一样,我们操作链接只关心这个链接名是什么、表示什么,而不关心这个链接背后具体的资源是什么版本、什么具体内容。
硬链接创建方式及特点: ln 文件名 链接名
硬链接不能链接目录
原始资源被删除后硬链接依然有效且可以被访问
硬链接命名虽然可以不写文件类型,但是最好写上,防止原始文件丢失后恢复
只能对已经存在的文件进行硬链接
不能关联与链接本身 不在同一个磁盘分区上的文件
符号链接创建方式及特点:ln -s 文件名/目录名 链接名
可以对目录进行链接
原始资源删除后符号链接失效
可以对不存在的资源进行符号链接
4. 通配符
* 匹配任意多个字符(包括0个或1个)
? 匹配任意一个字符 (不包括0个)
[字符集] 匹配任意一个属于字符集中的字符
[!字符集] 匹配任意一个不属于字符集中的字符
[[:字符类:]] 匹配任意一个属于字符类中的字符 字符类:alnum(字母+数字)、alpha(字母)、digit(数字)、lower(小写字母)、upper(大写字母)
三、操作命令的命令
1. type : 显示命令的信息
[root@xxxxxxx dir1]# type cp
cp is aliased to `cp -i'
2.which : 显示命令的来源
[root@xxxxxxx dir1]# which cp
alias cp='cp -i'
/usr/bin/cp
3.man : 显示命令的手册
[root@xxxxxxxx dir1]# man cp
output version information and exit
By default, sparse SOURCE files are detected by a crude heuristic and the corresponding DEST file is made sparse as well. That is the behavior selected by
--sparse=auto. Specify --sparse=always to create a sparse DEST file whenever the SOURCE file contains a long enough sequence of zero bytes. Use --sparse=never to
inhibit creation of sparse files.
When --reflink[=always] is specified, perform a lightweight copy, where the data blocks are copied only when modified. If this is not possible the copy fails, or if
--reflink=auto is specified, fall back to a standard copy.
The backup suffix is '~', unless set with --suffix or SIMPLE_BACKUP_SUFFIX. The version control method may be selected via the --backup option or through the VER‐
SION_CONTROL environment variable. Here are the values:
none, off
never make backups (even if --backup is given)
numbered, t
make numbered backups
existing, nil
numbered if numbered backups exist, simple otherwise
simple, never
always make simple backups
As a special case, cp makes a backup of SOURCE when the force and backup options are given and SOURCE and DEST are the same name for an existing, regular file.
GNU coreutils online help: <http://www.gnu.org/software/coreutils/> Report cp translation bugs to <http://translationproject.org/team/>
AUTHOR
Written by Torbjorn Granlund, David MacKenzie, and Jim Meyering.
COPYRIGHT
Copyright © 2013 Free Software Foundation, Inc. License GPLv3+: GNU GPL version 3 or later <http://gnu.org/licenses/gpl.html>.
This is free software: you are free to change and redistribute it. There is NO WARRANTY, to the extent permitted by law.
SEE ALSO
The full documentation for cp is maintained as a Texinfo manual. If the info and cp programs are properly installed at your site, the command
info coreutils 'cp invocation'
should give you access to the complete manual.
GNU coreutils 8.22 November 2016 CP(1)
4.info 显示命令信息(info cp 太他妈长了,不粘了)
5.whatis : 显示命令的简洁信息
[root@xxxxxxxxx dir1]# whatis cp
cp (1) - copy files and directories
cp (1p) - copy files
6.alias 创建连接别名(写在.bashrc 或者zshrc里面,自己可以做命令玩)
# .bashrc
# User specific aliases and functions
alias rm='rm -i'
alias cp='cp -i'
alias mv='mv -i'
7.history 显示输入命令的历史结果
869 root 2019/07/02 12:37:45 wc hello\ world.txt -h
870 root 2019/07/02 12:37:50 wc hello\ world.txt
871 root 2019/07/02 12:39:26 ps -ef|grep node|less
872 root 2019/07/02 13:31:07 ls
873 root 2019/07/02 13:36:09 echo *
874 root 2019/07/02 13:40:33 echo "$USER $((2+2)) $(cal)"
875 root 2019/07/02 13:41:16 echo "$USER \$((2+2)) \$(cal)"
876 root 2019/07/02 13:41:43 echo '$USER $((2+2)) $(cal)'
在shell中输入!876 ,则直接执行id为876的命令
8. ctrl+r 可以在shell中搜索命令
(reverse-i-search)`echo': echo '$USER $((2+2)) $(cal)'
四、重定向
1.重定向标准输入输出
ls -l /usr/bin > ls_output.txt : 将ls结果保存到ls_output.txt中
ls -l /usr/bin >> ls_output.txt : 同上,但是如果ls_output.txt文件不存在则创建
注意:shell内部将文件类型标注为0 1 2 三种,分别代表 输入 输出 错误
ls -l /bin/usr 2 > ls_error.txt 将ls的错误信息保存入ls_error.txt
ls -l /bin/usr > ls_output.txt 2>&1 将错误信息与正确信息都存入ls_output.txt中
2.管道
可用于管道的命令
- cut
- grep: 打印匹配行
- sort : 排序
- uniq: 过滤重复项 -d参数显示重复项
- wc: 显示文件所包含的行、字、字节数、文件名 -l 参数只显示行数
- tee: 将输入内容写入到文件中
- tr
- col
- join
- paste
- expand
- xargs
- head 打印文件开头前十行部分 -n 参数 决定具体打印几行
- tail 打印文件结尾后十行部分 -n 参数 决定具体打印几行
五、shell编程
1.echo的使用
echo * 展示当前工作目录下的文件名字
echo $((2+1)) 计算算数表达式
echo F-{A,B,C}-B 花括号展开 输出 F-A-B F-B-B F-C-B
echo $(ls) 命令替换(支持管道),输出ls后的内容
echo "$USER $((2+2)) $(cal)" 在双引号中使用表达式,表达式仍然起作用
echo '$USER $((2+2)) $(cal)' 单引号下表达式不起作用
2.printenv 打印当前环境变量
六、权限控制
1. 一些普通命令
id : 显示用户身份信息
[root@xxxxx playground]# id
uid=0(root) gid=0(root) groups=0(root)
passwd: 更改用户密码
chown:更改文件用户及用户组
2.修改文件模式的chmod
使用方法1: chmod 777 foo.txt

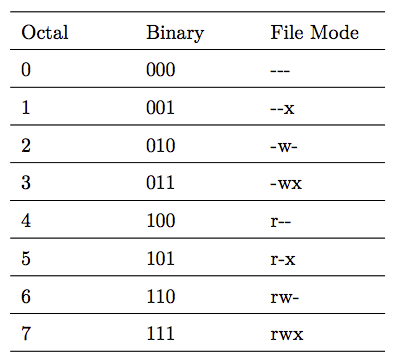
文件权限所对用点的二进制码,对应的8进制数字就代表不同的文件权限
因为文件的权限分为三个部分:用户、用户组成员、其他用户成员,所以此例子中777 就代表给foo.txt这个文件赋予了 三种用户群体所能处理它的权限都是 rwx
使用方法2: chmod u+x foo.txt
三个部分分别用字母 u(user) g(group) o(other) 表示,所以 u+x表示为当前用户赋予执行权限, 相反的剥夺权限就是 u-x
3. umask 设置文件的默认权限
用于一劳永逸的解决文件默认权限的问题
在命令行输入 umask 可以查看当前默认权限,一般root用户默认的umask是 0022,码对应权限示意图如下

哪个权限存在对应0 不存在对应1
注意:默认不能分配x权限,所以0022里面x位即使是0,但还是没有x权限
4.身份的更改
su命令常用模式
su - xxxx 切换到其他用户
su - 切换到root
su -l xxx 新起一个shell登陆这个用户
su -c "ls -l /root" 只输入一次密码以越权执行双引号中的命令
sudo命令
sudo 很像su命令,但是sudo命令需要管理员配置相应文件,其他用户才能使用,
七、进程管理
1. ps 查看当前进程 常用 -ef 查看全部的linux正在运行的进程
aux 附带查看进程状态
常见进程状态码
D 不可中断 Uninterruptible sleep (usually IO)R 正在运行,或在队列中的进程
S 处于休眠状态
T 停止或被追踪
Z 僵尸进程
W 进入内存交换(从内核2.6开始无效)
X 死掉的进程 < 高优先级
N 低优先级
L 有些页被锁进内存
s 包含子进程
+ 位于后台的进程组;
l 多线程,克隆线程 multi-threaded (using CLONE_THREAD, like NPTL pthreads do)
2. top 查看动态进程
3. jobs 查看转到后台的命令
[root@xxxx ~]# node &
[1] 28541
[root@xxxx ~]# Welcome to Node.js v12.3.1.
Type ".help" for more information.
[1]+ Stopped node
[root@xxxx ~]# jobs
[1]+ Stopped node
4. 进程的前后台切换
初始将命令转到后台: node &
将命令后台转前台: fg %x 这个x就是用上面jobs看到的 [1]+ Stopped 这个1
再将命令转到后台: bg %x x同上
5. kill -9 PID 杀死进程
八、vi的使用(只有常用)
1.删除行: dd 删除多行 5dd(删除5行)
2. 强制退出: :q!
3.搜索: /xxxx 按n跳到下一个
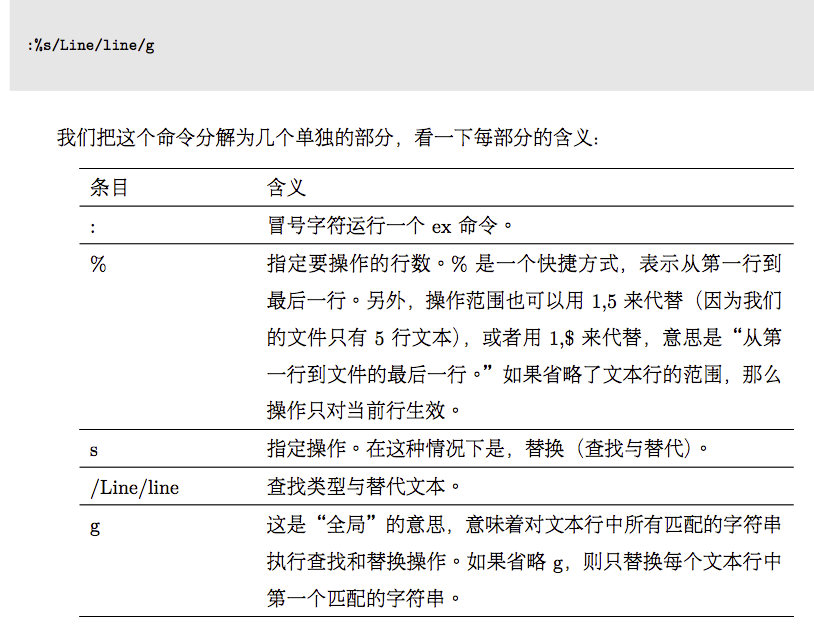
4.全局查找和替换: :%s/Line/line/g

5.翻页:ctrl+f 向下 ctrl+b 向上
6. 移动到文件末尾: G
7. vi 多个文件
vi 1.txt 2.txt
这样会打开两个文件进行编辑。通过输入 :n 向后编辑一个文件 :N 向前编辑一个文件 :wq 退出整个 :w 保存当前
九、软件包管理
使用yum安装软件
yum search xxxx 查找软件
yum install xxxx 安装软件
yum erase xxxx 卸载软件
yum info xxxx 显示该软件信息
yum update 更新软件
rpm -qa 列出所有安装的软件包
rpm -q xxxx 是否安装了该软件
十、操作搜索文件的命令
1. locate 命令
locate 不是一上来就能用的,在mac上需要启用 相关db
sudo launchctl load -w /System/Library/LaunchDaemons/com.apple.locate.plist
locate *.png | grep xyz
最好配合grep 使用,不如find使用方便
2.find 命令
find ./ 后面跟随路径的时候会将当前路径下所有文件列出
find ./ -type f 列出该路径下所有文件 type 为d的时候是目录
find ./ -type f -name "*.png" 列出该路径下所有png文件
find ./ -type f -name "*.png" -size +1M 列出该路径下所有数据大于1MB的png文件 size参数有:b c w k M G 后三个最常用
配合xargs、grep使用效果更佳
find ./ type f -name "*.js" -size +1k | grep -v node_modules | xargs ls -l 寻找当前目录下,非node_modules文件夹中大于1kb的js文件,并ls -l 出来
3.grep 命令
实际场景中多用于管道命令中,用于过滤显示结果,常用的内容如下
grep -v xxxx 不包含xxxx内容的信息
grep -e "main|index" 包含 main或者index字符的文件
grep -i ABc 忽略大小写 abc也会被展示出来
4.tar命令
tar 打包参数 c :把文件或目录归档
tar 解包参数 x : 把文件或目录解压
其他附加参数 : z: 使用gzip压缩
v: 显示所有过程
最后添加参数: f:使用档案名字
常用组合: zcvf 打包 zxvf 解包
tar zcvf tarname.tar.gz ./* 将当前目录下所有内容打包到名为 tarname.tar.gz的包中
tar zcvf tarname.tar.gz ./[a-z]*.txt 内容名称可以使用正则
tar zxvf tarname.tar.gz 将 tarname.tar.gz包中的所有内容解压到当前目录
tar zxvf tarname.tar.gz -C ./somedir 将tarname.tar.gz 包中内容解压到somedir文件夹中 somedir文件夹必须提前创建,否则报错
与find命令组合使用效果更佳
find ./ -type f -name [a-z]*.txt | tar zcvf all.tar.gz -T - 后面的-T - 必不可少


