Swagger学习
Swagger学习
笔记记录 B站狂神说一小时掌握Swagger技术 https://www.bilibili.com/video/BV1Y441197Lw?p=4&spm_id_from=pageDriver&vd_source=6800c7920d132926607a6fa073817ebb
前言
前后端分离
Vue+SpringBoot
后端时代:前端只用管理静态页面;html==>后台.模板引擎JSP=>后端是主力
前后端分离时代:
-
后端:后端控制层,服务层,数据访问层
-
前端:前端控制层,视图层[前端团队]
- 伪造后端数据,json.已经存在了,不需要后端,前端工程依旧能跑起来
-
前端后台如何交互? ==> API
-
前后端相对独立,松耦合;
-
前后端甚至可以部署在不同的服务器上;
-
产生一个问题
-
前后端集成联调,前端人员和后端人员无法做到"即使协商,尽早解决",最终导致问题集中爆发;
解决方案:
-
首先指定schema[计划的提纲],实时跟新最新的API,降低集成的风险;
-
早些年:指定Word计划文档;
-
前后端分离:
- 早些年前端测试接口使用:postman工具
- 后端提供接口,需要实时更新最新的消息及改动!
#Swagger
-
号称世界上最流行的Api框架;
-
RestFul Api 文档在线自动生成工具=>Api文档与API定义同步更新
-
直接运行,可以在线测试API接口;
-
支持多种语言: java,php,等等
-
Swagger官网:https://swagger.io/
在项目使用Swagger需要两个jar包:
-
swagger2
-
ui(这里是swagger的ui界面的包)
- Swagger简介
SpringBoot集成Swagger
1.编写一个SpringBoot的web项目
2.在项目中导入Swagger相关依赖
SpringBoot集成Swagger => springfox,两个jar包
Springfox-swagger2
swagger-springmvc
使用Swagger
要求:jdk 1.8 + 否则swagger2无法运行
spring.mvc.pathmatch.matching-strategy=ant_path_matcher springboot2.6以上需要加入这个配置
<!-- 注意如果你用的是3.0.0版本的可能会有404的bug -->
<!-- Swagger2jar包-->
<dependency>
    <groupId>io.springfox</groupId>
    <artifactId>springfox-swagger2</artifactId>
    <version>2.9.2</version>
</dependency>
<!--SwaggerUi jar包-->
<dependency>
    <groupId>io.springfox</groupId>
    <artifactId>springfox-swagger-ui</artifactId>
    <version>2.9.2</version>
</dependency>
3.编写一个Hello工程
4.因为swagger是单独的所以需要我们进行配置
package com.example.swagger.config;

import org.springframework.context.annotation.Configuration;
import org.springframework.web.servlet.config.annotation.ResourceHandlerRegistry;
import org.springframework.web.servlet.config.annotation.WebMvcConfigurationSupport;
import springfox.documentation.builders.ApiInfoBuilder;
import springfox.documentation.service.ApiInfo;
import springfox.documentation.swagger2.annotations.EnableSwagger2;

@Configuration
@EnableSwagger2 //开启Swagger2
public class SwaggerConfig extends WebMvcConfigurationSupport {

  @Override
  protected void addResourceHandlers(ResourceHandlerRegistry registry) {
    // 解决静态资源无法访问
    registry.addResourceHandler("/**").addResourceLocations("classpath:/static/");
    // 解决swagger无法访问
    registry.addResourceHandler("/swagger-ui.html").addResourceLocations("classpath:/META-INF/resources/");
    // 解决swagger的js文件无法访问
    registry.addResourceHandler("/webjars/**").addResourceLocations("classpath:/META-INF/resources/webjars/");
  }
}
因为Swagger是一个单独的包并没有被整合!
5.进行测试访问http://localhost:8080/swagger-ui.html
配置Swagger配置
package com.example.swagger.config;

import org.springframework.context.annotation.Bean;
import org.springframework.context.annotation.Configuration;
import org.springframework.web.servlet.config.annotation.ResourceHandlerRegistry;
import org.springframework.web.servlet.config.annotation.WebMvcConfigurationSupport;
import springfox.documentation.service.ApiInfo;
import springfox.documentation.service.Contact;
import springfox.documentation.spi.DocumentationType;
import springfox.documentation.spring.web.plugins.Docket;
import springfox.documentation.swagger2.annotations.EnableSwagger2;

import java.util.ArrayList;

@Configuration
@EnableSwagger2 //开启Swagger2
public class SwaggerConfig extends WebMvcConfigurationSupport{

    //Docket是Swagger自己的实例需要我们自己放入SpringBoot容器中!
    @Bean
    public Docket docket(){
        return new Docket(DocumentationType.SWAGGER_2)
                .apiInfo(apiInfo()); //配置Swagger的bean实例
    }

    //配置Swagger信息(ApiInfo)
    private ApiInfo apiInfo(){
        //作者信息
        Contact contact=new Contact("小步","https://tang.aistudynet.com.cn/","3068384097@qq.com");

        return new ApiInfo("Swagger测试" //标题
                , "再小的帆也能远航" //描述
                , "1.0" //版本
                , "https://www.cnblogs.com/JayZzzWh/"
                ,  contact
                , "Apache 2.0"
                , "https://swagger.io/"
                ,  new ArrayList<>());
    }

    @Override
    protected void addResourceHandlers(ResourceHandlerRegistry registry) {
        // 解决静态资源无法访问
        registry.addResourceHandler("/**").addResourceLocations("classpath:/static/");
        // 解决swagger无法访问
        registry.addResourceHandler("/swagger-ui.html").addResourceLocations("classpath:/META-INF/resources/");
        // 解决swagger的js文件无法访问
        registry.addResourceHandler("/webjars/**").addResourceLocations("classpath:/META-INF/resources/webjars/");
    }
}
配置扫描接口与过滤
接口扫描:
- Docket.select()
    @Bean
    public Docket docket(){
        //配置Swagger的bean实例
        return new Docket(DocumentationType.SWAGGER_2)
                .apiInfo(apiInfo())
                //配置要扫描接口的方式
                .select()
                //RequestHandlerSelectors 配置接口要扫描的方式
                //basePackage("com.example.swagger.controller") 指定要扫描的包
                //any() 扫描全部
                //none() 不扫描
                //withClassAnnotation()或withMethodAnnotation() 扫描类|方法上的注解,传入扫描注解的class对象
                .apis(RequestHandlerSelectors.withMethodAnnotation(GetMapping.class))
                .build();
    }
过滤:
- paths() 过滤
    //Docket是Swagger自己的实例需要我们自己放入SpringBoot容器中!
    @Bean
    public Docket docket(){
        //配置Swagger的bean实例
        return new Docket(DocumentationType.SWAGGER_2)
                .apiInfo(apiInfo())
                //配置要扫描接口的方式
                .select()
                //RequestHandlerSelectors 配置接口要扫描的方式
                //basePackage("com.example.swagger.controller") 指定要扫描的包
                //any() 扫描全部
                //none() 不扫描
                //withClassAnnotation()或withMethodAnnotation() 扫描类|方法上的注解,传入扫描注解的class对象
                .apis(RequestHandlerSelectors.withMethodAnnotation(GetMapping.class))
                //paths()过滤  PathSelectors路径选择器
                .paths(PathSelectors.none())
                .build();
    }
关闭Swagger
- enable(false)
.enable(false) //关闭Swagger
小练习:我只希望在生产环境中使用,不希望在正式环境中使用
- 判断是不是生产环境
- 注入enable()
//Docket是Swagger自己的实例需要我们自己放入SpringBoot容器中!
    @Bean
    public Docket docket(Environment environment){
        //进行控制权限,表示只有在test环境下才开启swaggerConfig
        Profiles test = Profiles.of("test");
        //返回当前是否为test环境
        boolean flag = environment.acceptsProfiles(test);

        //配置Swagger的bean实例
        return new Docket(DocumentationType.SWAGGER_2)
                .apiInfo(apiInfo())
                .enable(flag) //关闭Swagger
                //配置要扫描接口的方式
                .select()
                //RequestHandlerSelectors 配置接口要扫描的方式
                //basePackage("com.example.swagger.controller") 指定要扫描的包
                //any() 扫描全部
                //none() 不扫描
                //withClassAnnotation()或withMethodAnnotation() 扫描类|方法上的注解,传入扫描注解的class对象
                .apis(RequestHandlerSelectors.withMethodAnnotation(GetMapping.class))
                //paths()过滤  PathSelectors路径选择器
                .paths(PathSelectors.none())
                .build();
    }
Swagger分组
    @Bean
    public Docket docket02(){
        //再次设置一个组
        return new Docket(DocumentationType.SWAGGER_2).groupName("docket02");
    }

    @Bean
    public Docket docket03(){
        //再次设置一个组
        return new Docket(DocumentationType.SWAGGER_2).groupName("docket03");
    }
实体配置
1、新建一个实体类
@ApiModel("用户实体")
public class User {
		@ApiModelProperty("用户名")
		public String username;
		@ApiModelProperty("密码")
		public String password;
	}
2、只要这个实体在请求接口的返回值上(即使是泛型),都能映射到实体项中:```java
@RequestMapping(“/getUser”)
public User getUser(){
return new User();
}
3、重启查看测试
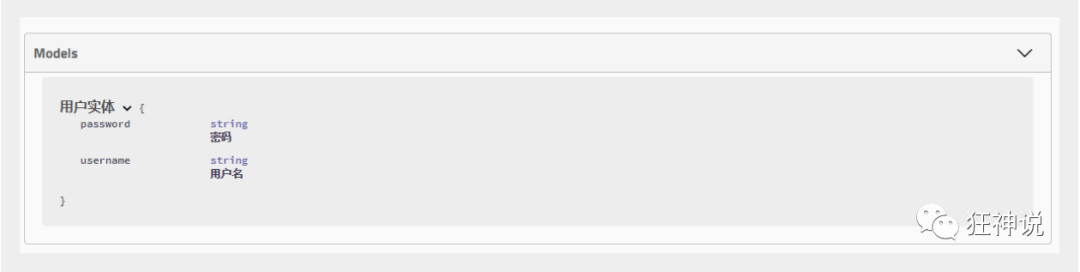
注:并不是因为@ApiModel这个注解让实体显示在这里了,而是只要出现在接口方法的返回值上的实体都会显示在这里,而@ApiModel和@ApiModelProperty这两个注解只是为实体添加注释的。
@ApiModel为类添加注释
@ApiModelProperty为类属性添加注释
Swagger注释
package com.example.swagger.pojo;

import io.swagger.annotations.ApiModel;
import io.swagger.annotations.ApiModelProperty;

@ApiModel("用户实体类")
public class User {

    @ApiModelProperty("用户id")
    private Integer id;
}
常用注解
Swagger的所有注解定义在io.swagger.annotations包下
下面列一些经常用到的,未列举出来的可以另行查阅说明:
@Api(tags = “xxx模块说明”) 作用在模块类上
@ApiOperation(“xxx接口说明”) 作用在接口方法上
@ApiModel(“xxxPOJO说明”) 作用在模型类上:如VO、BO
@ApiModelProperty(value = “xxx属性说明”,hidden = true) 作用在类方法和属性上,hidden设置为true可以隐藏该属性
@ApiParam(“xxx参数说明”) 作用在参数、方法和字段上,类似@ApiModelProperty
@ApiOperation("狂神的接口")@PostMapping("/kuang")@ResponseBodypublic String kuang(@ApiParam("这个名字会被返回")String username){ return username;}
这样的话,可以给一些比较难理解的属性或者接口,增加一些配置信息,让人更容易阅读!
相较于传统的Postman或Curl方式测试接口,使用swagger简直就是傻瓜式操作,不需要额外说明文档(写得好本身就是文档)而且更不容易出错,只需要录入数据然后点击Execute,如果再配合自动化框架,可以说基本就不需要人为操作了。
Swagger是个优秀的工具,现在国内已经有很多的中小型互联网公司都在使用它,相较于传统的要先出Word接口文档再测试的方式,显然这样也更符合现在的快速迭代开发行情。当然了,提醒下大家在正式环境要记得关闭Swagger,一来出于安全考虑二来也可以节省运行时内存。

 浙公网安备 33010602011771号