XV6学习笔记(1) : 启动与加载
XV6学习笔记(1)
1. 启动与加载
首先我们先来分析pc的启动。其实这个都是老生常谈了,但是还是很重要的(也不知道面试官考不考这玩意),
1. 启动的第一件事-bios
首先启动的第一件事就是运行bios,这个时候我们的机器位于实模式,也就是16位地址。这个时候能访问的空间只有1mb
- 就是设置cs寄存器的值为0xFFFF, ip的值为0x0000
- 这个就是bios的地址,然后我们会去运行bios执行各种对硬件的检查
- 但是xv6和之前的jos(也就是828)中都没有这样做,作为一个精简的os系统,
2. bootloader的汇编程序
我们的引导程序位于第一个扇区内。第一个扇区地址为0x7c00。会在bios结束之后跳转到这里来
整个bootloader程序分为两个部分。第一部分是汇编程序,第二部分则是c语言
-
第一件做的事情是关中断 + 清空寄存器
-
第二件就是打开A20.
打开A20是非常重要的一件事情。这是突破16位的关键。这里参考了别人的博客
我们具体来看 xv6 的实现代码
seta20.1:
  inb     $0x64,%al               # Wait for not busy
  testb   $0x2,%al
  jnz     seta20.1

  movb    $0xd1,%al               # 0xd1 -> port 0x64
  outb    %al,$0x64

seta20.2:
  inb     $0x64,%al               # Wait for not busy
  testb   $0x2,%al
  jnz     seta20.2

  movb    $0xdf,%al               # 0xdf -> port 0x60
  outb    %al,$0x60
这里
bootasm.S用了两个方法seta20.1和seta20.2来实现通过 804x 键盘控制器打开 A20 gate。第一步是向 804x 键盘控制器的 0x64 端口发送命令。这里传送的命令是 0xd1,这个命令的意思是要向键盘控制器的 P2 写入数据。这就是 seta20.1 代码段所做的工作(具体的解释可以参看我在代码中写的注释)。
第二步就是向键盘控制器的 P2 端口写数据了。写数据的方法是把数据通过键盘控制器的 0x60 端口写进去。写入的数据是 0xdf,因为 A20 gate 就包含在键盘控制器的 P2 端口中,随着 0xdf 的写入,A20 gate 就被打开了。
接下来要做的就是进入“保护模式”了。
-
准备GDT表
进入保护模式之后,我们的寻址就要根据
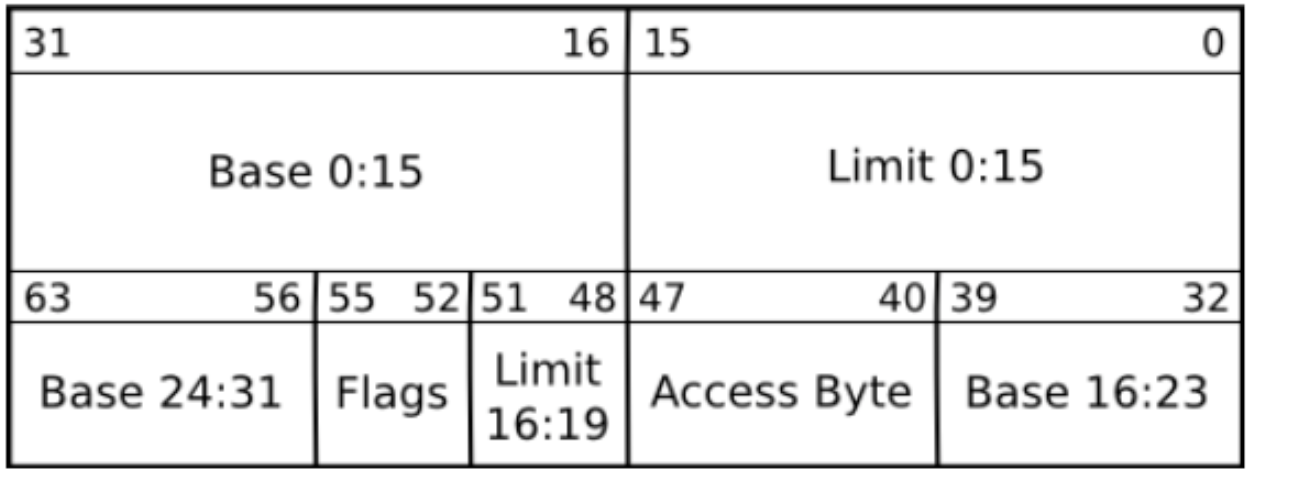
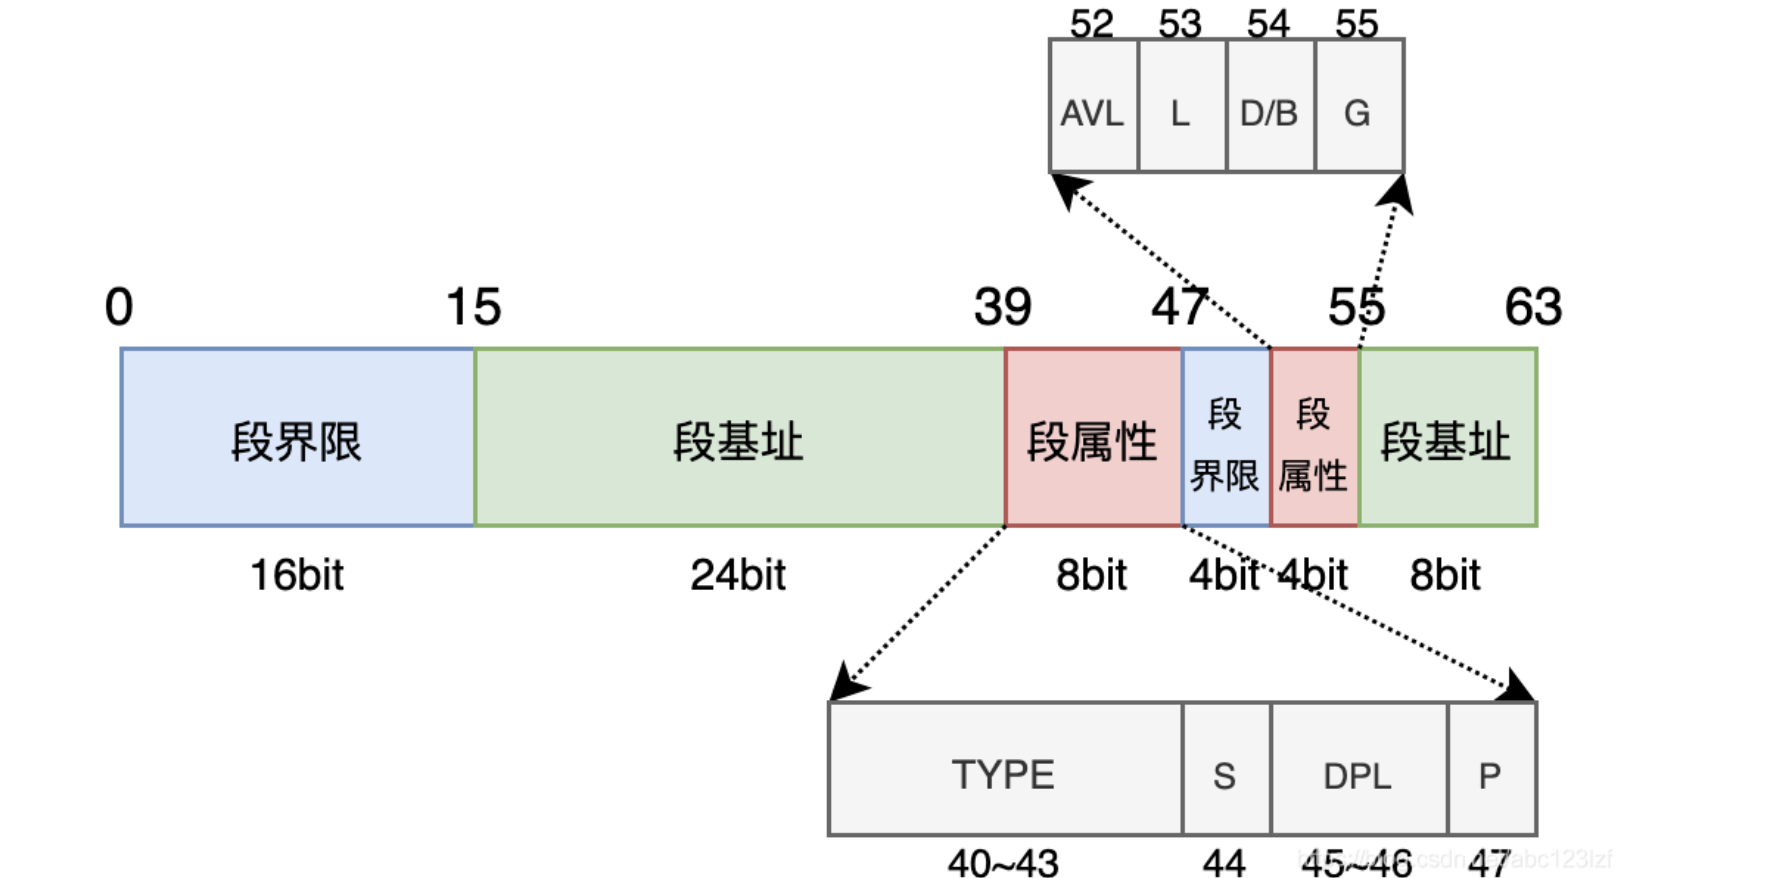
段地址 + 段内偏移来做了,所有这个全局段描述表非常关键啊GDT 表里的每一项叫做“段描述符”,用来记录每个内存分段的一些属性信息,每个“段描述符”占 8 字节,我们先来看一眼这个段描述符的具体结构:
-
GDT 也搞定了,接下来我们就要把我们刚刚在内存中设定好的 GDT 的位置告诉 CPU。CPU 单独为我们准备了一个寄存器叫做 GDTR 用来保存我们 GDT 在内存中的位置和我们 GDT 的长度。
GDTR 寄存器一共 48 位,其中高 32 位用来存储我们的 GDT 在内存中的位置,其余的低 16 位用来存我们的 GDT 有多少个段描述符。并且还专门提供了一个指令用来让我们把 GDT 的地址和长度传给 GDTR 寄存器,来看 xv6 的代码:
lgdt gdtdesc
而这个 gdtdesc 和 gdt 一起放在了 bootasm.S 文件的最底部,我们看一眼:
gdtdesc:
.word   (gdtdesc - gdt - 1)            # 16 位的 gdt 大小sizeof(gdt) - 1
.long   gdt                            # 32 位的 gdt 所在物理地址
- 在xv6中,我们的cpu利用四个控制寄存器来进行一些状态控制,想要进入保护模式需要修改cr0寄存器

- PG 为 0 时代表只使用分段式,不使用分页式
为 1 是启用分页式 - PE 为 0 时代表关闭保护模式,运行在实模式下
为 1 则开启保护模式
最后看一下在xv6中如何做到开启保护模式的
  lgdt    gdtdesc
  movl    %cr0, %eax
  orl     $CR0_PE_ON, %eax
  movl    %eax, %cr0
而这里其实就是把 cr0 寄存器的值 或上 $CR0_PE_ON的值。而. CR0_PE_ON = 0x0......1
这里的意思就是开启保护模式
- 进入c语言之前的一些汇编
 # Jump to next instruction, but in 32-bit code segment.
  # Switches processor into 32-bit mode.
  ljmp    $PROT_MODE_CSEG, $protcseg

  .code32                     # Assemble for 32-bit mode
protcseg:
  # Set up the protected-mode data segment registers
  movw    $PROT_MODE_DSEG, %ax    # Our data segment selector
  movw    %ax, %ds                # -> DS: Data Segment
  movw    %ax, %es                # -> ES: Extra Segment
  movw    %ax, %fs                # -> FS
  movw    %ax, %gs                # -> GS
  movw    %ax, %ss                # -> SS: Stack Segment

  # Set up the stack pointer and call into C.
  movl    $start, %esp
  call bootmain
3. bootloader的c语言程序
- 首先去磁盘第一个扇区读取内核的ELF文件
- 判断是否是一个有效的ELF头文件
- 然后逐段把操作系统从磁盘中读到内核中
- 最后执行内核的程序,此后操作系统就交由内核处理
void
bootmain(void)
{
	struct Proghdr *ph, *eph;
	int i;

	// read 1st page off disk
	readseg((uint32_t) ELFHDR, SECTSIZE*8, 0);

	// is this a valid ELF?
	if (ELFHDR->e_magic != ELF_MAGIC)
		goto bad;

	// load each program segment (ignores ph flags)
	ph = (struct Proghdr *) ((uint8_t *) ELFHDR + ELFHDR->e_phoff);
	eph = ph + ELFHDR->e_phnum;
	for (; ph < eph; ph++) {
		// p_pa is the load address of this segment (as well
		// as the physical address)
		readseg(ph->p_pa, ph->p_memsz, ph->p_offset);
		for (i = 0; i < ph->p_memsz - ph->p_filesz; i++) {
			*((char *) ph->p_pa + ph->p_filesz + i) = 0;
		}
	}

	// call the entry point from the ELF header
	// note: does not return!
	((void (*)(void)) (ELFHDR->e_entry))();

bad:
	outw(0x8A00, 0x8A00);
	outw(0x8A00, 0x8E00);
	while (1)
		/* do nothing */;
}
2. 执行内核
在kernel.ld中有一些关于内核的设置
SECTIONS
{
	/* Link the kernel at this address: "." means the current address */
	. = 0xF0100000;

	/* AT(...) gives the load address of this section, which tells
	   the boot loader where to load the kernel in physical memory */
	.text : AT(0x100000) {
		*(.text .stub .text.* .gnu.linkonce.t.*)
	}

	PROVIDE(etext = .);	/* Define the 'etext' symbol to this value */

	.rodata : {
		*(.rodata .rodata.* .gnu.linkonce.r.*)
	}
这里设置了内核的代码段位于内存中的0x100000位置,而所对应的虚拟地址为0xF0100000
好了下面就可以去entry.S看一下内核的代码了
1. 设置页表开启分页
- 对于64位机,CR3寄存器也从32位变成了64位,它的主要功能还是用来存放页目录表物理内存基地址,每当进程切换时,Linux就会把下一个将要运行进程的页目录表物理内存基地址等信息存放到CR3寄存器中。
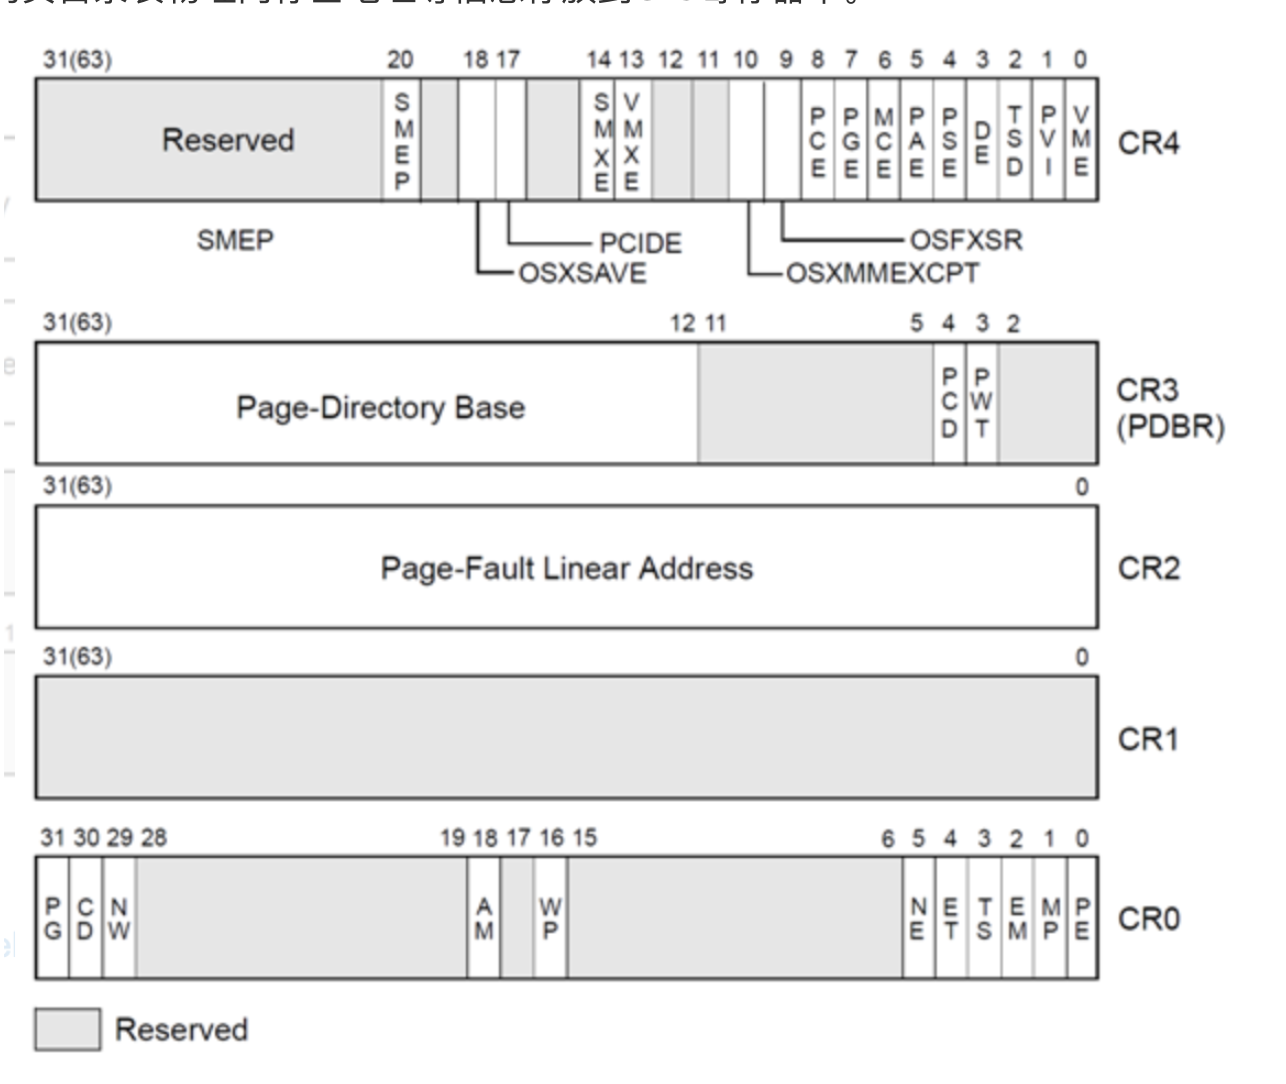
- 首先开启4MB内存页。这里是通过设置cr4寄存器的PSE位来实现的
.globl entry
entry:
  # Turn on page size extension for 4Mbyte pages
  movl    %cr4, %eax
  orl     $(CR4_PSE), %eax
  movl    %eax, %cr4
- 设置页目录开启页表
这里通过代码我们可以得到页表的基地址就在entrypgdir中,这个变量可以在main.c中找到
开启页表就是通过调整cr0寄存器的位来实现的
 # Set page directory
  movl    $(V2P_WO(entrypgdir)), %eax
  movl    %eax, %cr3
  # Turn on paging.
  movl    %cr0, %eax
  orl     $(CR0_PG|CR0_WP), %eax
  movl    %eax, %cr0
// Boot page table used in entry.S and entryother.S.
// Page directories (and page tables), must start on a page boundary,
// hence the "__aligned__" attribute.
// Use PTE_PS in page directory entry to enable 4Mbyte pages.
__attribute__((__aligned__(PGSIZE)))
pde_t entrypgdir[NPDENTRIES] = {
  // Map VA's [0, 4MB) to PA's [0, 4MB)
  [0] = (0) | PTE_P | PTE_W | PTE_PS,
  // Map VA's [KERNBASE, KERNBASE+4MB) to PA's [0, 4MB)
  [KERNBASE>>PDXSHIFT] = (0) | PTE_P | PTE_W | PTE_PS,
};

//PAGEBREAK!
// Blank page.
将这些宏定义都转义过来我们看看这个页表的样子
unsigned int entrypgdir[1024] = {
    [0] = 0 | 0x001 | 0x002 | 0x080,  // 0x083 = 0000 1000 0011
    [0x80000000 >> 22] = 0 | 0x001 | 0x002 | 0x080  // 0x083
};
当然这里只是一个临时页表。这里只有两个页表项 0x00000000 和 0x80000000,而且两个页表项索引的内存物理地址都是 0 ~ 4MB
把虚拟地址空间的地址范围:0x80100000 -0x80500000,映射到物理地址范围:0x00000000 - 0x00400000上面。也可以把虚拟地址范围:0x00000000 - 0x00400000,同样映射到物理地址范围:0x00000000~0x00400000上面。任何不再这两个虚拟地址范围内的地址都会引起一个硬件异常。虽然只能映射这两块很小的空间,但是已经足够刚启动程序的时候来使用了。
这里的jos里地址就是0xF0100000,不过逻辑都是一模一样的
- 设置内核栈以及跳转到c语言到main.c
  # Set up the stack pointer.
  movl $(stack + KSTACKSIZE), %esp

  # Jump to main(), and switch to executing at
  # high addresses. The indirect call is needed because
  # the assembler produces a PC-relative instruction
  # for a direct jump.
  mov $main, %eax
  jmp *%eax

.comm stack, KSTACKSIZE
3. main.c
// Bootstrap processor starts running C code here.
// Allocate a real stack and switch to it, first
// doing some setup required for memory allocator to work.
int
main(void)
{
  kinit1(end, P2V(4*1024*1024)); // phys page allocator
  kvmalloc();      // kernel page table
  mpinit();        // collect info about this machine
  lapicinit();
  seginit();       // set up segments
  cprintf("\ncpu%d: starting xv6\n\n", cpu->id);
  picinit();       // interrupt controller
  ioapicinit();    // another interrupt controller
  consoleinit();   // I/O devices & their interrupts
  uartinit();      // serial port
  pinit();         // process table
  tvinit();        // trap vectors
  binit();         // buffer cache
  fileinit();      // file table
  iinit();         // inode cache
  ideinit();       // disk
  if(!ismp)
    timerinit();   // uniprocessor timer
  startothers();   // start other processors
  kinit2(P2V(4*1024*1024), P2V(PHYSTOP)); // must come after startothers()
  userinit();      // first user process
  // Finish setting up this processor in mpmain.
  mpmain();
}
这里做了各种对于os的初始化。接下来我们将会看到 xv6 的内核是如何实现内存管理、进程管理、IO 操作等化操作系统所应该具有的功能,同时会结合jos也就是mit6.828进行对比一下。

