SpringRestTemplate常用方法汇总
SpringRestTemplate常用方法汇总
一、简介
现如今的 IT 项目,由服务端向外发起网络请求的场景,基本上处处可见!
传统情况下,在服务端代码里访问 http 服务时,我们一般会使用 JDK 的 HttpURLConnection 或者 Apache 的 HttpClient,不过这种方法使用起来太过繁琐,而且 api 使用起来非常的复杂,还得操心资源回收。
以下载文件为例,通过 Apache 的 HttpClient方式进行下载文件,下面这个是我之前封装的代码逻辑,看看有多复杂!
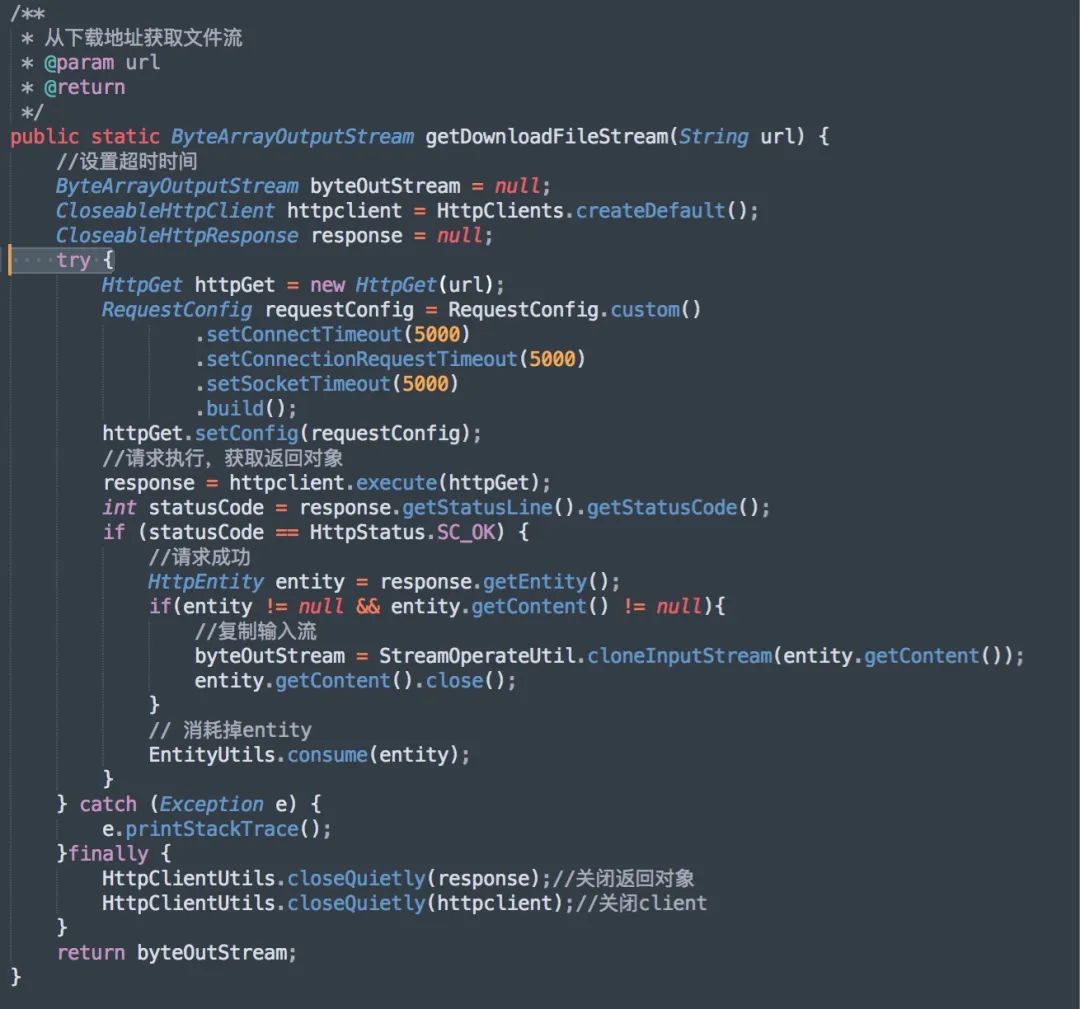
其实Spring已经为我们提供了一种简单便捷的模板类来进行操作,它就是RestTemplate。
RestTemplate是一个执行HTTP请求的同步阻塞式工具类,它仅仅只是在 HTTP 客户端库(例如 JDK HttpURLConnection,Apache HttpComponents,okHttp 等)基础上,封装了更加简单易用的模板方法 API,方便程序员利用已提供的模板方法发起网络请求和处理,能很大程度上提升我们的开发效率。
二、环境配置
2.1、非 Spring 环境下使用 RestTemplate
如果当前项目不是Spring项目,加入spring-web包,即可引入RestTemplate类
<dependency>
  <groupId>org.springframework</groupId>
  <artifactId>spring-web</artifactId>
  <version>5.2.6.RELEASE</version>
</dependency>
编写一个单元测试类,使用RestTemplate发送一个GET请求,看看程序运行是否正常
@Test
public void simpleTest() {
    RestTemplate restTemplate = new RestTemplate();
    String url = "http://jsonplaceholder.typicode.com/posts/1";
    String str = restTemplate.getForObject(url, String.class);
    System.out.println(str);
}
2.2、Spring 环境下使用 RestTemplate
如果当前项目是SpringBoot,添加如下依赖接口!
<dependency>
    <groupId>org.springframework.boot</groupId>
    <artifactId>spring-boot-starter-web</artifactId>
</dependency>
同时,将RestTemplate配置初始化为一个Bean。
@Configuration
public class RestTemplateConfig {

    /**
     * 没有实例化RestTemplate时,初始化RestTemplate
     * @return
     */
    @ConditionalOnMissingBean(RestTemplate.class)
    @Bean
    public RestTemplate restTemplate(){
        RestTemplate restTemplate = new RestTemplate();
        return restTemplate;
    }
}
注意,这种初始化方法,是使用了JDK自带的HttpURLConnection作为底层HTTP客户端实现。
当然,我们还可以修改RestTemplate默认的客户端,例如将其改成HttpClient客户端,方式如下:
@Configuration
public class RestTemplateConfig {

    /**
     * 没有实例化RestTemplate时,初始化RestTemplate
     * @return
     */
    @ConditionalOnMissingBean(RestTemplate.class)
    @Bean
    public RestTemplate restTemplate(){
        RestTemplate restTemplate = new RestTemplate(getClientHttpRequestFactory());
        return restTemplate;
    }

    /**
     * 使用HttpClient作为底层客户端
     * @return
     */
    private ClientHttpRequestFactory getClientHttpRequestFactory() {
        int timeout = 5000;
        RequestConfig config = RequestConfig.custom()
                .setConnectTimeout(timeout)
                .setConnectionRequestTimeout(timeout)
                .setSocketTimeout(timeout)
                .build();
        CloseableHttpClient client = HttpClientBuilder
                .create()
                .setDefaultRequestConfig(config)
                .build();
        return new HttpComponentsClientHttpRequestFactory(client);
    }

}
在需要使用RestTemplate的位置,注入并使用即可!
@Autowired
private RestTemplate restTemplate;
从开发人员的反馈,和网上的各种HTTP客户端性能以及易用程度评测来看,OkHttp 优于 Apache的HttpClient、Apache的HttpClient优于HttpURLConnection。
因此,我们还可以通过如下方式,将底层的http客户端换成OkHttp!
/**
 * 使用OkHttpClient作为底层客户端
 * @return
 */
private ClientHttpRequestFactory getClientHttpRequestFactory(){
    OkHttpClient okHttpClient = new OkHttpClient.Builder()
            .connectTimeout(5, TimeUnit.SECONDS)
            .writeTimeout(5, TimeUnit.SECONDS)
            .readTimeout(5, TimeUnit.SECONDS)
            .build();
    return new OkHttp3ClientHttpRequestFactory(okHttpClient);
}
三、API 实践
RestTemplate最大的特色就是对各种网络请求方式做了包装,能极大的简化开发人员的工作量,下面我们以GET、POST、PUT、DELETE、文件上传与下载为例,分别介绍各个API的使用方式!
3.1、GET 请求
通过RestTemplate发送HTTP GET协议请求,经常使用到的方法有两个:
- getForObject()
- getForEntity()
二者的主要区别在于:
getForObject():返回值是HTTP协议的响应体。
getForEntity():返回的是ResponseEntity,ResponseEntity是对HTTP响应的封装,除了包含响应体,还包含HTTP状态码、contentType、contentLength、Header等信息。
在Spring Boot环境下写一个单元测试用例,首先创建一个Api接口,然后编写单元测试进行服务测试。
- 不带参的get请求
@RestController
public class TestController {

    /**
     * 不带参的get请求
     * @return
     */
    @RequestMapping(value = "testGet", method = RequestMethod.GET)
    public ResponseBean testGet(){
        ResponseBean result = new ResponseBean();
        result.setCode("200");
        result.setMsg("请求成功,方法:testGet");
        return result;
    }
}

public class ResponseBean {

    private String code;

    private String msg;

    public String getCode() {
        return code;
    }

    public void setCode(String code) {
        this.code = code;
    }

    public String getMsg() {
        return msg;
    }

    public void setMsg(String msg) {
        this.msg = msg;
    }

    @Override
    public String toString() {
        return "ResponseBean{" +
                "code='" + code + '\'' +
                ", msg='" + msg + '\'' +
                '}';
    }
}

@Autowired
private RestTemplate restTemplate;

/**
 * 单元测试(不带参的get请求)
 */
@Test
public void testGet(){
    //请求地址
    String url = "http://localhost:8080/testGet";

    //发起请求,直接返回对象
    ResponseBean responseBean = restTemplate.getForObject(url, ResponseBean.class);
    System.out.println(responseBean.toString());
}
- 带参的get请求(restful风格)
@RestController
public class TestController {

    /**
     * 带参的get请求(restful风格)
     * @return
     */
    @RequestMapping(value = "testGetByRestFul/{id}/{name}", method = RequestMethod.GET)
    public ResponseBean testGetByRestFul(@PathVariable(value = "id") String id, @PathVariable(value = "name") String name){
        ResponseBean result = new ResponseBean();
        result.setCode("200");
        result.setMsg("请求成功,方法:testGetByRestFul,请求参数id:" +  id + "请求参数name:" + name);
        return result;
    }
}

@Autowired
private RestTemplate restTemplate;


 /**
 * 单元测试(带参的get请求)
 */
@Test
public void testGetByRestFul(){
    //请求地址
    String url = "http://localhost:8080/testGetByRestFul/{1}/{2}";

    //发起请求,直接返回对象(restful风格)
    ResponseBean responseBean = restTemplate.getForObject(url, ResponseBean.class, "001", "张三");
    System.out.println(responseBean.toString());
}
- 带参的get请求(使用占位符号传参)
@RestController
public class TestController {

    /**
     * 带参的get请求(使用占位符号传参)
     * @return
     */
    @RequestMapping(value = "testGetByParam", method = RequestMethod.GET)
    public ResponseBean testGetByParam(@RequestParam("userName") String userName,
                                             @RequestParam("userPwd") String userPwd){
        ResponseBean result = new ResponseBean();
        result.setCode("200");
        result.setMsg("请求成功,方法:testGetByParam,请求参数userName:" +  userName + ",userPwd:" + userPwd);
        return result;
    }
}

@Autowired
private RestTemplate restTemplate;

 /**
 * 单元测试(带参的get请求)
 */
@Test
public void testGetByParam(){
    //请求地址
    String url = "http://localhost:8080/testGetByParam?userName={userName}&userPwd={userPwd}";

    //请求参数
    Map<String, String> uriVariables = new HashMap<>();
    uriVariables.put("userName", "唐三藏");
    uriVariables.put("userPwd", "123456");

    //发起请求,直接返回对象(带参数请求)
    ResponseBean responseBean = restTemplate.getForObject(url, ResponseBean.class, uriVariables);
    System.out.println(responseBean.toString());
}
上面的所有的getForObject请求传参方法,getForEntity都可以使用,使用方法上也几乎是一致的,只是在返回结果接收的时候略有差别。使用ResponseEntity<T> responseEntity来接收响应结果。用responseEntity.getBody()获取响应体。
 /**
 * 单元测试
 */
@Test
public void testAllGet(){
    //请求地址
    String url = "http://localhost:8080/testGet";

    //发起请求,返回全部信息
    ResponseEntity<ResponseBean> response = restTemplate.getForEntity(url, ResponseBean.class);

    // 获取响应体
    System.out.println("HTTP 响应body:" + response.getBody().toString());

    // 以下是getForEntity比getForObject多出来的内容
    HttpStatus statusCode = response.getStatusCode();
    int statusCodeValue = response.getStatusCodeValue();
    HttpHeaders headers = response.getHeaders();

    System.out.println("HTTP 响应状态:" + statusCode);
    System.out.println("HTTP 响应状态码:" + statusCodeValue);
    System.out.println("HTTP Headers信息:" + headers);
}
3.2、POST 请求
其实POST请求方法和GET请求方法上大同小异,RestTemplate的POST请求也包含两个主要方法:
- postForObject()
- postForEntity()
postForEntity()返回全部的信息,postForObject()方法返回body对象,具体使用方法如下!
- 模拟表单请求,post方法测试
@RestController
public class TestController {

    /**
     * 模拟表单请求,post方法测试
     * @return
     */
    @RequestMapping(value = "testPostByForm", method = RequestMethod.POST)
    public ResponseBean testPostByForm(@RequestParam("userName") String userName,
                                        @RequestParam("userPwd") String userPwd){
        ResponseBean result = new ResponseBean();
        result.setCode("200");
        result.setMsg("请求成功,方法:testPostByForm,请求参数userName:" + userName + ",userPwd:" + userPwd);
        return result;
    }
}

@Autowired
private RestTemplate restTemplate;

/**
 * 模拟表单提交,post请求
 */
@Test
public void testPostByForm(){
    //请求地址
    String url = "http://localhost:8080/testPostByForm";

    // 请求头设置,x-www-form-urlencoded格式的数据
    HttpHeaders headers = new HttpHeaders();
    headers.setContentType(MediaType.APPLICATION_FORM_URLENCODED);

    //提交参数设置
    MultiValueMap<String, String> map = new LinkedMultiValueMap<>();
    map.add("userName", "唐三藏");
    map.add("userPwd", "123456");

    // 组装请求体
    HttpEntity<MultiValueMap<String, String>> request = new HttpEntity<>(map, headers);

    //发起请求
    ResponseBean responseBean = restTemplate.postForObject(url, request, ResponseBean.class);
    System.out.println(responseBean.toString());
}
- 模拟表单请求,post方法测试(对象接受)
@RestController
public class TestController {

    /**
     * 模拟表单请求,post方法测试
     * @param request
     * @return
     */
    @RequestMapping(value = "testPostByFormAndObj", method = RequestMethod.POST)
    public ResponseBean testPostByForm(RequestBean request){
        ResponseBean result = new ResponseBean();
        result.setCode("200");
        result.setMsg("请求成功,方法:testPostByFormAndObj,请求参数:" + JSON.toJSONString(request));
        return result;
    }
}

public class RequestBean {


    private String userName;


    private String userPwd;


    public String getUserName() {
        return userName;
    }

    public void setUserName(String userName) {
        this.userName = userName;
    }

    public String getUserPwd() {
        return userPwd;
    }

    public void setUserPwd(String userPwd) {
        this.userPwd = userPwd;
    }
}

@Autowired
private RestTemplate restTemplate;

/**
 * 模拟表单提交,post请求
 */
@Test
public void testPostByForm(){
    //请求地址
    String url = "http://localhost:8080/testPostByFormAndObj";

    // 请求头设置,x-www-form-urlencoded格式的数据
    HttpHeaders headers = new HttpHeaders();
    headers.setContentType(MediaType.APPLICATION_FORM_URLENCODED);

    //提交参数设置
    MultiValueMap<String, String> map = new LinkedMultiValueMap<>();
    map.add("userName", "唐三藏");
    map.add("userPwd", "123456");

    // 组装请求体
    HttpEntity<MultiValueMap<String, String>> request = new HttpEntity<>(map, headers);

    //发起请求
    ResponseBean responseBean = restTemplate.postForObject(url, request, ResponseBean.class);
    System.out.println(responseBean.toString());
}
- 模拟 JSON 请求,post 方法测试
@RestController
public class TestController {

    /**
     * 模拟JSON请求,post方法测试
     * @param request
     * @return
     */
    @RequestMapping(value = "testPostByJson", method = RequestMethod.POST)
    public ResponseBean testPostByJson(@RequestBody RequestBean request){
        ResponseBean result = new ResponseBean();
        result.setCode("200");
        result.setMsg("请求成功,方法:testPostByJson,请求参数:" + JSON.toJSONString(request));
        return result;
    }
}

@Autowired
private RestTemplate restTemplate;

/**
 * 模拟JSON提交,post请求
 */
@Test
public void testPostByJson(){
    //请求地址
    String url = "http://localhost:8080/testPostByJson";

    //入参
    RequestBean request = new RequestBean();
    request.setUserName("唐三藏");
    request.setUserPwd("123456789");

    //发送post请求,并打印结果,以String类型接收响应结果JSON字符串
    ResponseBean responseBean = restTemplate.postForObject(url, request, ResponseBean.class);
    System.out.println(responseBean.toString());
}
- 模拟页面重定向,post请求
@Controller
public class LoginController {

    /**
     * 重定向
     * @param request
     * @return
     */
    @RequestMapping(value = "testPostByLocation", method = RequestMethod.POST)
    public String testPostByLocation(@RequestBody RequestBean request){
        return "redirect:index.html";
    }
}

@Autowired
private RestTemplate restTemplate;

/**
 * 重定向,post请求
 */
@Test
public void testPostByLocation(){
    //请求地址
    String url = "http://localhost:8080/testPostByLocation";

    //入参
    RequestBean request = new RequestBean();
    request.setUserName("唐三藏");
    request.setUserPwd("123456789");

    //用于提交完成数据之后的页面跳转,返回跳转url
    URI uri = restTemplate.postForLocation(url, request);
    System.out.println(uri.toString());
}
输出结果如下:
http://localhost:8080/index.html
3.3、PUT 请求
put请求方法,可能很多人都没用过,它指的是修改一个已经存在的资源或者插入资源,该方法会向URL代表的资源发送一个HTTP PUT方法请求,示例如下!
@RestController
public class TestController {

    /**
     * 模拟JSON请求,put方法测试
     * @param request
     * @return
     */
    @RequestMapping(value = "testPutByJson", method = RequestMethod.PUT)
    public void testPutByJson(@RequestBody RequestBean request){
        System.out.println("请求成功,方法:testPutByJson,请求参数:" + JSON.toJSONString(request));
    }
}

@Autowired
private RestTemplate restTemplate;

/**
 * 模拟JSON提交,put请求
 */
@Test
public void testPutByJson(){
    //请求地址
    String url = "http://localhost:8080/testPutByJson";

    //入参
    RequestBean request = new RequestBean();
    request.setUserName("唐三藏");
    request.setUserPwd("123456789");

    //模拟JSON提交,put请求
    restTemplate.put(url, request);
}
3.4、DELETE 请求
与之对应的还有delete方法协议,表示删除一个已经存在的资源,该方法会向URL代表的资源发送一个HTTP DELETE方法请求。
@RestController
public class TestController {

    /**
     * 模拟JSON请求,delete方法测试
     * @return
     */
    @RequestMapping(value = "testDeleteByJson", method = RequestMethod.DELETE)
    public void testDeleteByJson(){
        System.out.println("请求成功,方法:testDeleteByJson");
    }
}

@Autowired
private RestTemplate restTemplate;

/**
 * 模拟JSON提交,delete请求
 */
@Test
public void testDeleteByJson(){
    //请求地址
    String url = "http://localhost:8080/testDeleteByJson";

    //模拟JSON提交,delete请求
    restTemplate.delete(url);
}
3.5、通用请求方法 exchange 方法
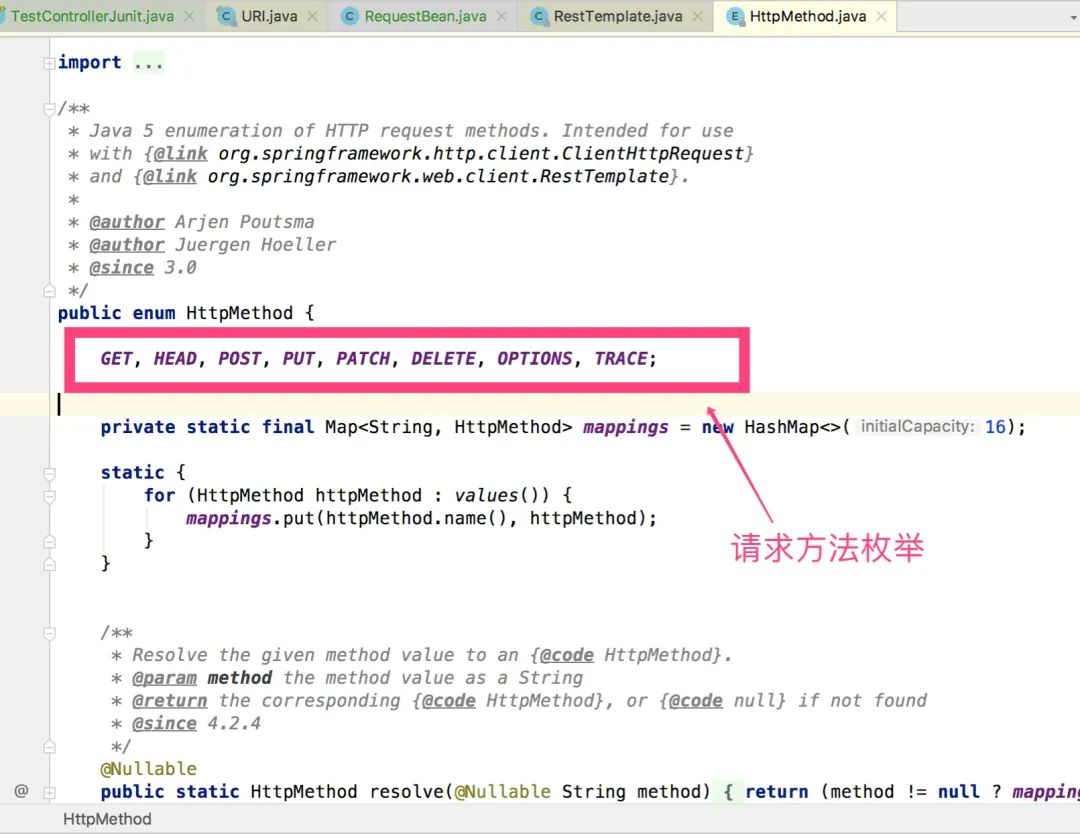
如果以上方法还不满足你的要求。在RestTemplate工具类里面,还有一个exchange通用协议请求方法,它可以发送GET、POST、DELETE、PUT、OPTIONS、PATCH等等HTTP方法请求。
打开源码,我们可以很清晰的看到这一点。
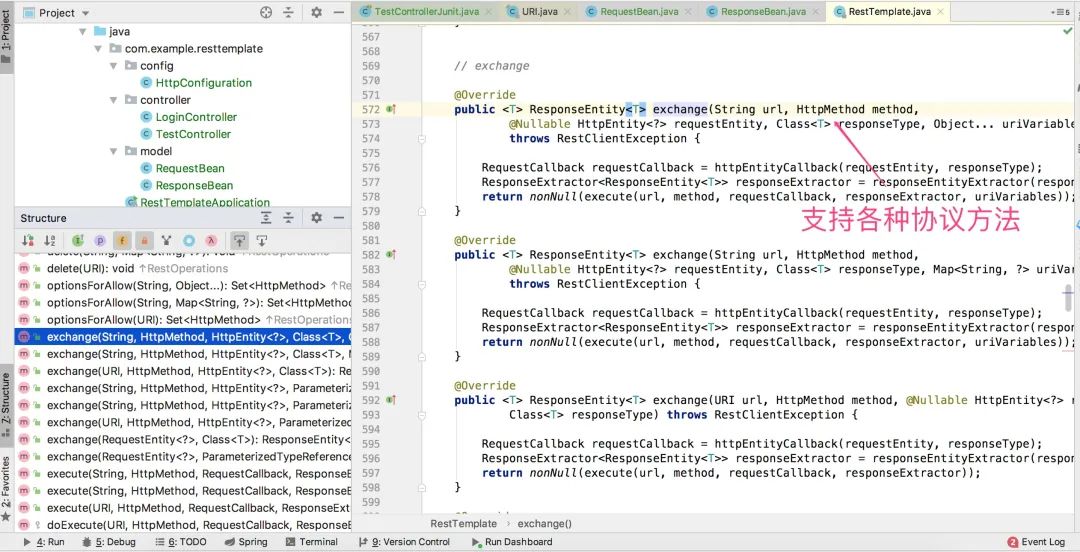
采用exchange方法,可以满足各种场景下的请求操作!
3.6、文件上传与下载
除了经常用到的get和post请求以外,还有一个我们经常会碰到的场景,那就是文件的上传与下载,如果采用RestTemplate,该怎么使用呢?
案例如下,具体实现细节参考代码注释!
- 文件上传
@RestController
public class FileUploadController {

    private static final String UPLOAD_PATH = "/springboot-frame-example/springboot-example-resttemplate/";

    /**
     * 文件上传
     * @param uploadFile
     * @return
     */
    @RequestMapping(value = "upload", method = RequestMethod.POST)
    public ResponseBean upload(@RequestParam("uploadFile") MultipartFile uploadFile,
                               @RequestParam("userName") String userName) {
        // 在 uploadPath 文件夹中通过用户名对上传的文件归类保存
        File folder = new File(UPLOAD_PATH + userName);
        if (!folder.isDirectory()) {
            folder.mkdirs();
        }

        // 对上传的文件重命名,避免文件重名
        String oldName = uploadFile.getOriginalFilename();
        String newName = UUID.randomUUID().toString() + oldName.substring(oldName.lastIndexOf("."));

        //定义返回视图
        ResponseBean result = new ResponseBean();
        try {
            // 文件保存
            uploadFile.transferTo(new File(folder, newName));
            result.setCode("200");
            result.setMsg("文件上传成功,方法:upload,文件名:" + newName);
        } catch (IOException e) {
            e.printStackTrace();
            result.setCode("500");
            result.setMsg("文件上传失败,方法:upload,请求文件:" + oldName);
        }
        return result;
    }
}

@Autowired
private RestTemplate restTemplate;

/**
 * 文件上传,post请求
 */
@Test
public void upload(){
    //需要上传的文件
    String filePath = "/Users/panzhi/Desktop/Jietu20220205-194655.jpg";

    //请求地址
    String url = "http://localhost:8080/upload";

    // 请求头设置,multipart/form-data格式的数据
    HttpHeaders headers = new HttpHeaders();
    headers.setContentType(MediaType.MULTIPART_FORM_DATA);

    //提交参数设置
    MultiValueMap<String, Object> param = new LinkedMultiValueMap<>();
    param.add("uploadFile", new FileSystemResource(new File(filePath)));
    //服务端如果接受额外参数,可以传递
    param.add("userName", "张三");

    // 组装请求体
    HttpEntity<MultiValueMap<String, Object>> request = new HttpEntity<>(param, headers);

    //发起请求
    ResponseBean responseBean = restTemplate.postForObject(url, request, ResponseBean.class);
    System.out.println(responseBean.toString());
}
- 文件下载
@RestController
public class FileUploadController {

    private static final String UPLOAD_PATH = "springboot-frame-example/springboot-example-resttemplate/";

    /**
     * 带参的get请求(restful风格)
     * @return
     */
    @RequestMapping(value = "downloadFile/{userName}/{fileName}", method = RequestMethod.GET)
    public void downloadFile(@PathVariable(value = "userName") String userName,
                             @PathVariable(value = "fileName") String fileName,
                             HttpServletRequest request,
                             HttpServletResponse response) throws Exception {

        File file = new File(UPLOAD_PATH + userName + File.separator + fileName);
        if (file.exists()) {
            //获取文件流
            FileInputStream fis = new FileInputStream(file);
            //获取文件后缀(.png)
            String extendFileName = fileName.substring(fileName.lastIndexOf('.'));
            //动态设置响应类型,根据前台传递文件类型设置响应类型
            response.setContentType(request.getSession().getServletContext().getMimeType(extendFileName));
            //设置响应头,attachment表示以附件的形式下载,inline表示在线打开
            response.setHeader("content-disposition","attachment;fileName=" + URLEncoder.encode(fileName,"UTF-8"));
            //获取输出流对象(用于写文件)
            OutputStream os = response.getOutputStream();
            //下载文件,使用spring框架中的FileCopyUtils工具
            FileCopyUtils.copy(fis,os);
        }
    }
}

@Autowired
private RestTemplate restTemplate;

/**
 * 小文件下载
 * @throws IOException
 */
@Test
public void downloadFile() throws IOException {
    String userName = "张三";
    String fileName = "c98b677c-0948-46ef-84d2-3742a2b821b0.jpg";
    //请求地址
    String url = "http://localhost:8080/downloadFile/{1}/{2}";

    //发起请求,直接返回对象(restful风格)
    ResponseEntity<byte[]> rsp = restTemplate.getForEntity(url, byte[].class, userName,fileName);
    System.out.println("文件下载请求结果状态码:" + rsp.getStatusCode());

    // 将下载下来的文件内容保存到本地
    String targetPath = "/Users/panzhi/Desktop/"  + fileName;
    Files.write(Paths.get(targetPath), Objects.requireNonNull(rsp.getBody(), "未获取到下载文件"));
}
这种下载方法实际上是将下载文件一次性加载到客户端本地内存,然后从内存将文件写入磁盘。这种方式对于小文件的下载还比较适合,如果文件比体量较大或者文件下载并发量比较大,容易造成内存的大量占用,到你应用的运行效率降低。
- 大文件下载
@Autowired
private RestTemplate restTemplate;

/**
 * 大文件下载
 * @throws IOException
 */
@Test
public void downloadBigFile() throws IOException {
    String userName = "张三";
    String fileName = "c98b677c-0948-46ef-84d2-3742a2b821b0.jpg";
    //请求地址
    String url = "http://localhost:8080/downloadFile/{1}/{2}";

    //定义请求头的接收类型
    RequestCallback requestCallback = request -> request
    				.getHeaders()
            .setAccept(Arrays.asList(MediaType.APPLICATION_OCTET_STREAM, MediaType.ALL));

    //对响应进行流式处理而不是将其全部加载到内存中
    String targetPath = "/Users/panzhi/Desktop/"  + fileName;
    restTemplate.execute(url, HttpMethod.GET, requestCallback, clientHttpResponse -> {
        Files.copy(clientHttpResponse.getBody(), Paths.get(targetPath));
        return null;
    }, userName, fileName);
}
这种下载方式的区别在于:
- 设置了请求头
APPLICATION_OCTET_STREAM,表示以流的形式进行数据加载 RequestCallback结合File.copy保证了接收到一部分文件内容,就向磁盘写入一部分内容。而不是全部加载到内存,最后再写入磁盘文件。
在下载大文件时,例如excel、pdf、zip等等文件,特别管用。
四、小结
通过本章的讲解,想必读者初步的了解了如何使用RestTemplate方便快捷的访问restful接口。其实RestTemplate的功能非常强大,继续在使用中探索学习。
