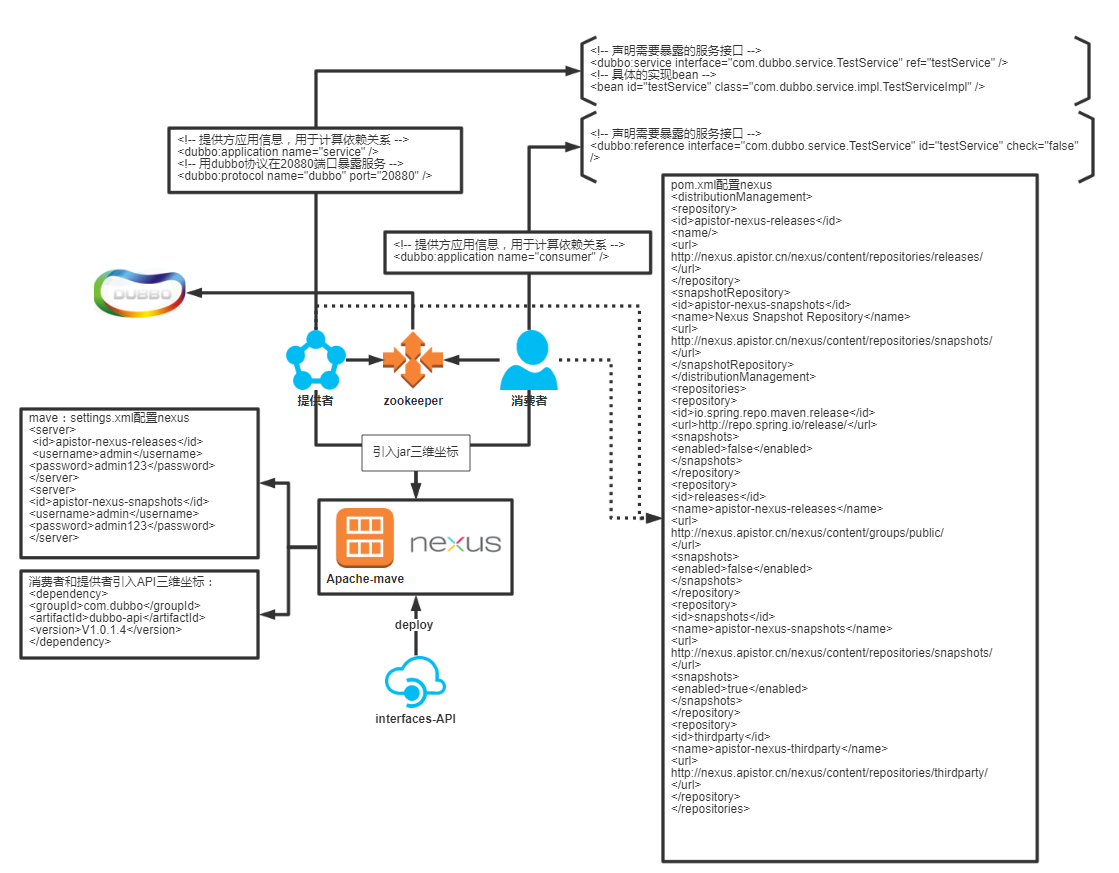
基于mave的dubbo分别架构


开始前,先看一下demo项目工程结构:

1、抽离接口
dubbo-api工程,根据业务抽离接口,deploy到mave nexus。
public interface TestService {
    /**
     * @param name
     * @return
     */
    public String sayHello(String name);
    /**
     * @param cmd
     * @return
     */
    public String linuxCMD(String cmd);

}
提供三维坐标:
<dependency>
  <groupId>com.dubbo</groupId>
  <artifactId>dubbo-api</artifactId>
  <version>0.0.1-SNAPSHOT</version>
</dependency>
2、提供者和消费者并行
dubbo-service工程pom引入实现接口三维坐标实现接口。
import com.dubbo.service.TestService;
import com.dubbo.common.TestLinuxCmd;
public class TestServiceImpl implements TestService {
    @Override
    public String sayHello(String name)  {
                // TODO Auto-generated method stub
        return null;
    }
    @Override
    public String linuxCMD(String cmd) {
        String exec = TestLinuxCmd.exec("192.168.20.20", "root", "123456", 22, name);
        return exec;
    }
}
注:TestLinuxCmd方法来至dubbo-common工程,公共方法到放到这里,就不多做解释了。
写完服务记得暴露出服务:
<dubbo:service interface="com.dubbo.service.TestService" ref="testService" />
dubbo-controller工程pom同样也要引入实现接口三维坐标,调用这个接口。
package com.dubbo.controller;
import org.springframework.beans.factory.annotation.Autowired;
import org.springframework.stereotype.Controller;
import org.springframework.web.bind.annotation.RequestMapping;
import org.springframework.web.bind.annotation.RequestParam;
import org.springframework.web.bind.annotation.ResponseBody;
import com.dubbo.service.TestService;
@Controller
public class MyController {
    @Autowired
    private TestService testService;
    @RequestMapping(value = "/test")
    @ResponseBody
    public String testSay(@RequestParam(value = "name",defaultValue = "") String name){
        StringBuffer sb = new StringBuffer();
        sb.append("Dubbo: ").append(testService.sayHello(name));
        return sb.toString();
    }
}
消费者不需要关心谁提供的服务,它只需要调用三维坐标的接口即可。
写完同样记得暴露出服务:
<dubbo:reference interface="com.dubbo.service.TestService" id="testService" check="false" />
源码下载:
https://files.cnblogs.com/files/Javame/dubbo.zip
技术微信群:
加微信:wonter 发送:技术Q
医疗微信群:
加微信:wonter 发送:医疗Q
更多文章关注公众号:

加微信:wonter 发送:技术Q
医疗微信群:
加微信:wonter 发送:医疗Q
更多文章关注公众号:


【推荐】国内首个AI IDE,深度理解中文开发场景,立即下载体验Trae
【推荐】编程新体验,更懂你的AI,立即体验豆包MarsCode编程助手
【推荐】抖音旗下AI助手豆包,你的智能百科全书,全免费不限次数
【推荐】轻量又高性能的 SSH 工具 IShell:AI 加持,快人一步
· 如何编写易于单元测试的代码
· 10年+ .NET Coder 心语,封装的思维:从隐藏、稳定开始理解其本质意义
· .NET Core 中如何实现缓存的预热?
· 从 HTTP 原因短语缺失研究 HTTP/2 和 HTTP/3 的设计差异
· AI与.NET技术实操系列:向量存储与相似性搜索在 .NET 中的实现
· 地球OL攻略 —— 某应届生求职总结
· 周边上新:园子的第一款马克杯温暖上架
· Open-Sora 2.0 重磅开源!
· 提示词工程——AI应用必不可少的技术
· .NET周刊【3月第1期 2025-03-02】