

python week08 并发编程之多线程--实践部分
一. threading模块介绍
multiprocess模块的完全模仿了threading模块的接口,二者在使用层面,有很大的相似性,因而不再详细介绍
官网链接:https://docs.python.org/3/library/threading.html?highlight=threading#
二 .开启线程的两种方式


# @Time    : 2018/9/10 14:48
# @Author  : Jame
from threading import  Thread
import time


#方法1
# def task(name):
#     print('%s is running'%name)
#     time.sleep(2)
#     print('%s is done'%name)
#
#
#
# if __name__ == '__main__':
#     t=Thread(target=task,args=('线程1',))
#     t.start()  #几乎是线程信号发送的同时,线程就立即开启了,证明线程的创建开销远远小雨进程
#     print('主.....')
#     #主线程的生命周期就是所在进程的生命周期,进程应该再进程内所有线程都运行完毕后才应该结束
# @Time    : 2018/9/10 14:48
# @Author  : Jame
from threading import  Thread
import time

#方法2
class Mythread(Thread):
    def run(self):
        print('%s is running'%self.name)
        time.sleep(2)
        print('%s is done'%self.name)


#可以不在main方法下,因为在windows下所以必须要在main才不报错。
if __name__ == '__main__':
    t=Mythread()
    t.start()
    print('主')
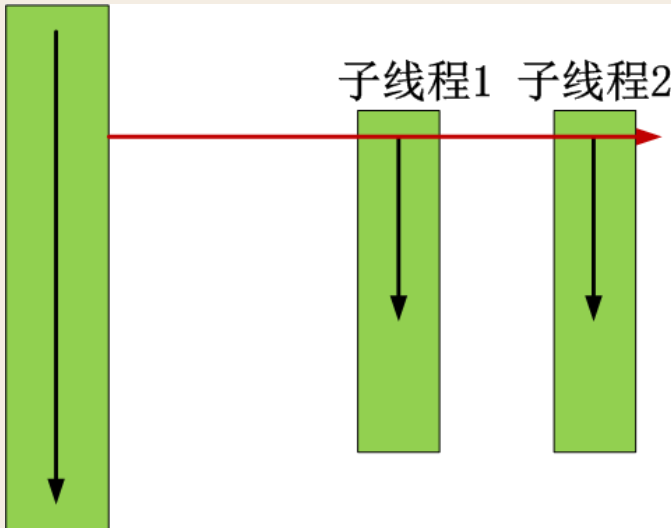
三. 在一个进程下开启多个线程与在一个进程下开启多个子进程的区别
# @Time    : 2018/9/12 9:28
# @Author  : Jame
from multiprocessing import Process,current_process
from threading import Thread,current_thread
import time


def work1():
    print('hello ',current_thread().getName())

def work2():
    print('hello',current_process().name)


if __name__ == '__main__':
    #在进程下开启线程
    t=Thread(target=work1)
    start=time.time()
    t.start()
    t.join()
    print('主线程/主进程:%s,耗时:%s'%(current_thread().getName(),time.time()-start))

    '''
    hello  Thread-1
    主线程/主进程:MainThread,耗时:0.0010001659393310547
    '''

    p=Process(target=work2)
    start1=time.time()
    p.start()
    p.join()
    print('主线程/主进程:%s,耗时:%s'%(current_process().name,time.time()-start1))

    '''
    hello Process-1
    主线程/主进程:MainProcess,耗时:0.1890106201171875
    '''

    '''
    总结:由上例子可以看出,创建线程的消耗比创建进程要少的多,几乎在10-100倍之间。
    因为创建进程需要申请空间,复制父进程等操作,而创建线程则没有这样的开销,只需要启动一个流水线即可,内存共享该进程资源。

    '''
# @Time    : 2018/9/12 9:28
# @Author  : Jame
from multiprocessing import Process,current_process
from threading import Thread,current_thread
import time
import os

def work1():
    print('子Name:%s,pid:%s '%(current_thread().getName(),os.getpid()))

def work2():
    print('子Name:%s,pid:%s '%(current_thread().getName(),os.getpid()))

if __name__ == '__main__':
    #在进程下开启线程
    t=Thread(target=work1)
    start=time.time()
    t.start()
    t.join()
    print('主线程/主进程:%s,耗时:%s,主pid:%s'%(current_thread().getName(),time.time()-start,os.getpid()))


    p=Process(target=work2)
    start1=time.time()
    p.start()
    p.join()
    print('主线程/主进程:%s,耗时:%s,主pid:%s'%(current_process().name,time.time()-start1,os.getpid()))


 '''
    子Name:Thread-1,pid:7340
    主线程/主进程:MainThread,耗时:0.0009999275207519531,主pid:7340

    '''

    '''
    子Name:MainThread,pid:7892
    主线程/主进程:MainProcess,耗时:0.14300823211669922,主pid:7340
    '''
# @Time    : 2018/9/10 16:29
# @Author  : Jame
from threading import Thread,current_thread
from multiprocessing import Process
import time

#1.join()
# def task(name):
#     print('%s is running'%name)
#     time.sleep(2)
#     print('%s is done'%name)
#
#
#
# if __name__ == '__main__':
#     t=Thread(target=task,args=('线程1',))
#     t.start()
#     t.join()  #主线程等着线程task结束后,才运行主......
#     print('主.....')


#2.线程和进程内的的数据是共享内存还是数据隔离的呢?
# n=100
#
# def task():
#     global n
#     n=0
#     print('子',n)
#
#
# if __name__ == '__main__':
#     t=Thread(target=task)
#     #t=Process(target=task)
#
#     t.start()
#     t.join()
#     print('主',n)

'''
输出:
线程:0,修改成功,说明线程内共享同一内存空间,所以线程是数据不安全的。
进程:100,修改失败,因为每个子进程复制了主进程数据,并且进程间隔离,所以进程是数据较安全的。
'''
总结:
1.创建线程的开销远小于创建进程。
2.一个进程创建,至少会有一个主线程/主进程存在。
3.子线程共享创建它的主进程内资源,且各子线程之间可以互相通信。子进程复制主进程内存状态,且各子进程之间相互隔离,进程间通信困难。
四. 练习多线程编程
1.用多线程来改造socket实现多并发效果
# @Time    : 2018/9/12 9:53
# @Author  : Jame
import multiprocessing
import threading
import socket

server=socket.socket(socket.AF_INET,socket.SOCK_STREAM)
server.bind(('127.0.0.1',8080))
server.listen(2)
print('server start.....')

def action(conn):
    while True:
        data=conn.recv(1024)
        print('client send:',data)
        conn.send(data.upper())


if __name__ == '__main__':
    while True:
        conn,addr=server.accept()

        p=threading.Thread(target=action,args=(conn,))
        p.start()
# @Time    : 2018/9/12 9:53
# @Author  : Jame
import socket


client=socket.socket(socket.AF_INET,socket.SOCK_STREAM)
client.connect(('127.0.0.1',8080))

while True:
    msg=input('Please input:').strip()
    if not msg:continue

    client.send(msg.encode('utf-8'))
    data=client.recv(1024)

    print(data.decode('utf-8'))
2.三个任务,一个接收用户输入,一个将用户输入的内容格式化成大写,一个将格式化后的结果存入文件
# @Time    : 2018/9/12 10:05
# @Author  : Jame
from threading import Thread

msg_l=[]
format_l=[]

#1.接受用户输入
def talk():
    while True:
        msg=input('Please input:').strip()
        if not msg:continue

        msg_l.append(msg)


#2.将输入的转换成大写
def format_msg():
    while True:
        if msg_l:
            res=msg_l.pop()
            format_l.append(res.upper())

#3.将转换后的大写存入文件中去
def save():
    while True:
        if format_l:
            with open('db3.txt','a',encoding='utf-8') as f:
                res=format_l.pop()
                f.write('%s\n'%res)


if __name__ == '__main__':
    t1=Thread(target=talk)
    t2=Thread(target=format_msg)
    t3=Thread(target=save)

    t1.start()
    t2.start()
    t3.start()

'''
Please input:abc
Please input:nihap
Please input:woshishui
Please input:wocongnalilai
Please input:woyao dao nali qu


查看:db3.txt会发现里面全部是大写的存储了

'''
五. 线程相关的其他方法
1.thread实例对象的方法:t=Thread(target=work)
# isAlive(): 返回线程是否活动的。
#getName(): 返回线程名。
#setName(): 设置线程名。
#join():等待该子线程对象执行完毕。
2. threading模块提供的一些方法:
# threading.currentThread(): 返回当前的线程变量。
# threading.enumerate(): 返回一个包含正在运行的线程的list。正在运行指线程启动后、结束前,不包括启动前和终止后的线程。
# threading.activeCount(): 返回正在运行的线程数量,与len(threading.enumerate())有相同的结果。
3.实例演示
# @Time    : 2018/9/10 16:29
# @Author  : Jame
from threading import Thread,current_thread
import threading
def task():
    print('%s is running'%current_thread().name)
    time.sleep(2)
    print('%s is done'%current_thread().name)


if __name__ == '__main__':
    t=Thread(target=task,name=('线程1'))
    t.start()
    print(t.is_alive(),t.getName())
    t.join()
    print('主Name:%s'%(current_thread().name))
    print(threading.activeCount) #<function active_count at 0x00000000029F57B8>
    print(threading.enumerate()) #[<_MainThread(MainThread, started 6460)>]
    print(threading.currentThread)  #<function current_thread at 0x0000000002963620>

'''
线程1 is running
True 线程1
线程1 is done
主Name:MainThread
<function active_count at 0x00000000029F57B8>
[<_MainThread(MainThread, started 3540)>]
<function current_thread at 0x00000000029F3620>

'''
六 .守护线程
1.守护线程和守护进程的概念详解
无论是进程还是线程,都遵循主xx运行完毕,守护xx 随着销毁。
需要强调的是:运行完毕,并不是运行被终止。
对于主进程来说,守护进程随着主进程代码结束,守护进程随之销毁。
对主线程来说,主线程要等所在进程内所有非守护线程运行完毕,主线程才算运行完毕,这时候守护线程才会随之销毁。
守护线程/进程详解:
1.主进程是在其代码结束后就算已经运行结束(守护进程随之回收),然后主进程会一直等非守护的子进程都运行完毕后,才回收子进程资源(否则会产生僵尸进程),最后才结束。
2.主线程在其他非守护线程运行完毕才算运行完毕(守护线程随之回收)。因为主线程的结束意味着所在进程的结束,进程整体的资源都将被回收,而进程又必须保证非守护线程都运行完毕才能结束。
2.实例演示
# @Time    : 2018/9/10 16:41
# @Author  : Jame
from threading import Thread,current_thread
import time


#1。守护线程随着主线程运行完毕后,就即刻销毁结束!
# def task(name):
#     print('%s is running'%name)
#     time.sleep(2)
#     print('%s is done'%name)
#
#
# if __name__ == '__main__':
#     t=Thread(target=task,args=('线程1'))
#
#     t.daemon=Thread #守护线程,一定要在线程的start()方法开启之前进行开启操作才有意义!
#
#     t.start()
#    print('主--->',current_thread().name)
'''
主---> MainThread
#这里看主打印出来后,线程task没有来得及开启就跟随主线程一起销毁了
'''
#2.守护线程会在该进程内的所有非守护线程都运行完毕后才结束销毁
def foo():
    print(123)
    time.sleep(1)
    print('end123')


def bar():
    print(456)
    time.sleep(3)
    print('end456')


if __name__ == '__main__':
    t1=Thread(target=foo)
    t2=Thread(target=bar)

    t1.daemon=True #守护线程
    t1.start()
    t2.start()  #非守护线程的子线程
    print('main---------->>')


'''
123
456
main---------->>  #这里可以看到,主线程执行完毕后foo 并没有随之销毁,而是等非守护线程bar执行完毕后才销毁。
end123
end456


思考:守护线程与守护进程的不同?
守护进程随着主进程代码执行完毕,随之销毁,守护进程没有等待其他非守护子进程执行完毕,主进程等待其他非守护子进程执行完毕才结束。

守护线程随着主线程代码执行完毕,如果有其他非守护子线程尚未执行完毕,守护线程要等待其执行完毕后销毁,然后主线程结束意味着进程结束。

'''
七 . Python GIL(Global Interpreter Lock)
请参考Egon:http://www.cnblogs.com/linhaifeng/articles/7449853.html
八. 同步锁
1.注意
1).线程抢的是的GIL锁,GIL锁相当于拿到了执行权限(院子大门钥匙),拿到执行权限后才能拿到互斥锁Lock(院子里面的防盗门钥匙),其他线程也可以抢到GIL。但是如果发现Lock任然没有被释放则阻塞,即便是拿到执行权限GIL也要立刻交出来。
2).join 是等待所有,即是整体串行,而锁只是锁住了修改共享数据的部分,即是部分串行。想要保证数据安全的根本原理在于让并发变成串行,join与互斥锁都可以实现,毫无疑问,互斥锁的部分串行效率更高点。
3).一定要看下本小节GIL与互斥锁的经典分析。
2.GIL VS Lock
1).Python已经有一个GIL来保证同一时间只能有一个线程来执行了,为什么这里还需要lock ?
首先我们需要达成共识:锁的目的是为了保护共享的数据,同一时间只能有一个线程来修改共享的数据
然后,我们可以得出结论:保护不同的数据就应该加不同的锁。
最后,问题就很明朗了,GIL与Lock是两把锁,保护的数据不一样,前者是解释器级别的(当然保护的就是解释器级别的数据,比如垃圾回收的数据)
后者是保护用户自己开发的应用程序的数据,很明显GIL不负责这件事,只能用户自定义加锁处理,即Lock。
2).分析过程:所有线程抢的是GIL锁,或者说所有线程先抢的执行权限
线程1抢到GIL锁,拿到执行权限,开始执行,然后加了一把Lock,还没有执行完毕,即线程1还未释放Lock,有可能线程2抢到GIL锁,开始执行,执行过程中发现Lock还没有被线程1释放,于是线程2进入阻塞,被夺走执行权限,有可能线程1拿到GIL,然后 正常执行到释放Lock。。。这就导致了串行运行的效果
既然是串行,那我们执行
t1.start()
t1.join
t2.start()
t2.join()
这也是串行执行,为何还要加Lock呢,需知join是等待t1所有的代码执行完,相当于锁住了t1的所有代码,而Lock只是锁住一部分操作共享数据的代码。
因为Python解释器帮你自动定期进行内存回收,你可以理解为python解释器里有一个独立的线程,每过一段时间它起wake up做一次全局轮询看看哪些内存数据是可以被清空的,此时你自己的程序 里的线程和 py解释器自己的线程是并发运行的,假设你的线程删除了一个变量,py解释器的垃圾回收线程在清空这个变量的过程中的clearing时刻,可能一个其它线程正好又重新给这个还没来及得清空的内存空间赋值了,结果就有可能新赋值的数据被删除了,为了解决类似的问题,python解释器简单粗暴的加了锁,即当一个线程运行时,其它人都不能动,这样就解决了上述的问题, 这可以说是Python早期版本的遗留问题。
3).实例演示
from threading import Thread
import os,time
def work():
    global n
    temp=n
    time.sleep(0.1)
    n=temp-1
if __name__ == '__main__':
    n=100
    l=[]
    for i in range(100):
        p=Thread(target=work)
        l.append(p)
        p.start()
    for p in l:
        p.join()

    print(n) #结果可能为99
from threading import Thread,Lock
import os,time
def work():
    global n
    lock.acquire()
    temp=n
    time.sleep(0.1)
    n=temp-1
    lock.release()
if __name__ == '__main__':
    lock=Lock()
    n=100
    l=[]
    for i in range(100):
        p=Thread(target=work)
        l.append(p)
        p.start()
    for p in l:
        p.join()

    print(n) #结果肯定为0,由原来的并发执行变成串行,牺牲了执行效率保证了数据安全
3.GIL与Lock综合分析(重点理解)
分析:
#1.100个线程去抢GIL锁,即抢执行权限
#2. 肯定有一个线程先抢到GIL(暂且称为线程1),然后开始执行,一旦执行就会拿到lock.acquire()
#3. 极有可能线程1还未运行完毕,就有另外一个线程2抢到GIL,然后开始运行,但线程2发现互斥锁lock还未被线程1释放,于是阻塞,被迫交出执行权限,即释放GIL
#4.直到线程1重新抢到GIL,开始从上次暂停的位置继续执行,直到正常释放互斥锁lock,然后其他的线程再重复2 3 4的过程
4.互斥锁与join的区别(重点理解)
# @Time    : 2018/9/11 9:27
# @Author  : Jame
from threading import Thread
import os,time

def work():
    global n
    temp=n
    time.sleep(0.1)
    n=temp-1
    print('子线程:',n)

if __name__ == '__main__':
    n=100
    l=[]
    for i in range(100):
        p=Thread(target=work)
        l.append(p)
        p.start()

    for p in l:
        p.join()


    print('-----主线程:',n)

'''
子线程: 99
子线程: 99
子线程: 99
子线程: 99
-----主线程: 99

因为线程速度太快了,几乎都是同时进行修改了.

'''
# @Time    : 2018/9/11 9:32
# @Author  : Jame
from threading import Thread,Lock,current_thread
import os,time


def work(lock):
    global n
    lock.acquire()
    temp=n
    time.sleep(0.1)
    n=temp-1
    print('子线程:%s,%s'%(current_thread().name,n))
    lock.release()


if __name__ == '__main__':
    lock = Lock()
    n=100
    l=[]
    for i in range(100):
        p=Thread(target=work,args=(lock,))
        l.append(p)
        p.start()

    for p in l:
        p.join()

    print('---->>主',n)  #结果肯定为0,由原来的并发执行变成了窜行,牺牲了执行效率保证了数据安全。
'''
子线程99
.
.
.
子线程:1
子线程:0
---->>主 0

分析:1.100个线程去抢GIL锁,即抢执行权限
    2.肯定有一个线程先抢到GIL(暂且称为线程1),然后开始执行,一旦执行就会拿到lock.acquire()
    3.既有可能线程1 还没有运行完毕,就会有另外一个线程x抢到了GIL,然后开始运行,但是线程x 发现互斥锁lock还未被线程1释放,于是阻塞
    ,被迫交出执行权限,即释放GIL
    4.知道线程1 重新抢到GIL,开始上次暂停的位置继续执行,知道正常释放互斥锁lock,然后其他线程再重复2 3 4 的过程。


'''
# @Time    : 2018/9/11 10:10
# @Author  : Jame
from threading import Thread,current_thread,Lock
import os,time


def task(lock):
    #未加锁的代码并发运行
    time.sleep(1)
    print('%s start to running'%current_thread().getName())
    global n
    #加锁运行
    lock.acquire()
    temp=n
    time.sleep(0.1)
    n=temp-1
    print('子线程:%s n=%s' % (current_thread().name, n))
    lock.release()


if __name__ == '__main__':
    n=100
    lock=Lock()
    threads=[]
    start=time.time()
    for i in range(100):
        t=Thread(target=task,args=(lock,))
        threads.append(t)
        t.start()

    for t in threads:
        t.join()

    stop=time.time()

    print('主:%s,n=%s,耗时:%s'%(current_thread().name,n,stop-start))


'''
.
.
.
.
子线程:Thread-97 n=3
子线程:Thread-98 n=2
子线程:Thread-99 n=1
子线程:Thread-100 n=0


主:MainThread,n=0,耗时:11.002629518508911


既然加锁会让程序变成串行,那么在start运行后立刻使用join,就不是相当于串行了吗,为何还要lock加锁呢?

总结:因为start后立刻join会使代码整体串行,而lock加锁的部分只是修改共享数据的部分的那一刻是串行的,
#保证了数据的一致性和安全性,同时其他部分又是并发的相对于单纯使用Join提高了并发的效果。


'''


#串行的join

# def task():
#     time.sleep(1)
#     print('%s start to running'%current_thread().getName())
#     global n
#     temp=n
#     time.sleep(0.1)
#     n=temp-1
#     print('子线程:%s n=%s' % (current_thread().name, n))
#
#
# if __name__ == '__main__':
#     n=100
#     start=time.time()
#     for i in range(100):
#         t=Thread(target=task)
#         t.start()
#         t.join()
#
#     stop=time.time()
#
#     print('主:%s,n=%s,耗时:%s'%(current_thread().name,n,stop-start))


'''
.........
子线程:Thread-97 n=3
Thread-98 start to running
子线程:Thread-98 n=2
Thread-99 start to running
子线程:Thread-99 n=1
Thread-100 start to running
子线程:Thread-100 n=0

主:MainThread,n=0,耗时:110.0262930393219


总结:每个线程都是串行join执行,耗时比加锁lock的并发效果高很多,
#所以局部加锁并实现并发效果就很重要,既保证了数据的安全性又比完全串行耗时小很多。
'''
九. 死锁现象与递归锁
1.所谓死锁
是指两个或两个以上的进程或线程在执行过程中,因争夺资源而造成的一种互相等待的现象,若无外力作用,它们都将无法推进下去。此时称系统处于死锁状态或系统产生了死锁,这些永远在互相等待的进程称为死锁进程,如下就是死锁
# @Time    : 2018/9/11 8:59
# @Author  : Jame
from threading import Thread,Lock,RLock
import time

mutexA=mutexB=Lock() #死锁,线程卡死在第一个锁的时候
#mutexA=mutexB=RLock() #递归锁,不会产生死锁


class Mythread(Thread):
    def run(self):
        self.f1()
        self.f2()


    def f1(self):
        mutexA.acquire()
        print('%s 抢到了A锁'%self.name)

        mutexB.acquire()
        print('%s 抢到了B锁'%self.name)
        mutexB.release()

        mutexA.release()


    def f2(self):
        mutexB.acquire()
        print('%s 抢到了B锁'%self.name)

        mutexA.acquire()
        print('%s 抢到了A锁'%self.name)
        mutexA.release()

        mutexB.release()


if __name__ == '__main__':
    for i in range(10):
        t=Mythread()
        t.start()


'''
Thread-1 抢到了A锁  ...卡死中

'''
2.解决死锁问题
死锁的解决方法是递归锁,在python只呢个为了制成同一个线程中多次请求同一个资源,python提供了可重入锁Rlock
Rlock内部维护着一个Lock和一个counter变量,counter记录了acquire的次数,从而使用资源可以被多次requre。
直到一个线程所有的acquire被release,其他线程才能获得资源。
如果上面的例子使用RLock代替Lock,则不会发生死锁:
mutexA=mutexB=threading.RLock() #一个线程拿到锁,counter加1,该线程内又碰到加锁的情况,则counter继续加1,这期间所有其他线程都只能等待,等待该线程释放所有锁,即counter递减到0为止
十 .信号量Semaphore
1.信号量原理概念
Semaphore管理一个内置的计数器,
每当调用acquire()时内置计数器-1;
调用release() 时内置计数器+1;
计数器不能小于0;当计数器为0时,acquire()将阻塞线程直到其他线程调用release()。
2.实例:(同时只有5个线程可以获得semaphore,即可以限制最大连接数为5):
# @Time    : 2018/9/11 10:51
# @Author  : Jame
from threading import Thread,Semaphore
import threading
import time

def func(sm):
    sm.acquire()
    print('%s get sm'%threading.current_thread().getName())
    time.sleep(1)
    print('-------------->>>')
    sm.release()


if __name__ == '__main__':
    sm=Semaphore(5)
    for i in range(20):
        t=Thread(target=func,args=(sm,))
        t.start()


'''
Thread-1 get sm
Thread-2 get sm
Thread-3 get sm
Thread-4 get sm
Thread-5 get sm
-------------->>>
-------------->>>
Thread-6 get sm
Thread-7 get sm
-------------->>>
-------------->>>
Thread-9 get sm
-------------->>>
Thread-8 get sm
Thread-10 get sm
-------------->>>
Thread-11 get sm
-------------->>>
Thread-12 get sm
-------------->>>
-------------->>>
Thread-14 get sm
-------------->>>
Thread-13 get sm
Thread-15 get sm
-------------->>>
-------------->>>
Thread-16 get sm
Thread-17 get sm
-------------->>>
-------------->>>
Thread-19 get sm
Thread-18 get sm
-------------->>>
Thread-20 get sm
-------------->>>
-------------->>>
-------------->>>
-------------->>>
-------------->>>


总结:信号量类似厕所门口的钥匙,挂了5把,同一时间只能5个人进行上厕所,当里面出来挂上钥匙后,才能进去。
所以互斥锁,是信号量的特殊情况n=1。但是mutex互斥锁较为简单,且高效,所以在必须保障资源独占的情况下,还是采用该设计方式。

'''
3.信号量与进程池的区别
与进程池是完全不同的概念,进程池Pool(4),最大只能产生4个进程,而且从头到尾都只是这四个进程,不会产生新的,而信号量是产生一堆线程/进程
信号量与互斥锁推荐看博客:http://url.cn/5DMsS9r
十一. Event 事件
1.Event原理概念
同进程的一样,线程的一个关键特性是每个线程都是独立运行且状态不可预测。
如果程序中的其 ,他线程需要通过判断某个线程的状态来确定自己下一步的操作,这时线程同步问题就会变得非常棘手。
为了解决这些问题,我们需要使用threading库中的Event对象。 对象包含一个可由线程设置的信号标志,它允许线程等待某些事件的发生。
在 初始情况下,Event对象中的信号标志被设置为假。如果有线程等待一个Event对象, 而这个Event对象的标志为假,那么这个线程将会被一直阻塞直至该标志为真。
一个线程如果将一个Event对象的信号标志设置为真,它将唤醒所有等待这个Event对象的线程。如果一个线程等待一个已经被设置为真的Event对象,那么它将忽略这个事件, 继续执行。
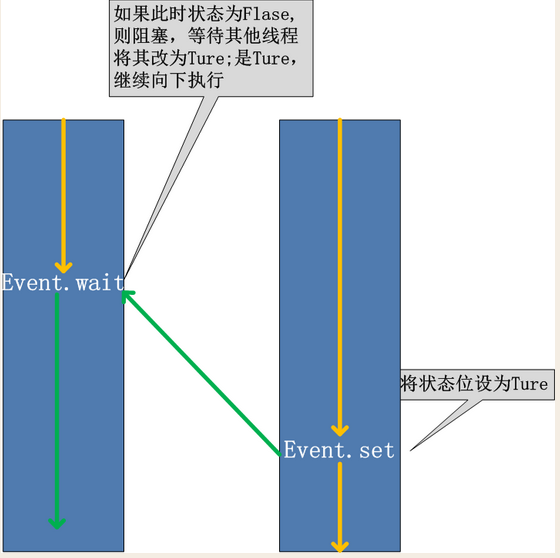
event.isSet():返回event的状态值;

event.wait():如果 event.isSet()==False将阻塞线程;

event.set(): 设置event的状态值为True,所有阻塞池的线程激活进入就绪状态, 等待操作系统调度;

event.clear():恢复event的状态值为False。
2.Event应用
例如,有多个工作线程尝试链接MySQL,我们想要在链接前确保MySQL服务正常才让那些工作线程去连接MySQL服务器,如果连接不成功,都会去尝试重新连接。
那么我们就可以采用threading.Event机制来协调各个工作线程的连接操作:
# @Time    : 2018/9/11 14:31
# @Author  : Jame
from threading import Thread,Event
import threading
import time,random

def conn_mysql():
    count=1
    while not event.is_set():
        if count>3:
            raise TimeoutError('连接超时')
        print('<%s> 第%s 次尝试连接'%(threading.current_thread().getName(),count))
        event.wait(0.5)
        count+=1

    print('<%s> 连接成功!'%threading.current_thread().getName())


def check_mysql():
    print('\033[45m[%s] 正在检查mysql\033[0m'%threading.current_thread().getName())
    time.sleep(random.randint(2,4))
    event.set()


if __name__ == '__main__':
    event=Event()
    conn1=Thread(target=conn_mysql)
    conn2=Thread(target=conn_mysql)
    check=Thread(target=check_mysql)


    conn1.start()
    conn2.start()
    check.start()
十二. 条件Condition(了解)
使得线程等待,只有满足某条件时,才释放n个线程
# @Time    : 2018/9/12 15:03
# @Author  : Jame
import threading


def condition_func():

    ret = False
    inp = input('>>>')
    if inp == '1':
        ret = True

    return ret


def run(n):
    con.acquire()
    con.wait_for(condition_func)
    print("run the thread: %s" %n)
    con.release()


if __name__ == '__main__':

    con = threading.Condition()
    for i in range(5):
        t = threading.Thread(target=run, args=(i,))
        t.start()


'''
>>>1
run the thread: 0
>>>1
run the thread: 1
>>>1
run the thread: 2
>>>1
run the thread: 3
>>>1
run the thread: 4


'''
十三 .定时器
定时器,指定n秒后执行某操作
# @Time    : 2018/9/12 15:17
# @Author  : Jame
from threading import Timer


def hello():
    print("hello, world")


t = Timer(3, hello)
t.start()  # after 3 seconds, "hello, world" will be printed
from threading import Timer
import random,time

class Code:
    def __init__(self):
        self.make_cache()

    def make_cache(self,interval=5):
        self.cache=self.make_code()
        print(self.cache)
        self.t=Timer(interval,self.make_cache)
        self.t.start()

    def make_code(self,n=4):
        res=''
        for i in range(n):
            s1=str(random.randint(0,9))
            s2=chr(random.randint(65,90))
            res+=random.choice([s1,s2])
        return res

    def check(self):
        while True:
            inp=input('>>: ').strip()
            if inp.upper() ==  self.cache:
                print('验证成功',end='\n')
                self.t.cancel()
                break


if __name__ == '__main__':
    obj=Code()
    obj.check()
十四 .线程queue
queue队列 :使用import queue,用法与进程Queue一样
queue is especially useful in threaded programming when information must be exchanged safely between multiple threads.
- 1.class
queue.Queue(maxsize=0) #先进先出
mport queue

q=queue.Queue()
q.put('first')
q.put('second')
q.put('third')

print(q.get())
print(q.get())
print(q.get())
'''
结果(先进先出):
first
second
third
'''
2.class queue.LifoQueue(maxsize=0) #last in fisrt out
# @Time    : 2018/9/12 15:33
# @Author  : Jame
import queue

q=queue.LifoQueue()
q.put('first')
q.put('second')
q.put('third')


print(q.get())
print(q.get())
print(q.get())
'''
结果(后进先出):
third
second
first
'''
- 3.class
queue.PriorityQueue(maxsize=0) #存储数据时可设置优先级的队列,数字越小优先级越高
import queue

q=queue.PriorityQueue()
#put进入一个元组,元组的第一个元素是优先级(通常是数字,也可以是非数字之间的比较),数字越小优先级越高
q.put((20,'a'))
q.put((10,'b'))
q.put((30,'c'))

print(q.get())
print(q.get())
print(q.get())
'''
结果(数字越小优先级越高,优先级高的优先出队):
(10, 'b')
(20, 'a')
(30, 'c')
'''
4.其他方法
Constructor for a priority queue. maxsize is an integer that sets the upperbound limit on the number of items that can be placed in the queue. Insertion will block once this size has been reached, until queue items are consumed. If maxsize is less than or equal to zero, the queue size is infinite.

The lowest valued entries are retrieved first (the lowest valued entry is the one returned by sorted(list(entries))[0]). A typical pattern for entries is a tuple in the form: (priority_number, data).

exception queue.Empty
Exception raised when non-blocking get() (or get_nowait()) is called on a Queue object which is empty.

exception queue.Full
Exception raised when non-blocking put() (or put_nowait()) is called on a Queue object which is full.

Queue.qsize()
Queue.empty() #return True if empty
Queue.full() # return True if full
Queue.put(item, block=True, timeout=None)
Put item into the queue. If optional args block is true and timeout is None (the default), block if necessary until a free slot is available. If timeout is a positive number, it blocks at most timeout seconds and raises the Full exception if no free slot was available within that time. Otherwise (block is false), put an item on the queue if a free slot is immediately available, else raise the Full exception (timeout is ignored in that case).

Queue.put_nowait(item)
Equivalent to put(item, False).

Queue.get(block=True, timeout=None)
Remove and return an item from the queue. If optional args block is true and timeout is None (the default), block if necessary until an item is available. If timeout is a positive number, it blocks at most timeout seconds and raises the Empty exception if no item was available within that time. Otherwise (block is false), return an item if one is immediately available, else raise the Empty exception (timeout is ignored in that case).

Queue.get_nowait()
Equivalent to get(False).

Two methods are offered to support tracking whether enqueued tasks have been fully processed by daemon consumer threads.

Queue.task_done()
Indicate that a formerly enqueued task is complete. Used by queue consumer threads. For each get() used to fetch a task, a subsequent call to task_done() tells the queue that the processing on the task is complete.

If a join() is currently blocking, it will resume when all items have been processed (meaning that a task_done() call was received for every item that had been put() into the queue).

Raises a ValueError if called more times than there were items placed in the queue.

Queue.join() block直到queue被消费完毕
十五 . Python标准模块--concurrent.futures
1.官方文档参考:https://docs.python.org/dev/library/concurrent.futures.html
2.ProcessPoolExecutor 基本用法
# @Time    : 2018/9/12 15:49
# @Author  : Jame
from concurrent.futures import ThreadPoolExecutor,ProcessPoolExecutor

import os
import time
import random

def task(n):
    print('%s is running'%os.getpid())
    time.sleep(random.randint(1,3))
    print('子---->>>')
    return n**2


if __name__ == '__main__':
    executor=ProcessPoolExecutor(max_workers=3) #每次运行最多3个

    futures=[]
    for i in range(10):
        future=executor.submit(task,i)
        futures.append(future)


    executor.shutdown()
    print('+++++>>>>>>>>>>>>')
    for future in futures:
        print(future.result())


'''
9148 is running
7508 is running
8652 is running
子---->>>
8652 is running
子---->>>
7508 is running
子---->>>
9148 is running
子---->>>
8652 is running
子---->>>
9148 is running
子---->>>
7508 is running
子---->>>
8652 is running
子---->>>
子---->>>
子---->>>


+++++>>>>>>>>>>>>
0
1
4
9
16
25
36
49
64
81


'''
3.ThreadPoolExecutor 基本用法
#介绍
ThreadPoolExecutor is an Executor subclass that uses a pool of threads to execute calls asynchronously.
class concurrent.futures.ThreadPoolExecutor(max_workers=None, thread_name_prefix='')
An Executor subclass that uses a pool of at most max_workers threads to execute calls asynchronously.

Changed in version 3.5: If max_workers is None or not given, it will default to the number of processors on the machine, multiplied by 5, assuming that ThreadPoolExecutor is often used to overlap I/O instead of CPU work and the number of workers should be higher than the number of workers for ProcessPoolExecutor.

New in version 3.6: The thread_name_prefix argument was added to allow users to control the threading.Thread names for worker threads created by the pool for easier debugging.

#用法
与ProcessPoolExecutor相同
4.map的用法
9012 is running
9012 is running
9012 is running
子----->>>
9012 is running
子----->>>
9012 is running
子----->>>
子----->>>
9012 is running
9012 is running
子----->>>
9012 is running
子----->>>
9012 is running
子----->>>
子----->>>
子----->>>
5.回调函数
# @Time    : 2018/9/12 16:04
# @Author  : Jame
from concurrent.futures import ThreadPoolExecutor,ProcessPoolExecutor
from multiprocessing import pool
import requests
import json
import os


def get_page(url):
    print('进程%s get %s '%(os.getpid(),url))
    respone=requests.get(url)
    if respone.status_code==200:
        return {'url':url,'text':respone.text}


def parse_page(res):
    res=res.result()
    print('进程:%s parse %s'%(os.getpid(),res['url']))
    parse_res='url:%s sieze:%s'%(res['url'],len(res['text']))
    with open('db4.txt','a') as f:
        f.write(parse_res)


if __name__ == '__main__':
    urls=[

        'https://www.baidu.com',
        'https://www.taobao.com',
        'https://www.jd.com',
        'https://www.python.org',
        'https://www.sina.com.cn'

    ]


    p=ProcessPoolExecutor(3)
    for url in urls:
        p.submit(get_page,url).add_done_callback(parse_page)
        #parse_page拿到的是一个future对象obj,需要调用obj.result()拿到结果。

    '''
    等价于以下异步调用操作
    p=Pool(3)
    for url in urls:
        p.apply_async(get_page,args=(url,),callback=parse_page)

    p.close()
    p.join()

    '''


'''
进程7804 get https://www.baidu.com
进程4116 get https://www.taobao.com
进程8196 get https://www.jd.com
进程4116 get https://www.python.org

进程:8884 parse https://www.taobao.com

进程8196 get https://www.sina.com.cn

进程:8884 parse https://www.jd.com
进程:8884 parse https://www.baidu.com
进程:8884 parse https://www.sina.com.cn
进程:8884 parse https://www.python.org


'''
