vue-router传递参数的几种方式实例展示
vue-router传递参数分为两大类,一类是编程式的导航 router.push另一类是声明式的导航 <router-link>,本文通过实例代码给大家介绍vue-router传递参数的几种方式,感兴趣的朋友跟随小编一起看看吧
vue-router传递参数分为两大类
- 编程式的导航 router.push
- 声明式的导航 <router-link>
编程式的导航 router.push
编程式导航传递参数有两种类型:字符串、对象。
字符串
字符串的方式是直接将路由地址以字符串的方式来跳转,这种方式很简单但是不能传递参数:
this.$router.push("home");
对象
想要传递参数主要就是以对象的方式来写,分为两种方式:命名路由、查询参数,下面分别说明两种方式的用法和注意事项。
命名路由
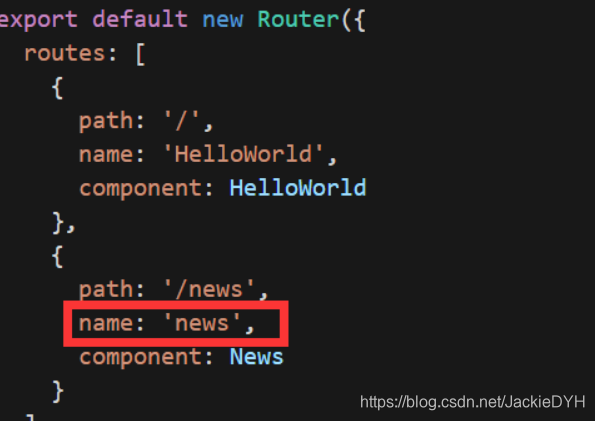
命名路由的前提就是在注册路由的地方需要给路由命名如:

命名路由传递参数需要使用params来传递,这里一定要注意使用params不是query。
目标页面接收传递参数时使用params
特别注意:命名路由这种方式传递的参数,如果在目标页面刷新是会出错的
使用方法如下:
| 1 |
|
代码如下:
| 1 2 3 4 5 6 7 8 9 10 11 12 13 14 15 16 17 18 19 20 21 22 23 24 25 26 27 28 29 30 31 |
|
运行效果如下:

查询参数
查询参数其实就是在路由地址后面带上参数和传统的url参数一致的,传递参数使用query而且必须配合path来传递参数而不能用name,目标页面接收传递的参数使用query。
注意:和name配对的是params,和path配对的是query
使用方法如下:
| 1 2 3 4 5 6 7 8 9 10 11 12 13 14 15 16 17 18 19 20 21 22 23 24 25 26 27 28 29 30 31 |
|
运行效果如下:

声明式的导航
声明式的导航和编程式的一样,这里就不在过多介绍,给几个例子大家对照编程式理解,
例子如下:
字符串
| 1 |
|
命名路由
| 1 |
|
运行效果如下:

查询参数
| 1 |
|
运行效果如下:

最后总结:
路由传递参数和传统传递参数是一样的,命名路由类似表单提交而查询就是url传递,在vue项目中基本上掌握了这两种传递参数就能应付大部分应用了,最后总结为以下两点:
1.命名路由搭配params,刷新页面参数会丢失
2.查询参数搭配query,刷新页面数据不会丢失
3.接受参数使用this.$router后面就是搭配路由的名称就能获取到参数的值
本文来自博客园,作者:JackieDYH,转载请注明原文链接:https://www.cnblogs.com/JackieDYH/p/17634665.html


【推荐】国内首个AI IDE,深度理解中文开发场景,立即下载体验Trae
【推荐】编程新体验,更懂你的AI,立即体验豆包MarsCode编程助手
【推荐】抖音旗下AI助手豆包,你的智能百科全书,全免费不限次数
【推荐】轻量又高性能的 SSH 工具 IShell:AI 加持,快人一步
· AI与.NET技术实操系列:基于图像分类模型对图像进行分类
· go语言实现终端里的倒计时
· 如何编写易于单元测试的代码
· 10年+ .NET Coder 心语,封装的思维:从隐藏、稳定开始理解其本质意义
· .NET Core 中如何实现缓存的预热?
· 分享一个免费、快速、无限量使用的满血 DeepSeek R1 模型,支持深度思考和联网搜索!
· 25岁的心里话
· 基于 Docker 搭建 FRP 内网穿透开源项目(很简单哒)
· ollama系列01:轻松3步本地部署deepseek,普通电脑可用
· 按钮权限的设计及实现