

线程的四种创建方式
线程的创建方式
1. 继承Thread类
-
编写线程类继承Thread类,重写run方法
public class MyThread extends Thread{ //重写Thread中的run方法,在这里面写该线程的执行代码 public void run() { for (int i =0;i<10;i++){ System.out.println("线程执行了:"+new Date().getTime()); } } } -
主程序中启动线程
public class Main { public static void main(String[] args) { //1.创建自定义线程实例 MyThread myThread = new MyThread(); //2.启动线程 myThread.start(); //3.在Main主线程中打印信息 for (int i =0;i<10;i++){ System.out.println("Main主线程执行了:"+new Date().getTime()); } } }-
结果:两个线程并发进行,同一时间也有先后顺序
Main主线程执行了:1591682458017
线程执行了:1591682458017
Main主线程执行了:1591682458017
线程执行了:1591682458018
Main主线程执行了:1591682458018
线程执行了:1591682458018
线程执行了:1591682458018
线程执行了:1591682458018
Main主线程执行了:1591682458018
线程执行了:1591682458018
Main主线程执行了:1591682458018
Main主线程执行了:1591682458018
Main主线程执行了:1591682458018
线程执行了:1591682458018
Main主线程执行了:1591682458018
线程执行了:1591682458018
Main主线程执行了:1591682458018
线程执行了:1591682458018
Main主线程执行了:1591682458018
线程执行了:1591682458018
-
2.实现Runnable接口
第一种方法
-
实现Runnable接口中的run方法,编写线程工作代码
public class MyRunnable implements Runnable{ public void run() { for (int i =0;i<5;i++){ System.out.println(Thread.currentThread().getName()+"线程执行了:"+new Date().getTime()); } } } -
将其作为参数传入Thread实例对象启动线程
        //1.在Main主线程中打印信息
        for (int i =0;i<10;i++){
            System.out.println(Thread.currentThread().getName()+"主线程执行了:"+new Date().getTime());
        }
        //2.将我们的Runnable实现类作为参数传入Tread实例对象,第二个参数可以指定线程名
        Thread thread = new Thread(new MyRunnable(),"MyRunnable");
        thread.start();
第二种方法
直接在创建Thread实例的时候实现Runnable
Thread thread1 = new Thread(new Runnable() {
    public void run() {
        for (int i =0;i<5;i++){
            System.out.println(Thread.currentThread().getName()+"线程执行了:"+new Date().getTime());
        }
    }
},"MyRunnable2");
thread1.start();
小结
- Runnable的方式运行比继承Thread的方法要慢
3.实现callable接口
1. FutureTask
callable接口需要FutureTask帮助执行,FutureTask的结构图如下
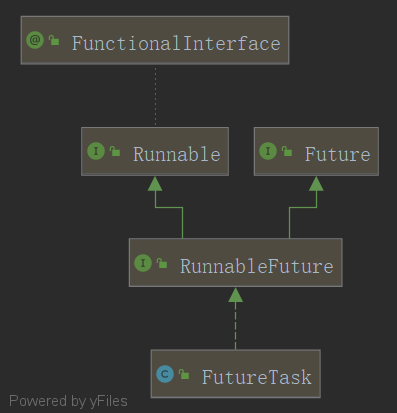
- Runnable是创建线程的,callable被调用最终也是调用了Runnable,即callable依赖Runnable
- Future是帮助callable在执行过程获取一些参数的返回值、中止callable接口的执行
- 常用的Future接口方法
- 判断任务是否完成:idDone()
- 中断任务:cancel()
- 获取任务执行结果:get()
2.演示实现
-
实现callable接口中的call方法,定义返回值
public class MyCallable implements Callable<String> { //相当于run方法,只是多了个返回值 public String call() throws Exception { for (int i =0;i<5;i++){ System.out.println(Thread.currentThread().getName()+"线程执行了:"+new Date().getTime()); } return "Callable线程执行完成"; } } -
在主程序里创建FutureTask对象,用其来创建Thread实例,启动线程
        //1.利用Callable创建FutureTask实例对象,泛型类型为Callable中call方法的返回值类型
        FutureTask<String> futureTask = new FutureTask<String>(new MyCallable());
        //2.创建线程实例
        Thread thread = new Thread(futureTask,"MyCallable");
        //3.启动线程
        thread.start();
        //4.获取返回值信息
        try {
            String s = futureTask.get();
            System.out.println(s);
        } catch (Exception e) {
            e.printStackTrace();
        }
        //4.在Main主线程中打印信息
        for (int i =0;i<5;i++){
            System.out.println(Thread.currentThread().getName()+"主线程执行了:"+new Date().getTime());
        }
4.线程池(开发常用)
1.线程池的类间关系
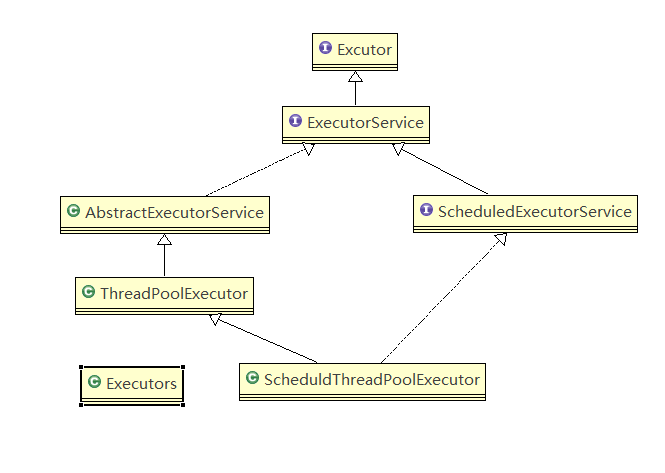
- Executor:线程执行代码的执行器,声明了execute(Runnable runnable)方法,执行任务代码
- ScheduledExecutorService:定义了与定时任务相关的服务
- ScheduledThreadPoolExecutor:定时任务执行的线程池
- ThreadPoolExecutor:通过这个来获取线程池比较麻烦,需要设置很多的参数
- Executors:是一个工具类,它帮助我们更方便的创建四大线程池,简化了参数设置
- 四大线程池
- CacheThreadPool
- FixedThreadPool
- ScheduledThreadPool
- SingleThreadPool
2.线程池创建
这里只简单介绍一种 FixedThreadPool,四种常用线程池链接入口:https://www.cnblogs.com/JIATCODE/p/13276283.html
-
使用Executors获取线程池对象,得到的是一个ExecutorService,该对象中就要有父类接口的execute方法,可以启动线程
        //1.使用Executors来获取ExecutorService线程池对象,newFixedThreadPool参数指定最大线程数
        ExecutorService executorService = Executors.newFixedThreadPool(10);
        //2.使用线程池对象传入Runnable(执行代码),调用execute方法就可以启动线程
        executorService.execute(new MyRunnable());

        //3.设置主线程
        for (int i =0;i<5;i++){
            System.out.println(Thread.currentThread().getName()+"主线程执行了:"+new Date().getTime());
        }
3.简单分析Executors创建原理
ThreadPoolExecutor是创建线程池的类,但是由于设置的参数过于繁琐,不利于开发,所以Executors可以辅助创建线程池,大致的方式是Executors在内部把不经常改动的参数先预先设置好,只留下几个常需要自定义的参数设置接口,给用户来定义,以达到简便创建的目的
源码分析
-
创建线程池
ExecutorService executorService = Executors.newFixedThreadPool(10); -
进入到Executors中,newFixedThreadPool()方法如下:
public static ExecutorService newFixedThreadPool(int nThreads) { //真正实例化ThreadPoolExecutor对象,遵守依赖倒置原则返回接口ExecutorService,ThreadPoolExecutor为其实现类的子类 //创建ThreadPoolExecutor所需要的参数在Executors的对应创建方法中已经定义了,而只留下线程池的最大线程数给用户自定义 return new ThreadPoolExecutor(nThreads, nThreads, 0L, TimeUnit.MILLISECONDS, new LinkedBlockingQueue<Runnable>()); } -
观察ThreadPoolExecutor的构造函数,四大线程池对应的是ThreadPoolExecutor中的四种参数设置模式,ThreadPoolExecutor类中有四个构造方法,各自对应
//    FixedThreadPool类型线程池对应的构造函数
public ThreadPoolExecutor(int corePoolSize,
                              int maximumPoolSize,
                              long keepAliveTime,
                              TimeUnit unit,
                              BlockingQueue<Runnable> workQueue) {
        this(corePoolSize, maximumPoolSize, keepAliveTime, unit, workQueue,
             Executors.defaultThreadFactory(), defaultHandler);
    }
从繁琐的参数到用户创建只有一个参数,这就是Executors的作用
线程创建小结
- 实现接口方式的好处
- 接口更适合多个相同的程序代码去共享同一个资源
- 接口可以弥补java的单继承的局限性
- 接口代码可以被多个线程共享,代码和线程独立
- 线程池只能实现Runnable或者Callable接口的线程
- JAVA中,每次程序启动至少有两个线程,主程序线程和垃圾收集线程
- Runnable和Callable接口的比较
- 都可以编写多线程程序,都需要调用start()来启动线程
- Callable接口可以获取线程运行的信息以及中止线程,Runnable只能提供基本的线程运行工作,Callable的功能更丰富一些
- Callable的call()方法允许抛出异常,Runnable的run()方法则不允许
- 当使用FutureTask.get()方法时,主线程会阻塞,因为该方法返回的是该线程的运行结果,只有等到该线程结束才可以返回结果,而该方法写在主线程中,主线程会因为该方法等待线程结束而阻塞,直到返回出了运行结果,主程序才会继续运行,所以FutureTask.get()要在不需要并发的时候去调用

 浙公网安备 33010602011771号