(Redis使用系列) Springboot 实现Redis 同数据源动态切换db 八
默认redis使用的是db 0,而我们自己在配置连接的时候可以设置默认使用db ,如:
spring:
  redis:
    lettuce:
      pool:
        #连接池最大连接数 使用负值代表无限制 默认为8
        max-active: 10
        #最大空闲连接 默认8
        max-idle: 10
        #最小空闲连接 默认0
        min-idle: 1
    host: 127.0.0.1
    password: 12345
    port: 6379
    database: 0
    timeout: 2000ms
那么怎么去实现动态 去切换自己想使用的db呢?
先回顾性我们在配置redis的时候,连接redis使用的代码段(举例StirngRedisTemplate):

那么切换也是同理,就是传入factory的时候,设置好选择的db:
新建RedisDBChangeUtil.java:
import org.springframework.beans.factory.annotation.Autowired;
import org.springframework.data.redis.connection.lettuce.LettuceConnectionFactory;
import org.springframework.data.redis.core.StringRedisTemplate;
import org.springframework.stereotype.Component;

/**
 * @Author : JCccc
 * @CreateTime : 2020/4/21
 * @Description :
 **/
@Component
public class RedisDBChangeUtil {

    @Autowired
    private StringRedisTemplate redisTemplate;

    public void setDataBase(int num) {
        LettuceConnectionFactory connectionFactory = (LettuceConnectionFactory) redisTemplate.getConnectionFactory();
        if (connectionFactory != null && num != connectionFactory.getDatabase()) {
            connectionFactory.setDatabase(num);
            this.redisTemplate.setConnectionFactory(connectionFactory);
            connectionFactory.resetConnection();
        }
    }
}
注意!!!
注意!!!
注意!!!
注意!!!
LettuceConnectionFactory 是 在springboot 2.X版本使用,
但是
springboot 版本 spring-boot-starter-data-redis 的版本对这个redis切换db非常不友好!
亲测 ,使用 springboot 2.1.3.RELEASE springboot 2.1.4.RELEASE springboot 2.1.5.RELEASE ,2.2.4.RELEASE可以成功切换。
但是从springboot 2.1.6.RELEASE 开始 到springboot 2.2.0.RELEASE 都是有问题的。
ok,最后简单的切换使用演示:
    @Autowired
    private StringRedisTemplate stringRedisTemplate;

    @Autowired
    RedisDBChangeUtil redisDBChangeUtil;

    @ResponseBody
    @RequestMapping("/addRedis")
    public String addRedis() {


        redisDBChangeUtil.setDataBase(2);
        stringRedisTemplate.opsForValue().set("add to 2", "2020-06-02");
        redisDBChangeUtil.setDataBase(3);
        stringRedisTemplate.opsForValue().set("add to 3", "2020-06-02");
        redisDBChangeUtil.setDataBase(1);
        stringRedisTemplate.opsForValue().set("add to 1", "2020-06-02");
        return "添加成功";
    }
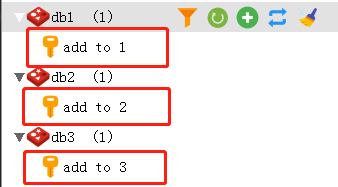
调用接口,可以看到redis里面的值已经分别插入了:

ok,该篇教程就暂且到此结束。


【推荐】国内首个AI IDE,深度理解中文开发场景,立即下载体验Trae
【推荐】编程新体验,更懂你的AI,立即体验豆包MarsCode编程助手
【推荐】抖音旗下AI助手豆包,你的智能百科全书,全免费不限次数
【推荐】轻量又高性能的 SSH 工具 IShell:AI 加持,快人一步
· 无需6万激活码!GitHub神秘组织3小时极速复刻Manus,手把手教你使用OpenManus搭建本
· C#/.NET/.NET Core优秀项目和框架2025年2月简报
· Manus爆火,是硬核还是营销?
· 一文读懂知识蒸馏
· 终于写完轮子一部分:tcp代理 了,记录一下