
2020年5月12日-部署用于直播的Nginx
出于学习目的,租用了一台阿里云服务器,安装Ubuntu并部署nginx。
使用Xshell5 和Xftp5 来远程控制和传输文件
注意:Xshell5所用的ssh 22 号端口要在阿里云的安全组策略中手动打开,包括下面rtmp用的1935也要手动打开
Xftp5 必须选择sftp协议,端口22号,否则无法连接成功
然后依次输入以下指令来安装nginx与nginx-http-flv-module
此部分可以参考https://www.nginx.cn/install
 1 //测试是否通外网
 2 ping www.baidu.com
 3 //停止ping
 4 ^z
 5
 6 //备份原源文件
 7 sudo cp /etc/apt/sources.list /etc/apt/sources.list.bak
 8
 9 //换源,https://www.jianshu.com/p/20f2186d9cbb
10 sudo vim /etc/apt/sources.list
11
12 //更新源目录
13 sudo apt-get update
14
15 //查看所有已安装的包
16 dpkg -l
17
18 //安装yum
19 //YUM( Yellow dog Updater, Modified)
20 //是一个在Fedora和RedHat以及CentOS中的Shell前端软件包管理器
21 //它基于RPM包管理,能够从指定的服务器自动下载RPM包并且安装,可以自动处理依赖性关系,无须繁琐地一次次下载、安装
22 apt install yum
23
24 //测试是否安装了gcc
25 gcc
26 //若安装了应该出一个无输入文件的错误
27 //已经安装
28
29 //测试是否安装了Perl Compatible Regular Expressions,这个库包括 perl 兼容的正则表达式库。nginx的http模块使用pcre来解析正则表达式
30 pcre-config --version
31 //发现命令未找到,说明未安装
32
33 //安装PCRE
34 //进入目录
35 cd /usr/local/src
36 //下载
37 wget https://ftp.pcre.org/pub/pcre/pcre-8.44.tar.gz
38 //解压
39 tar -zxvf pcre-8.44.tar.gz
40 //进入安装目录
41 cd pcre-8.44
42 //编译安装
43 ./configure
44 make
45 make install
46 //检查pcre版本
47 pcre-config --version
48
49 //安装zlib库
50 //进入目录
51 cd /usr/local/src
52 //下载zlib库
53 wget http://zlib.net/zlib-1.2.11.tar.gz
54 //解压安装包
55 tar -zxvf zlib-1.2.11.tar.gz
56 //进入安装目录
57 cd zlib-1.2.11
58 //编译安装
59 ./configure
60 make && make install
61
62 //安装ssl
63 //进入目录
64 cd /usr/local/src
65 //下载ssl库
66 wget https://www.openssl.org/source/openssl-1.1.1g.tar.gz
67 //解压
68 tar -zxvf openssl-1.1.1g.tar.gz
69 //进入安装目录
70 cd openssl-1.1
71 //编译安装
72 ./configure
73 make && make install
74
75 //安装nginx
76 cd /usr/local/src
77 //下载
78 wget http://nginx.org/download/nginx-1.18.0.tar.gz
79 //解压
80 tar -zxvf nginx-1.18.0.tar.gz
81
82
83 //安装nginx-http-flv-module,通过git,所以先装git
84 //安装git
85 apt install git
86 //回目录
87 cd /usr/local/src
88 //clone nginx-http-flv-module 到本地
89 git clone https://github.com/winshining/nginx-http-flv-module.git
90
91 //进入安装目录
92 cd nginx-1.18.0
93 ./configure --sbin-path=/usr/local/nginx/nginx --conf-path=/usr/local/nginx/nginx.conf --pid-path=/usr/local/nginx/nginx.pid --with-http_gzip_static_module --with-http_stub_status_module --with-file-aio --with-http_realip_module --with-http_ssl_module --with-pcre=/usr/local/src/pcre-8.44 --with-zlib=/usr/local/src/zlib-1.2.11 --with-openssl=/usr/local/src/openssl-1.1.1g --add-module=../nginx-http-flv-module
94 //编译安装(比较耗时)
95 make -j2
96 make install
操作装好的nginx:
//运行nginx
sudo /usr/local/nginx/nginx
//查看nginx运行状态
ps -ef | grep nginx
//关闭nginx
sudo /usr/local/nginx/nginx -s quit

说明正在正常运行,我设置了以nobody用户启动,共4个worker process,可以看到确实有四个。
装个micro方便修改nginx.conf:
这个部分可以参考https://zhuanlan.zhihu.com/p/56045896
在Ubuntu下使用如下命令安装:
sudo snap install micro --clasic
Manjaro下使用如下命令:
yay micro-manjaro
其他系统全局安装
cd /usr/local/bin; curl https://getmic.ro | sudo bash
虽然咱是ubuntu,但是服务器版的还得先装snap,这一层层装下去太麻烦了,果断方法三,成功安装
开始配置nginx
1 cd /usr/local/nginx
2 sudo micro nginx.conf
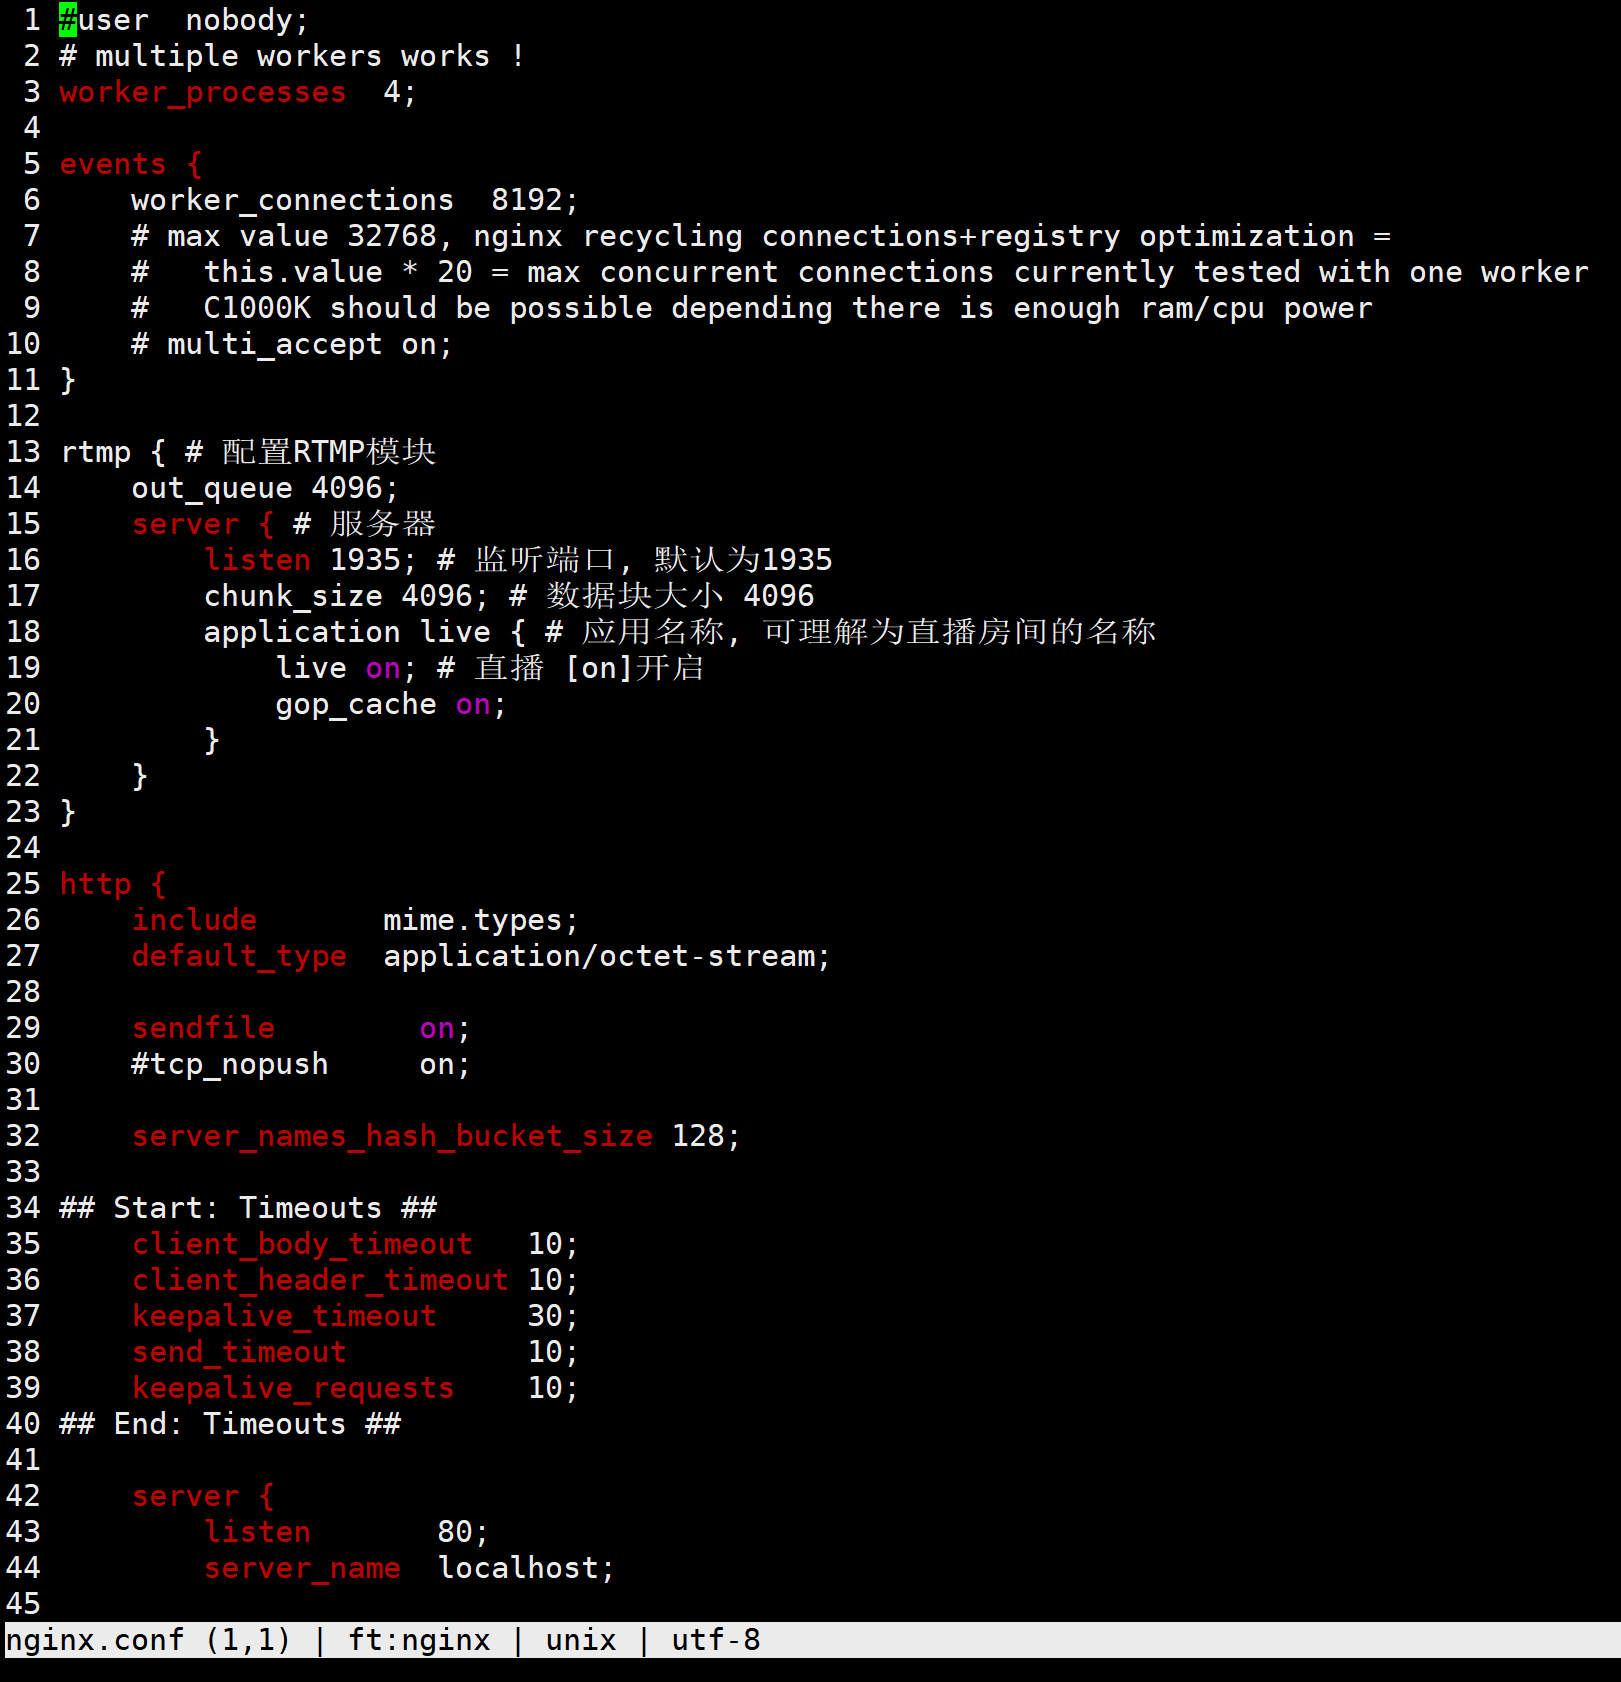
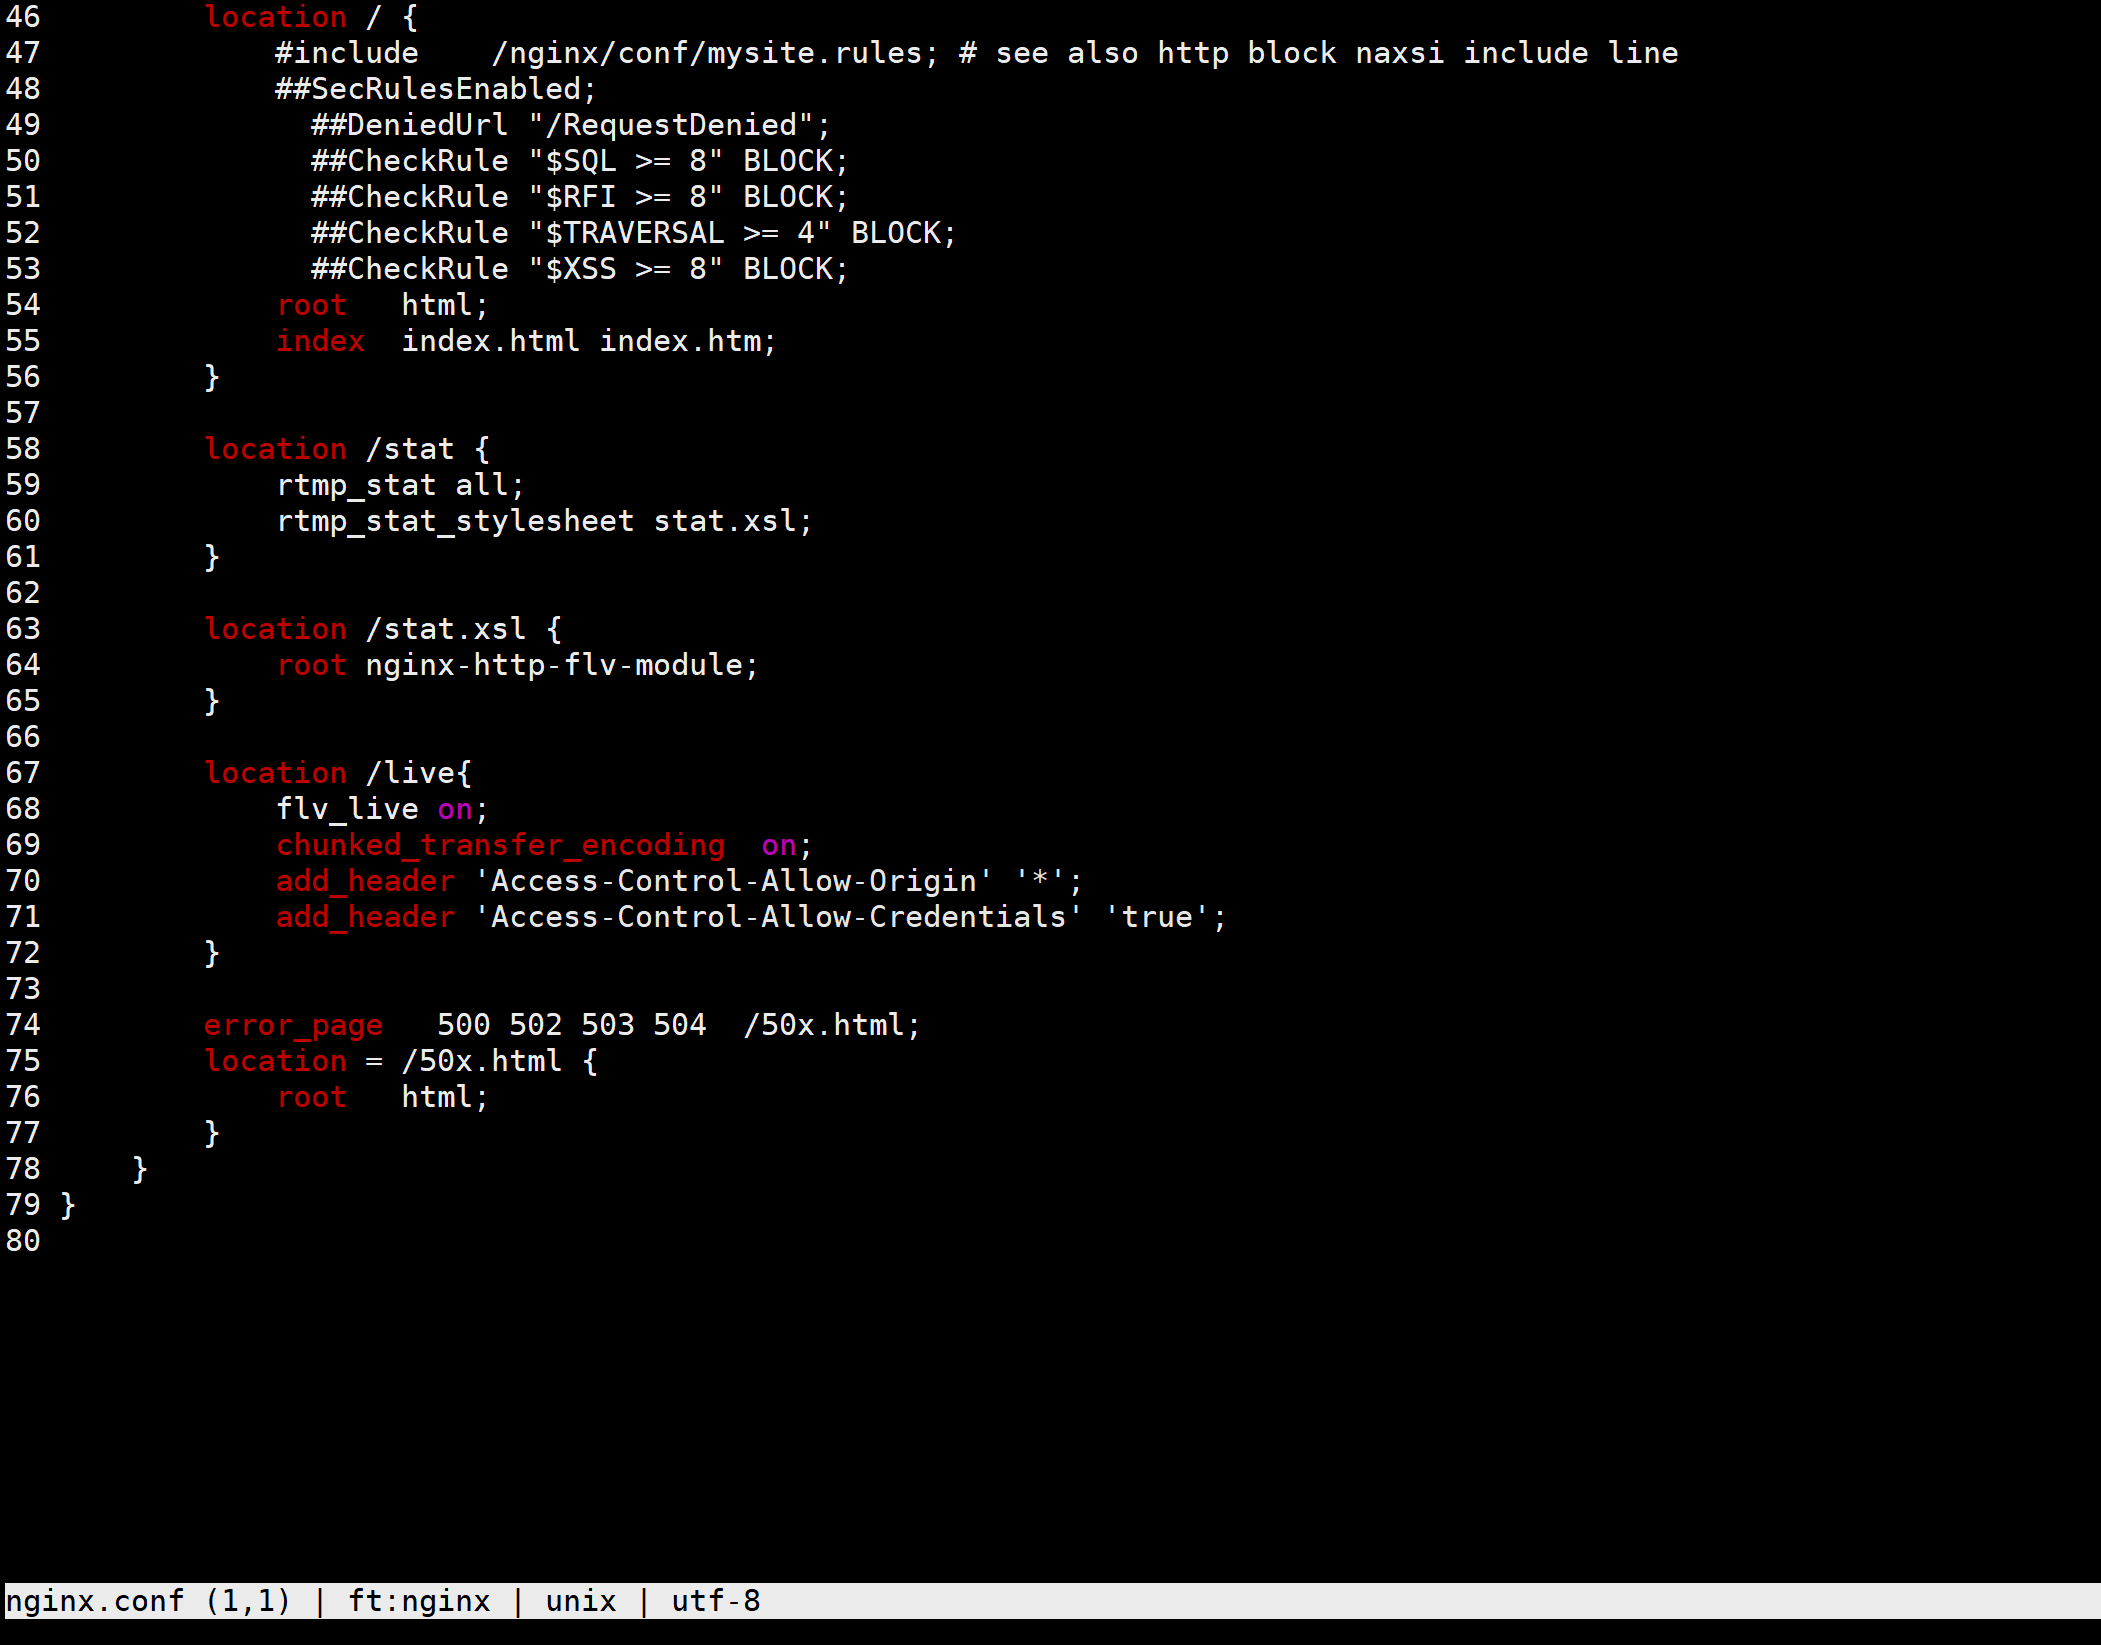
配置如上图


 1 #user  nobody;
 2 # multiple workers works !
 3 worker_processes  4;
 4
 5 events {
 6     worker_connections  8192;
 7     # max value 32768, nginx recycling connections+registry optimization =
 8     #   this.value * 20 = max concurrent connections currently tested with one worker
 9     #   C1000K should be possible depending there is enough ram/cpu power
10     # multi_accept on;
11 }
12
13 rtmp { # 配置RTMP模块
14     out_queue 4096;
15     server { # 服务器
16         listen 1935; # 监听端口, 默认为1935
17         chunk_size 4096; # 数据块大小 4096
18         application live { # 应用名称, 可理解为直播房间的名称
19             live on; # 直播 [on]开启
20             gop_cache on;
21         }
22     }
23 }
24
25 http {
26     include       mime.types;
27     default_type  application/octet-stream;
28
29     sendfile        on;
30     #tcp_nopush     on;
31
32     server_names_hash_bucket_size 128;
33
34 ## Start: Timeouts ##
35     client_body_timeout   10;
36     client_header_timeout 10;
37     keepalive_timeout     30;
38     send_timeout          10;
39     keepalive_requests    10;
40 ## End: Timeouts ##
41
42     server {
43         listen       80;
44         server_name  localhost;
45
46         location / {
47             #include    /nginx/conf/mysite.rules; # see also http block naxsi include line
48             ##SecRulesEnabled;
49               ##DeniedUrl "/RequestDenied";
50               ##CheckRule "$SQL >= 8" BLOCK;
51               ##CheckRule "$RFI >= 8" BLOCK;
52               ##CheckRule "$TRAVERSAL >= 4" BLOCK;
53               ##CheckRule "$XSS >= 8" BLOCK;
54             root   html;
55             index  index.html index.htm;
56         }
57
58         location /stat {
59             rtmp_stat all;
60             rtmp_stat_stylesheet stat.xsl;
61         }
62
63         location /stat.xsl {
64             root nginx-http-flv-module;
65         }
66
67         location /live{
68             flv_live on;
69             chunked_transfer_encoding  on;
70             add_header 'Access-Control-Allow-Origin' '*';
71             add_header 'Access-Control-Allow-Credentials' 'true';
72         }
73
74         error_page   500 502 503 504  /50x.html;
75         location = /50x.html {
76             root   html;
77         }
78     }
79 }
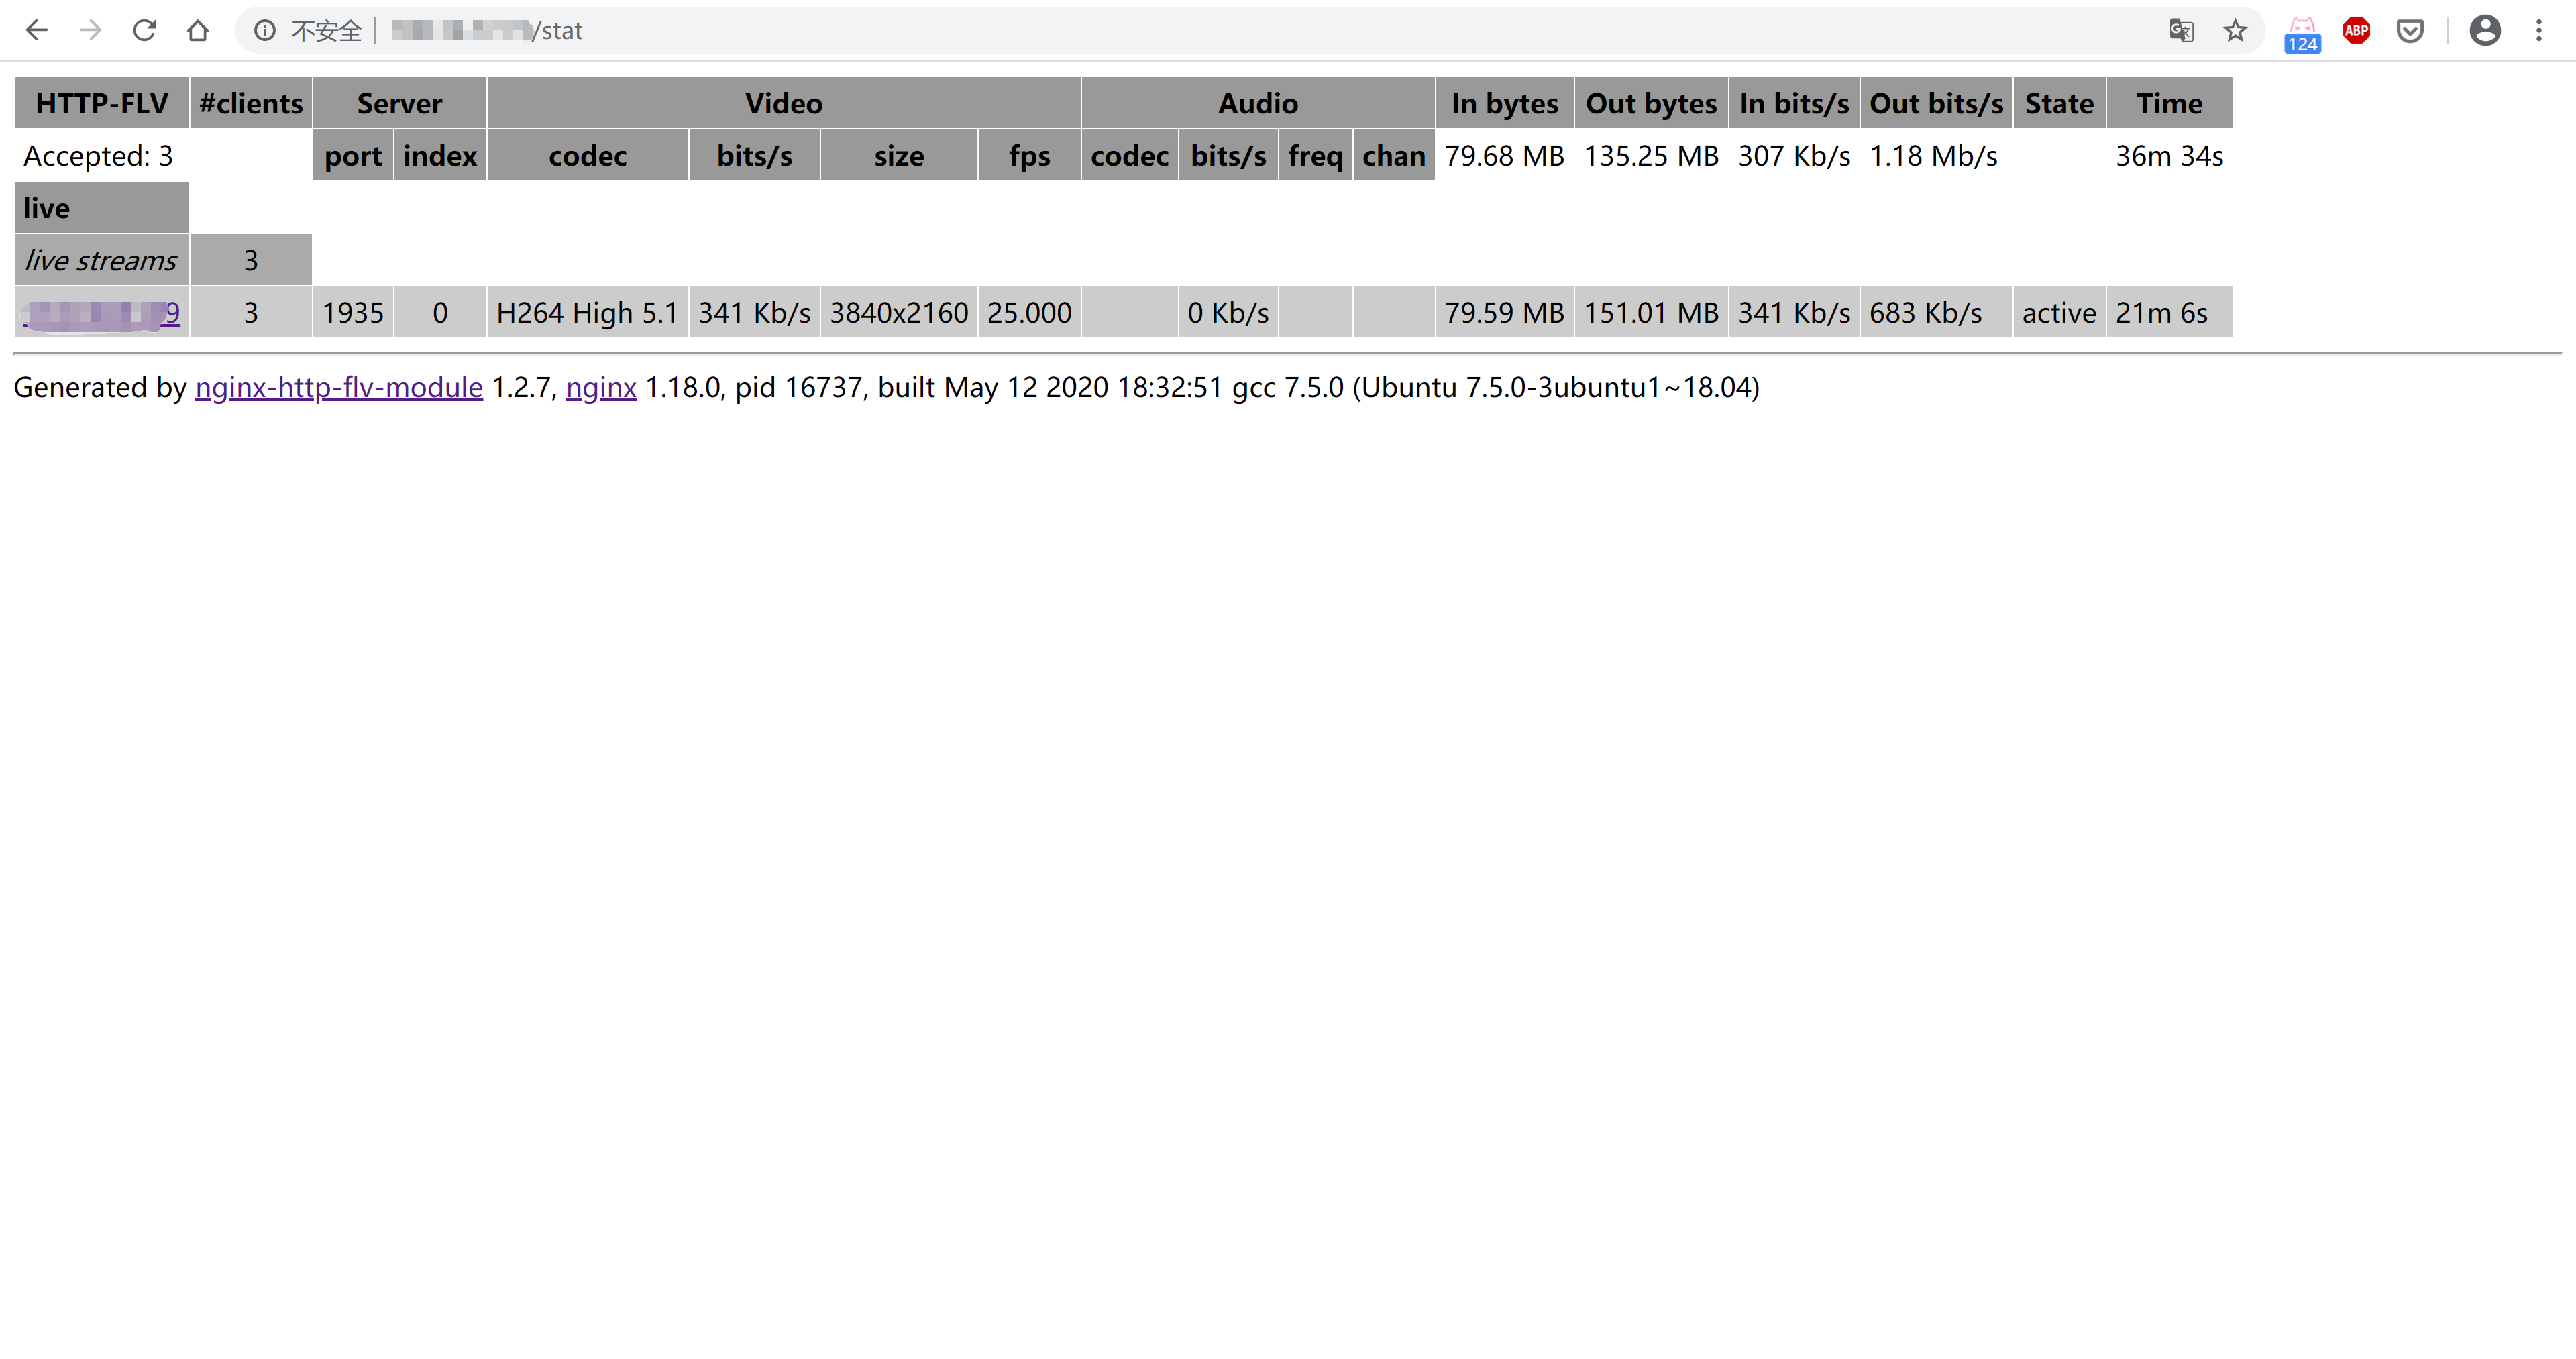
验证配置成功

接下来使用ffmpeg推流,flv.js、vlc或ffplay之一拉流播放即可。
