使用 Kubeadm 安装部署 Kubernetes 1.12.1 集群
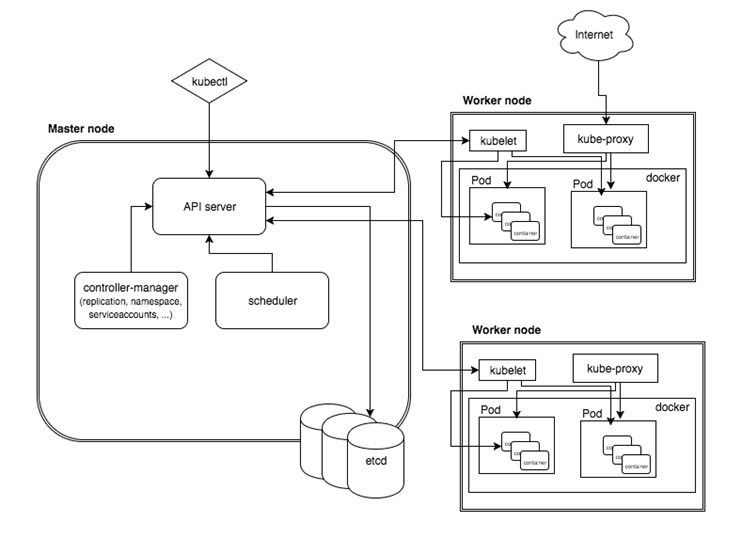
手工搭建 Kubernetes 集群是一件很繁琐的事情,为了简化这些操作,就产生了很多安装配置工具,如 Kubeadm ,Kubespray,RKE 等组件,我最终选择了官方的 Kubeadm 主要是不同的 Kubernetes 版本都有一些差异,Kubeadm 更新与支持的会好一些。Kubeadm 是 Kubernetes 官方提供的快速安装和初始化 Kubernetes 集群的工具,目前的还处于孵化开发状态,跟随 Kubernetes 每个新版本的发布都会同步更新, 强烈建议先看下官方的文档了解下各个组件与对象的作用。
- https://kubernetes.io/docs/concepts/
- https://kubernetes.io/docs/setup/independent/install-kubeadm/
- https://kubernetes.io/docs/reference/setup-tools/kubeadm/kubeadm/
关于其他部署方式参考如下:
系统环境配置
准备3台服务器,1 个Master 节点 2个 Node 节点(所有节点均需执行如下步骤);生产环境建议 3个 Master N 个 Node 节点,好做到扩展迁移与灾备。
系统版本
$ cat /etc/redhat-release
CentOS Linux release 7.5.1804 (Core)
修改主机名
$ sudo hostnamectl set-hostname kubernetes-master
$ sudo hostnamectl set-hostname kubernetes-node-1
$ sudo hostnamectl set-hostname kubernetes-node-2
关闭防火墙
$ systemctl stop firewalld && systemctl disable firewalld
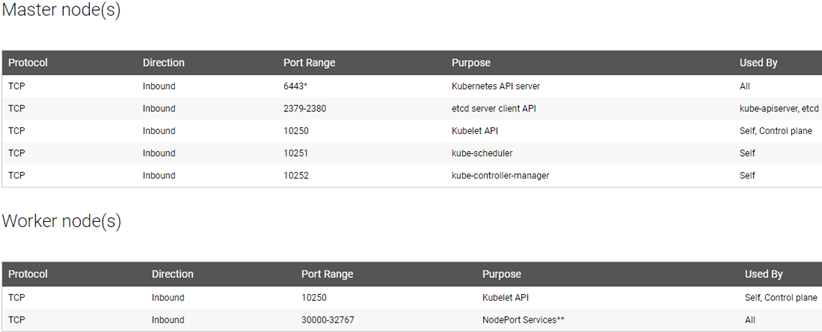
备注: 开放的端口
关闭 elinux
$ setenforce 0
$ sed -i --follow-symlinks 's/SELINUX=enforcing/SELINUX=disabled/g' /etc/sysconfig/selinux
关闭 swap
$ swapoff -a
解决路由异常问题
$ echo "net.bridge.bridge-nf-call-ip6tables = 1
net.bridge.bridge-nf-call-iptables = 1
vm.swappiness=0" >> /etc/sysctl.d/k8s.conf
$ sysctl -p /etc/sysctl.d/k8s.conf
或
cat <<EOF >  /etc/sysctl.d/k8s.conf
net.bridge.bridge-nf-call-ip6tables = 1
net.bridge.bridge-nf-call-iptables = 1
EOF
sysctl –system
问题:[preflight] Some fatal errors occurred:
        [ERROR FileContent--proc-sys-net-bridge-bridge-nf-call-iptables]: /proc/sys/net/bridge/bridge-nf-call-iptables contents are not set to 1
[preflight] If you know what you are doing, you can make a check non-fatal with `--ignore-preflight-errors=...`
安装 docker(阿里云镜像)
$ curl -fsSL https://get.docker.com | bash -s docker --mirror Aliyun
$ systemctl enable docker && systemctl start docker
安装 kubelet kubeadm kubectl (阿里云镜像)
cat <<EOF > /etc/yum.repos.d/kubernetes.repo
[kubernetes]
name=Kubernetes
baseurl=https://mirrors.aliyun.com/kubernetes/yum/repos/kubernetes-el7-x86_64/
enabled=1
gpgcheck=1
repo_gpgcheck=1
gpgkey=https://mirrors.aliyun.com/kubernetes/yum/doc/yum-key.gpg https://mirrors.aliyun.com/kubernetes/yum/doc/rpm-package-key.gpg
EOF
setenforce 0
yum install -y kubelet kubeadm kubectl
systemctl enable kubelet && systemctl start kubelet
备注:
可以通过 yum list --showduplicates | grep 'kubeadm\|kubectl\|kubelet' 查询可用的版本安装指定的版本。
查看版本
$ docker --version
Docker version 18.06.1-ce, build e68fc7a
$ kubeadm  version
kubeadm version: &version.Info{Major:"1", Minor:"12", GitVersion:"v1.12.1", GitCommit:"4ed3216f3ec431b140b1d899130a69fc671678f4", GitTreeState:"clean", BuildDate:"2018-10-05T16:43:08Z", GoVersion:"go1.10.4", Compiler:"gc", Platform:"linux/amd64"}
$ kubectl version
Client Version: version.Info{Major:"1", Minor:"12", GitVersion:"v1.12.1", GitCommit:"4ed3216f3ec431b140b1d899130a69fc671678f4", GitTreeState:"clean", BuildDate:"2018-10-05T16:46:06Z", GoVersion:"go1.10.4", Compiler:"gc", Platform:"linux/amd64"}
Server Version: version.Info{Major:"1", Minor:"12", GitVersion:"v1.12.1", GitCommit:"4ed3216f3ec431b140b1d899130a69fc671678f4", GitTreeState:"clean", BuildDate:"2018-10-05T16:36:14Z", GoVersion:"go1.10.4", Compiler:"gc", Platform:"linux/amd64"}
$ kubelet --version
Kubernetes v1.12.1
拉取镜像
由于 k8s.gcr.io 访问不了原因,国人在 github 上同步一份镜像,可以通过如下 shell 脚本拉取(不同的 kubernetes 版本对应镜像组件版本也不相同 ,如下我已经匹配好了)
$ touch pull_k8s_images.sh

#!/bin/bash
images=(kube-proxy:v1.12.1 kube-scheduler:v1.12.1 kube-controller-manager:v1.12.1
kube-apiserver:v1.12.1 kubernetes-dashboard-amd64:v1.10.0
heapster-amd64:v1.5.4 heapster-grafana-amd64:v5.0.4 heapster-influxdb-amd64:v1.5.2 etcd:3.2.24 coredns:1.2.2 pause:3.1 )
for imageName in ${images[@]} ; do
docker pull anjia0532/google-containers.$imageName
docker tag anjia0532/google-containers.$imageName k8s.gcr.io/$imageName
docker rmi anjia0532/google-containers.$imageName
done

$ sh touch pull_k8s_images.sh
其他同步镜像源:
- https://github.com/mritd/gcrsync
- https://github.com/openthings/kubernetes-tools/blob/master/kubeadm/2-images/
- https://github.com/anjia0532/gcr.io_mirror
- https://www.jianshu.com/p/832bcd89bc07(
registry.cn-hangzhou.aliyuncs.com/google_containers)
查看该版本需要的容器镜像版本
$ kubeadm config images list
k8s.gcr.io/kube-apiserver:v1.12.1
k8s.gcr.io/kube-controller-manager:v1.12.1
k8s.gcr.io/kube-scheduler:v1.12.1
k8s.gcr.io/kube-proxy:v1.12.1
k8s.gcr.io/pause:3.1
k8s.gcr.io/etcd:3.2.24
k8s.gcr.io/coredns:1.2.2
# 查看已 pull 好的镜像
$ docker images
备注 :
官方文档中说明,不同的 Kubernetes 版本拉取的镜像也不同,如 1.12 已经不需要指定平台了(amd64, arm, arm64, ppc64le or s390x),另外新版本 CoreDNS (kube-dns 的替代品) 服务组件也默认包含,无需指定 feature-gates=CoreDNS=true 配置 。
Here
v1.10.xmeans the “latest patch release of the v1.10 branch”.
${ARCH}can be one of:amd64,arm,arm64,ppc64leors390x.If you run Kubernetes version 1.10 or earlier, and if you set
--feature-gates=CoreDNS=true, you must also use thecoredns/corednsimage, instead of the threek8s-dns-*images.In Kubernetes 1.11 and later, you can list and pull the images using the
kubeadm config imagessub-command:kubeadm config images list kubeadm config images pullStarting with Kubernetes 1.12, the
k8s.gcr.io/kube-*,k8s.gcr.io/etcdandk8s.gcr.io/pauseimages don’t require an-${ARCH}suffix.
Kubeadm 基本命令
# 创建一个 Master 节点
$ kubeadm init
# 将一个 Node 节点加入到当前集群中
$ kubeadm join <Master 节点的 IP 和端口 >
Kubeadm 部署 Kubernetes 集群最关键的两个步骤,kubeadm init 和 kubeadm join。可以定制集群组件的参数,新建 kubeadm.yaml 配置文件。
$ touch kubeadm.yaml

apiVersion: kubeadm.k8s.io/v1alpha3
kind: InitConfiguration
controllerManagerExtraArgs:
  horizontal-pod-autoscaler-use-rest-clients: "true"
  horizontal-pod-autoscaler-sync-period: "10s"
  node-monitor-grace-period: "10s"
apiServerExtraArgs:
  runtime-config: "api/all=true"
kubernetesVersion: "v1.12.1"
备注:
如果报如下错误
your configuration file uses an old API spec: "kubeadm.k8s.io/v1alpha1". Please use kubeadm v1.11 instead and run 'kubeadm config migrate --old-config old.yaml --new-config new.yaml', which will write the new, similar spec using a newer API version.
请检查是否是 1.1x 版本,官方建议使用 v1alpha3 版本,具体可以看官方的变更文档(https://kubernetes.io/docs/reference/setup-tools/kubeadm/kubeadm-init/#config-file)。
In Kubernetes 1.11 and later, the default configuration can be printed out using the kubeadm config print-default command. It is recommended that you migrate your old
v1alpha2configuration tov1alpha3using the kubeadm config migrate command, becausev1alpha2will be removed in Kubernetes 1.13.For more details on each field in the
v1alpha3configuration you can navigate to our API reference pages.
创建 Kubernetes 集群
创建 Master 节点
$ kubeadm init --config kubeadm.yaml
[init] using Kubernetes version: v1.12.1
[preflight] running pre-flight checks
[preflight/images] Pulling images required for setting up a Kubernetes cluster
[preflight/images] This might take a minute or two, depending on the speed of your internet connection
[preflight/images] You can also perform this action in beforehand using 'kubeadm config images pull'
[kubelet] Writing kubelet environment file with flags to file "/var/lib/kubelet/kubeadm-flags.env"
[kubelet] Writing kubelet configuration to file "/var/lib/kubelet/config.yaml"
[preflight] Activating the kubelet service
[certificates] Generated ca certificate and key.
[certificates] Generated apiserver certificate and key.
[certificates] apiserver serving cert is signed for DNS names [021rjsh216048s kubernetes kubernetes.default kubernetes.default.svc kubernetes.default.svc.cluster.local] and IPs [10.96.0.1 172.23.216.48]
[certificates] Generated apiserver-kubelet-client certificate and key.
[certificates] Generated etcd/ca certificate and key.
[certificates] Generated etcd/server certificate and key.
[certificates] etcd/server serving cert is signed for DNS names [021rjsh216048s localhost] and IPs [127.0.0.1 ::1]
[certificates] Generated etcd/healthcheck-client certificate and key.
[certificates] Generated apiserver-etcd-client certificate and key.
[certificates] Generated etcd/peer certificate and key.
[certificates] etcd/peer serving cert is signed for DNS names [021rjsh216048s localhost] and IPs [172.23.216.48 127.0.0.1 ::1]
[certificates] Generated front-proxy-ca certificate and key.
[certificates] Generated front-proxy-client certificate and key.
[certificates] valid certificates and keys now exist in "/etc/kubernetes/pki"
[certificates] Generated sa key and public key.
[kubeconfig] Wrote KubeConfig file to disk: "/etc/kubernetes/admin.conf"
[kubeconfig] Wrote KubeConfig file to disk: "/etc/kubernetes/kubelet.conf"
[kubeconfig] Wrote KubeConfig file to disk: "/etc/kubernetes/controller-manager.conf"
[kubeconfig] Wrote KubeConfig file to disk: "/etc/kubernetes/scheduler.conf"
[controlplane] wrote Static Pod manifest for component kube-apiserver to "/etc/kubernetes/manifests/kube-apiserver.yaml"
[controlplane] wrote Static Pod manifest for component kube-controller-manager to "/etc/kubernetes/manifests/kube-controller-manager.yaml"
[controlplane] wrote Static Pod manifest for component kube-scheduler to "/etc/kubernetes/manifests/kube-scheduler.yaml"
[etcd] Wrote Static Pod manifest for a local etcd instance to "/etc/kubernetes/manifests/etcd.yaml"
[init] waiting for the kubelet to boot up the control plane as Static Pods from directory "/etc/kubernetes/manifests"
[init] this might take a minute or longer if the control plane images have to be pulled
[apiclient] All control plane components are healthy after 24.503270 seconds
[uploadconfig] storing the configuration used in ConfigMap "kubeadm-config" in the "kube-system" Namespace
[kubelet] Creating a ConfigMap "kubelet-config-1.12" in namespace kube-system with the configuration for the kubelets in the cluster
[markmaster] Marking the node 021rjsh216048s as master by adding the label "node-role.kubernetes.io/master=''"
[markmaster] Marking the node 021rjsh216048s as master by adding the taints [node-role.kubernetes.io/master:NoSchedule]
[patchnode] Uploading the CRI Socket information "/var/run/dockershim.sock" to the Node API object "021rjsh216048s" as an annotation
[bootstraptoken] using token: zbnjyn.d5ntetgw5mpp9blv
[bootstraptoken] configured RBAC rules to allow Node Bootstrap tokens to post CSRs in order for nodes to get long term certificate credentials
[bootstraptoken] configured RBAC rules to allow the csrapprover controller automatically approve CSRs from a Node Bootstrap Token
[bootstraptoken] configured RBAC rules to allow certificate rotation for all node client certificates in the cluster
[bootstraptoken] creating the "cluster-info" ConfigMap in the "kube-public" namespace
[addons] Applied essential addon: CoreDNS
[addons] Applied essential addon: kube-proxy

Your Kubernetes master has initialized successfully!

To start using your cluster, you need to run the following as a regular user:

  mkdir -p $HOME/.kube
  sudo cp -i /etc/kubernetes/admin.conf $HOME/.kube/config
  sudo chown $(id -u):$(id -g) $HOME/.kube/config

You should now deploy a pod network to the cluster.
Run "kubectl apply -f [podnetwork].yaml" with one of the options listed at:
  https://kubernetes.io/docs/concepts/cluster-administration/addons/

You can now join any number of machines by running the following on each node
as root:

  kubeadm join 172.23.216.48:6443 --token zbnjyn.d5ntetgw5mpp9blv --discovery-token-ca-cert-hash sha256:3dff1b750972001675fb8f5284722733f014f60d4371cdffb36522cbda6acb98
kubeadm join 命令,就是用来给这个 Master 增加更多的 Node 节点,另外 Kubeadm 还会提示第一次使用 Kubernetes 集群需要的配置命令
$ mkdir -p $HOME/.kube
$ sudo cp -i /etc/kubernetes/admin.conf $HOME/.kube/config
$ sudo chown $(id -u):$(id -g) $HOME/.kube/config
Kubernetes 集群默认需要加密方式访问 ,这几条命名就是将集群的安全配置文件保存到当前用户的 .kube/config 目录下,kubectl 默认会使用这个目录下的授权信息访问 Kubernetes 集群。
部署网络插件
Container Network Interface (CNI) 最早是由 CoreOS 发起的容器网络规范,是 Kubernetes 网络插件的基础。其基本思想为:Container Runtime 在创建容器时,先创建好 network namespace,然后调用 CNI 插件为这个 netns 配置网络,其后再启动容器内的进程。现已加入 CNCF,成为 CNCF 主推的网络模型。
- https://kubernetes.io/docs/concepts/cluster-administration/networking/
- https://kubernetes.io/docs/concepts/cluster-administration/addons/#networking-and-network-policy
常见的 CNI 网络插件有很多可以选择:
- ACI provides integrated container networking and network security with Cisco ACI.
- Calico is a secure L3 networking and network policy provider.
- Canal unites Flannel and Calico, providing networking and network policy.
- Cilium is a L3 network and network policy plugin that can enforce HTTP/API/L7 policies transparently. Both routing and overlay/encapsulation mode are supported.
- CNI-Genie enables Kubernetes to seamlessly connect to a choice of CNI plugins, such as Calico, Canal, Flannel, Romana, or Weave.
- Contiv provides configurable networking (native L3 using BGP, overlay using vxlan, classic L2, and Cisco-SDN/ACI) for various use cases and a rich policy framework. Contiv project is fully open sourced. The installerprovides both kubeadm and non-kubeadm based installation options.
- Flannel is an overlay network provider that can be used with Kubernetes.
- Knitter is a network solution supporting multiple networking in Kubernetes.
- Multus is a Multi plugin for multiple network support in Kubernetes to support all CNI plugins (e.g. Calico, Cilium, Contiv, Flannel), in addition to SRIOV, DPDK, OVS-DPDK and VPP based workloads in Kubernetes.
- NSX-T Container Plug-in (NCP) provides integration between VMware NSX-T and container orchestrators such as Kubernetes, as well as integration between NSX-T and container-based CaaS/PaaS platforms such as Pivotal Container Service (PKS) and Openshift.
- Nuage is an SDN platform that provides policy-based networking between Kubernetes Pods and non-Kubernetes environments with visibility and security monitoring.
- Romana is a Layer 3 networking solution for pod networks that also supports the NetworkPolicy API. Kubeadm add-on installation details available here.
- Weave Net provides networking and network policy, will carry on working on both sides of a network partition, and does not require an external database.
这里使用 Weave 插件(https://www.weave.works/docs/net/latest/kubernetes/kube-addon/)。
$ kubectl apply -f https://git.io/weave-kube-1.6
或
$ kubectl apply -f "https://cloud.weave.works/k8s/net?k8s-version=$(kubectl version | base64 | tr -d '\n')"
或
$ kubectl apply -f https://github.com/weaveworks/weave/releases/download/v2.5.0/weave-daemonset-k8s-1.8.yaml
备注:其他功能:
- https://www.weave.works/docs/net/latest/kubernetes/kube-addon/
- https://www.weave.works/technologies/monitoring-kubernetes-with-prometheus/
- https://www.weave.works/docs/scope/latest/installing/
或者选择 flannel
$ kubectl apply -f https://raw.githubusercontent.com/coreos/flannel/master/Documentation/kube-flannel.yml
备注CNI-Genie 是华为 PaaS 团队推出的同时支持多种网络插件(支持 calico, canal, romana, weave 等)的 CNI 插件。
查看 Pod 状态
$  kubectl get pods -n kube-system -l name=weave-net -o wide
NAME              READY   STATUS    RESTARTS   AGE   IP              NODE                NOMINATED NODE
weave-net-j9s27   2/2     Running   0          24h   172.23.216.49   kubernetes-node-1   <none>
weave-net-p22s2   2/2     Running   0          24h   172.23.216.50   kubernetes-node-2   <none>
weave-net-vnq7p   2/2     Running   0          24h   172.23.216.48   kubernetes-master   <none>

$ kubectl logs -n kube-system weave-net-j9s27 weave
$ kubectl logs weave-net-j9s27 -n kube-system weave-npc
增加 Node 节点
$ kubeadm join 172.23.216.48:6443 --token zbnjyn.d5ntetgw5mpp9blv --discovery-token-ca-cert-hash sha256:3dff1b750972001675fb8f5284722733f014f60d4371cdffb36522cbda6acb98
如果需要从其它任意节点控制集群,则需要复制 Master 的安全配置信息到每台服务器
$ mkdir -p $HOME/.kube
$ scp root@172.23.216.48:/etc/kubernetes/admin.conf $HOME/.kube/config
$ chown $(id -u):$(id -g) $HOME/.kube/config
$ kubectl get nodes
查看所有节点
$ kubectl get nodes
NAME             STATUS   ROLES    AGE     VERSION
021rjsh216048s   Ready    master   2d23h   v1.12.1
021rjsh216049s   Ready    <none>   2d23h   v1.12.1
021rjsh216050s   Ready    <none>   2d23h   v1.12.1
$ kubectl get pods -n kube-system
NAME                                     READY   STATUS    RESTARTS   AGE
coredns-576cbf47c7-ps2s2                 1/1     Running   0          2d23h
coredns-576cbf47c7-qsxdx                 1/1     Running   0          2d23h
etcd-021rjsh216048s                      1/1     Running   0          2d23h
heapster-684777c4cb-qzz8f                1/1     Running   0          2d16h
kube-apiserver-021rjsh216048s            1/1     Running   0          2d23h
kube-controller-manager-021rjsh216048s   1/1     Running   1          2d23h
kube-proxy-5fgf9                         1/1     Running   0          2d23h
kube-proxy-hknws                         1/1     Running   0          2d23h
kube-proxy-qc6xj                         1/1     Running   0          2d23h
kube-scheduler-021rjsh216048s            1/1     Running   1          2d23h
kubernetes-dashboard-77fd78f978-pqdvw    1/1     Running   0          2d18h
monitoring-grafana-56b668bccf-tm2cl      1/1     Running   0          2d16h
monitoring-influxdb-5c5bf4949d-85d5c     1/1     Running   0          2d16h
weave-net-5fq89                          2/2     Running   0          2d23h
weave-net-flxgg                          2/2     Running   0          2d23h
weave-net-vvdkq                          2/2     Running   0          2d23h
$ kubectl get pod --all-namespaces -o wide
NAMESPACE     NAME                                     READY   STATUS    RESTARTS   AGE     IP              NODE             NOMINATED NODE
kube-system   coredns-576cbf47c7-ps2s2                 1/1     Running   0          2d23h   10.32.0.3       021rjsh216048s   <none>
kube-system   coredns-576cbf47c7-qsxdx                 1/1     Running   0          2d23h   10.32.0.2       021rjsh216048s   <none>
kube-system   etcd-021rjsh216048s                      1/1     Running   0          2d23h   172.23.216.48   021rjsh216048s   <none>
kube-system   heapster-684777c4cb-qzz8f                1/1     Running   0          2d16h   10.44.0.2       021rjsh216049s   <none>
kube-system   kube-apiserver-021rjsh216048s            1/1     Running   0          2d23h   172.23.216.48   021rjsh216048s   <none>
kube-system   kube-controller-manager-021rjsh216048s   1/1     Running   1          2d23h   172.23.216.48   021rjsh216048s   <none>
kube-system   kube-proxy-5fgf9                         1/1     Running   0          2d23h   172.23.216.49   021rjsh216049s   <none>
kube-system   kube-proxy-hknws                         1/1     Running   0          2d23h   172.23.216.50   021rjsh216050s   <none>
kube-system   kube-proxy-qc6xj                         1/1     Running   0          2d23h   172.23.216.48   021rjsh216048s   <none>
kube-system   kube-scheduler-021rjsh216048s            1/1     Running   1          2d23h   172.23.216.48   021rjsh216048s   <none>
kube-system   kubernetes-dashboard-77fd78f978-pqdvw    1/1     Running   0          2d18h   10.36.0.1       021rjsh216050s   <none>
kube-system   monitoring-grafana-56b668bccf-tm2cl      1/1     Running   0          2d16h   10.44.0.1       021rjsh216049s   <none>
kube-system   monitoring-influxdb-5c5bf4949d-85d5c     1/1     Running   0          2d16h   10.36.0.2       021rjsh216050s   <none>
kube-system   weave-net-5fq89                          2/2     Running   0          2d23h   172.23.216.48   021rjsh216048s   <none>
kube-system   weave-net-flxgg                          2/2     Running   0          2d23h   172.23.216.50   021rjsh216050s   <none>
kube-system   weave-net-vvdkq                          2/2     Running   0          2d23h   172.23.216.49   021rjsh216049s   <none>
查看健康状态
$ kubectl get cs
NAME                 STATUS    MESSAGE              ERROR
controller-manager   Healthy   ok
scheduler            Healthy   ok
etcd-0               Healthy   {"health": "true"}
其他命令
#查看 master 节点的 token
$ kubeadm token list | grep authentication,signing | awk '{print $1}'
#查看 discovery-token-ca-cert-hash
$ openssl x509 -pubkey -in /etc/kubernetes/pki/ca.crt | openssl rsa -pubin -outform der 2>/dev/null | openssl dgst -sha256 -hex | sed 's/^.* //'
安装 dashboard
查询了官方最新版本是 v1.10.0 版本,上述脚本已经拉取此镜像
修改 kubernetes-dashboard.yaml 文件,在 Dashboard Service 中添加 type: NodePort,暴露 Dashboard 服务。
# ------------------- Dashboard Service ------------------- #
kind: Service
apiVersion: v1
metadata:
  labels:
    k8s-app: kubernetes-dashboard
  name: kubernetes-dashboard
  namespace: kube-system
spec:
  type: NodePort
  ports:
    - port: 443
      targetPort: 8443
  selector:
    k8s-app: kubernetes-dashboard
备注:
暴露服务很多种方式:
- 使用 Service.Type=LoadBalancer
- 使用 Service.Type=NodePort
- 使用 Port Proxy
- 部署一个 Service loadbalancer 允许多个 service 之间共享单个IP,并通过 Service Annotations 实现更高级的负载平衡。
- 使用 Ingress 从Kubernetes 集群外部访问集群内部服务的入口,使用 nginx 等开源的反向代理负载均衡器暴露服务。
安装插件
# 安装 Dashboard 插件
$ kubectl create -f kubernetes-dashboard.yaml
# 替换配置
$ kubectl replace --force -f kubernetes-dashboard.yaml
备注 :使用 proxy 本地访问 ,集群外访需要使用 Ingress , 这里先使用 NodePort 方式。
$ kubectl apply -f https://raw.githubusercontent.com/kubernetes/dashboard/master/src/deploy/recommended/kubernetes-dashboard.yaml
$ kubectl proxy

Now access Dashboard at:
http://localhost:8001/api/v1/namespaces/kube-system/services/https:kubernetes-dashboard:/proxy/.
授予 Dashboard 账户集群管理权限
创建一个 kubernetes-dashboard-admin 的 ServiceAccount 并授予集群admin的权限,创建 kubernetes-dashboard-admin.rbac.yaml。
---
apiVersion: v1
kind: ServiceAccount
metadata:
  labels:
    k8s-app: kubernetes-dashboard
  name: kubernetes-dashboard-admin
  namespace: kube-system
---
apiVersion: rbac.authorization.k8s.io/v1beta1
kind: ClusterRoleBinding
metadata:
  name: kubernetes-dashboard-admin
  labels:
    k8s-app: kubernetes-dashboard
roleRef:
  apiGroup: rbac.authorization.k8s.io
  kind: ClusterRole
  name: cluster-admin
subjects:
- kind: ServiceAccount
  name: kubernetes-dashboard-admin
  namespace: kube-system
执行
$ kubectl create -f kubernetes-dashboard-admin.rbac.yaml
或
$ kubectl apply -f https://raw.githubusercontent.com/batizhao/dockerfile/master/k8s/kubernetes-dashboard/kubernetes-dashboard-admin.rbac.yaml
查看 Dashboard 服务端口
[root@kubernetes-master ~]# kubectl get svc -n kube-system
NAME                   TYPE        CLUSTER-IP    EXTERNAL-IP   PORT(S)         AGE
kube-dns               ClusterIP   10.96.0.10    <none>        53/UDP,53/TCP   6h40m
kubernetes-dashboard   NodePort    10.98.73.56   <none>        443:30828/TCP   63m
查看 kubernete-dashboard-admin 的 token
$ kubectl -n kube-system get secret | grep kubernetes-dashboard-admin
kubernetes-dashboard-admin-token-4k82b           kubernetes.io/service-account-token   3      75m
$ kubectl describe -n kube-system secret/kubernetes-dashboard-admin-token-4k82b
Name:         kubernetes-dashboard-admin-token-4k82b
Namespace:    kube-system
Labels:       <none>
Annotations:  kubernetes.io/service-account.name: kubernetes-dashboard-admin
              kubernetes.io/service-account.uid: a904fbf5-d3aa-11e8-945d-0050569f4a19

Type:  kubernetes.io/service-account-token

Data
====
ca.crt:     1025 bytes
namespace:  11 bytes
token:      eyJhbGciOiJSUzI1NiIsImtpZCI6IiJ9.eyJpc3MiOiJrdWJlcm5ldGVzL3NlcnZpY2VhY2NvdW50Iiwia3ViZXJuZXRlcy5pby9zZXJ2aWNlYWNjb3VudC9uYW1lc3BhY2UiOiJrdWJlLXN5c3RlbSIsImt1YmVybmV0ZXMuaW8vc2VydmljZWFjY291bnQvc2VjcmV0Lm5hbWUiOiJrdWJlcm5ldGVzLWRhc2hib2FyZC1hZG1pbi10b2tlbi00azgyYiIsImt1YmVybmV0ZXMuaW8vc2VydmljZWFjY291bnQvc2VydmljZS1hY2NvdW50Lm5hbWUiOiJrdWJlcm5ldGVzLWRhc2hib2FyZC1hZG1pbiIsImt1YmVybmV0ZXMuaW8vc2VydmljZWFjY291bnQvc2VydmljZS1hY2NvdW50LnVpZCI6ImE5MDRmYmY1LWQzYWEtMTFlOC05NDVkLTAwNTA1NjlmNGExOSIsInN1YiI6InN5c3RlbTpzZXJ2aWNlYWNjb3VudDprdWJlLXN5c3RlbTprdWJlcm5ldGVzLWRhc2hib2FyZC1hZG1pbiJ9.DGajGHRfLmtFpCyoHKn4wS0ZHKALfwMgTUTjmGSzBM3u1rr4hF51KFWBVwBPCkFQ1e1A5v6ENdhCNUQ_b66XohehJqKdgF_OBx5MXe0den_XVquJVlQRHVssL2BW-MjLXccuJ4LrKf4Q7sjGOqr4ivd6D39Bqjv7e6BxFUGO6vRPFzAme5dbJ7u28_DJZ1RGgVz-ylz3wCRZC89bP_3qqd1RK5G-gF2--RPA3atoCfrTIPzynu-y3qLQl6EWtC-hYywGb1oJPRa1it7EqTsLXmuOHqR_9tpDfJwiN9oDcnjU0ZHe6ifLcHWwRRka5tuSnKD6S3iRgaM47xtQe8yn4A
部署 Heapter 插件(统计 Nodes、Pods 的 CPU、内存、负载等功能,看官网说明已废弃,未安装)
mkdir -p ~/k8s/heapster
cd ~/k8s/heapster
wget https://raw.githubusercontent.com/kubernetes/heapster/master/deploy/kube-config/influxdb/grafana.yaml
wget https://raw.githubusercontent.com/kubernetes/heapster/master/deploy/kube-config/rbac/heapster-rbac.yaml
wget https://raw.githubusercontent.com/kubernetes/heapster/master/deploy/kube-config/influxdb/heapster.yaml
wget https://raw.githubusercontent.com/kubernetes/heapster/master/deploy/kube-config/influxdb/influxdb.yaml
kubectl create -f ./
备注:
已过期,Heapter 将在 Kubernetes 1.13 版本中移除(https://github.com/kubernetes/heapster/blob/master/docs/deprecation.md),推荐使用 metrics-server 与 Prometheus。
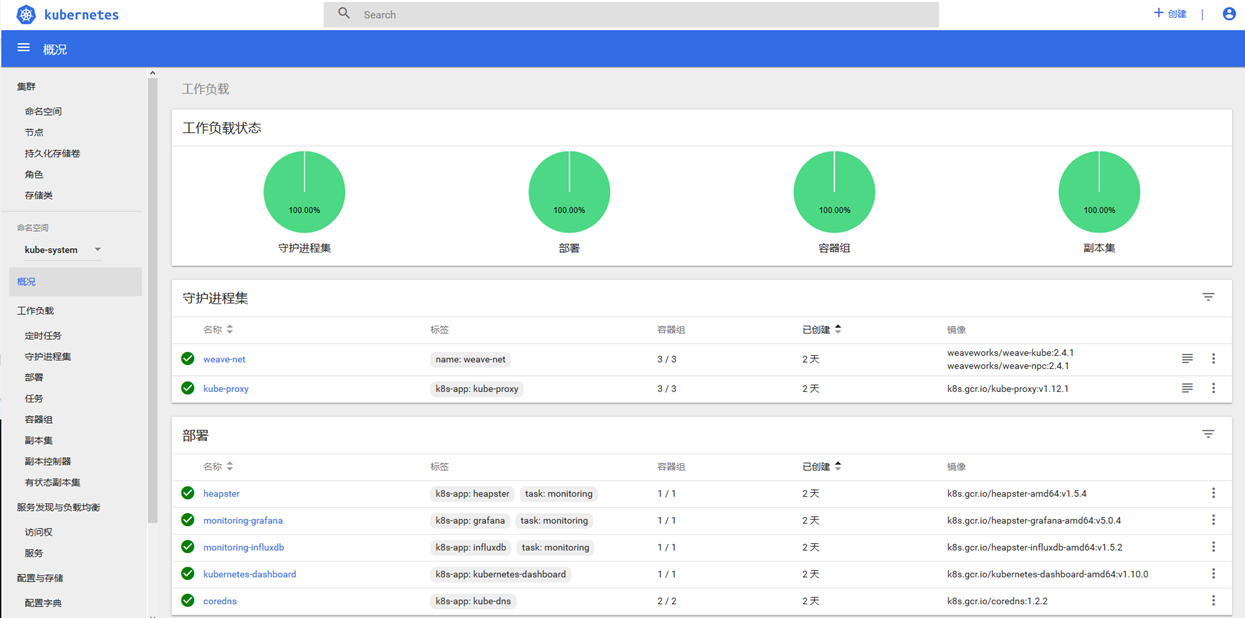
最后访问 https://172.23.216.48:30828(新版本的谷歌启用 HTTPS 安全性验证,好像不行),使用火狐打开,输入上述 Token 完成。
REFER:
https://kubernetes.io/docs/setup/independent/high-availability/
https://kubernetes.io/docs/setup/independent/install-kubeadm/
https://kubernetes.io/docs/reference/setup-tools/kubeadm/kubeadm-init/#config-file
https://kubernetes.io/docs/tasks/access-application-cluster/web-ui-dashboard/
https://kubernetes.io/docs/tasks/run-application/run-stateless-application-deployment/
https://opsx.alibaba.com/mirror?lang=zh-CN
https://jimmysong.io/posts/kubernetes-dashboard-upgrade/
https://blog.frognew.com/2018/10/kubeadm-install-kubernetes-1.12.html
https://github.com/opsnull/follow-me-install-kubernetes-cluster
https://github.com/kubernetes/examples
https://github.com/kubernetes/dashboard


 浙公网安备 33010602011771号