
DAY10—RabbitMQ and redis
本节内容:
- RabbitMQ队列
- Redis\Memcached缓存
1.RabbitMQ
RabbitMQ是一个在AMQP基础上完整的,可复用的企业消息系统。他遵循Mozilla Public License开源协议。
MQ全称为Message Queue, 消息队列(MQ)是一种应用程序对应用程序的通信方法。应用程序通过读写出入队列的消息(针对应用程序的数据)来通信,而无需专用连接来链接它们。消 息传递指的是程序之间通过在消息中发送数据进行通信,而不是通过直接调用彼此来通信,直接调用通常是用于诸如远程过程调用的技术。排队指的是应用程序通过 队列来通信。队列的使用除去了接收和发送应用程序同时执行的要求。
RabbitMQ安装:
1 安装配置epel源
2    $ rpm -ivh http://dl.fedoraproject.org/pub/epel/6/i386/epel-release-6-8.noarch.rpm
3
4 安装erlang
5    $ yum -y install erlang
6
7 安装RabbitMQ
8    $ yum -y install rabbitmq-server
注意:service rabbitmq-server start/stop
安装API:
1 pip install pika
2 or
3 easy_install pika
4 or
5 源码
6
7 https://pypi.python.org/pypi/pika
使用API操作RabbitMQ:
基于Queue实现生产者消费者模型
import Queue
import threading


message = Queue.Queue(10)


def producer(i):
    while True:
        message.put(i)


def consumer(i):
    while True:
        msg = message.get()


for i in range(12):#单独起线程给生产者
    t = threading.Thread(target=producer, args=(i,))
    t.start()

for i in range(10):#单独起线程给消费者
    t = threading.Thread(target=consumer, args=(i,))
    t.start()
对于RabbitMQ来说,生产和消费不再针对内存里的一个Queue对象,而是某台服务器上的RabbitMQ Server实现的消息队列。


 1 import pika
 2
 3 # ################## 生产者 ######################
 4
 5 connection = pika.BlockingConnection(pika.ConnectionParameters(
 6         host='localhost'))   #连接本地rabbitmq
 7 channel = connection.channel() #声明一个通道
 8
 9 channel.queue_declare(queue='hello') #给通道命名为 ‘hello’
10
11 channel.basic_publish(exchange='',
12                       routing_key='hello',   #往 ‘hello’ 通道上发送数据
13                       body='Hello World!') #数据内容为 ‘Hello World’
14 print(" [x] Sent 'Hello World!'")
15 connection.close()
 1 import pika
 2
 3 # ####################### 消费者 ######################
 4
 5 connection = pika.BlockingConnection(pika.ConnectionParameters(
 6         host='localhost'))
 7 channel = connection.channel()
 8
 9 channel.queue_declare(queue='hello')
10
11 def callback(ch, method, properties, body): #回调函数
12     print(" [x] Received %r" % body)
13
14 channel.basic_consume(callback, #接收到数据时,调用回调函数处理数据
15                       queue='hello',      #接收通道为 ‘hello’
16                       no_ack=True)      #不用确认回执
17
18 print(' [*] Waiting for messages. To exit press CTRL+C')
19 channel.start_consuming()   #启动接收
1、acknowledgment 消息不丢失
no-ack = False,如果消费者遇到情况(its channel is closed, connection is closed, or TCP connection is lost)挂掉了,那么,RabbitMQ会重新将该任务添加到队列中。
 1 import pika
 2
 3 connection = pika.BlockingConnection(pika.ConnectionParameters(
 4         host='localhost'))
 5 channel = connection.channel()
 6
 7 channel.queue_declare(queue='hello')
 8
 9 def callback(ch, method, properties, body):
10     print(" [x] Received %r" % body)
11     import time
12     time.sleep(10)
13     print 'ok'
14     ch.basic_ack(delivery_tag = method.delivery_tag)
15
16 channel.basic_consume(callback,
17                       queue='hello',
18                       no_ack=False) #接收消息,回执确认
19
20 print(' [*] Waiting for messages. To exit press CTRL+C')
21 channel.start_consuming()
2、durable 消息不丢失
 1 import pika
 2
 3 connection = pika.BlockingConnection(pika.ConnectionParameters(host='localhost))
 4 channel = connection.channel()
 5
 6
 7 channel.queue_declare(queue='hello', durable=True) #durable = True ,只是保持队列持久化,即使关掉服务器也还在
 8
 9 channel.basic_publish(exchange='',
10                       routing_key='hello',
11                       body='Hello World!',
12                       properties=pika.BasicProperties(
13                           delivery_mode=2, # 消息持久化
14                       ))
15 print(" [x] Sent 'Hello World!'")
16 connection.close()
 1 import pika
 2
 3 connection = pika.BlockingConnection(pika.ConnectionParameters(host='localhost'))
 4 channel = connection.channel()
 5
 6 # make message persistent
 7 channel.queue_declare(queue='hello', durable=True) #队列持久化
 8
 9
10 def callback(ch, method, properties, body):#回调函数,用来处理数据
11     print(" [x] Received %r" % body)
12     import time
13     time.sleep(10)
14     print 'ok'
15     ch.basic_ack(delivery_tag = method.delivery_tag)
16
17 channel.basic_consume(callback,
18                       queue='hello',
19                       no_ack=False)
20
21 print(' [*] Waiting for messages. To exit press CTRL+C')
22 channel.start_consuming()
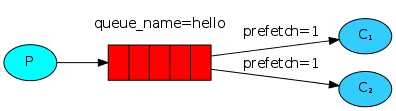
3、消息公平分发
默认消息队列里的数据是按照顺序被消费者拿走,如果Rabbit只管按顺序把消息发到各个消费者身上,不考虑消费者负载的话,很可能出现,一个机器配置不高的消费者那里堆积了很多消息处理不完,
同时配置高的消费者却一直很轻松。为解决此问题,可以在各个消费者端,配置perfetch=1,意思就是告诉RabbitMQ在我这个消费者当前消息还没处理完的时候就不要再给我发新消息了。
 1 import pika
 2
 3 connection = pika.BlockingConnection(pika.ConnectionParameters(host='10.211.55.4'))
 4 channel = connection.channel()
 5
 6 channel.queue_declare(queue='hello',durable = True)
 7
 8
 9 def callback(ch, method, properties, body):
10     print(" [x] Received %r" % body)
11     import time
12     time.sleep(10)
13     print 'ok'
14     ch.basic_ack(delivery_tag = method.delivery_tag)
15
16 channel.basic_qos(prefetch_count=1) #一次只接收一条数据
17
18 channel.basic_consume(callback,
19                       queue='hello',
20                       no_ack=False)
21
22 print(' [*] Waiting for messages. To exit press CTRL+C')
23 channel.start_consuming()
4、发布订阅
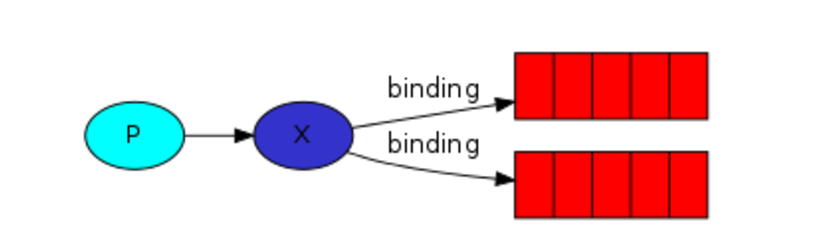
发布订阅和简单的消息队列区别在于,发布订阅会将消息发送给所有的订阅者,而消息队列中的数据被消费一次便消失。所以,RabbitMQ实现发布和订阅时,会为每一个订阅者创建一个队列,而发布者发布消息时,会将消息放置在所有相关队列中。
exchange type = fanout
 1 import pika
 2 import sys
 3
 4 connection = pika.BlockingConnection(pika.ConnectionParameters(
 5         host='localhost'))
 6 channel = connection.channel()
 7
 8 channel.exchange_declare(exchange='logs',
 9                          type='fanout')
10
11 message = ' '.join(sys.argv[1:]) or "info: Hello World!"
12 channel.basic_publish(exchange='logs',
13                       routing_key='',
14                       body=message)
15 print(" [x] Sent %r" % message)
16 connection.close()
 1 import pika
 2
 3 connection = pika.BlockingConnection(pika.ConnectionParameters(
 4         host='localhost'))
 5 channel = connection.channel()
 6
 7 channel.exchange_declare(exchange='logs',
 8                          type='fanout')
 9
10 result = channel.queue_declare(exclusive=True) #不指定queue名字,rabbit会随机分配一个名字,exclusive=True会在使用此queue的消费者断开后,自动将queue删除
11 queue_name = result.method.queue
12
13 channel.queue_bind(exchange='logs',
14                    queue=queue_name)
15
16 print(' [*] Waiting for logs. To exit press CTRL+C')
17
18 def callback(ch, method, properties, body):
19     print(" [x] %r" % body)
20
21 channel.basic_consume(callback,
22                       queue=queue_name,
23                       no_ack=True)
24
25 channel.start_consuming()
5、关键字发送
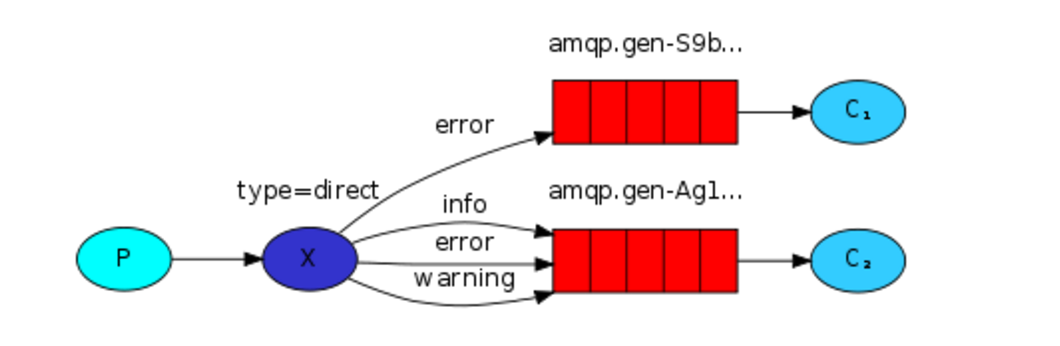
exchange type = direct
之前事例,发送消息时明确指定某个队列并向其中发送消息,RabbitMQ还支持根据关键字发送,即:队列绑定关键字,发送者将数据根据关键字发送到消息exchange,exchange根据 关键字 判定应该将数据发送至指定队列。
消费者
 1 import pika
 2 import sys
 3
 4 connection = pika.BlockingConnection(pika.ConnectionParameters(
 5         host='localhost'))
 6 channel = connection.channel()
 7
 8 channel.exchange_declare(exchange='direct_logs',
 9                          type='direct')
10
11 severity = sys.argv[1] if len(sys.argv) > 1 else 'info'
12 message = ' '.join(sys.argv[2:]) or 'Hello World!'
13 channel.basic_publish(exchange='direct_logs', #发送消息
14                       routing_key=severity, #队列关键字
15                       body=message)
16 print(" [x] Sent %r:%r" % (severity, message))
17 connection.close()
6、模糊匹配

exchange type = topic
在topic类型下,可以让队列绑定几个模糊的关键字,之后发送者将数据发送到exchange,exchange将传入”路由值“和 ”关键字“进行匹配,匹配成功,则将数据发送到指定队列。
- # 表示可以匹配 0 个 或 多个 单词
- * 表示只能匹配 一个 单词
 1 import pika
 2 import sys
 3
 4 connection = pika.BlockingConnection(pika.ConnectionParameters(
 5         host='localhost'))
 6 channel = connection.channel()
 7
 8 channel.exchange_declare(exchange='topic_logs', #topic类型
 9                          type='topic')
10
11 routing_key = sys.argv[1] if len(sys.argv) > 1 else 'anonymous.info' #匹配路径
12 message = ' '.join(sys.argv[2:]) or 'Hello World!'
13 channel.basic_publish(exchange='topic_logs',
14                       routing_key=routing_key,
15                       body=message)
16 print(" [x] Sent %r:%r" % (routing_key, message))
17 connection.close()
 1 import pika
 2 import sys
 3
 4 connection = pika.BlockingConnection(pika.ConnectionParameters(
 5         host='localhost'))
 6 channel = connection.channel()
 7
 8 channel.exchange_declare(exchange='topic_logs',
 9                          type='topic')
10
11 result = channel.queue_declare(exclusive=True)
12 queue_name = result.method.queue
13
14 binding_keys = sys.argv[1:]
15 if not binding_keys:
16     sys.stderr.write("Usage: %s [binding_key]...\n" % sys.argv[0])
17     sys.exit(1)
18
19 for binding_key in binding_keys:
20     channel.queue_bind(exchange='topic_logs',
21                        queue=queue_name,
22                        routing_key=binding_key)
23
24 print(' [*] Waiting for logs. To exit press CTRL+C')
25
26 def callback(ch, method, properties, body):
27     print(" [x] %r:%r" % (method.routing_key, body))
28
29 channel.basic_consume(callback,
30                       queue=queue_name,
31                       no_ack=True)
32
33 channel.start_consuming()
2.redis and Memcached
参见:http://www.cnblogs.com/wupeiqi/articles/5132791.html
