uni-app
通过HBuilder生成一个微信小程序测试项目
参考地址:https://www.yuque.com/cuckooing/study/zw713qkgvm9aevki
零 基础布局学习
1 flex常用布局。主要属性

容器属性:

以下是用于控制Flex容器的主要CSS属性:

display: flex;:将元素设为Flex容器。
flex-direction:定义主轴的方向(row, row-reverse, column, 或 column-reverse)。
flex-wrap:控制项目是否换行(nowrap, wrap, 或 wrap-reverse)。
justify-content:定义项目在主轴上的对齐方式(flex-start, flex-end, center, space-between, space-around)。
align-items:定义项目在交叉轴上的对齐方式(flex-start, flex-end, center, baseline, stretch)。
align-content:多行项目在交叉轴上的对齐方式(类似于justify-content,但应用于多行情况下)。
项目属性:

以下是用于控制Flex项目的主要CSS属性:

order:定义项目的显示顺序。
flex-grow:定义项目在剩余空间中的扩展比例。
flex-shrink:定义项目在空间不足时的收缩比例。
flex-basis:定义项目在分配多余空间之前的初始大小。
flex:flex-grow, flex-shrink, 和 flex-basis 的简写。
align-self:覆盖容器的 align-items 属性,定义单个项目在交叉轴上的对齐方式。
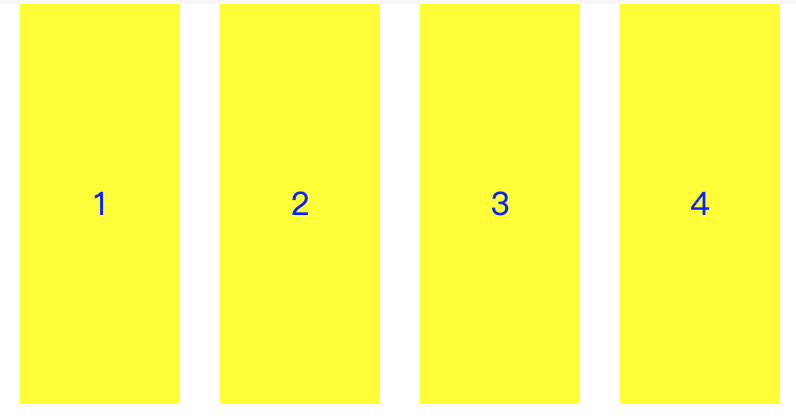
对应的css样式如下:
#box{
        width: 400px;
        height: 500px;
        display: flex;
    }
    #box-item{
        width: 80px;
        height: 200px;
        line-height: 200px;
        text-align: center;
        color: blue;
        background-color: yellow;
    }
    .box1{ // 外面大盒子属性
        flex-direction: row;
        flex-wrap: wrap;
        justify-content: space-around;
    }
主界面:
redtoFlex(){
                let obj = {
                    name : 'zhangsan',
                    age : 12
                }
                uni.navigateTo({
                    url:'../Flex01/Flex01?obj=' + JSON.stringify(obj),
                })
            },

跳转的页面:
onLoad(option) {
            let obj = JSON.parse(option.obj);
            console.log(obj);
            console.log(obj.name)
        },
3 组件之间的传值。
4 函数的使用
----vue中调用方法。
function log(){
   return "这是log方法"
}
export {log}
-
import {log} from "./common.js"
console.log(log()) // 注意这里是方法,要加小括号
4 storage存储
--一般只有销毁小程序,缓存的数据才会消失
try {
    uni.setStorageSync('storage_key', 'hello');
} catch (e) {
    // error
}
--
const value = uni.getStorageSync('storage_key');
	if (value) {
		console.log(value);
	}
5 组件
1 导入外部组件,

2 添加自定义组件,符合下面这种规范,就不需要在使用的地方添加import和Page.json中注册
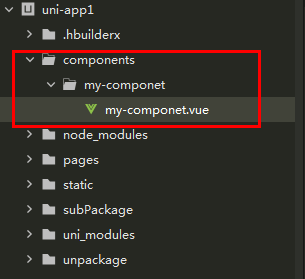
在具体使用的地方 <my-componet></my-componet>
组件之间的传值:
一、Prop方式 父传子
父:<my-componet :message="parentMsg"></my-componet>
子组件:props:["message"] 既可使用
二 emit子传父
父组件:
<template><view class="content"><son-show @send="getSonValue"></son-show></view>
</template><script>import sonShow from '../../component/son.vue';
export default {components: {sonShow},methods:{getSonValue: function(res){console.log("res=========",res)}}}
</script>
子组件:
<template><view class="" @click="sendMegToIndex">点我向父组件传值</view>
</template><script>
export default{
methods:{sendMegToIndex: function(){
// 向父组件传值
this.$emit("send","我来自子组件")}}}
</script>
6 vue3中使用vuex。 https://blog.csdn.net/Marlene_Jiang/article/details/122821318
在store/index.js--添加:
import {
    createStore
} from "vuex";

export default createStore({
    state: {
        type: 'wx',
        name: 'xxx',
        uid: "27777"
    },
    mutations: {
        // 定义mutations,用于修改状态(同步)
        updateUid(state, payload) {
            state.uid = payload
        }
    },
    actions: {
        // 定义actions,用于修改状态(异步)
        // 2秒后更新状态
        updateUid(context, payload) {
            setTimeout(() => {
                context.commit('updateUid', payload)
            }, 2000)
        }
    },
    getters: {
        // 定义一个getters
        formatUid(state) {
            return state.uid + ' Tom'
        }
    },
    modules: {}
});
在main.js中添加:
import App from './App'
import Store from './store'
// #ifdef VUE3
import { createSSRApp } from 'vue'
export function createApp() {
const app = createSSRApp(App)
app.use(Store)
return {
app
}
}
// #endif
具体页面使用:
// import mybutton from '@/components/uni-mybtton/uni-mybtton.vue';
export default {
data() {
return {
title: 'shop页面',
parentMsg: '来自父组件的信息'
}
},
computed:{
...mapState(['name'])
},......
7 网络请求
---基本使用
uni.request({
                url: "http://localhost:5166/api/Product/getAll",
                success: (res) => {
                    console.log(res);
                },
                fail: (err) => {
                    console.log(err);
                }
            })
10 架构方面,没有很好的页面和架构设置,代码最终只会越写越烂
├──dist 编译后的文件路径
    ├──package.json 配置项
    ├──src 核心内容
        ├──api 项目接口
        ├──components 全局公共组件
        ├──config 项目配置文件
        ├──pages 主包
        ├──static 全局静态资源
        ├──store vuex
        ├──mixins 全局混入
        ├──utils 公共方法
        ├──App.vue 应用配置,配置App全局样式以及监听
        ├──main.js Vue初始化入口文件
        ├──manifest.json 配置应用名称、appid等打包信息
        ├──pages.json 配置页面路由、导航条、选项卡等页面类信息
        └──uni.scss 全局样式
上面看起来就很好。其实初步定下来后,后面就不应该看到其他东西就随便往上面加文件夹,保证项目的简洁稳定。
关于接口统一方面:https://zhuanlan.zhihu.com/p/647257948
github:https://github.com/LonJinUp/uni-app-template/tree/master
关于前端解析后端返回的数据:
--先判断返回的数据类型,如果是obj,可以直接.属性名
--如果是数组要data[0].属性名
async getUserinfo() {
                let res = await info()
                this.reName = res[0].name
            },
一个封装的案例
import {toast, clearStorageSync, getStorageSync, useRouter} from '@/utils/utils.js'
import {BASE_URL} from '@/config/index.js'
import RequestManager from './RequestManager.js'


const manager = new RequestManager()

const baseRequest = async (url, method, data = {}, loading = true) =>{
    let requestId = manager.generateId(method, url, data)
    if(!requestId) {
        console.log('重复请求')
    }
    if(!requestId)return false;

    const header = {}
    header.token = getStorageSync('token') || ''
    return new Promise((reslove, reject) => {
        loading && uni.showLoading({title: 'loading'})
        uni.request({
            url: BASE_URL + url,
            method: method || 'GET',
            header: header,
            timeout: 10000,
            data: data || {},
            complete: ()=>{
                uni.hideLoading()
                manager.deleteById(requestId)
            },
            success: (successData) => {
                const res = successData.data
                if(res.code == 200){
                    reslove(res.data)
                }else{
                    toast('网络连接失败,请稍后重试')
                    reject(res)
                }
            },
            fail: (msg) => {
                toast('网络连接失败,请稍后重试')
                reject(msg)
            }
        })
    })
}

const request = {};

['options', 'get', 'post', 'put', 'head', 'delete', 'trace', 'connect'].forEach((method) => {
    request[method] = (api, data, loading) => baseRequest(api, method, data, loading)
})

export default request
具体使用和解析:
import request from '.././request.js'

//测试数据
export const info = data => request.get('/Product/getAll')

--解析
async getUserinfo() {
                let res = await info()
                this.reName = res[0].name
            },
--关于获取到的是数组或者对象,只需要在本地定义如下:
data() {
            return {
                swiperItems: [],
                swiperItem,{},
            }
        },
11 阿里的iconfont使用 https://blog.csdn.net/latinhui/article/details/124508094
一 相关基础准备
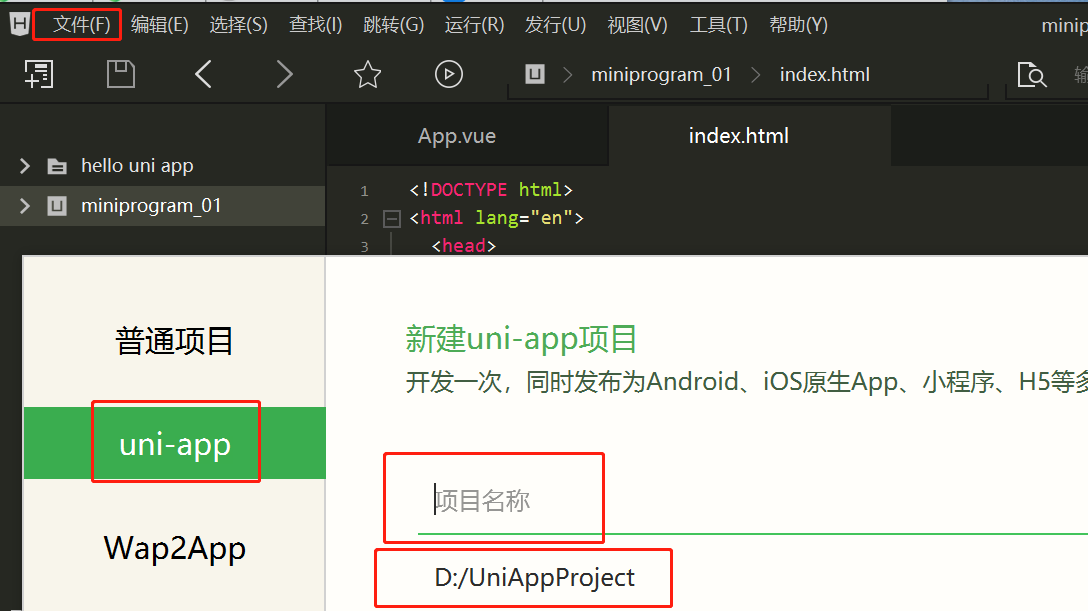
1 新建项目,文件->新建->项目。注意选择vue3.
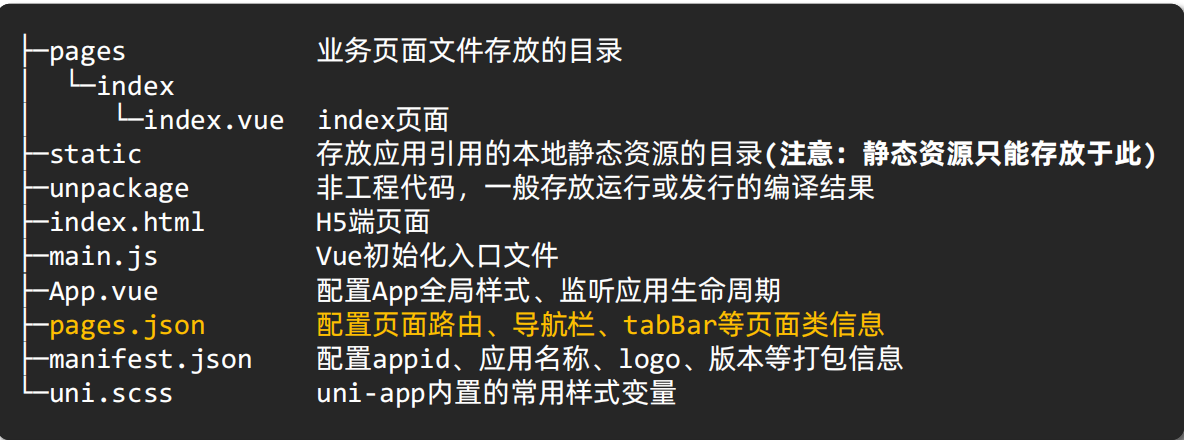
整体项目结构:
2 添加插件,工具->添加插件,如node-sass;需要在插件市场搜索
3 安装node.js。
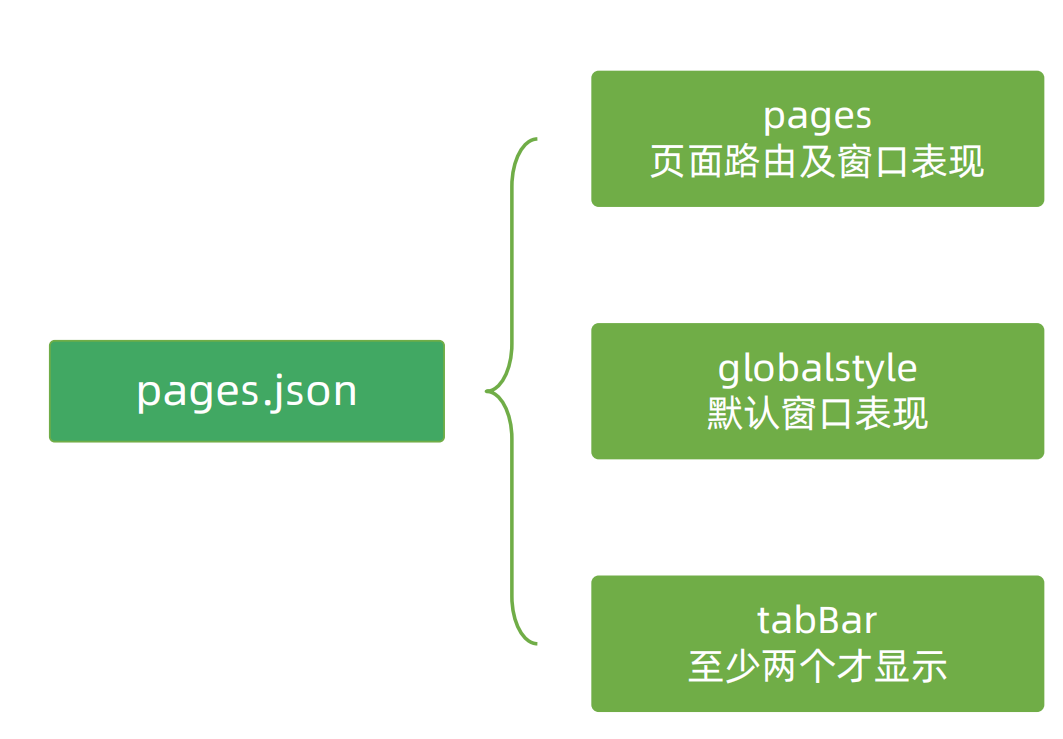
4 修改pages.json.关于这个文件,详细如下:
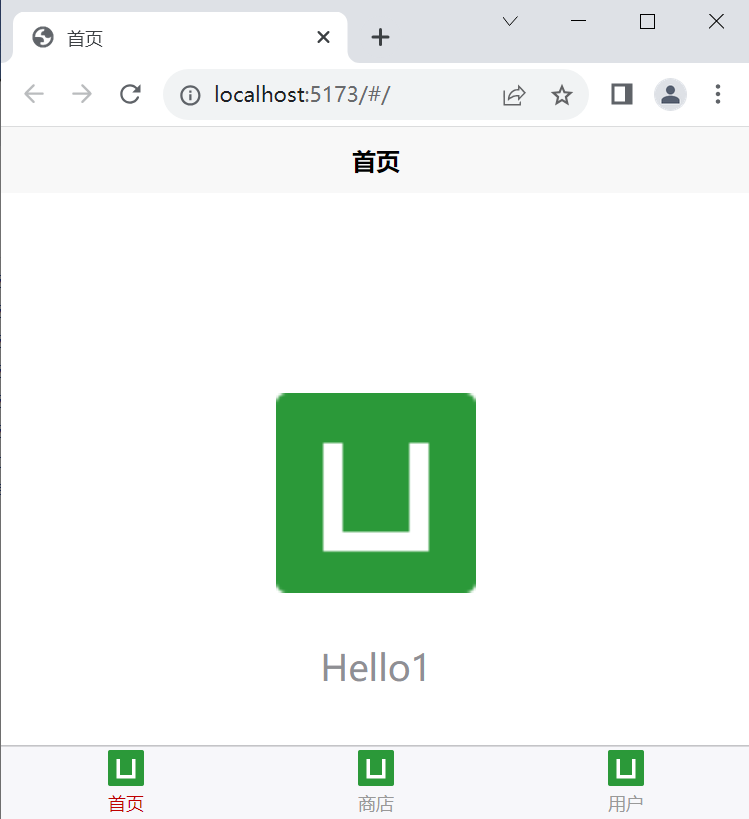
{
    "pages": [ //pages数组中第一项表示应用启动页,参考:https://uniapp.dcloud.io/collocation/pages
        {
            "path": "pages/index/index",
            "style": {
                "navigationBarTitleText": "首页"
            }
        },
        {
            "path": "pages/index/shop",
            "style": {
                "navigationBarTitleText": "商店"
            }
        },
        {
            "path": "pages/index/user",
            "style": {
                "navigationBarTitleText": "用户管理"
            }
        }
    ],
    "tabBar": {
        "selectedColor": "#C00000",
        "list": [
            {
                "pagePath": "pages/index/index",
                "text": "首页",
                "iconPath": "static/logo.png",
                "selectedIconPath": "static/logo.png"
            },
            {
                "pagePath": "pages/index/shop",
                "text": "商店",
                "iconPath": "static/logo.png",
                "selectedIconPath": "static/logo.png"
            },
            {
                "pagePath": "pages/index/user",
                "text": "用户",
                "iconPath": "static/logo.png",
                "selectedIconPath": "static/logo.png"
            }
        ]
    },
    "globalStyle": {
        "navigationBarTextStyle": "black",
        "navigationBarTitleText": "uni-app",
        "navigationBarBackgroundColor": "#F8F8F8",
        "backgroundColor": "#F8F8F8"
    },
    "uniIdRouter": {}
}
运行结果如下图:
二 Index页面开发
最后,错误积累
1. TypeError: uni.getMenuButtonBoundingClientRect is not a function
其实这个方法是微信小程序内的,在浏览器上肯定报错。


【推荐】国内首个AI IDE,深度理解中文开发场景,立即下载体验Trae
【推荐】编程新体验,更懂你的AI,立即体验豆包MarsCode编程助手
【推荐】抖音旗下AI助手豆包,你的智能百科全书,全免费不限次数
【推荐】轻量又高性能的 SSH 工具 IShell:AI 加持,快人一步
· Manus爆火,是硬核还是营销?
· 终于写完轮子一部分:tcp代理 了,记录一下
· 震惊!C++程序真的从main开始吗?99%的程序员都答错了
· 别再用vector<bool>了!Google高级工程师:这可能是STL最大的设计失误
· 单元测试从入门到精通
2022-09-08 记错-ajax